All references to Device Guardian within this guide also apply to Device Guardian Access Management, unless explicitly stated otherwise.
Overview
Device Guardian (DG) and Device Guardian Access Management (DGAM) are cloud-based solutions that consist of:
- A cloud-based server, hosted and managed by Zebra
- Client software designed for Zebra Android devices
DGAM enhances DG’s core capabilities by introducing additional features such as kiosk management and local device monitoring.
To enable communication between devices and the server, the client app must be installed and devices must be enrolled with the server. This setup is required for enabling device tracking and functionality. For installation guidance, refer to the section specific to your Enterprise Mobility Management (EMM) platform.
Important: Starting April 2026, LifeGuard disables DG/DGAM Google Play updates and ADB sideloading by default. Refer to the LifeGuard Updates section for details.
Migrating from Device Tracker?See the Migration Guide for important information.Requirements
Management System Requirements
- Enterprise Mobility Management (EMM) System: Configuration requires an EMM that supports Managed Configurations (also known as Managed App Configurations), such as Zebra DNA Cloud, Microsoft Intune, SOTI MobiControl, Workspace ONE UEM, or 42Gears SureMDM.
Device Requirements
- Supported Devices - Refer to the Zebra support portal for compatible hardware for both devices and kiosks (DGAM-specific).
Important: The WS50, as a non-GMS device, does not support:- Map-based Locationing (due to the lack of Location Services API support)
- Tracking of Bluetooth Scanner Accessories
- Operating System - Refer to the Zebra support portal for compatible Android versions and LifeGuard updates for both devices and kiosks (DGAM-specific).
- Bluetooth and Location Services - Must be enabled for device tracking. For kiosks, only Bluetooth is required.
- Wi-Fi - Devices and kiosks must connect to a Wi-Fi network with cloud server access.
- Mobility DNA Enterprise License - Required for Zebra Professional-series devices with Android 15 or higher when using the Virtual Tethering feature, which provides proximity warnings for paired Bluetooth scanners from their host devices.
- For
DGAM Only- DataWedge Profile: Upon installation, a DataWedge profile named "DGAM" is automatically generated to enable barcode scanning for device registration and recovery.
- Enrollment via XML or Barcode: Enrolling devices to DG/DGAM using an XML file or StageNow barcode requires specific Android versions and minimum LifeGuard (LG) Updates. These requirements vary by the device's platform; see Zebra Device Platform to identify the platform for the device model. The minimum supported LG Update for each platform is available for download from the Zebra support portal:
The LifeGuard update must contain at least the following versions for the enrollment process to succeed:Android Version Device Platform Minimum LifeGuard Update Android 11 SD660 July 2025 LG Android 13 QC6490 August 2025 LG QC4490 August 2025 LG SM6375 August 2025 LG SD660 March 2026 LG Android 14 QC4490 October 2025 LG QC6490 October 2025 LG SM6375 October 2025 LG SD660 August 2025 LG Android 15 and above All Device Platforms N/A Component Minimum Version Required MX 15.0 and above ZDM 15.0.0.5 and above MXMF 15.0.0.5 and above - Optional: Secondary BLE allows a device to be located even if it loses battery power or is powered off. This feature is available on select hardware with secondary BLE capability; see compatible hardware. Refer to the Secondary BLE Configuration guide for setup instructions.
Permissions
This section applies to
DGAM Only.
DGAM requires the following permissions to be granted for both kiosks and devices:
- Camera Permission - Required to scan the registration QR code, essential for registering the device with a kiosk.
- Location Permission - Enables location-based services and GPS-related functionalities.
- Music and Audio Permission - Allows the app to play or manage audio, such as alarms or sound notifications.
- Notifications Permission - Allows the application to send important updates or alerts to the user.
- Files and Media Permission - Specific to Android 11, required to read or write to device storage, adhering to Android 11’s scoped storage policies.
Network Requirements
To ensure seamless communication between the client app and cloud server, the following network configurations are required:
- Open HTTPS Port - Port 443 is typically used for HTTPS communication. Ensure this port is open, though it may vary based on network configurations.
- Web Portal Access - Allow the web portal URL (supplied by Zebra during onboarding) through the firewall or proxy for administrators and managers to access the dashboard.
- Email Addresses:
- Emails are sent from
zdtrksupport@zebra.comfor reporting or password resets. - Emails are sent from
NPDVIQFNoReply@zebra.comfor email notifications.
- Emails are sent from
- Firewall/Proxy Allowlist - Ensure the following domain names are allowed for web portal access and communication between the device client app and the cloud server.
If wildcards are supported:
connectivitycheck.gstatic.com*.googleapis.com*.firebaseio.com*.cloudfunctions.net*.zebra.com[ProjectID].firebaseapp.com1*.google.com[Web portal URL](supplied by Zebra during onboarding)
If wildcards are not supported, add these specific domains and ports:
| Domain | Port |
|---|---|
| connectivitycheck.gstatic.com | 80 |
| www.googleapis.com | 443 |
| firestore.googleapis.com | 443 |
| firebasestorage.googleapis.com | 443 |
| cloudfunctions.googleapis.com | 443 |
| content.swengagement.zebra.com | 443 |
| data.swengagement.zebra.com | 443 |
| us-central1-[ProjectID].cloudfunctions.net 1 | 443 |
| [ProjectID].firebaseio.com 1 2 | 443 |
| [ProjectID]-default-rtdb.firebaseio.com 1 2 | 443 |
| [ProjectID].firebaseapp.com 1 | 443 |
| [ProjectID].web.app 1 | 443 |
| www.google.com | 443 |
| [Web portal URL] (supplied by Zebra during onboarding) | 443 |
| firebaseinstallations.googleapis.com | 443 |
| andriod.apis.google.com | 443 |
| play.googleapis.com | 443 |
| misc.google.com | 443 |
| sisense.zams.zebra.com | 443 |
| mtalk.google.com | 5228 |
1[ProjectID] is included in the welcome email sent by Zebra services during the onboarding process.
2 For the Device Guardian client to communicate with the Cloud, *.firebaseio.com must be accessible. It is required to allow this URL in your Firewall or Proxy settings. If your Firewall or Proxy policy does not support wildcard entries, follow these steps to obtain the specific URL:
- Open the link in your browser (
[ProjectID]is provided during onboarding):https://[ProjectID]-default-rtdb.firebaseio.com/.settings/owner.json - Copy the URL displayed on the web page and add it to your firewall or proxy settings.
Important Note: Repeat steps 1 and 2 periodically, as Google's server resource allocation may cause the URL to change.
Web Portal Requirements
The web portal URL (supplied by Zebra during onboarding) is accessible via the following supported browsers:
- Chrome
- Edge
- Safari (v14.0 and later)
First-time use: Administrators must set their password by clicking Forgot Your Password on the login page and entering the registered email address. An email with a reset link will be sent.
If using single sign-on (SSO), see SSO for procedures on configuring SSO.
Licenses
End-user licenses are required for Device Guardian and Device Guardian Access Management to operate. Ensure the appropriate licenses are procured:
- Device Guardian License: Required for basic functionality.
- Device Guardian Access Management License: Required for advanced features like kiosk integration.
LifeGuard Updates
Starting with the April 2026 LifeGuard releases for Android 14 and 15, two significant changes were introduced:
- Google Play updates disabled by default: Select Zebra value-add applications (including DG/DGAM) no longer update automatically. This prevents provisioning interruptions and ensures stricter version control.
- ADB sideloading disabled by default: Android Debug Bridge (ADB) is deactivated by default to enhance device security.
Affected platforms:
- Android 14: QC4490, QC6490/QC5430, SD660, SM6375
- Android 15: QC4490, QC6490/QC5430, QC6690
To identify specific device models based on these platforms, see Zebra Device Platform.
Although these features are disabled by default, administrators retain full control over application management and can override these settings as needed.
Administrator Controls:
- Overriding the Default Behavior: The default setting can be changed at any time by submitting one of the following XML files through your EMM platform:
- To Enable Automatic Updates and Allow ADB Sideloading - Submit the Enable_AutoUpgrade_DG.xml through your EMM platform.
- To Disable Automatic Updates and Disable ADB Sideloading - Submit the Disable_AutoUpgrade_DG.xml through your EMM platform (restores the default behavior).
- Alternative Update Methods: Even with Google Play updates disabled, applications can still be updated directly through the following methods:
- EMM Deployment: Most EMMs supporting Android Enterprise management (Device Owner mode) allow administrators to directly push application updates to devices, bypassing the Google Play Store.
- Zebra MX Deployment: "AllowApplicationUpgrade" (Action 16) within the Zebra MX App Manager permits application upgrades to be applied via an EMM or StageNow. Specify
com.zebra.mdna.dgfor the Package Name to ensure Device Guardian upgrades are allowed.
Configuration Behavior Using MX App Manager:
- Existing App Restrictions: Applications restricted from Play Store updates using the
DisallowApplicationUpgradeparameter maintain these settings. DG/DGAM remains blocked by default. - Factory Reset Impact: A factory reset clears all configurations.
- Persistence of Override Settings: When
AllowApplicationUpgradeis used to override default settings, the persistence of those changes is as follows:- Persists: Device reboots, Enterprise resets (requires Persist Manager), and LifeGuard updates.
Installation & Setup
Setting up Device Guardian (DG) and Device Guardian Access Management (DGAM) involves ensuring all prerequisites are met, installing the required components, and configuring devices. Make sure to review the Requirements section and refer to the Installation Notes section for important information.
For a comprehensive guide on deployment and management of Device Guardian (DG) and Device Guardian Access Management (DGAM), refer to the Administrator Guide.
Installation Notes
Important for Android 11:For Android 11 devices, Device Guardian must be launched after installation to apply the configurations.- Google Play Services update - During an update, the Android system automatically stops Device Guardian. After the update is complete, relaunch the Device Guardian app or reboot the device to resume device tracking.
- Config Service Notification - When configuring Device Guardian client for the first time, a notification appears indicating the Config Service is running. This notification disappears following a subsequent device reboot.
- Compatibility with Device Tracker - The Device Guardian server is backward compatible with Device Tracker client apps. However, the Device Tracker client app cannot be upgraded to the Device Guardian client app; a new installation of the Device Guardian client is required.
- Application Installation - Zebra Android devices include pre-installed "stubs" of Identity Guardian and Device Guardian applications. For full functionality, these stubs must be upgraded by installing the full applications from one of the following sources:
- Managed Google Play
- Zebra support portal
- Device Guardian download
- Identity Guardian download
Using ZDNA Cloud
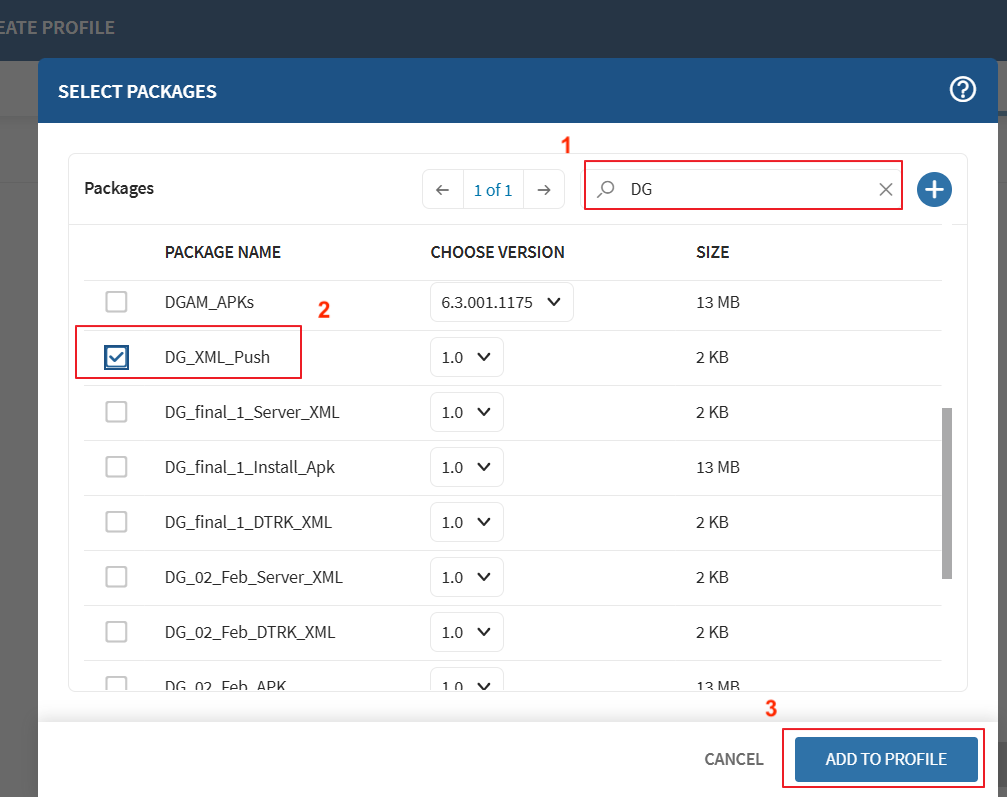
Follow these steps to install Device Guardian via Managed Configurations with ZDNA Cloud and apply a policy that enrolls the device with the Device Guardian cloud server.
Part I: Enroll Device to ZDNA
Create and apply the StageNow barcode for device enrollment in ZDNA Cloud:
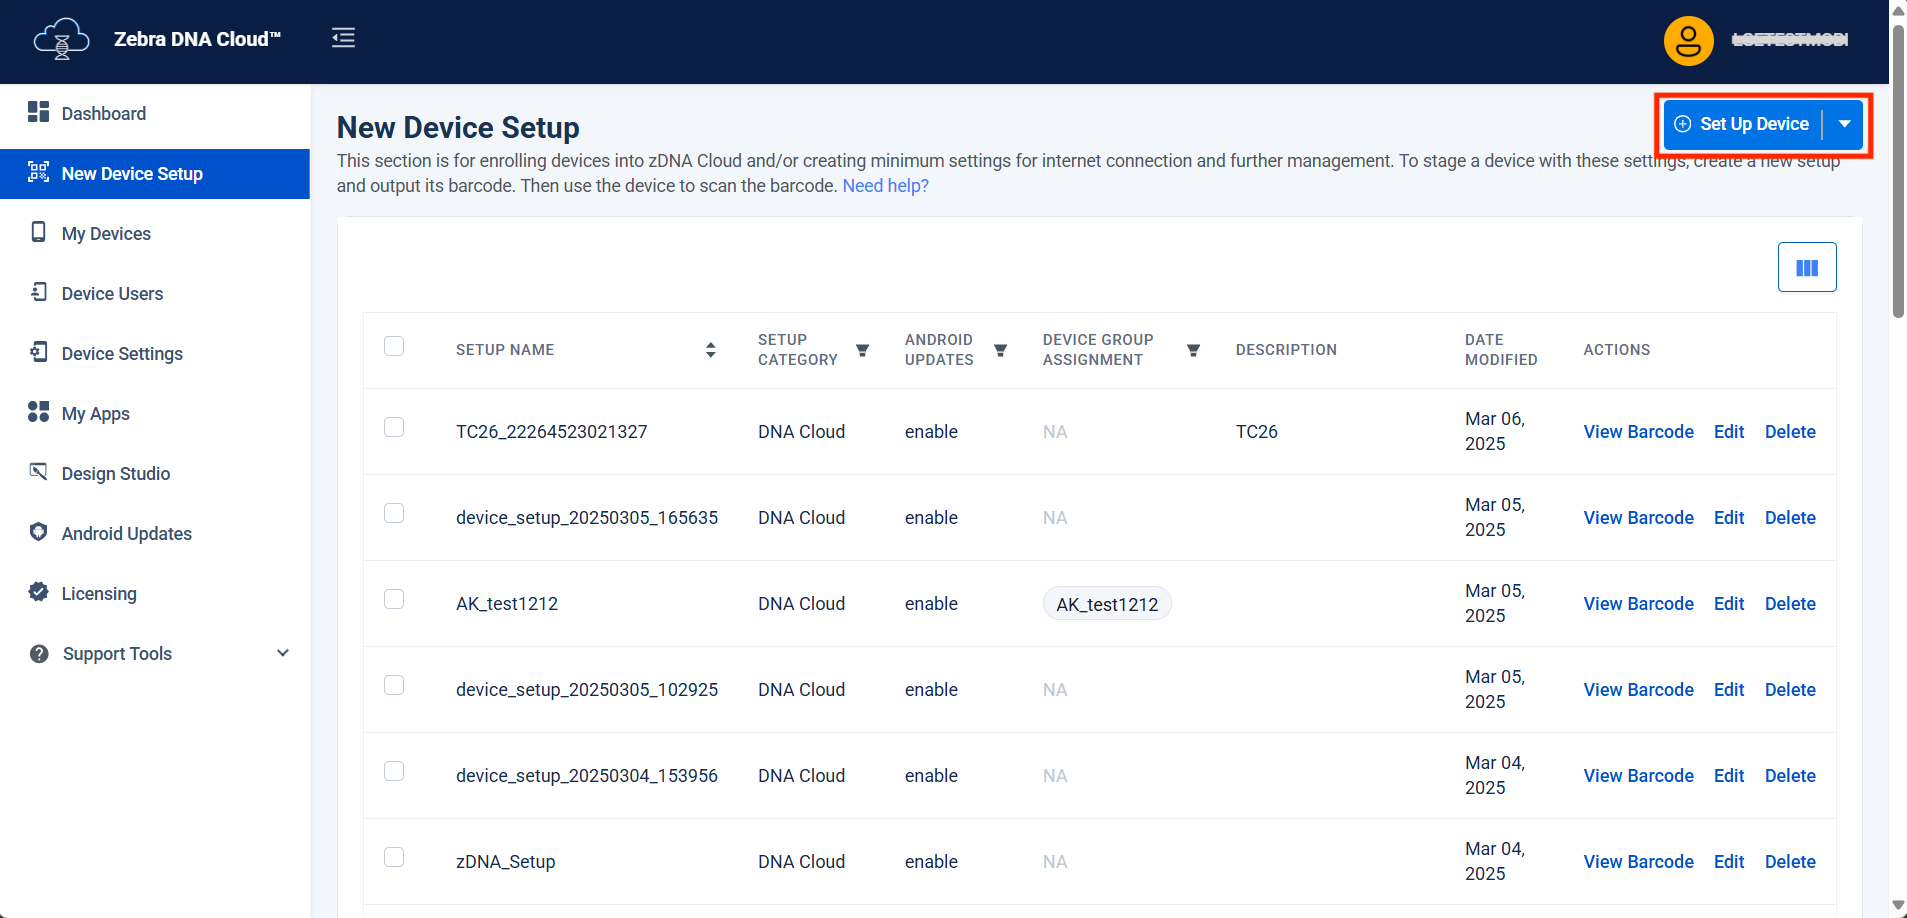
- Log in to ZDNA web portal. In the left menu, click New Device Setup.
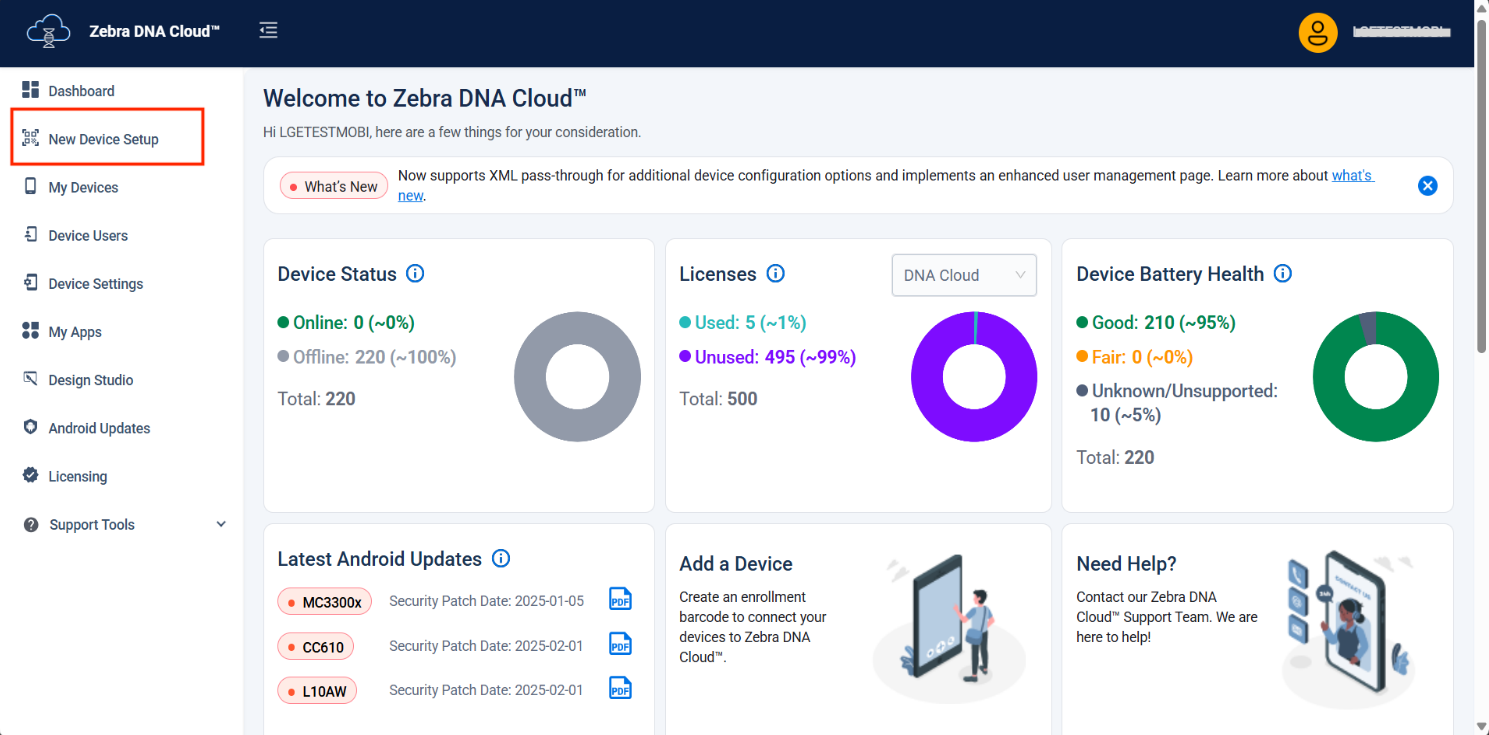
- From the top-right, click Set Up Device.
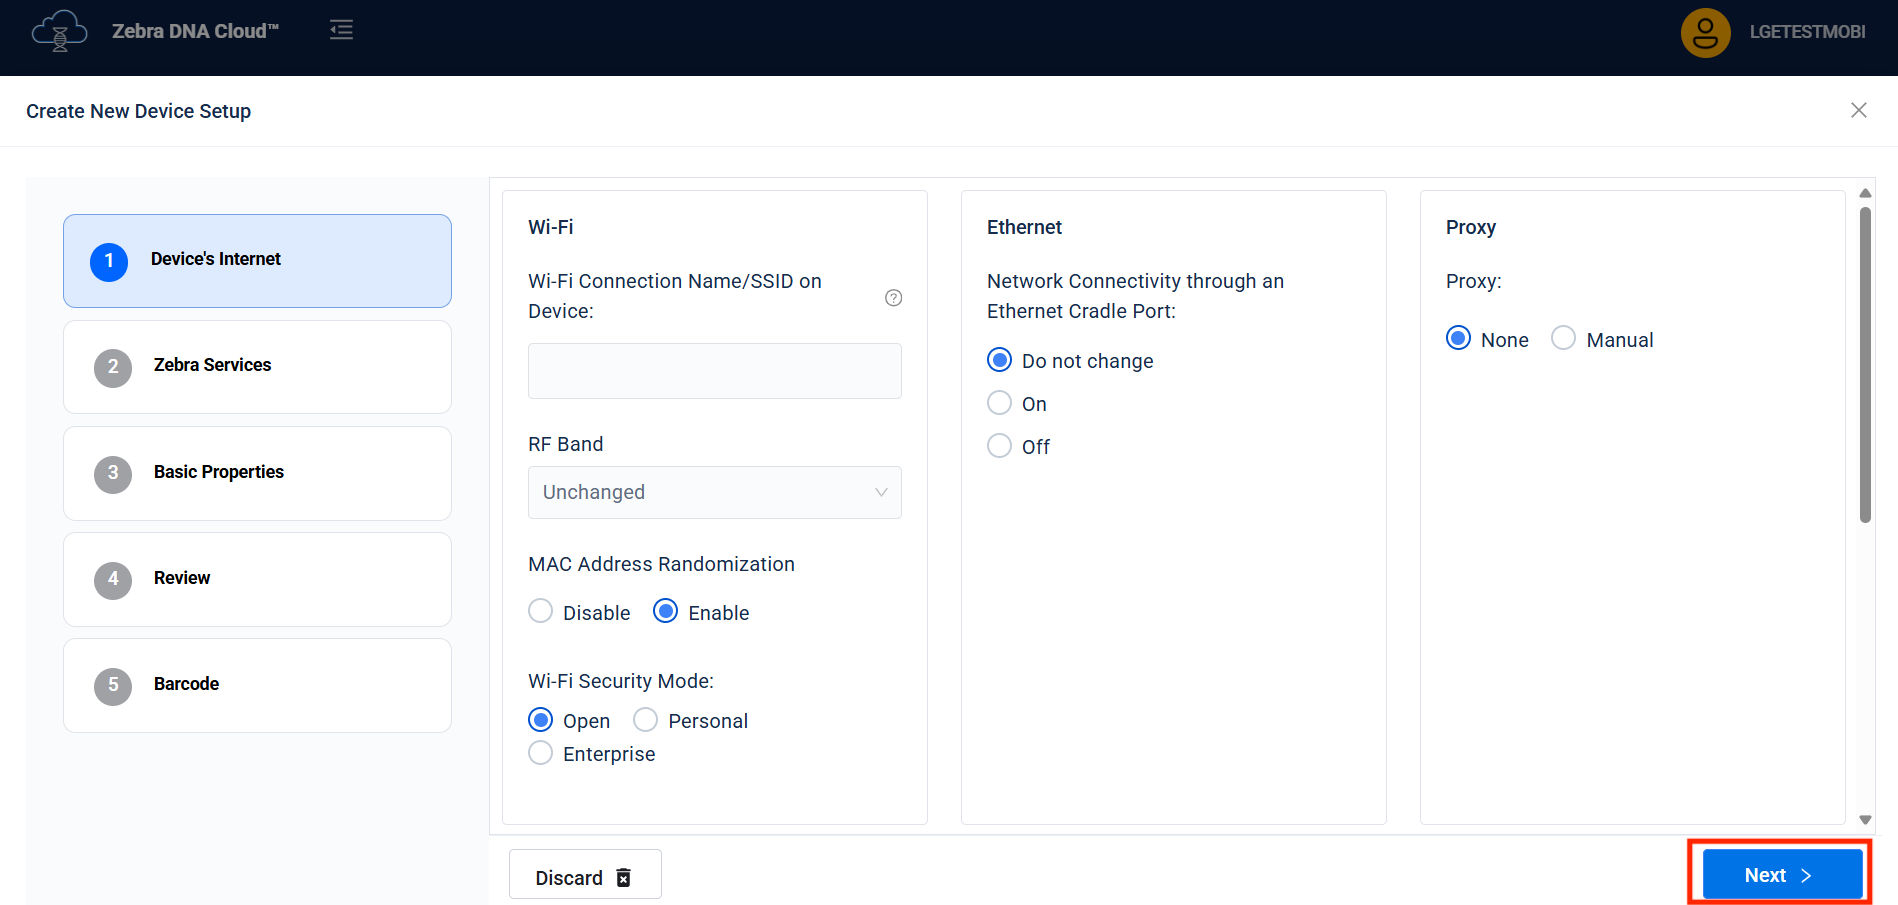
- Configure the device for enrollment. Enter the appropriate internet settings, then click Next.
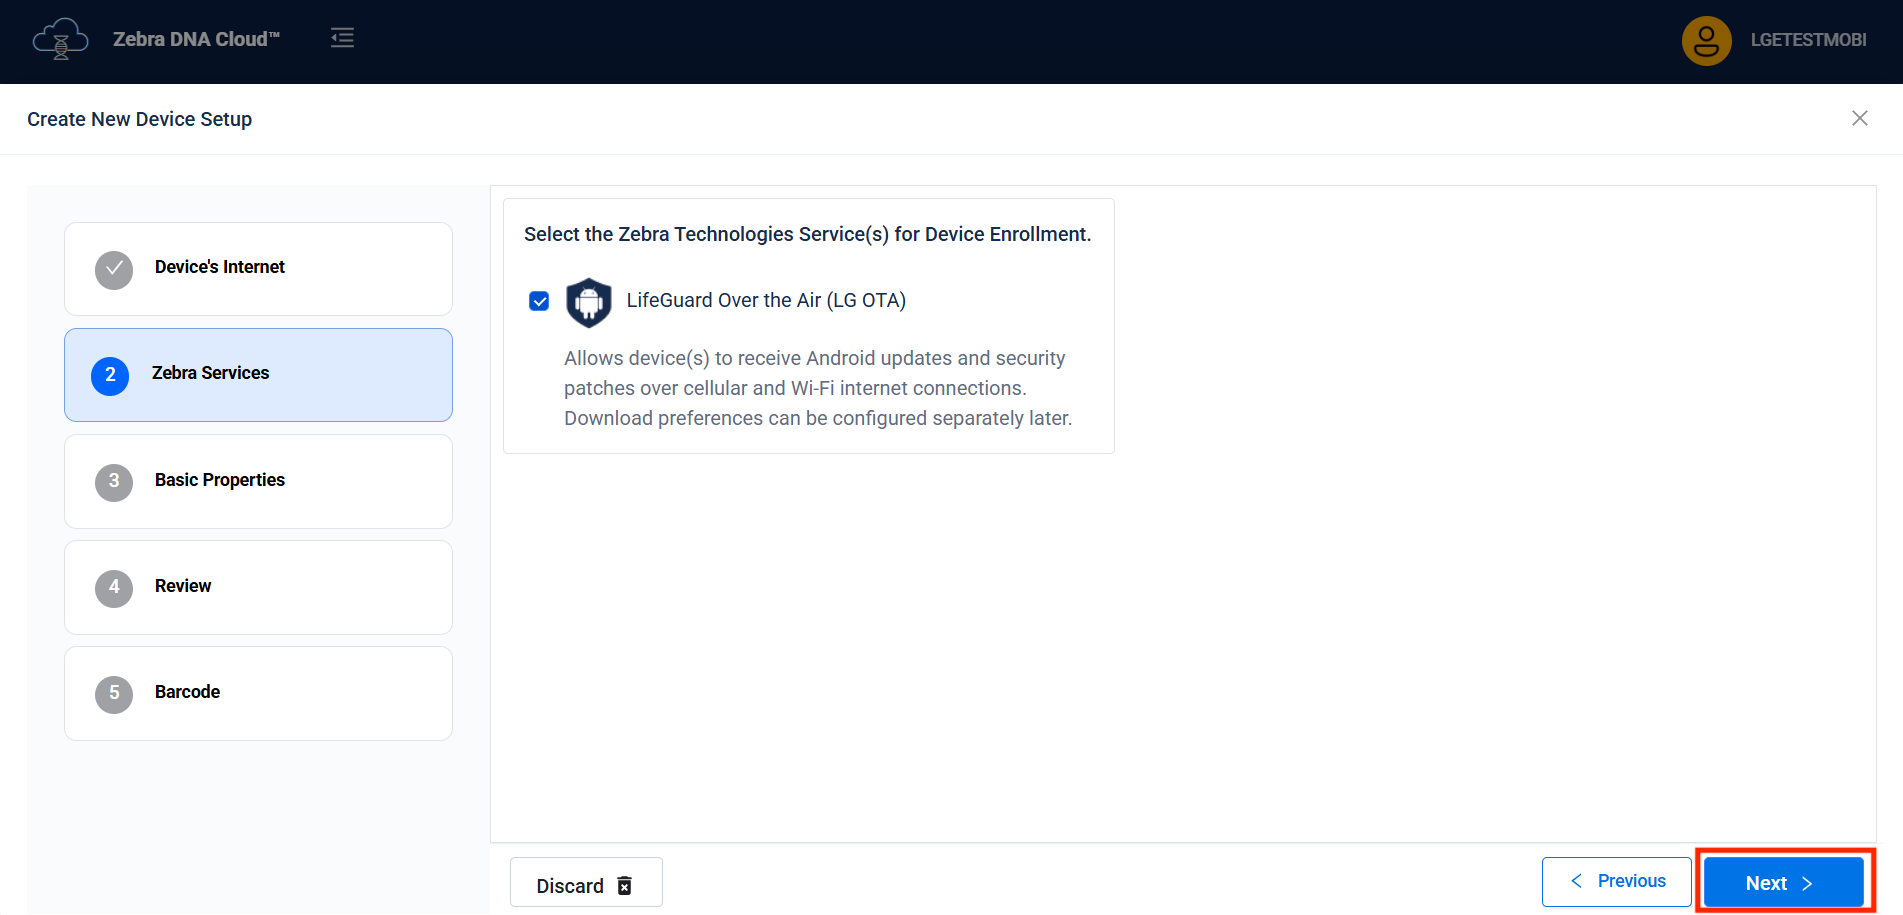
- Optionally, select the service for device enrollment. Click Next.
- Enter the properties and select the barcode type. Click Next.
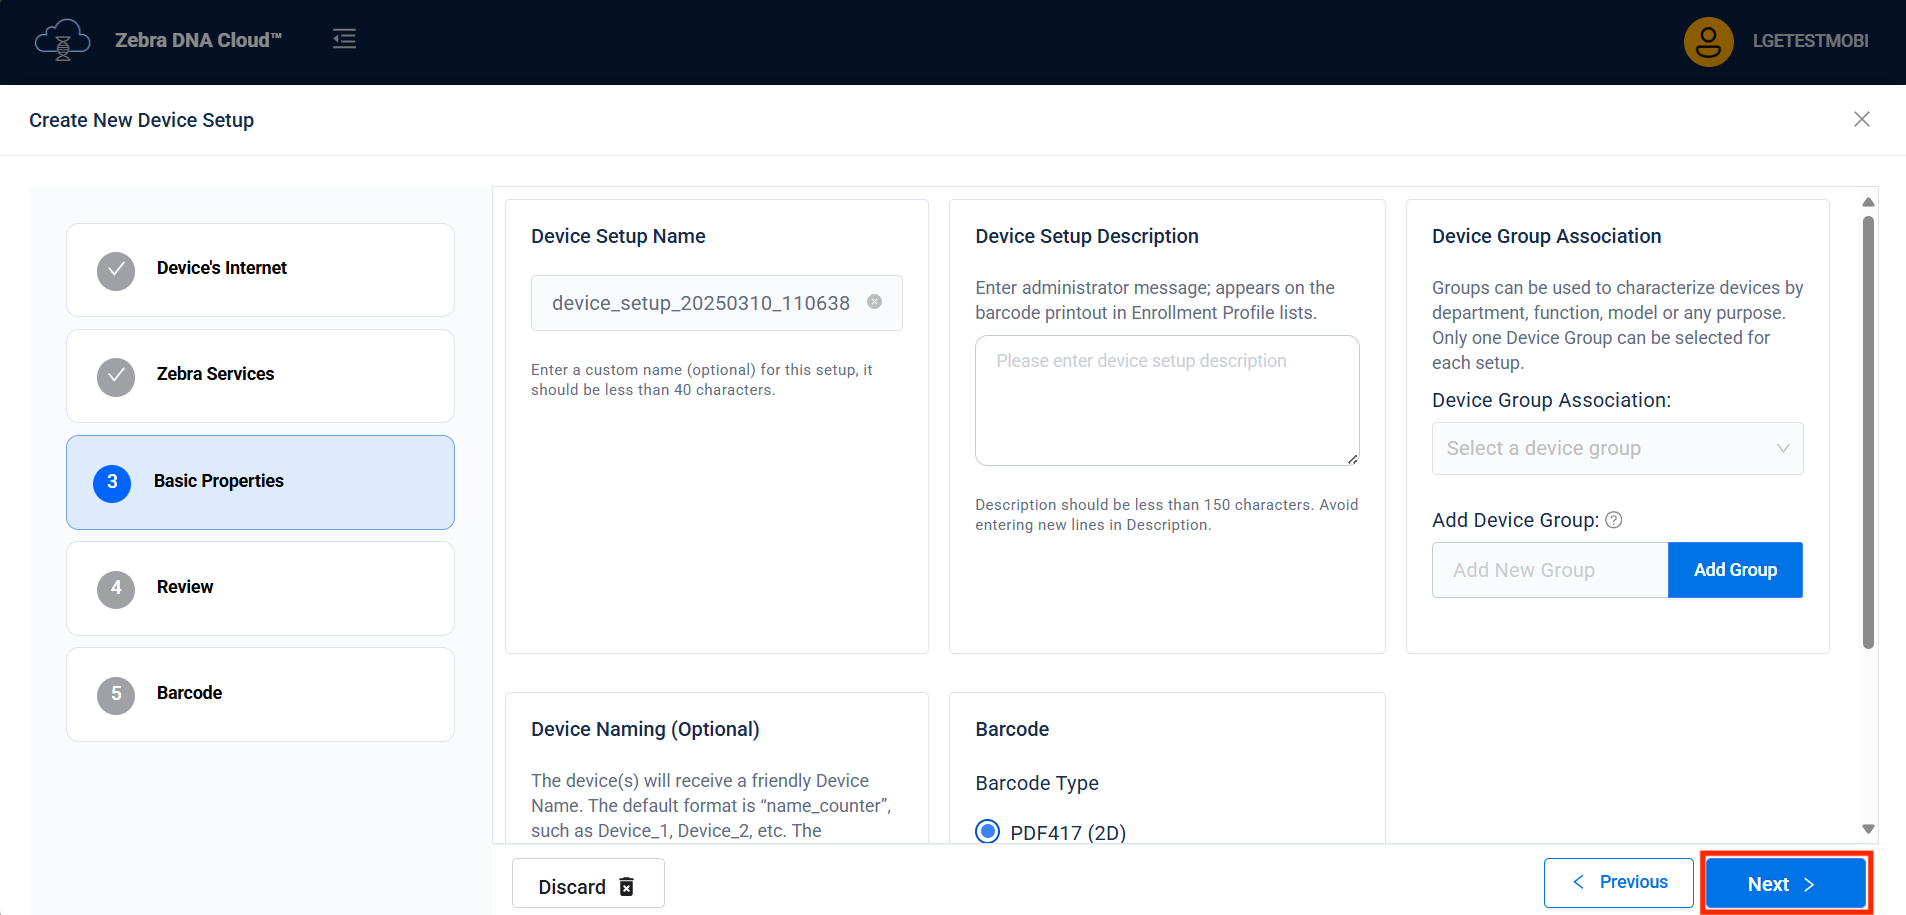
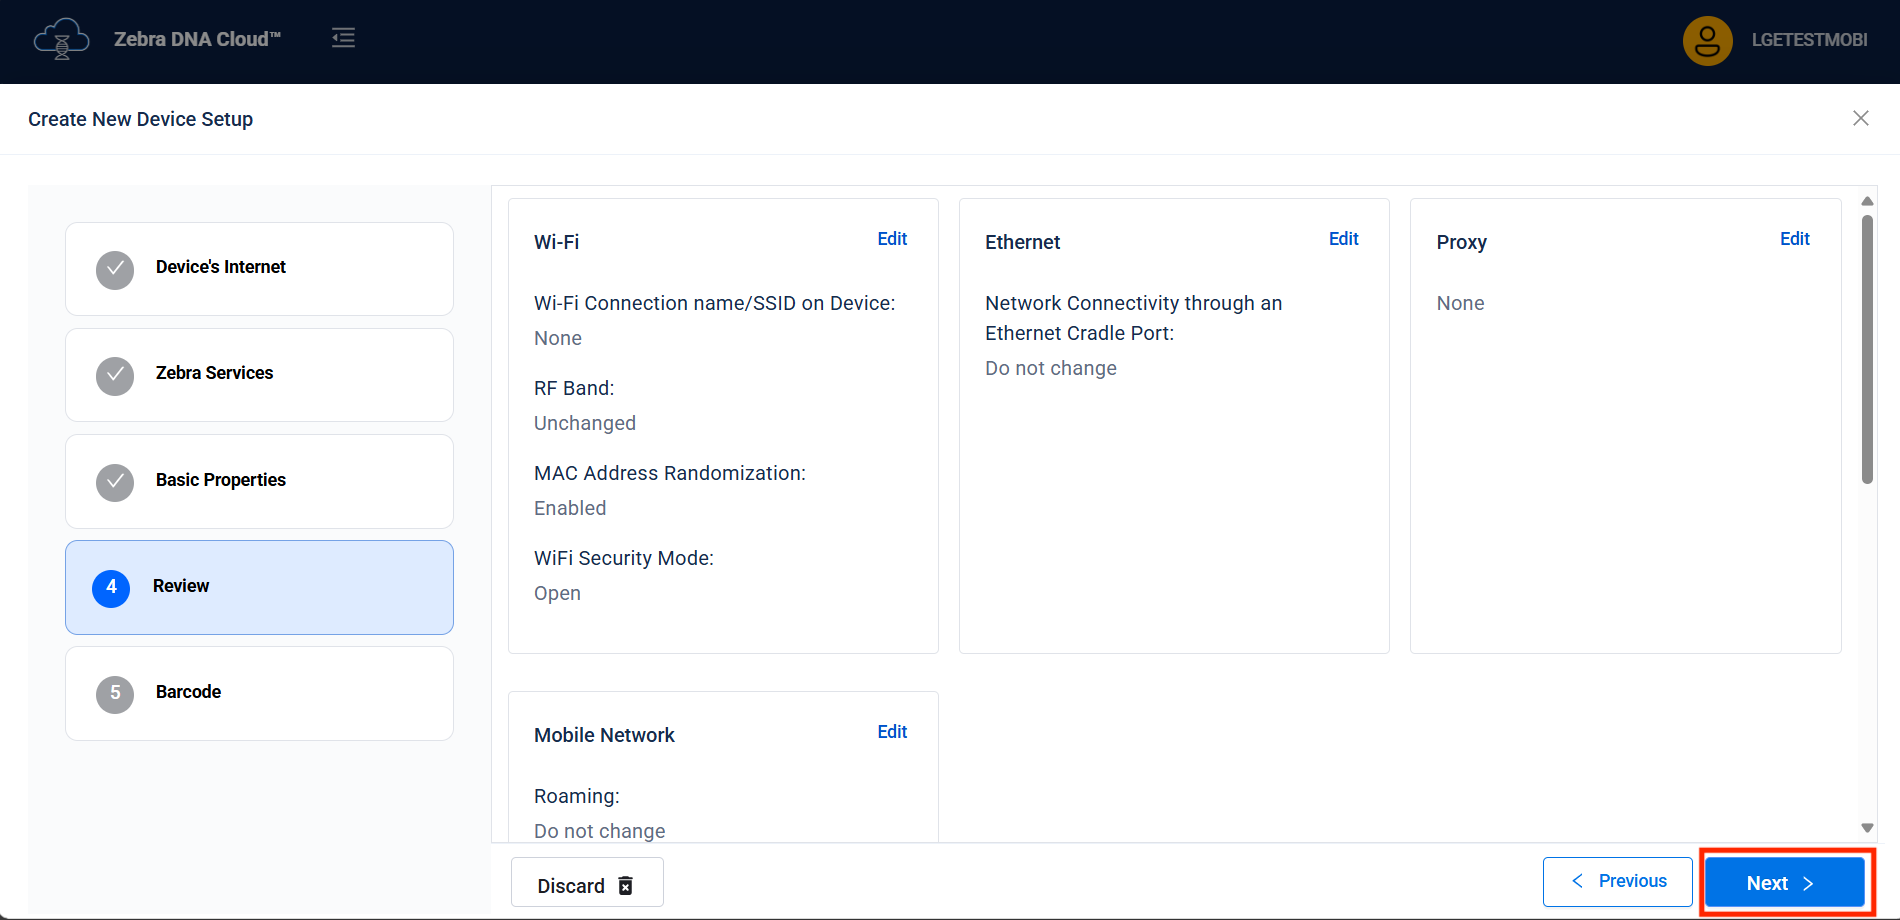
- Review the information and click Next.
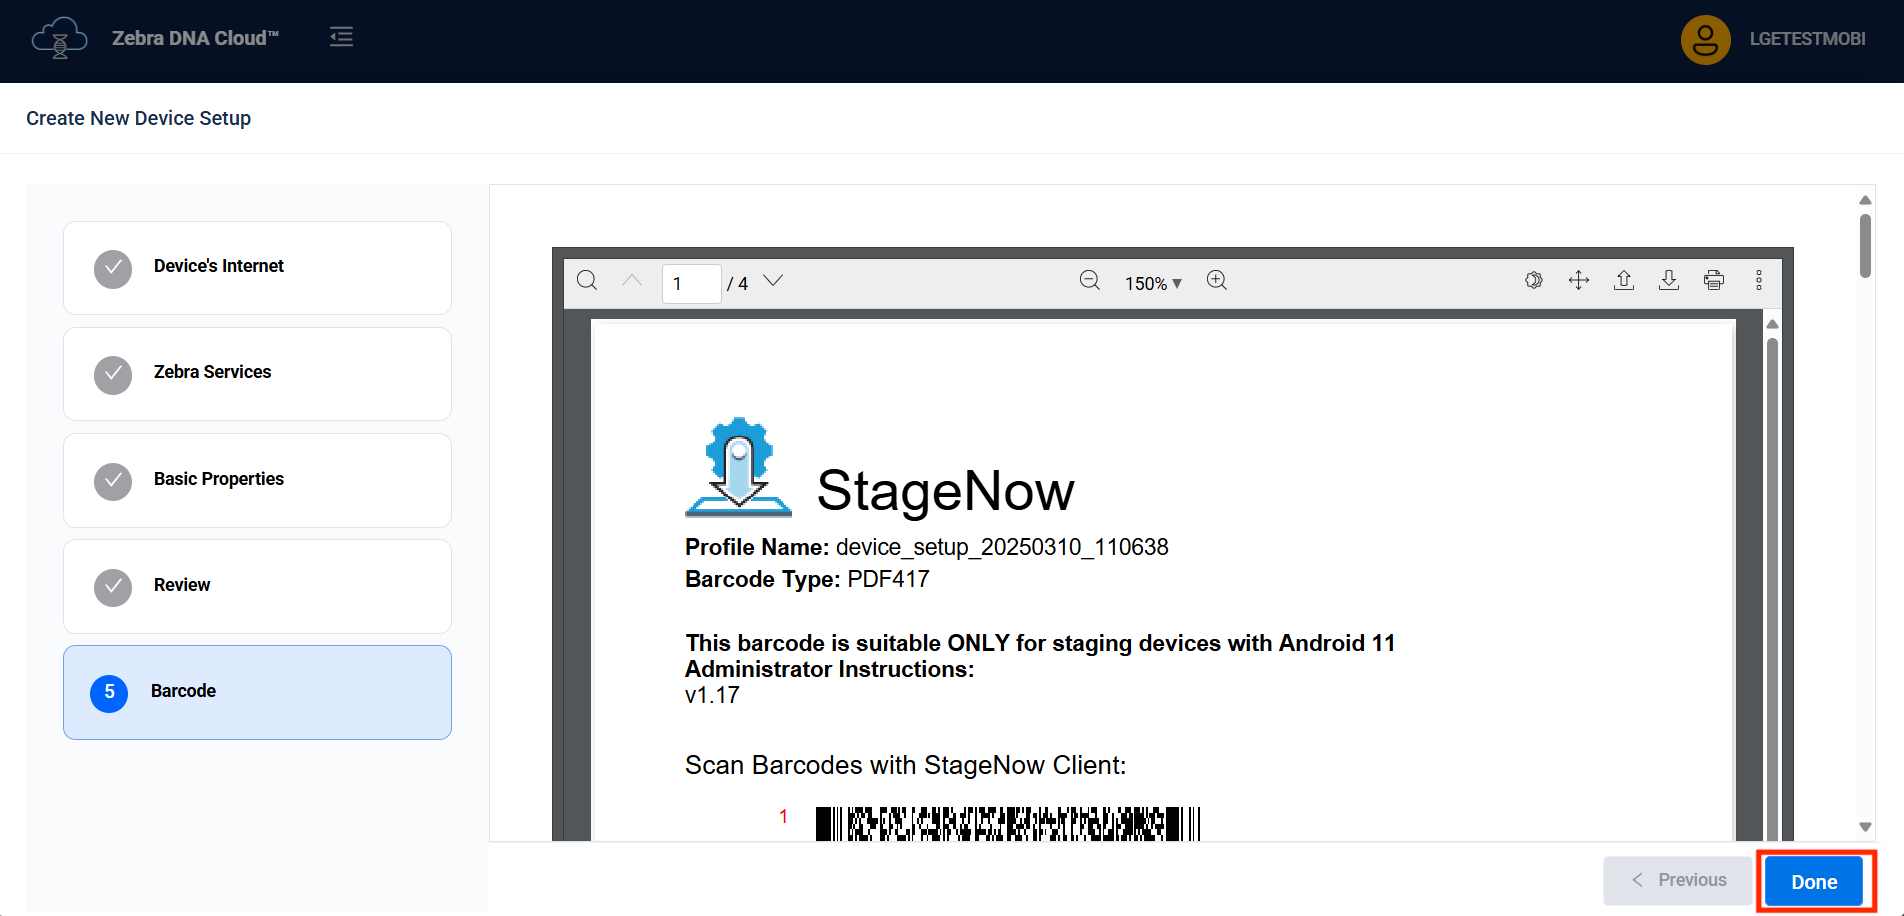
- The barcode is created. Click Done.
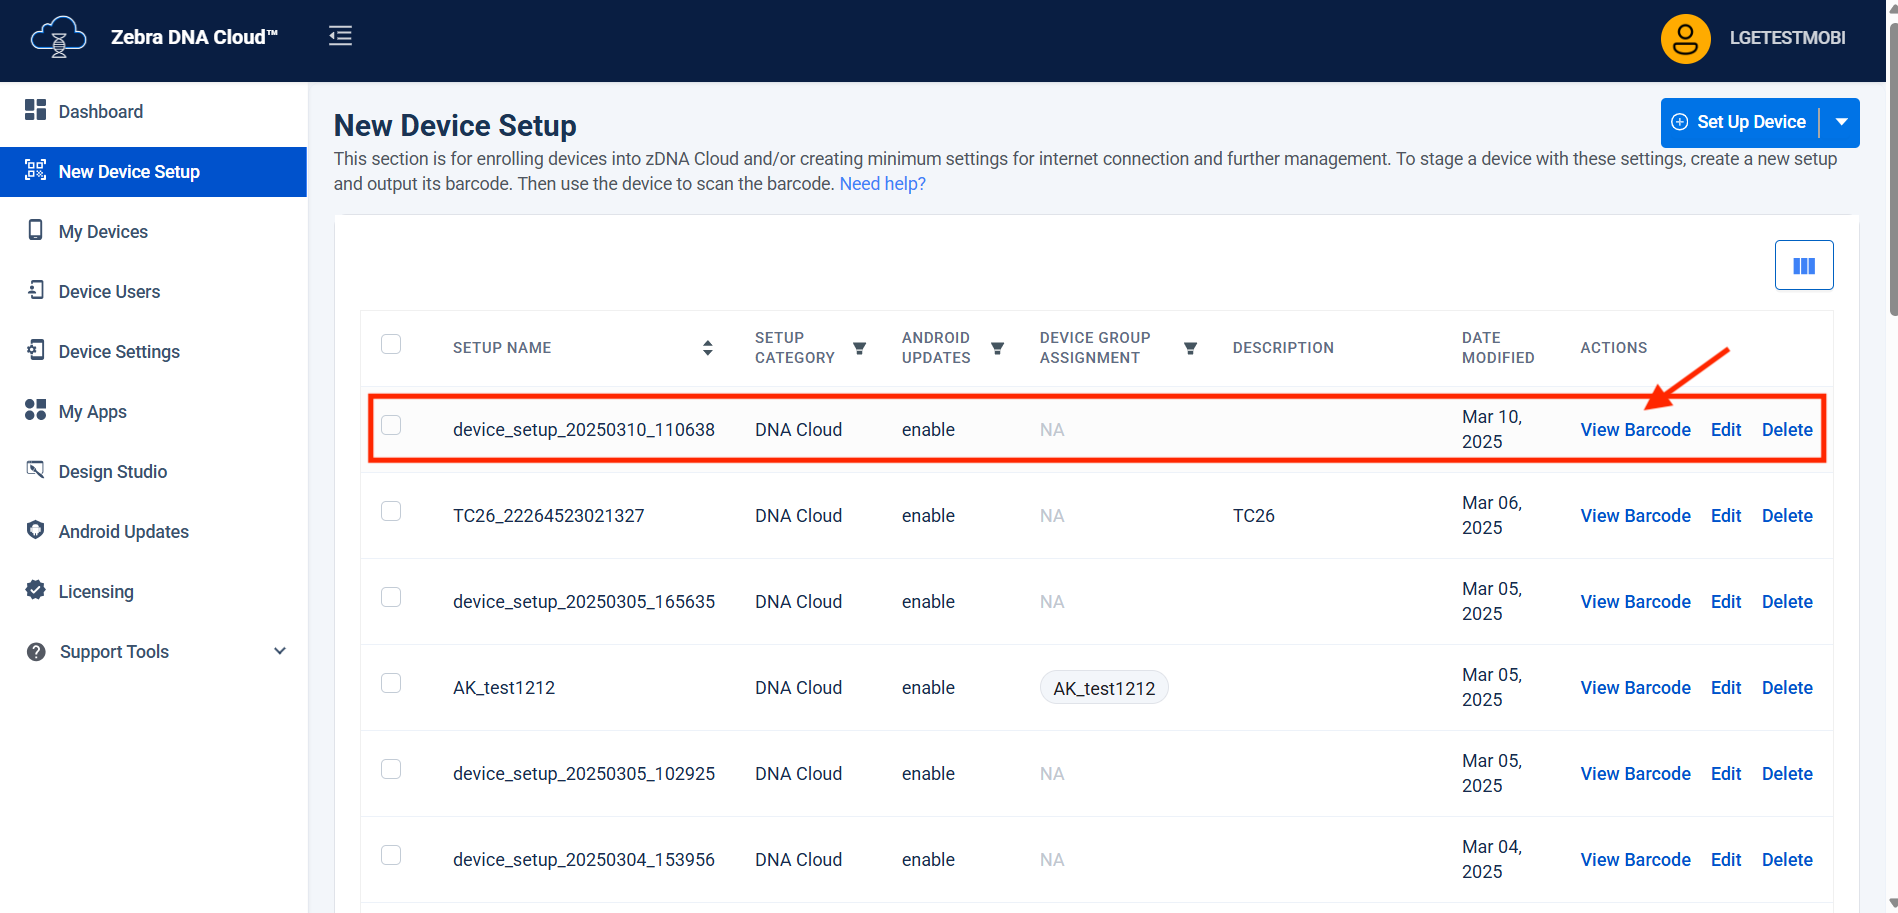
- The new setup is listed. Click View Barcode.
- For new enrollments, factory reset the device. Open StageNow and scan the barcode.
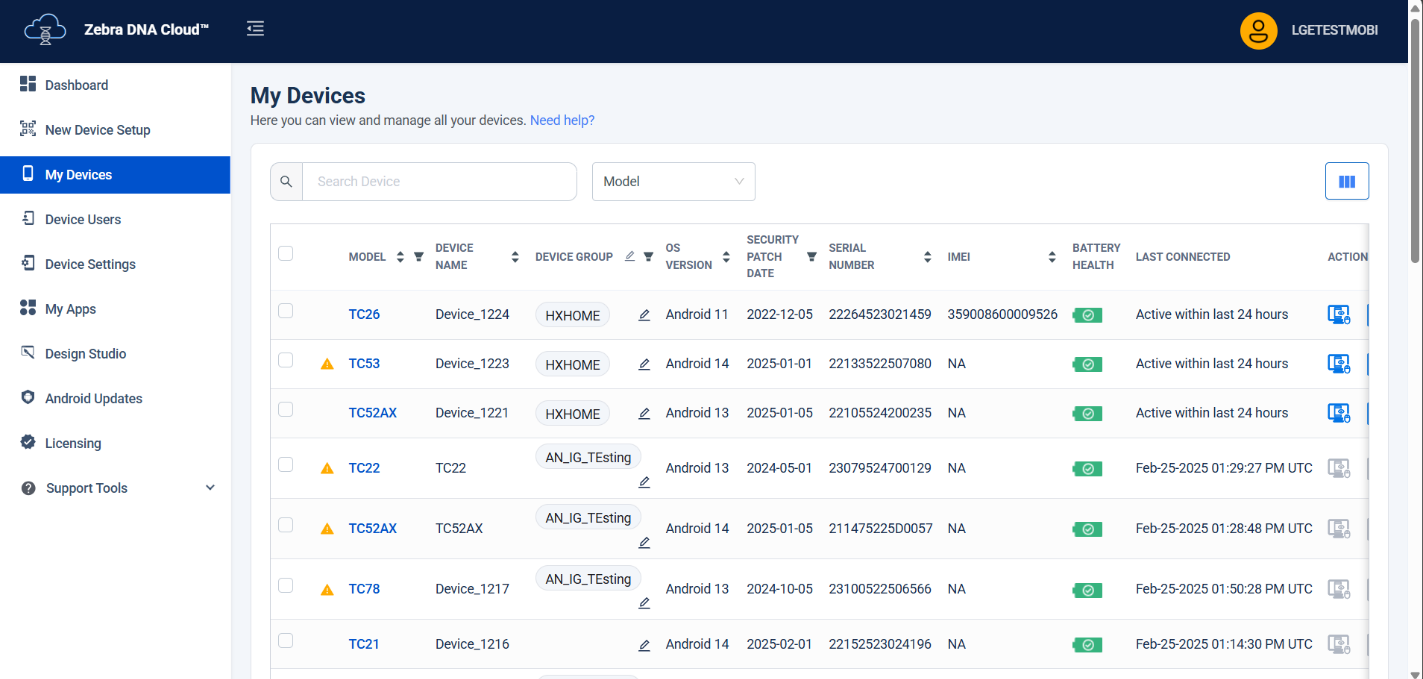
- After staging is complete, in ZDNA Cloud, click on My Devices and verify that the the enrolled device is listed.
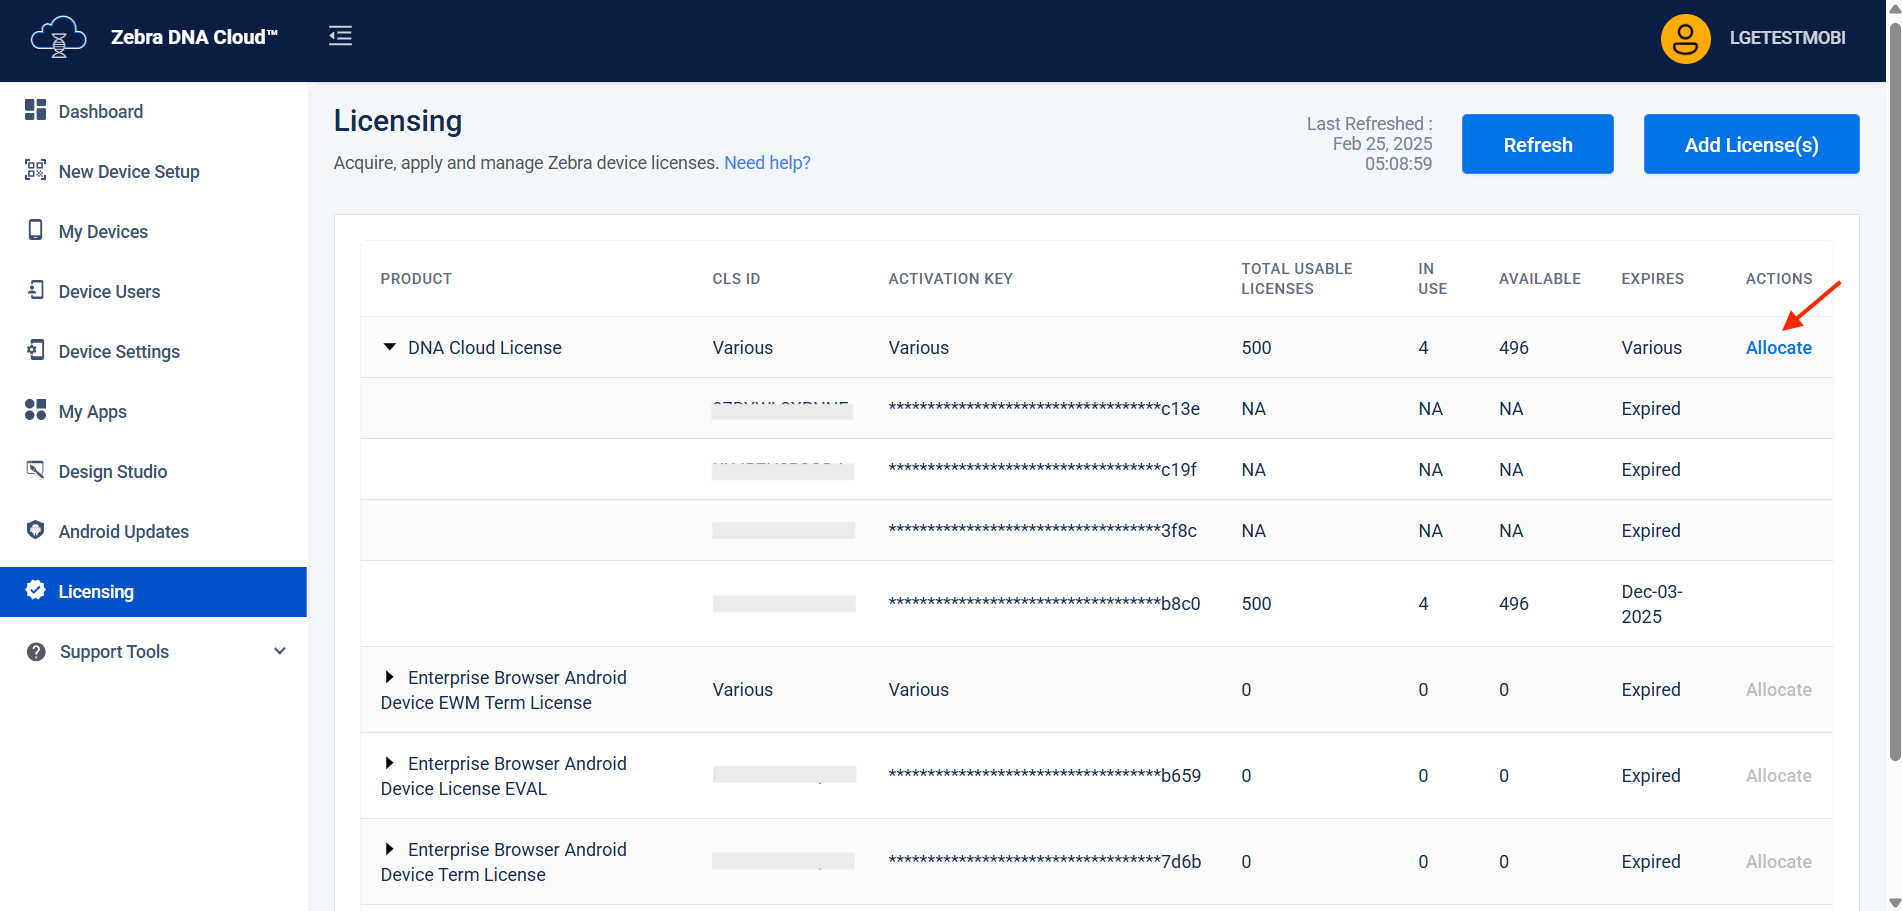
- Allocate the license for the enrolled device. Click Licensing from the left menu. Under DNA CLoud License, click Allocate.
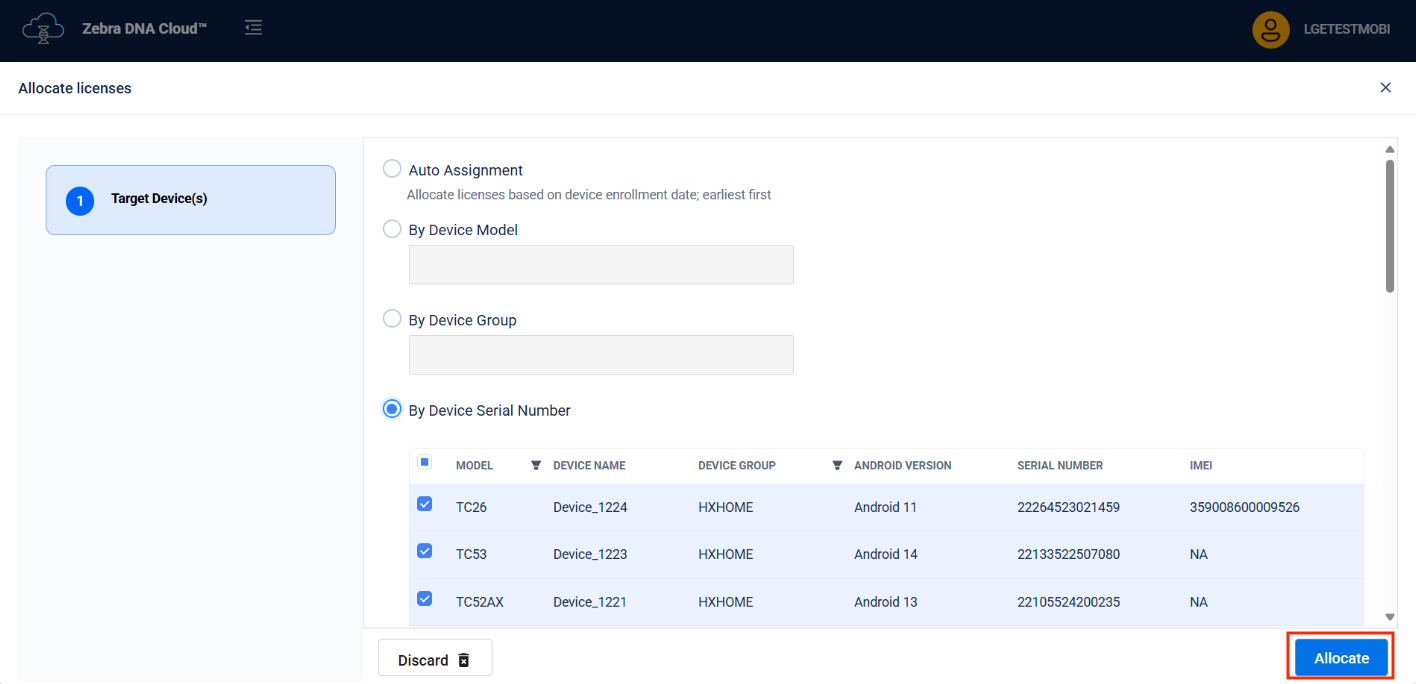
- Select the target device(s) to allocate the license to and click Allocate.
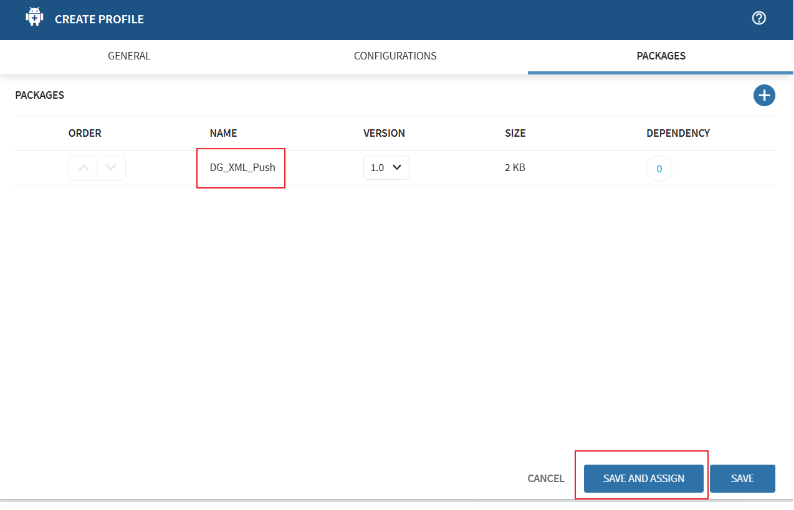
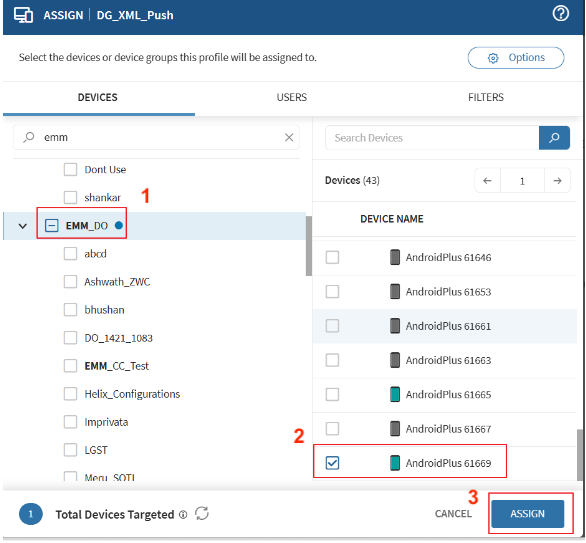
Part II: Install DG/DGAM
Install DG/DGAM:
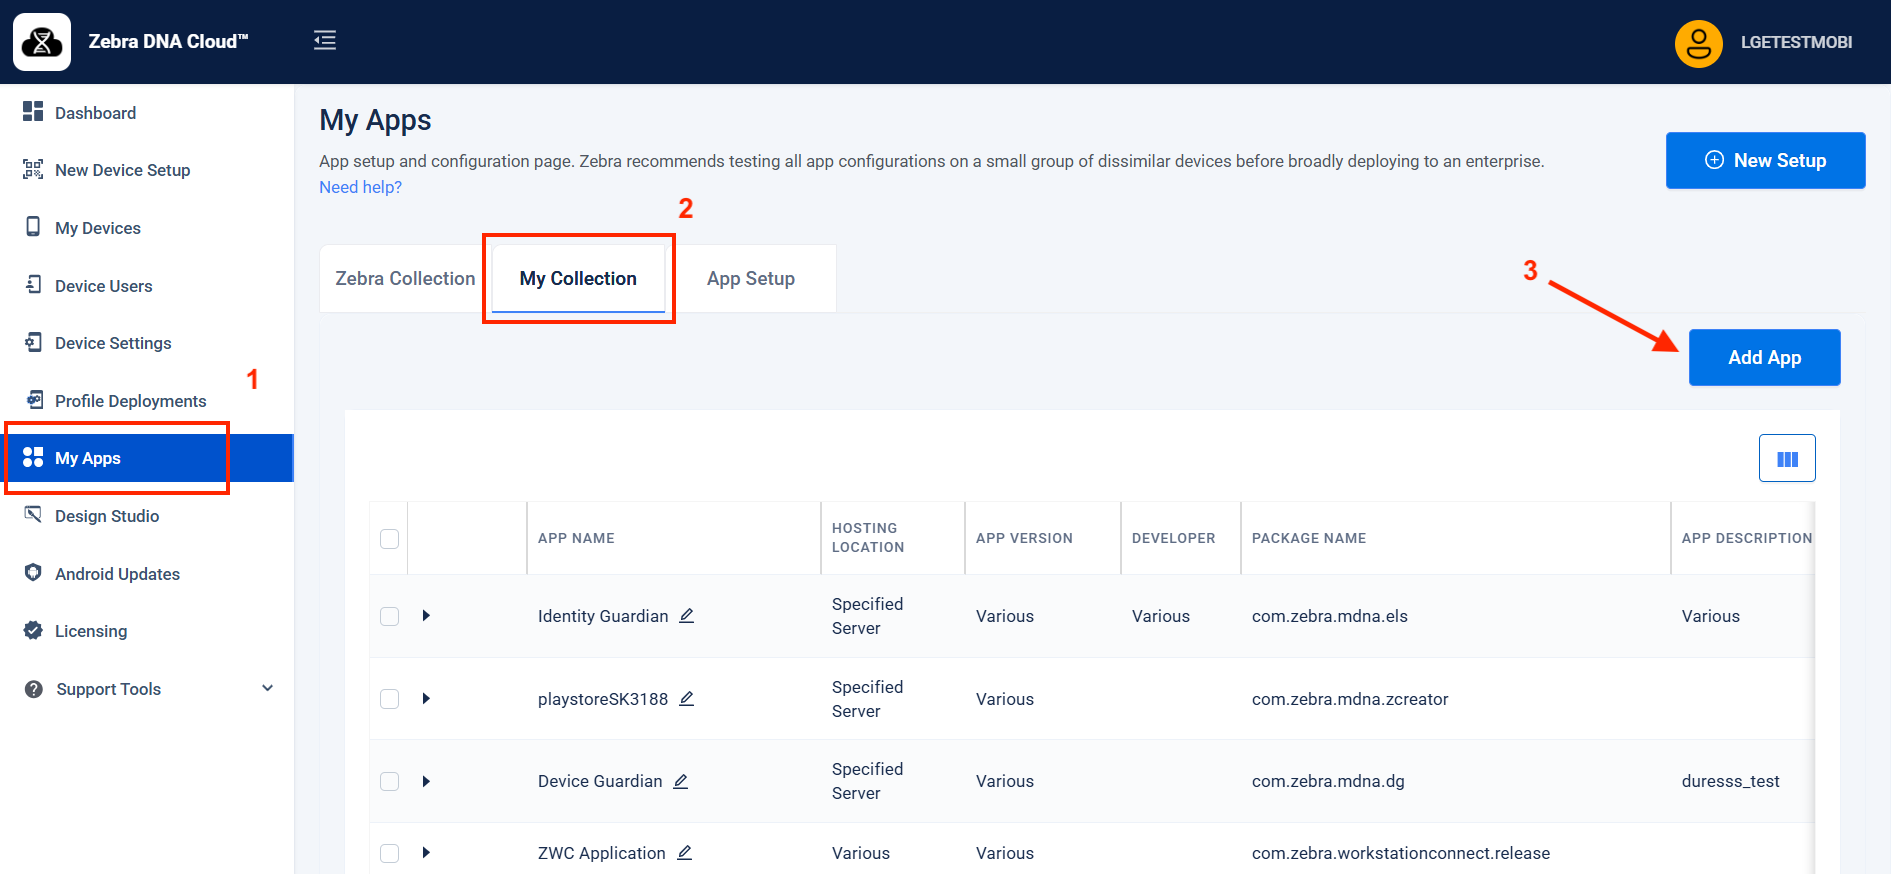
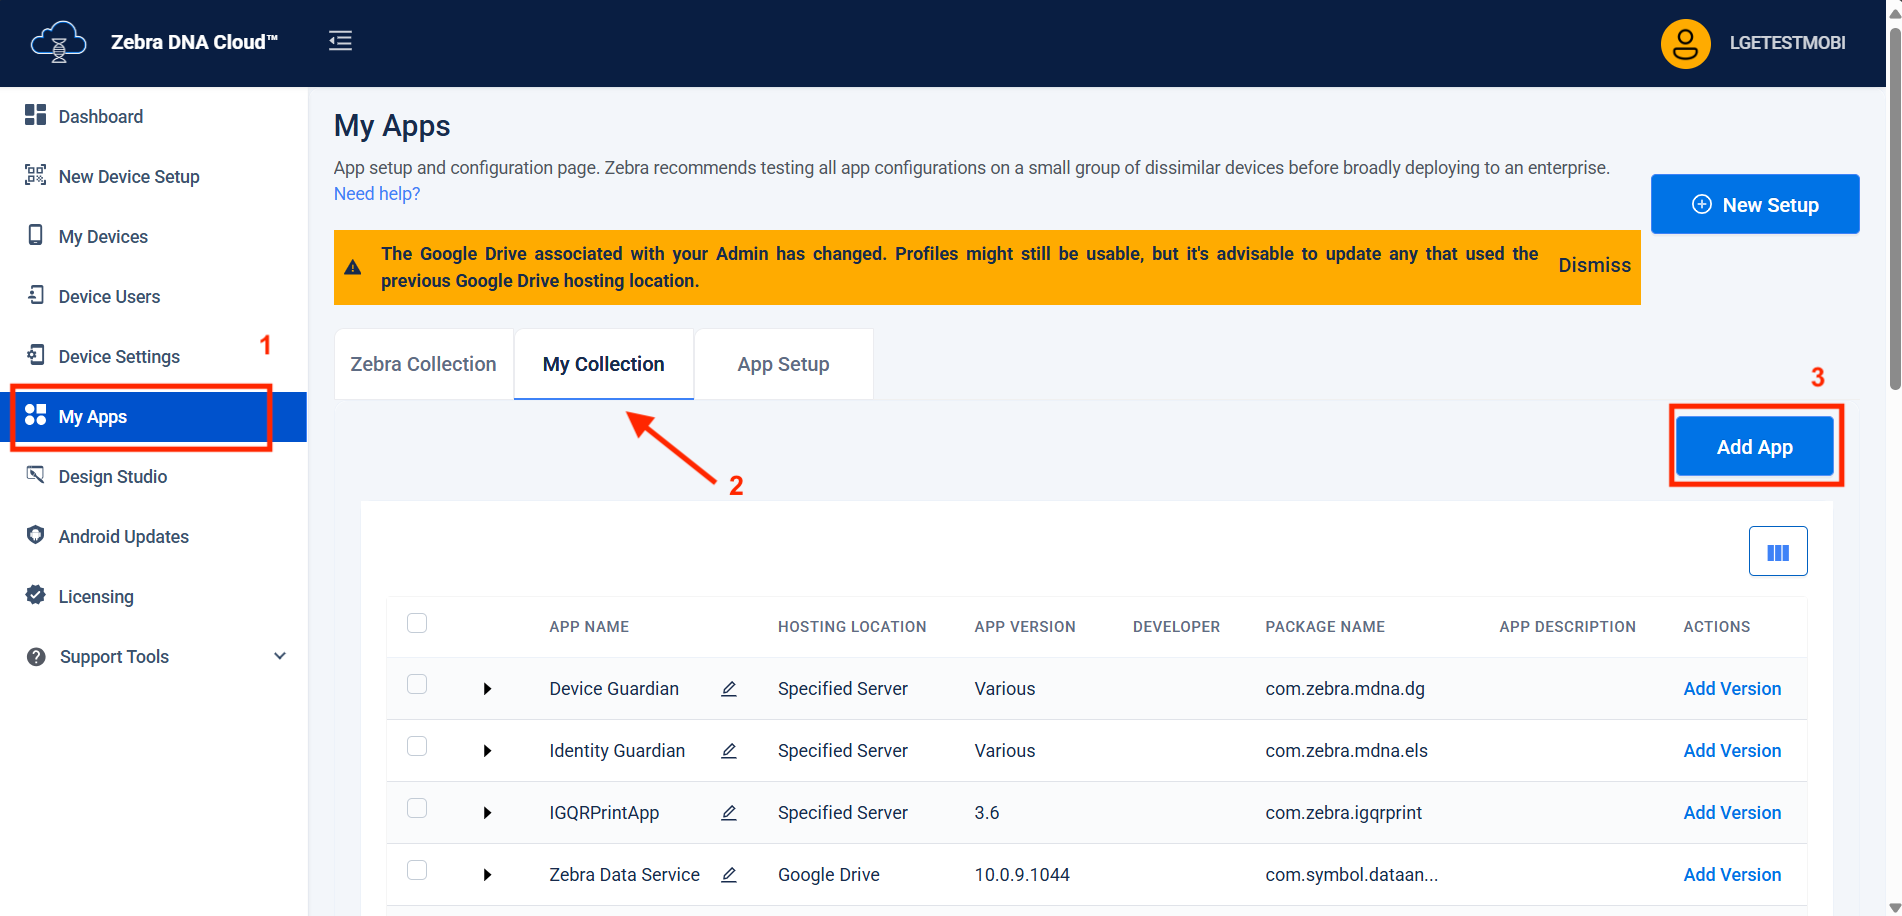
- In Zebra DNA Cloud, go to My Apps and click on My Collection tab. Click Add App.
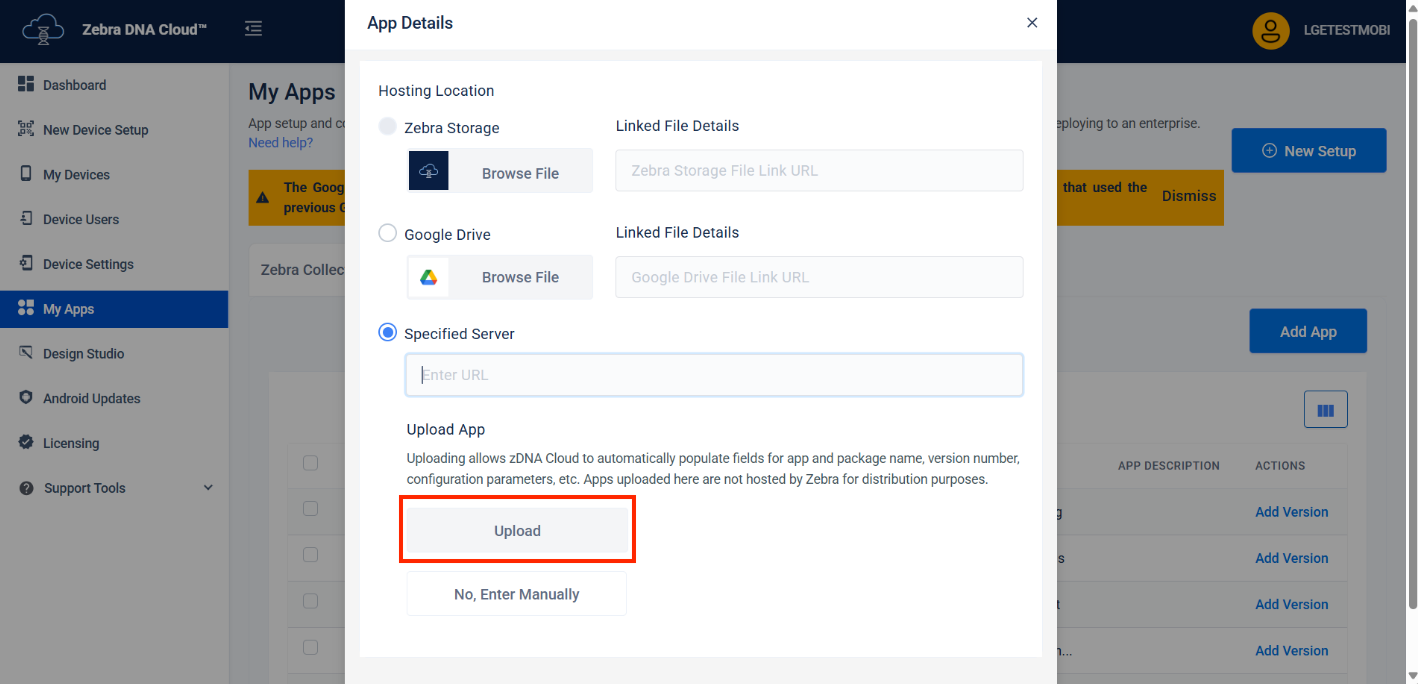
- Enter the server URL where the DG/DGAM .
apkis hosted. Click Upload.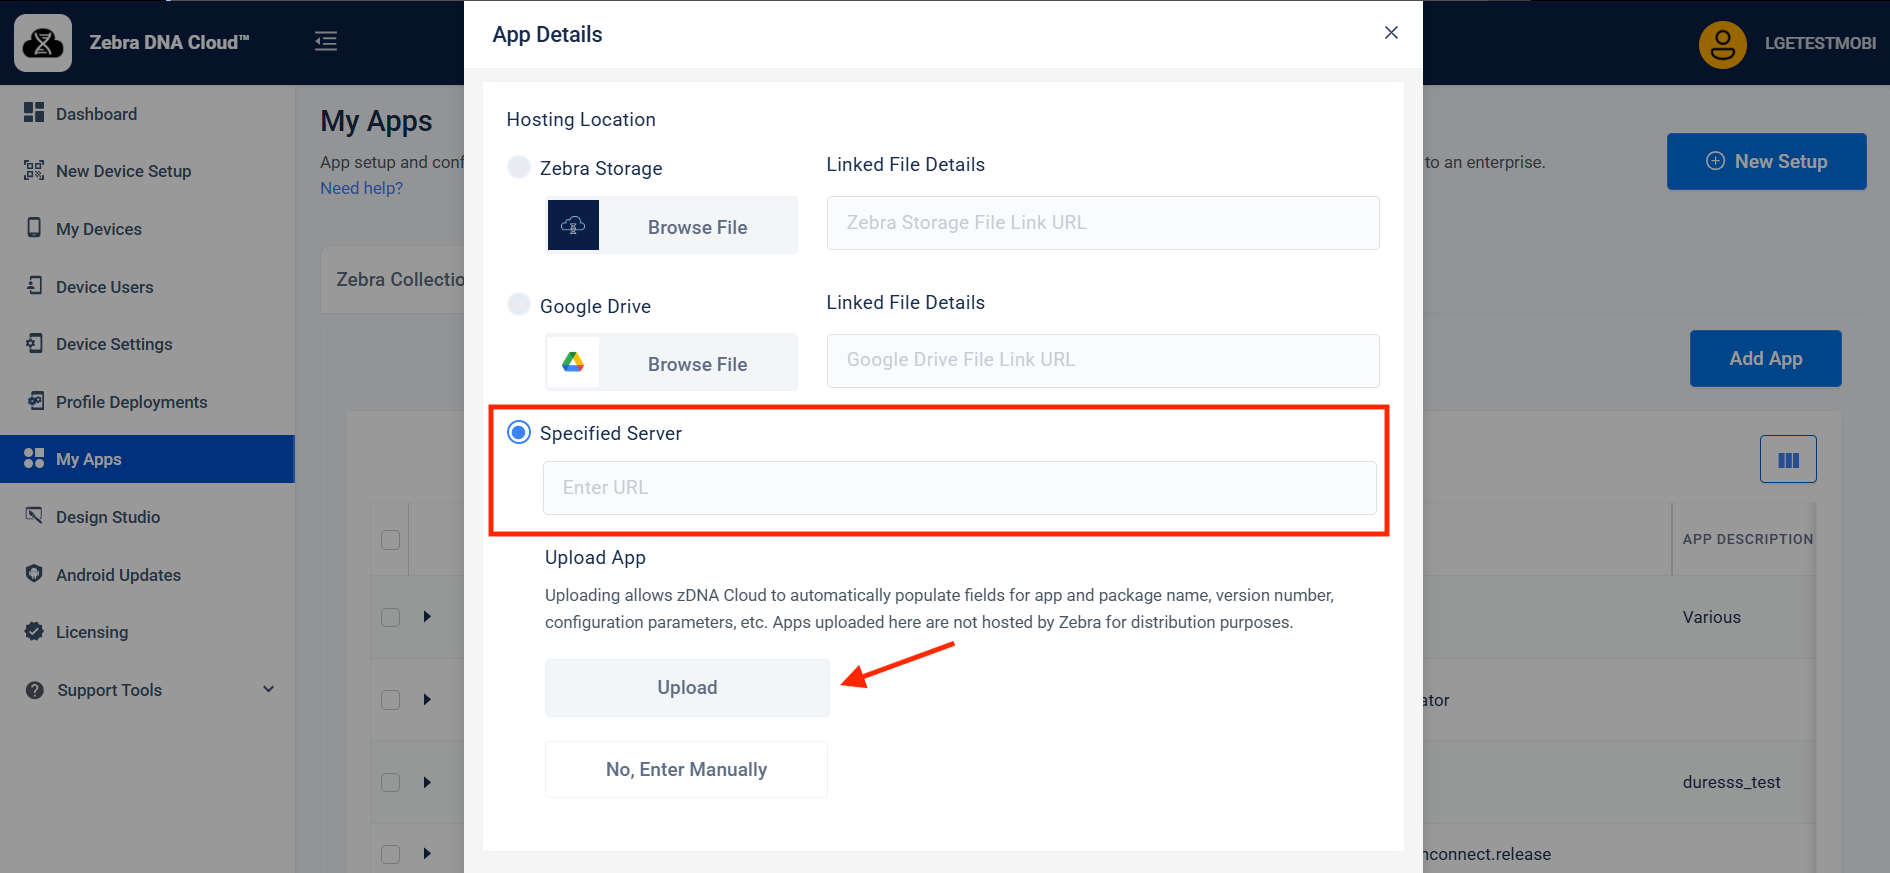
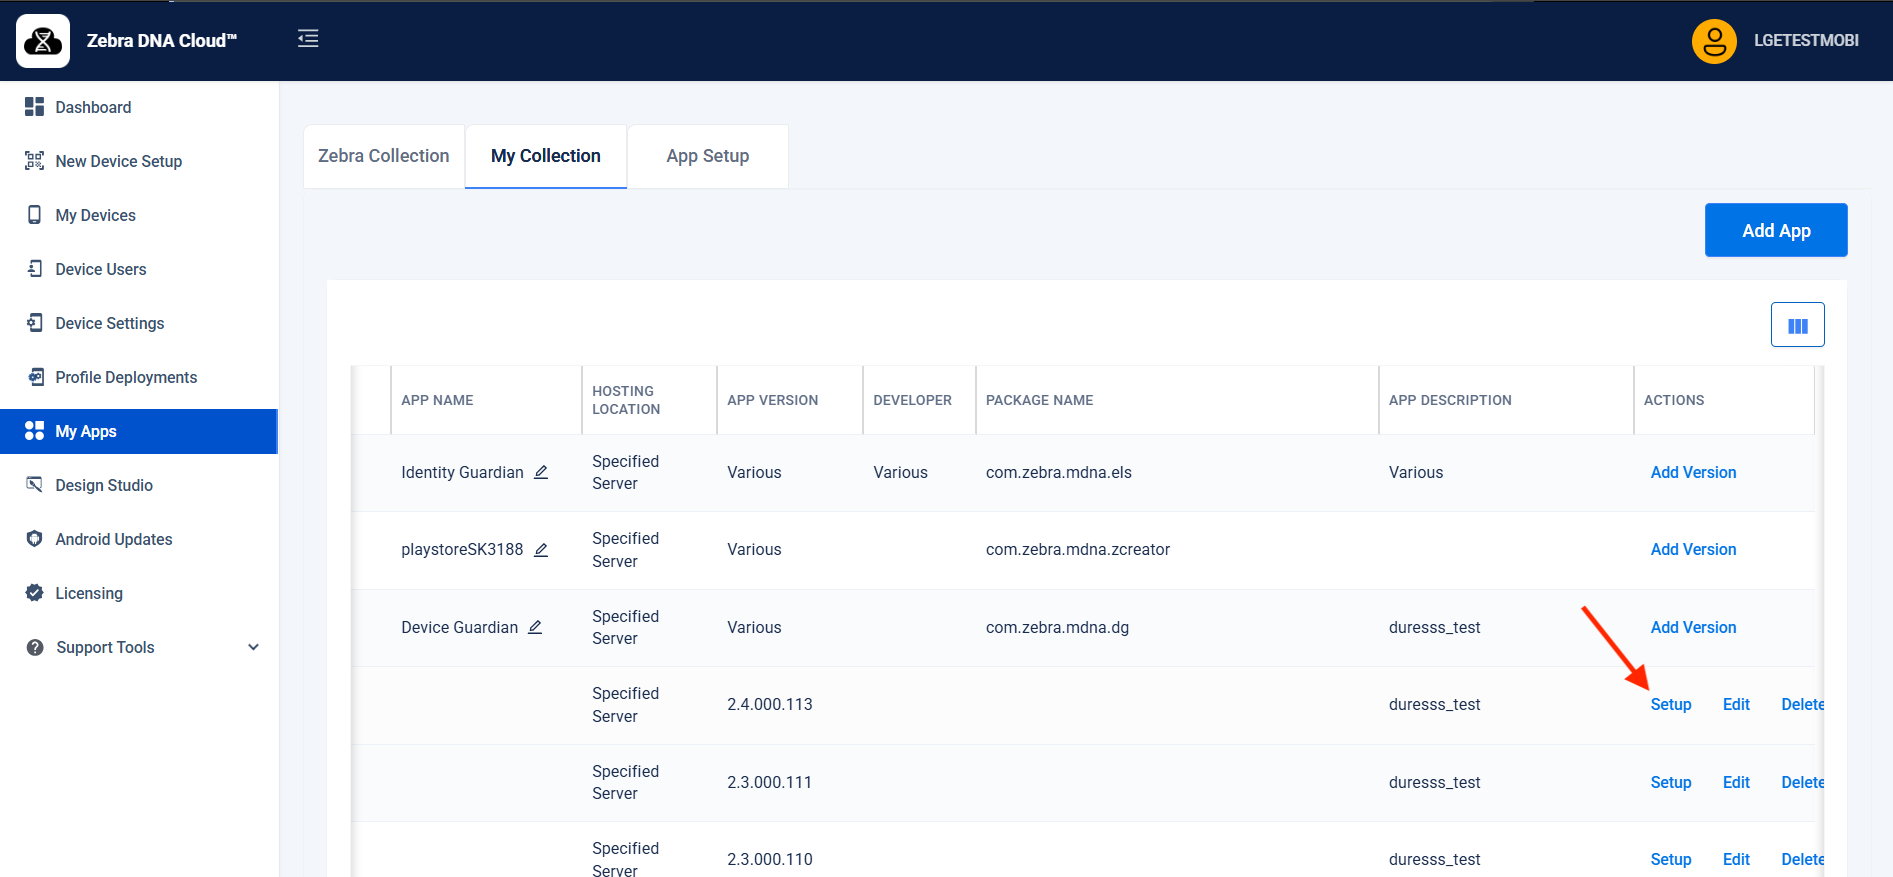
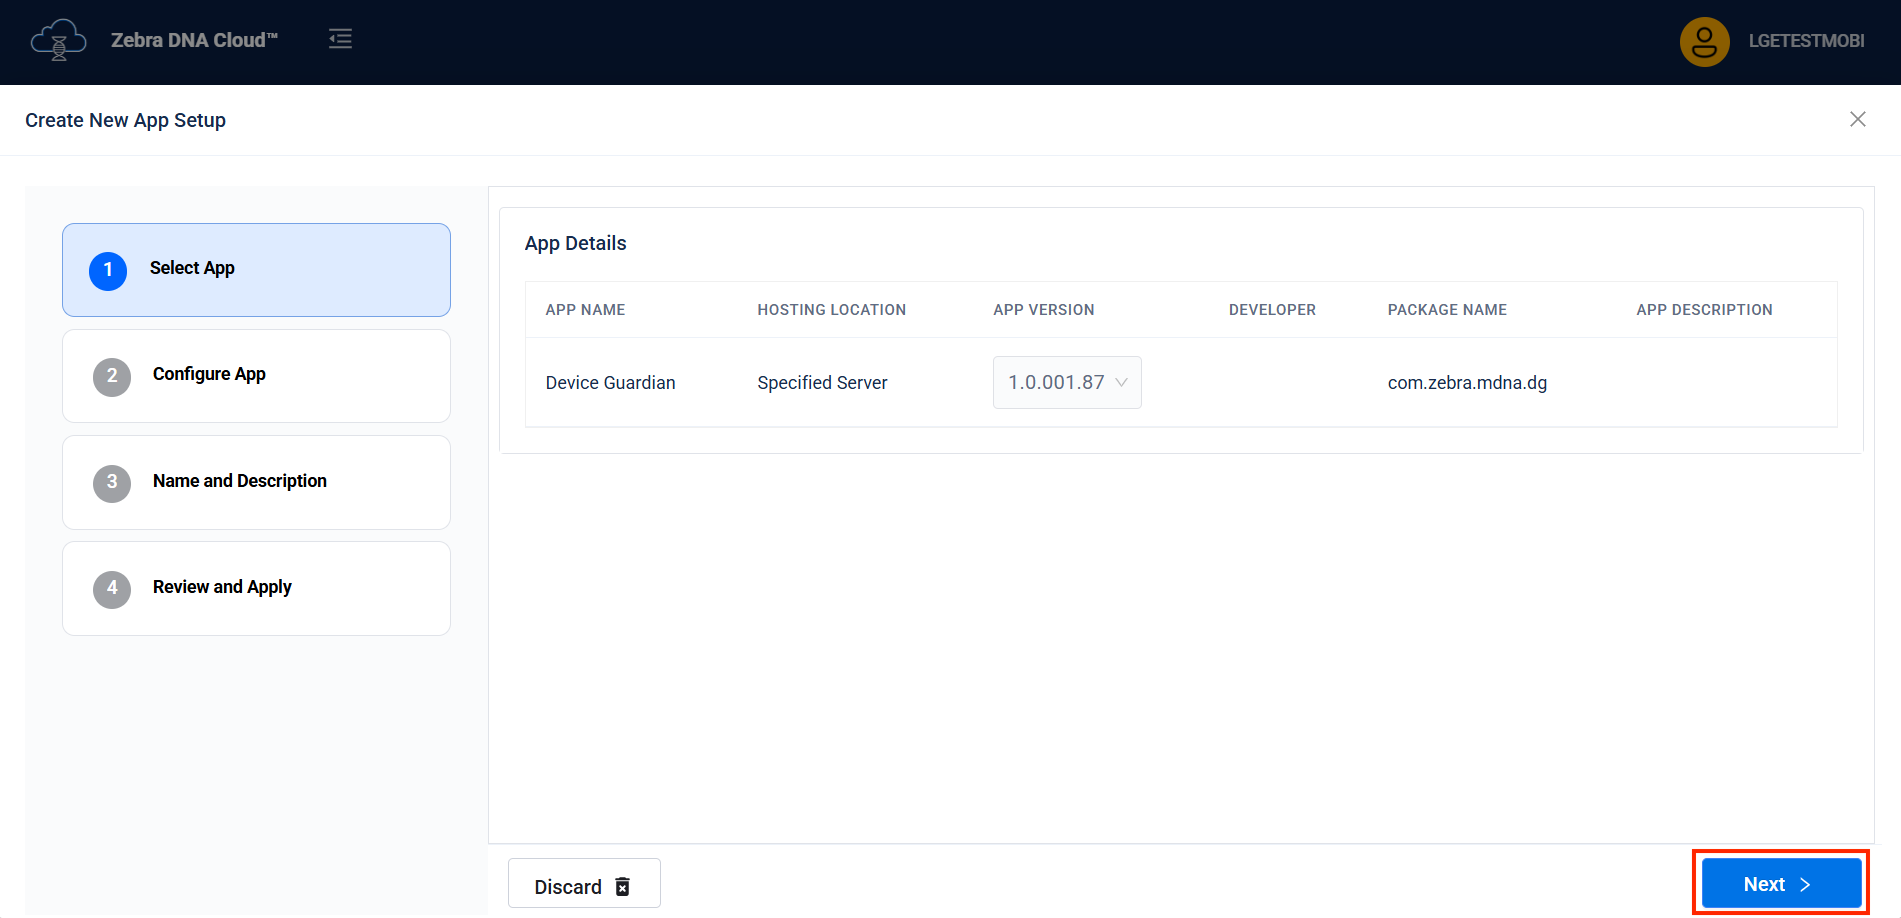
- From the table, expand Device Guardian. Locate the app version uploaaded and click Setup.
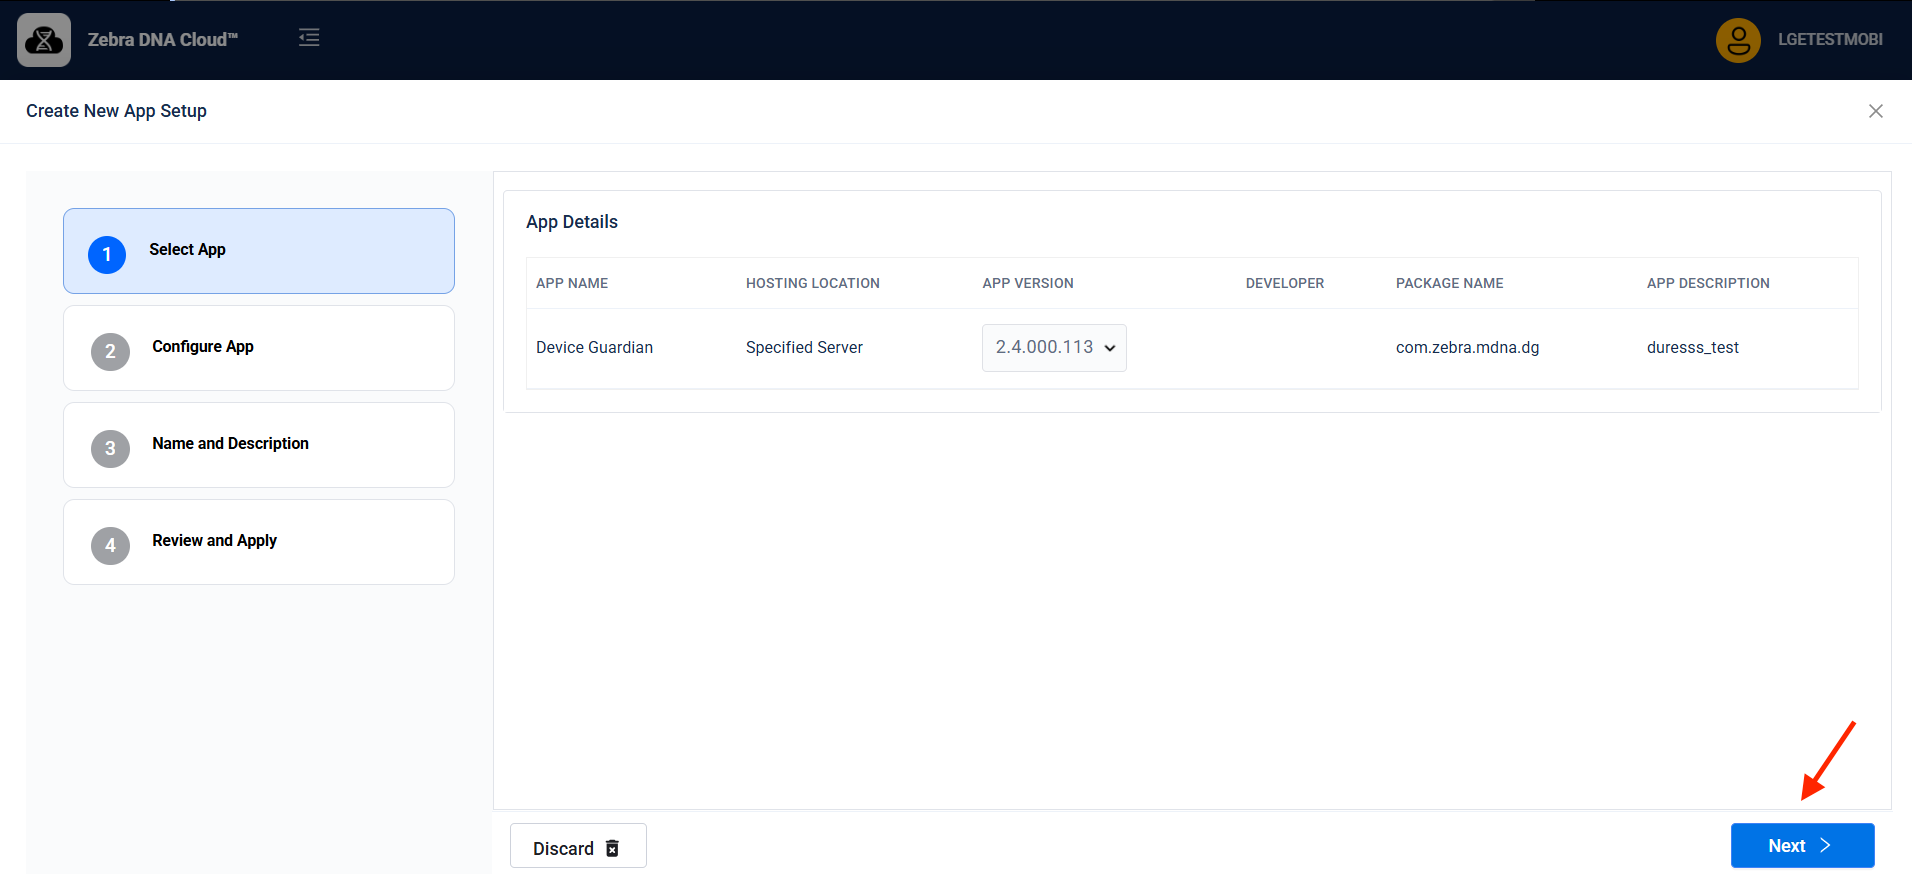
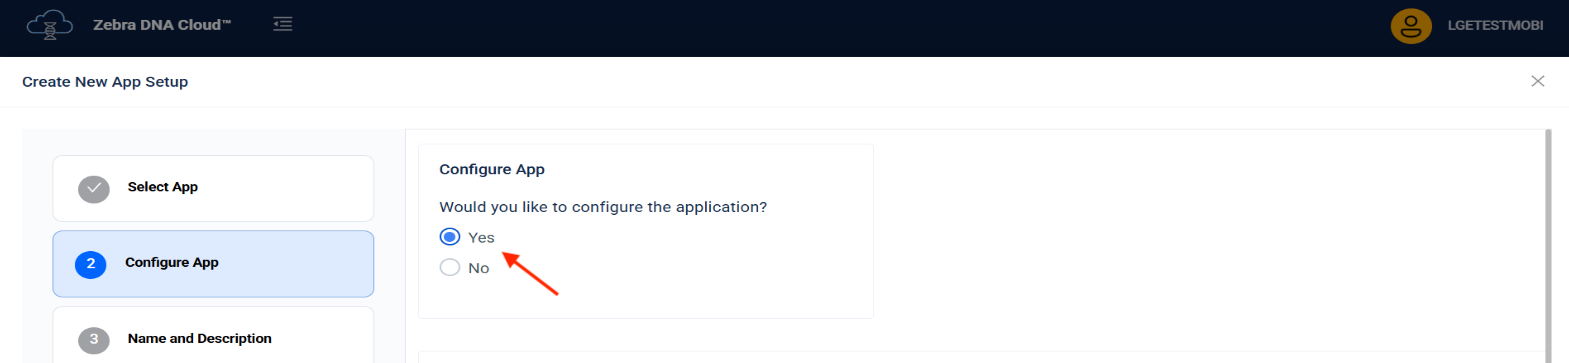
- Click Next.
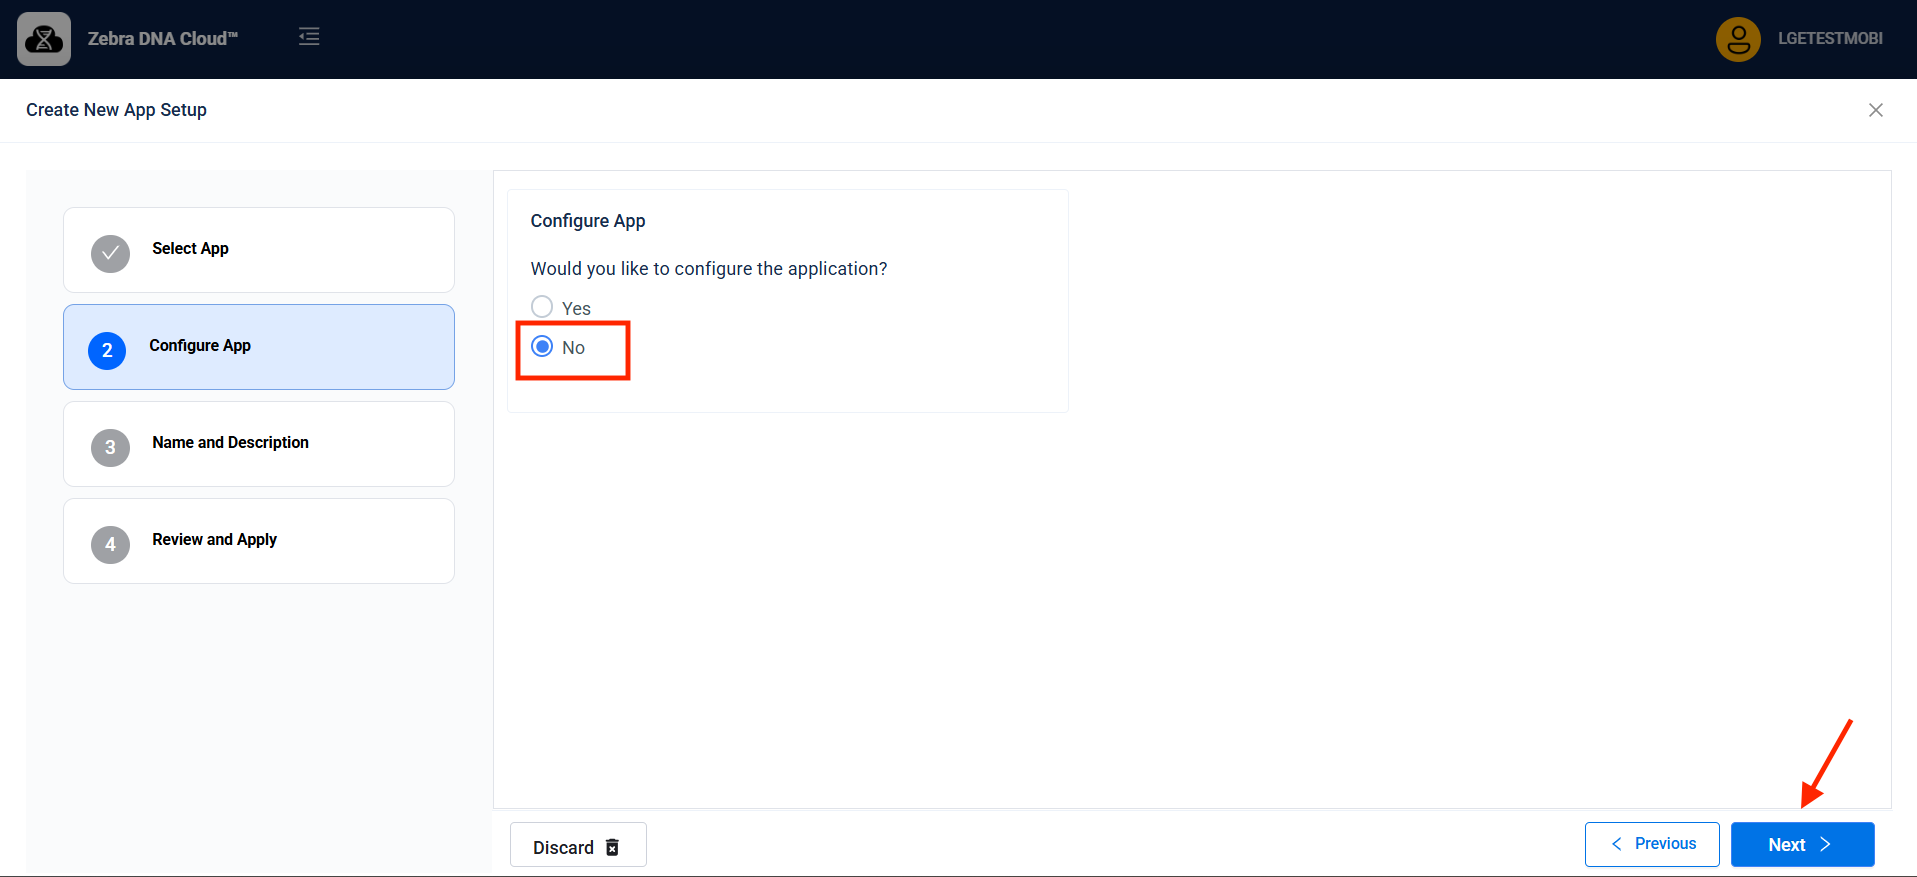
- Select No, then click Next.
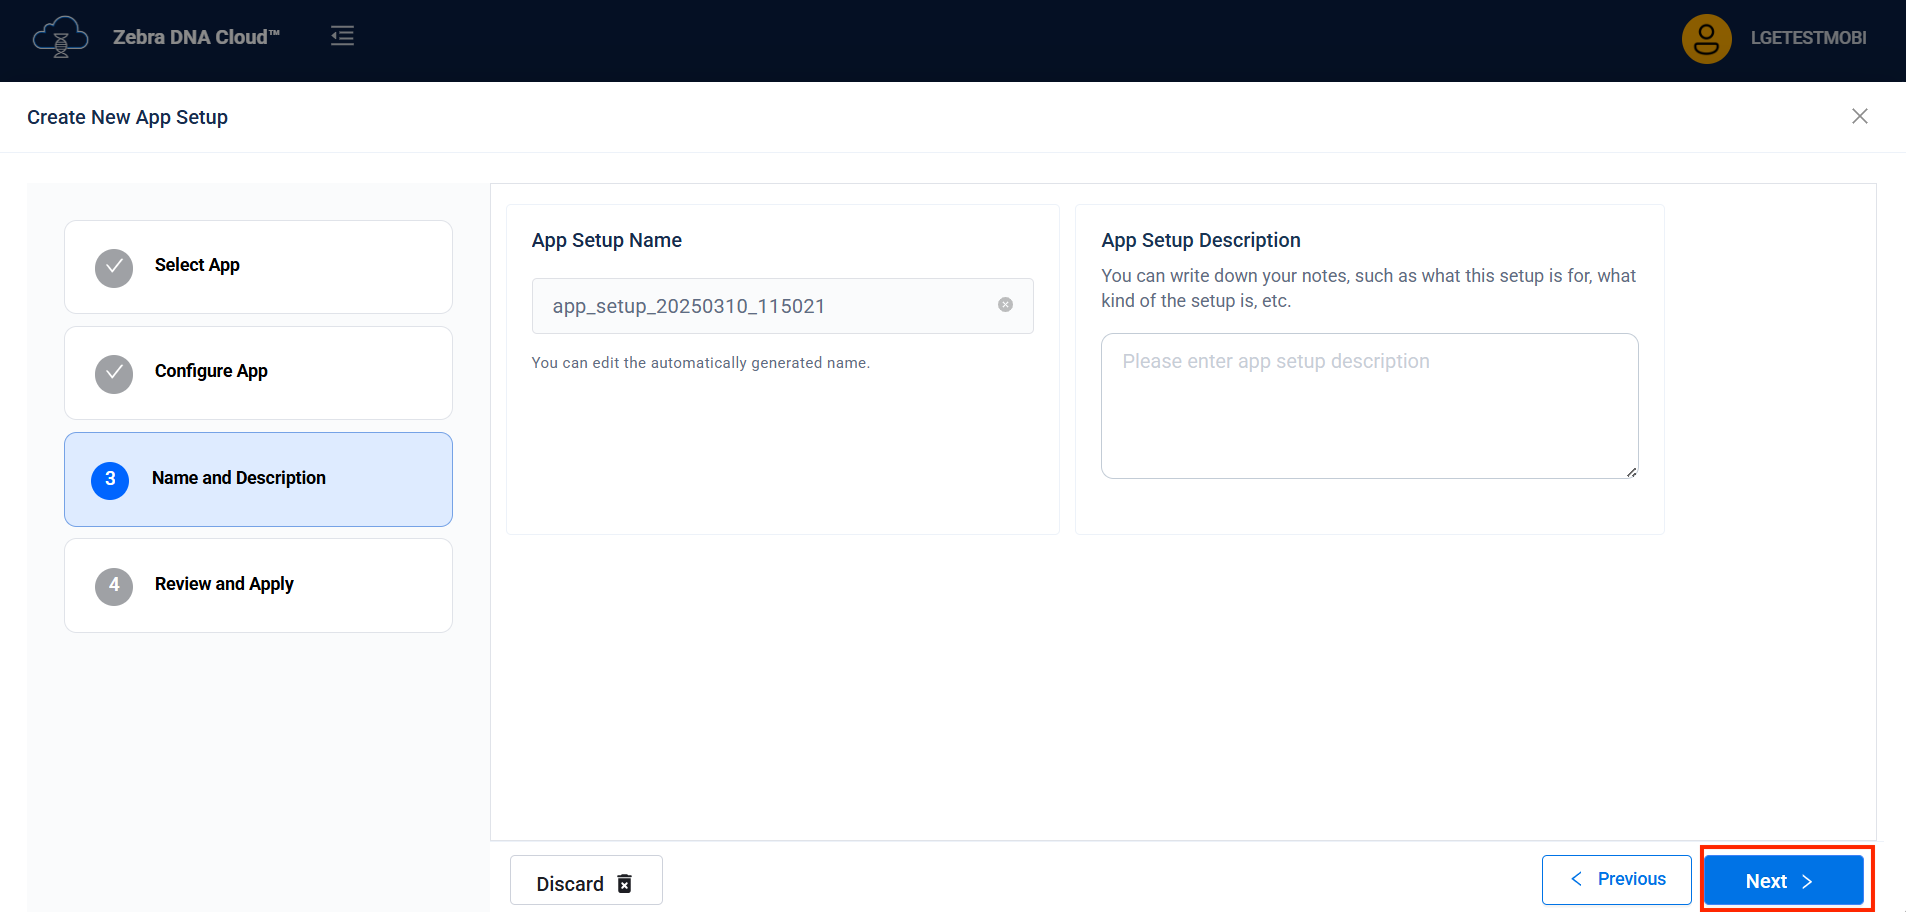
- Enter a name and description (optional) for the installation setup. Click Next.
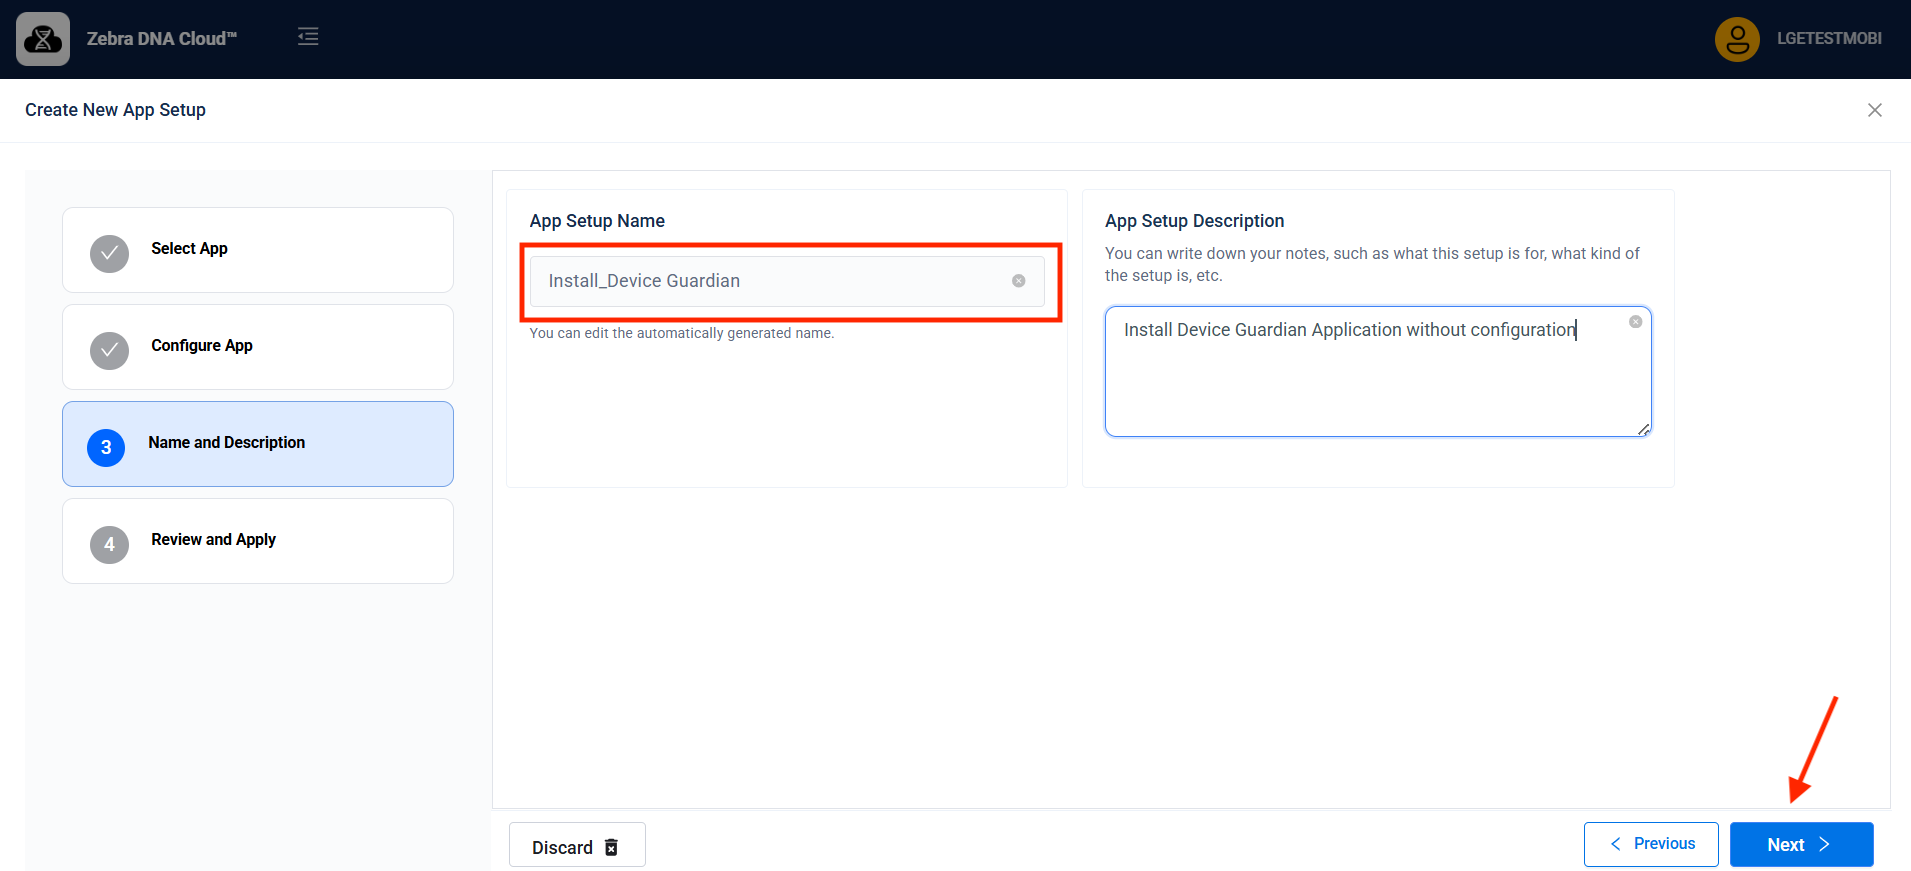
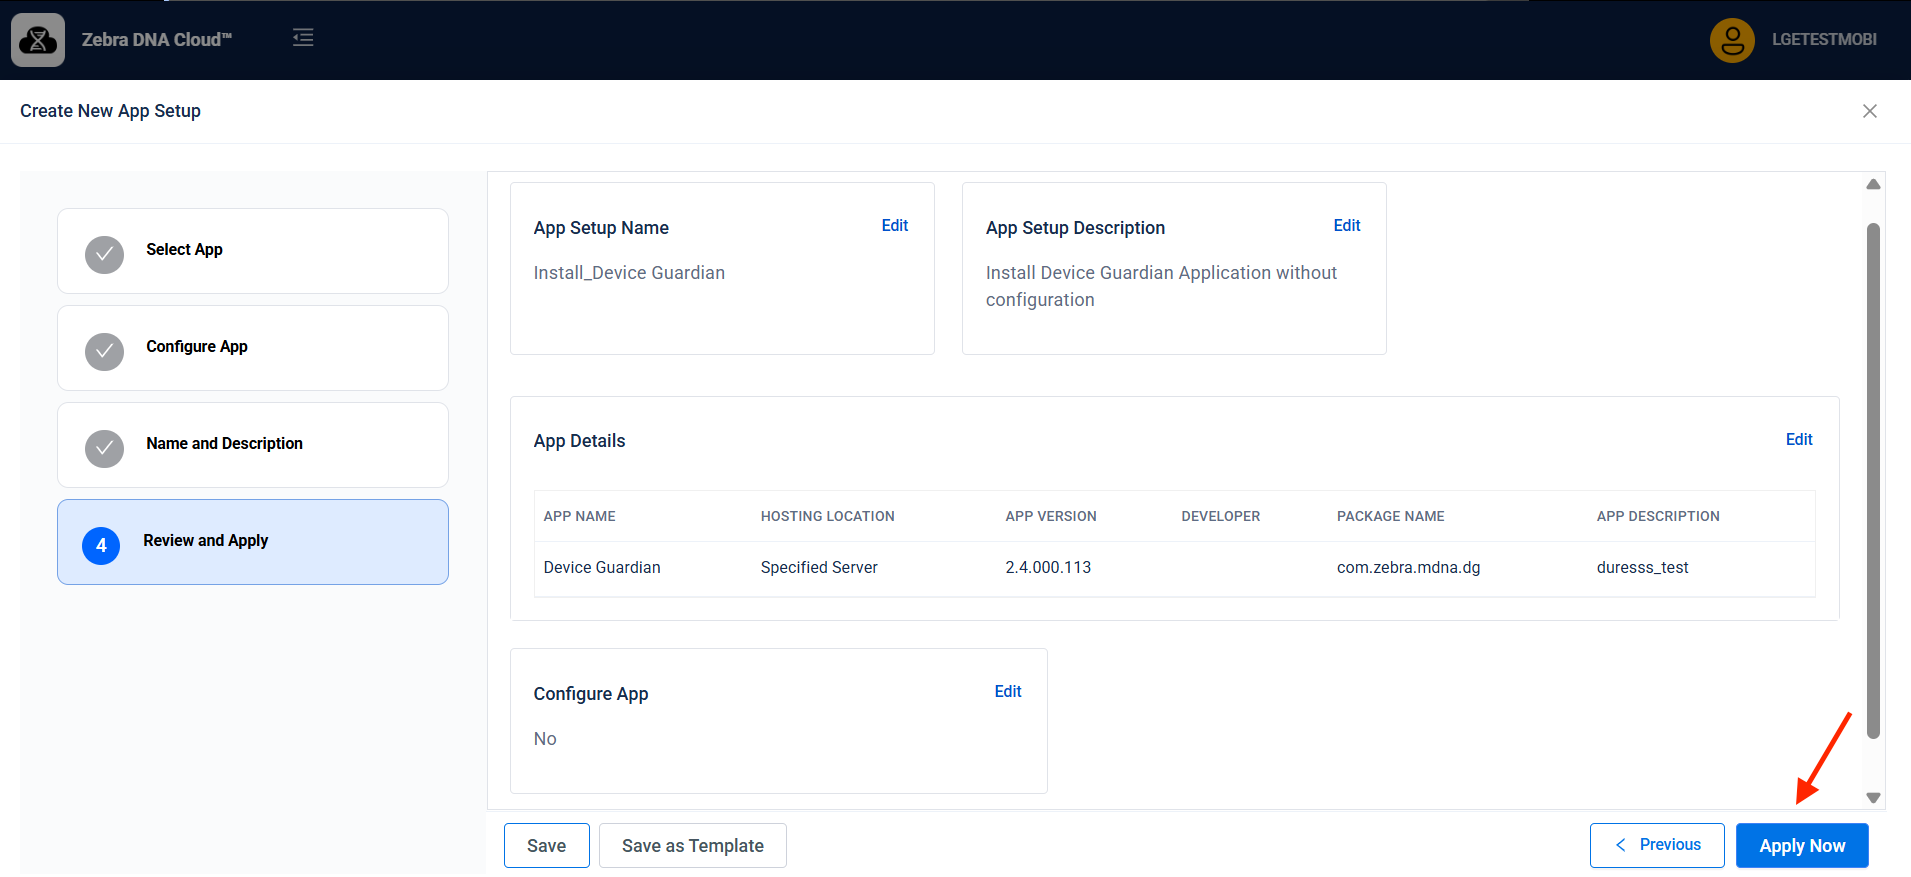
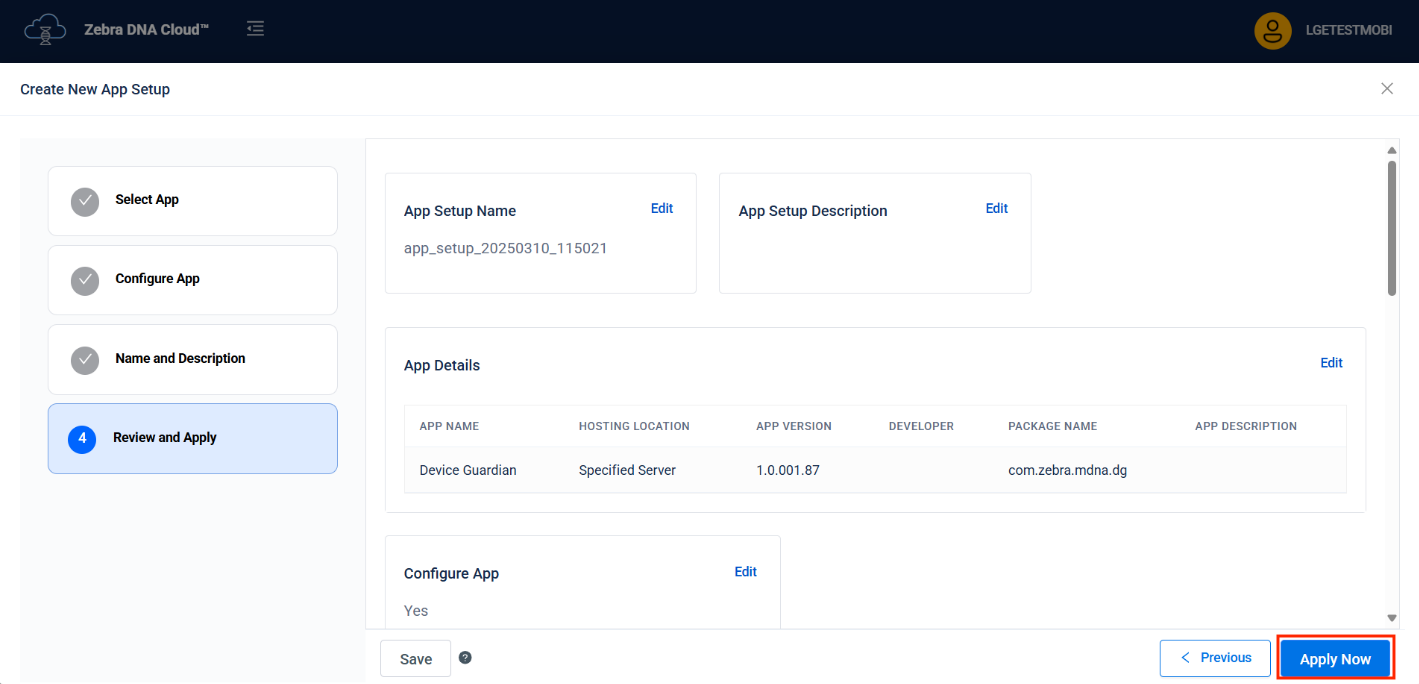
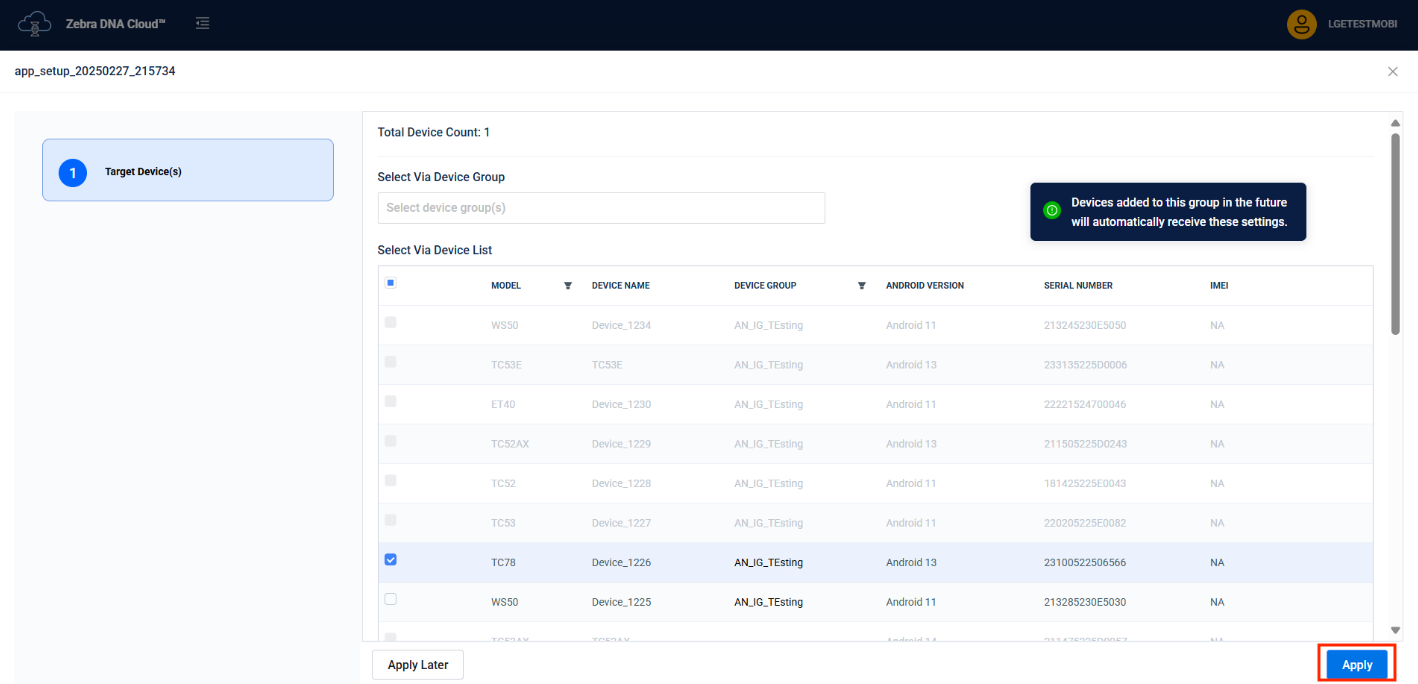
- Click Apply Now.
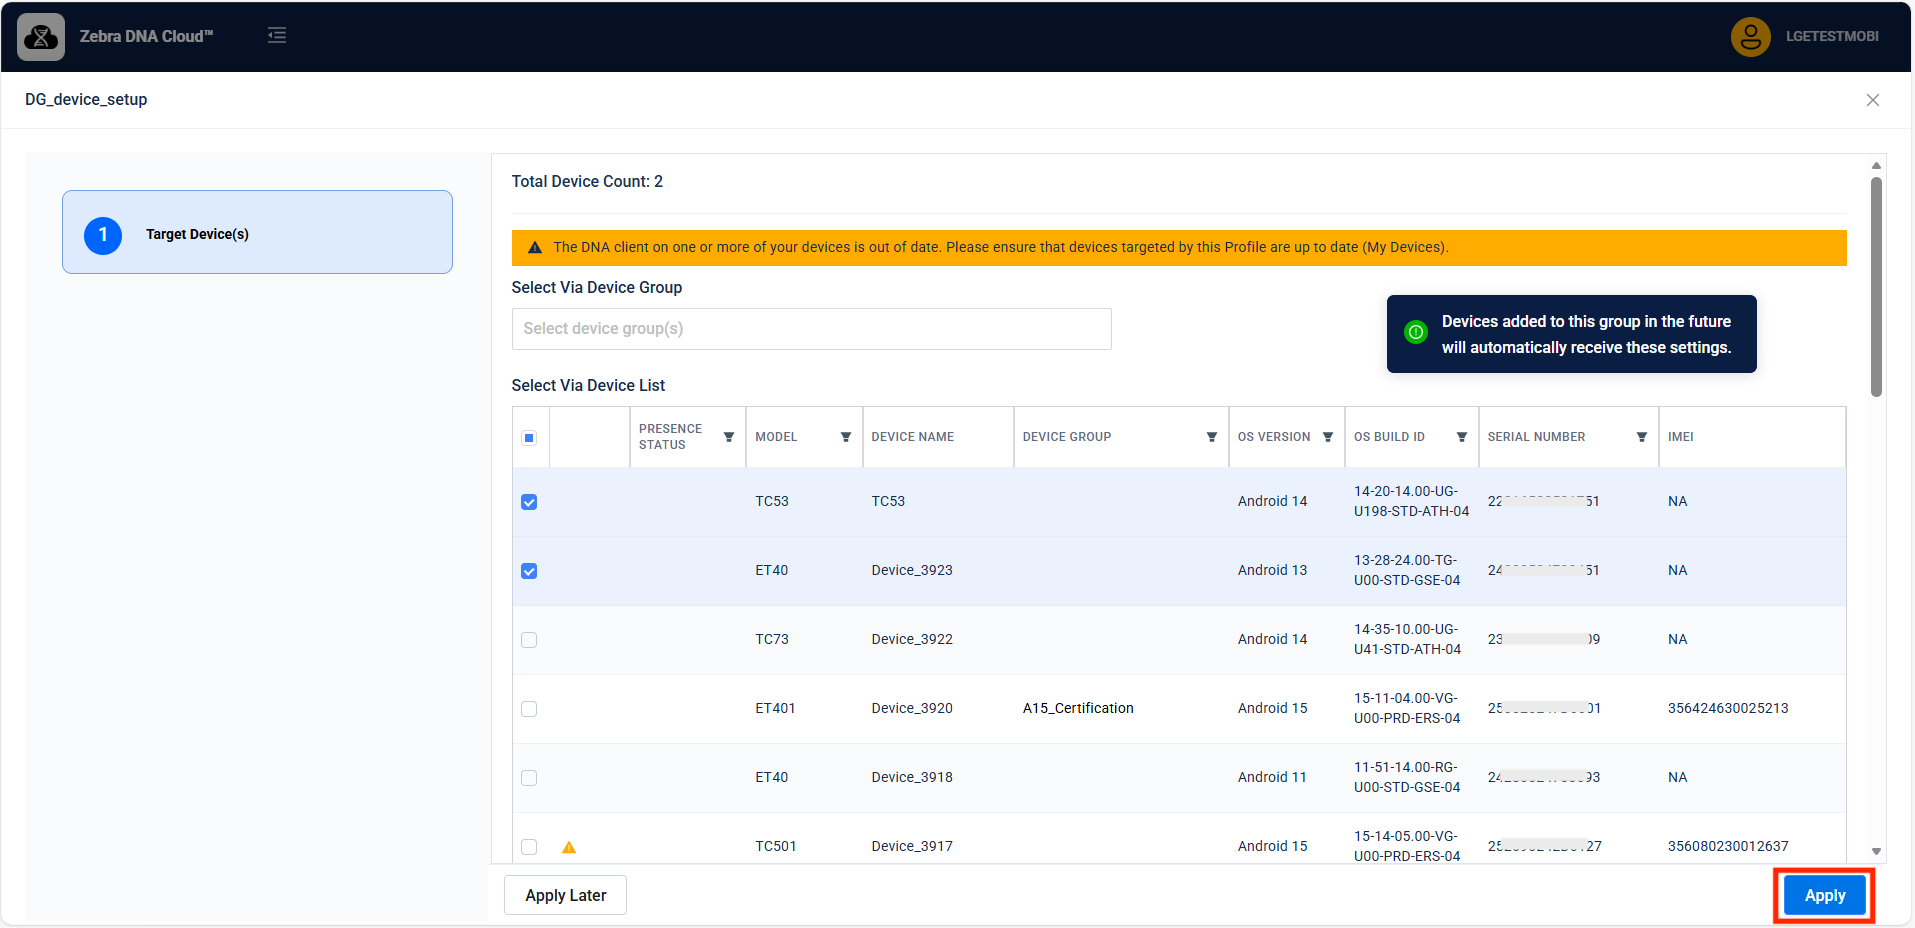
- Select the target devices, then click Apply.

Part III: Enroll Device to DG/DGAM
Choose one of these methods to enroll devices in DG/DGAM:
- Option 1: StageNow Barcode: Enroll device with the scan of a barcode using StageNow.
- Option 2: XML File Use Zebra DNA Cloud to deploy XML settings.
- Option 3: Managed .Config File: Deploy settings through Zebra DNA Cloud's Managed Configuration framework.
Option 1: StageNow Barcode
Use this method to enroll a device with the DG/DGAM server by scanning a barcode.
- Download the device enrollment barcode
.pdffile from the Download Kit. - Launch the StageNow client on the device.
- Scan the barcode.
- If applicable, repeat these steps for the following:
- Kiosk - Use the enrollment barcode for kiosk
- Device Tracker - For devices with Device Tracker, use the Device Tracker enrollment barcode for device. Repeat this for Kiosks if needed.
Option 2: XML File
Use this method to deploy the enrollment settings via XML (with OEMConfig) through ZDNA Cloud. This enrolls the device with the DG/DGAM server.
- Download the XML Configuration for Device
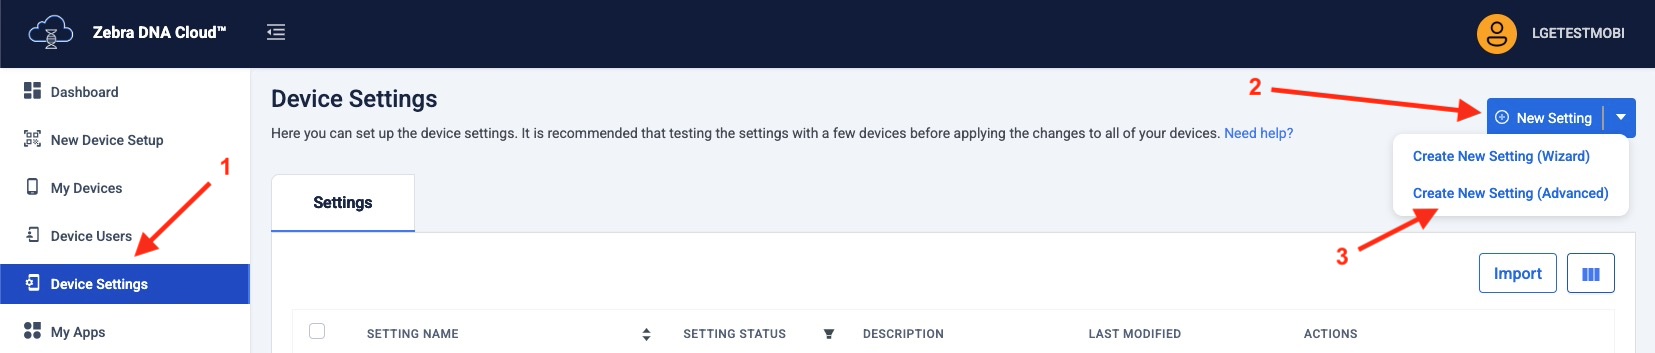
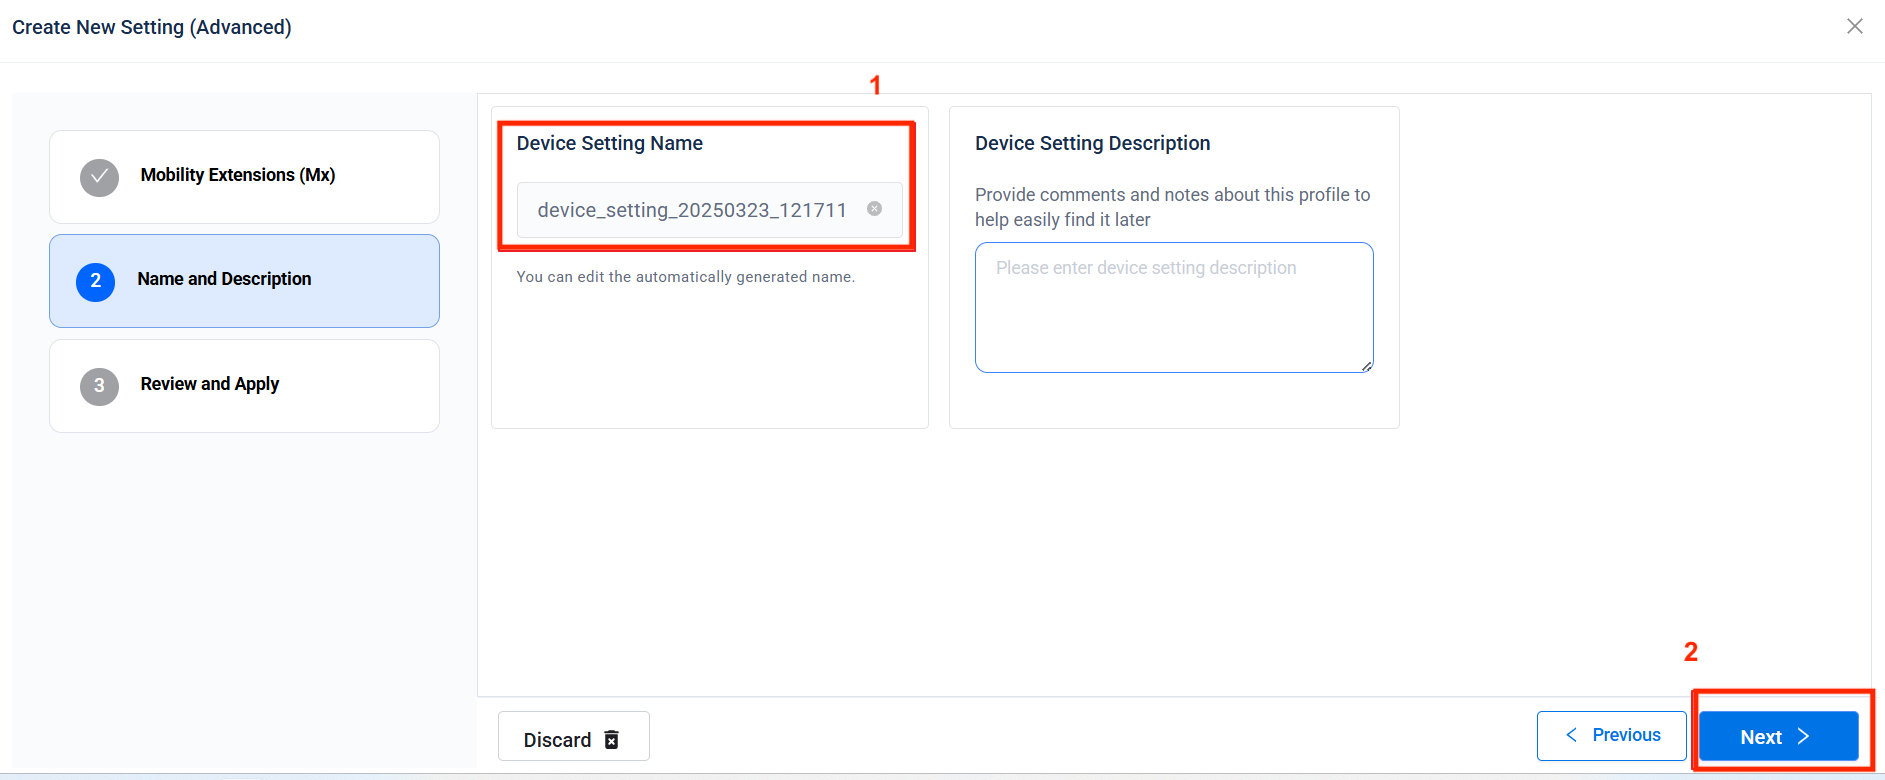
.xmlfile from the Download Kit. - In the ZDNA Cloud console, navigate to Device Settings and click Create New Setting (Advanced).

- Under Mobility Extensions (Mx), select System Configuration. Enable Pass Through Command. Copy the contents of the downloaded device
.xmlfile and paste it into the command field, then click Next.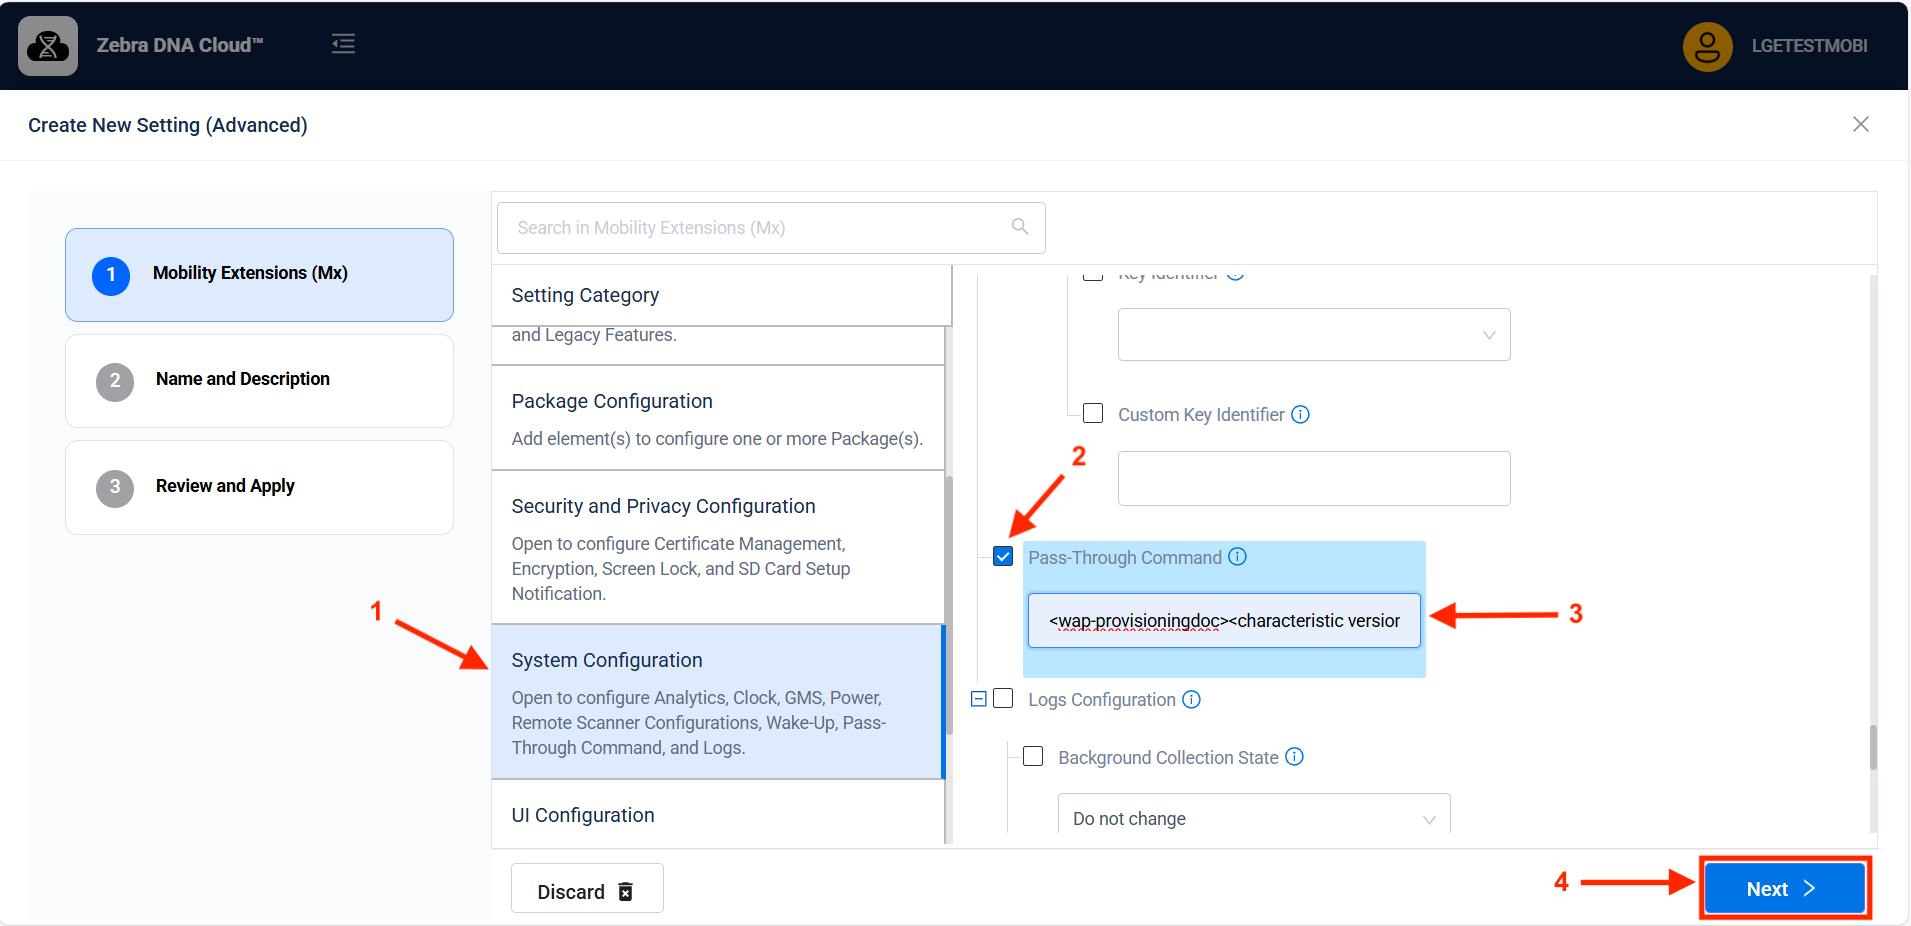
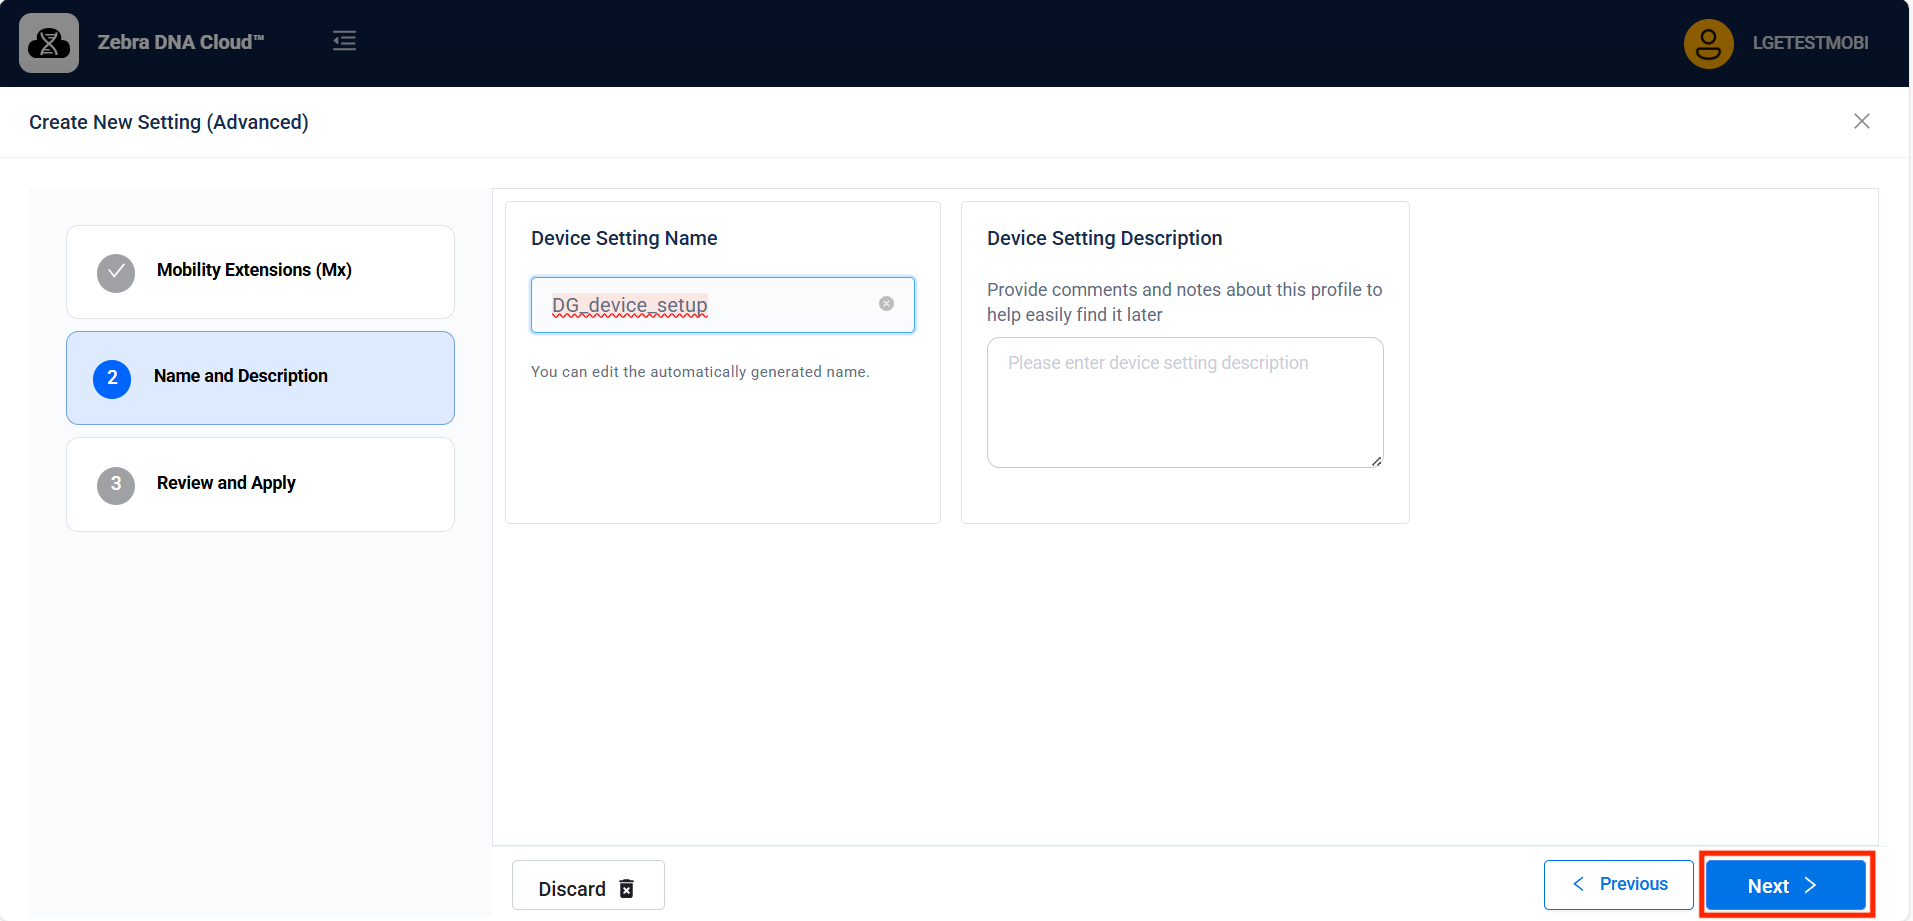
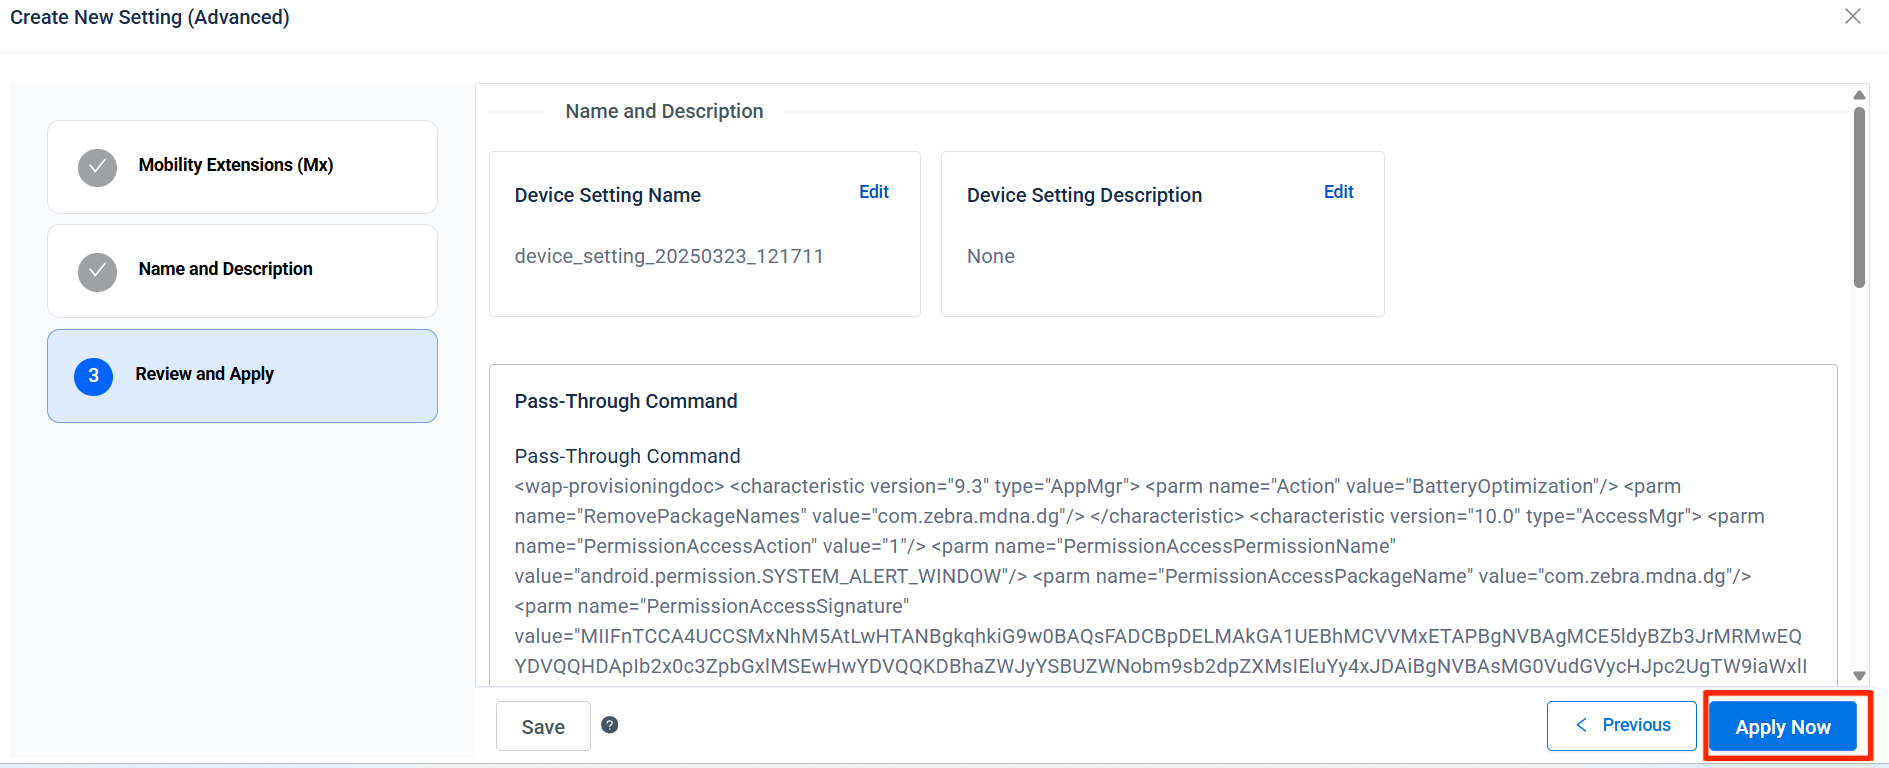
- If desired, enter the a description for the setting, then click Next.
- Click Apply Now.

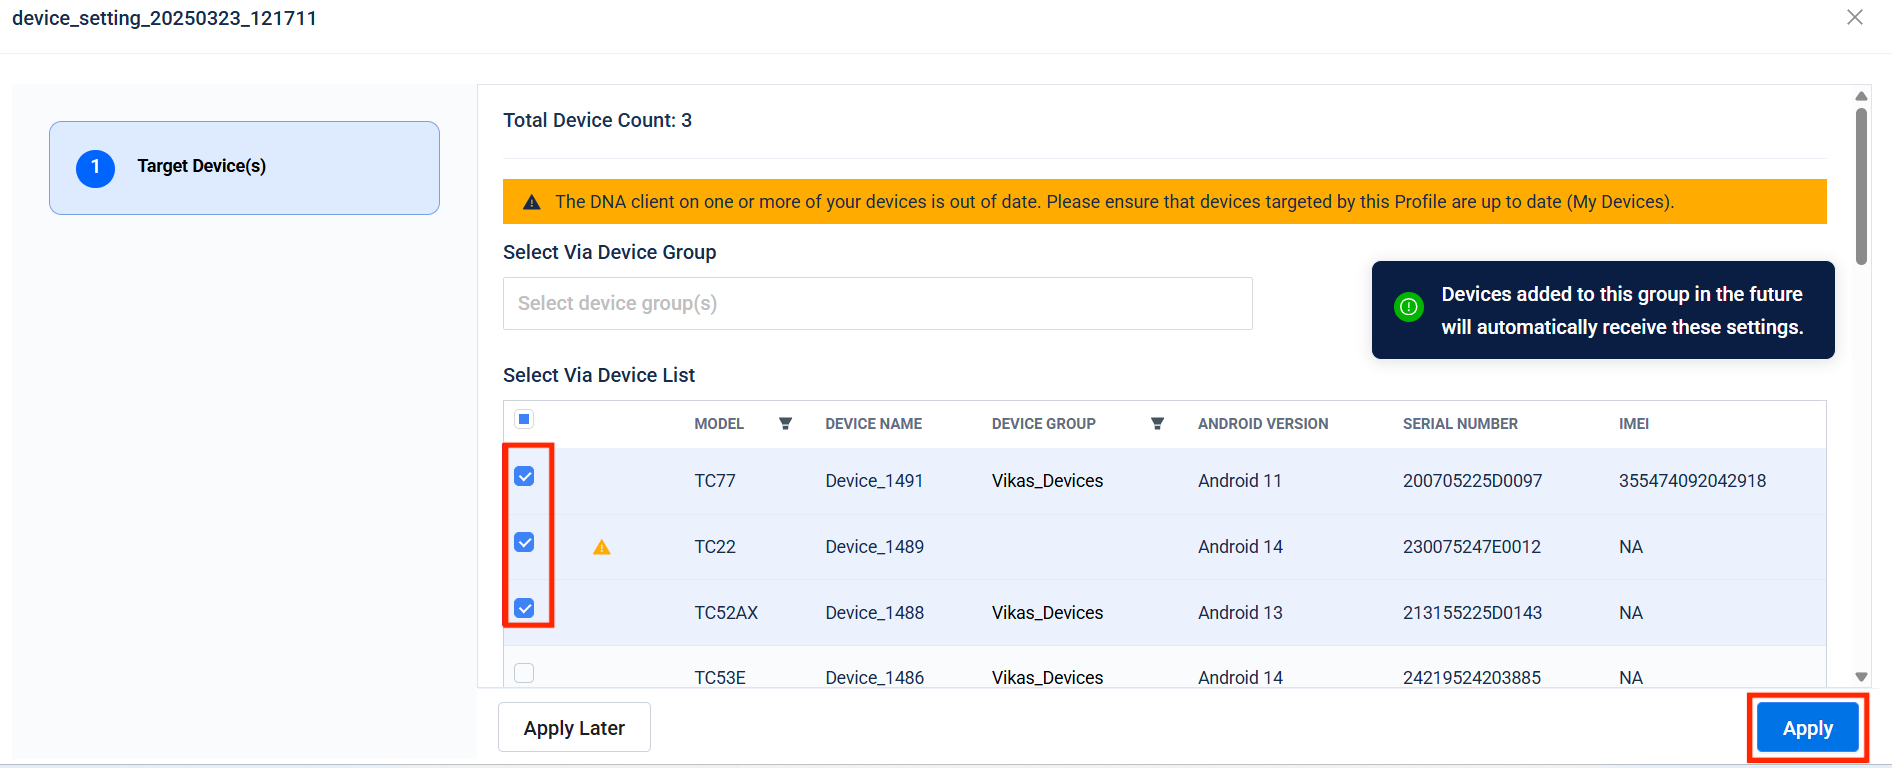
- Select the target device(s) to deploy the settings to, then click Apply.
- Create separate settings for any additional components. If applicable, repeat steps 1 to 6 to create new, separate settings for the following files from the Download Kit:
- XML Configuration for Kiosk - For standard kiosk enrollment.
- Device Tracker XML Configuration for Device - For transitioning devices from a previous Device Tracker installation.
- Device Tracker XML Configuration for Kiosk - For transitioning kiosks from a previous Device Tracker installation.
Option 3: Managed .Config File
Use this method to deploy the enrollment settings via Managed Configurations in ZDNA Cloud. This enrolls the device with the DG/DGAM server.
Create and apply a Device Guardian Managed Configurations policy, which installs Device Guardian on the device and enrolls it in the Device Guardian server:
- Download the
.configfile from the Download Kit. Its contents is required for a later step. - In the ZDNA Cloud web portal, click My Apps.
- If adding Device Guardian for the first time, click Add App.
- If a new Device Guardian app version is needed, click Add Version.
- Select the appropriate hosting location, provide the details, and click Upload.
- The application version is added. Click Setup.

- Click Next.
- Click Yes to configure the app.
- Select or enter the required Device Guardian Managed Configurations; for information on these settings, see Managed Configurations. If using the Managed Configuration method, ensure the following Server Connectivity settings are configured before clicking Next:
- Server Connectivity Settings: [Copy and paste the content from the Managed Configurations
.configfile from Part II (Method 2).]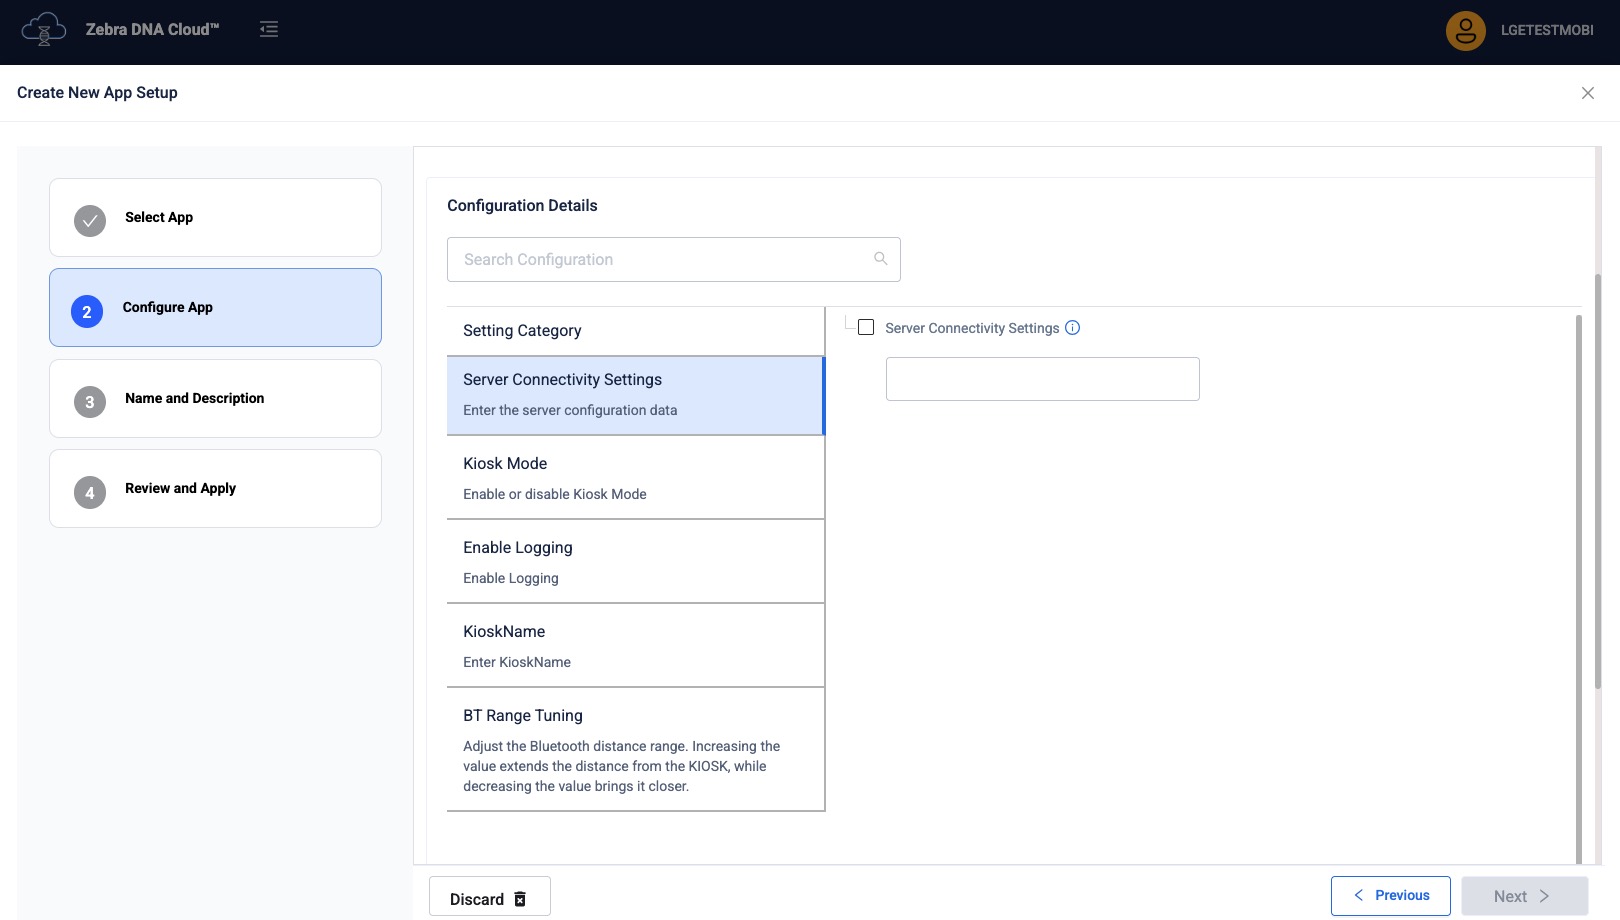
- Server Connectivity Settings: [Copy and paste the content from the Managed Configurations
- Enter a description for the setup and click Next.
- Review the settings and click Apply Now.
- Select the target device(s). Click Apply.
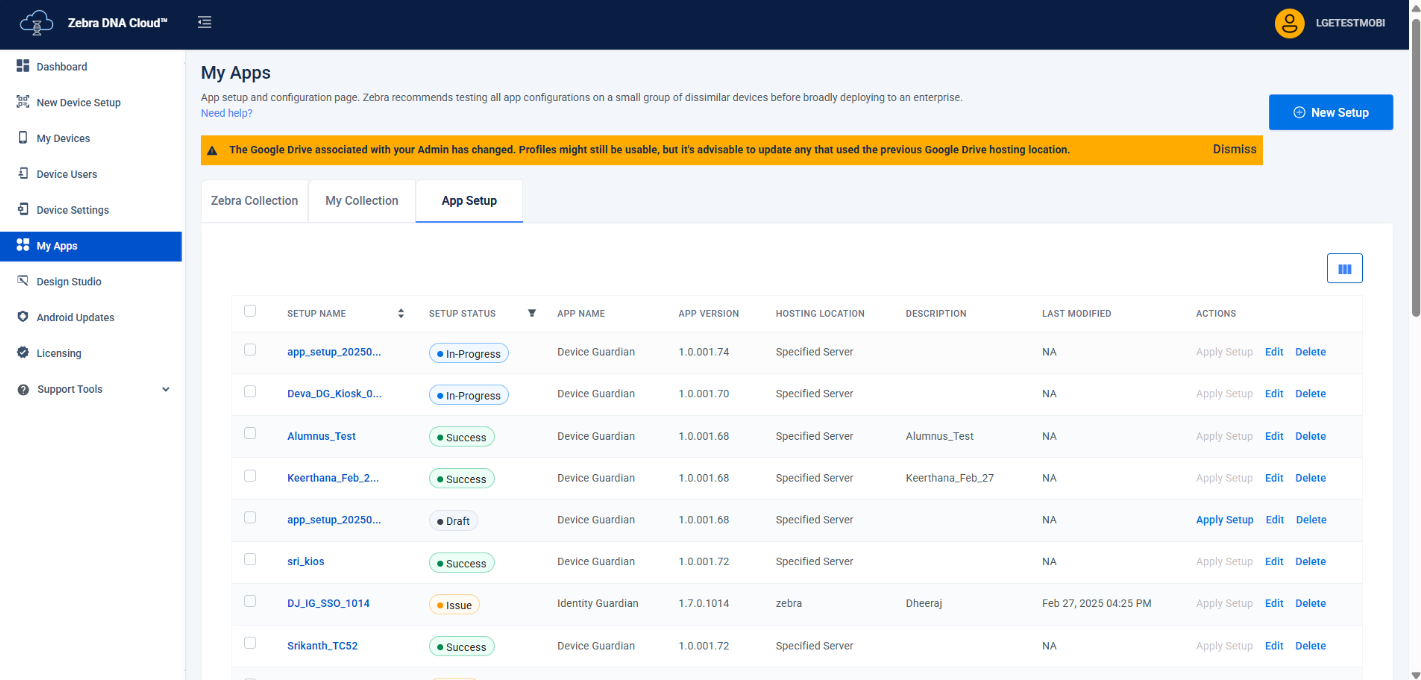
- The device(s) is listed under the App Setup tab with the status of applying the configuration. Once complete, "Success" is displayed as the status.
Part IV: Send Intents (Android 11 Only)
For Android 11 devices, intents must be sent to grant the necessary permissions and start Device Guardian, allowing the configurations to be applied:
- Download the DeviceGuardian.xml file, which will be needed in a later step.
- In the ZDNA Cloud web portal, go to Device Settings. Click New Setting, then Create New Setting (Advanced).
- Select System Configuration. Enable Pass-Through Command and paste the content from
DeviceGuardian.xmlinto the text field. Click Next.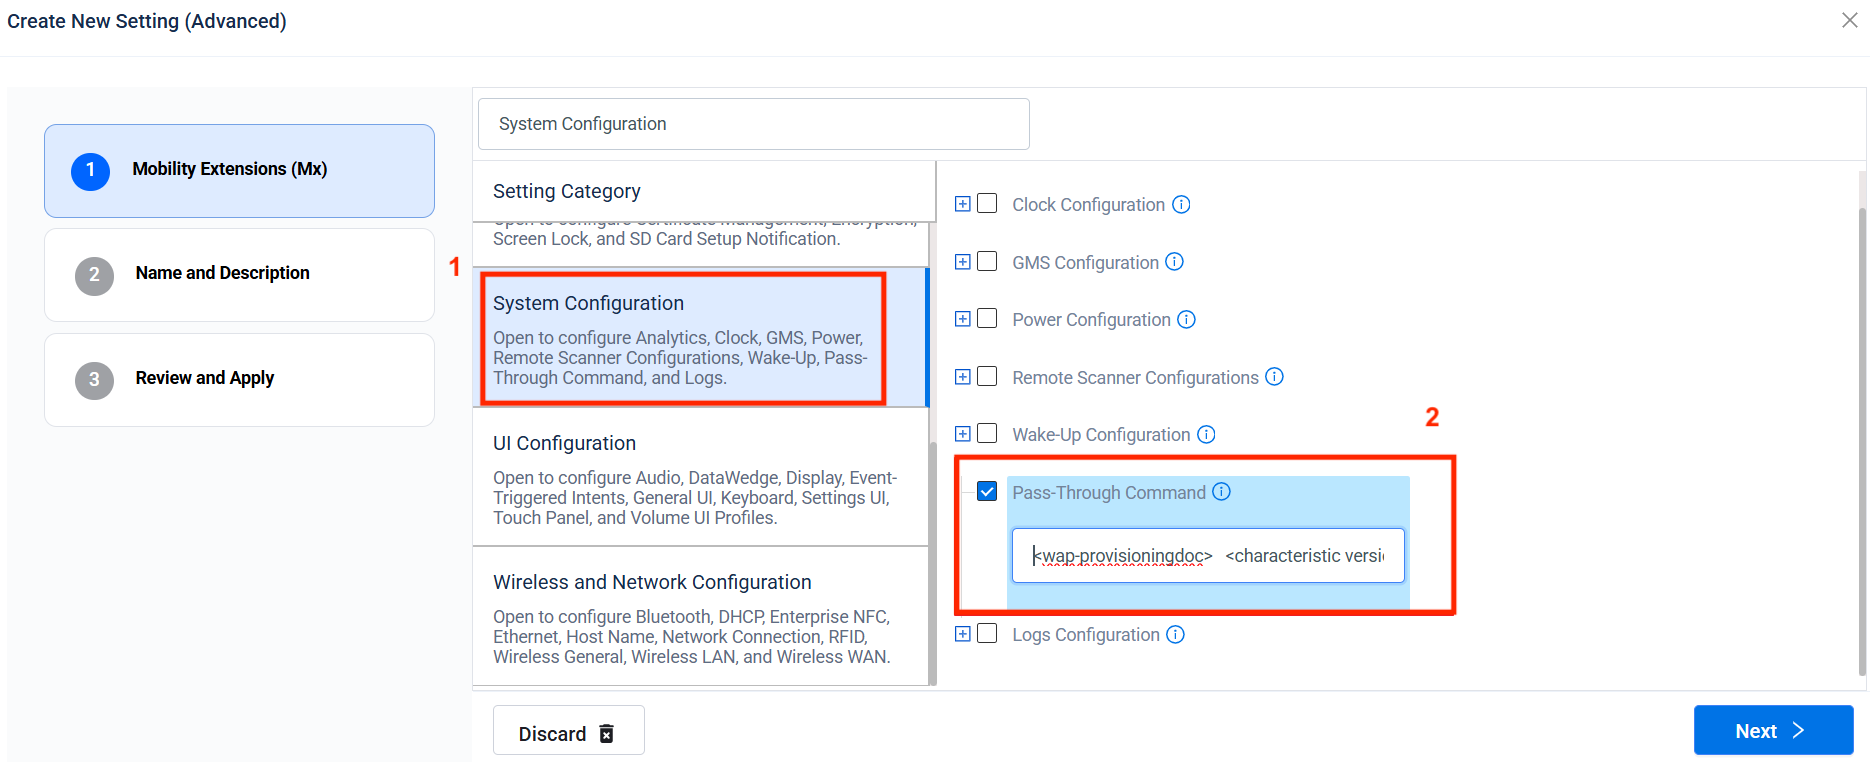
- Enter a Device Settings Name and Description, if needed, then click Next.
- Review the configuration settings. Click Apply Now.
- Select the target device(s) to apply the configuration. Click Apply.
Part V: Install & Configure Identity Guardian (DGAM Only)
Identity Guardian is required for user authentication when using DGAM. When adding device users via Bulk Upload, follow these steps.
- Create an App Setup Profile for Identity Guardian.
- Select Yes when prompted to Configure App.
- In the Usage Mode section, Select AUTHENTICATION.
- In the Authentication Configuration section, select the following:
- Comparison Source: CLOUD
- Primary Authentication Factor: CLOUD_PASSCODE
- Fallback Authentication Method: ADMIN BYBASS PASSCODE
- Select the remaining options as desired.
- Deploy the Profile to the target device(s).
After deployment, the device user experiences the following screen progression when logging in:
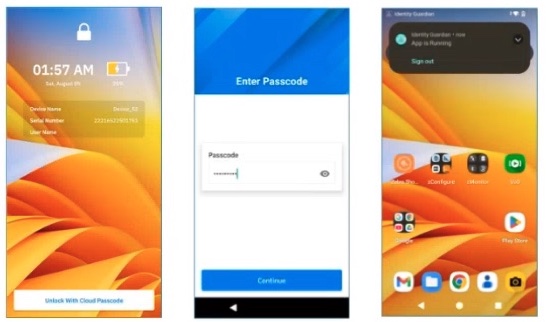
Identity Guardian login process
Part VI: Install & Configure the ZDNA Cloud Client App (DGAM Only)
The Zebra DNA Cloud client is required to add device users in DGAM.
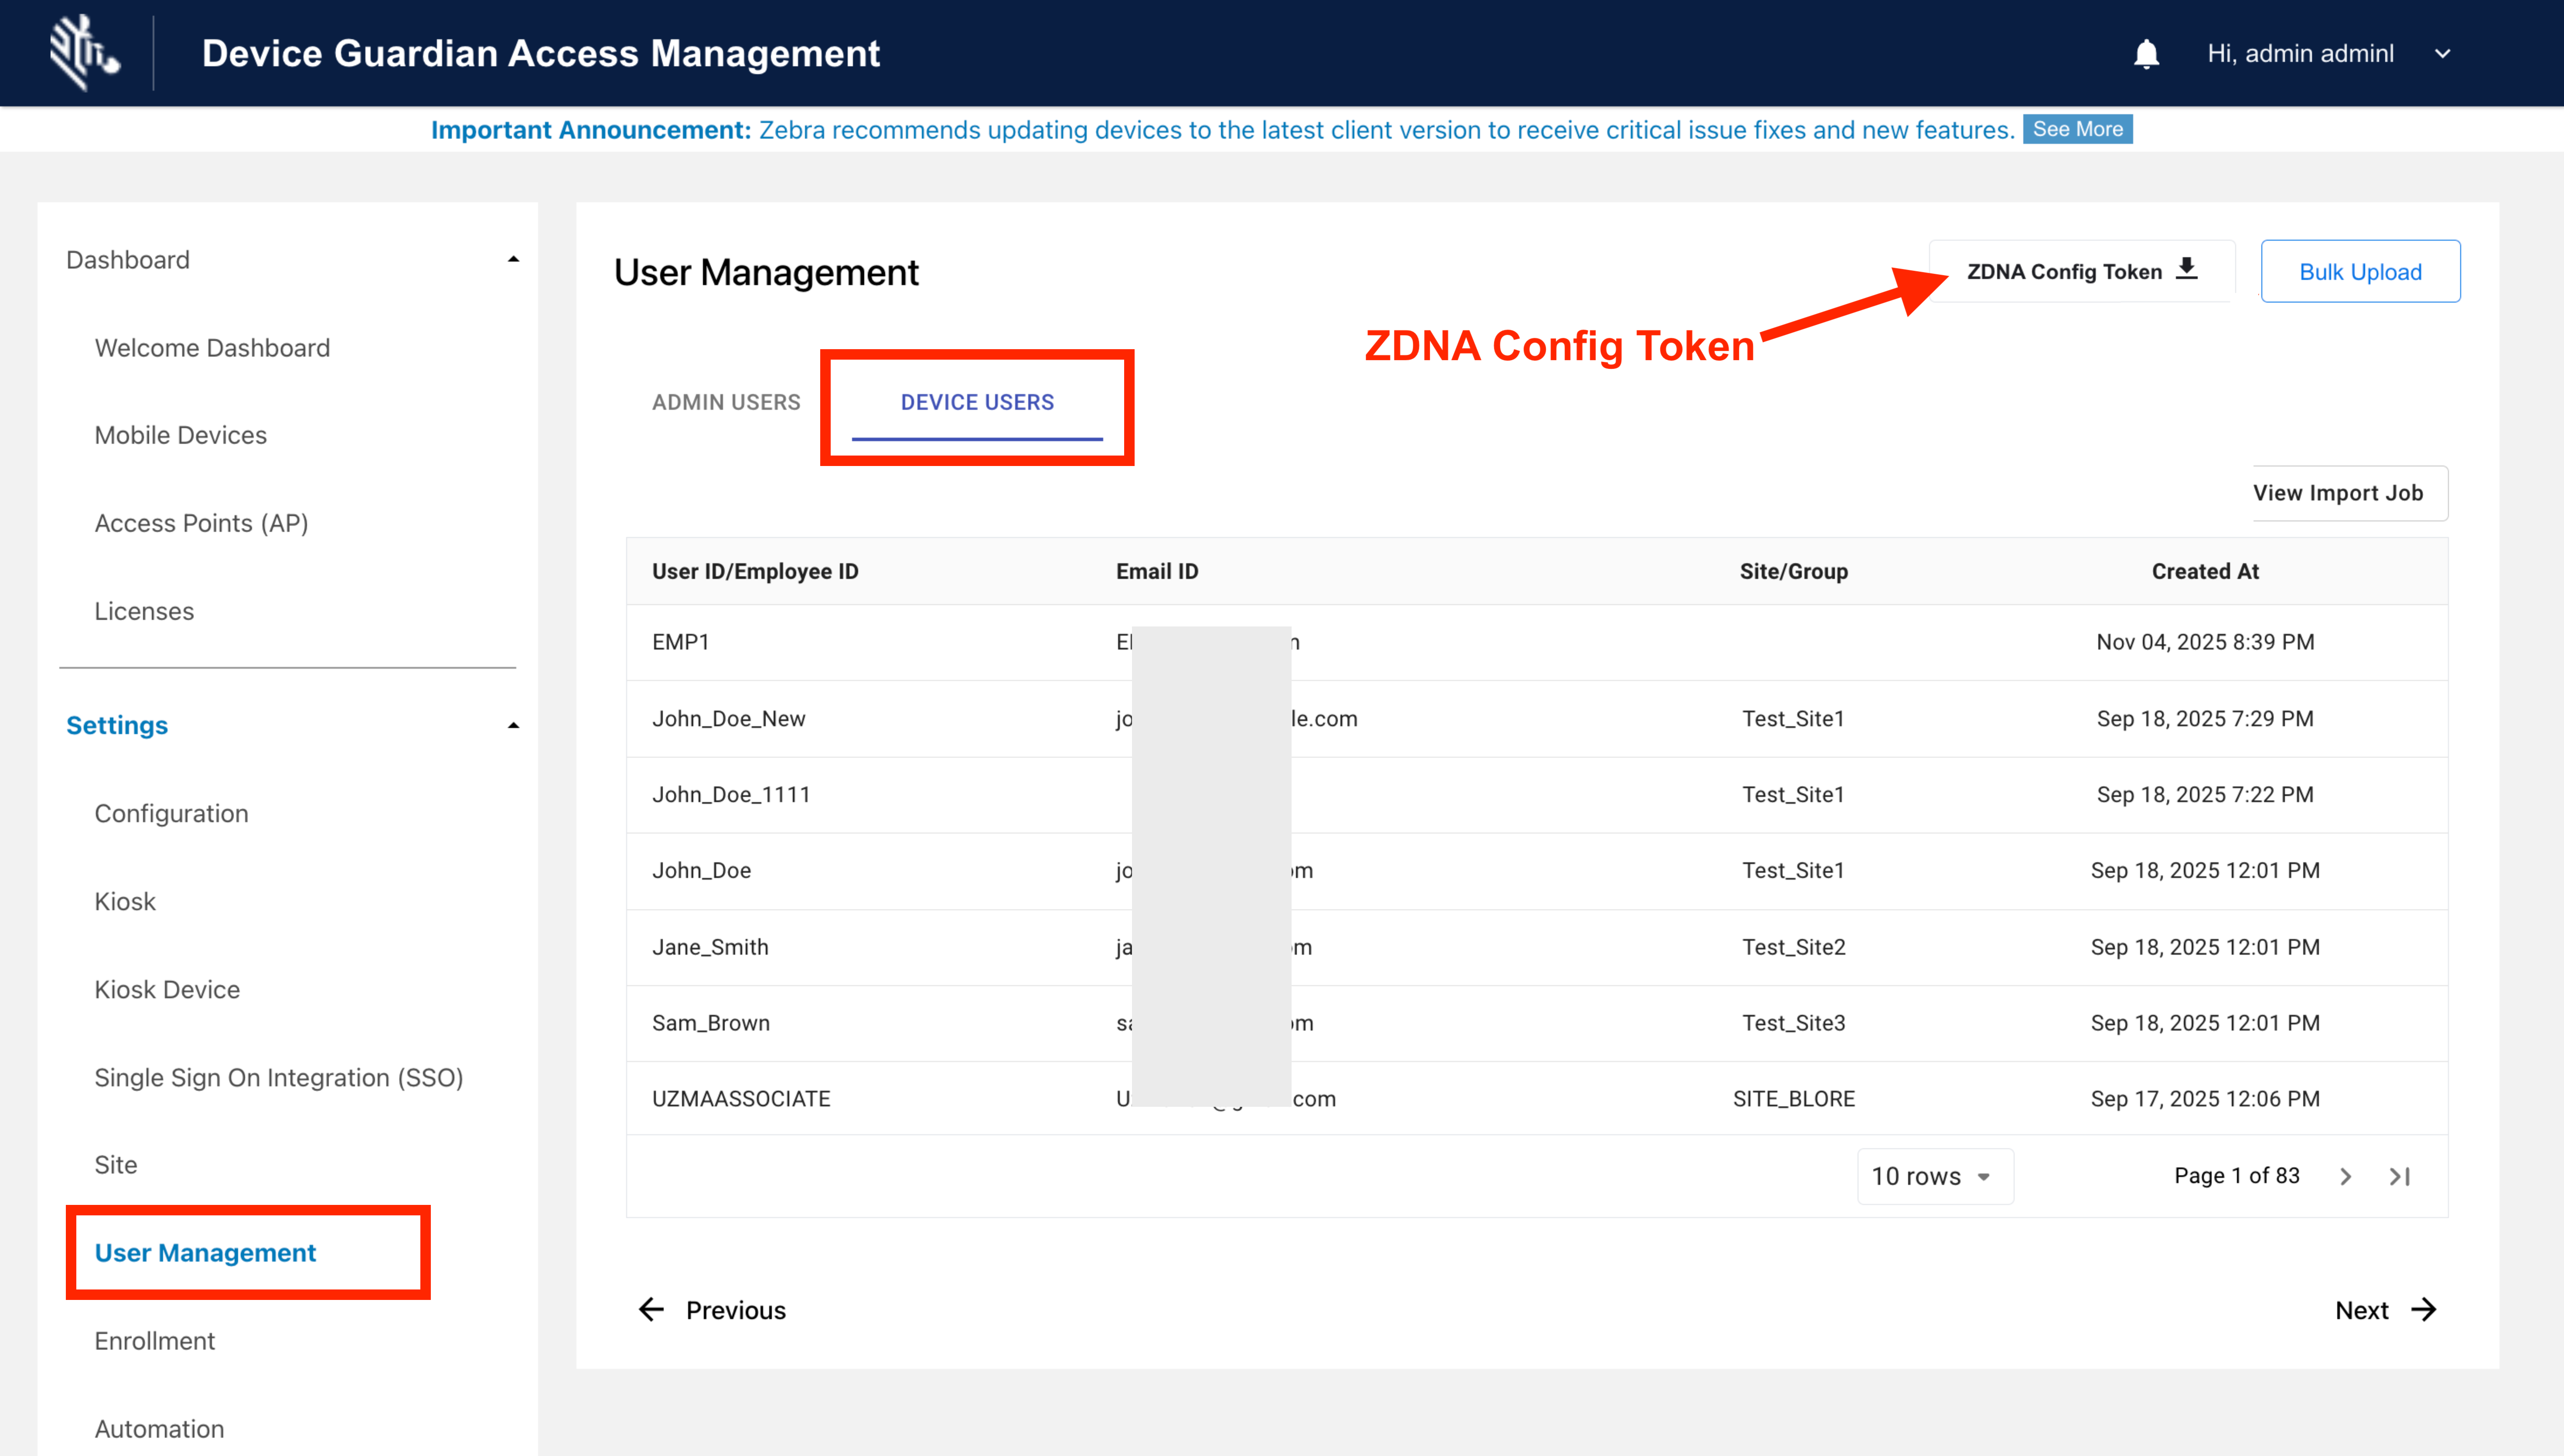
- Download the ZDNA Config Token:
- In the web portal, navigate to User Management > Device Users.
- Click ZDNA Config Token to download the file.
- Open the file and copy its contents.
- Apply the Token & Deploy the App via EMM: The general steps are provided below. For detailed instructions, see the Configure for a Mixed Population section within the ZDNA Cloud Setup guide and follow steps 1 to 3:
- Paste the copied token into Managed Configuration settings in ZDNA Cloud.
- Install and launch the app via EMM using one of these sources:
- Google Play
- Zebra.com
Using Microsoft Intune
Follow these steps to use Microsoft Intune to install Device Guardian from the Google Play Store and apply a policy that enrolls the device with the Device Guardian server.
Screen Variations Note: The screen UI may vary depending on the EMM version in use. Refer to your EMM user guide for additional guidance.
Part I: Enroll Device in Intune
Enroll the device in Microsoft Intune using the standard EMM procedure.
Part II: Install DG/DGAM
Install DG/DGAM via Google Play:
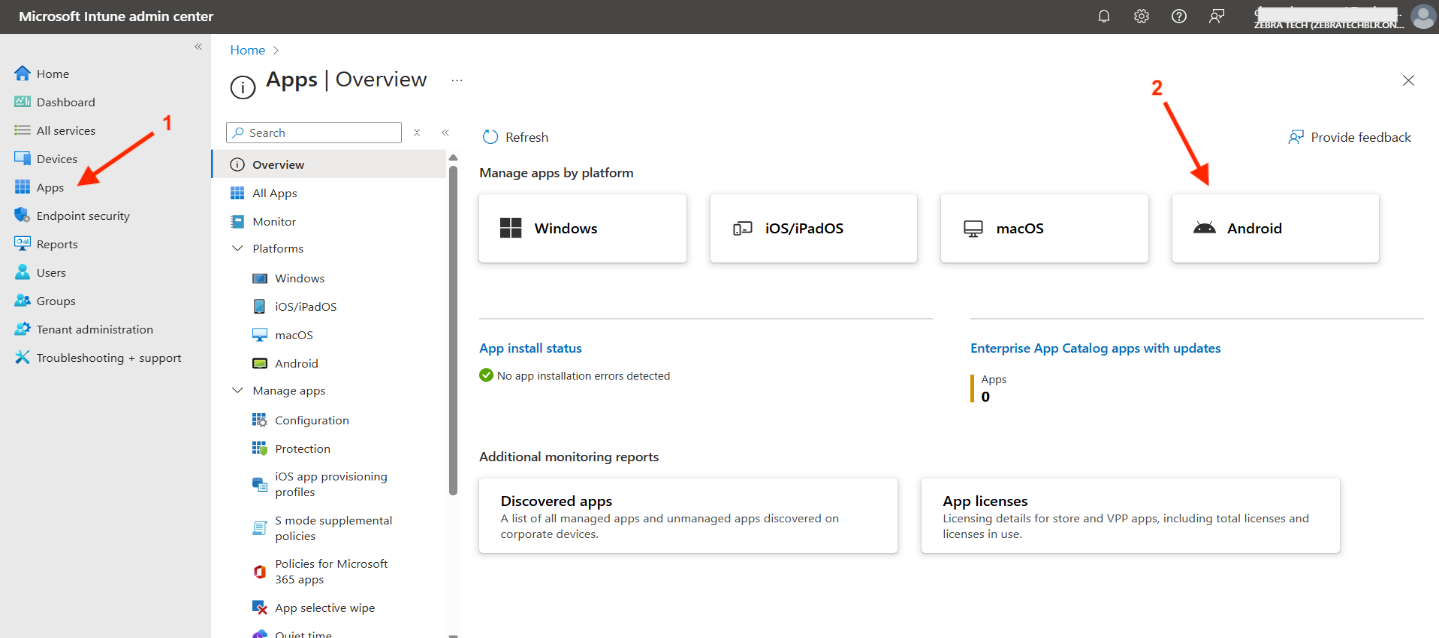
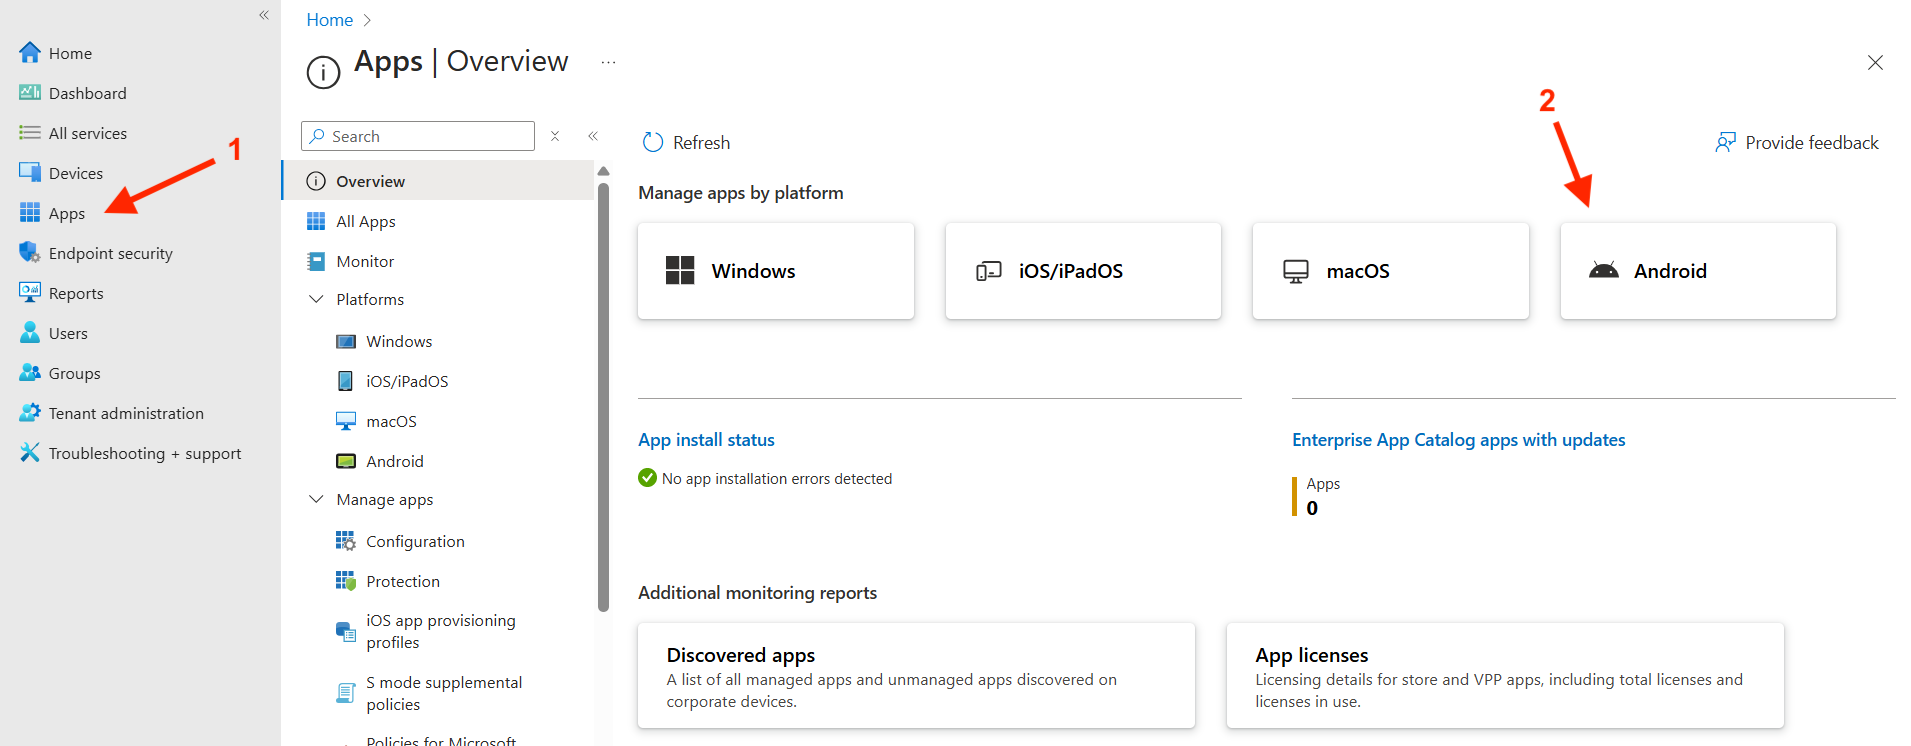
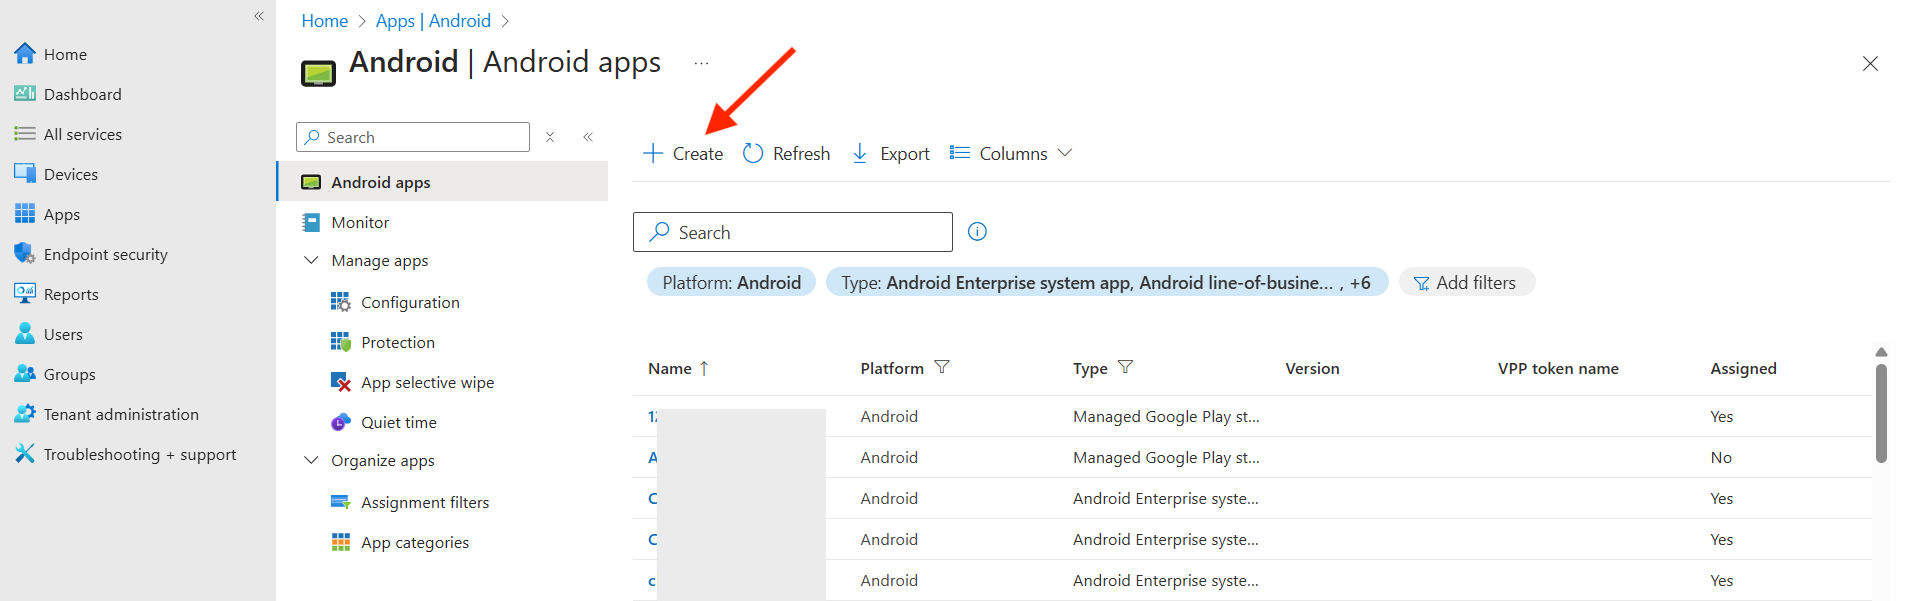
- In the Microsoft Intune web console, in Apps click Android.
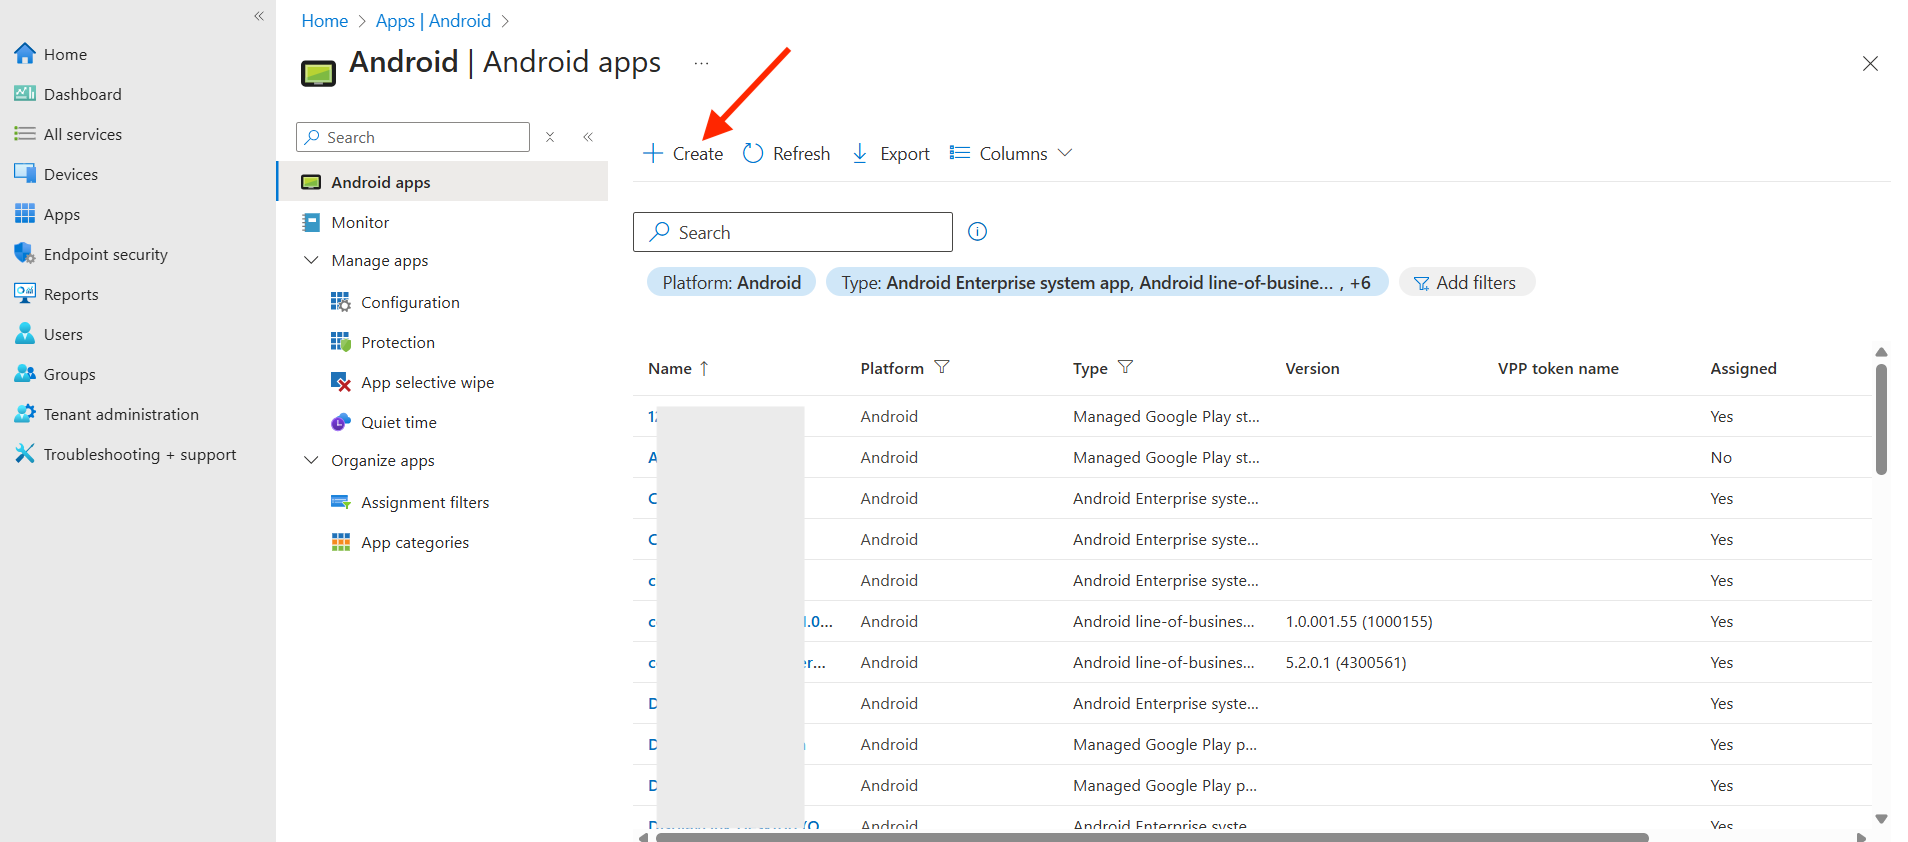
- Click Create.
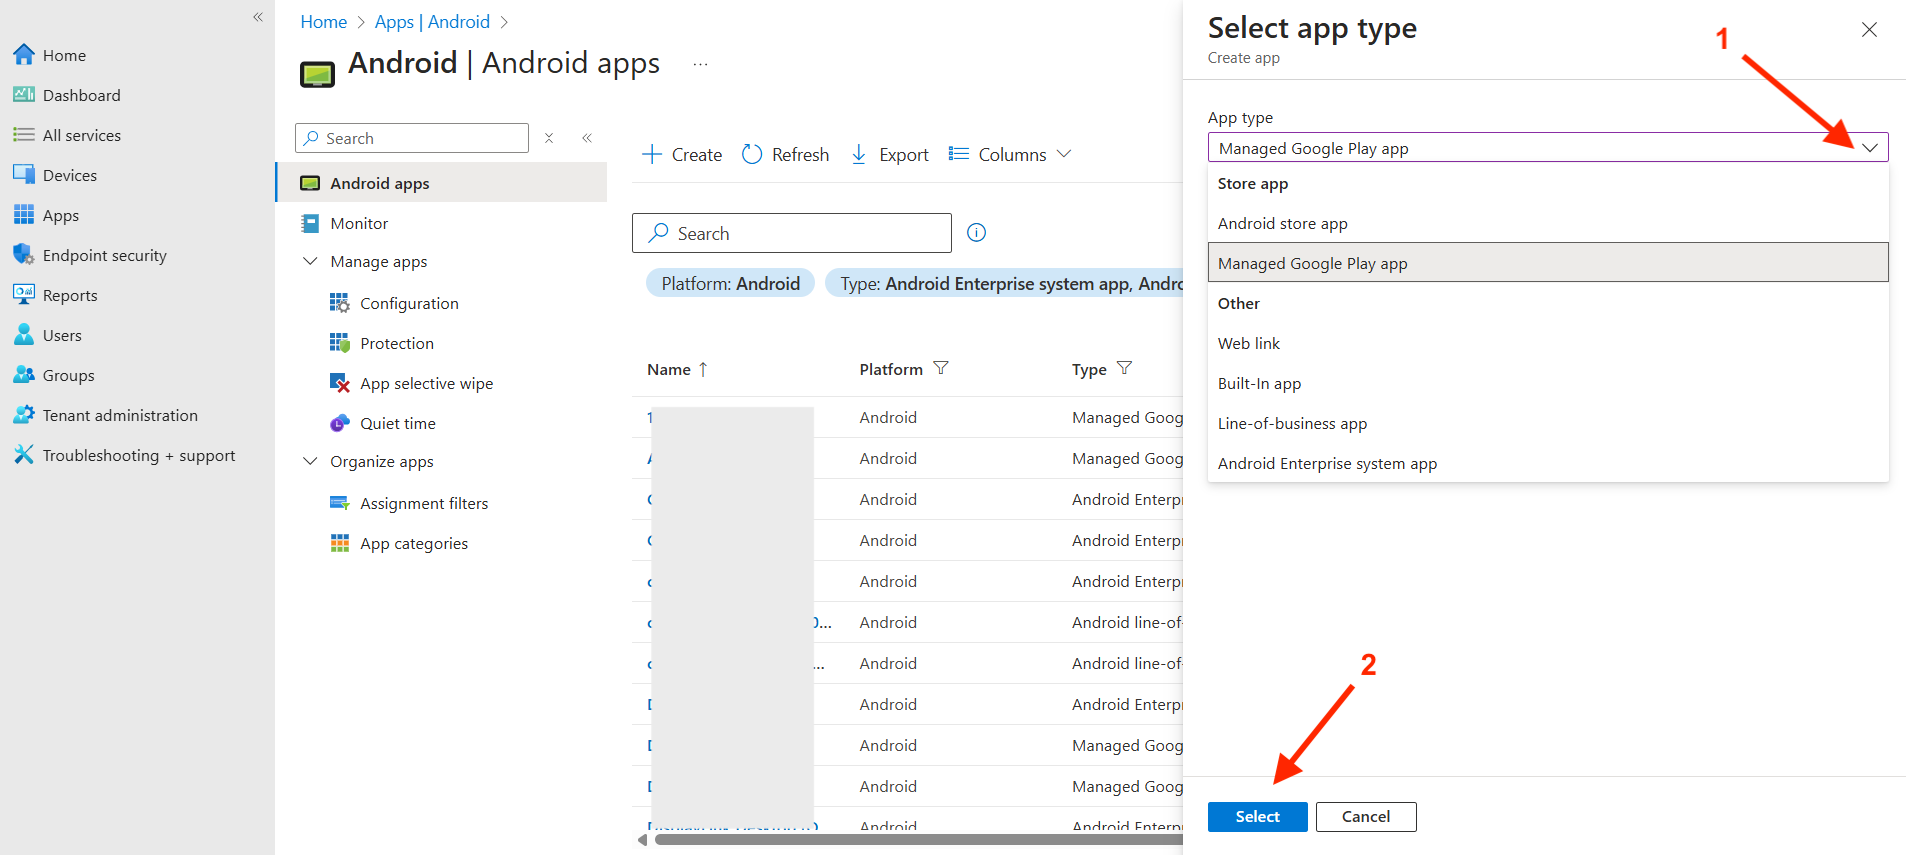
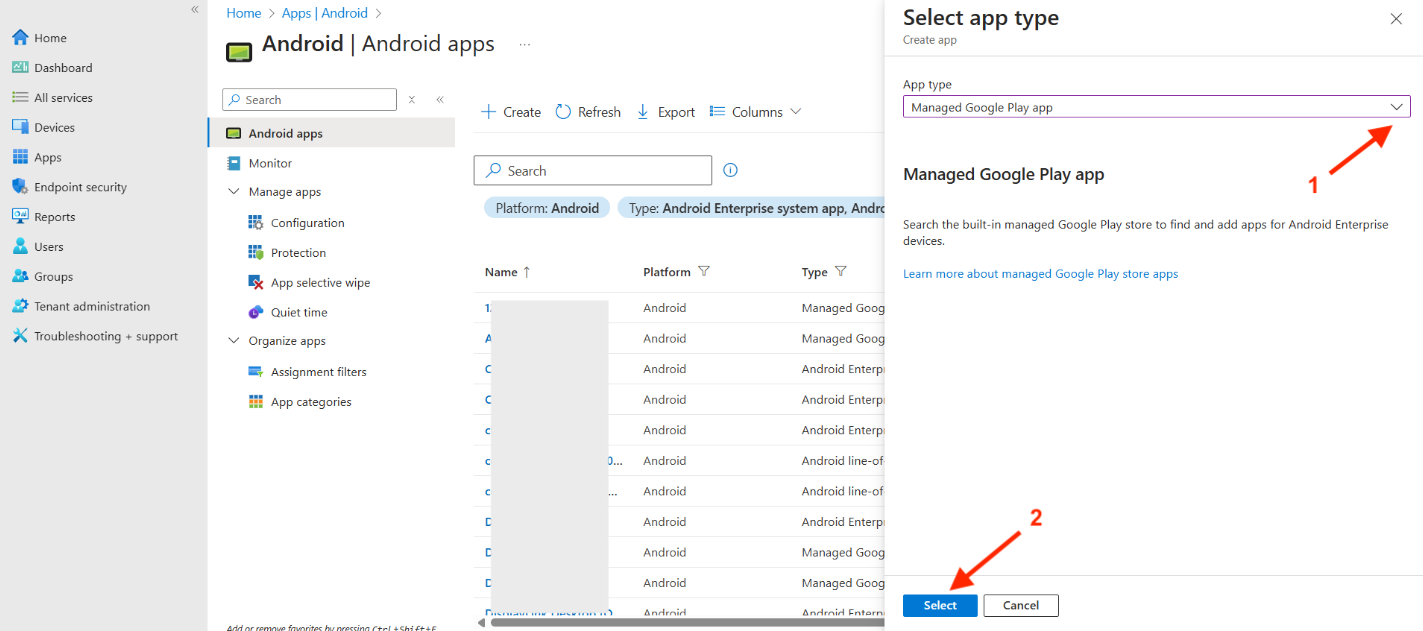
- From the dropdown, select Managed Google Play app, then click Select.
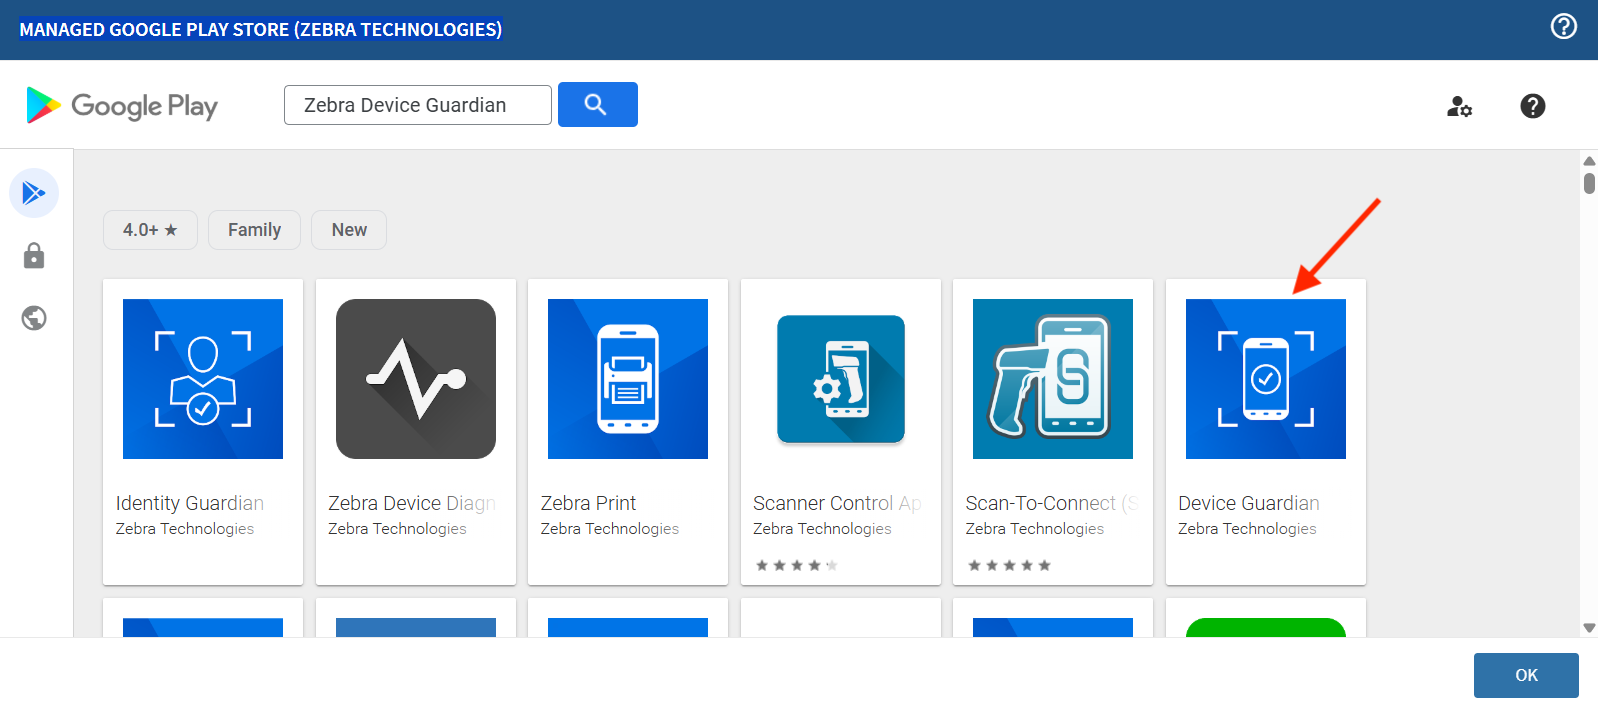
- Search for the Device Guardian app and click on it.
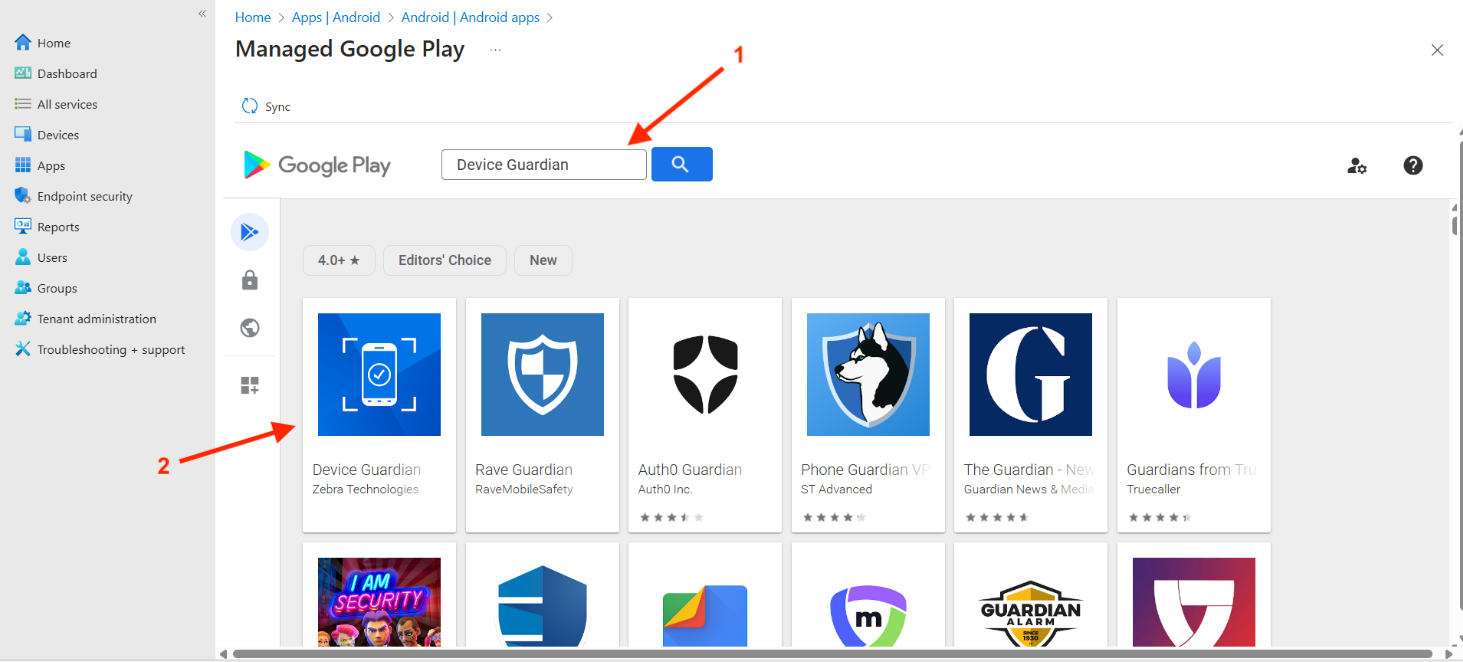
- Click Select, then click Sync.
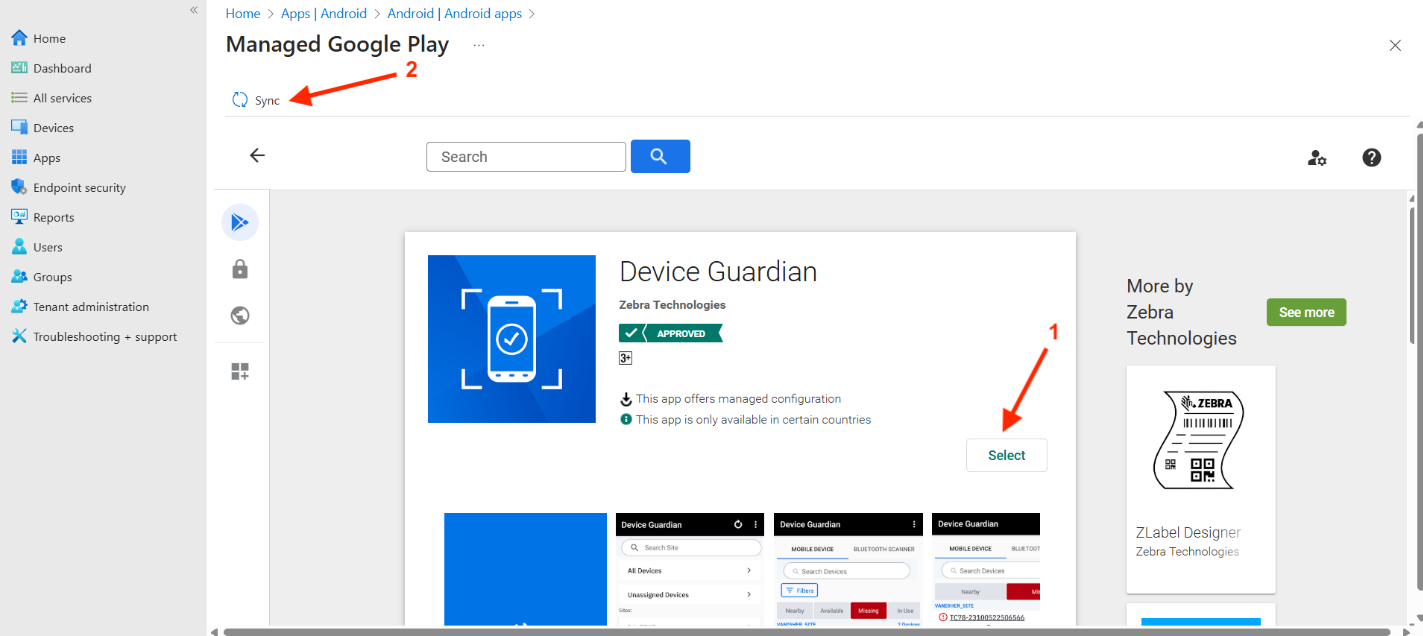
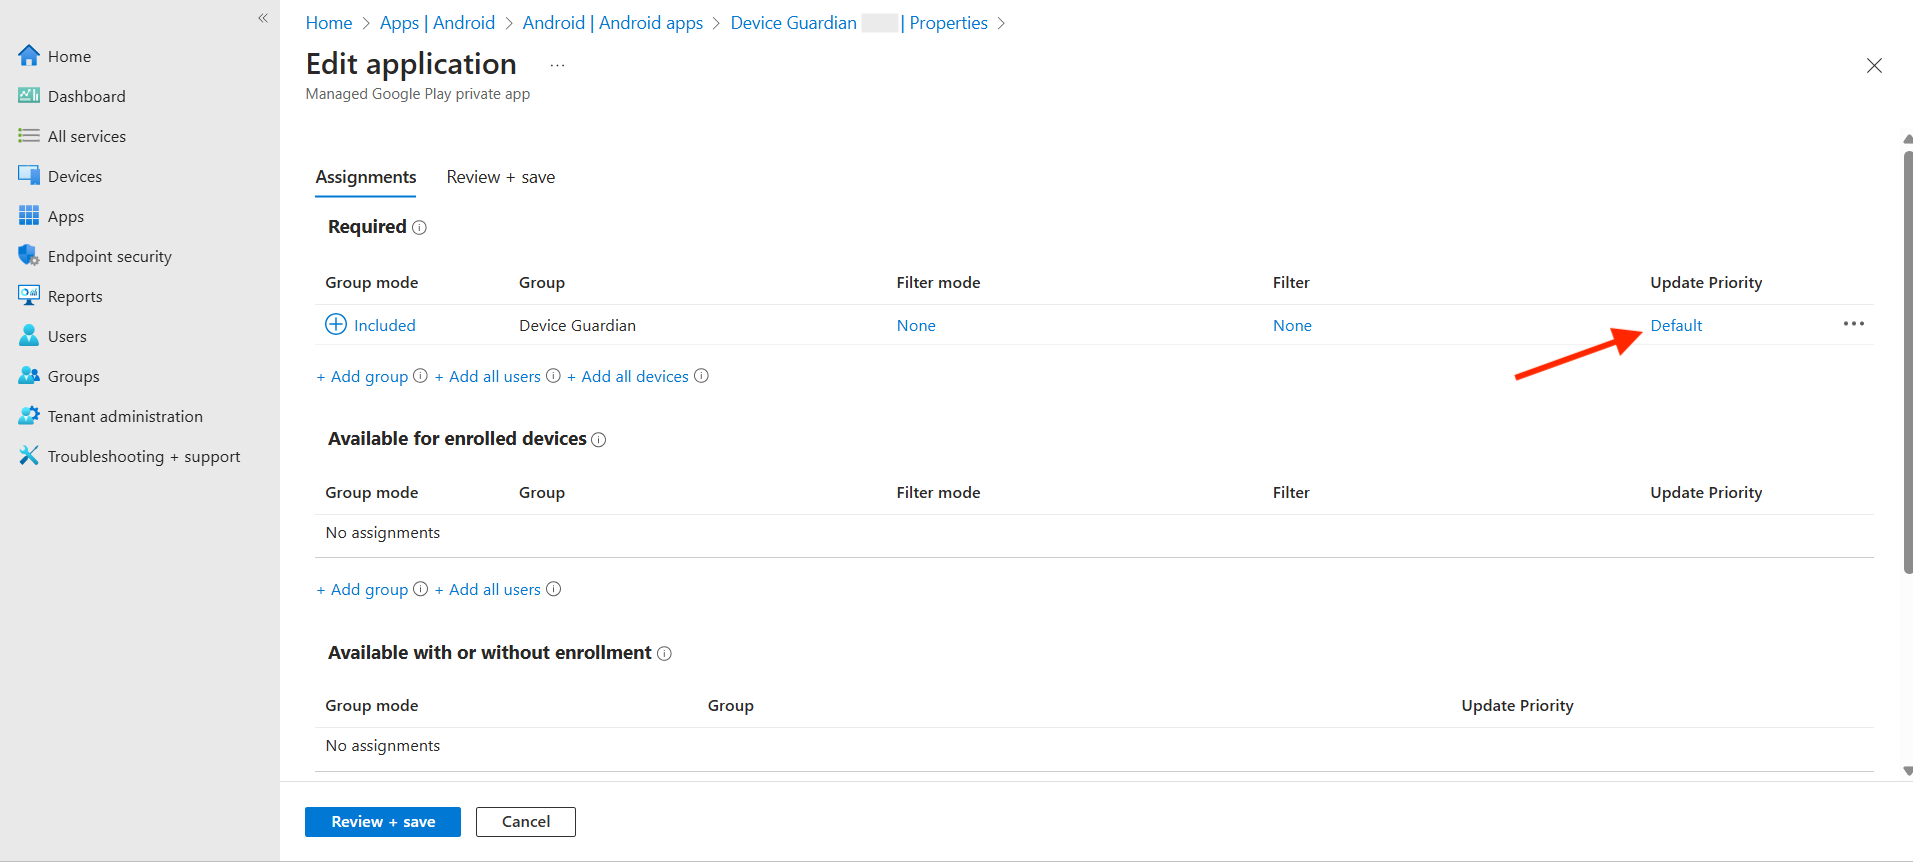
- The Device Guardian app is added to the Play Store. Click on the app in the list.

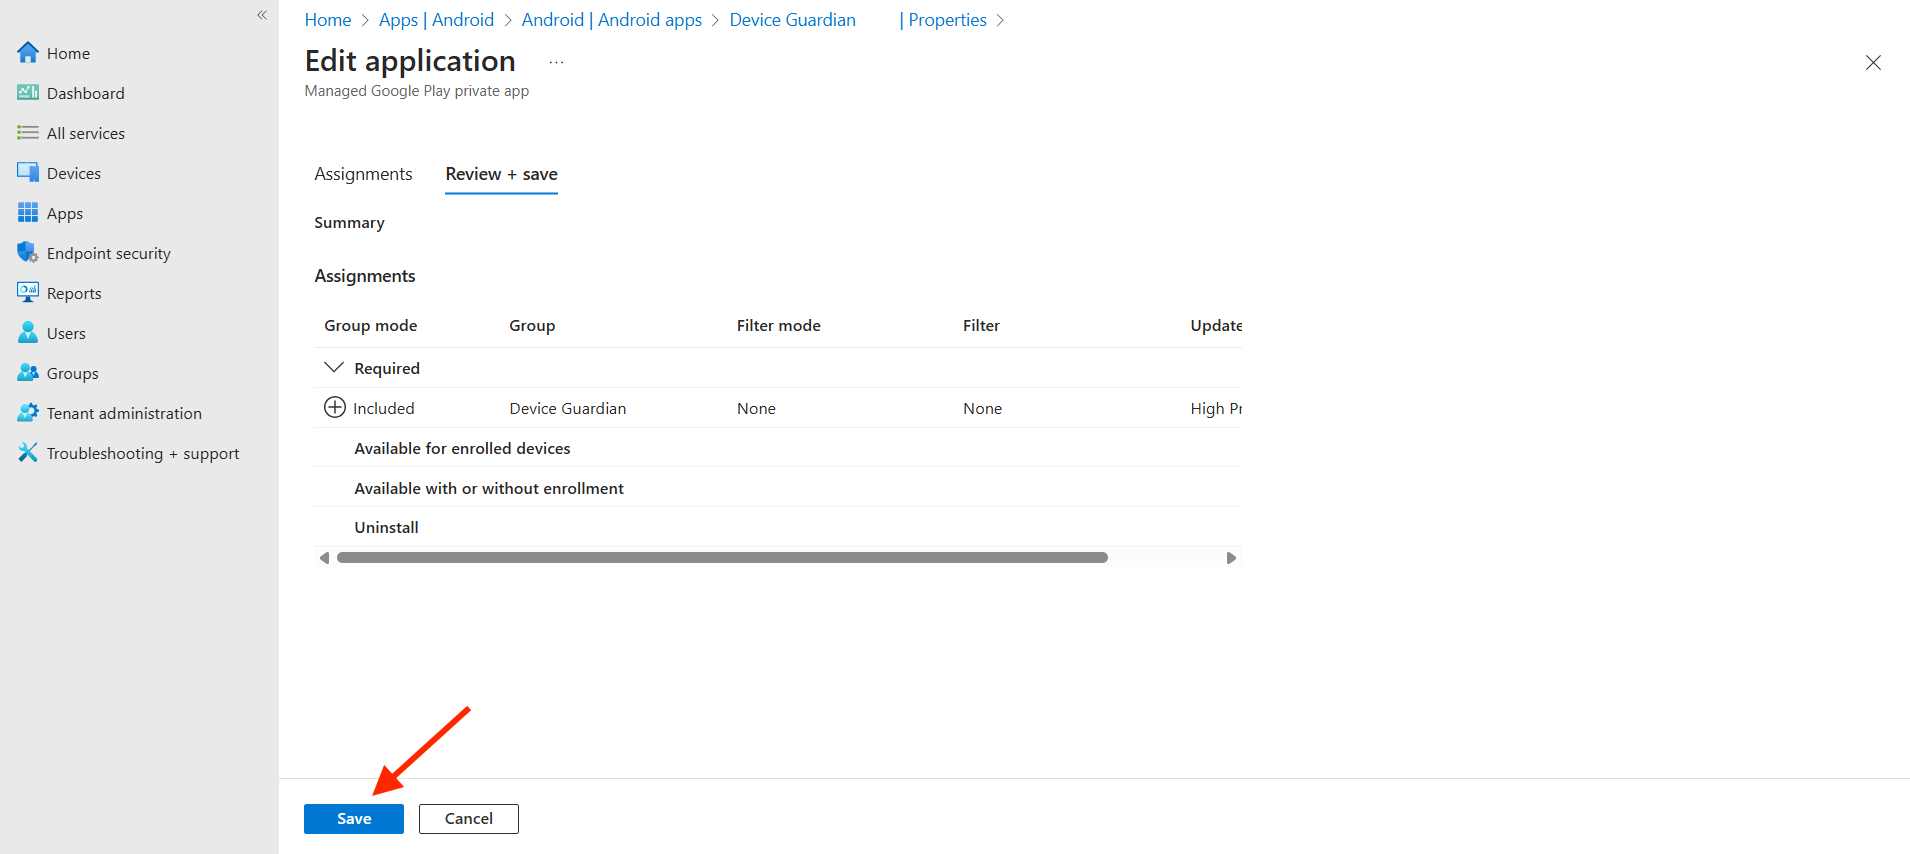
- Click on Properties and Edit near the Assignments section.
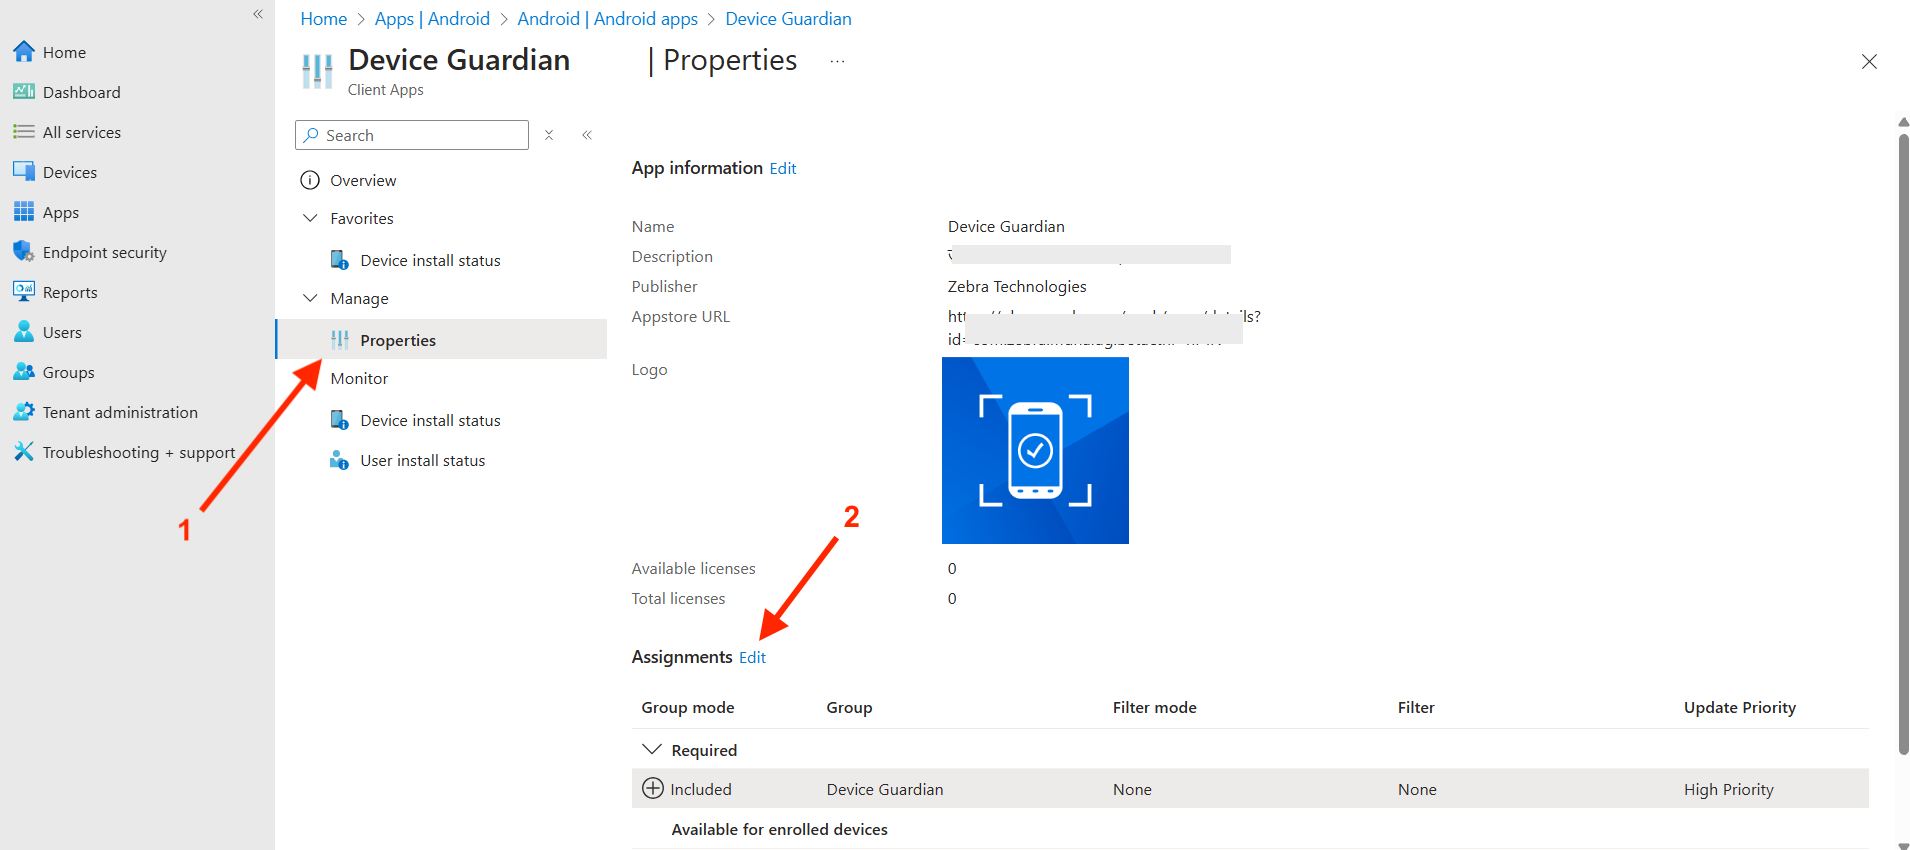
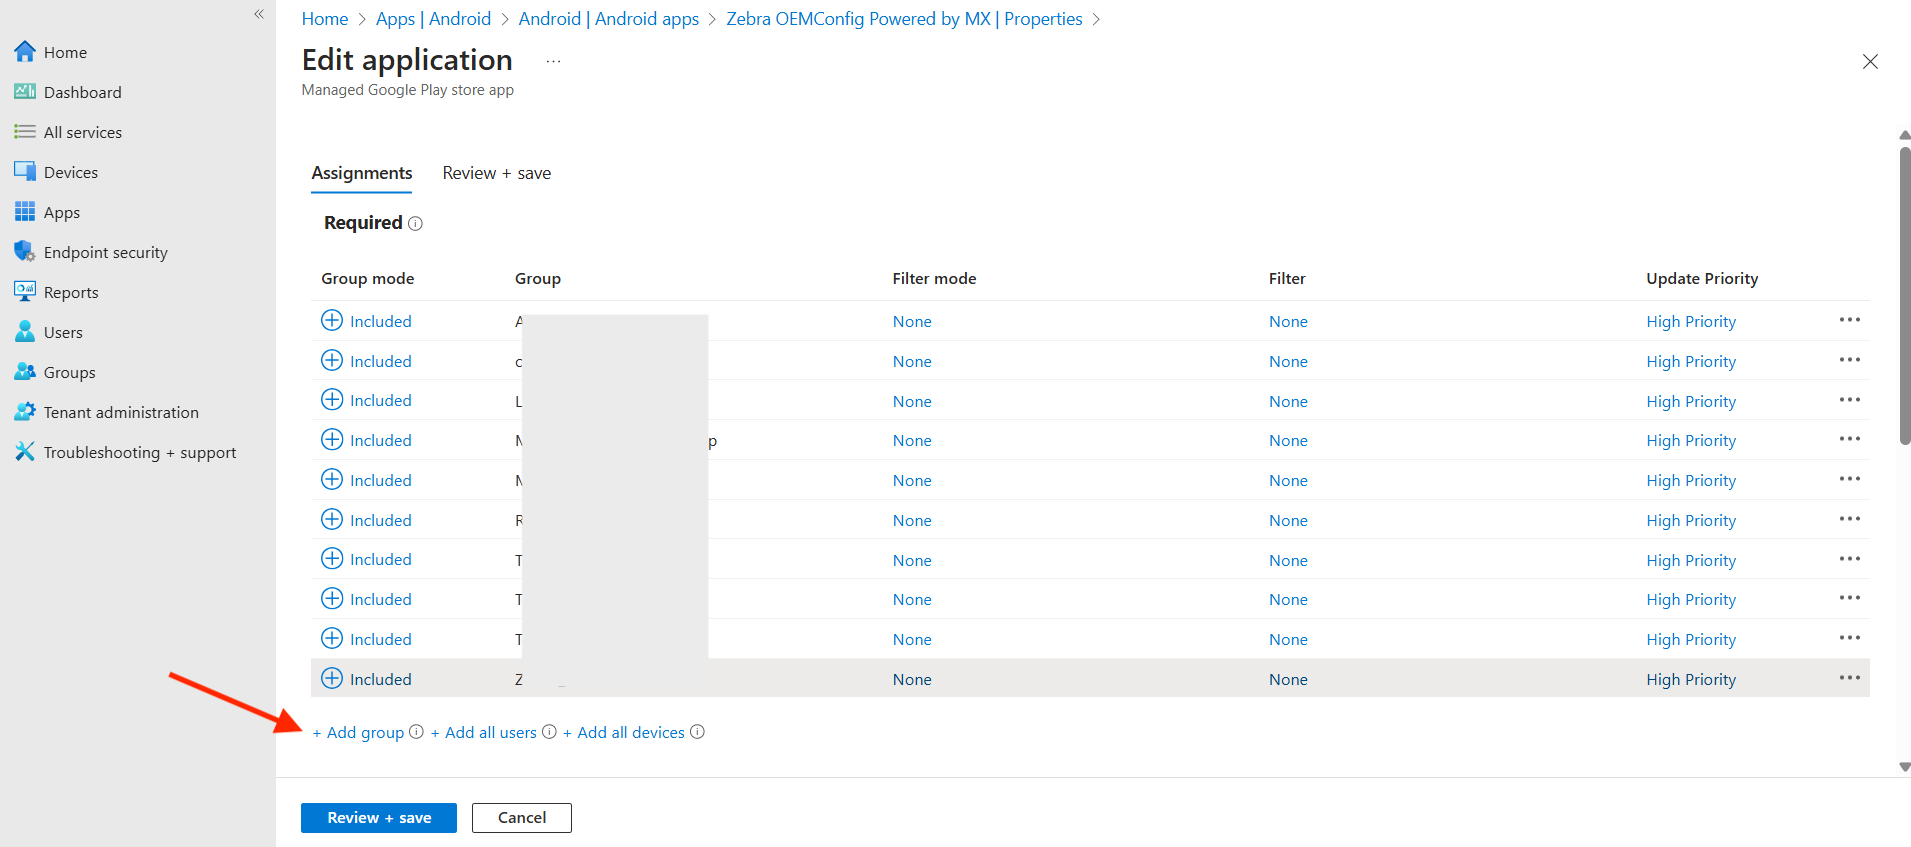
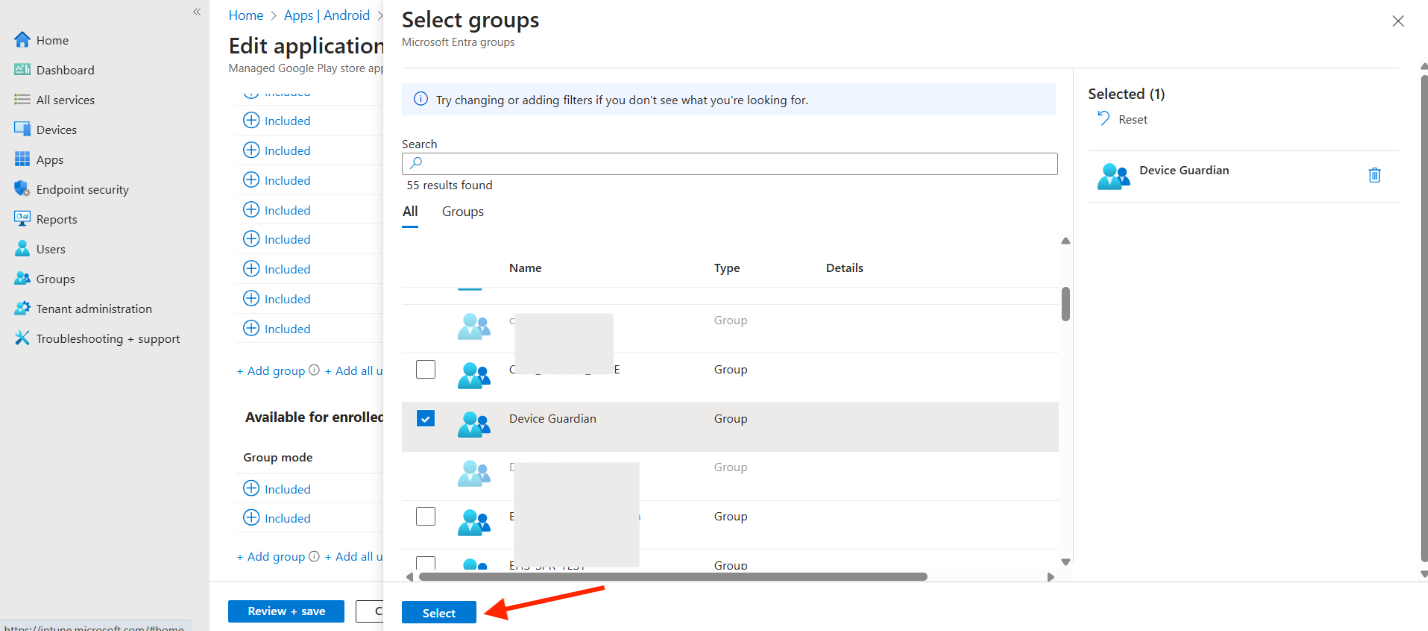
- Under the Required section, click Add group.
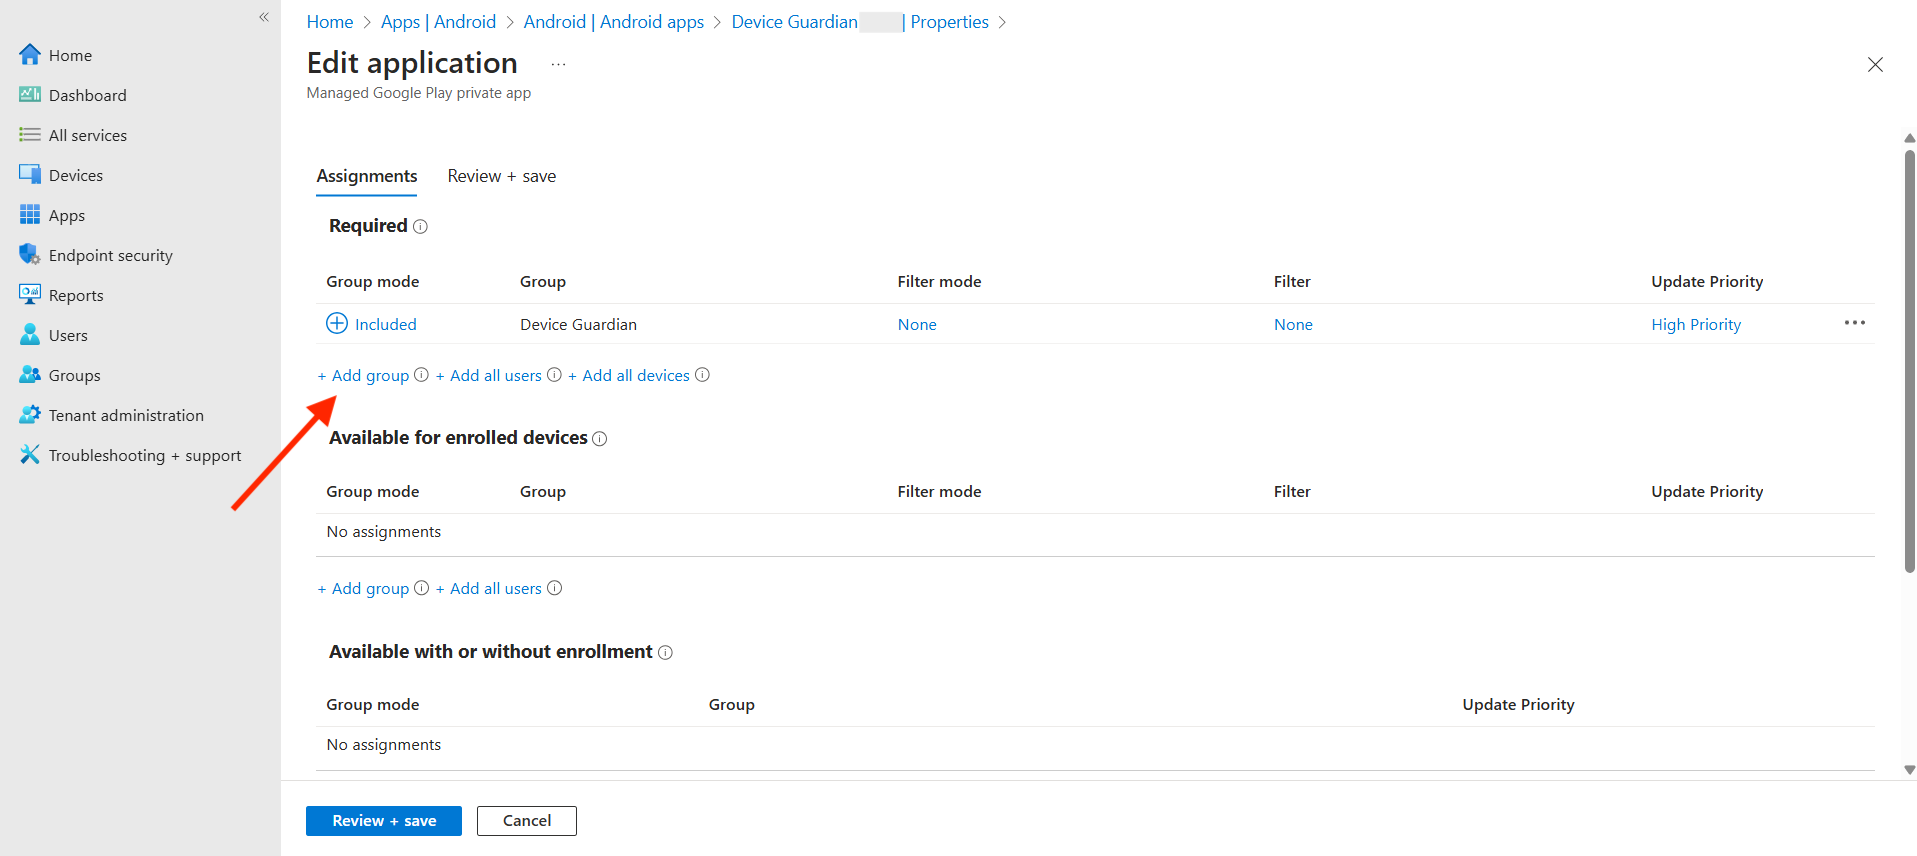
- Choose the group to install the app and click Select.
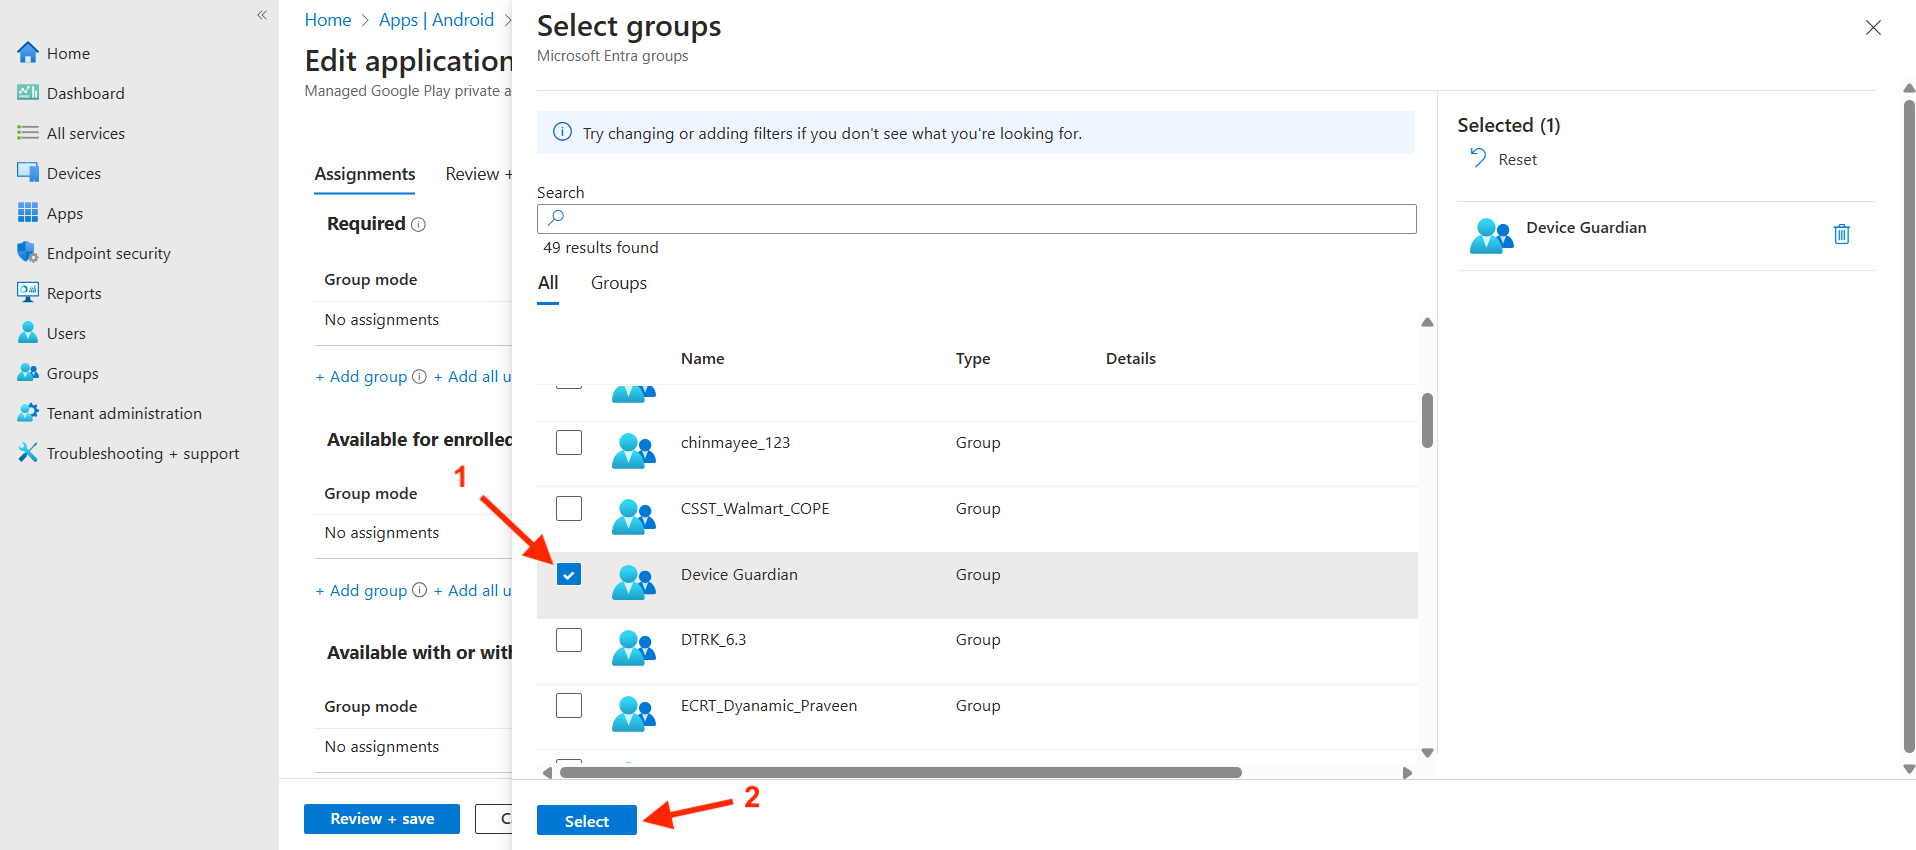
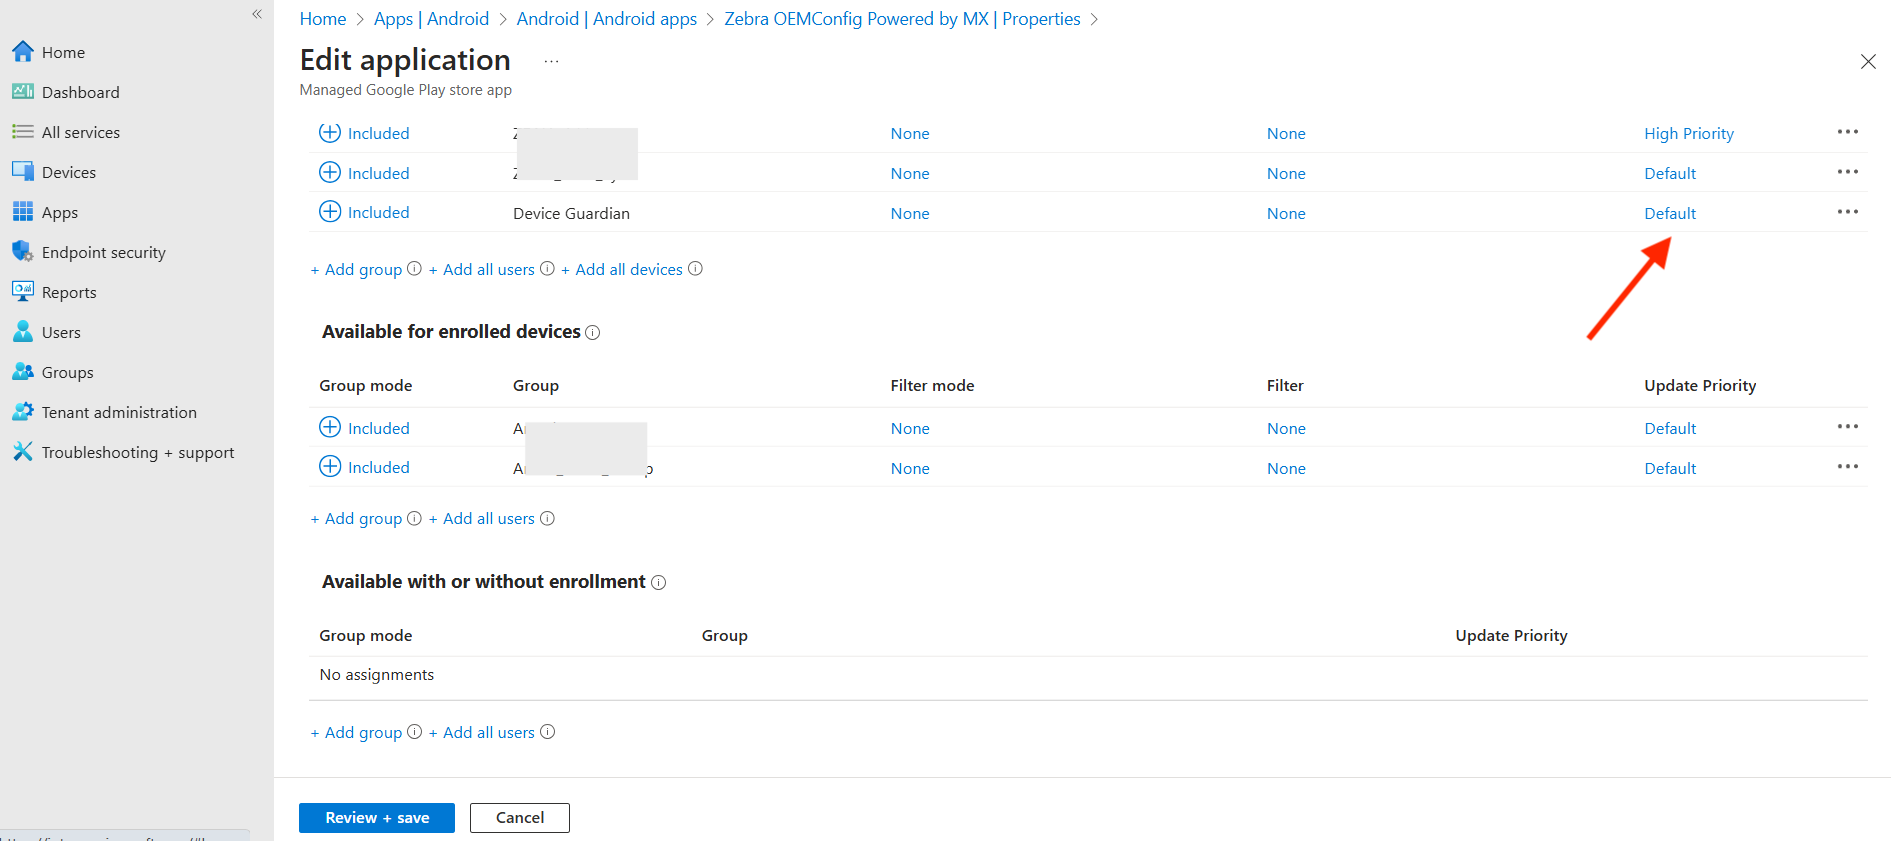
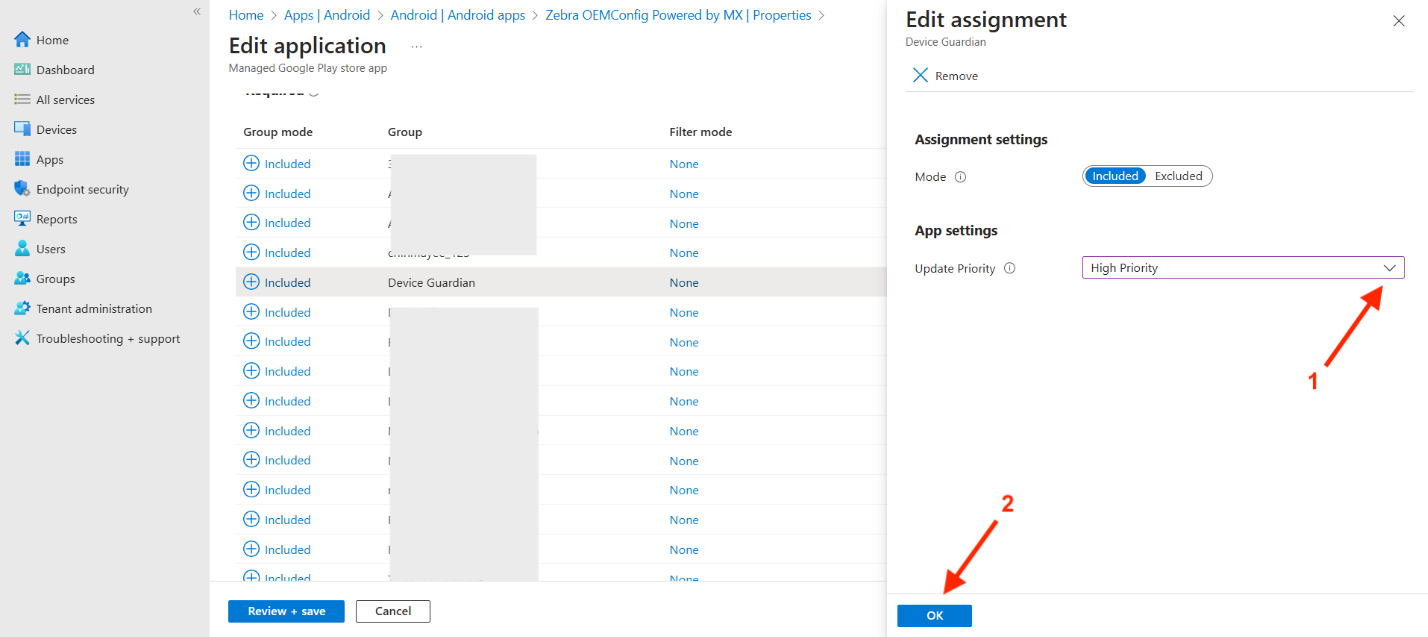
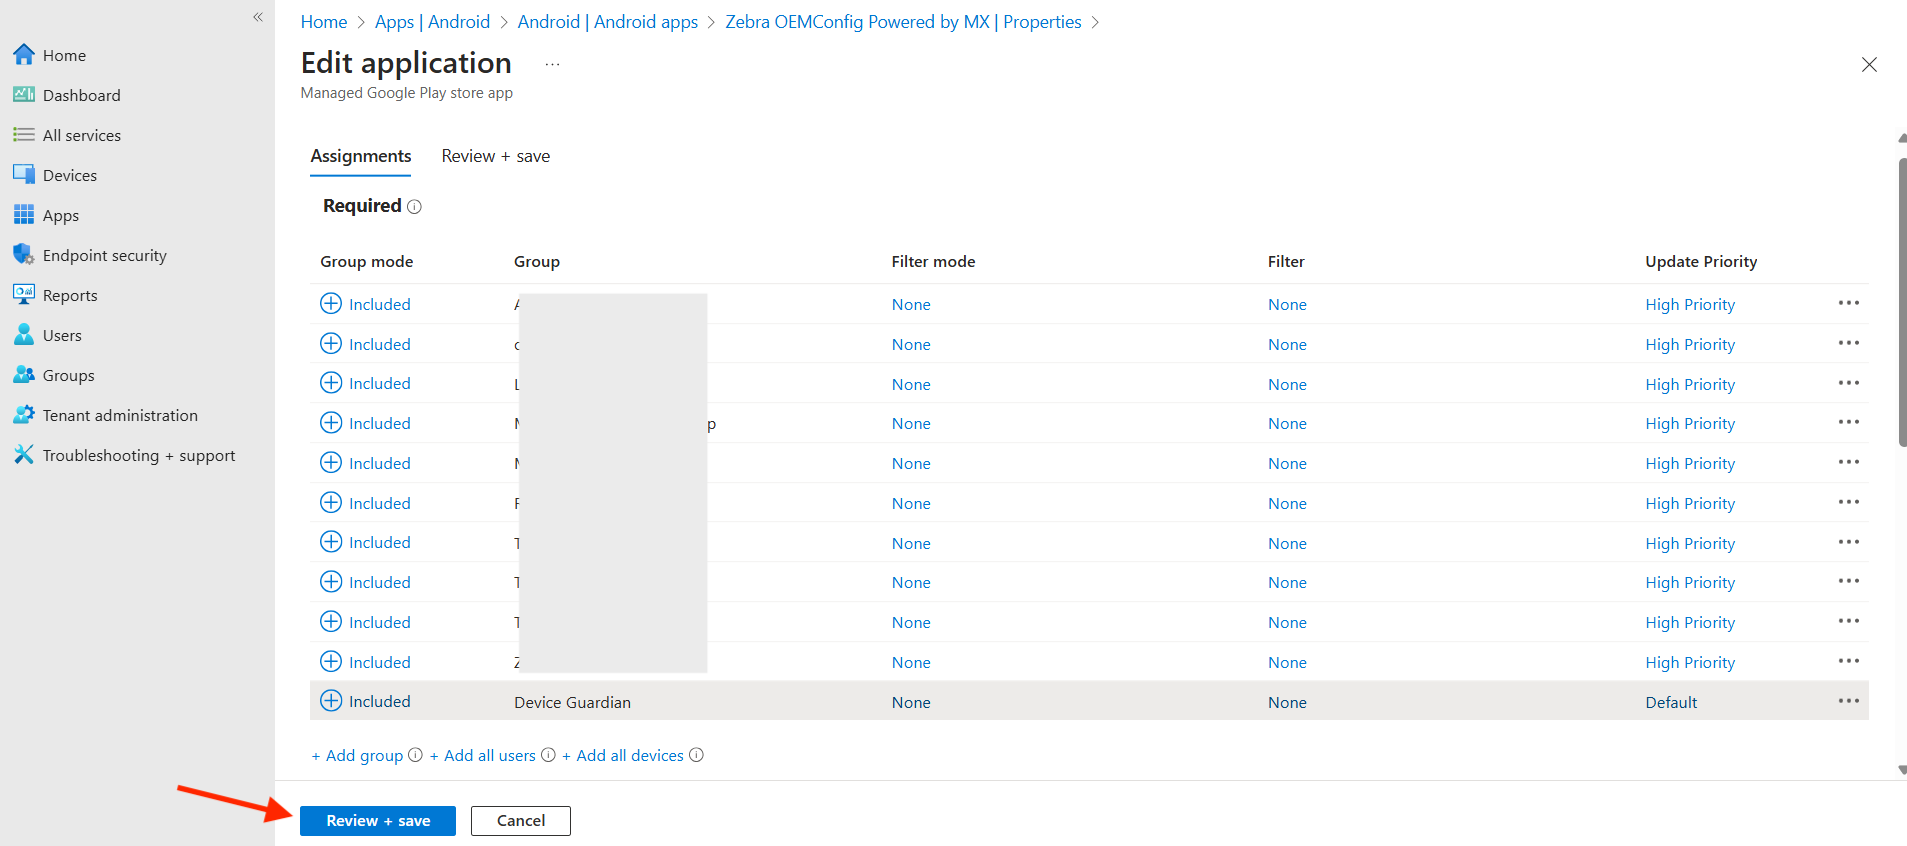
- Update the priority. Click Default under the Update Priority column.
- For the Update Priority dropdown, select High Priority. Click OK.
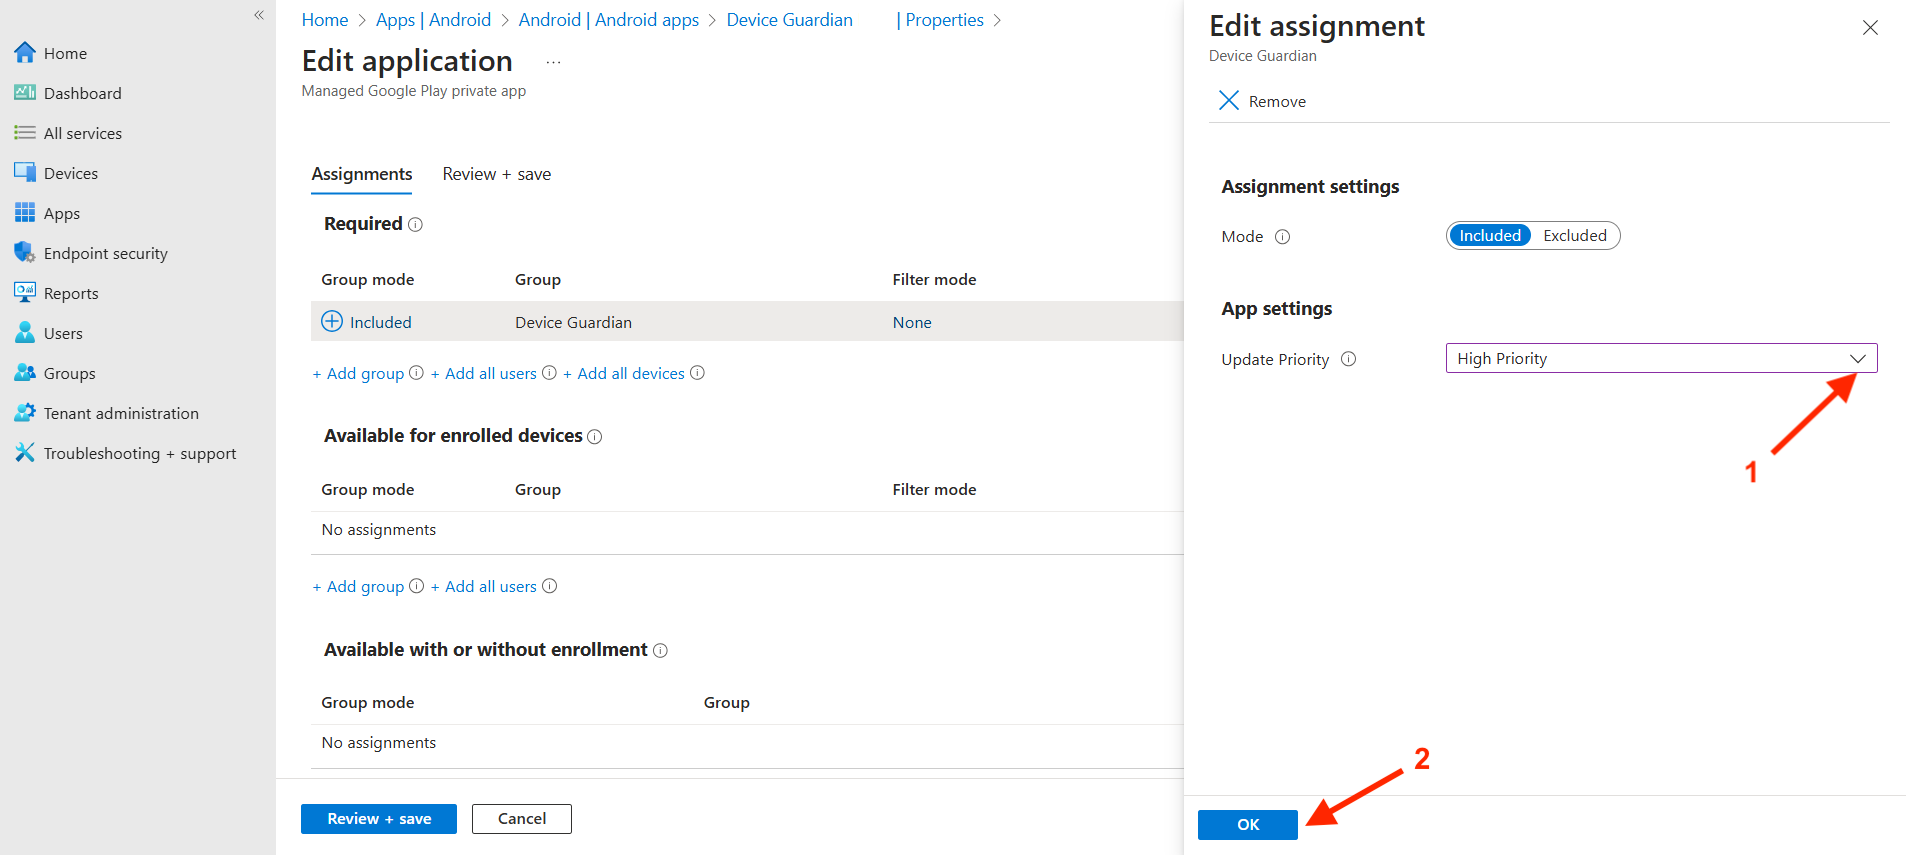
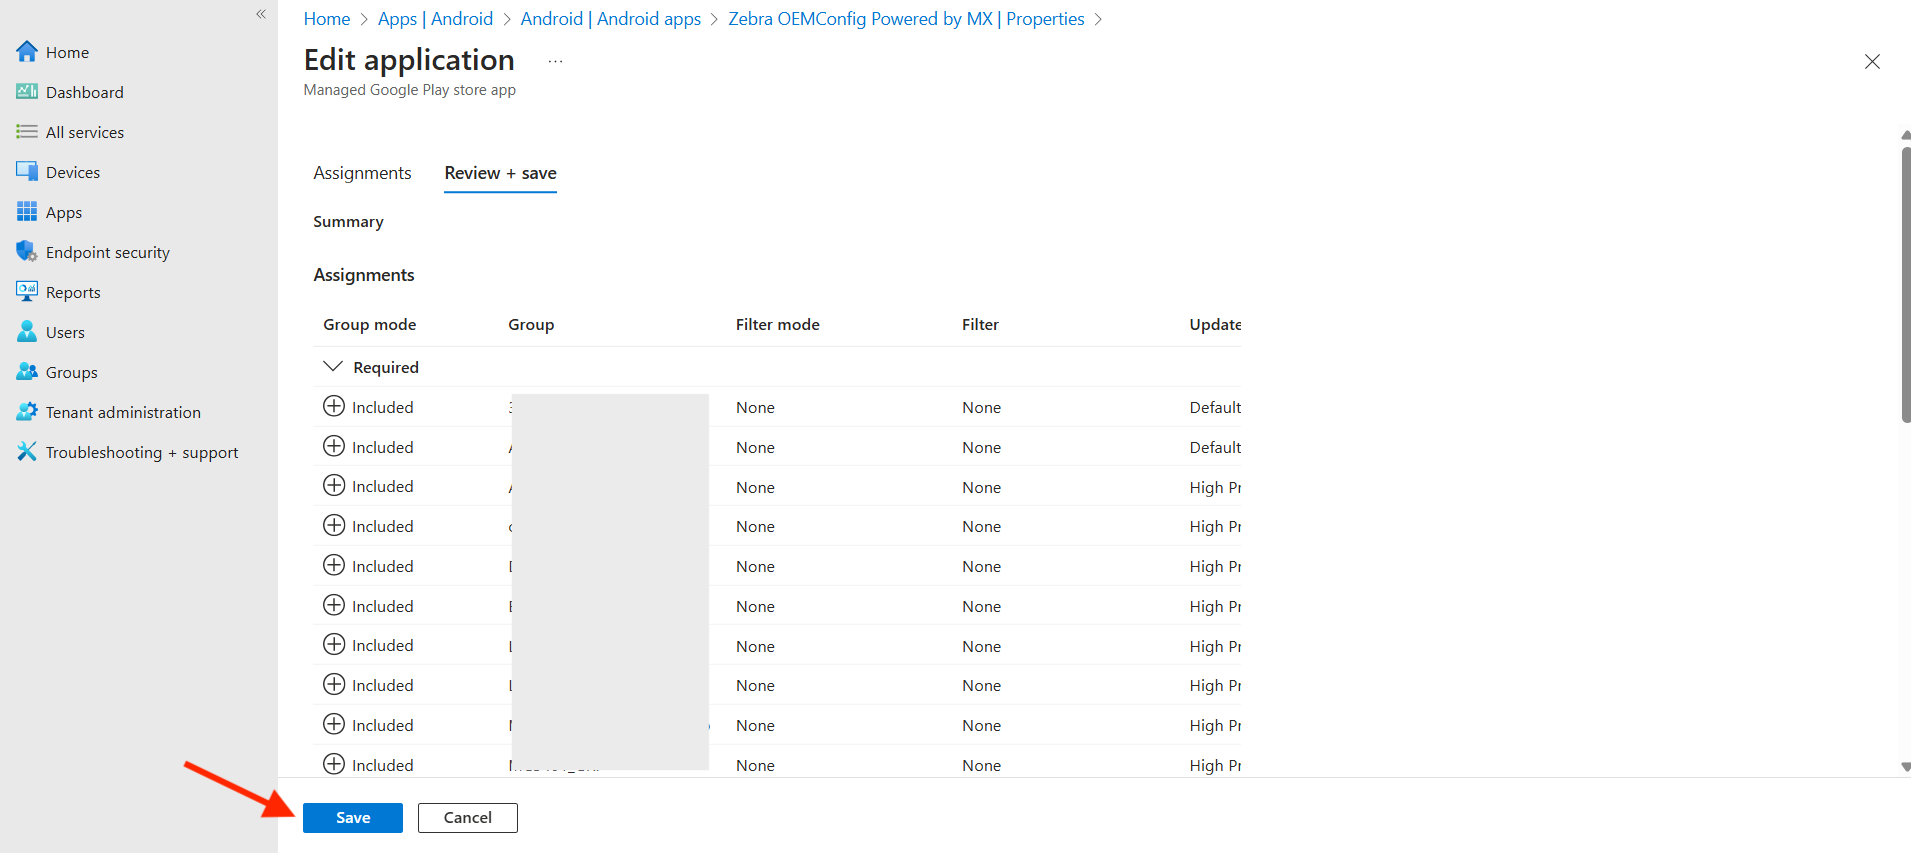
- The group is added with the updated priority. Click Review + save.
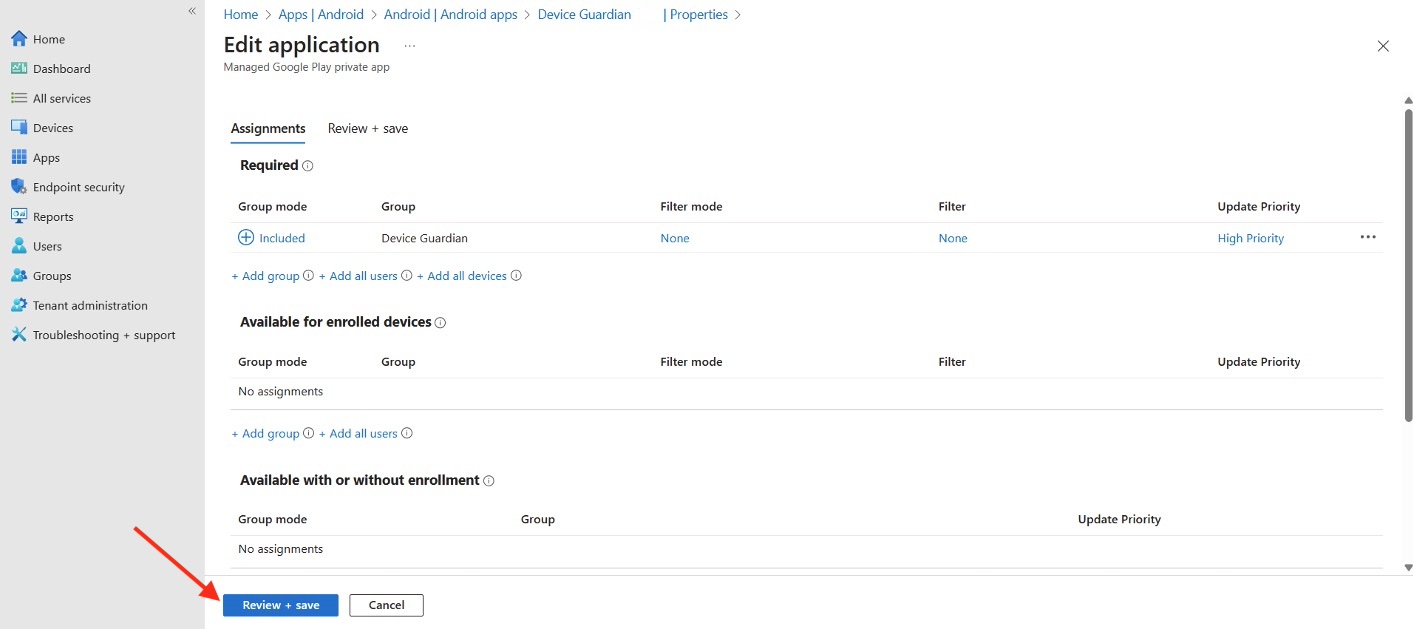
- Click Save. The app is installed in the devices.
Part III: Enroll Device in DG/DGAM
Choose one of the following methods to enroll devices in DG/DGAM:
- Option 1: StageNow Barcode: Enroll device with the scan of a barcode using StageNow.
- Option 2: XML File Use Microsoft Intune to deploy XML settings.
- Option 3: Managed .Config File: Deploy settings through Intune's Managed Configuration framework.
Option 1: StageNow Barcode
Use this method to enroll a device with the DG/DGAM server by scanning a barcode.
- Download the device enrollment barcode
.pdffile from the Download Kit. - Launch the StageNow client on the device.
- Scan the barcode.
- If applicable, repeat these steps for the following:
- Kiosk - Use the enrollment barcode for kiosk
- Device Tracker - For devices with Device Tracker, use the Device Tracker enrollment barcode for device. Repeat this for Kiosks if needed.
Option 2: XML File
Use this method to deploy the enrollment settings via XML (with OEMConfig) through Microsoft Intune. This enrolls the device with the DG/DGAM server.
- Download the XML Configuration for Device file from the Download Kit. The contents of this file is needed in a later step.
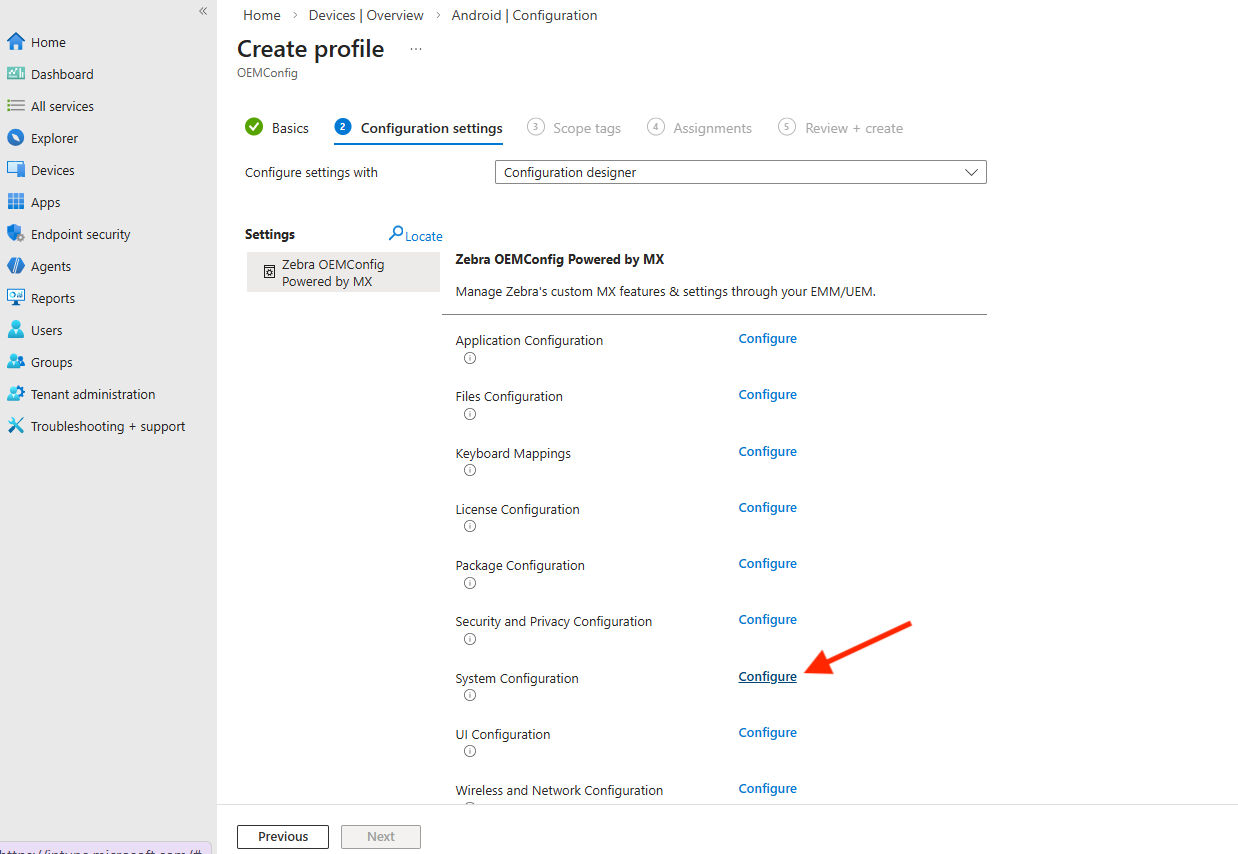
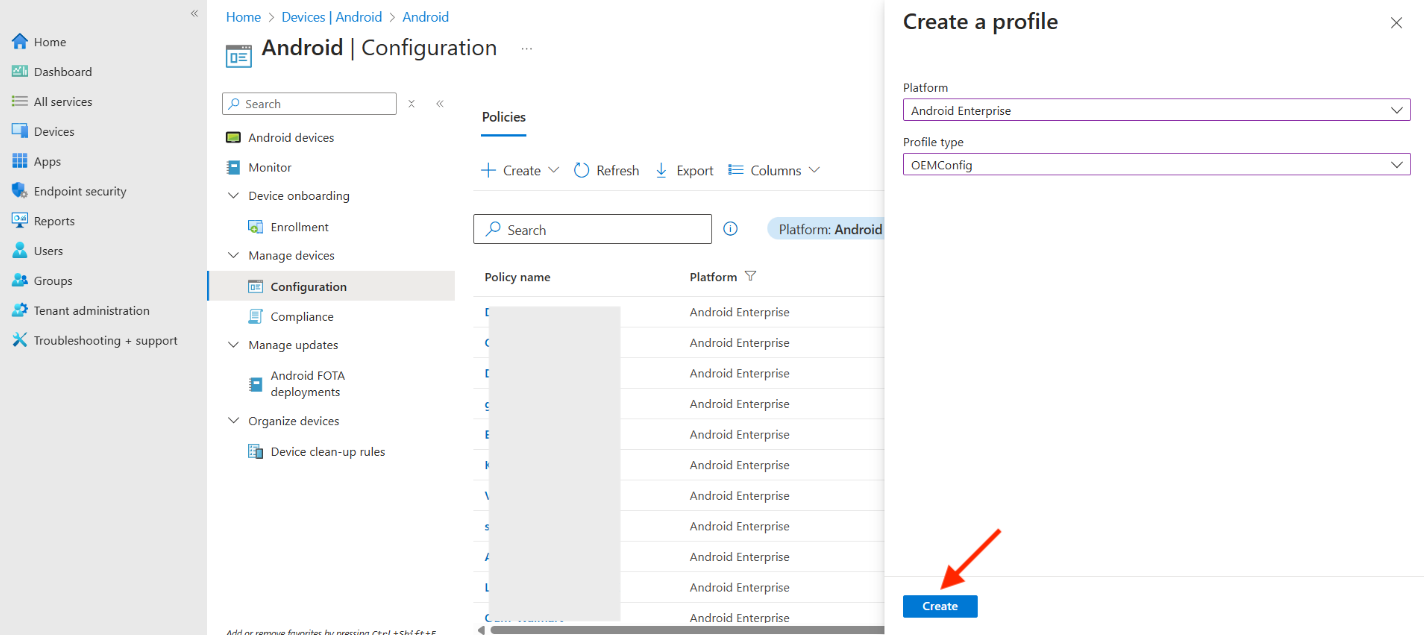
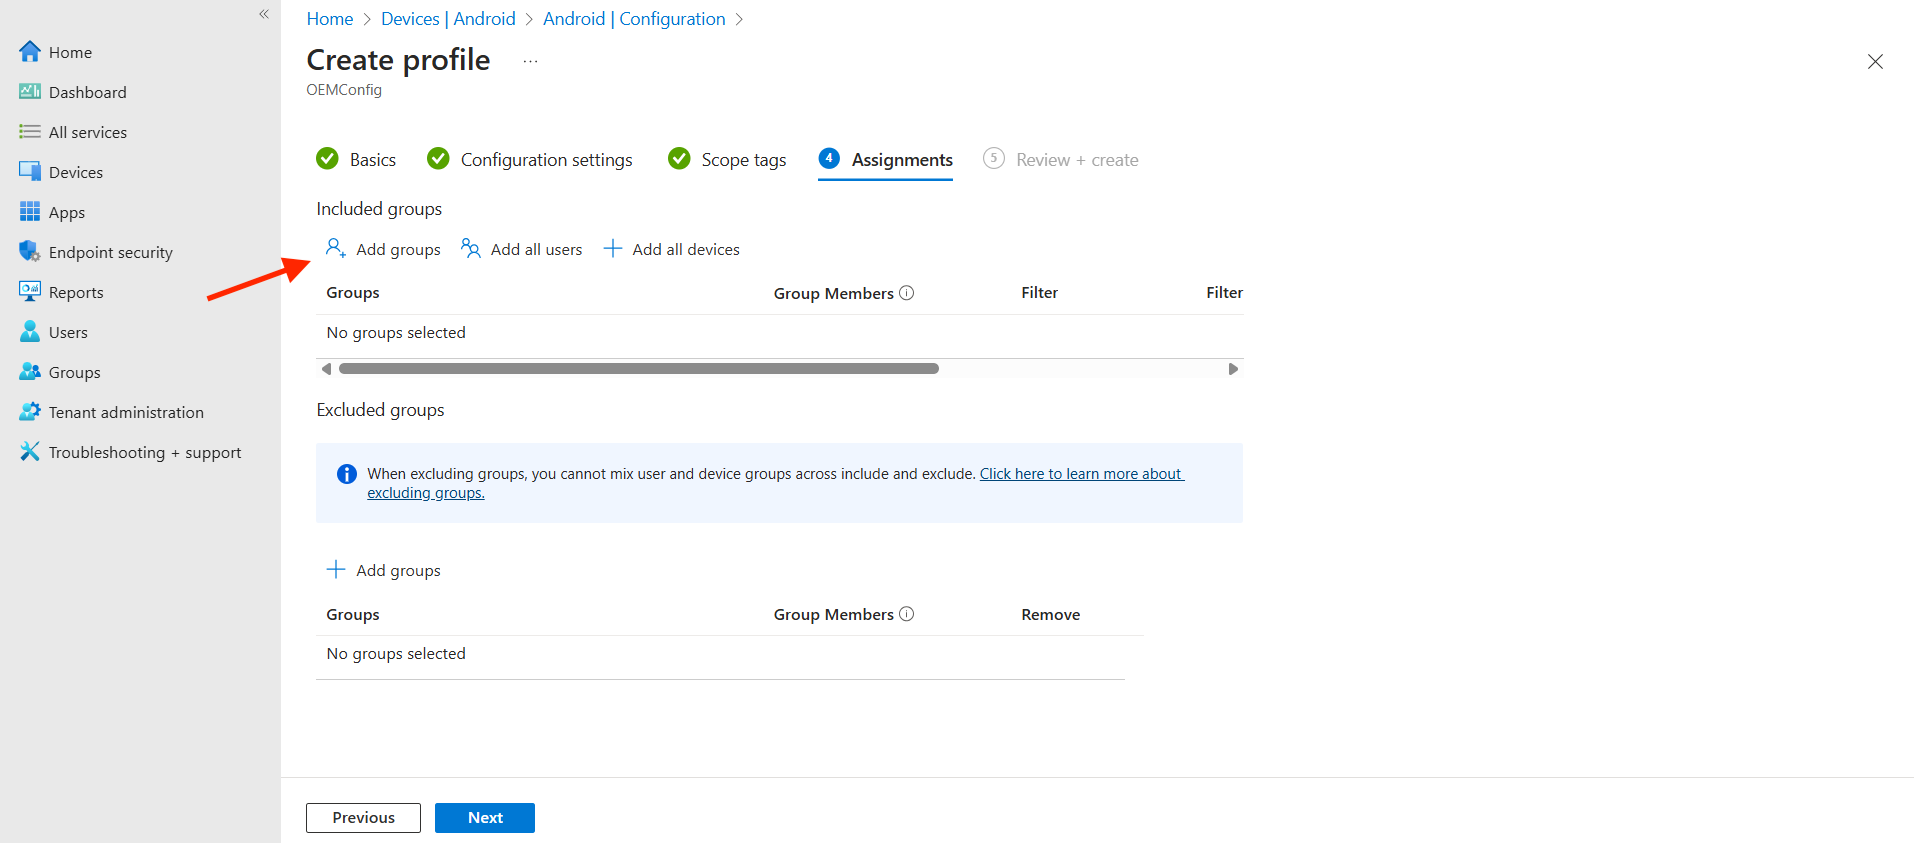
- In Microsoft Intune, navigate to Devices > Configuration. Click Create > New Policy.
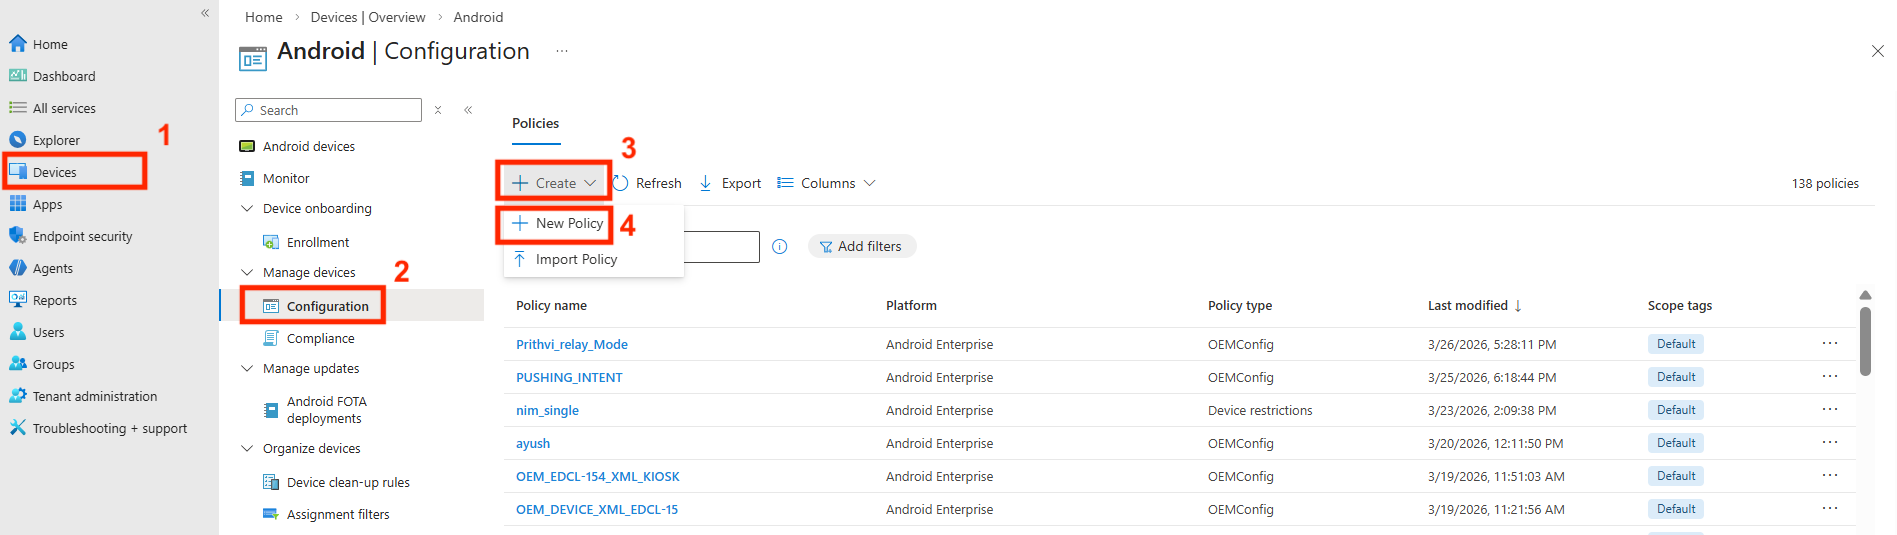
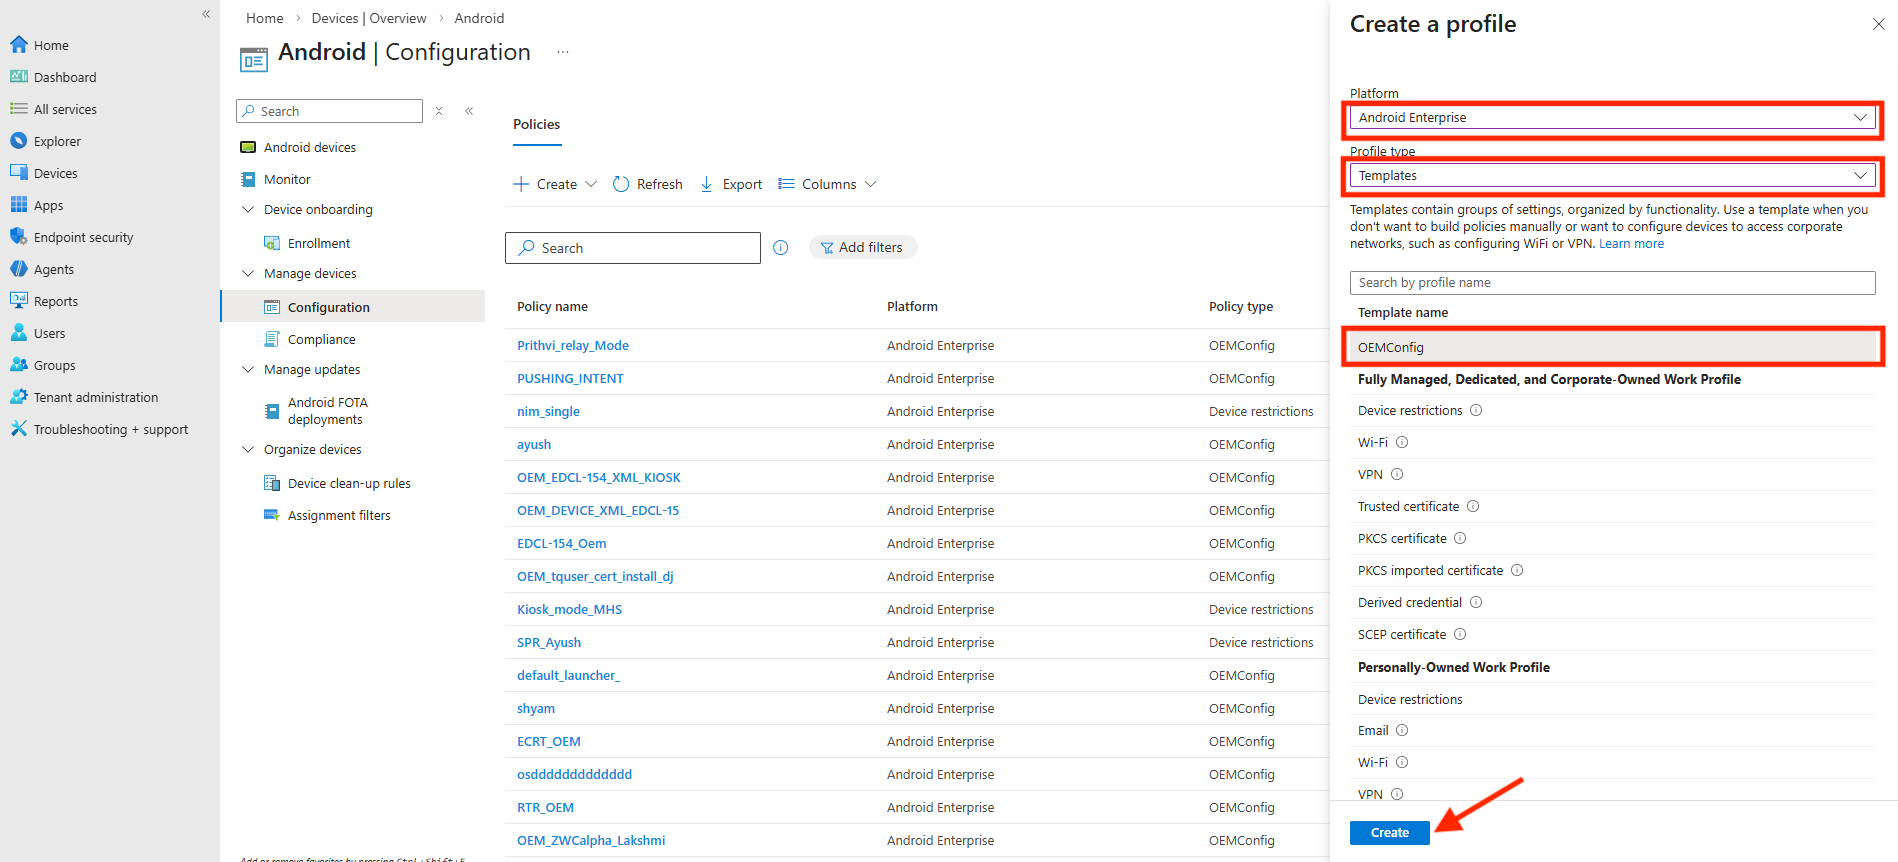
- Under Create a profile, configure the following and click Create:
- Platform: Android Enterprise
- Profile type: Templates
- Template name: OEMConfig
- Perform the following, then click Next:
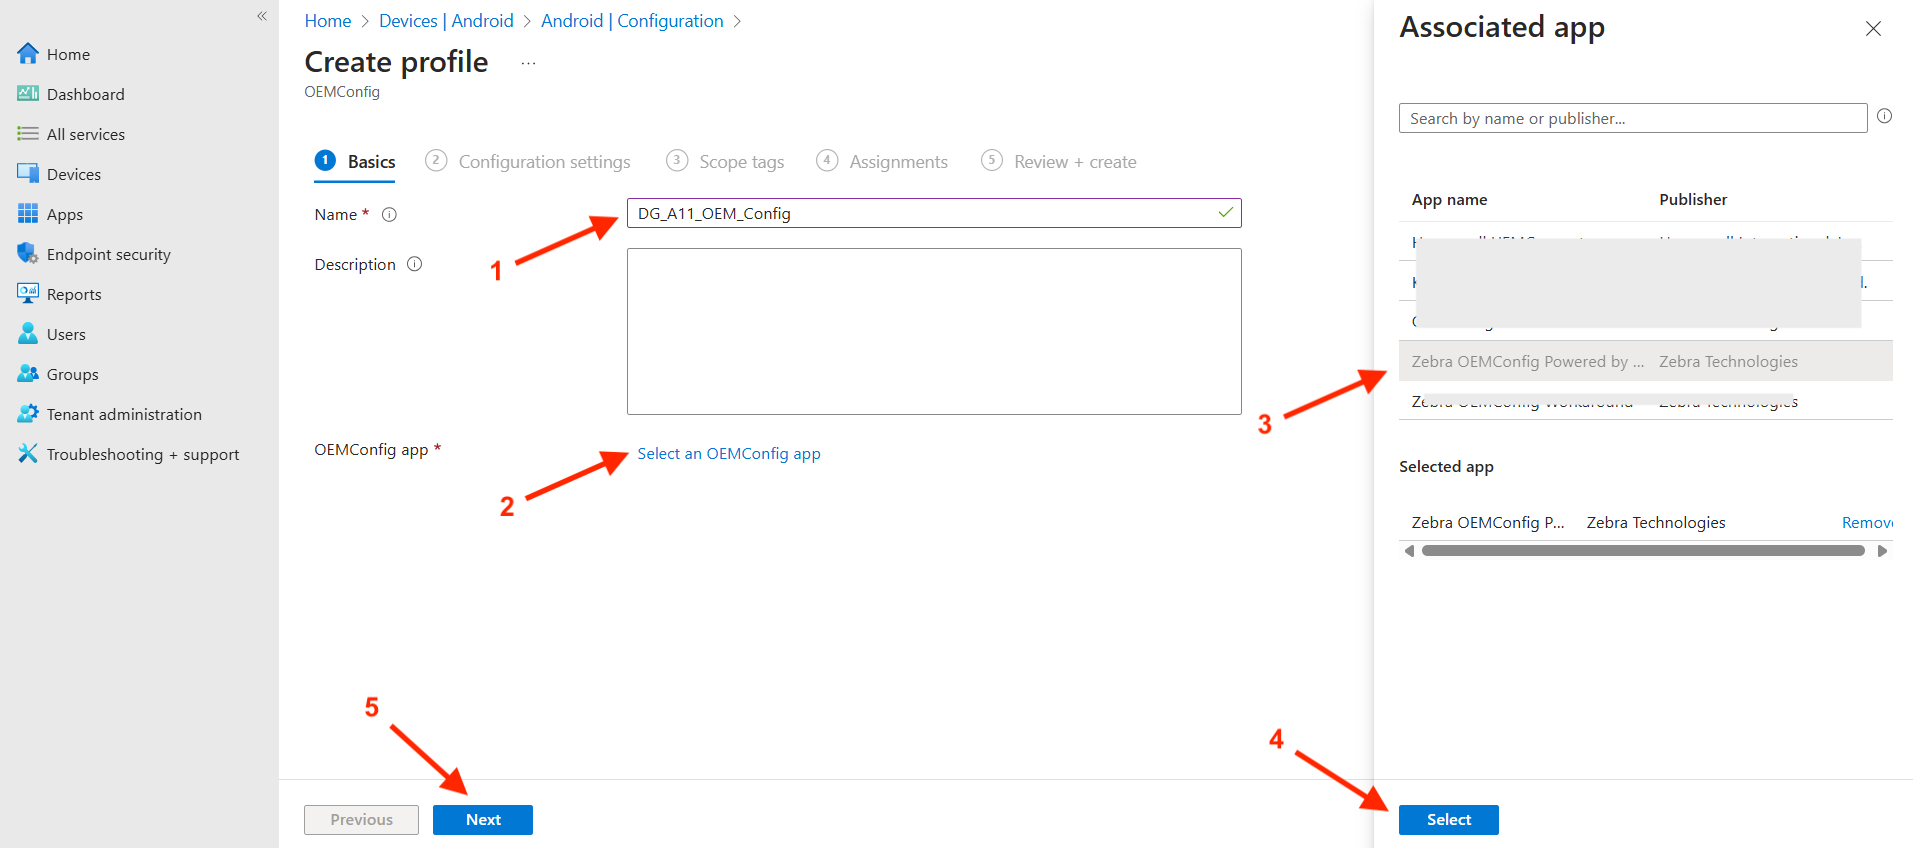
- Name: [Enter a name]
- Description: [(Optional) Enter a description]
- Select an OEMConfig app: [Select "Zebra OEMConfig Powered by..." then click Select]
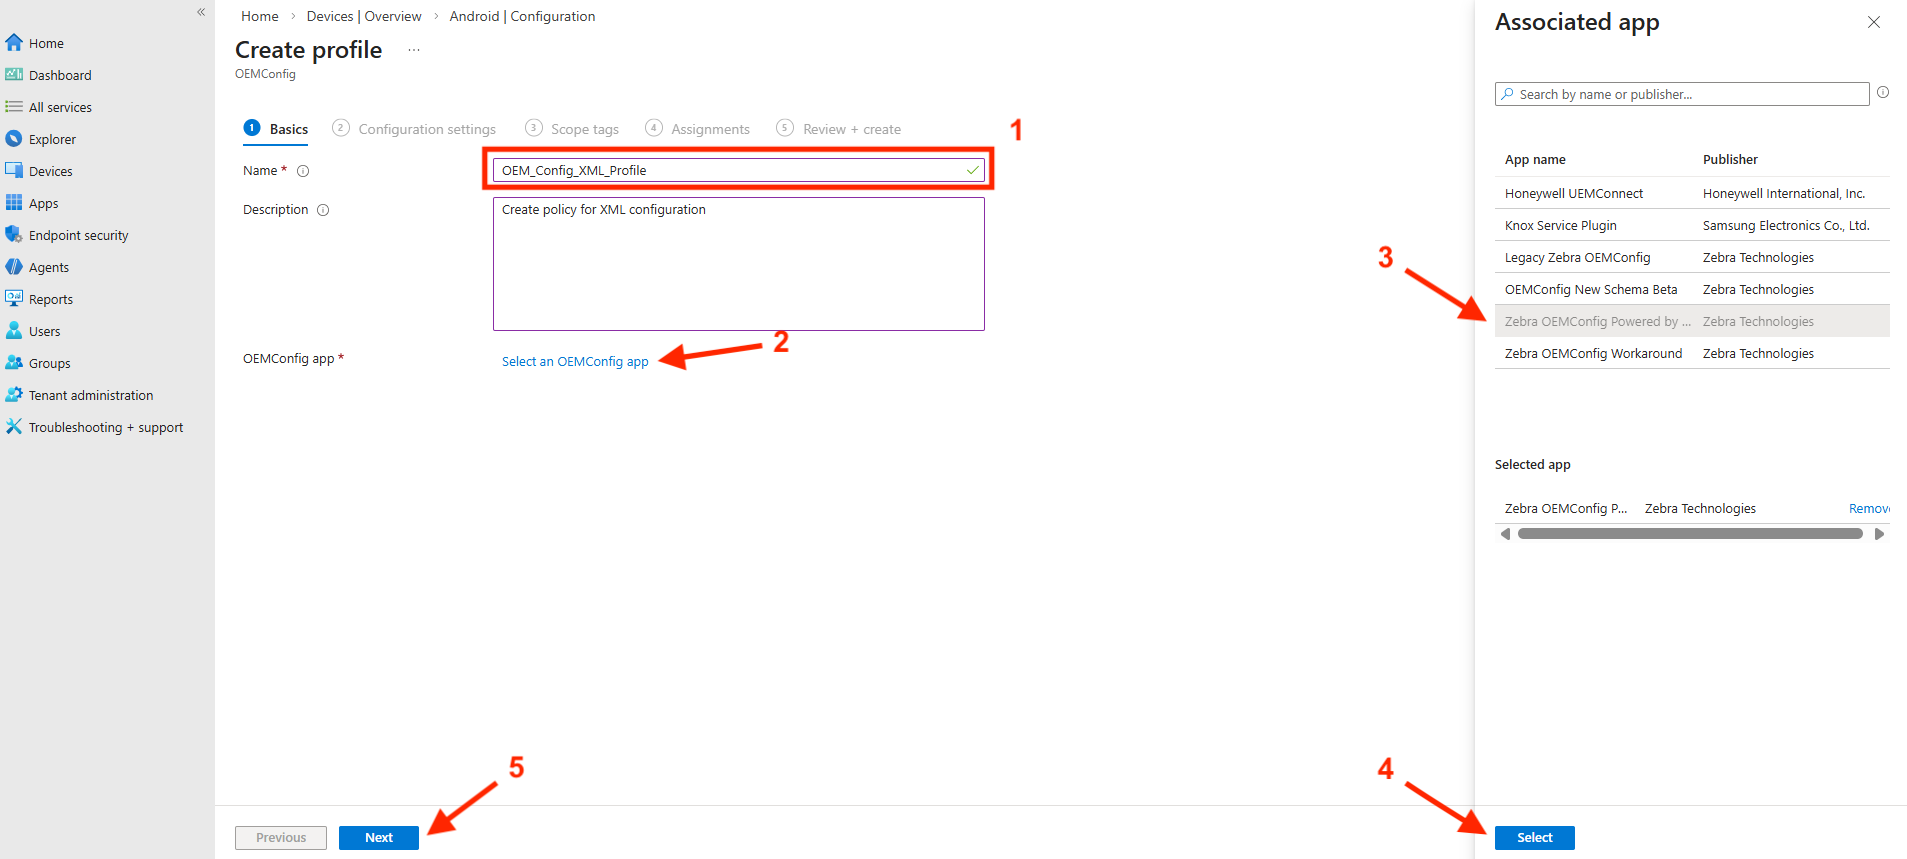
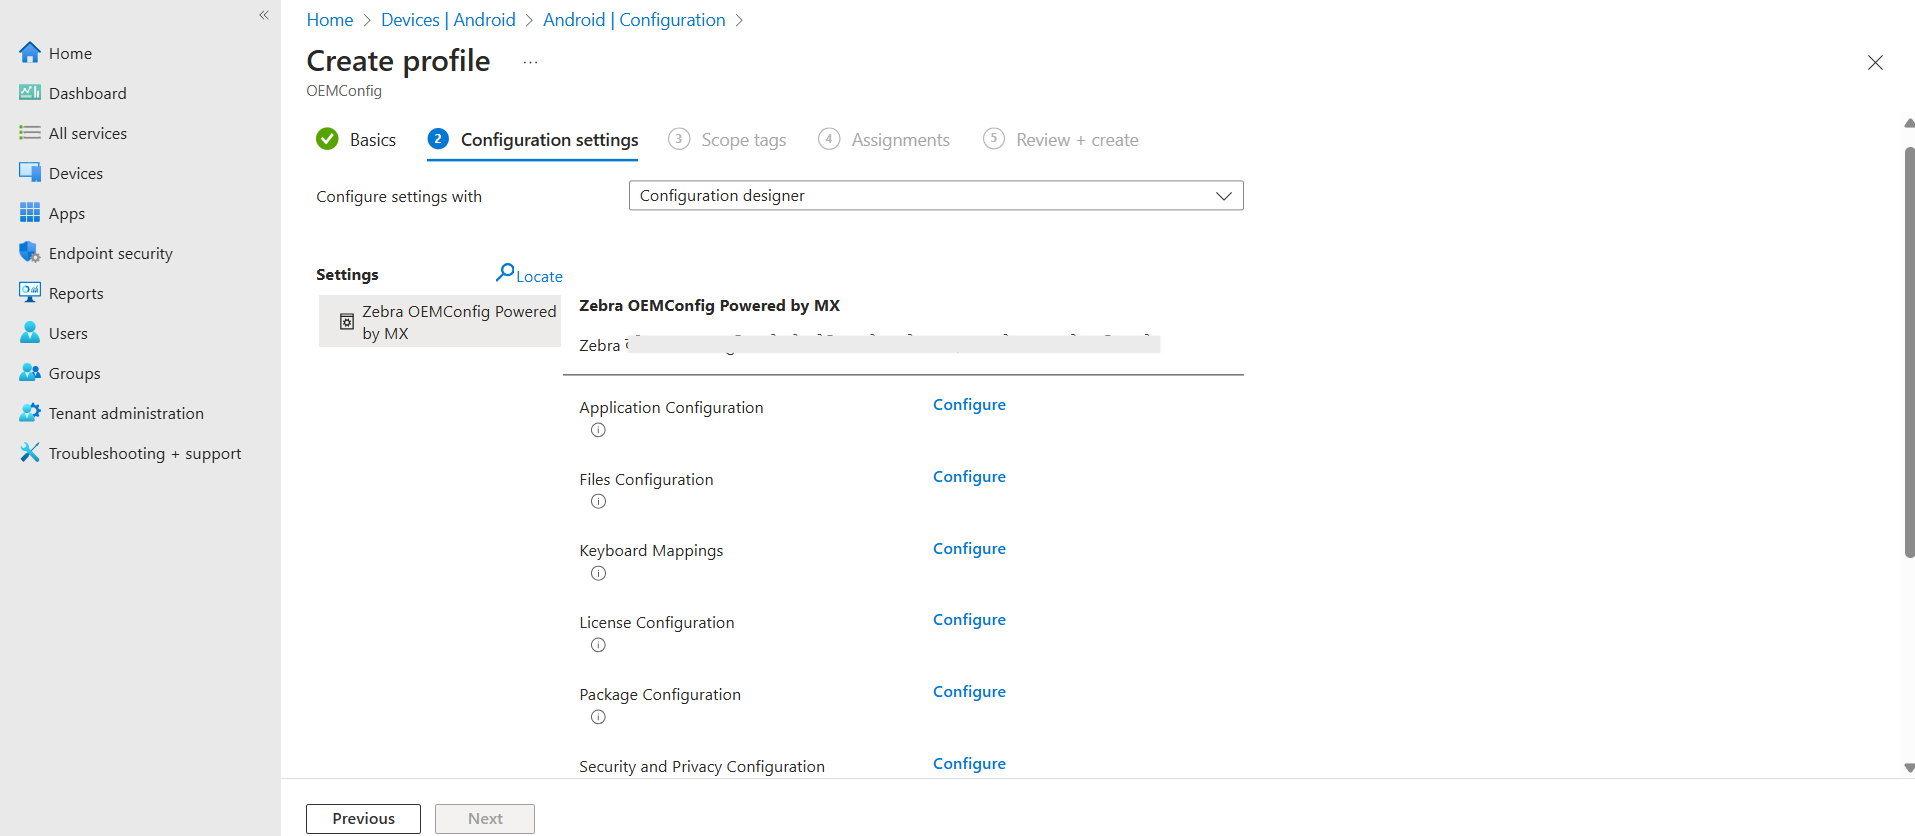
- Click Configure next to System Configuration.
- Copy the contents from the
.xmlfile downloaded earlier. Paste the copied text into the Pass-Through Command field. Click Next.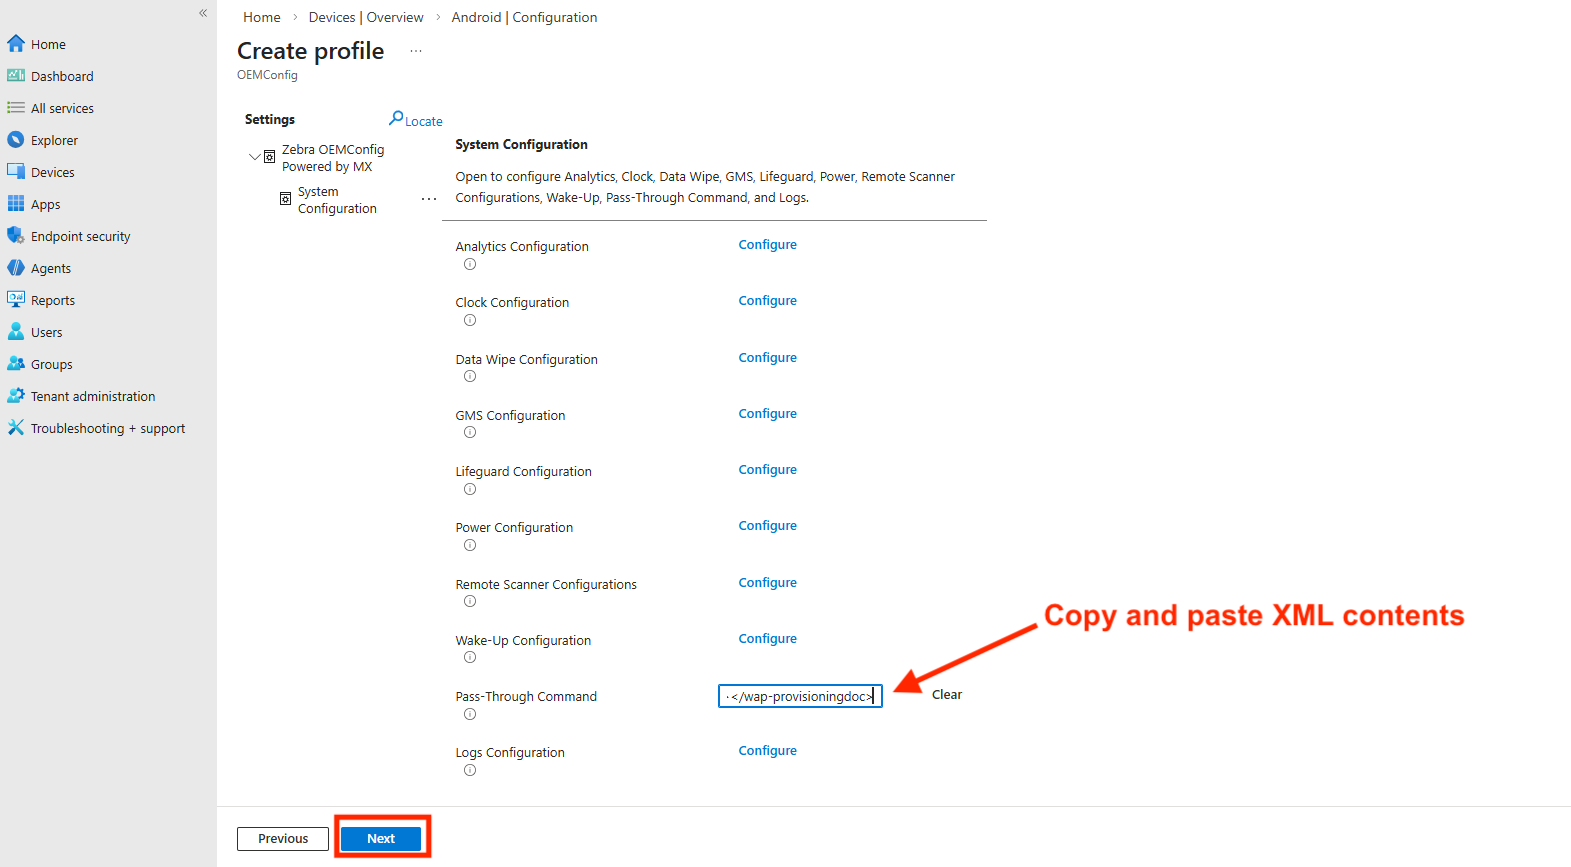
- Click Next.
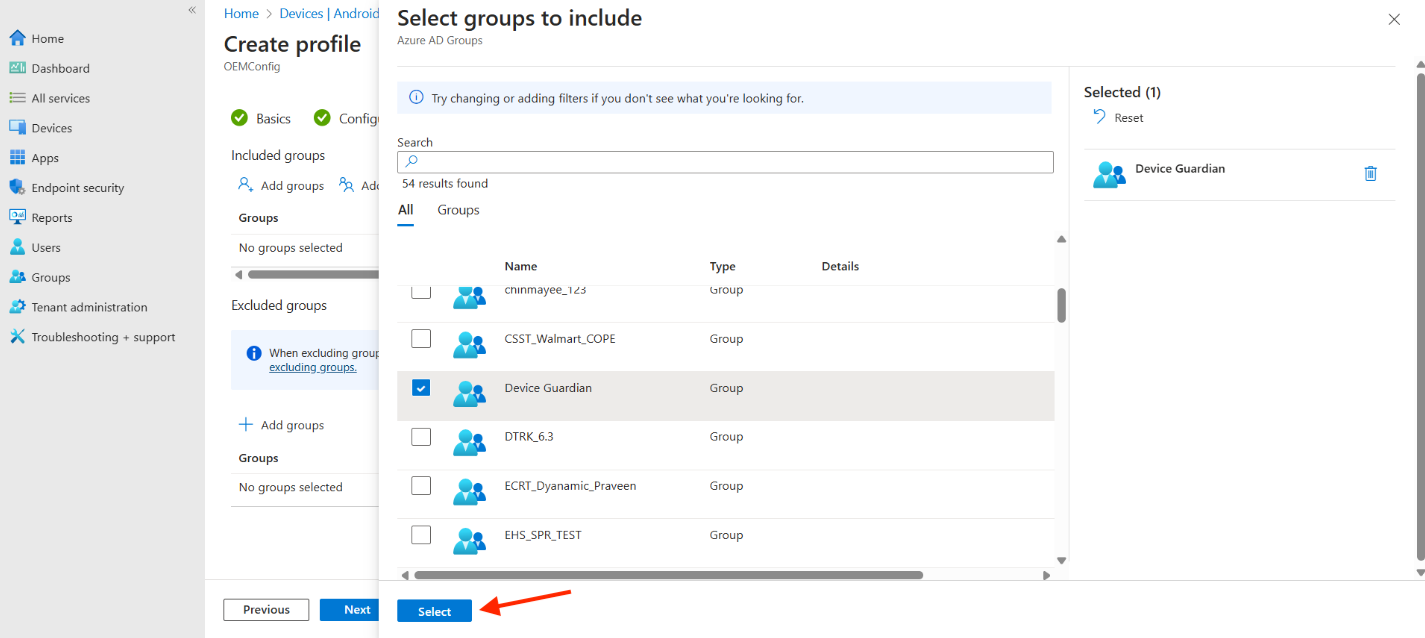
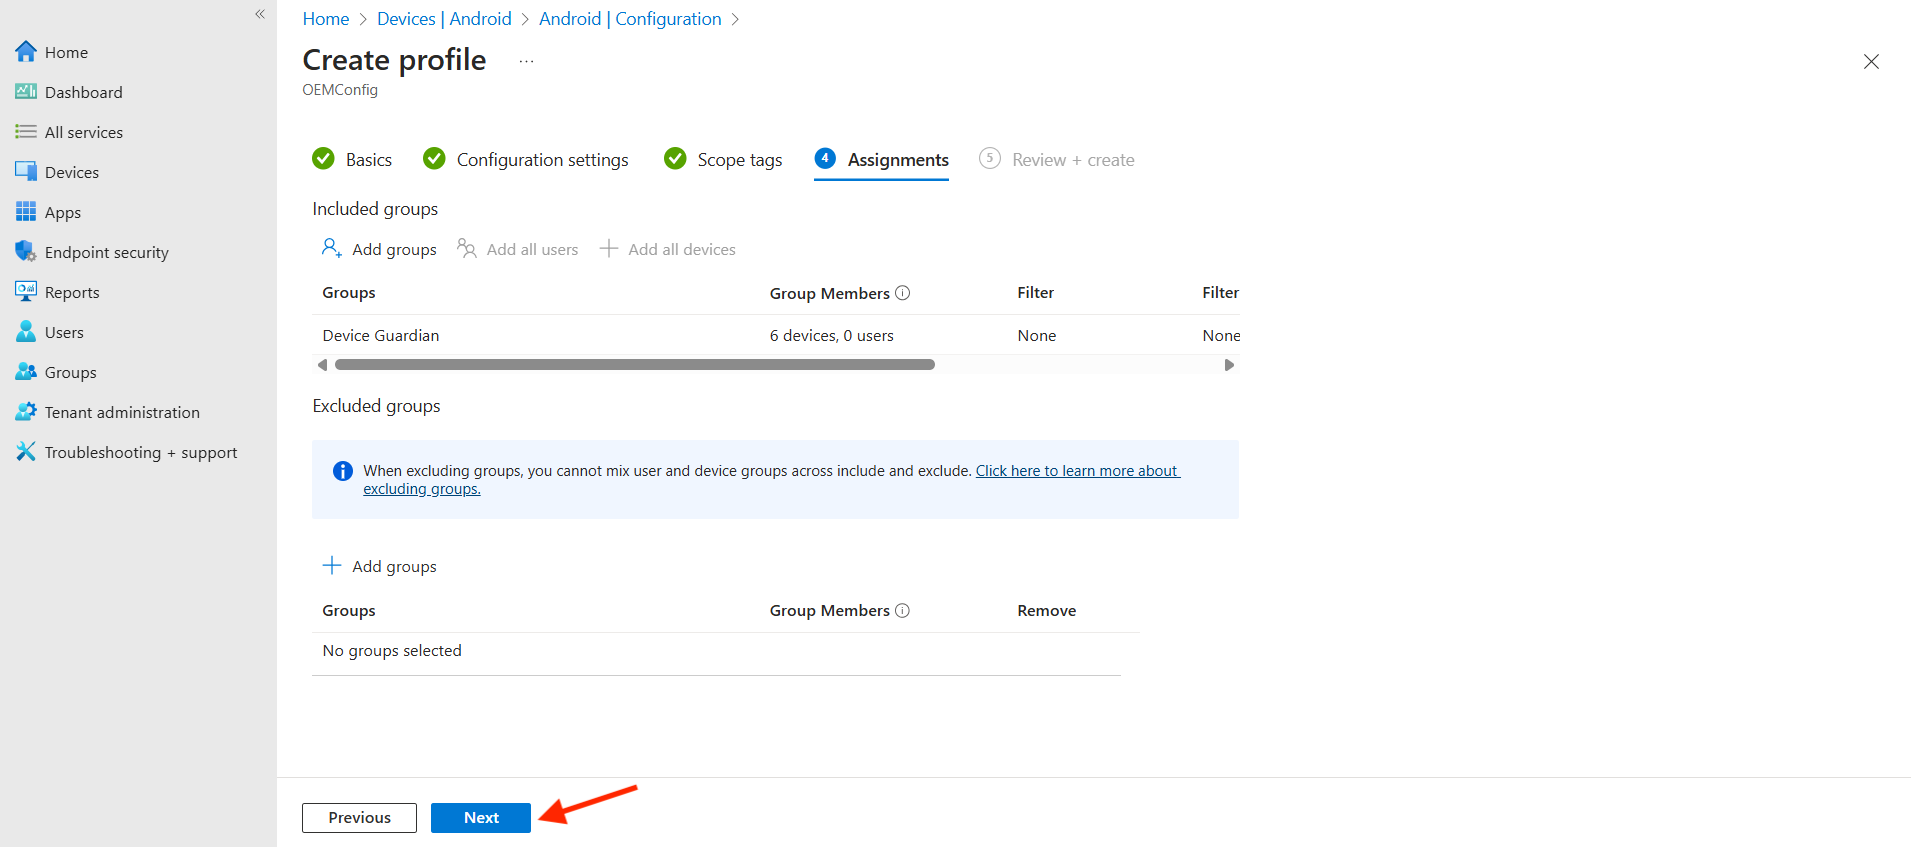
- Under Included Groups, click Add Groups.
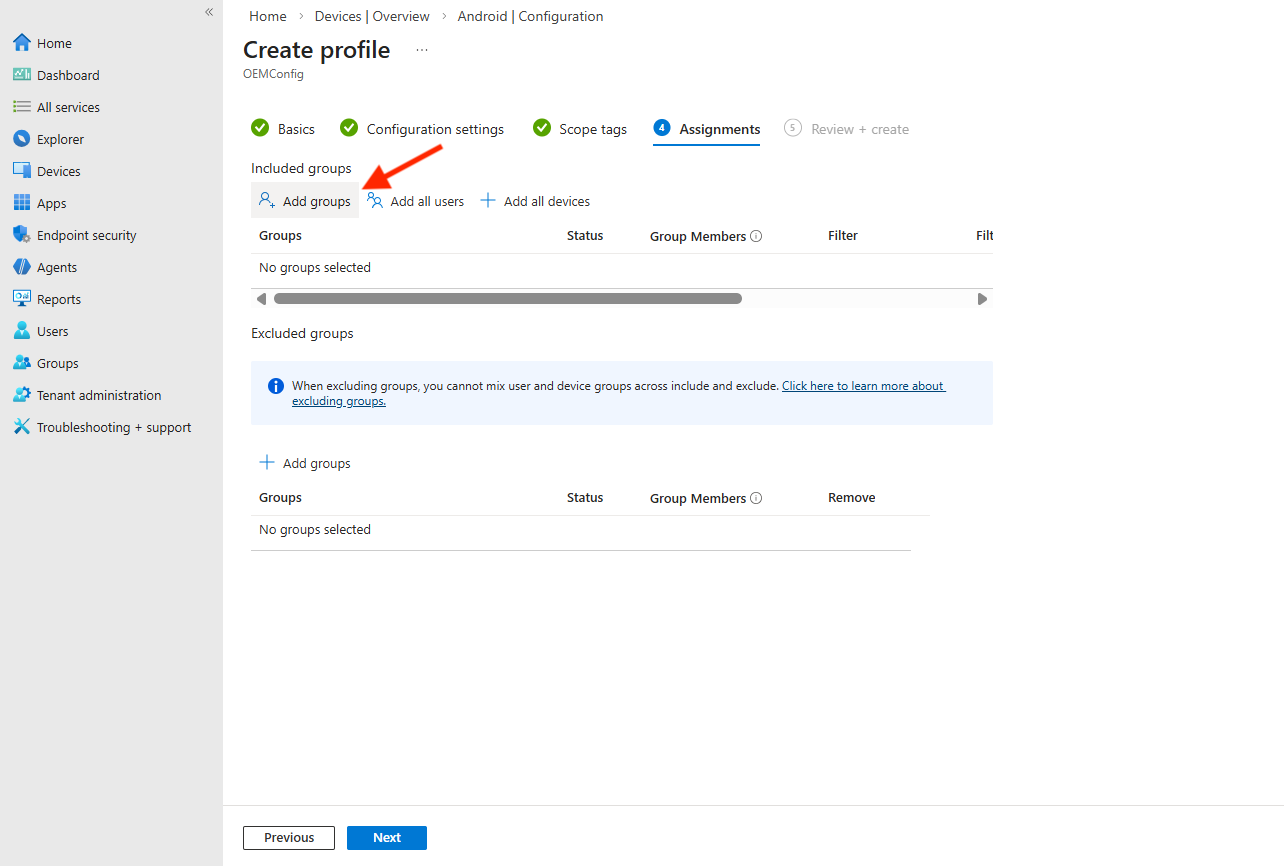
- Search for the group to assign the profile. When found, choose the group and click Select.
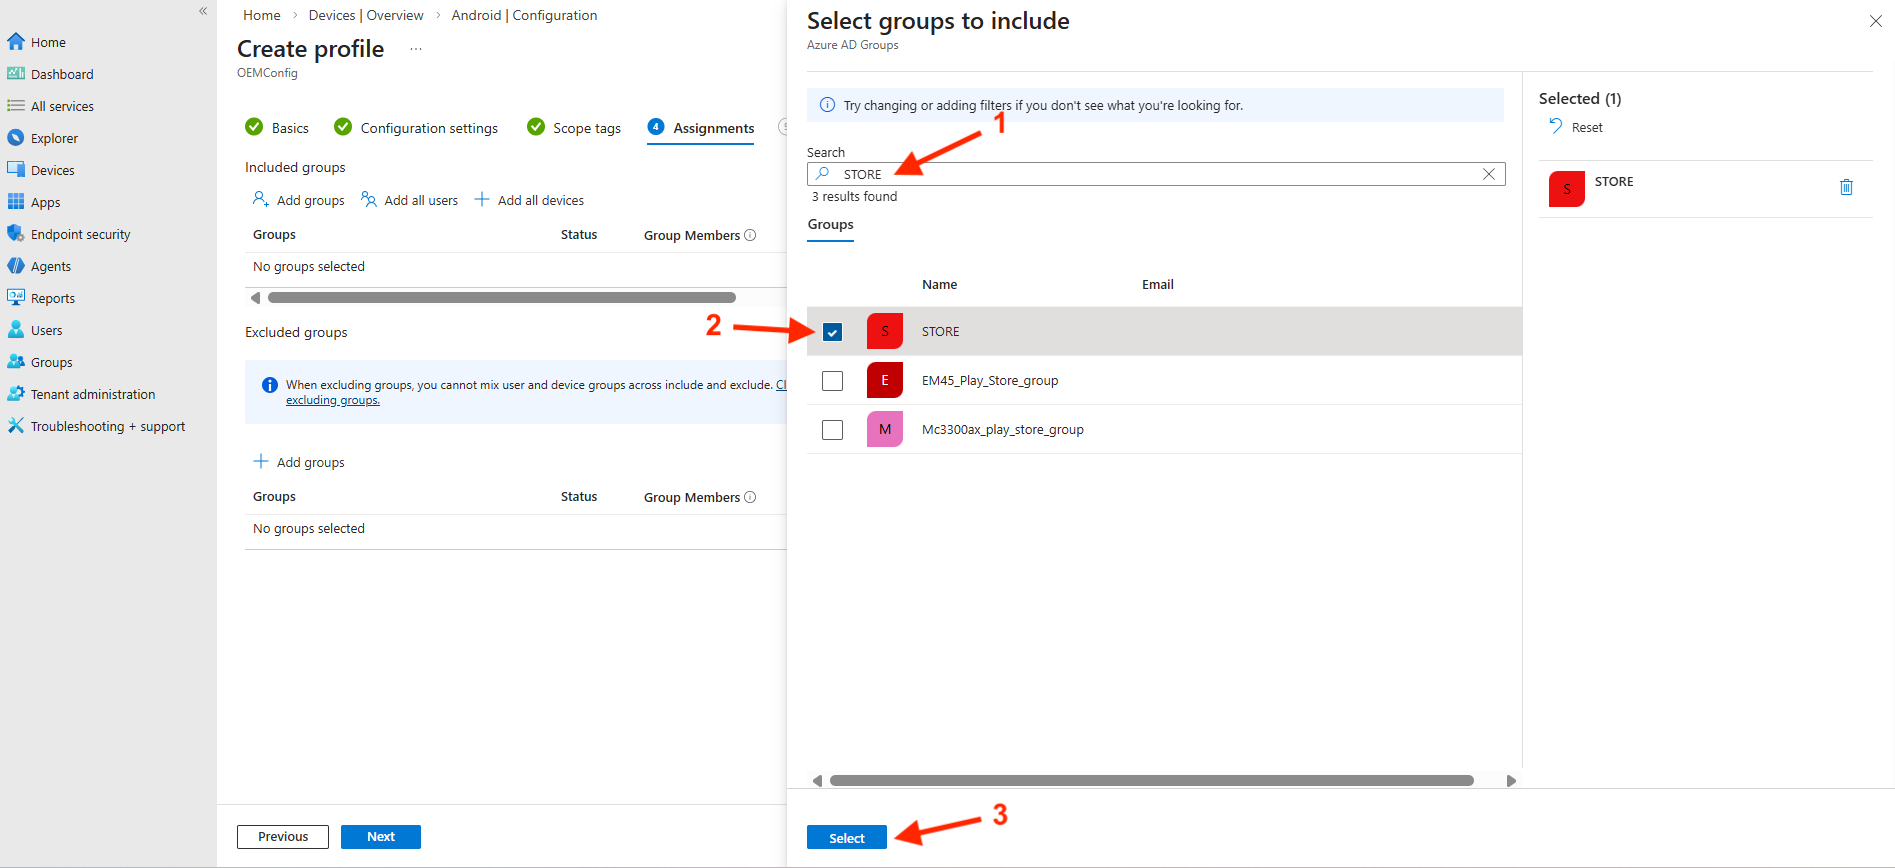
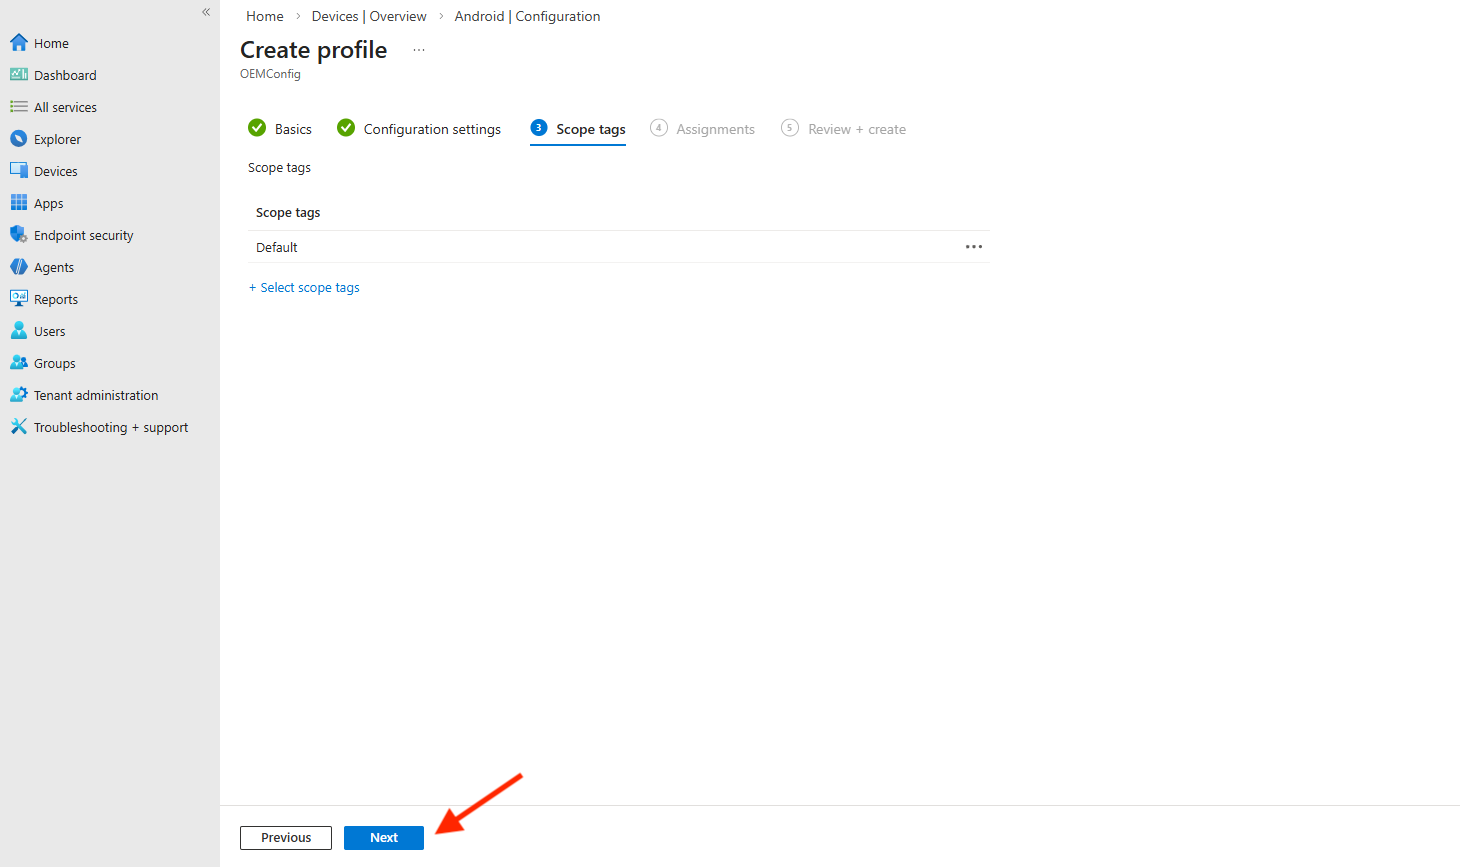
- Click Next.
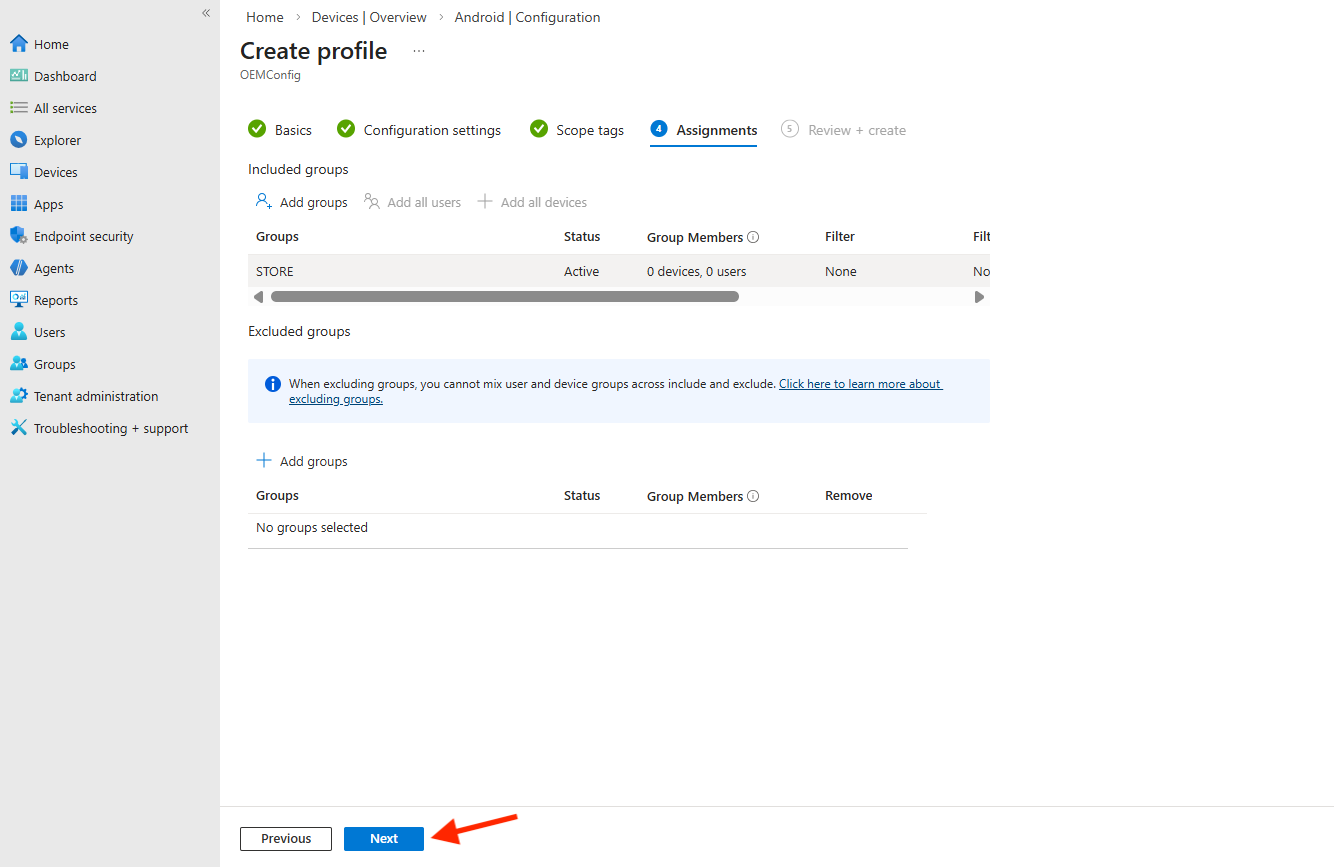
- Review the values and click Create.
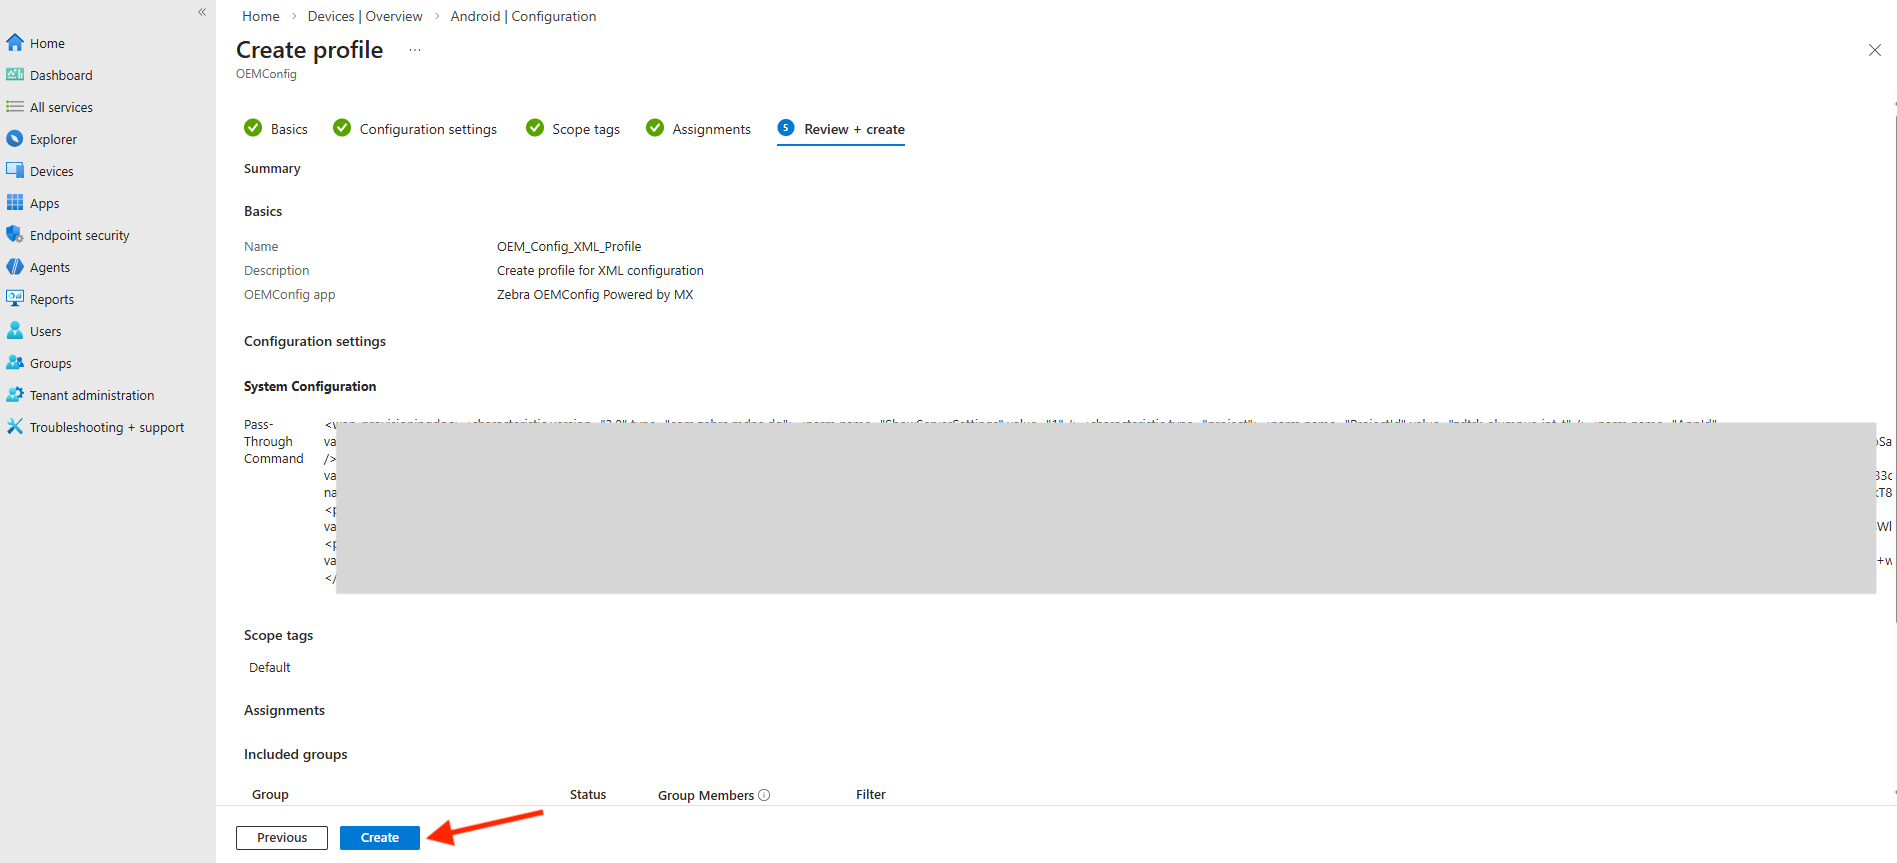
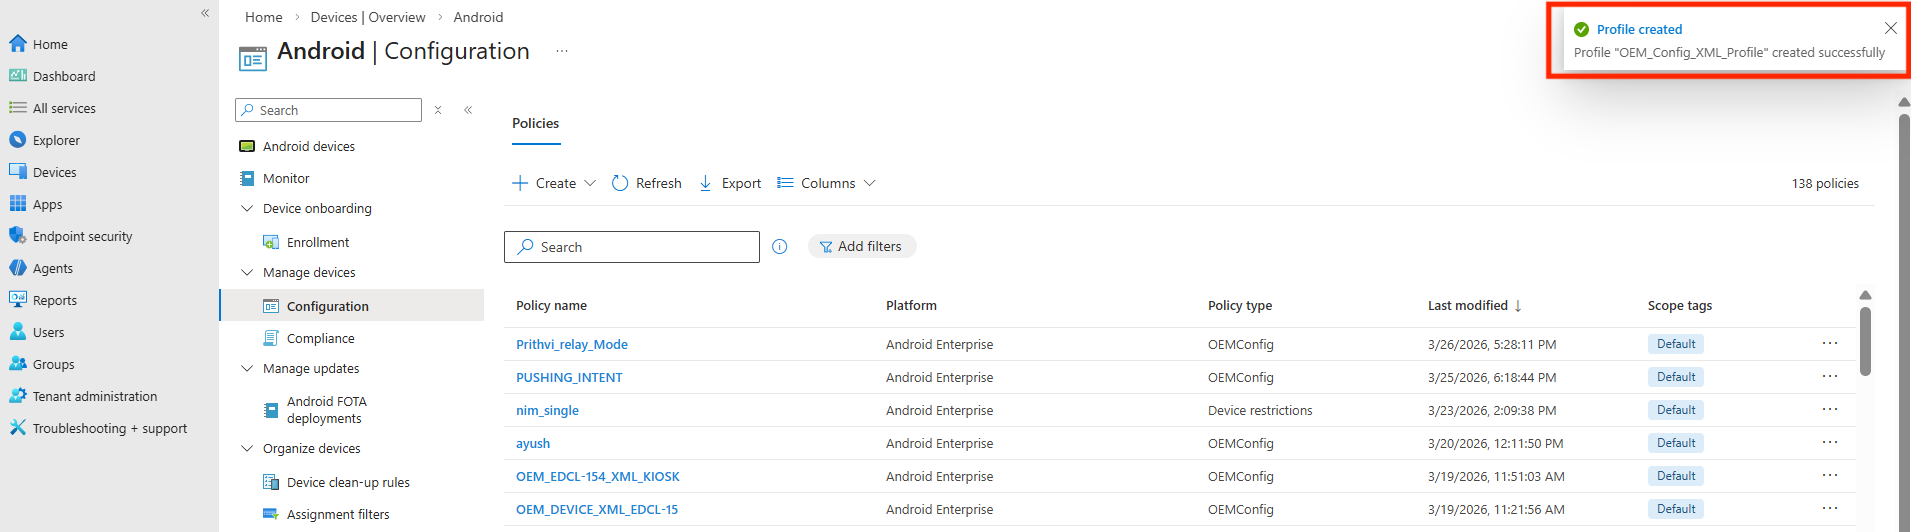
- When successful, a message appears showing the status and the profile is applied to the devices in the group.
Different Enrollment Scenarios: To enroll kiosks or transition devices from a previous installation, create a separate profile for each case. Use the corresponding .xml file from the Download Kit:
- For Kiosk Enrollment: Use
XML Configuration for Kiosk. - For Device Tracker Transition (Device): Use
Device Tracker XML Configuration for Device. - For Device Tracker Transition (Kiosk): Use
Device Tracker XML Configuration for Kiosk.
Option 3: Managed .Config File
Use this method to deploy the enrollment settings via Managed Configurations in Microsoft Intune. This enrolls the device with the DG/DGAM server.
- Download the
.configfile from the Download Kit. This.configfile containing the Managed Configuration settings is required for a later step. - In Microsoft Intune, create a profile to enroll the device to Device Guardian. From the left menu, click Apps > Configuration. Click Create and select Managed devices.
- Enter or select the following, then click OK.
- Name: [Enter a name for the policy]
- Platform: Android Enterprise
- Profile Type: Fully Manged, Dedicated, and Corporate-Owned Work Profile Only
- Targeted App: Device Guardian
- Click Save.
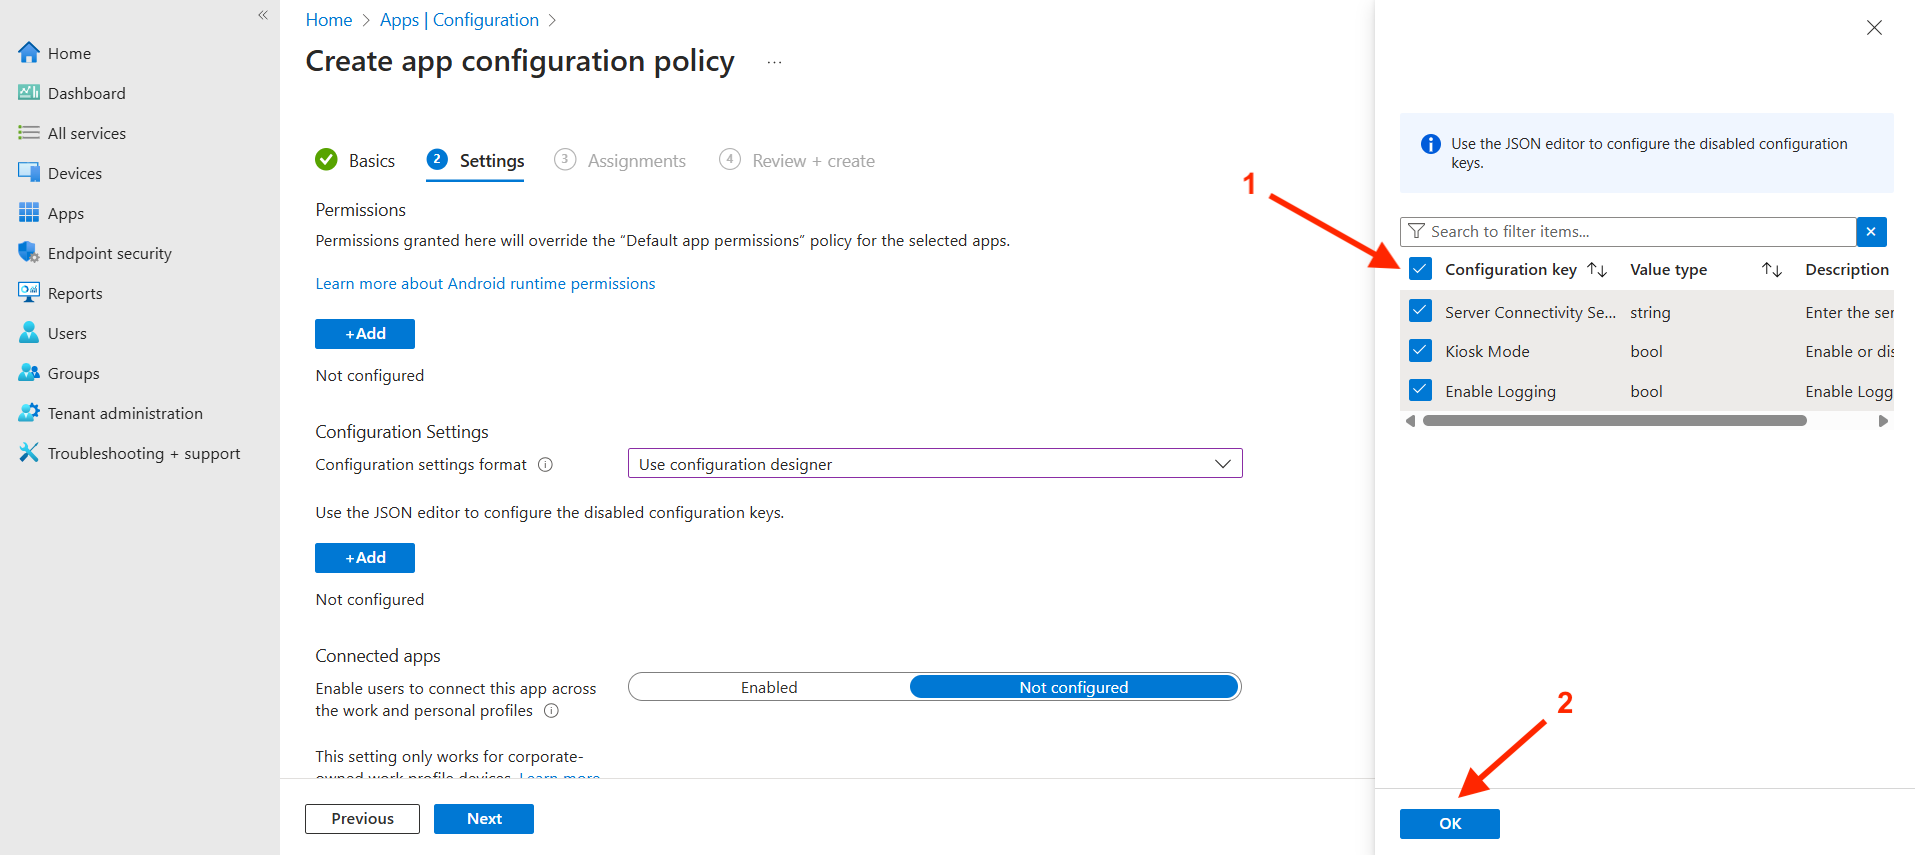
- In the Settings screen, for Configuration settings format select Use configuration designer. Click Next.
- Select all the configuration keys and click OK.
- If using the Managed Configuration method from Part II (Method 2), copy and paste the content from the Managed Configurations
.configfile into Server Connectivity Settings. Click Next.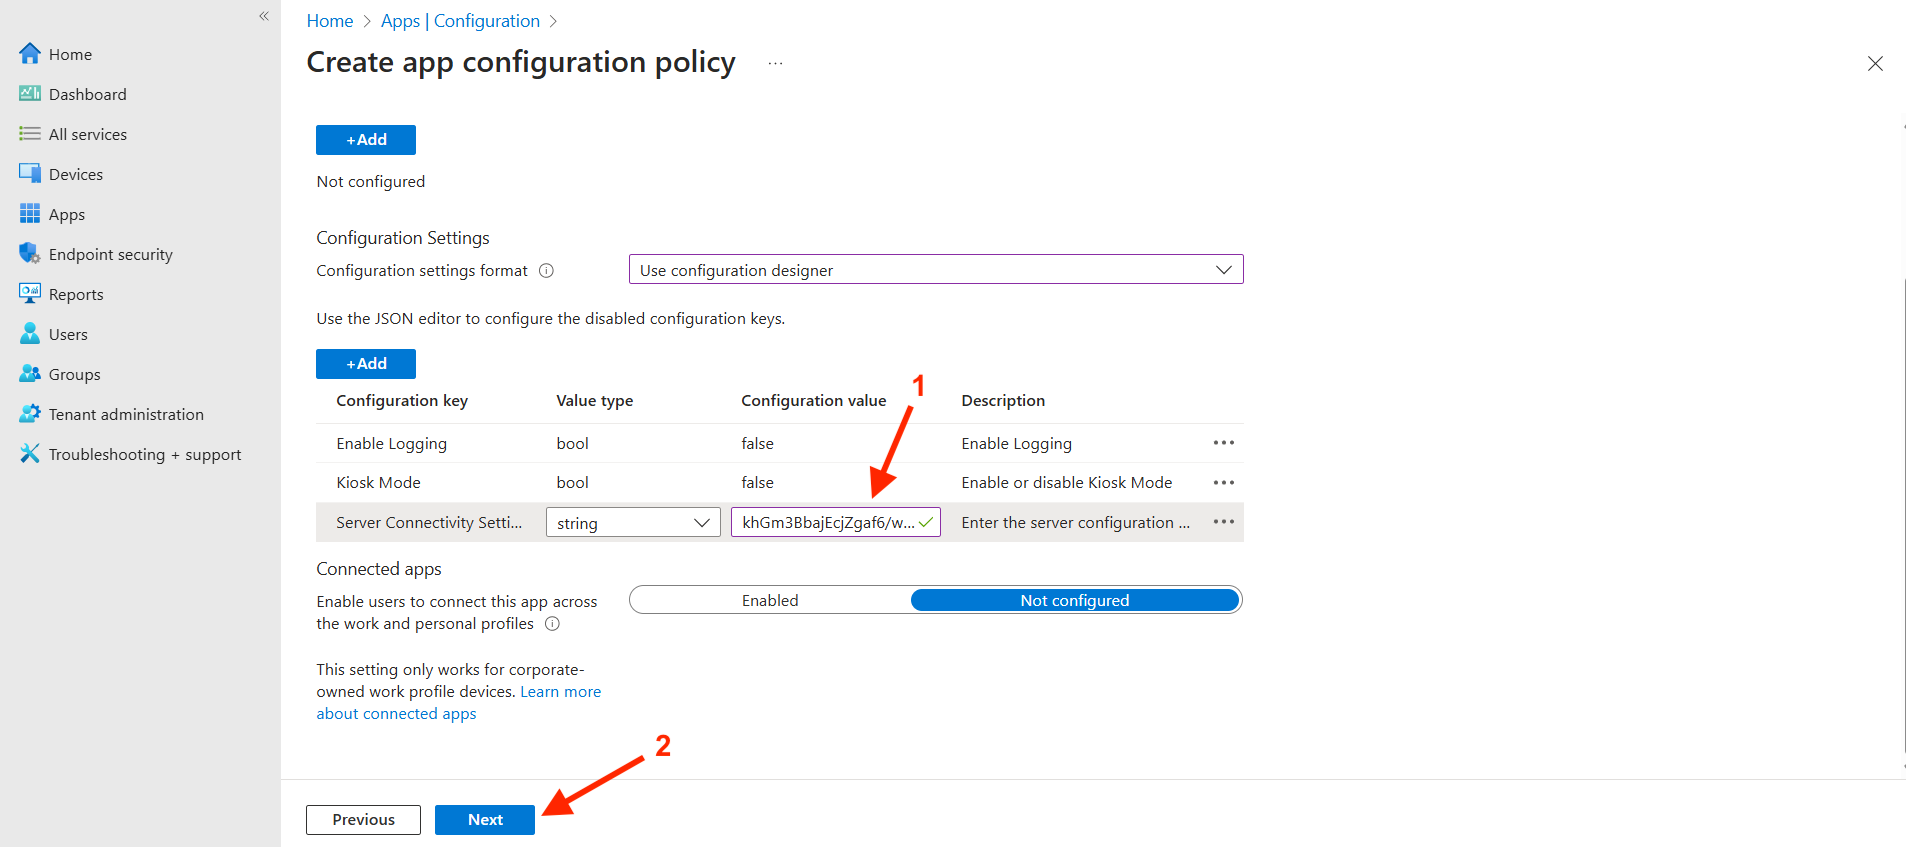
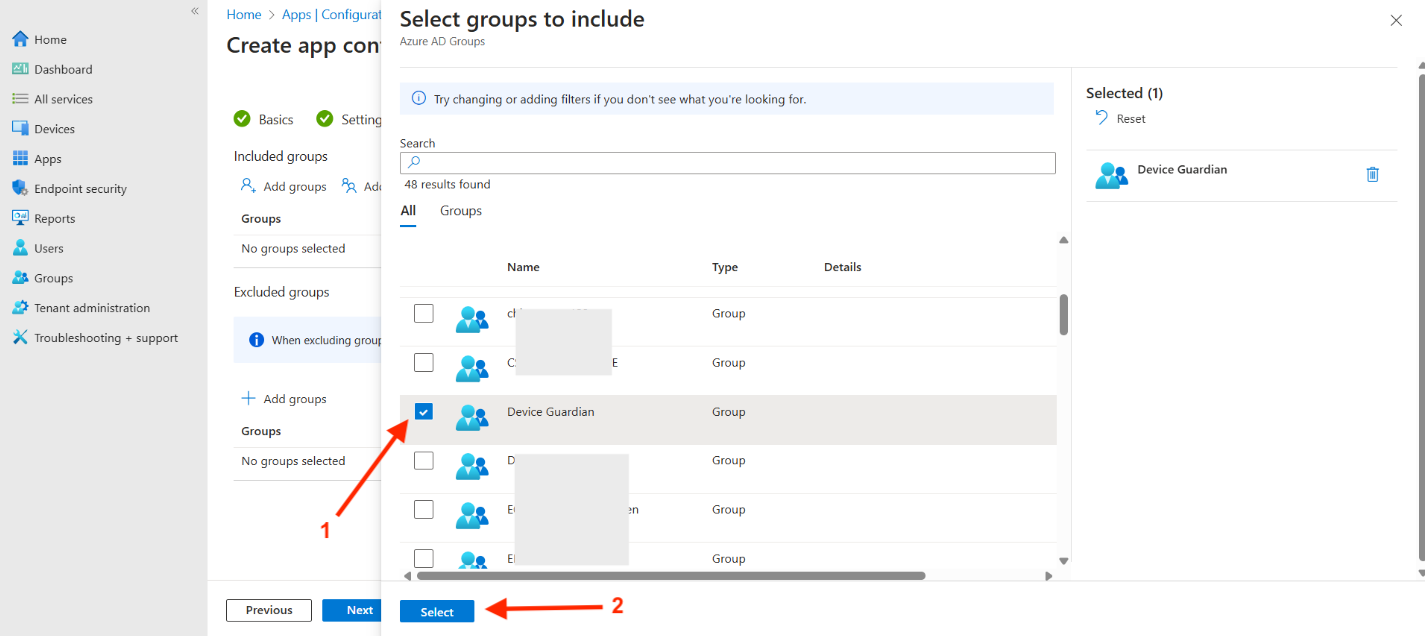
- Under Included groups, click Add groups.
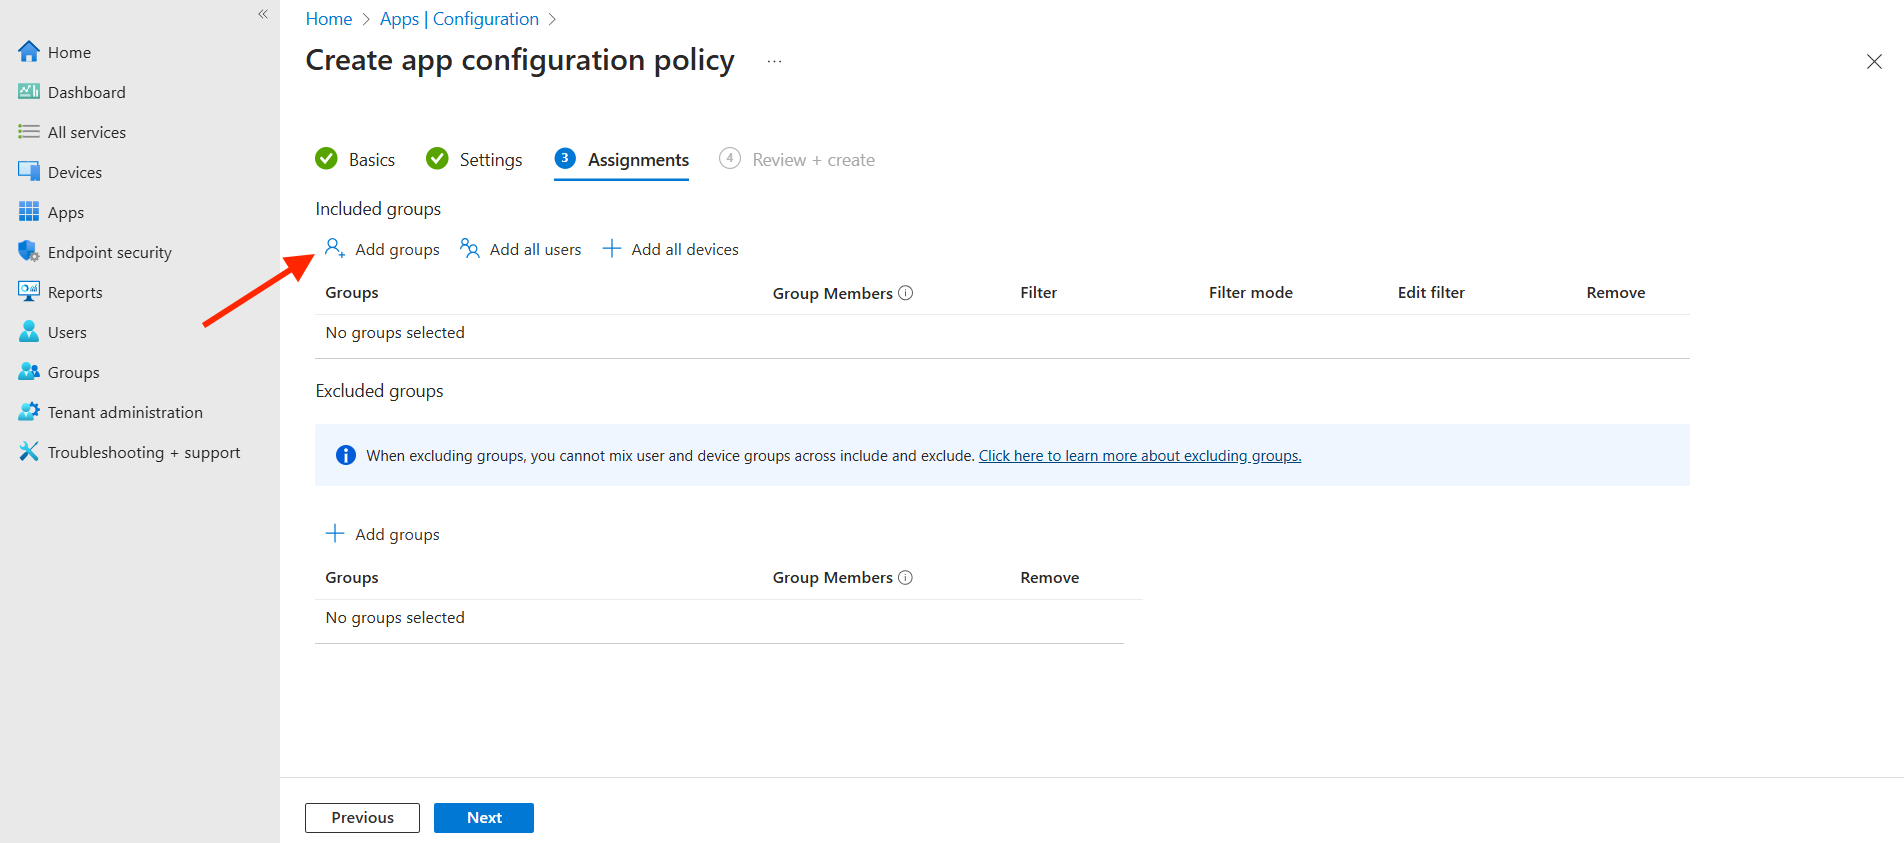
- Choose the group to apply the policy and click Select.
- Click Next.
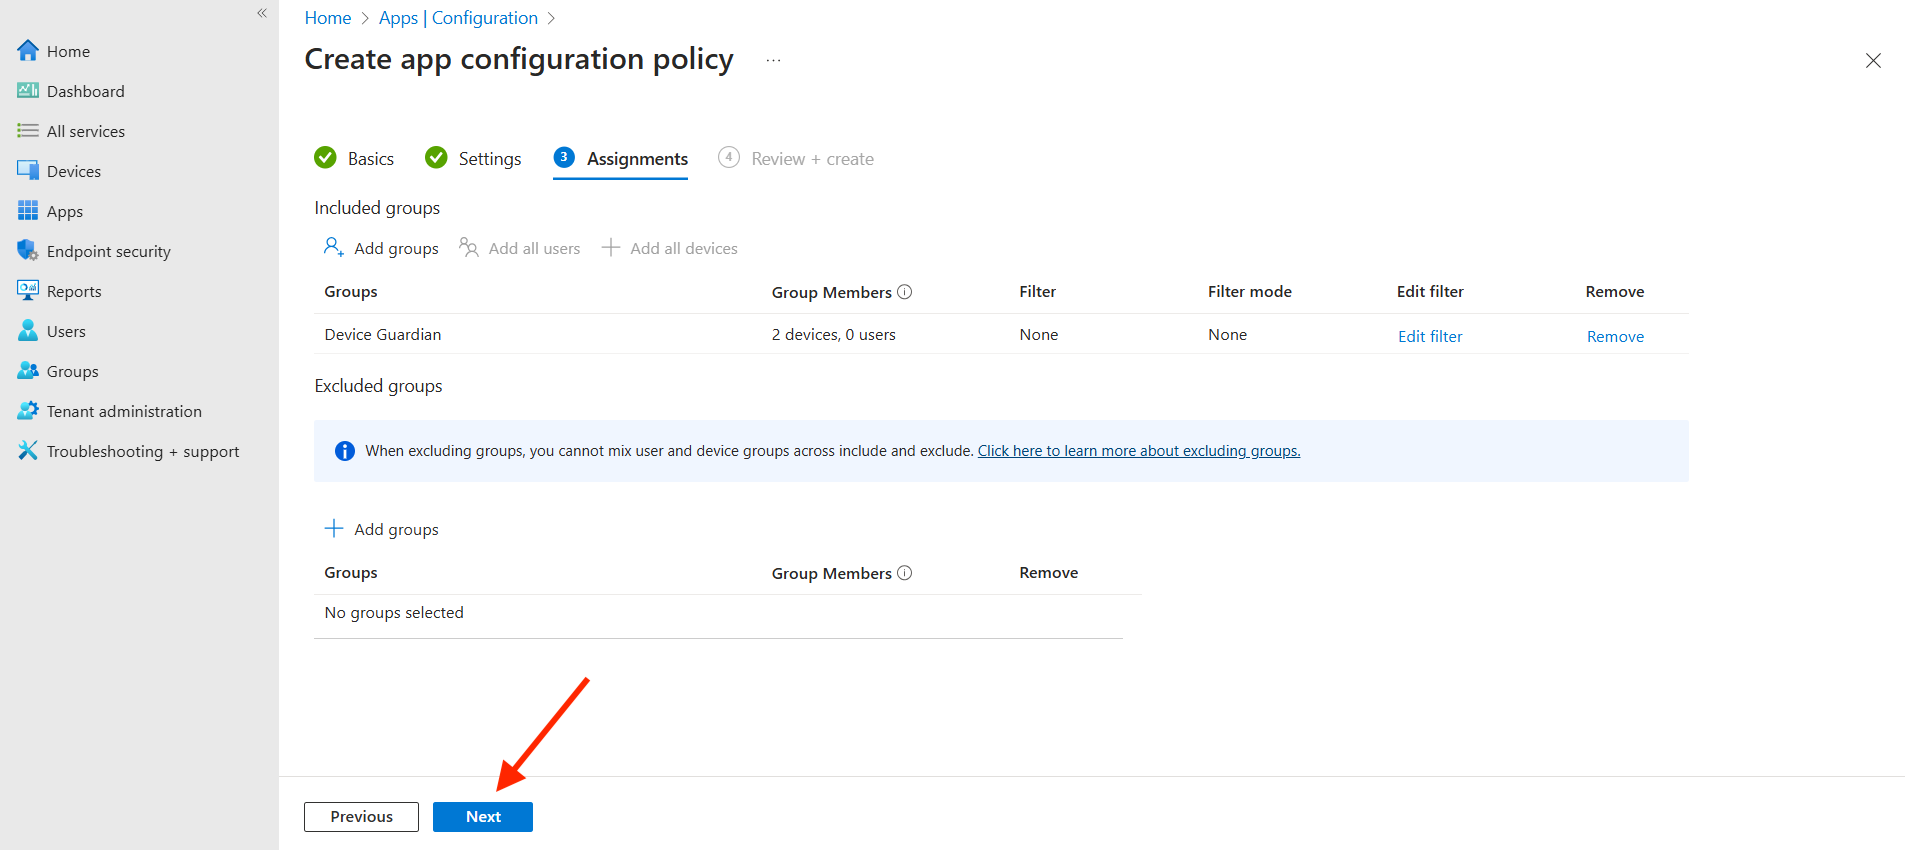
- Review the configuration and click Create.
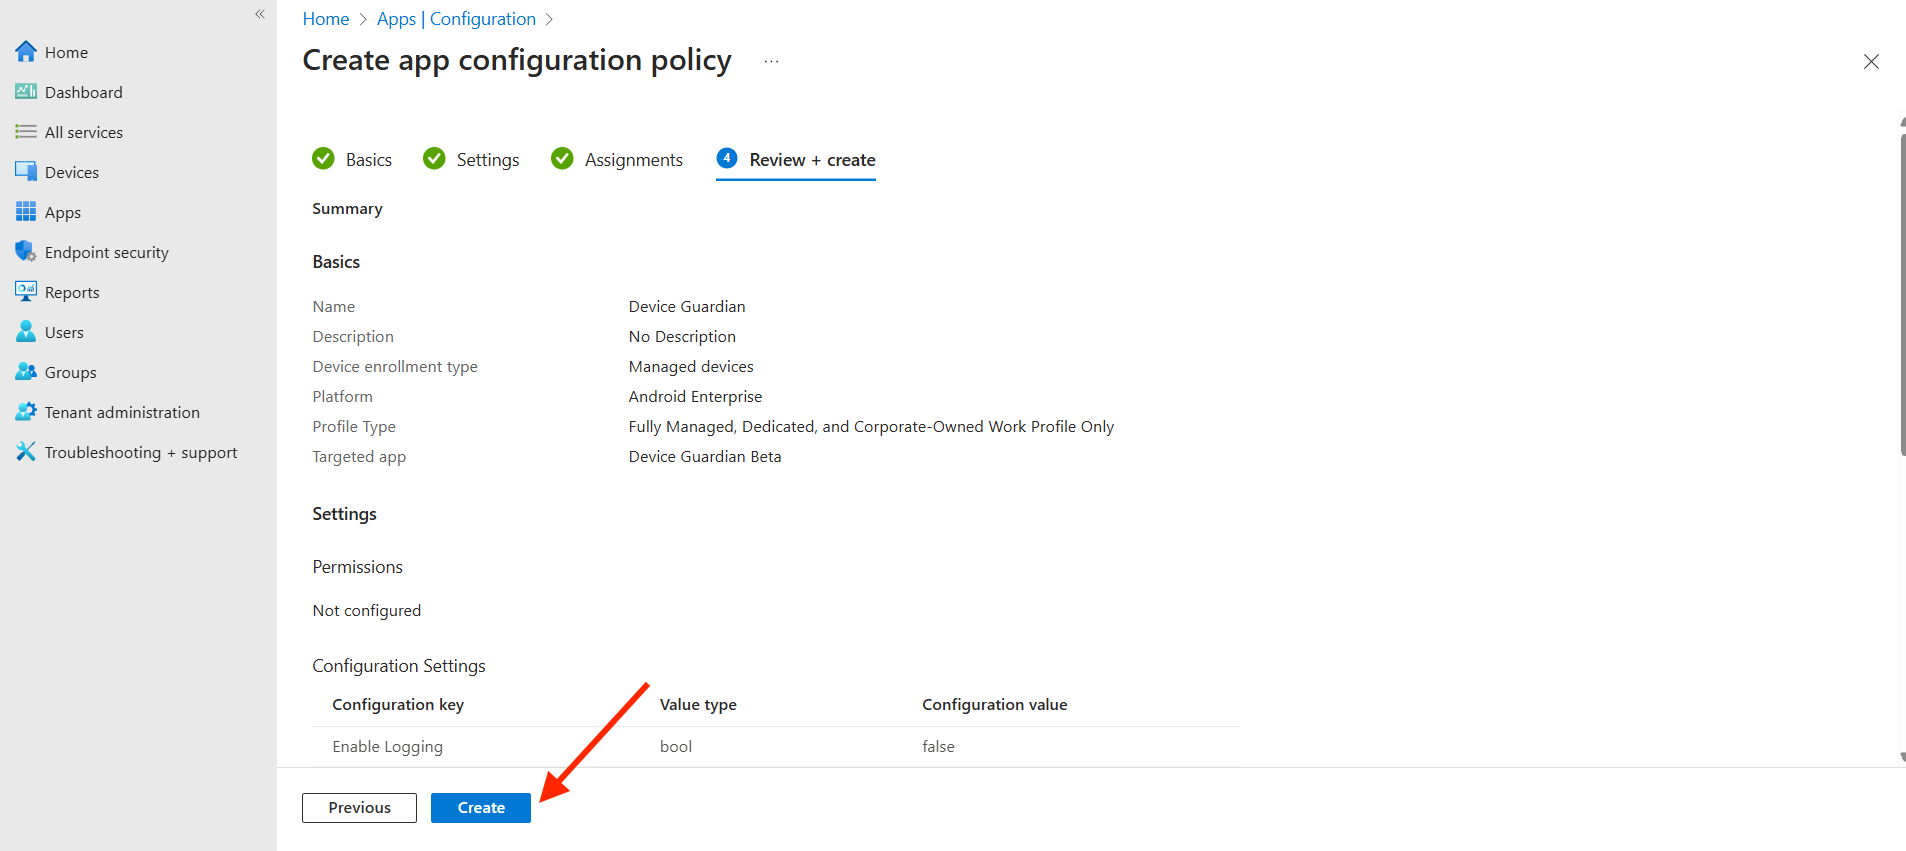 Device Guardian is enrolled to the server.
Part IV: Send Intent (Android 11 Only)
For Android 11 devices, an intent must be sent to start Device Guardian, allowing the configurations to be applied:
In the Microsoft Intune web console, go to Apps and select Android.
Click Create.
For App type, select Managed Google Play app and click Select.
Search for Zebra OEMConfig app, then click on the app.

Click Select, then click Sync.
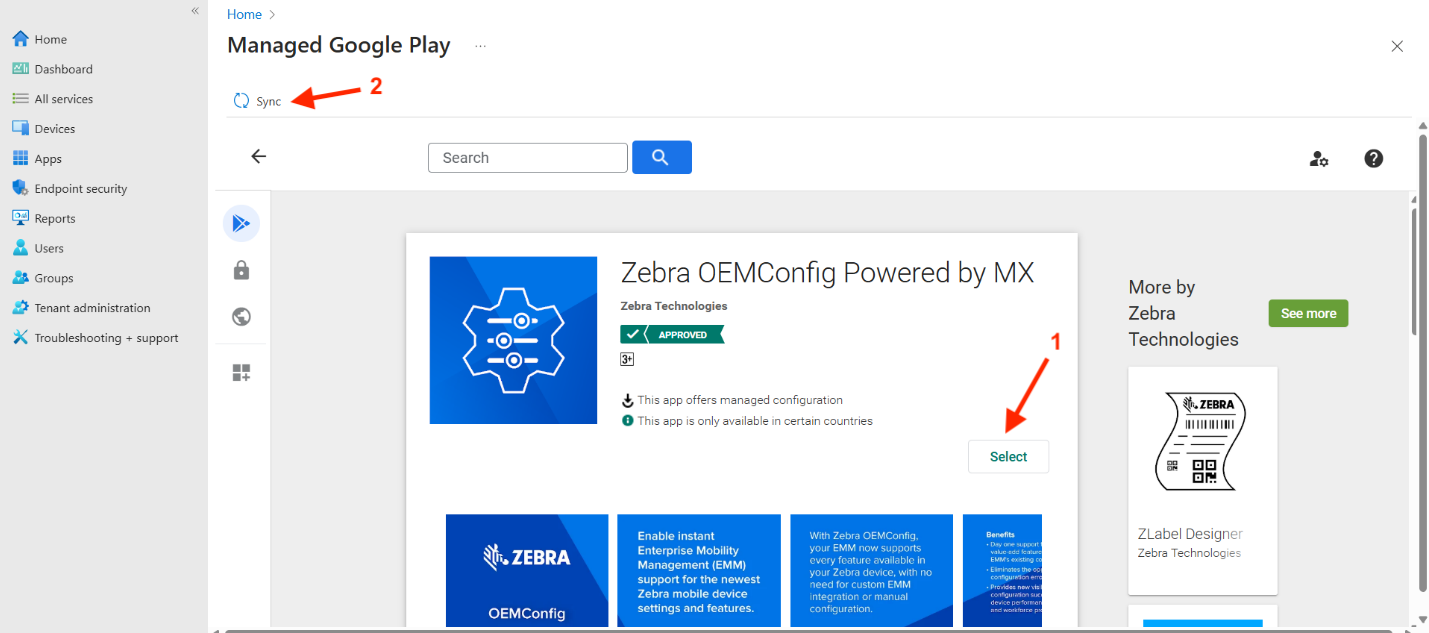
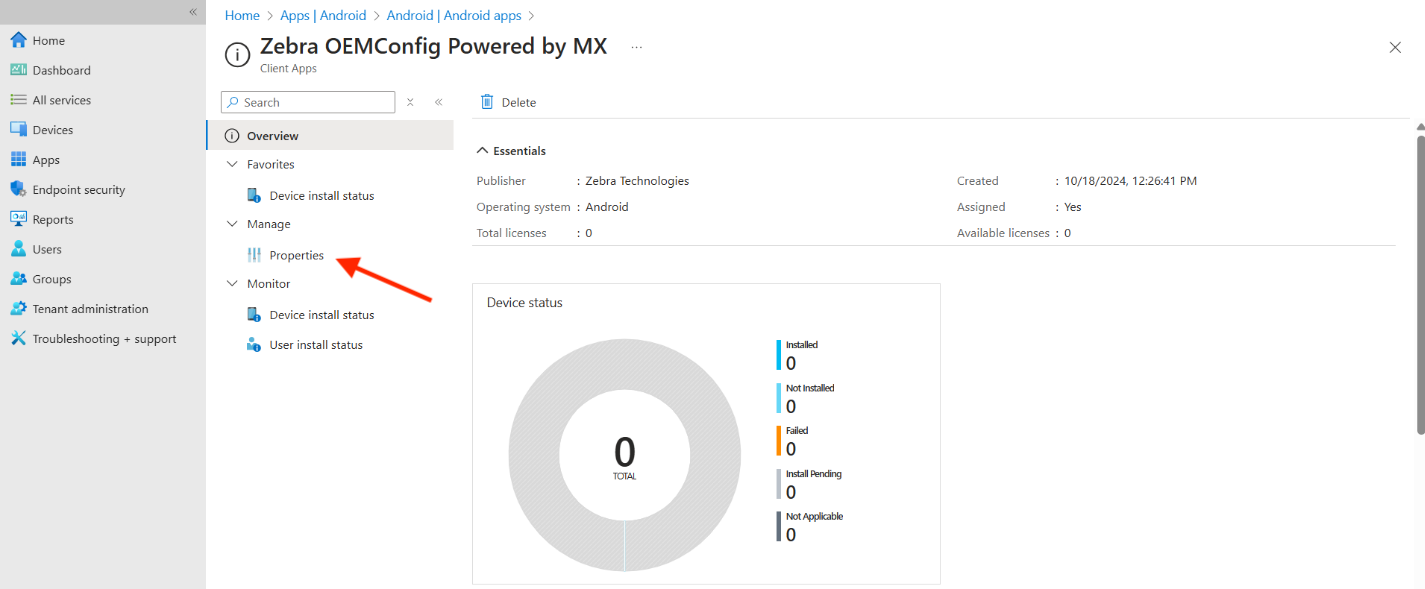
The Zebra OEMConfig app is added to the app list. Select the app.

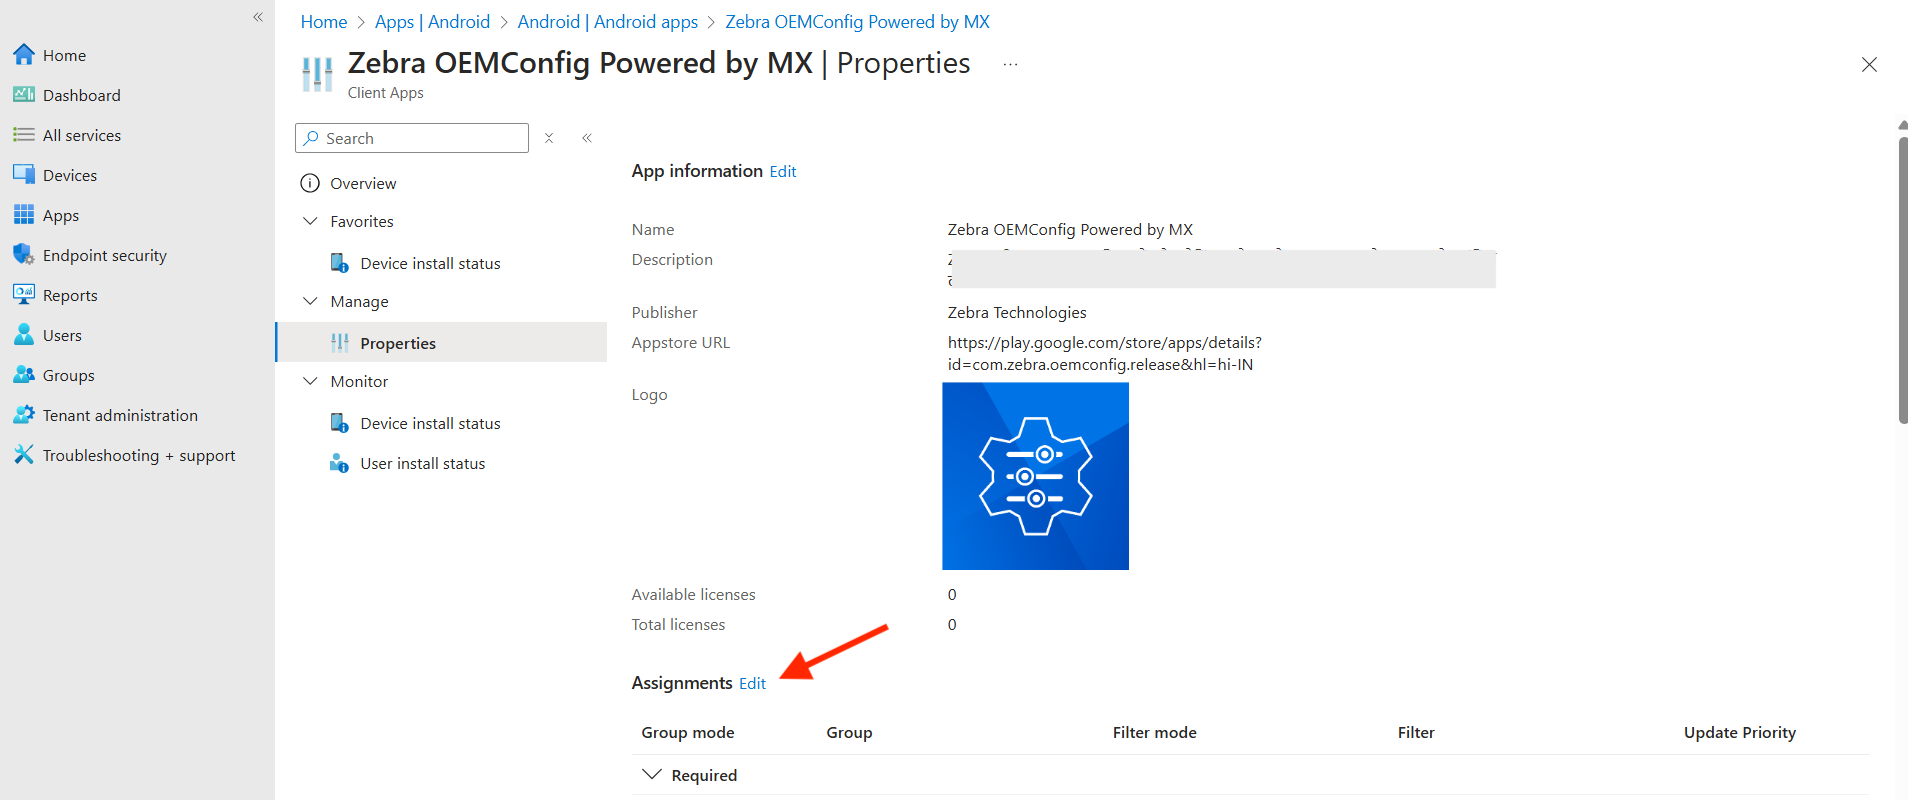
Click Properties.
By Assignments, click Edit.
Under the Required section, click Add group.
Choose the required device group, then click Select.
The group is added. To enable automatic app installation, update the priority by setting it to high. Under Update Priority, click Default.
For Update Priority, select High Priority. Then, click OK.
Check that the device group is added to the list, then click Review and Save.
Click Save. The OEMConfig app gets installed to the assigned device group.
Configure the Device Guardian app to get enrolled to the server. Go to Devices and select Android.
Under Managed Devices, click Configuration. Click Create > New Policy.

Select the following and click Create: - Platform: Android Enterprise - Profile Type: OEMConfig
Enter a name, click Select an OEMConfig app and select Zebra OEMConfig Powered by MX. Click Select. When the app is added, click Next.
In Configuration settings, scroll down and select System Configuration.
Copy and paste the following text into the Pass-Through Command field, then click Next:
<wap-provisioningdoc>
    <characteristic version="9.2" type="Intent">
        <parm name="Action" value="StartActivity"/>
        <parm name="ActionName" value="android.intent.action.MAIN"/>
        <parm name="Type" value="explicit"/>
        <parm name="Package" value="com.zebra.mdna.dg"/>
        <parm name="Class" value="com.zebra.mdna.dg.SplashActivity"/>
    </characteristic>
</wap-provisioningdoc>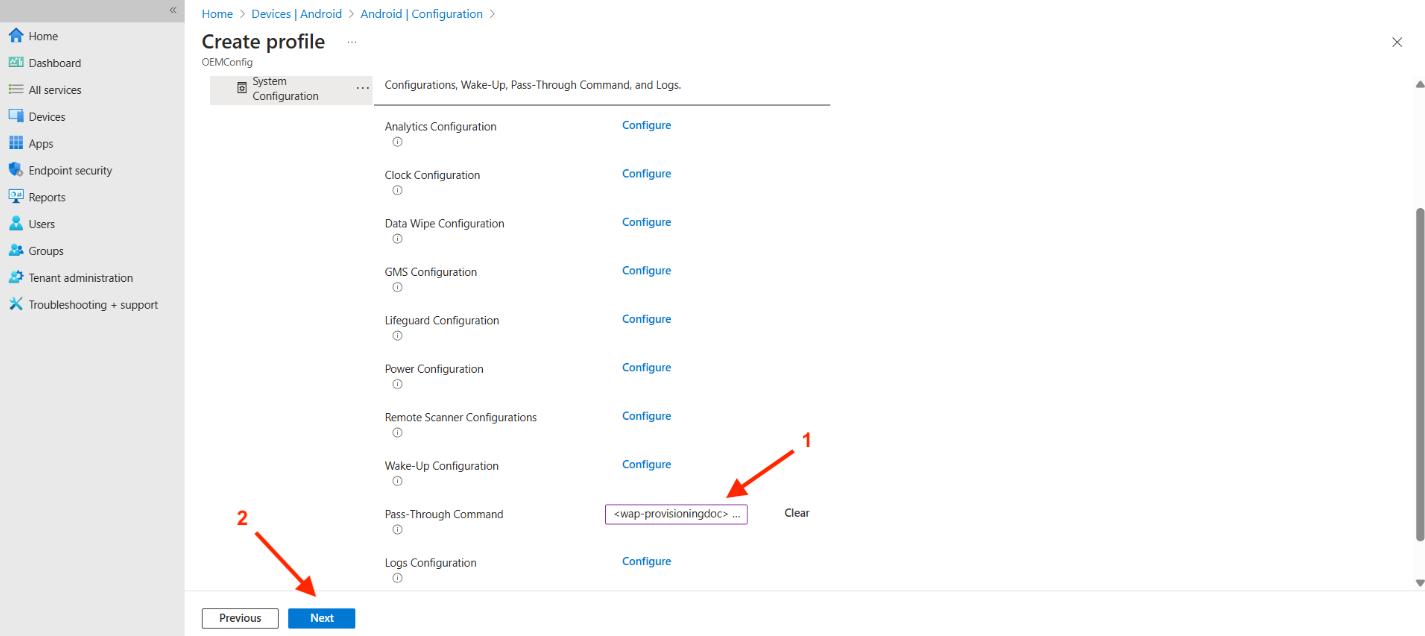
Click Next.
Under Included groups, click Add groups to assign the configurations to the devices.
Choose the device group and click Select.
The group is added. Click Next.
Review the changes and click Create. This launches Device Guardian, allowing the app configurations to be applied.

Part V: Install & Configure Identity Guardian (DGAM Only)
Identity Guardian is required for user authentication when using DGAM. When adding device users via Bulk Upload, follow these steps.
- Create an App Setup Profile for Identity Guardian.
- Select Yes when prompted to Configure App.
- In the Usage Mode section, Select AUTHENTICATION.
- In the Authentication Configuration section, select the following:
- Comparison Source: CLOUD
- Primary Authentication Factor: CLOUD_PASSCODE
- Fallback Authentication Method: ADMIN BYBASS PASSCODE
- Select the remaining options as desired.
- Deploy the Profile to the target device(s).
After deployment, the device user experiences the following screen progression when logging in:
Identity Guardian login process
Part VI: Install & Configure the ZDNA Cloud Client App (DGAM Only)
The Zebra DNA Cloud client is required to add device users in DGAM.
- Download the ZDNA Config Token:
- In the web portal, navigate to User Management > Device Users.
- Click ZDNA Config Token to download the file.
- Open the file and copy its contents.
- Apply the Token & Deploy the App via EMM: The general steps are provided below. For detailed instructions, see the Configure for a Mixed Population section within the ZDNA Cloud Setup guide and follow steps 1 to 3:
- Paste the copied token into Managed Configuration settings in ZDNA Cloud.
- Install and launch the app via EMM using one of these sources:
- Google Play
- Zebra.com
Using SOTI MobiControl
Follow these steps to use SOTI MobiControl to install DG/DGAM and apply a policy that enrolls the device with the DG/DGAM server.
Screen Variations Note: The screen UI may vary depending on the EMM version in use. Refer to your EMM user guide for additional guidance.
Part I: Enroll Device in MobiControl
Enroll the device in SOTI MobiControl using the standard EMM procedure.
Part II: Install DG/DGAM
Choose one of the following installation methods:
Option A: Google Play
Use this procedure to install DG/DGAM through Google Play.
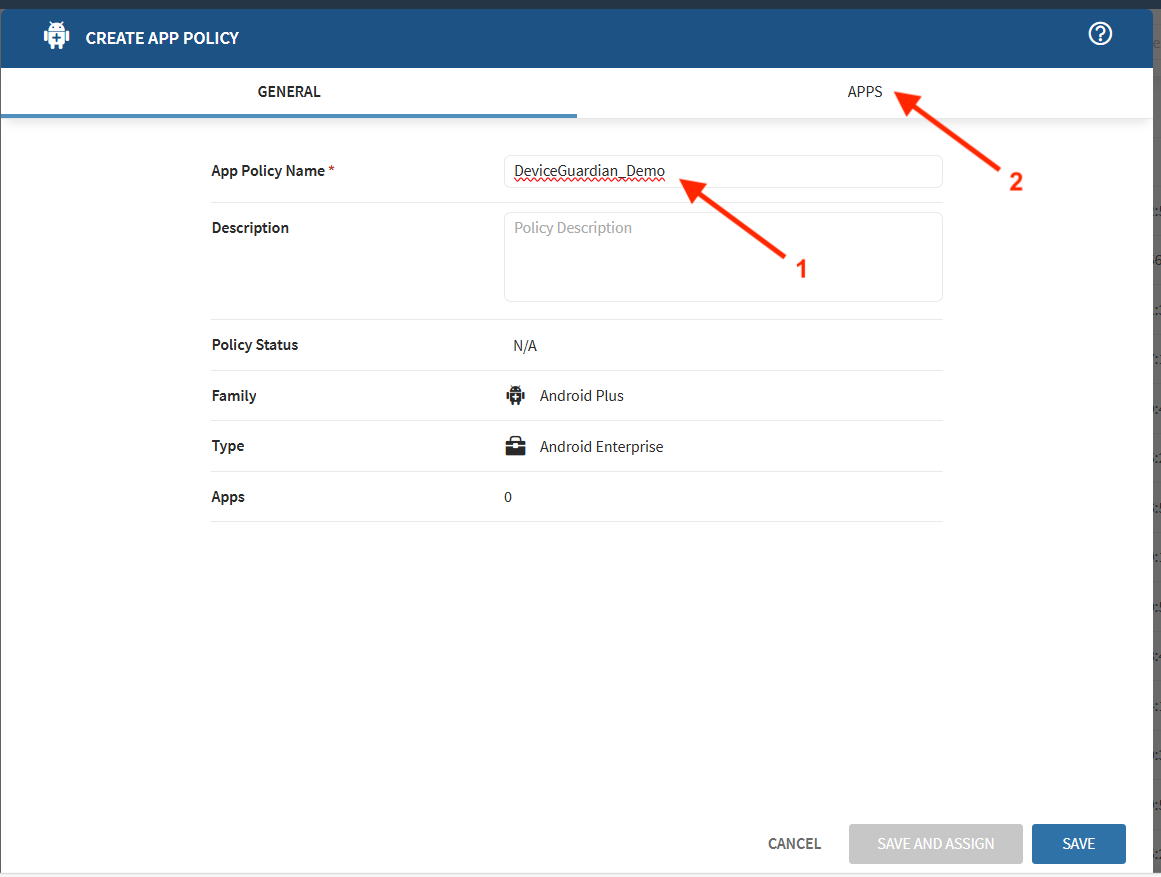
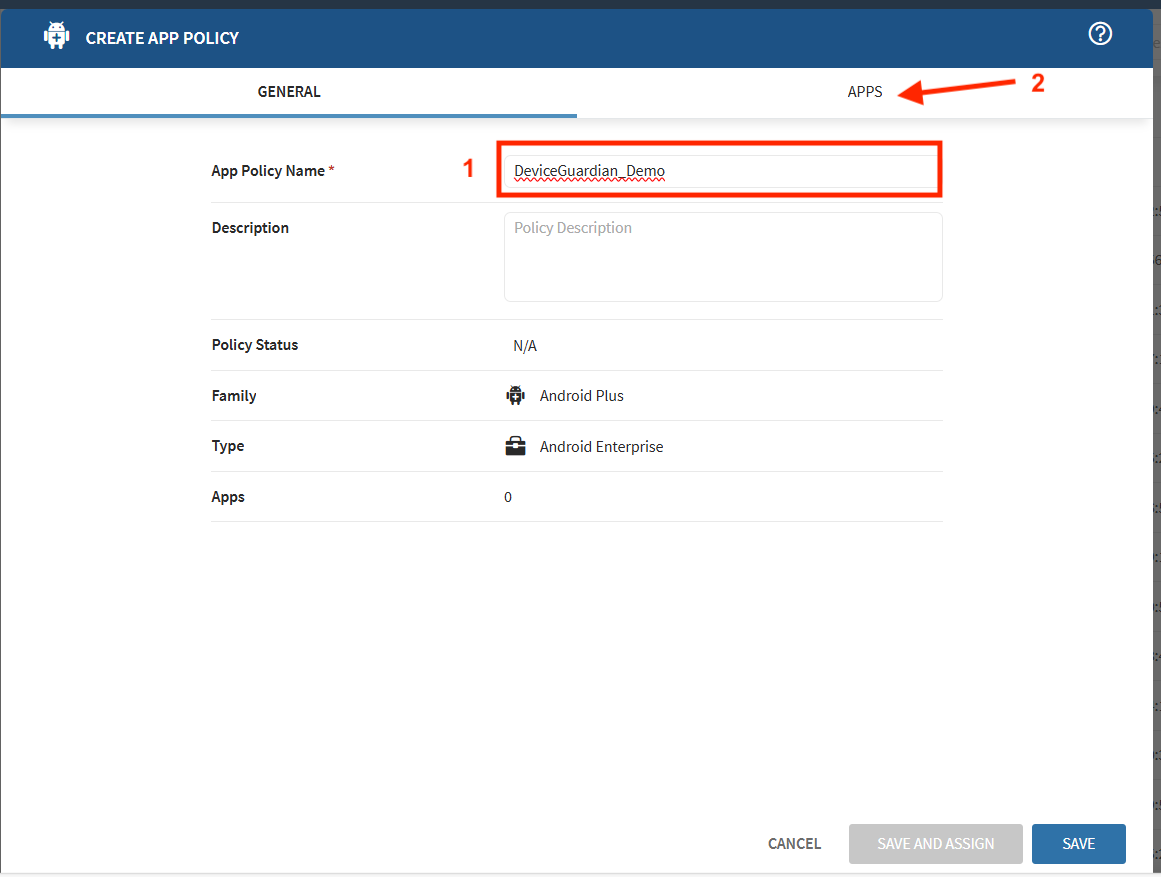
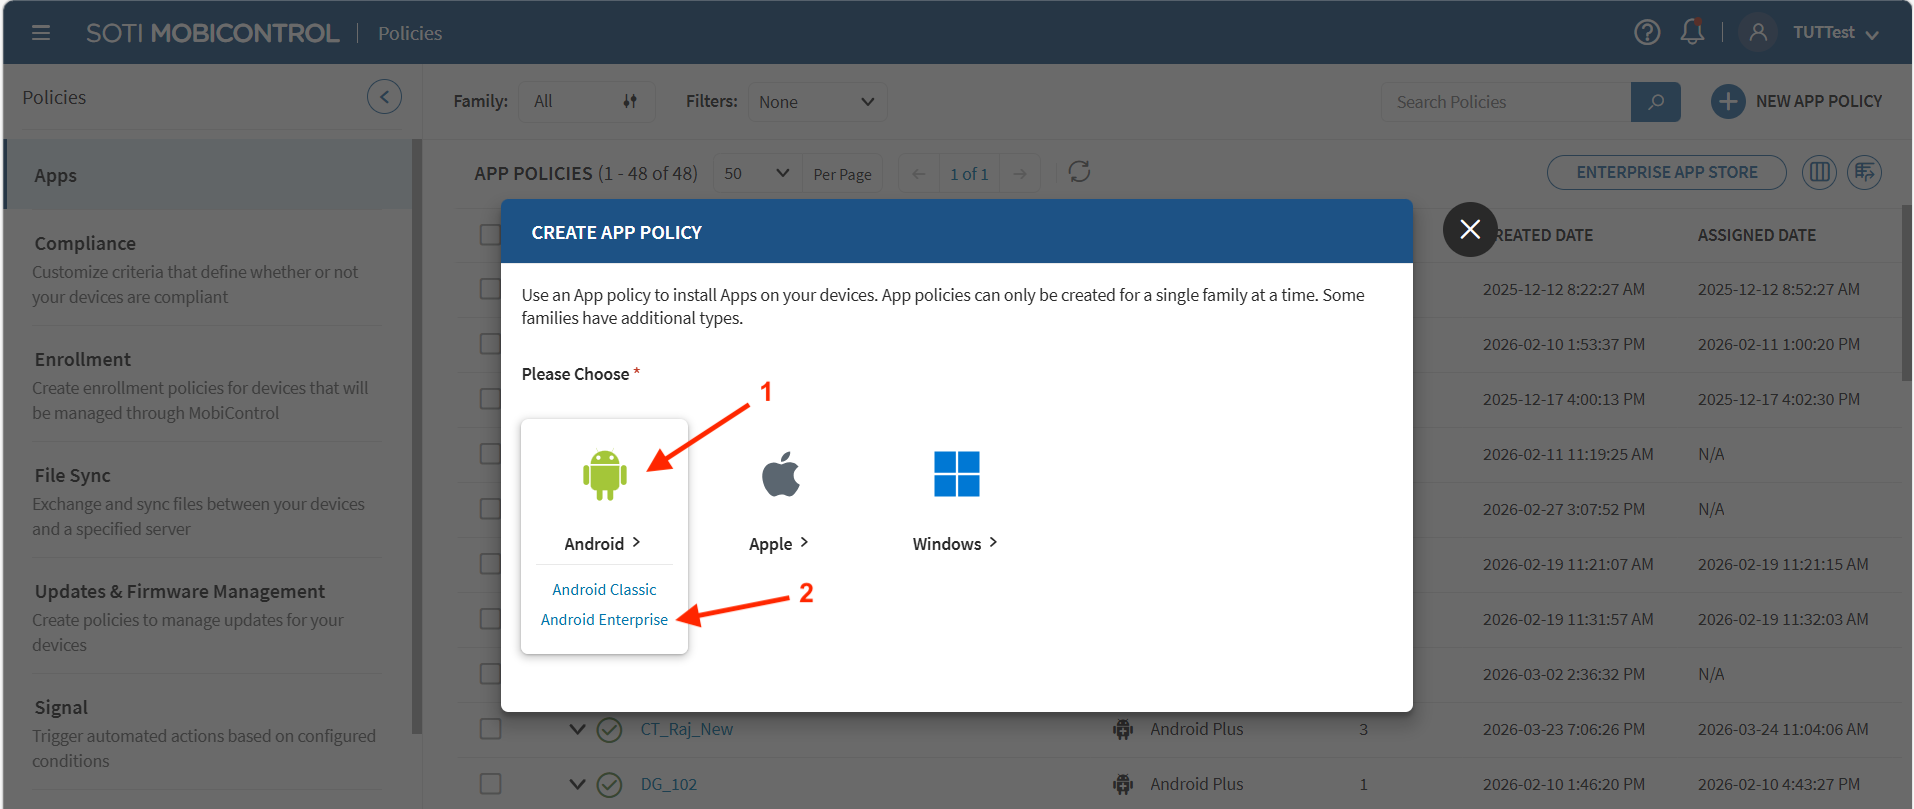
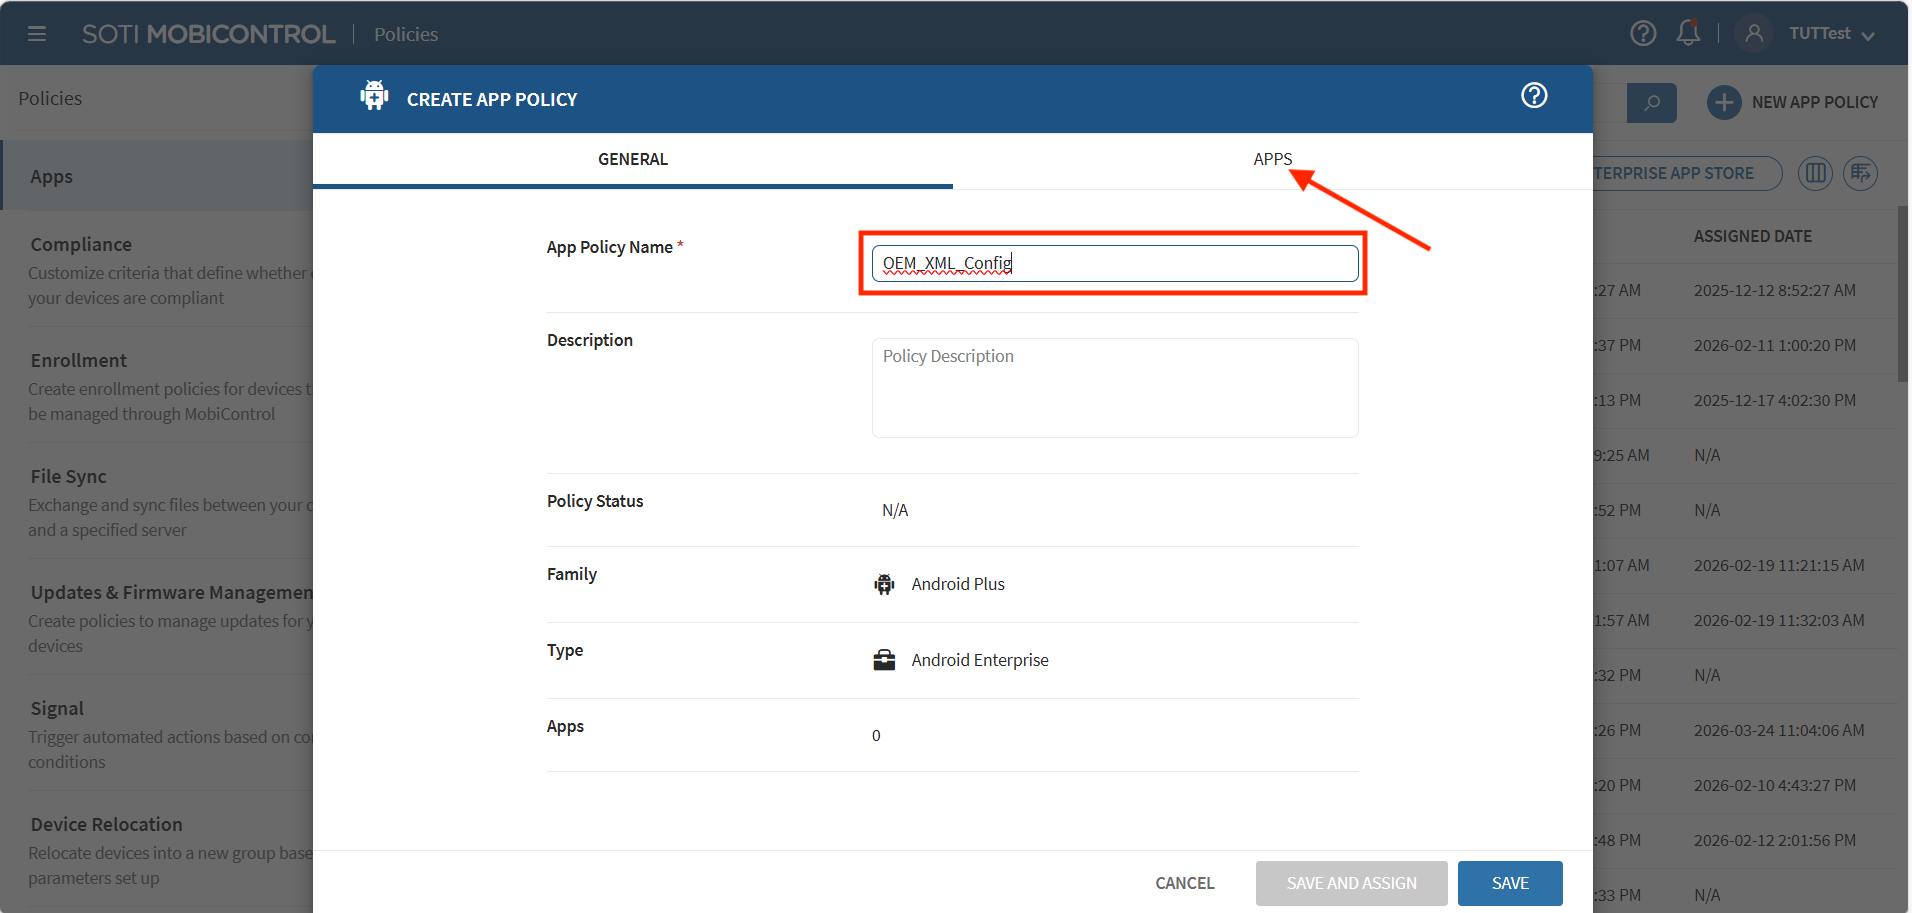
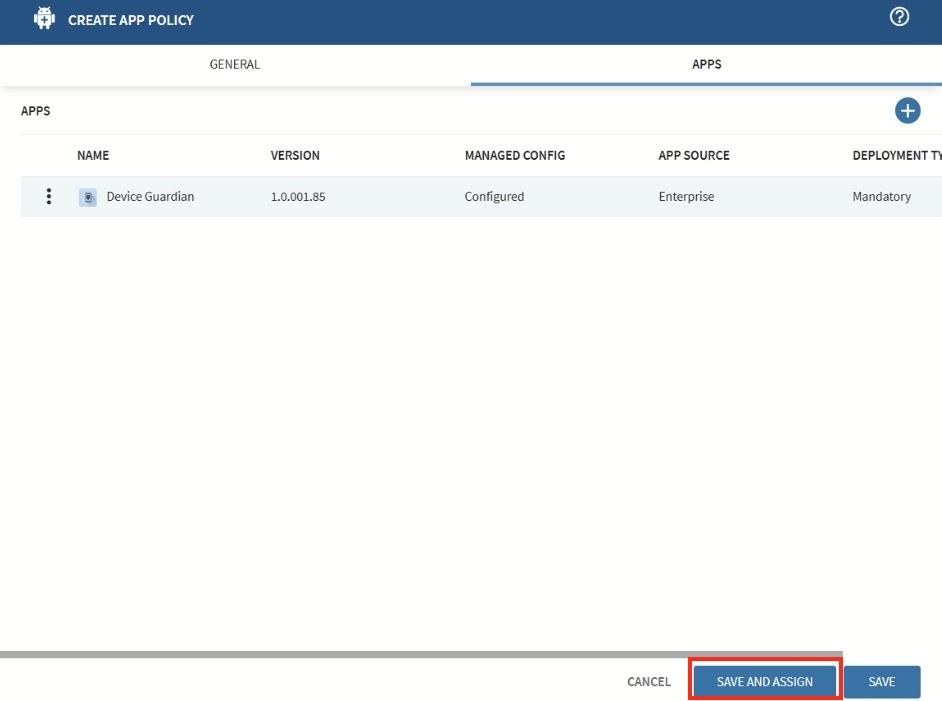
- In the SOTI MobiControl web console, go to Apps > Policies. Click New App Policy.
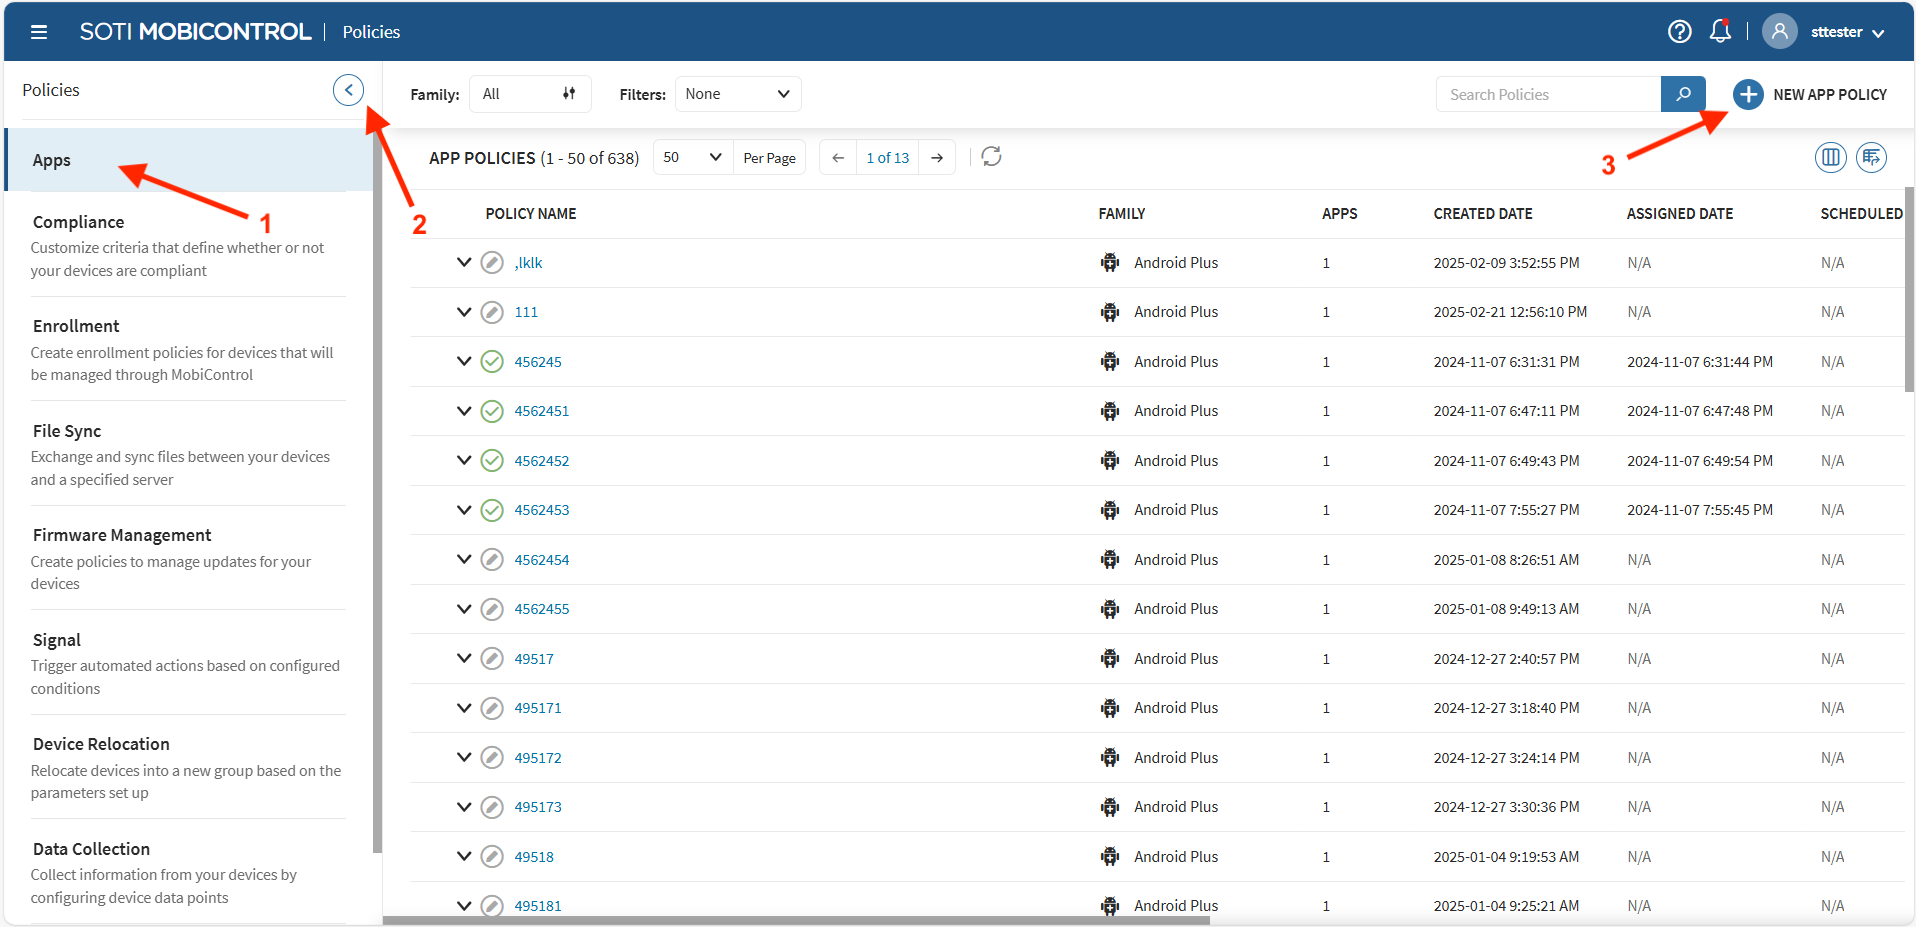
- Select Android Enterprise.
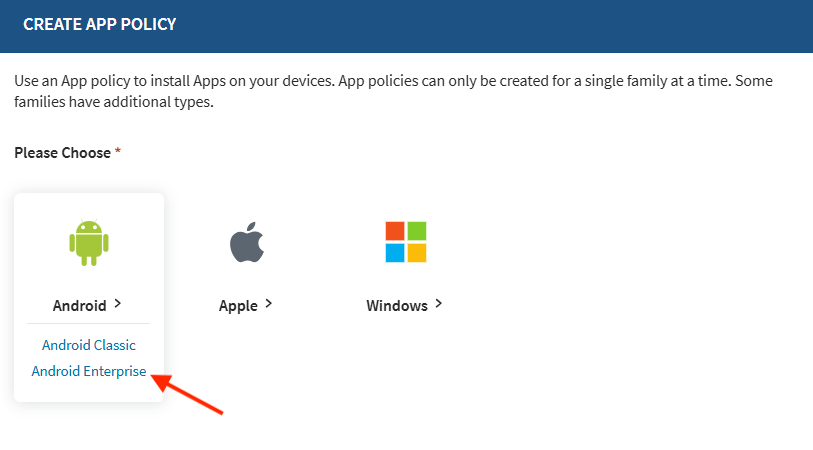
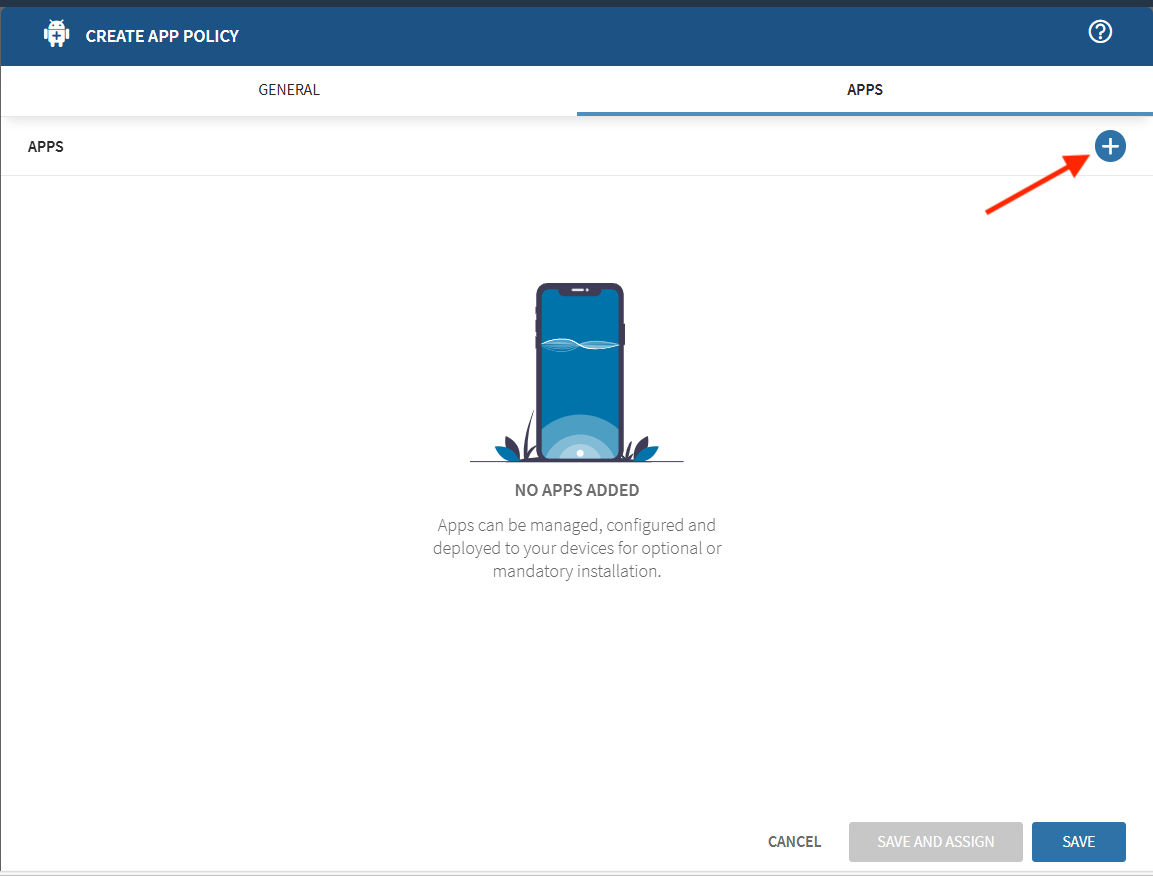
- Enter an App Policy Name, then click the Apps tab.
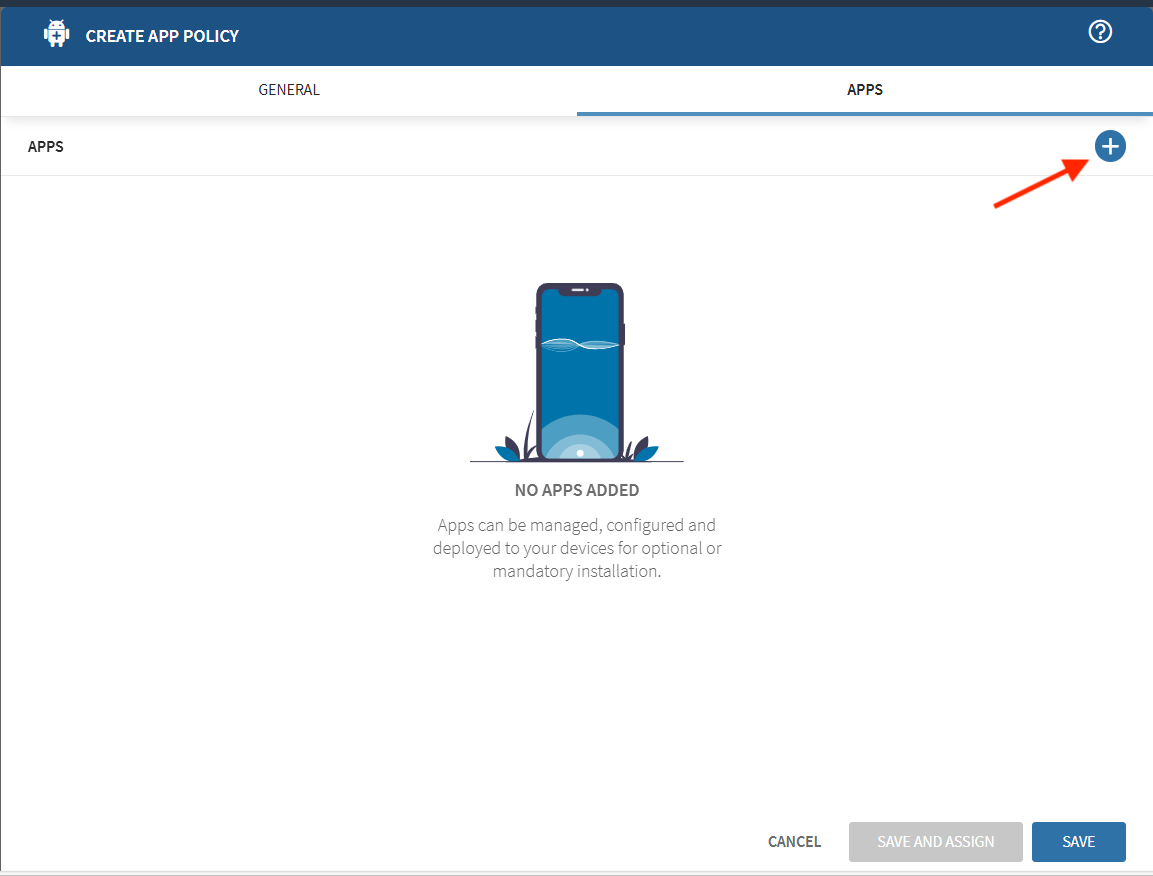
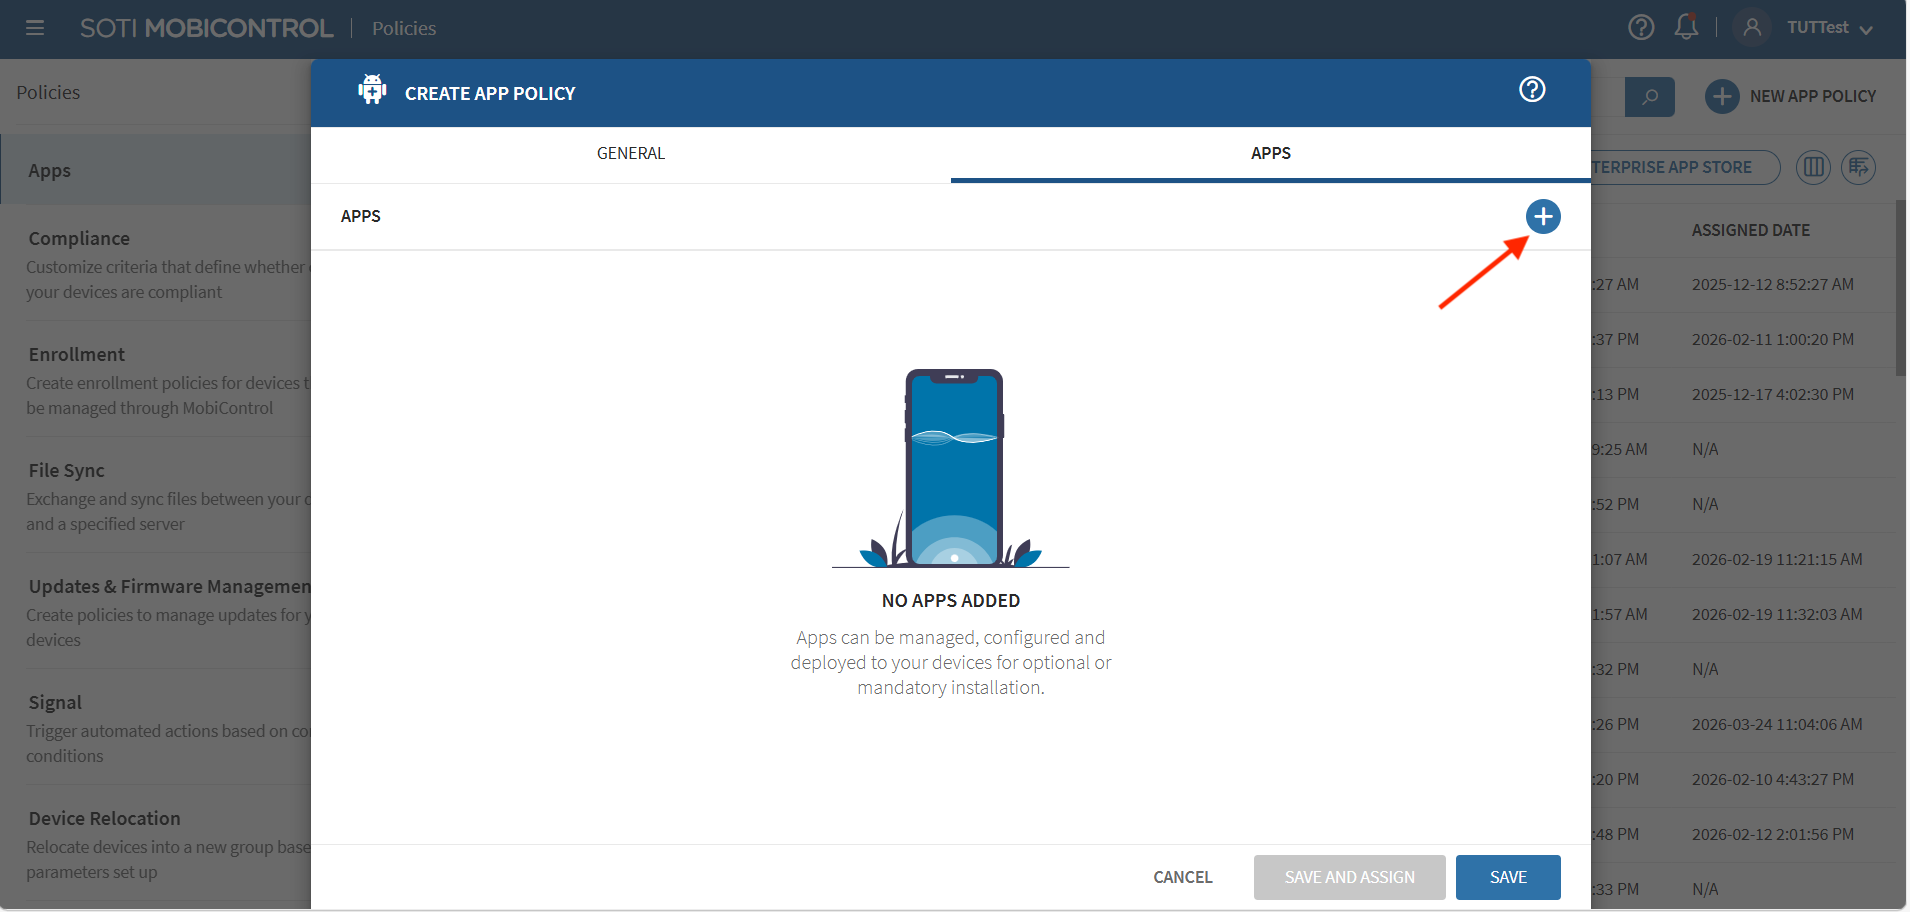
- Click +.
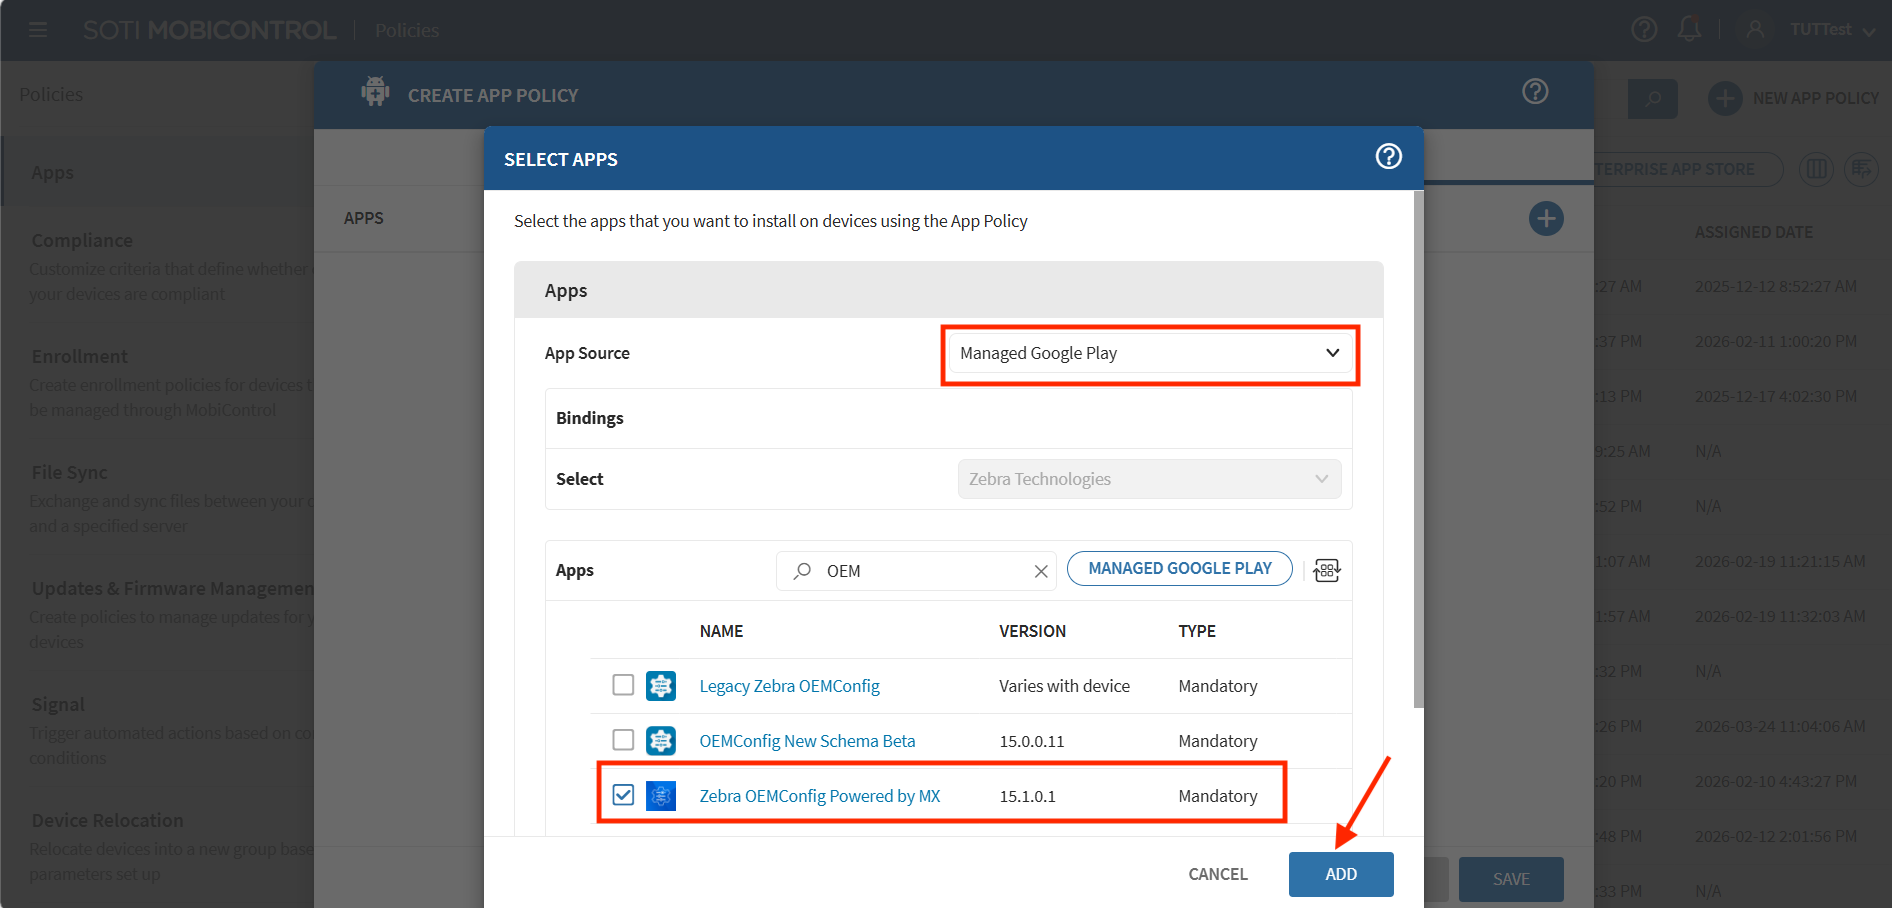
- Select the following, then search for the Device Guardian app.
- App Source: Managed Google Play
- Select: Zebra Technologies
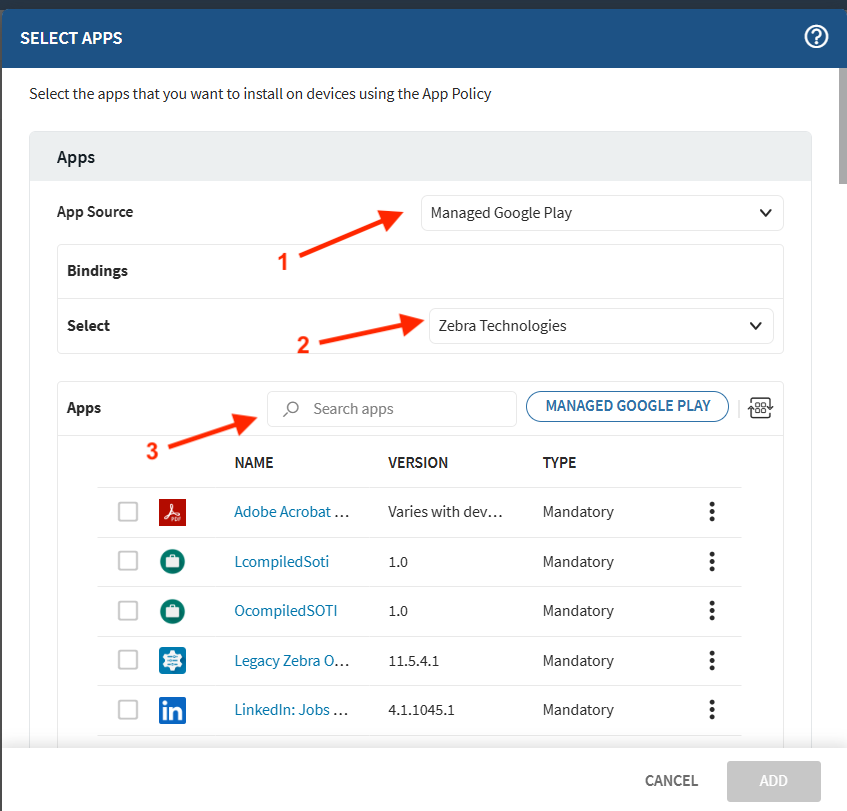
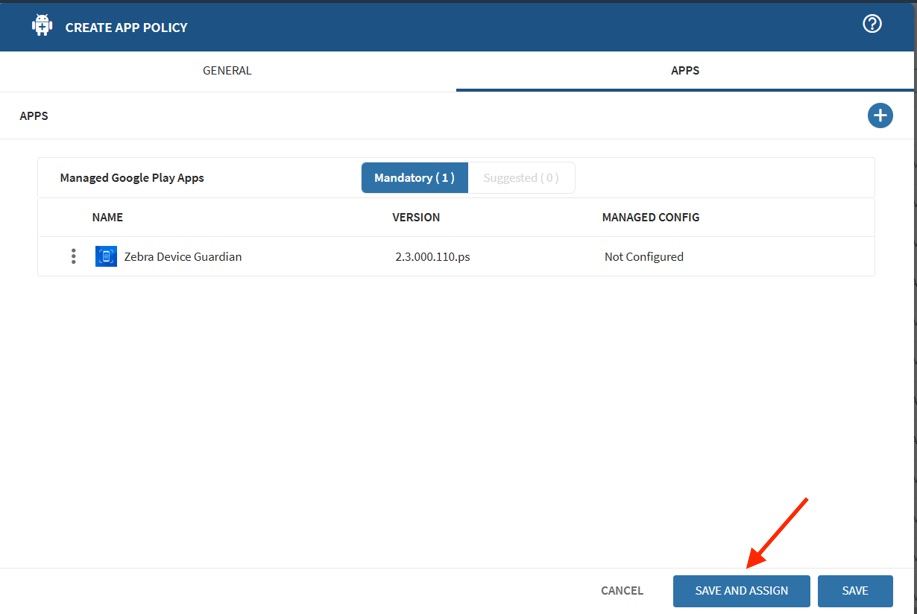
- Click on the Device Guardian app.
- Click Save and Assign.
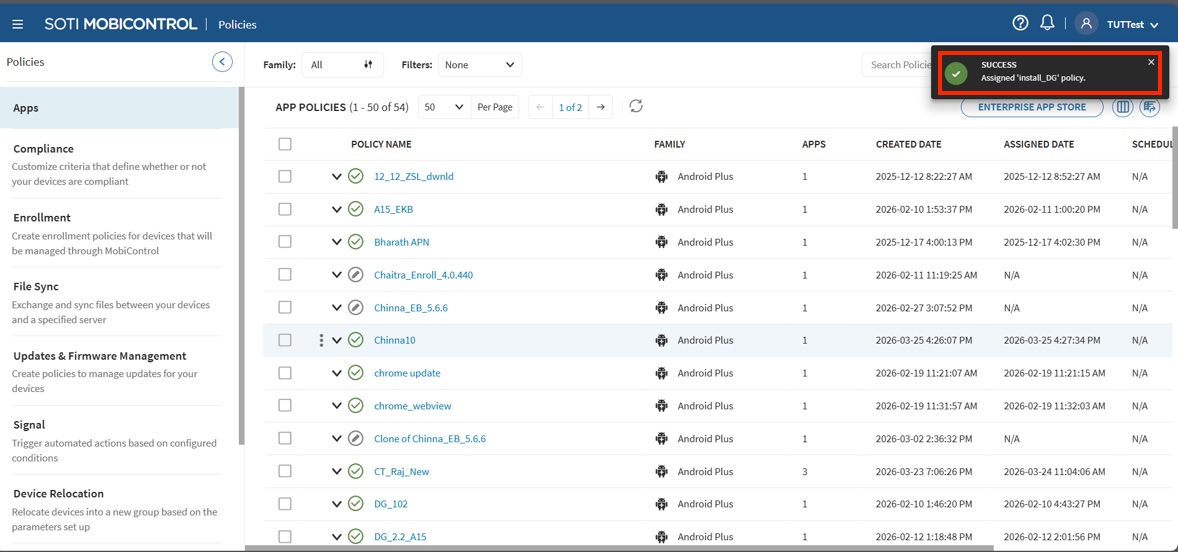
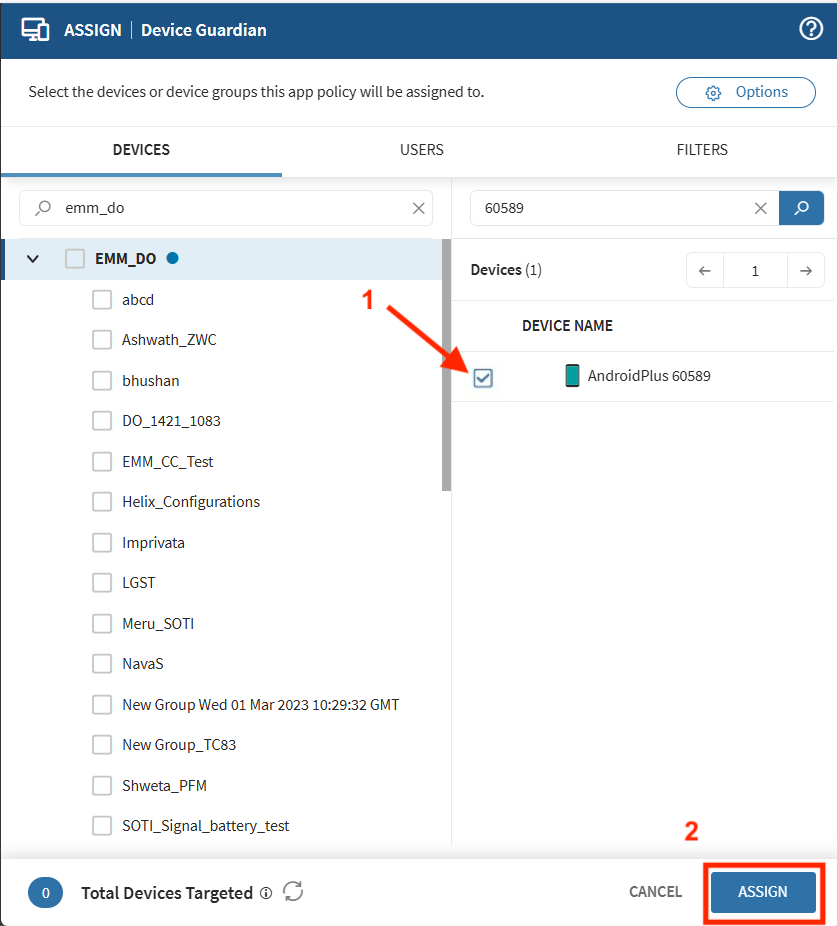
- When successful, a status message appears.
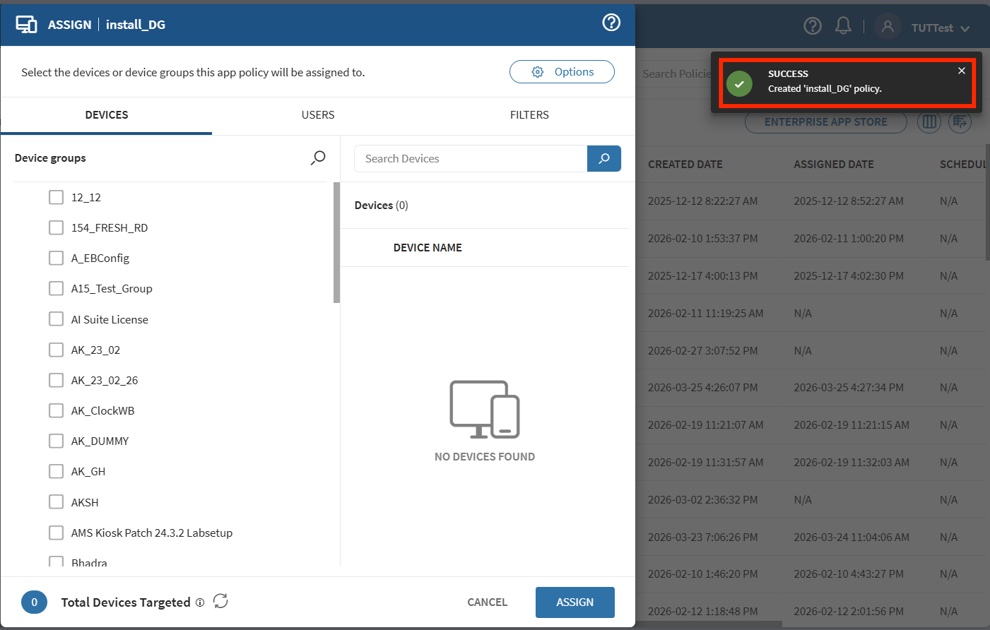
- Select the device group of the target device. Click Assign.
- When successful, a status message appears indicating the policy is assigned for app installation.
Option B: Managed Config through EMM
Use this procedure to install DG/DGAM from the EMM app store.
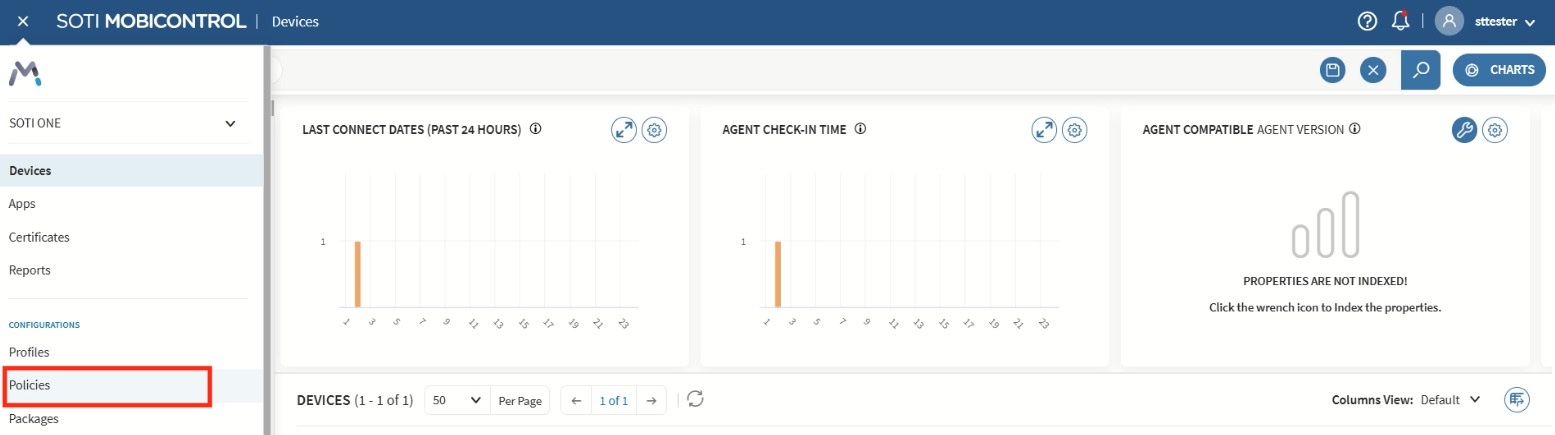
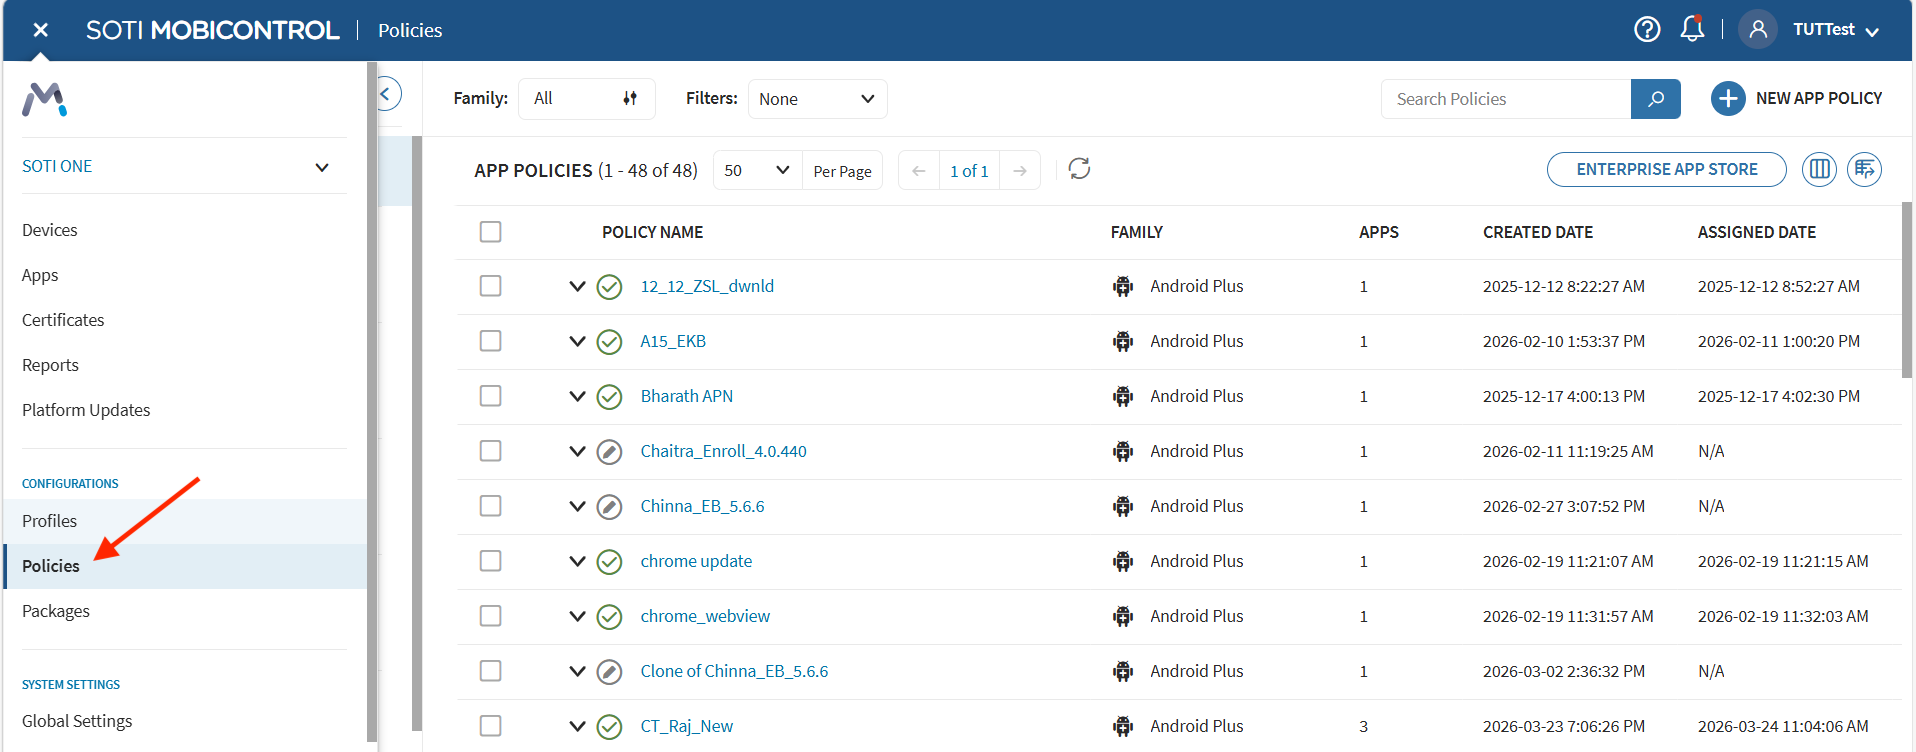
- In the SOTI MobiControl web console, click Policies.
- Click New App Policy.
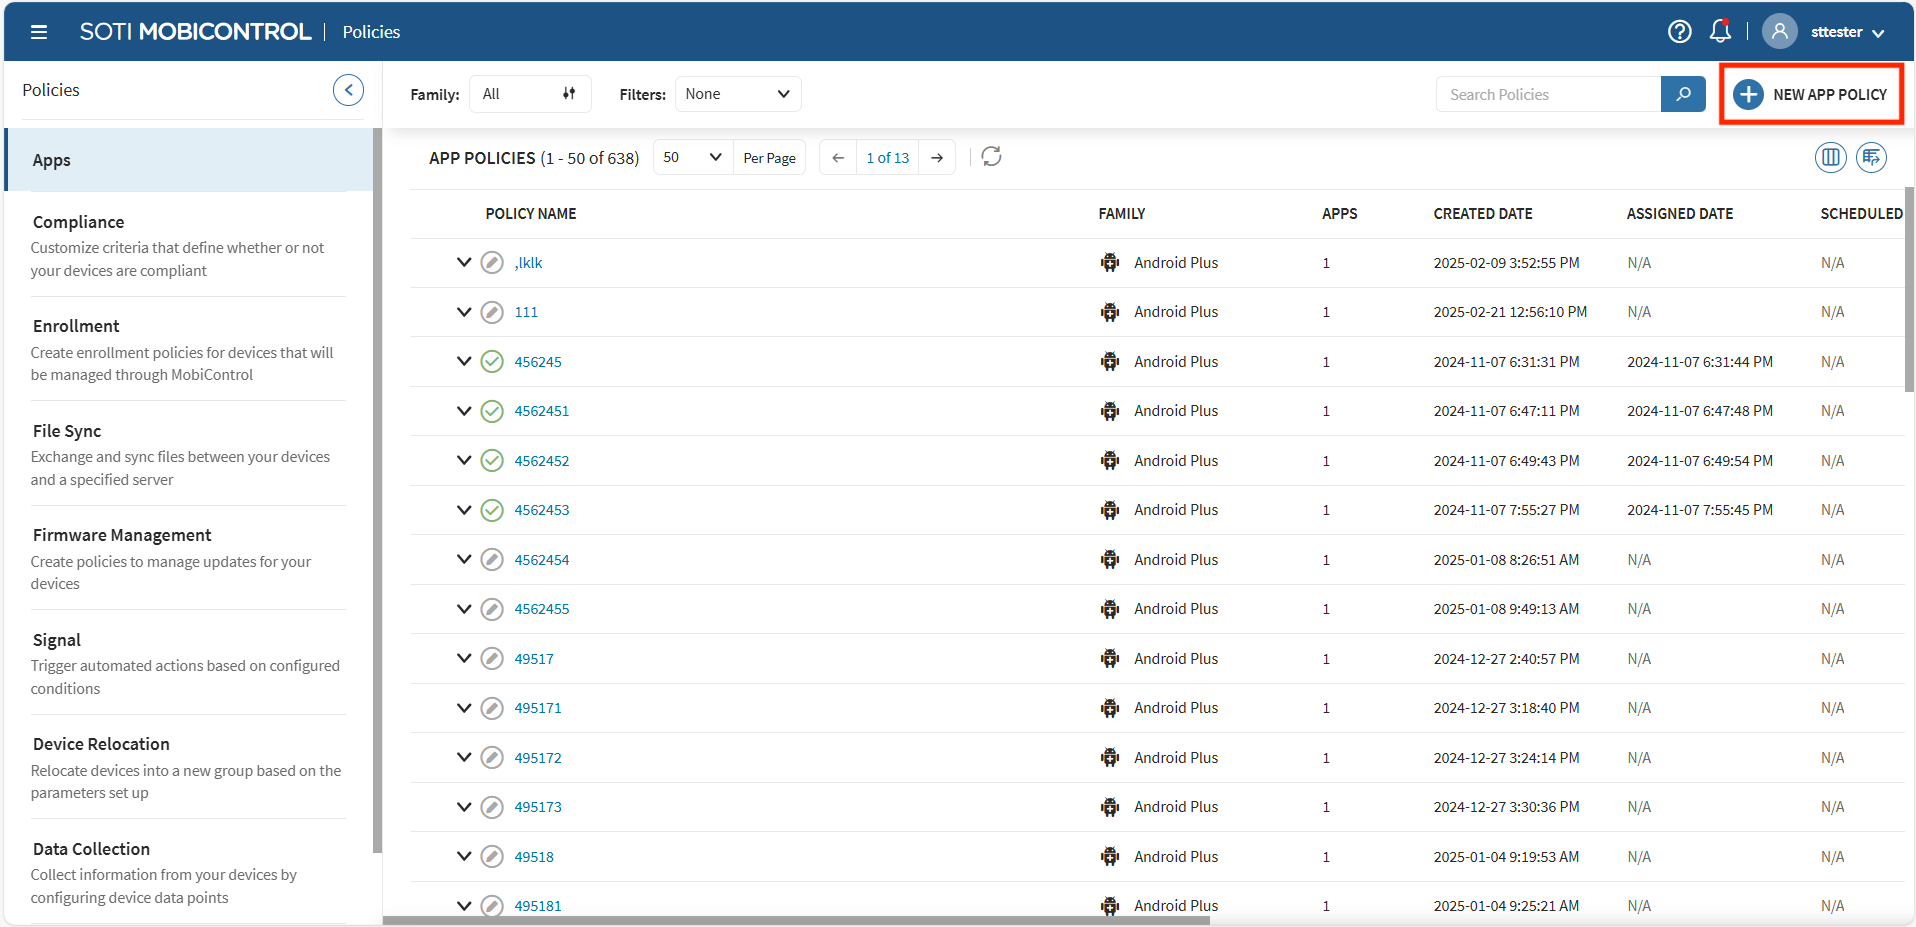
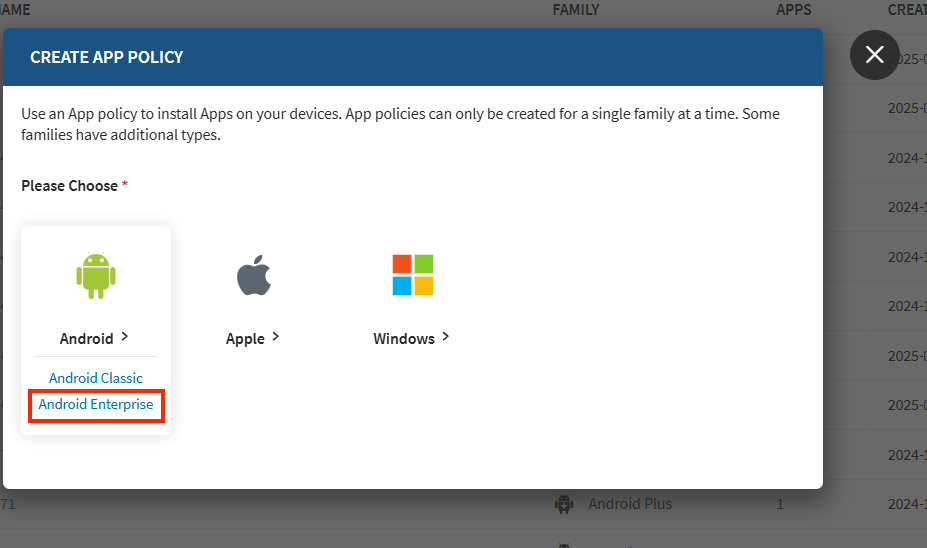
- Select Android and choose Android Enterprise.
- Enter a policy name and click on the Apps tab.
- Click +.
- Click the dropdown by App Source and select Enterprise App Store.
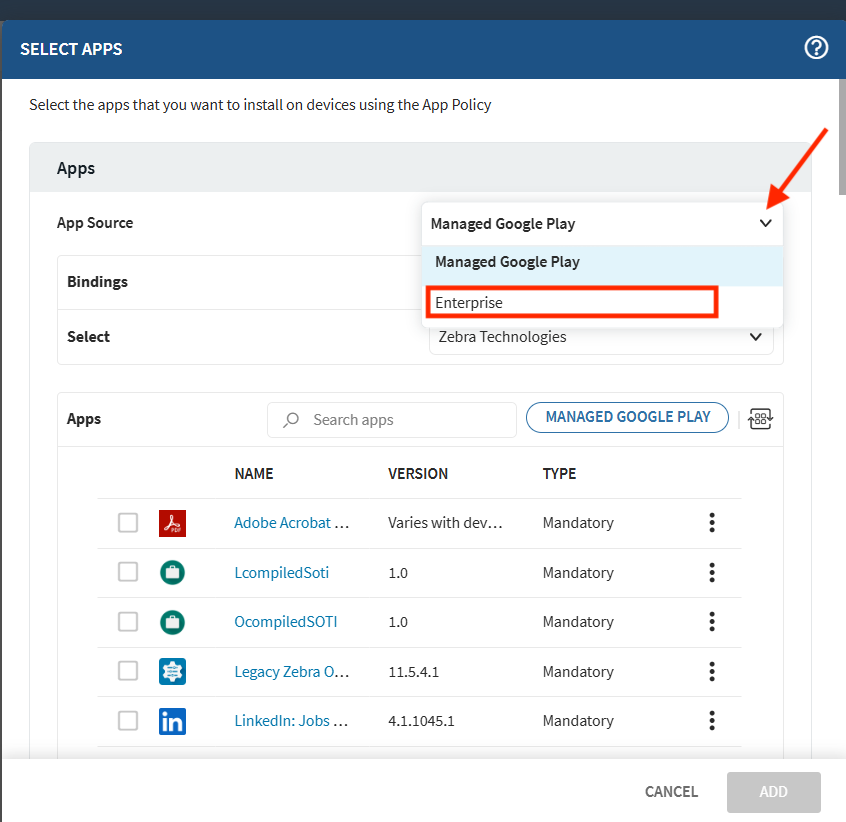
- Click the + icon.
- Browse to the .APK file.

- After the .APK is uploaded, click Save.
- Click Add.
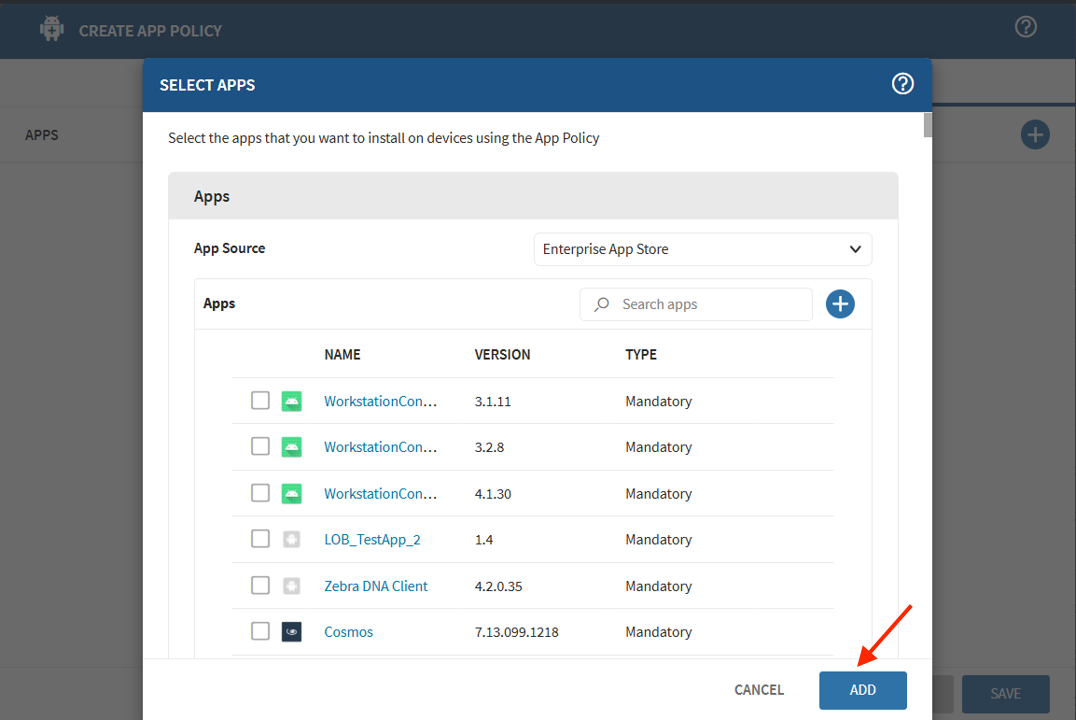
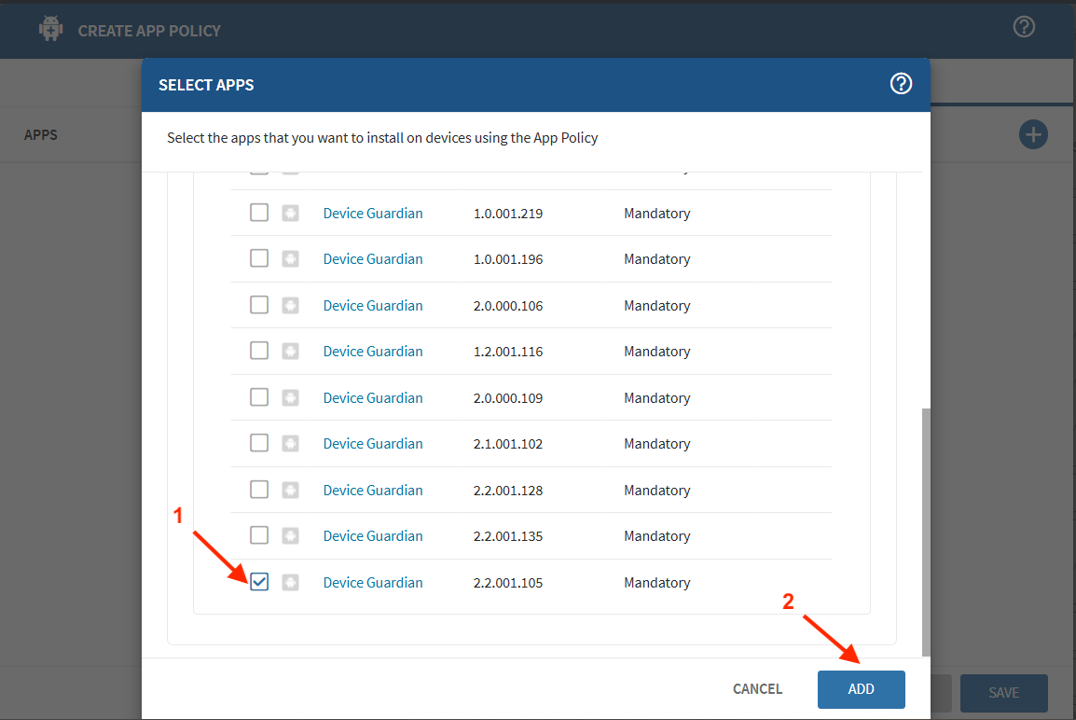
- Search for the uploaded app, Device Guardian.
- Select the app version and click Add.
- The app appears in the list. Click Save and Assign.
- Select the device group for the target devices and click Assign.
- When successful, a status message appears indicating the policy is assigned to the devices.

Part III: Enroll Device in DG/DGAM
Choose one of the following methods to enroll devices in DG/DGAM:
- Option 1: StageNow Barcode: Enroll device with the scan of a barcode using StageNow.
- Option 2: XML File Use SOTI MobiControl to deploy XML settings.
- Option 3: Managed .Config File: Deploy settings through SOTI MobiControl's Managed Configuration framework.
Option 1: StageNow Barcode
Use this method to enroll a device with the DG/DGAM server by scanning a barcode.
- Download the device enrollment barcode
.pdffile from the Download Kit. - Launch the StageNow client on the device.
- Scan the barcode.
- If applicable, repeat these steps for the following:
- Kiosk - Use the enrollment barcode for kiosk
- Device Tracker - For devices with Device Tracker, use the Device Tracker enrollment barcode for device. Repeat this for Kiosks if needed.
Option 2: XML File
Use this method to deploy the enrollment settings via XML (with OEMConfig) through SOTI MobiControl. This enrolls the device with the DG/DGAM server.
- Download the XML Configuration for Device file from the Download Kit. The contents of this file is needed in a later step.
- In the SOTI MobiControl web console, click
Policies.
- Click New App Policy.
- Click Android, then click Android Enterprise.
- Enter a name for the app policy, then click the APPS tab.
- Click on the + icon.
- Select Managed Google Play for the App Source and select Zebra OEMConfig Powered by MX. Click Add.
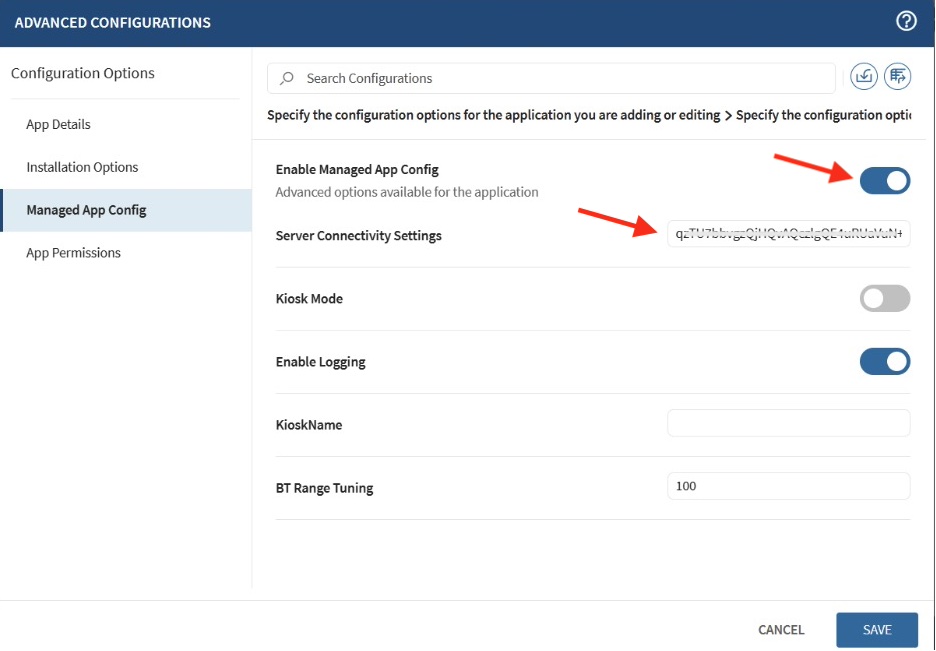
- Click the options menu, then click Configure.

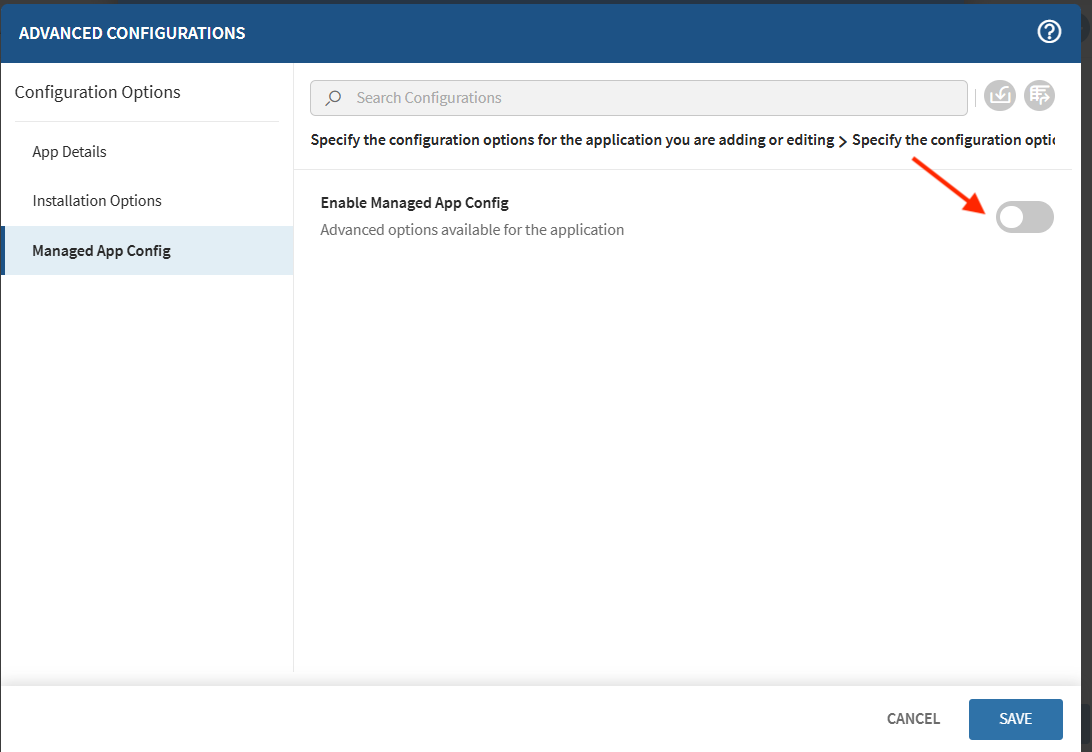
- Click Managed App Config, then toggle Enable Managed App Config.
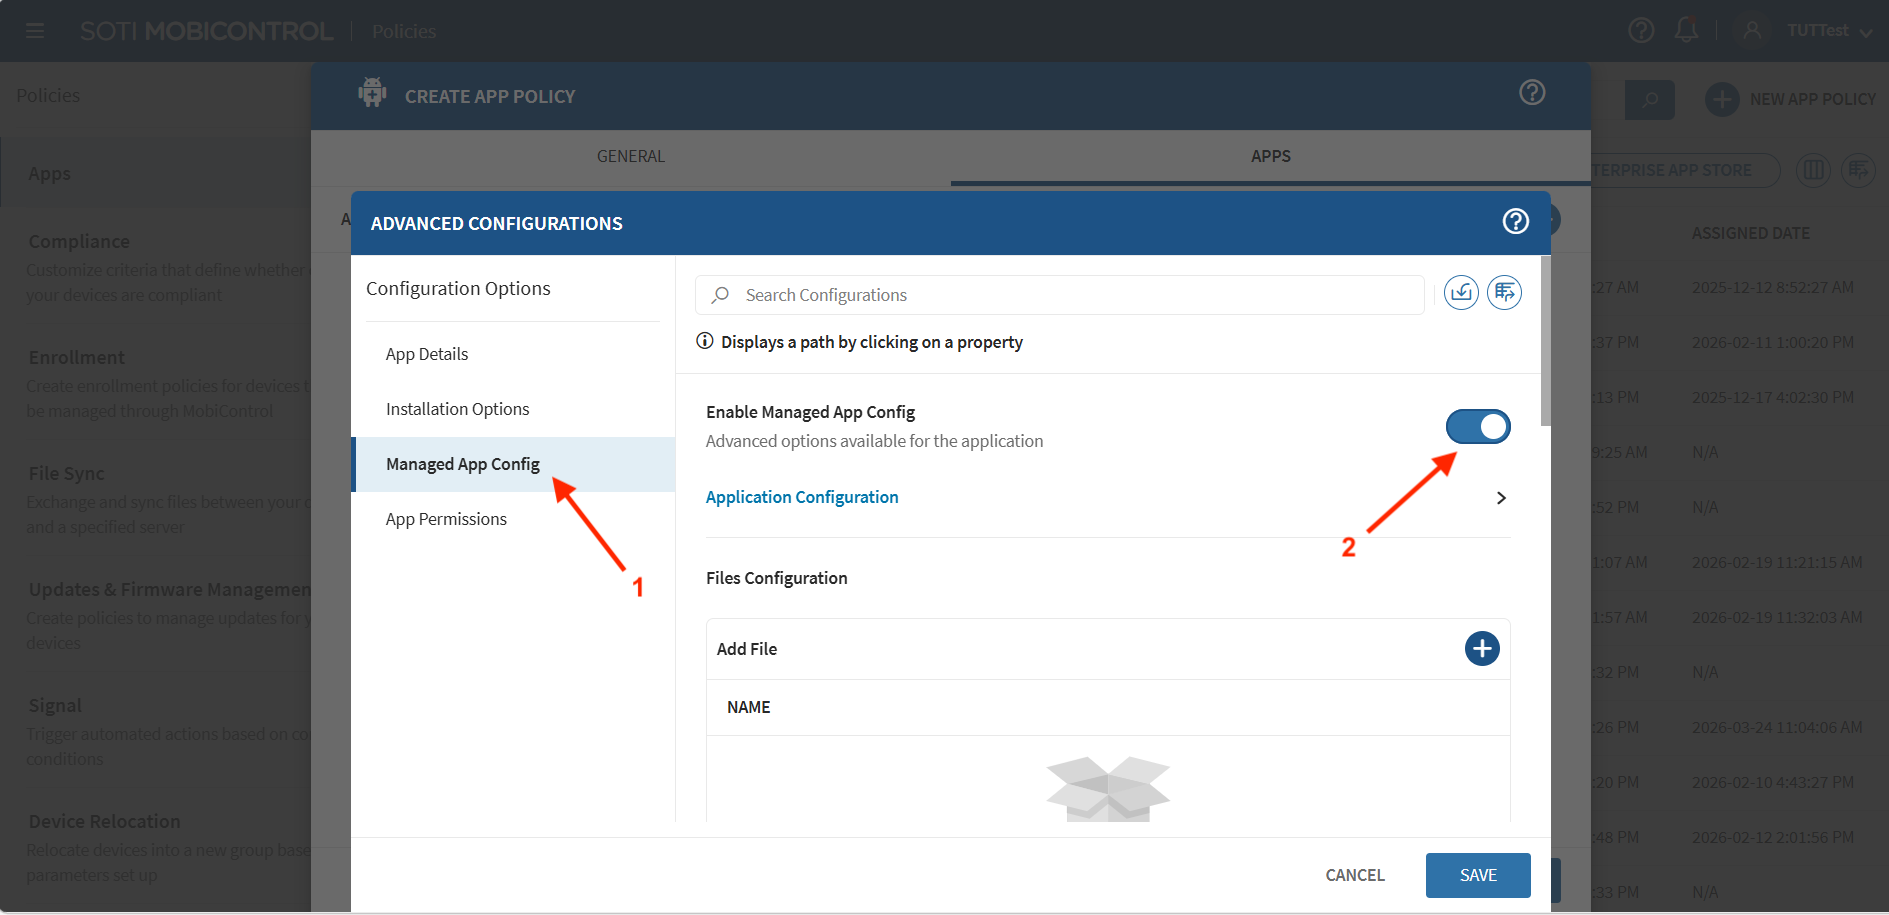
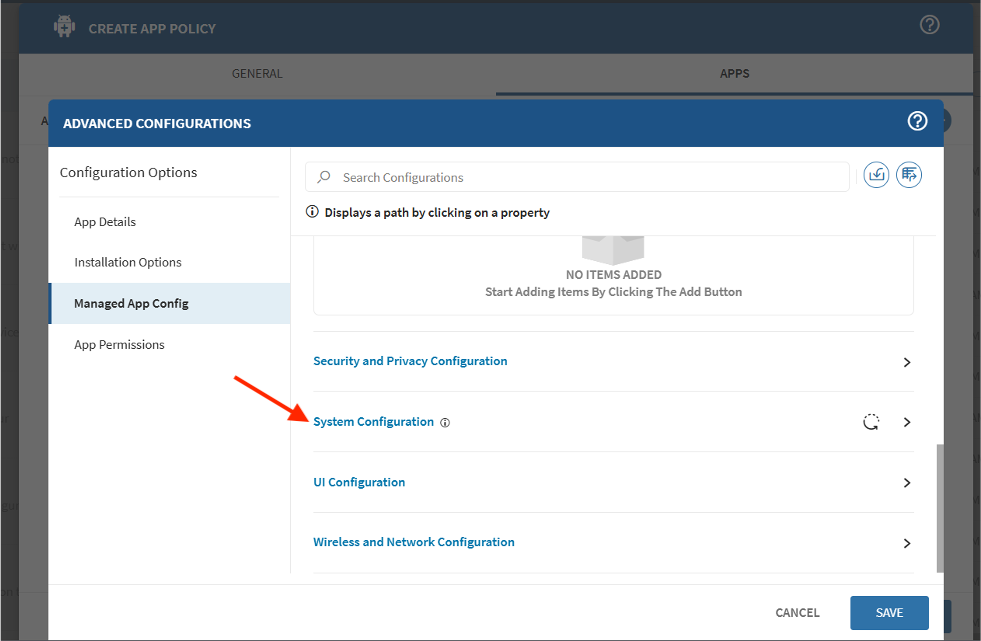
- Scroll down and click System Configuration.
- Copy the content from the
.xmlfile downloaded earlier. Paste the copied text into the Pass-Through Command field. Click Save.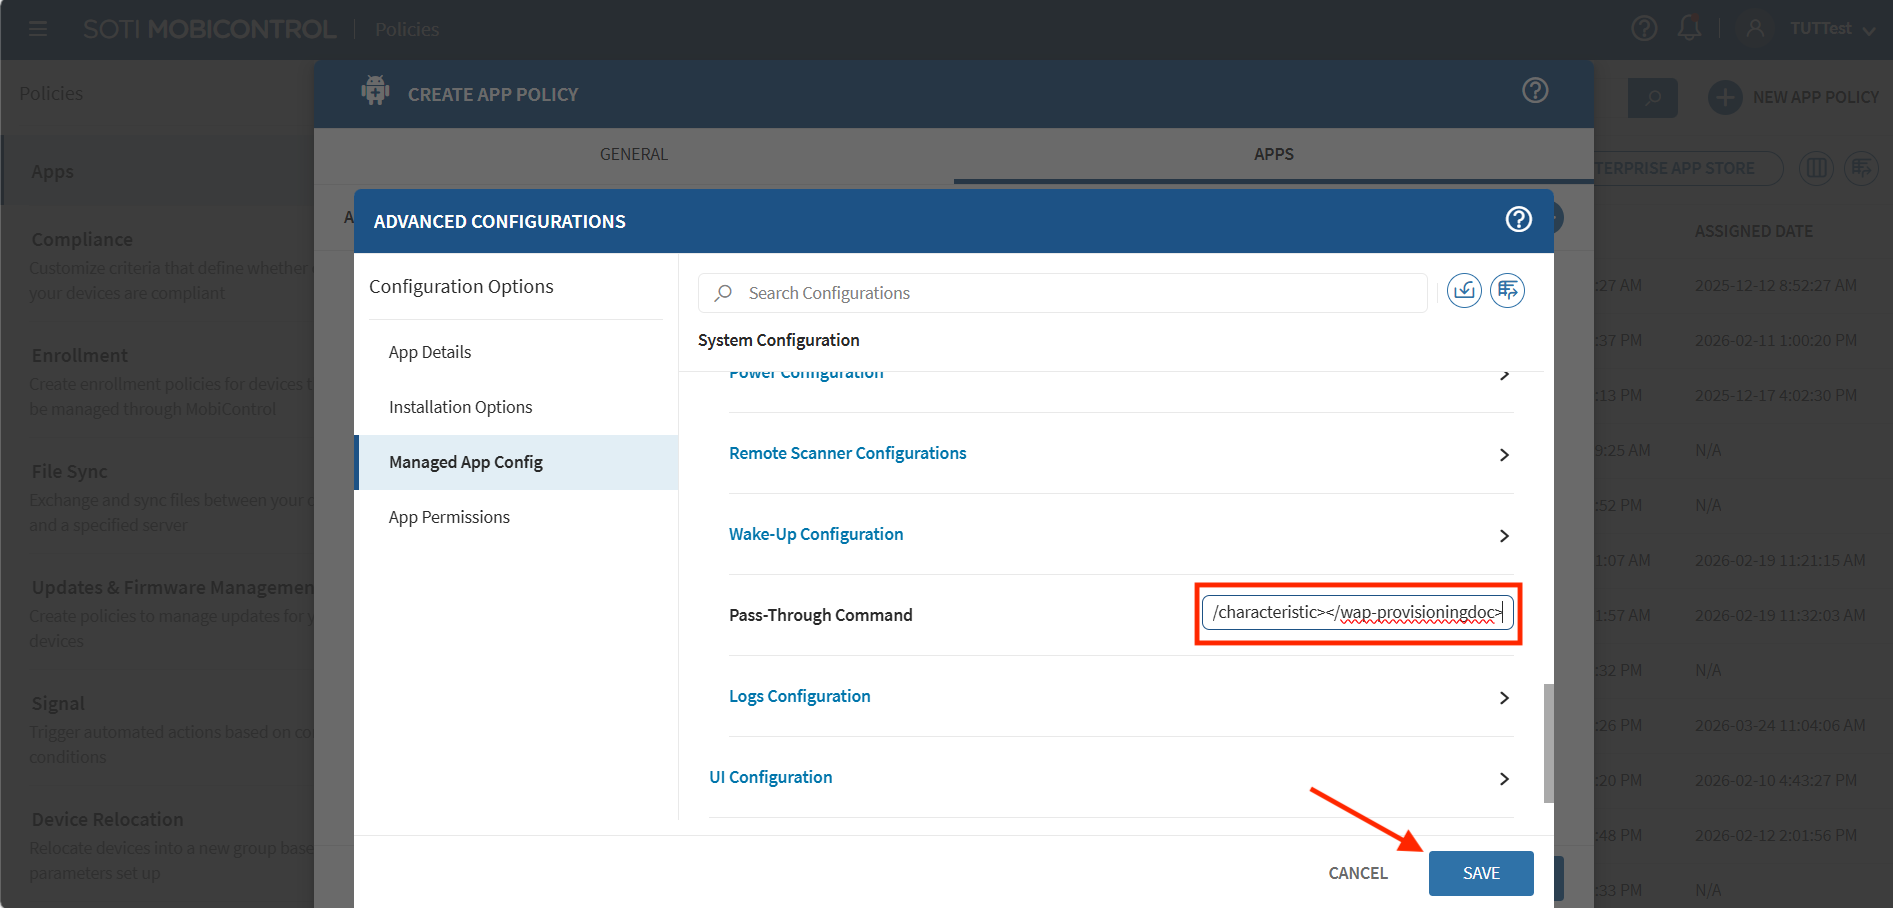
- Zebra OEMConfig POwered by MX appears in the list. Click Save and Assign.

- Select the device group for the target device. Click Assign to apply the policy.

Option 3: Managed .Config File
Use this method to deploy the enrollment settings via Managed Configurations in SOTI MobiControl. This enrolls the device with the DG/DGAM server.
- Download the
.configfile from the Download Kit. This.configfile containing the Managed Configuration settings is required for a later step. - In the SOTI MobiControl web console, click Policies.
- Click New App Policy.
- Select Android and choose Android Enterprise.
- Enter a policy name and click on the Apps tab.
- Click +.
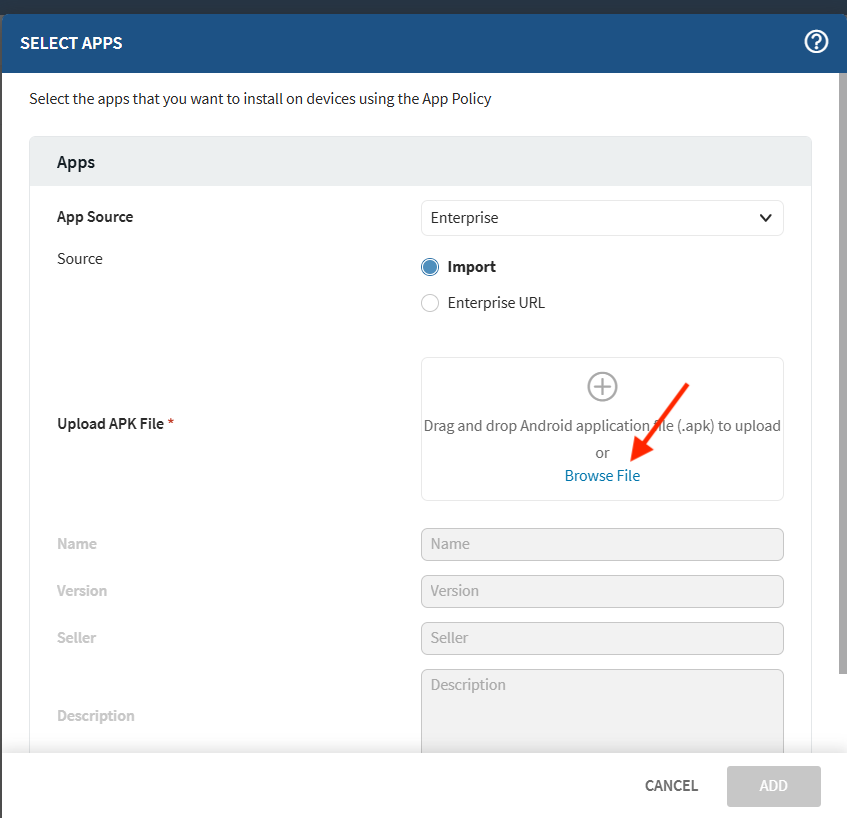
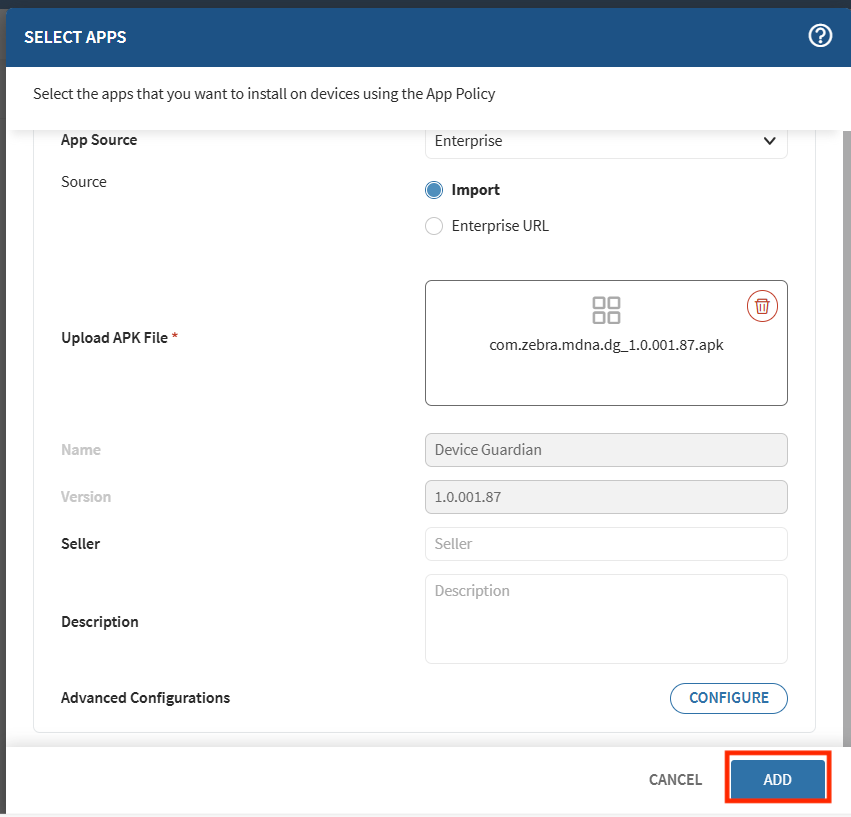
- For the App Source dropdown, select Enterprise.
- By default, Import is selected for the Source. Click Browse File and select the Device Guardian
.apkfile.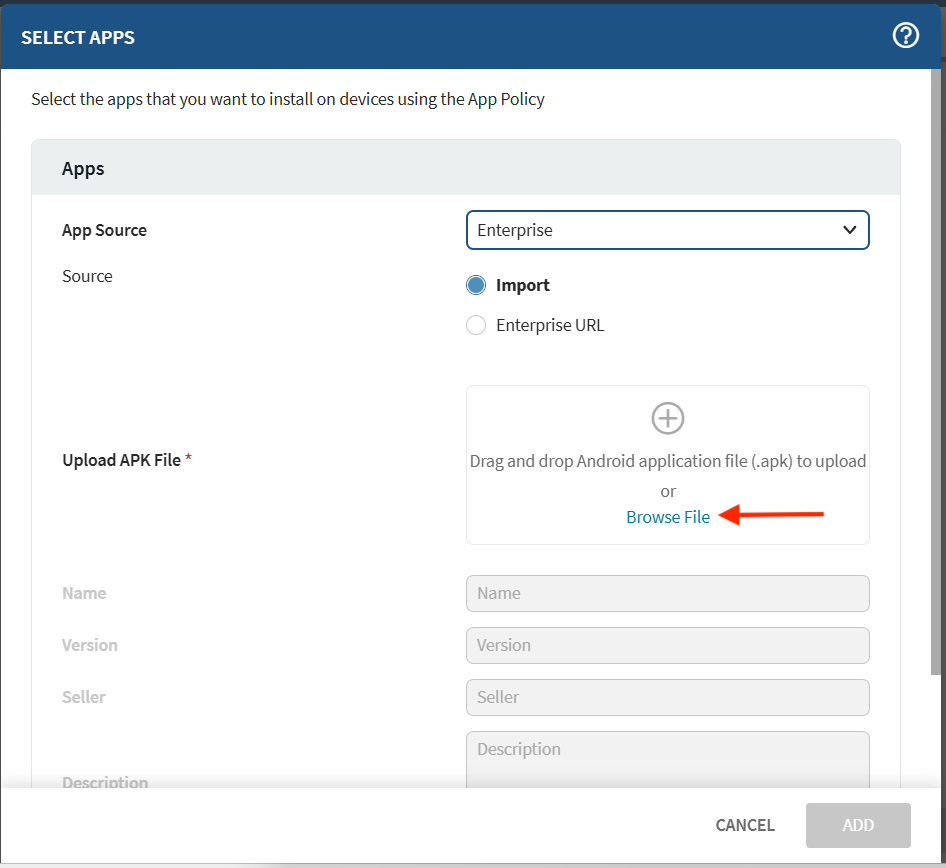
- After the file is uploaded, click Configure.
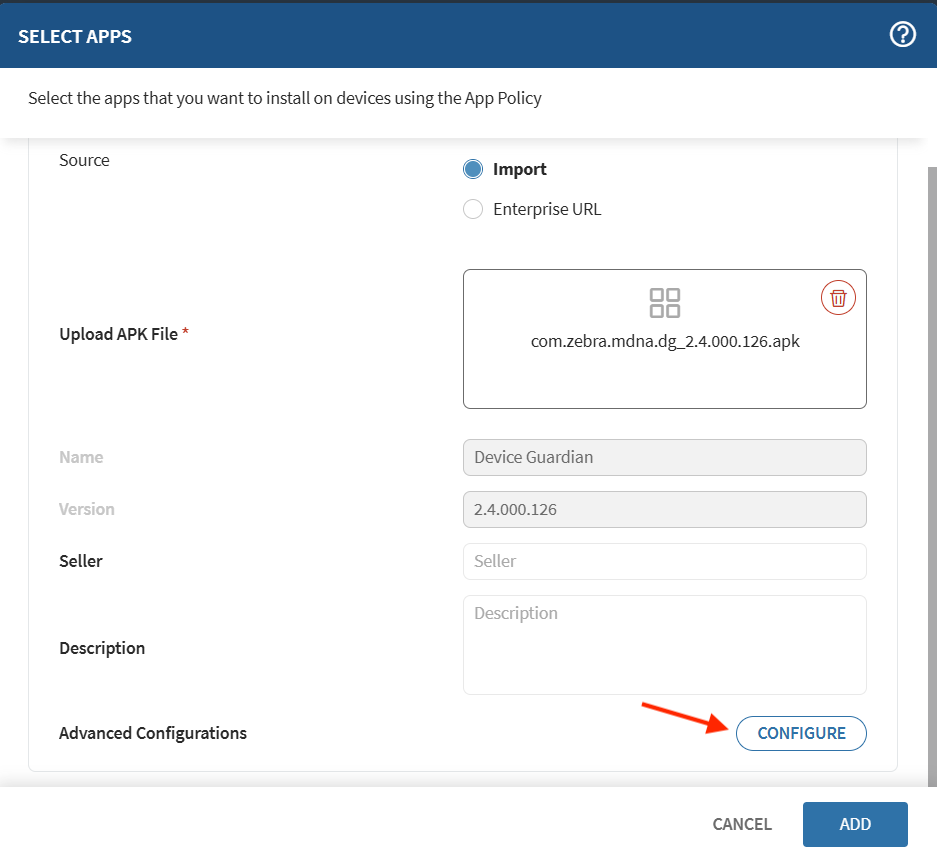
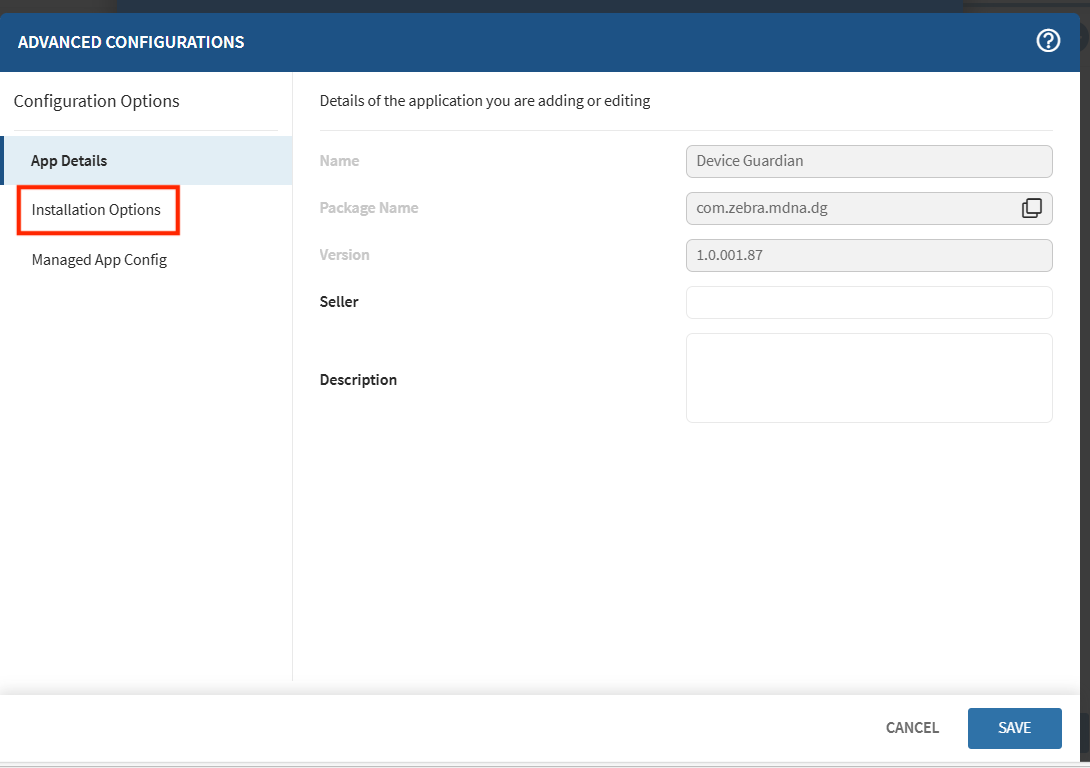
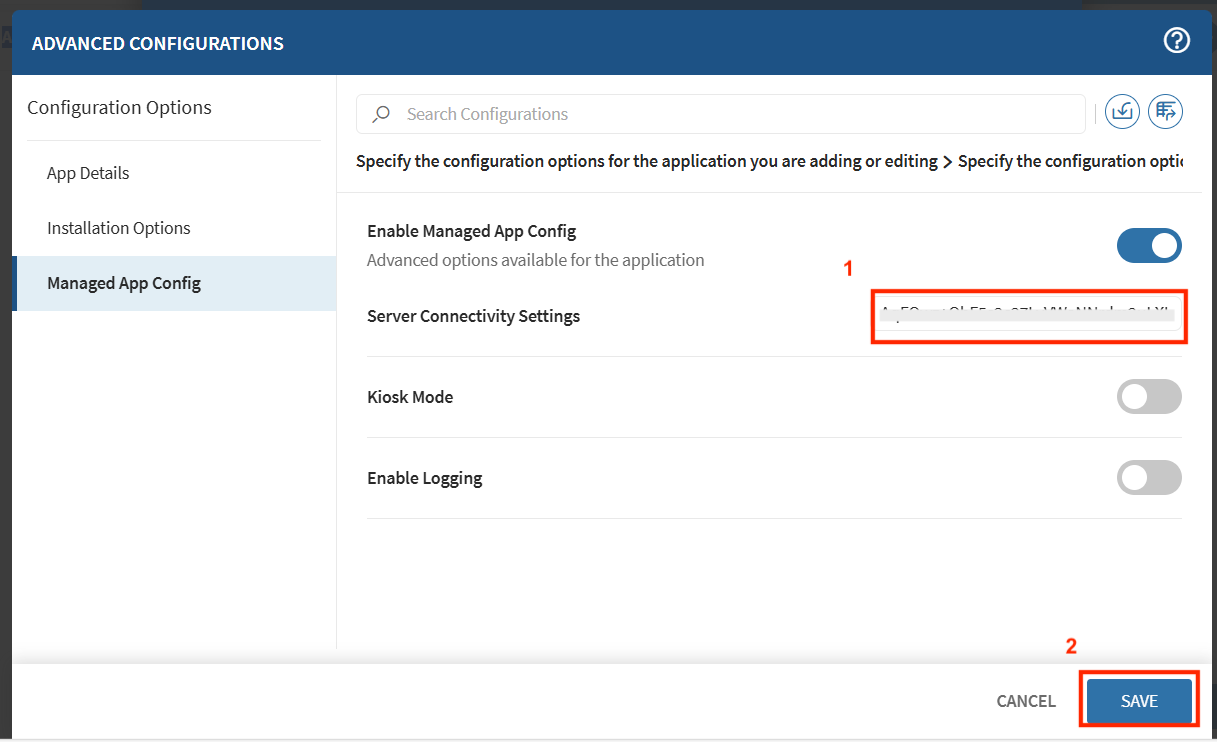
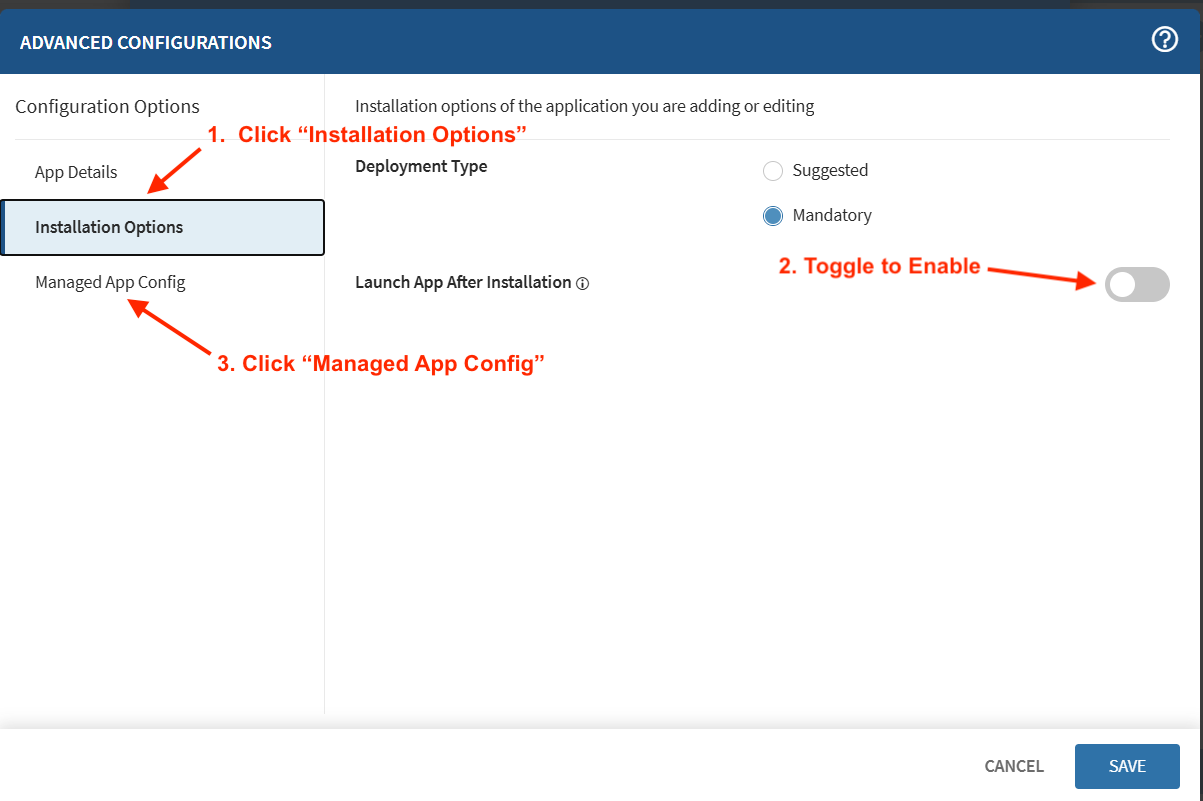
- The App Details are populated. Click Installation Options. Deployment Type is set to Mandatory by default. Toggle to enable Launch App After Installation and click Managed App Config.
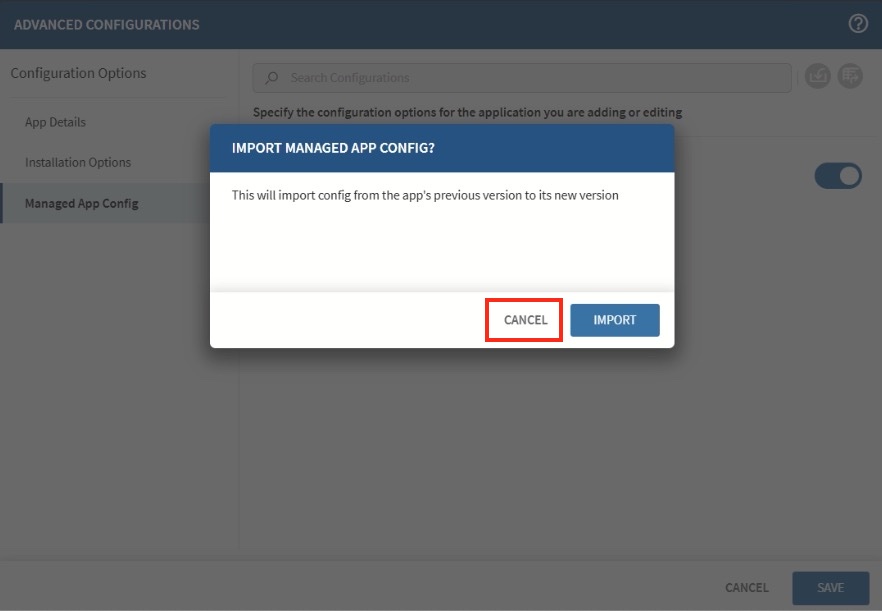
- Toggle on Enable Managed App Config.

- Tap Cancel when prompted to import config to create a new config.
- If using the Managed Configuration method from Part II (Method 2), copy and paste the content from the Managed Configurations
.configfile into Server Connectivity Settings. Click Save.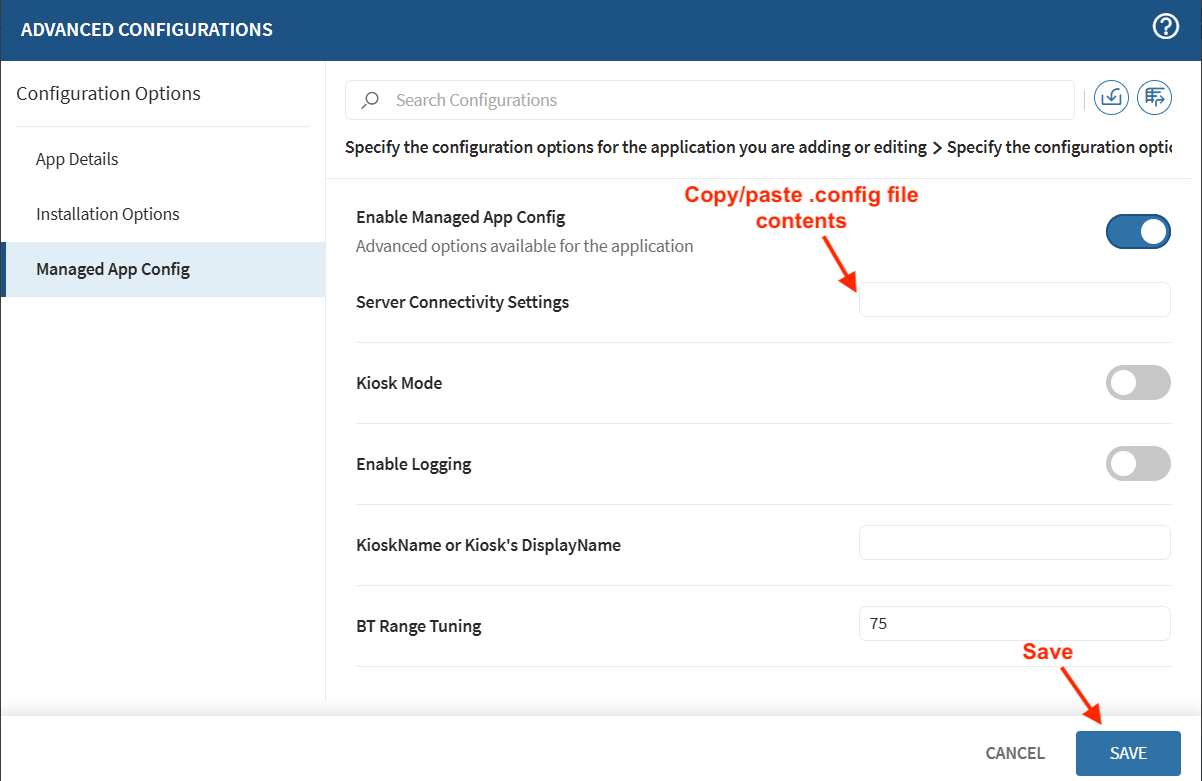
- Click Add.
- The policy is created. Click Save and Assign.
- Search for the enrolled device and select it. Click Assign.
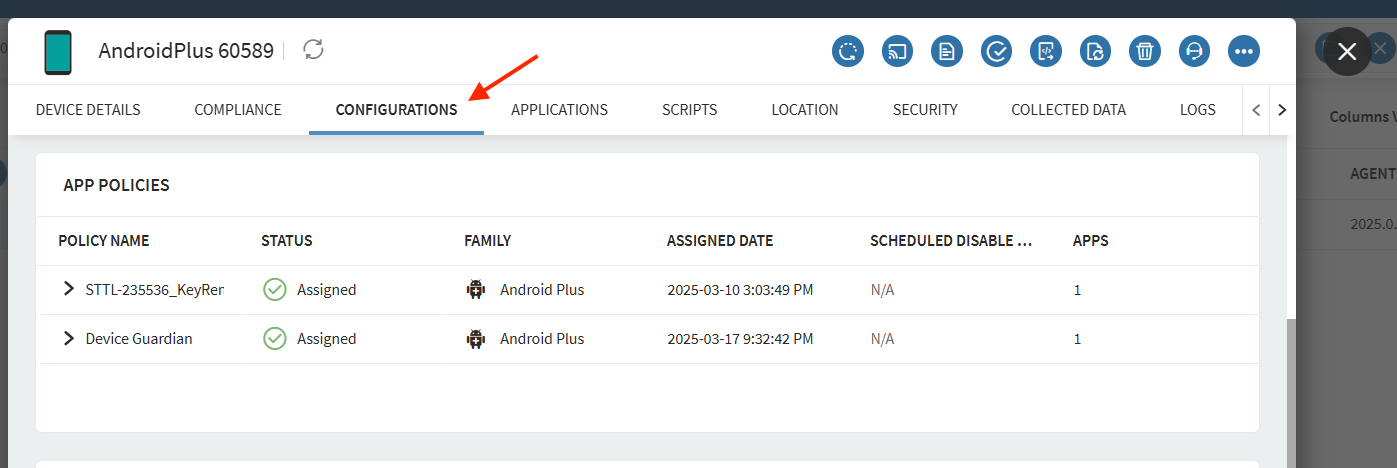
- Navigate to the Devices section.

- Search for the enrolled device and select it.

- Click the Configurations tab and verify that the policy is assigned, ensuring the device is installed and registered in Device Guardian.
Part IV: Send Intents (Android 11 Only)
For Android 11 devices, intents must be sent to grant the necessary permissions and start Device Guardian, allowing the configurations to be applied:
Download the DeviceGuardian.xml file, which will be needed in a later step.
Create a file named
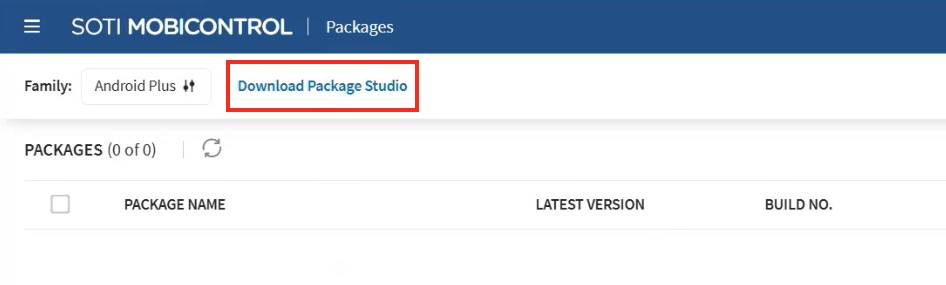
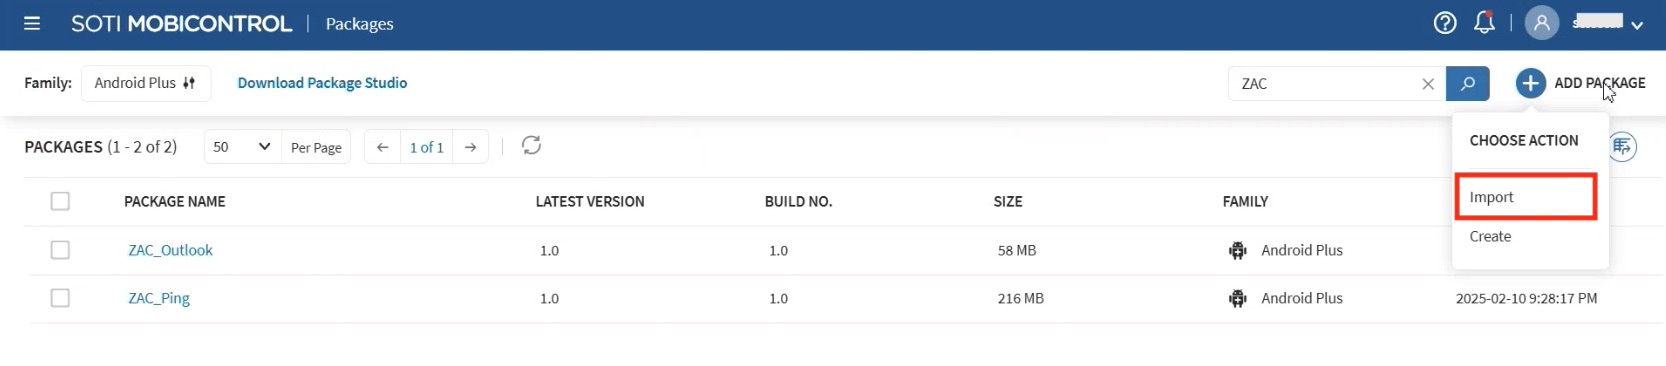
DG_XML_SOTI.CMDwith the following content and place this file in the same folder as the .XML file:mxconfig /sdcard/DeviceGuardian.xmlIn the SOTI MobiControl web console, click Packages from the left menu.
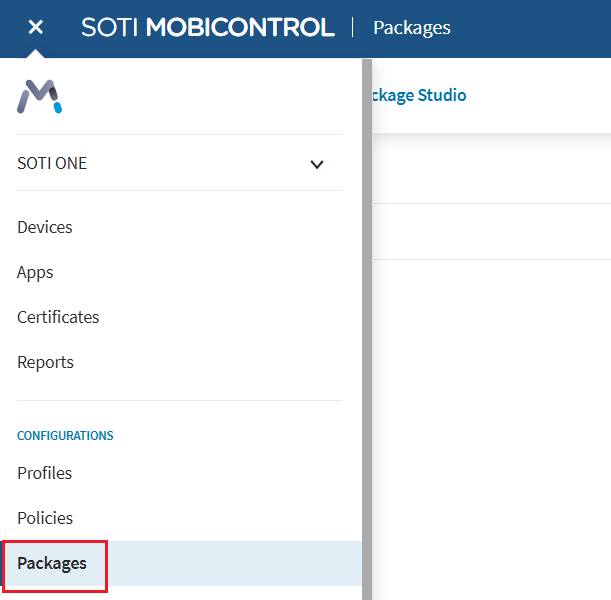
Click Download Package Studio.
MobiControl Package Studio
MCStudio.exeis downloaded. Execute to launch this app.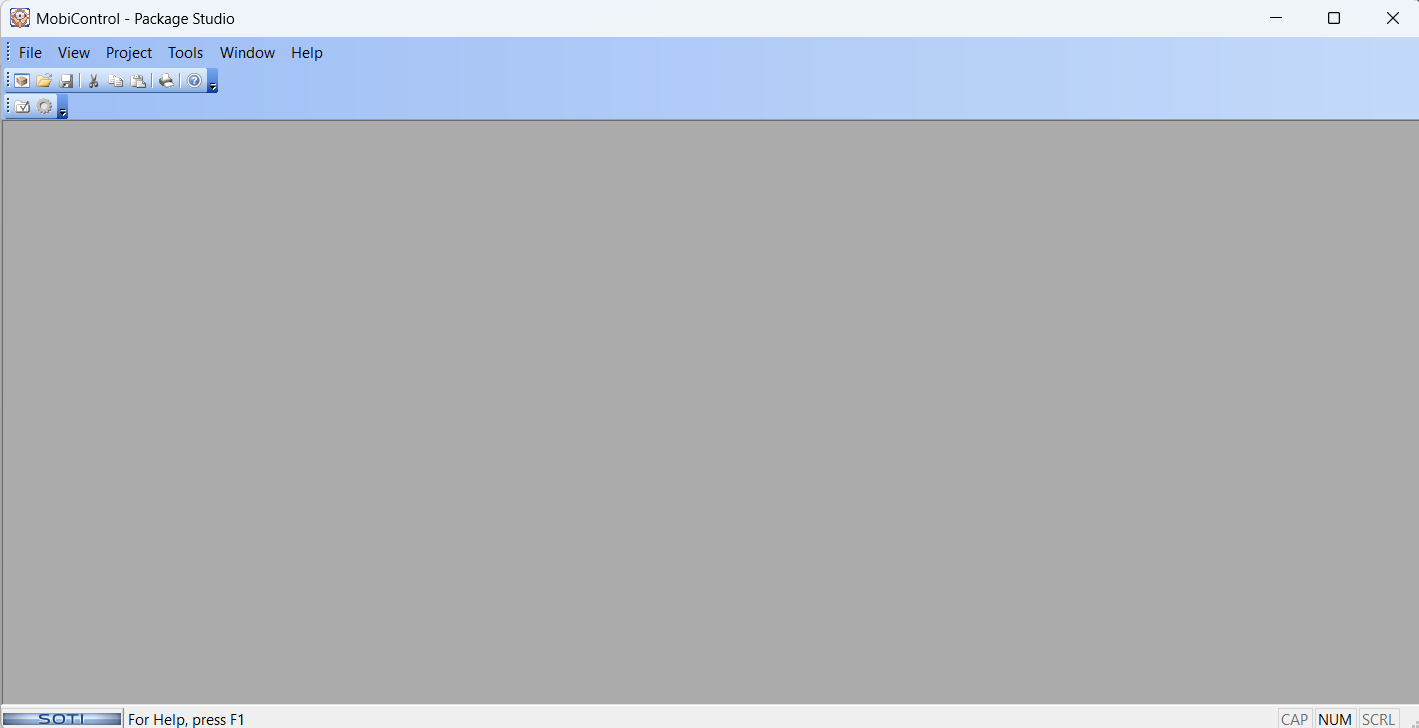
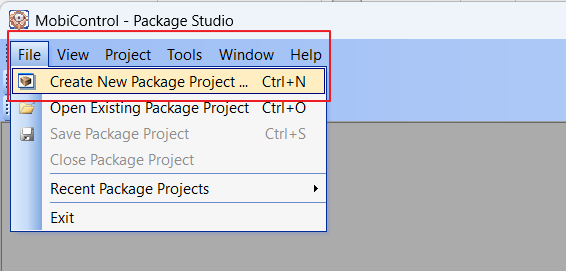
Create a new package file for Device Guardian .XML. Click File > Create New Package File.
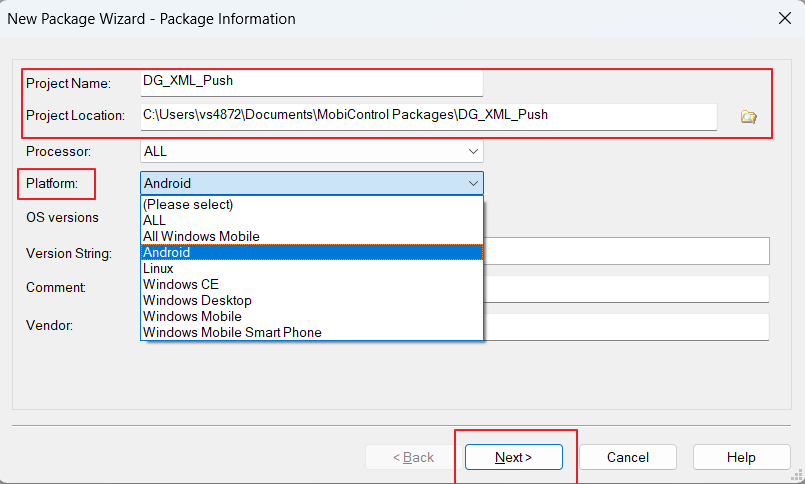
Enter the following and click Next:
- Project Name - [Enter a name for the project]
- Project Location - [Browse to the folder location to save the project]
- Platform - Android
Click Post-Install, browse to
DG_XML_SOTI.CMDcreated in step 2 and click Next.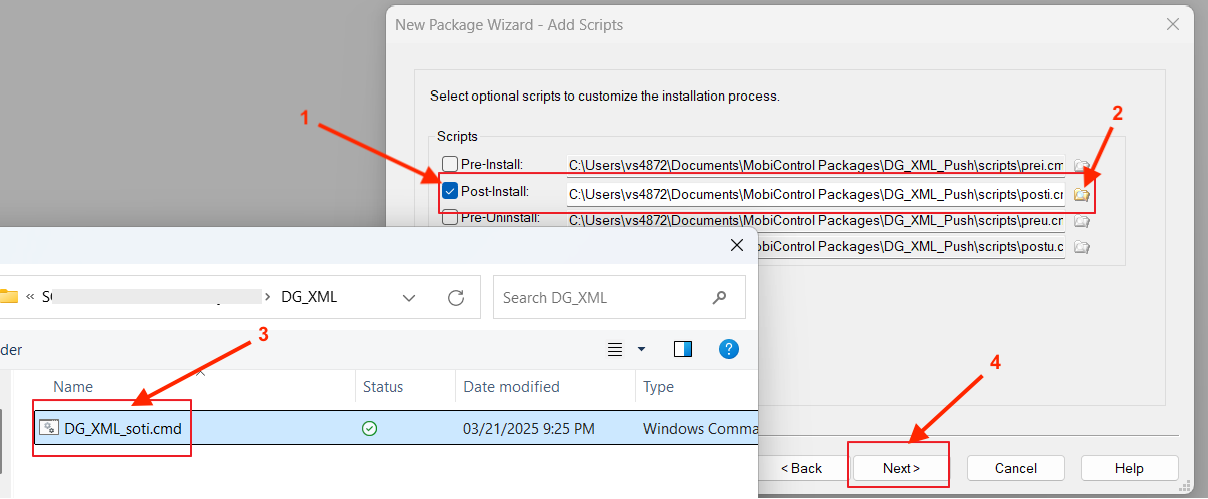
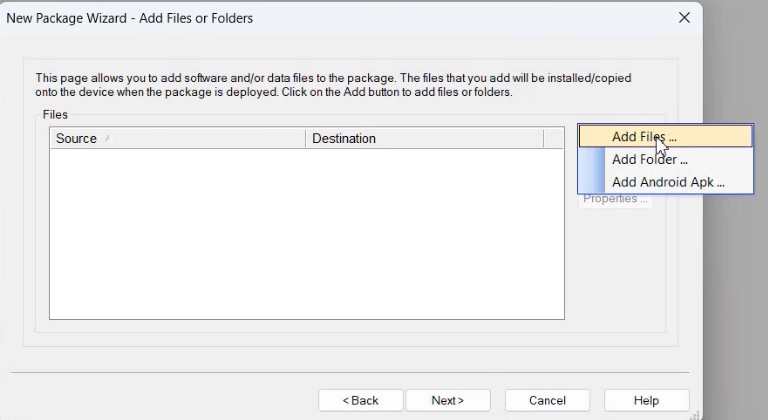
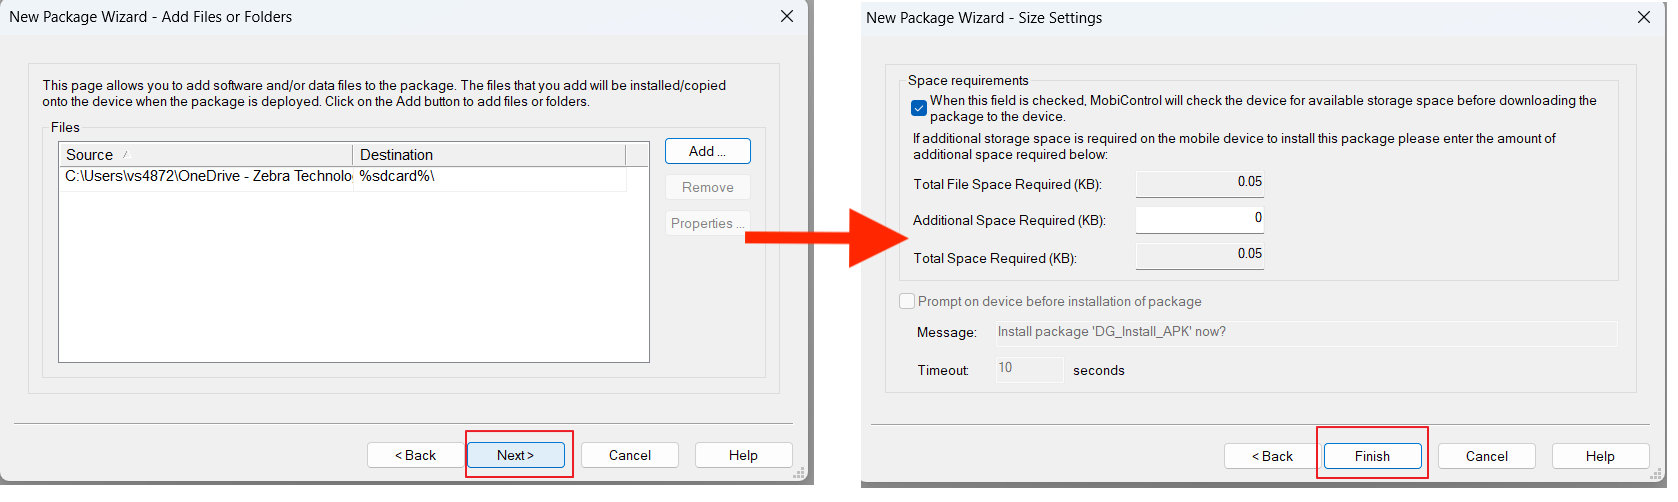
Click Add. Click Add Files and browse to add
DeviceGuardian.xml.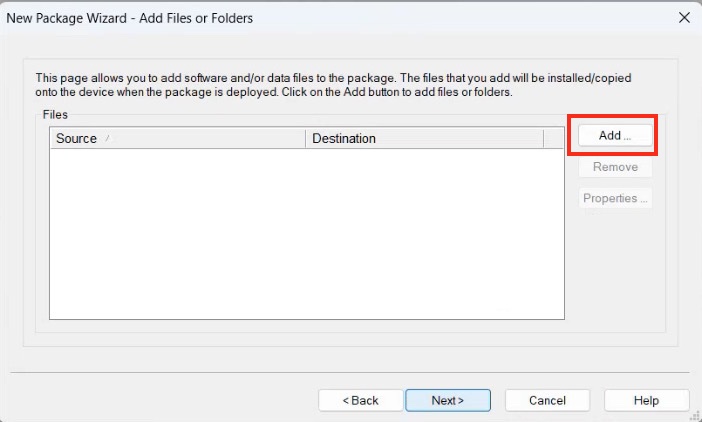
Leave the default destination as
%sdcard%/. Click OK.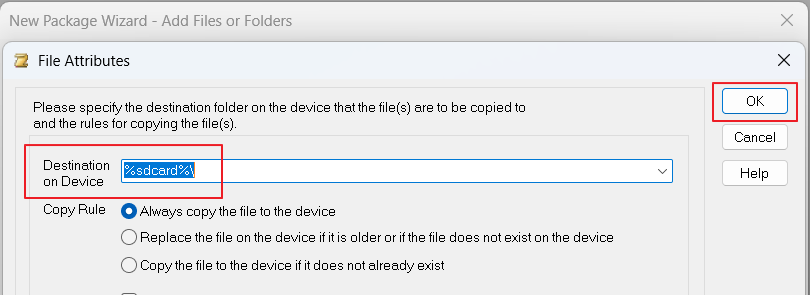
The file is added. Click Next, then click Finish.
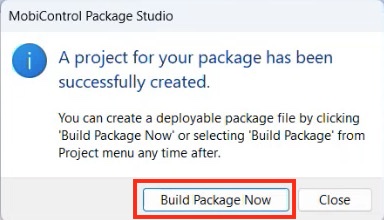
A popup message appears indicating that the package is created. Click Build Package Now.
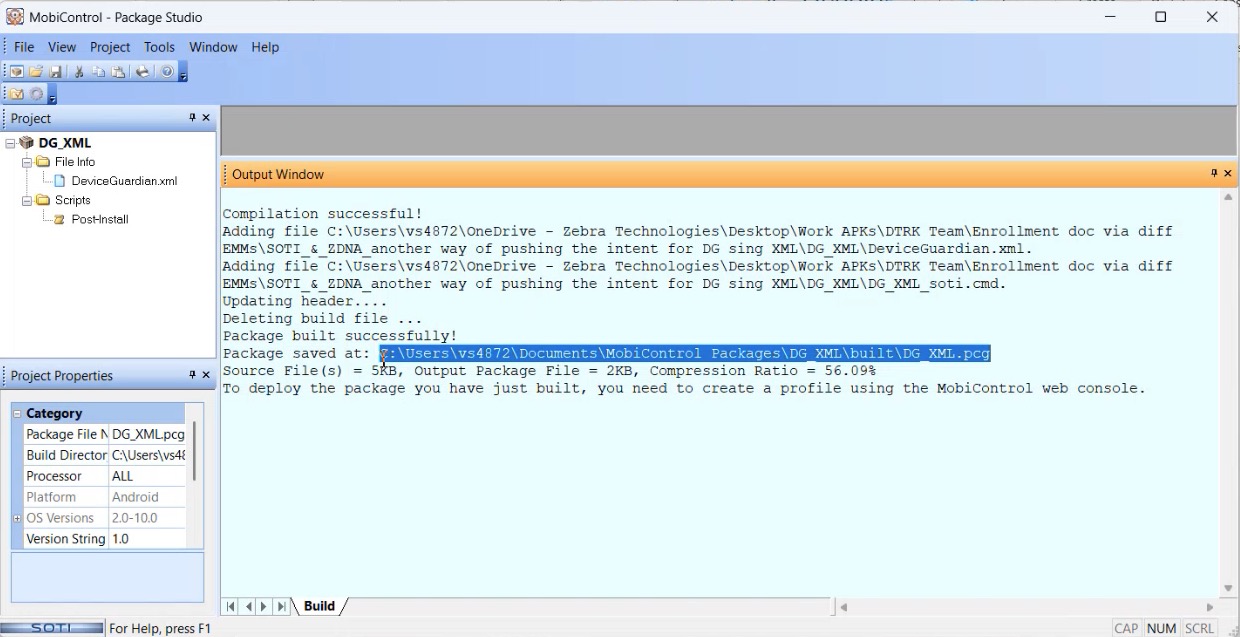
When complete, the output window displays the folder path with the package (.PCG file) is created. Record this folder path.
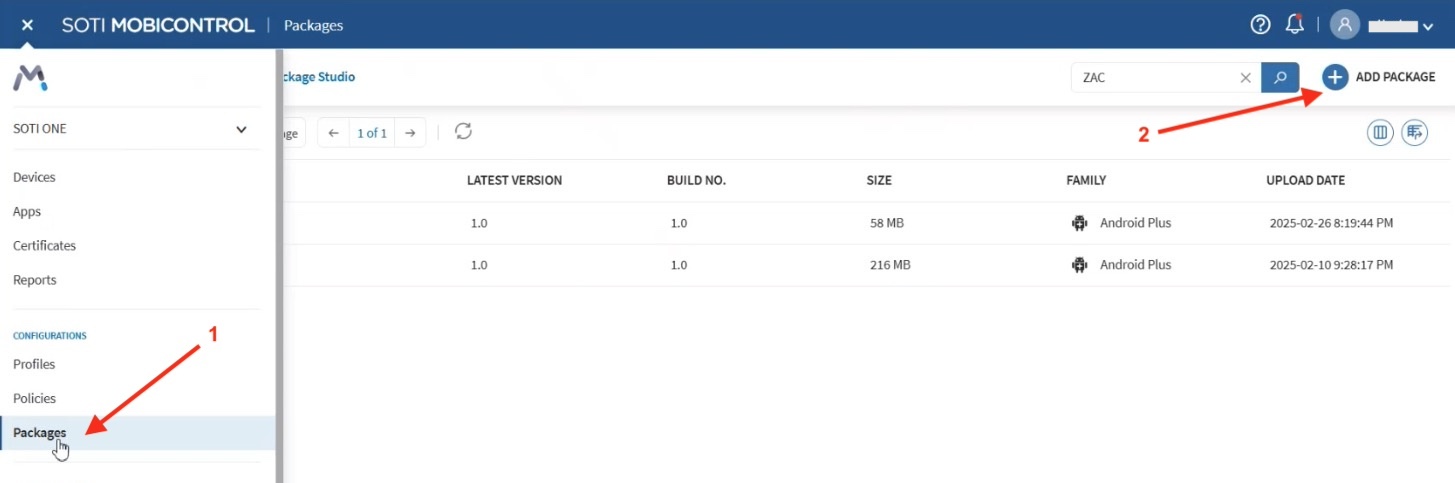
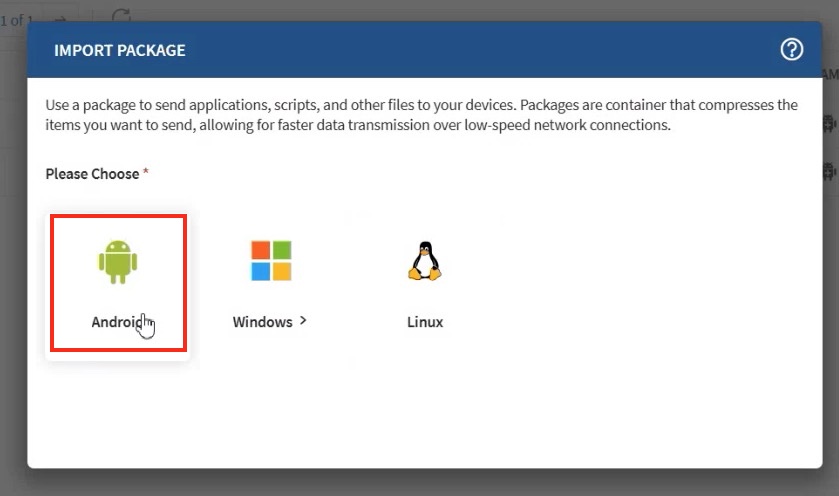
Upload the .PCG file to Soti MobiControl. In the SOTI MobiControl web console, click Packages and Add Package.
Click Import.
Select Android.
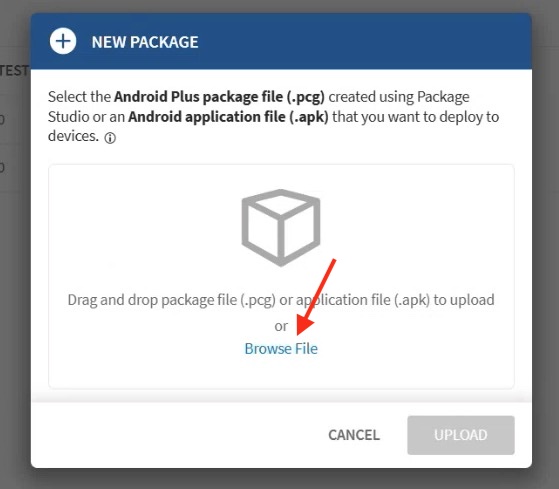
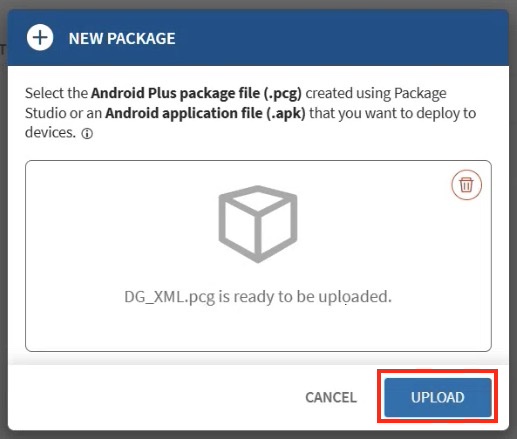
Browse to the package file (.PCG) folder path from step 13 and click Upload.
The new created package is listed.

Create a profile containing this package to deploy to devices. From the left menu, click Profiles.
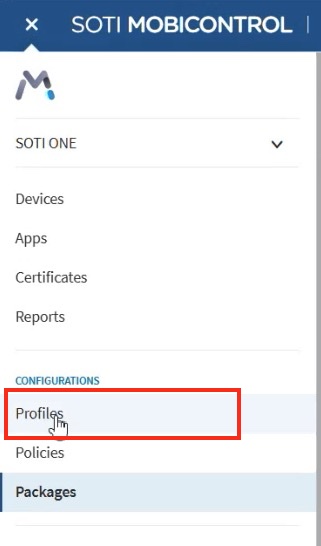
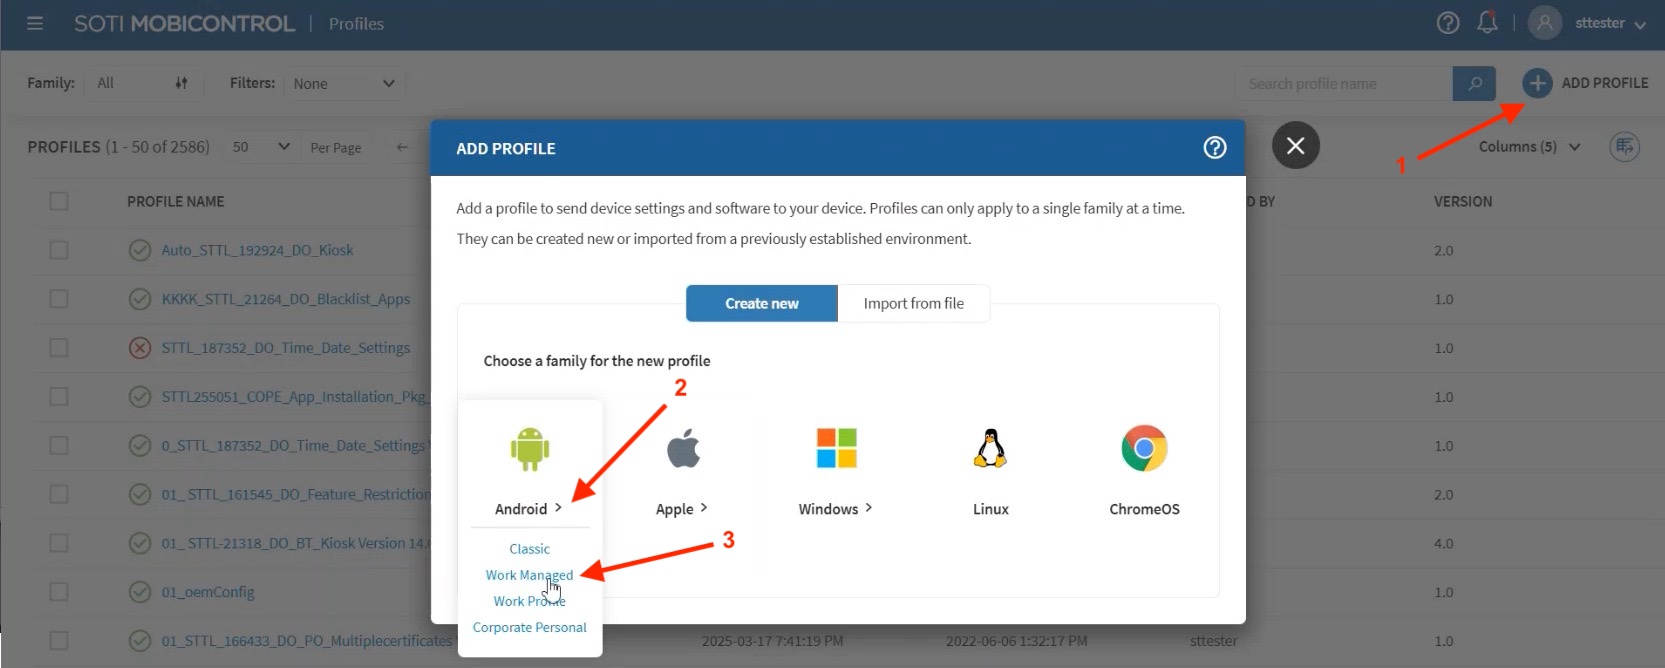
Click Add Profiles, select Android, and select Work Managed.
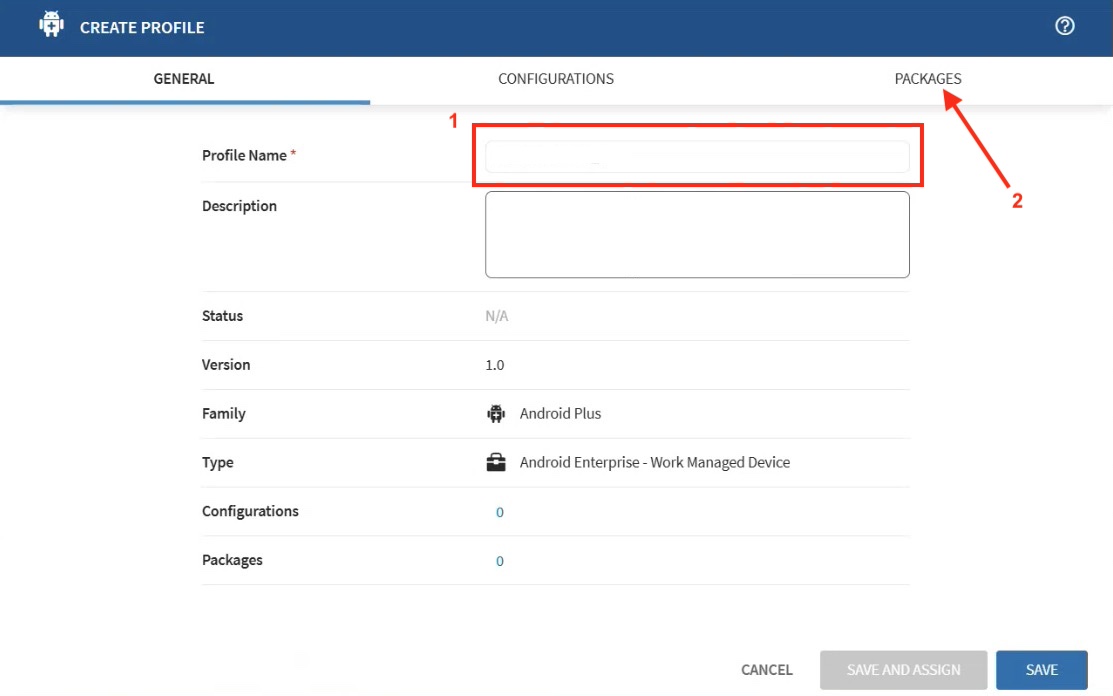
In the General tab, enter the Profile Name and then click the Packages tab.
Click "+"
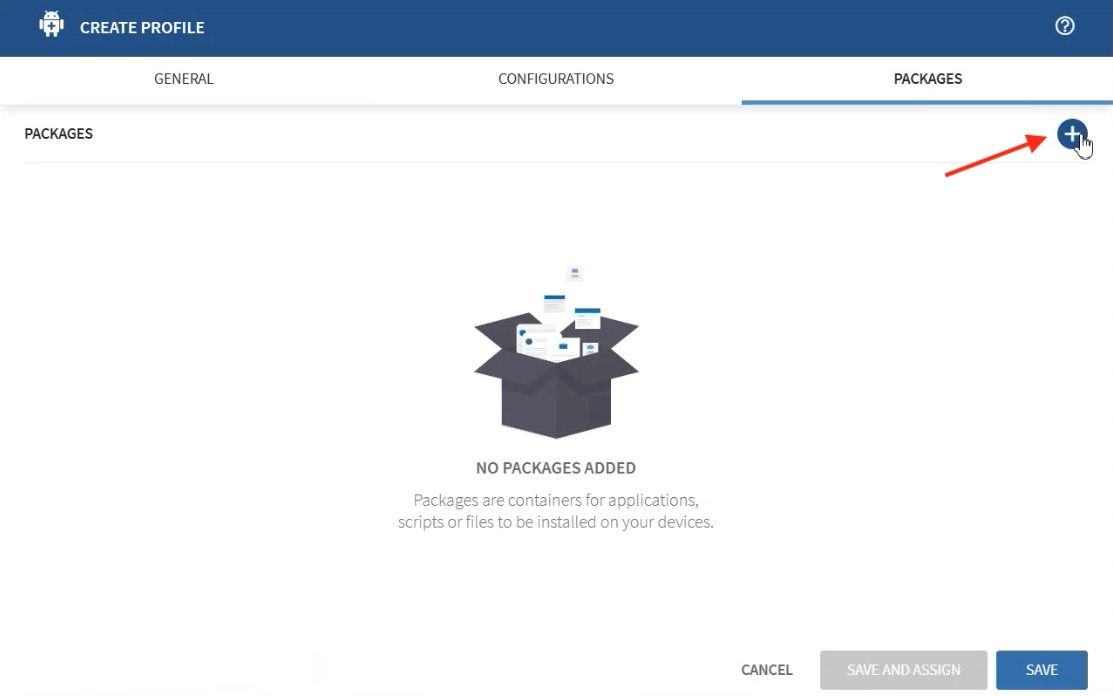
Search for the package just created, select it, and click Add to Profile.
Click Save and Assign.
Search for the device(s) to deploy the policy and click Assign.
Part V: Install & Configure Identity Guardian (DGAM Only)
Identity Guardian is required for user authentication when using DGAM. When adding device users via Bulk Upload, follow these steps.
- Create an App Setup Profile for Identity Guardian.
- Select Yes when prompted to Configure App.
- In the Usage Mode section, Select AUTHENTICATION.
- In the Authentication Configuration section, select the following:
- Comparison Source: CLOUD
- Primary Authentication Factor: CLOUD_PASSCODE
- Fallback Authentication Method: ADMIN BYBASS PASSCODE
- Select the remaining options as desired.
- Deploy the Profile to the target device(s).
After deployment, the device user experiences the following screen progression when logging in:
Identity Guardian login process
Part VI: Install & Configure the ZDNA Cloud Client App (DGAM Only)
The Zebra DNA Cloud client is required to add device users in DGAM.
- Download the ZDNA Config Token:
- In the web portal, navigate to User Management > Device Users.
- Click ZDNA Config Token to download the file.
- Open the file and copy its contents.
- Apply the Token & Deploy the App via EMM: The general steps are provided below. For detailed instructions, see the Configure for a Mixed Population section within the ZDNA Cloud Setup guide and follow steps 1 to 3:
- Paste the copied token into Managed Configuration settings in ZDNA Cloud.
- Install and launch the app via EMM using one of these sources:
- Google Play
- Zebra.com
Using Workspace ONE UEM
Follow these steps to use Workspace ONE UEM (WS1 UEM) to install DG/DGAM and apply a policy that enrolls the device with the DG/DGAM server.
Screen Variations Note: The screen UI may vary depending on the EMM version in use. Refer to your EMM user guide for additional guidance.
Part I: Enroll Device in WS1 UEM
Enroll the device in Workspace ONE UEM using the standard EMM procedure.
Part II: Install DG/DGAM
Choose one of the following installation methods:
Option A: Google Play
Use this procedure to install DG/DGAM through Google Play.
- In the Workspace ONE UEM web console, go to Resources > Native. Click Public, then Add Application.
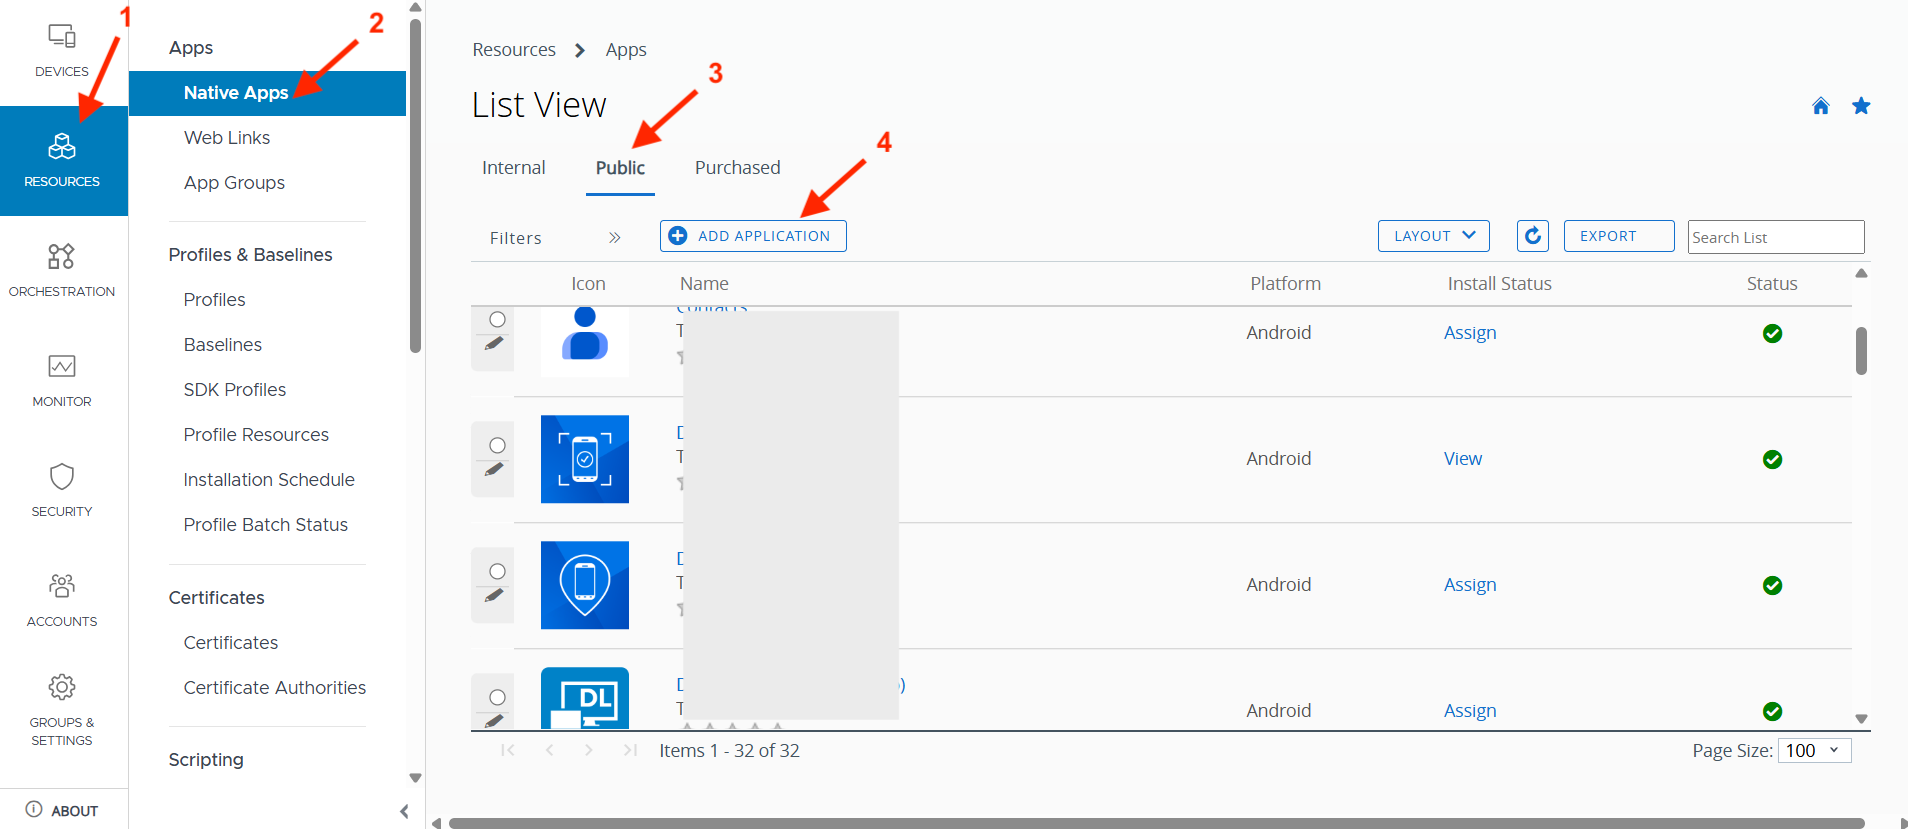
- Enter the following, then click Search App Store.
- Platform: Android
- Name: [Enter a name for the application]
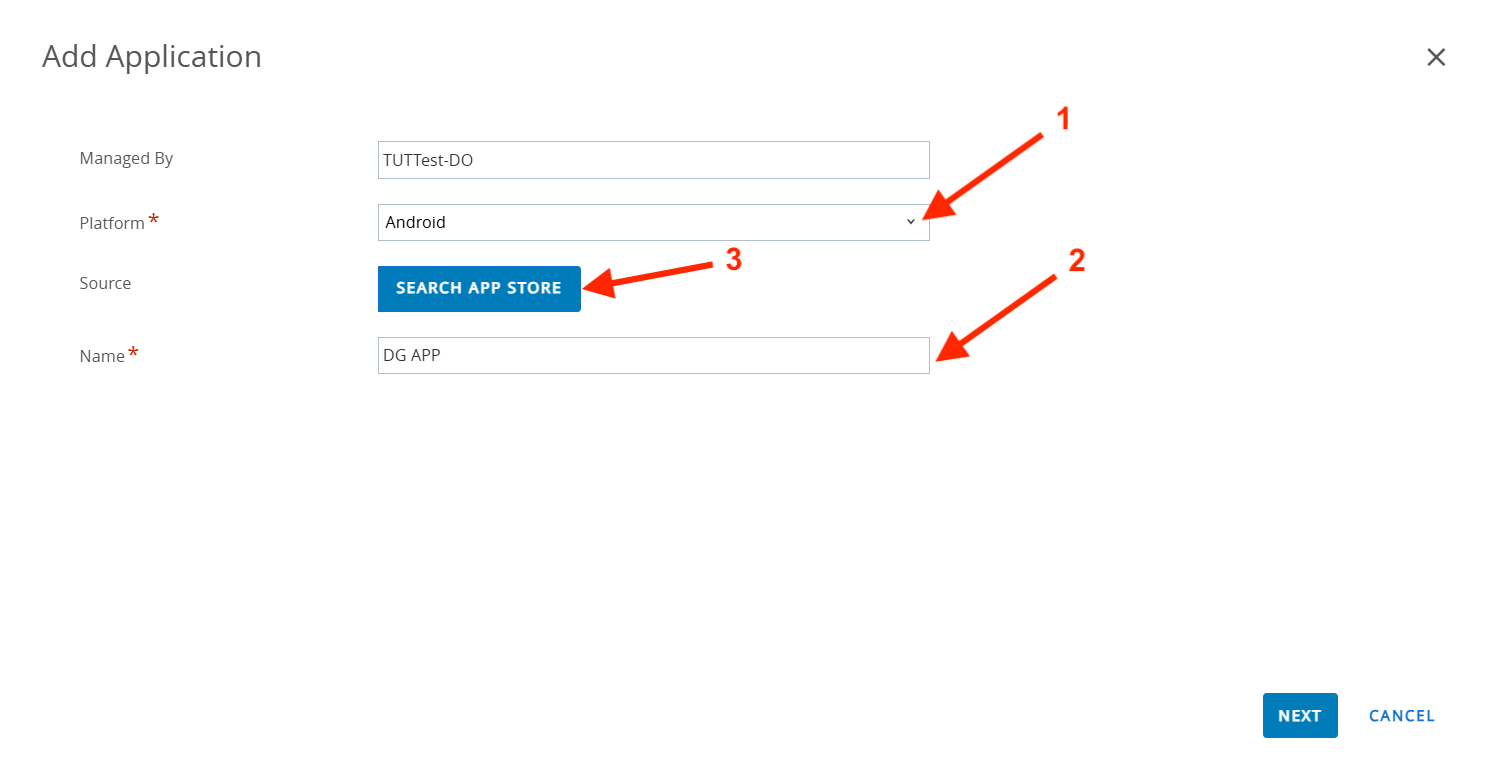
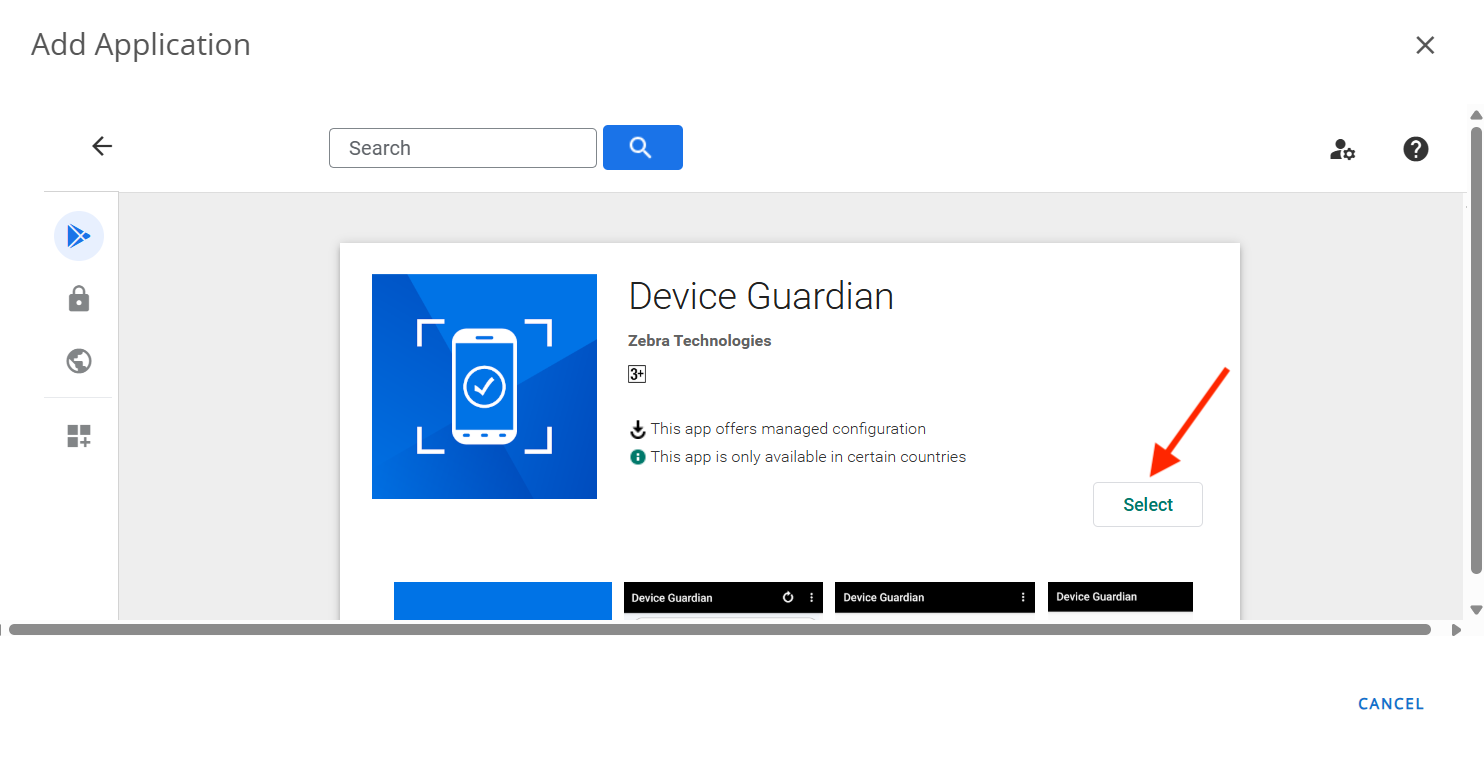
- Search for Device Guardian app and click on the app.
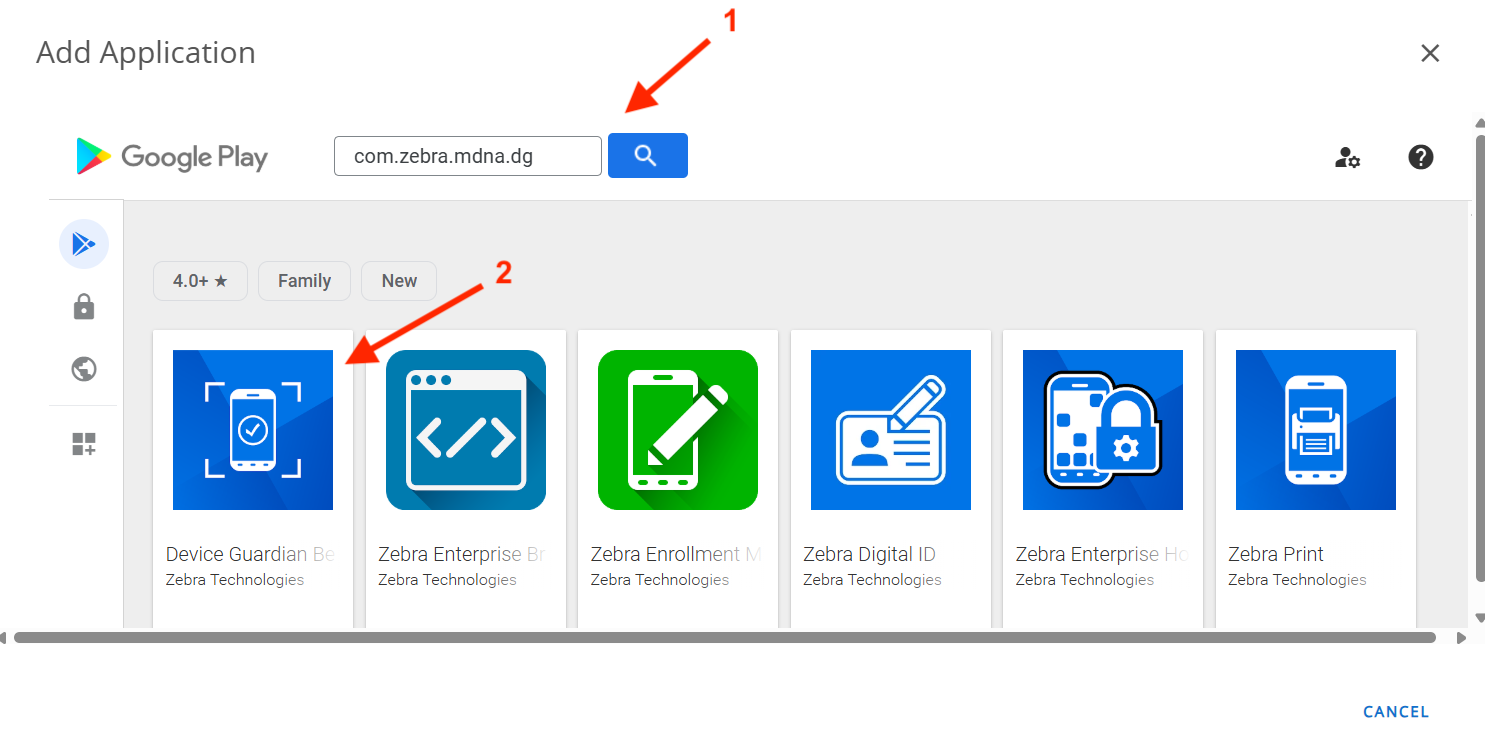
- Click Select.
- Click on the app.
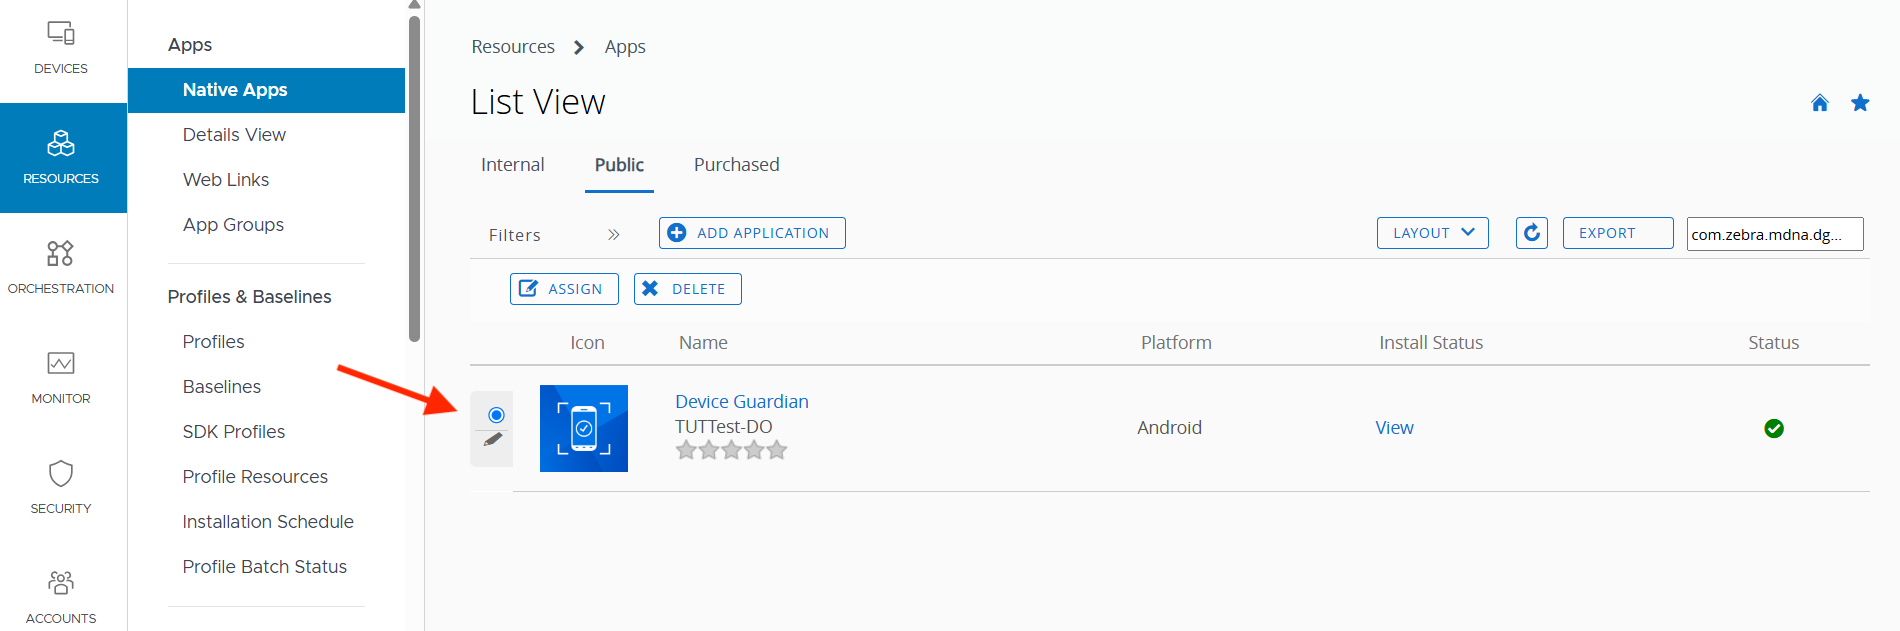
- Click Edit.
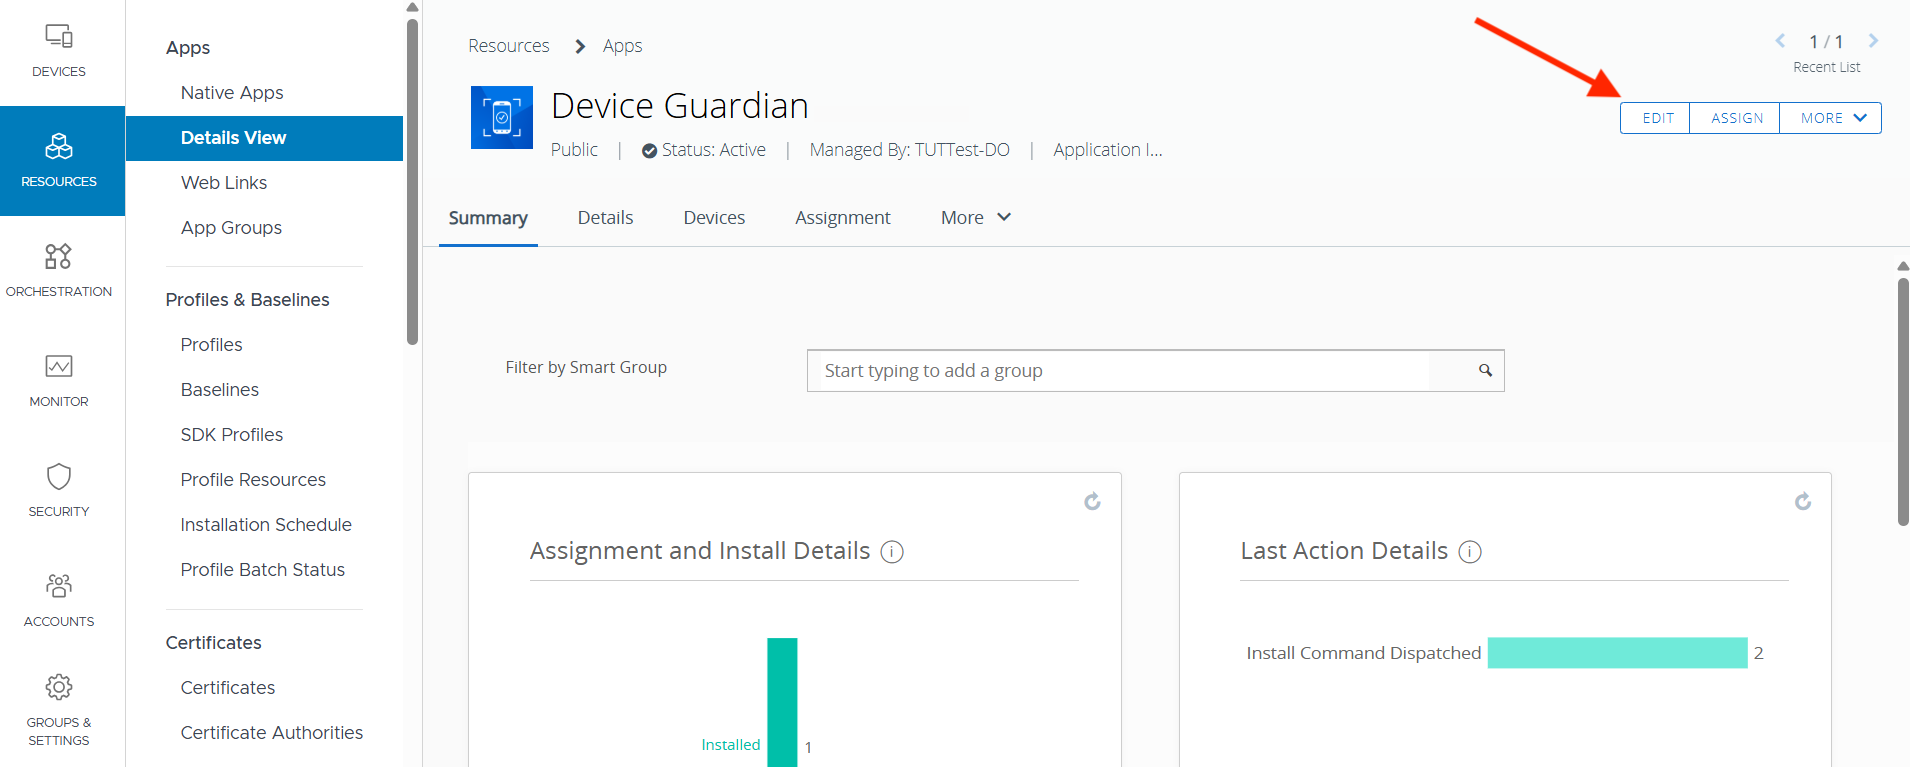
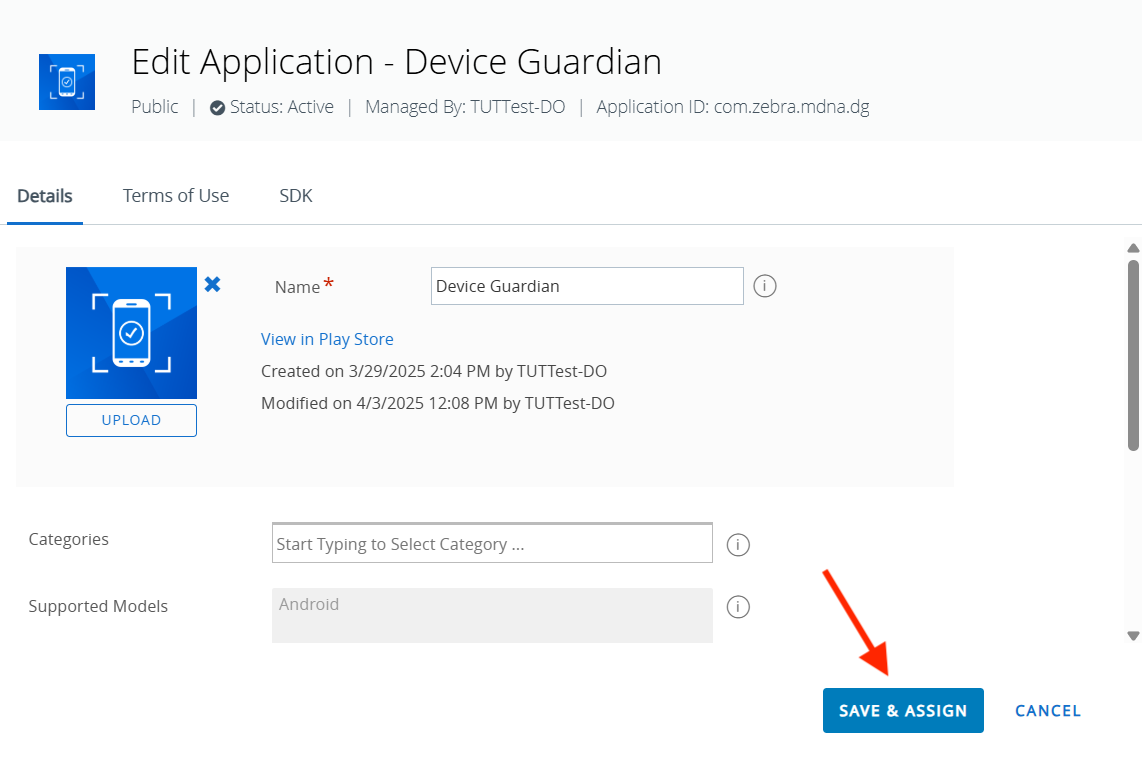
- Enter a name and click Save & Assign.
- Click Add Assignment.
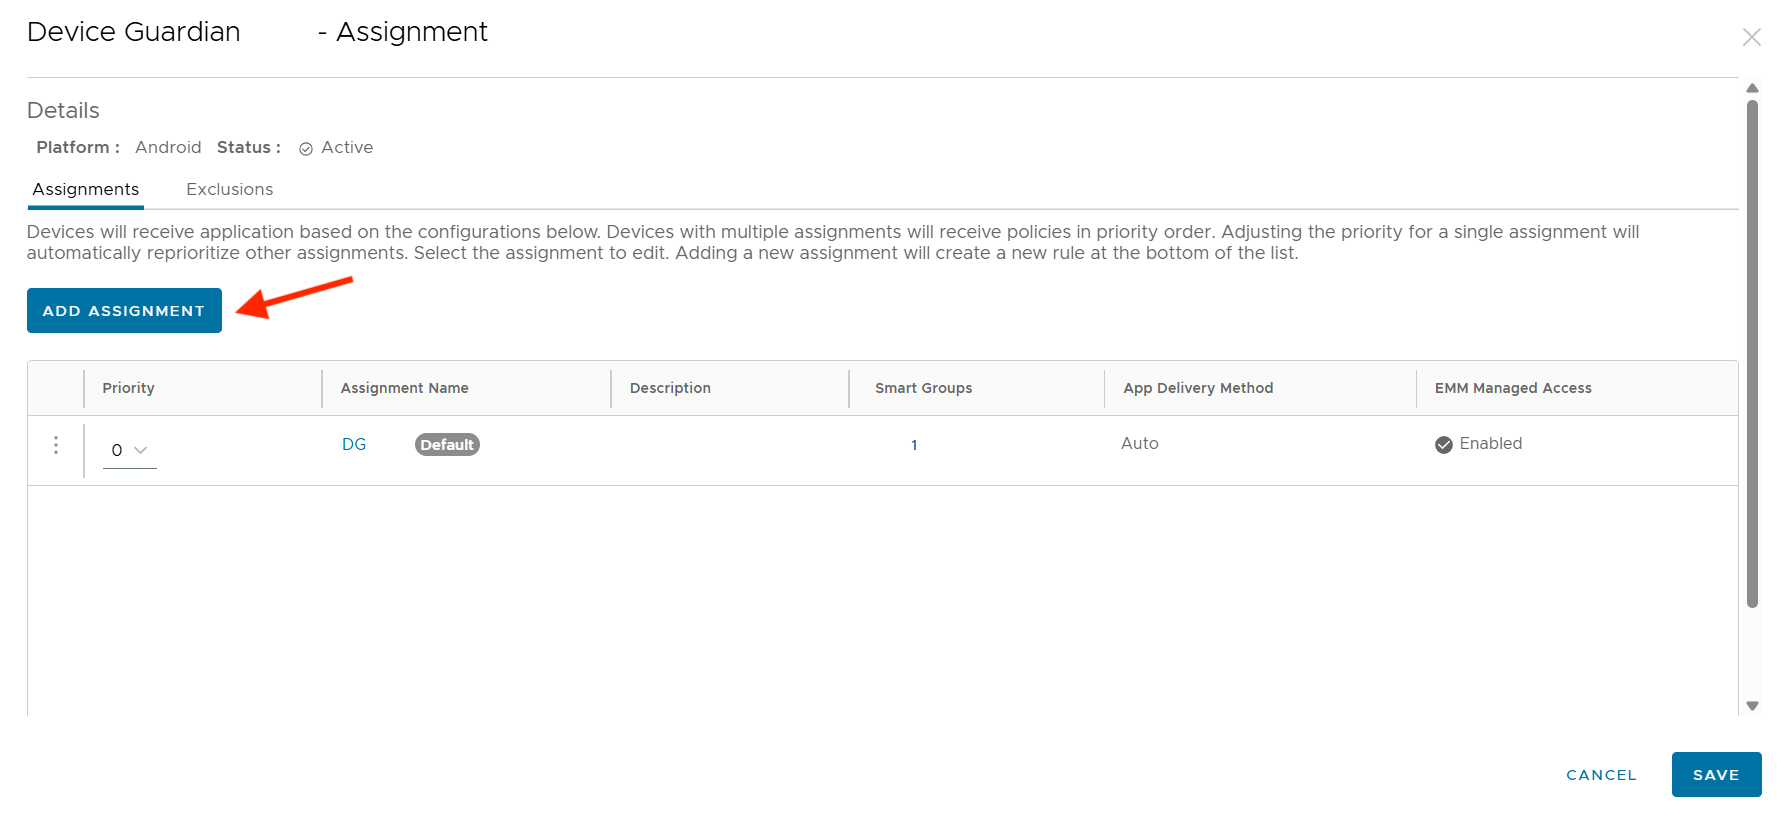
- Enter a name for the assignment. Select the target device group. Select Auto for the App Delivery Method, then click Application Configuration in the left panel.

- Click Create.
- Click Save.
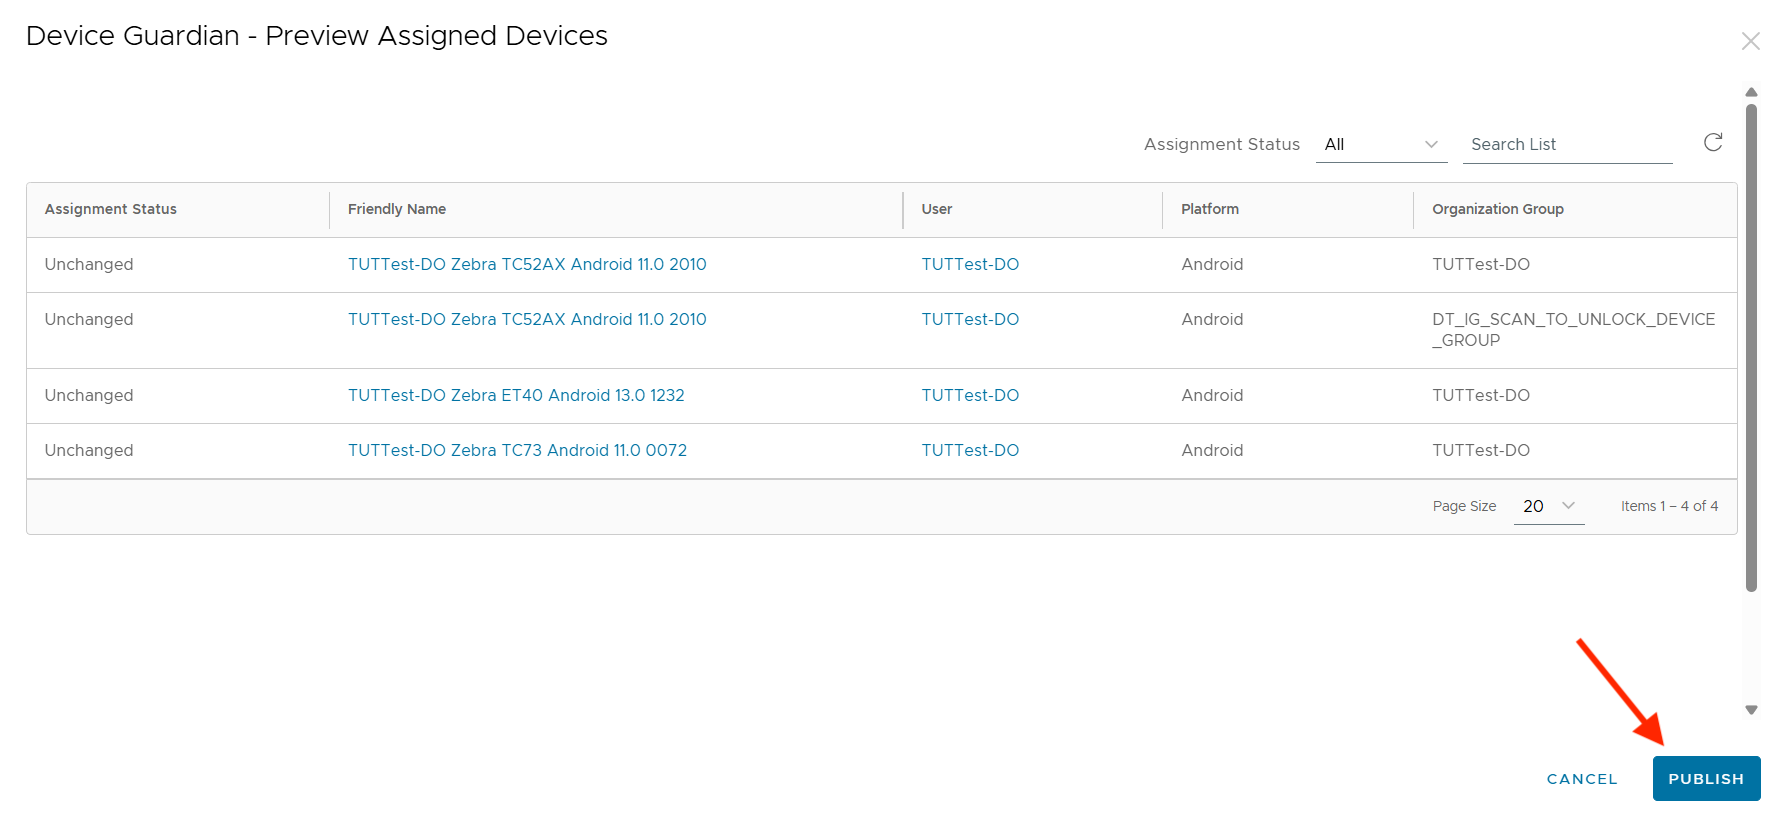
- Click Publish.
Option B: Managed Config through EMM
Use this procedure to install DG/DGAM from the EMM app store.
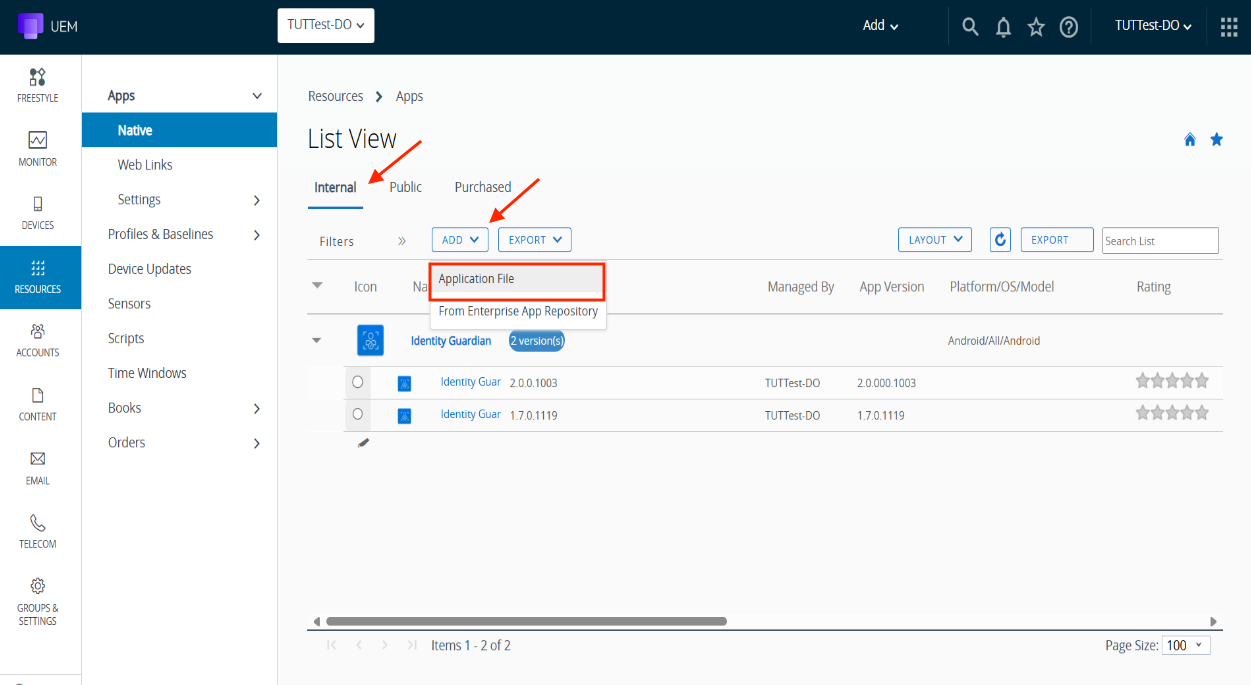
- In the Workspace ONE UEM web console, go to Resources > Native. Click Internal, then Add, and select Application File.
- Click Upload.
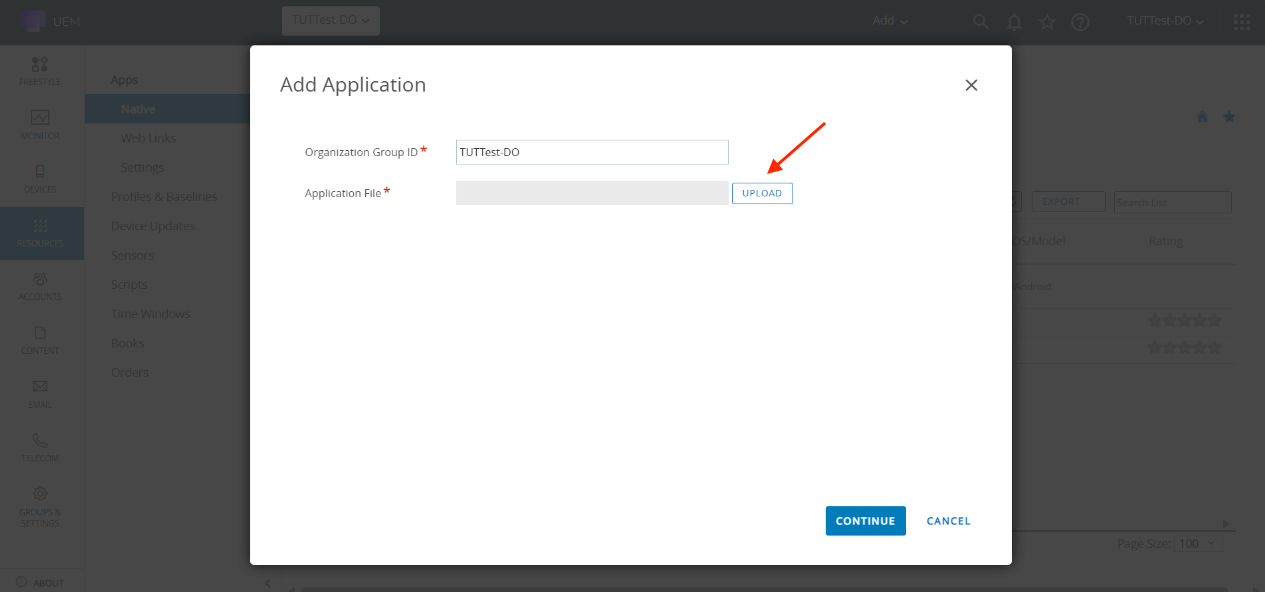
- Click Choose File. Select the Device Guardian .APK file to upload, then click Save.

- The Application File is populated with the file name. Click Continue.
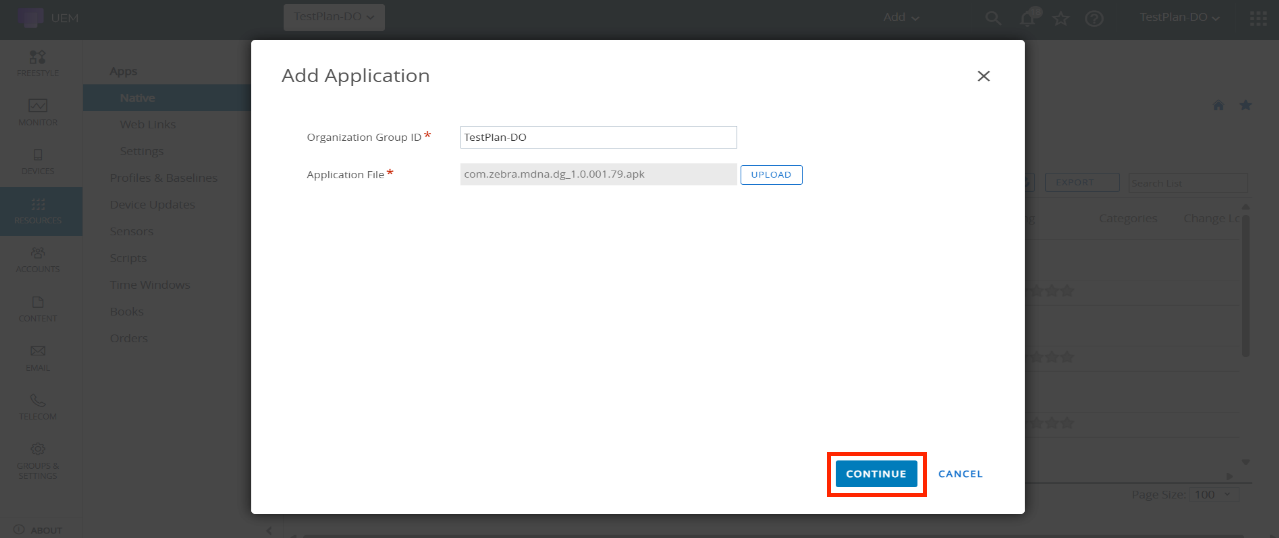
- Enter the application name and version. Click Save and Assign.
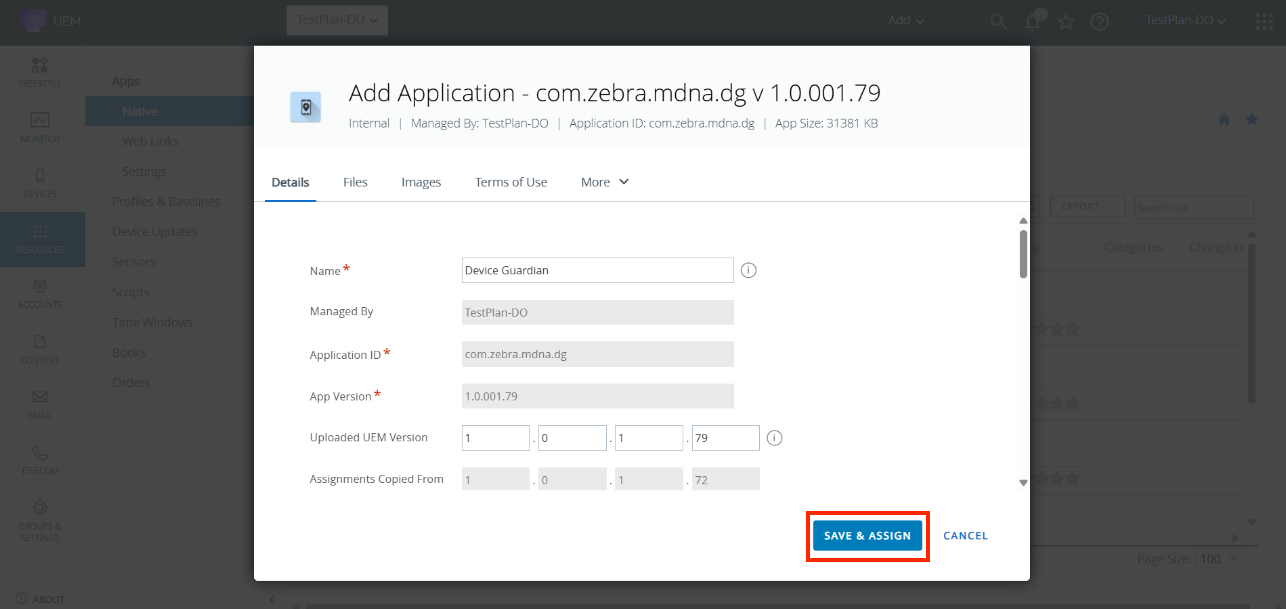
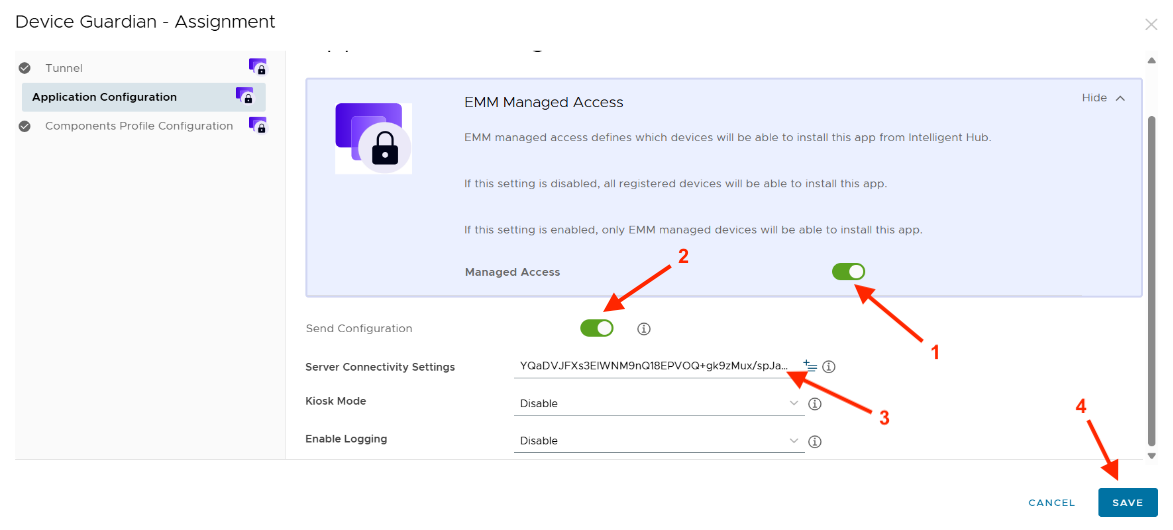
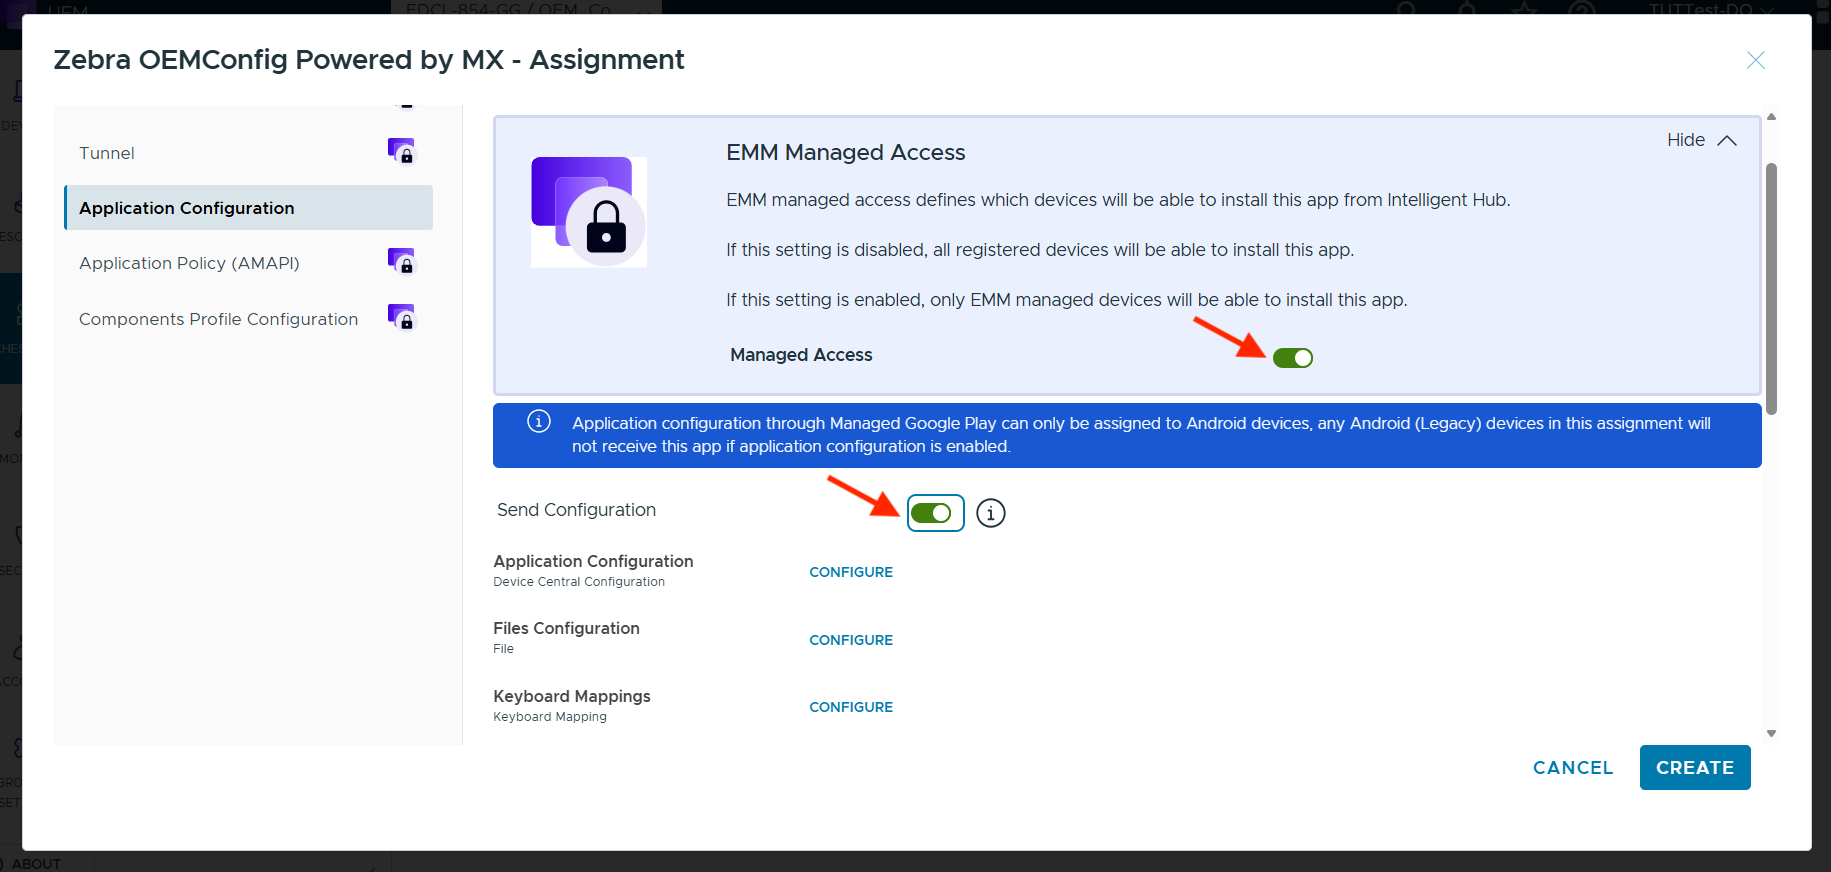
- From the left menu, click Application Configuration. Ensure that Managed Access and Send Configuration remain disabled. Click Create.
- Click Save.
- Click Publish.
Part III: Enroll Device in DG/DGAM
Choose one of the following methods to enroll devices in DG/DGAM:
- Option 1: StageNow Barcode: Enroll device with the scan of a barcode using StageNow.
- Option 2: XML File Use WS1 UEM to deploy XML settings.
- Option 3: Managed .Config File: Deploy settings through WS1 UEM's Managed Configuration framework.
Option 1: StageNow Barcode
Use this method to enroll a device with the DG/DGAM server by scanning a barcode.
- Download the device enrollment barcode
.pdffile from the Download Kit. - Launch the StageNow client on the device.
- Scan the barcode.
- If applicable, repeat these steps for the following:
- Kiosk - Use the enrollment barcode for kiosk
- Device Tracker - For devices with Device Tracker, use the Device Tracker enrollment barcode for device. Repeat this for Kiosks if needed.
Option 2: XML File
Use this method to deploy the enrollment settings via XML (with OEMConfig) through WS1 UEM. This enrolls the device with the DG/DGAM server.
- Download the XML Configuration for Device file from the Download Kit. The contents of this file is needed in a later step.
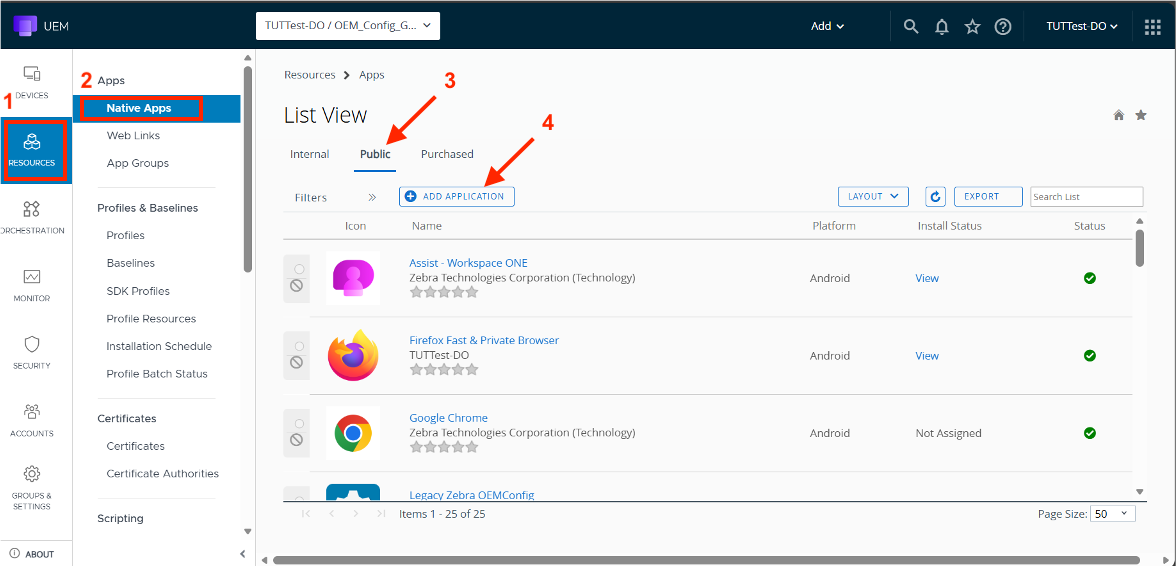
- In the Workspace ONE UEM web console, go to Resources > Native Apps. Search for the group with the target devices enrolled, then select the group.
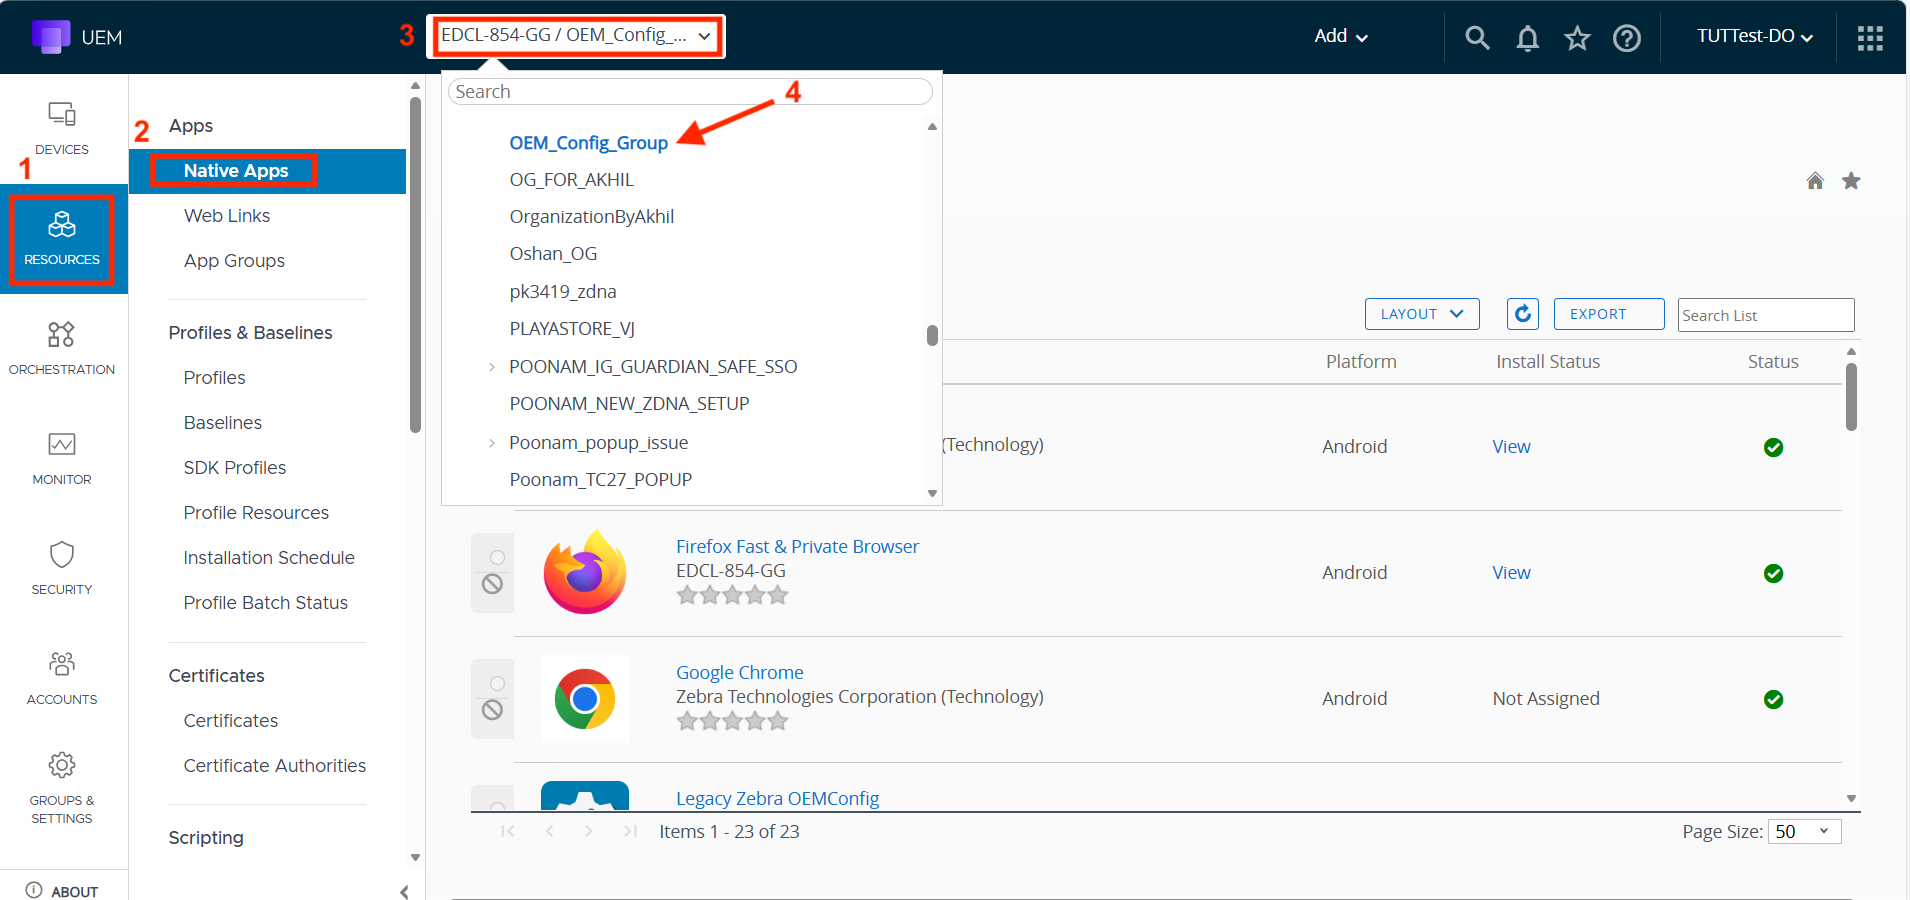
- Click Public, then click Add Application.
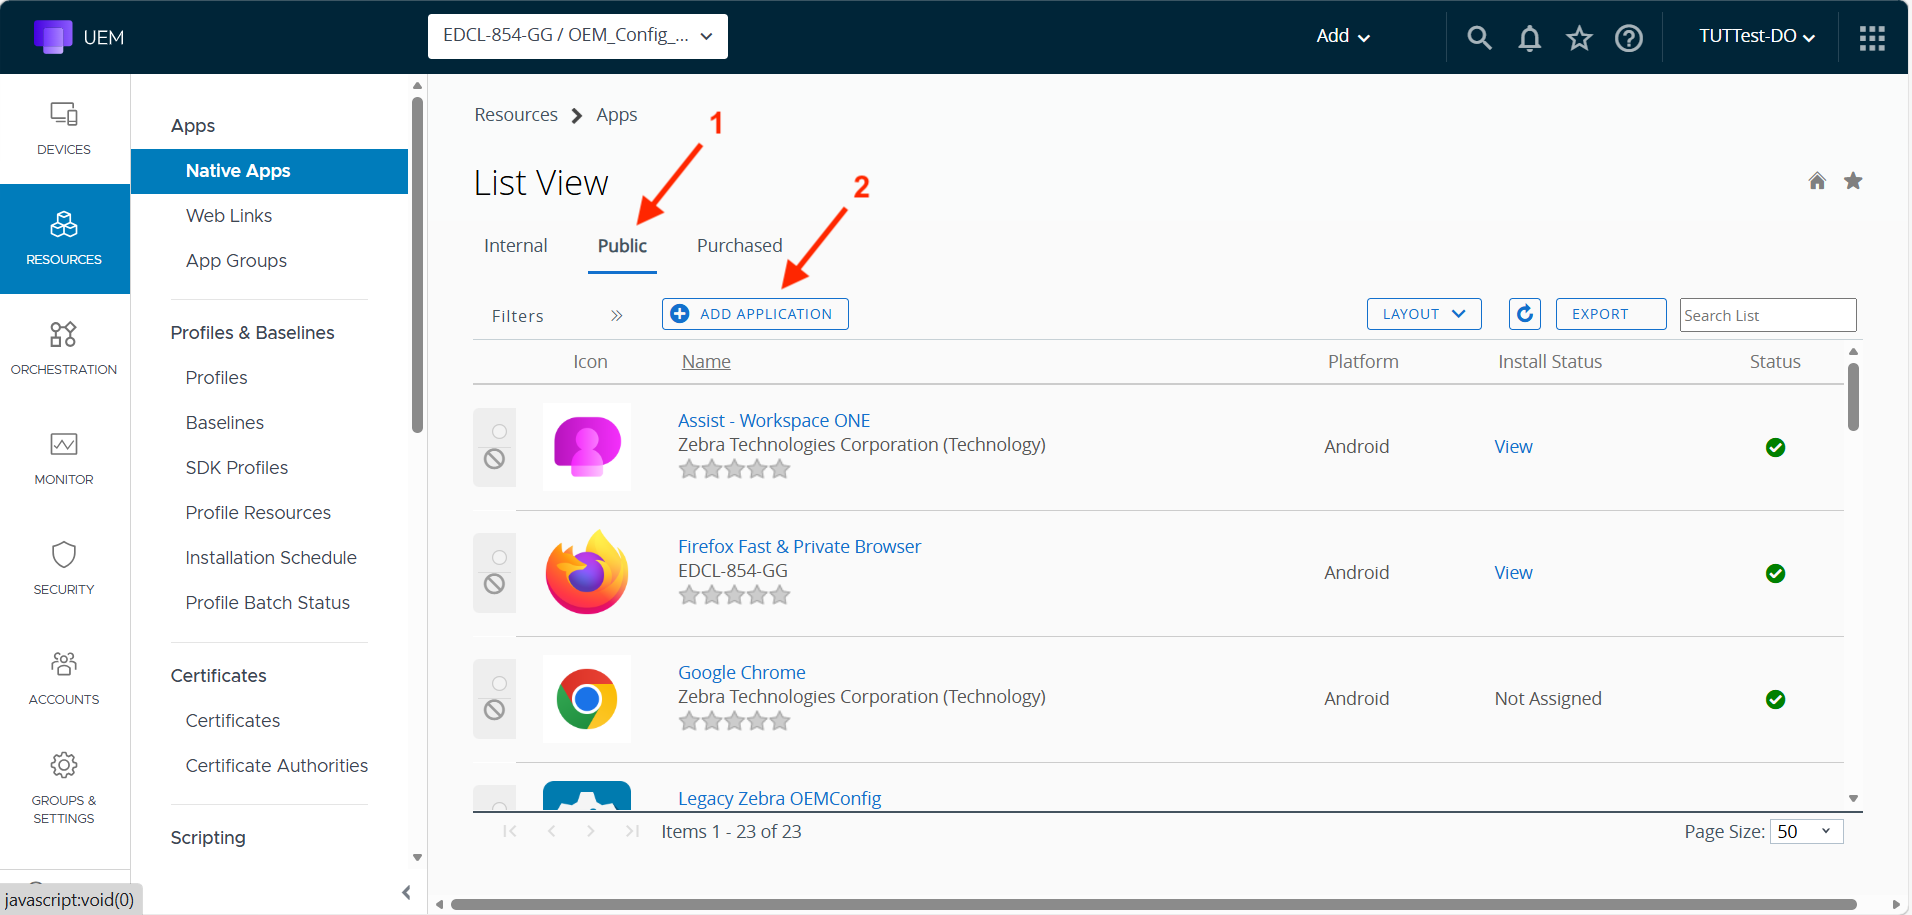
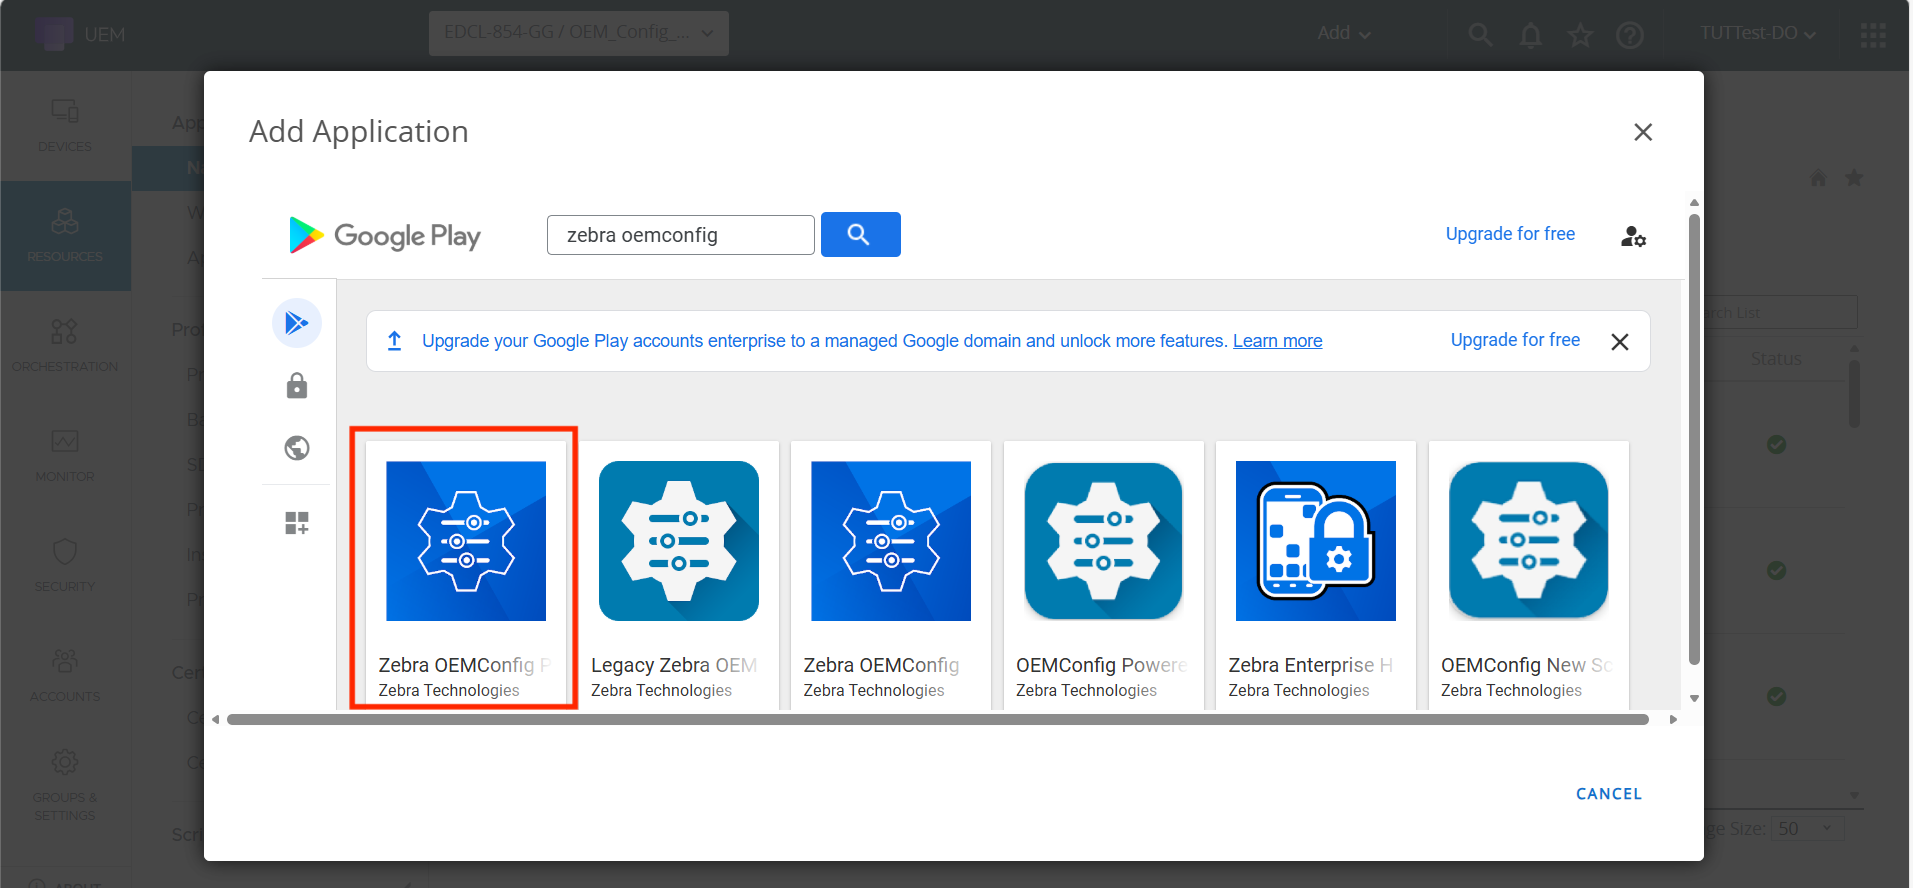
- Select Android for the Platform, then enter a name for the app (e.g., "zebra oemconfig"). Click Search.
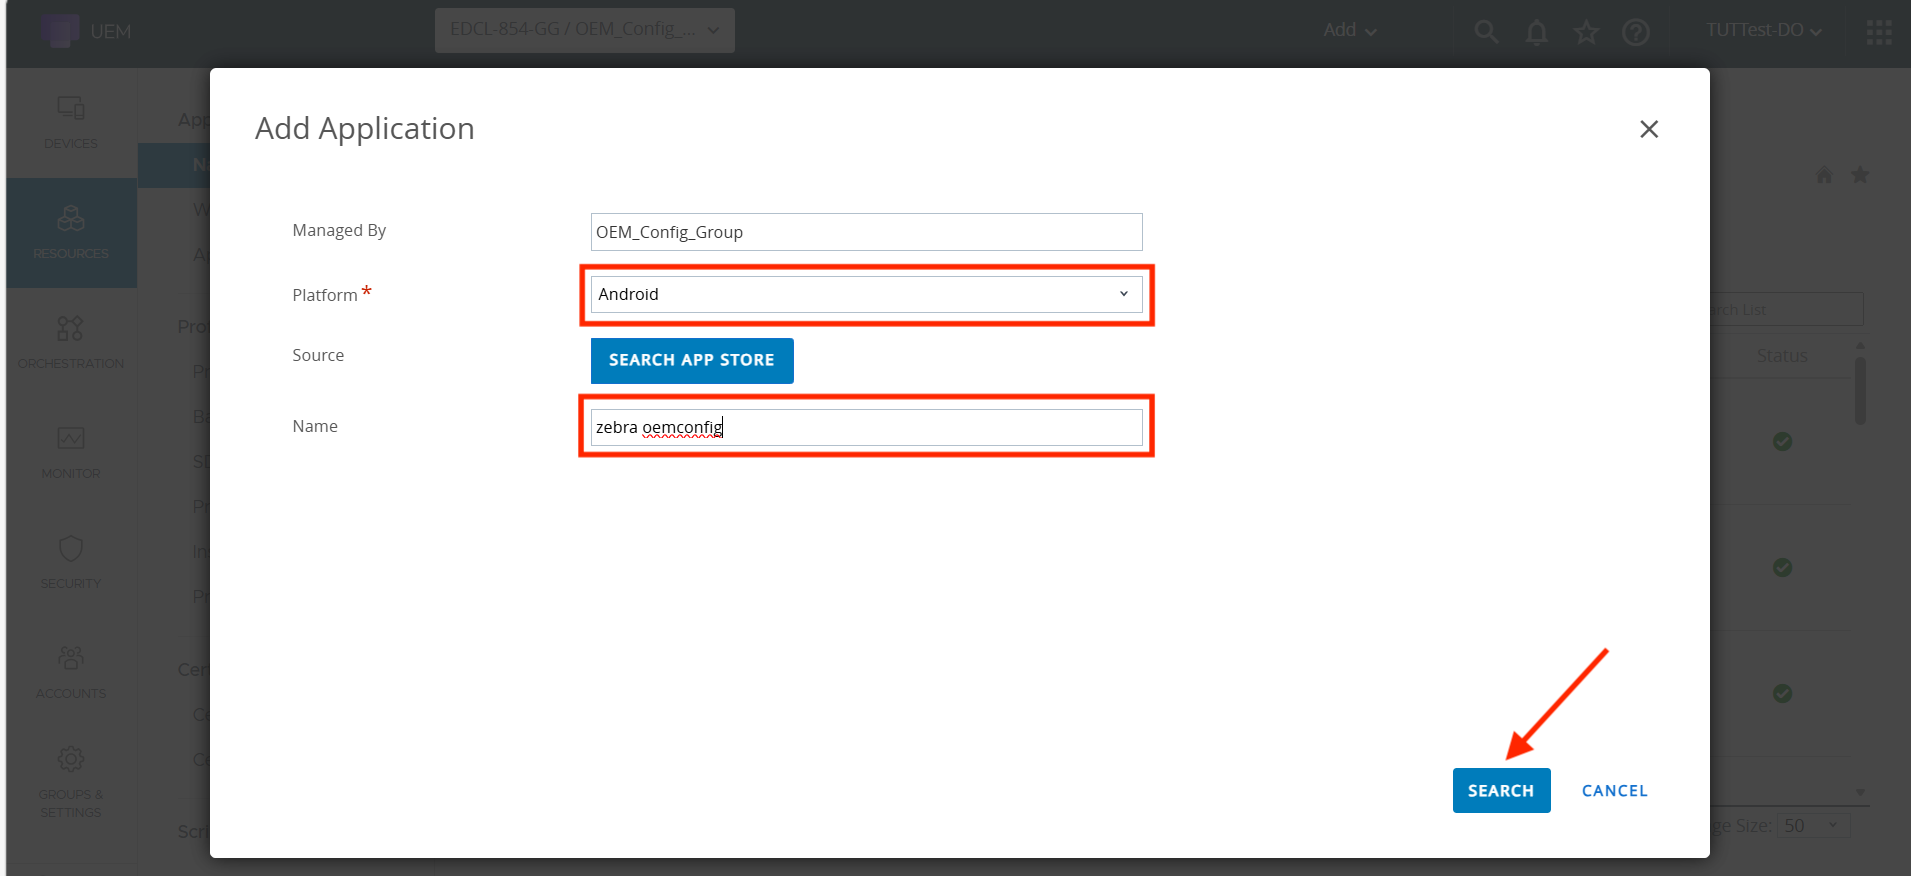
- Select Zebra OEMConfig.
- Click Select.
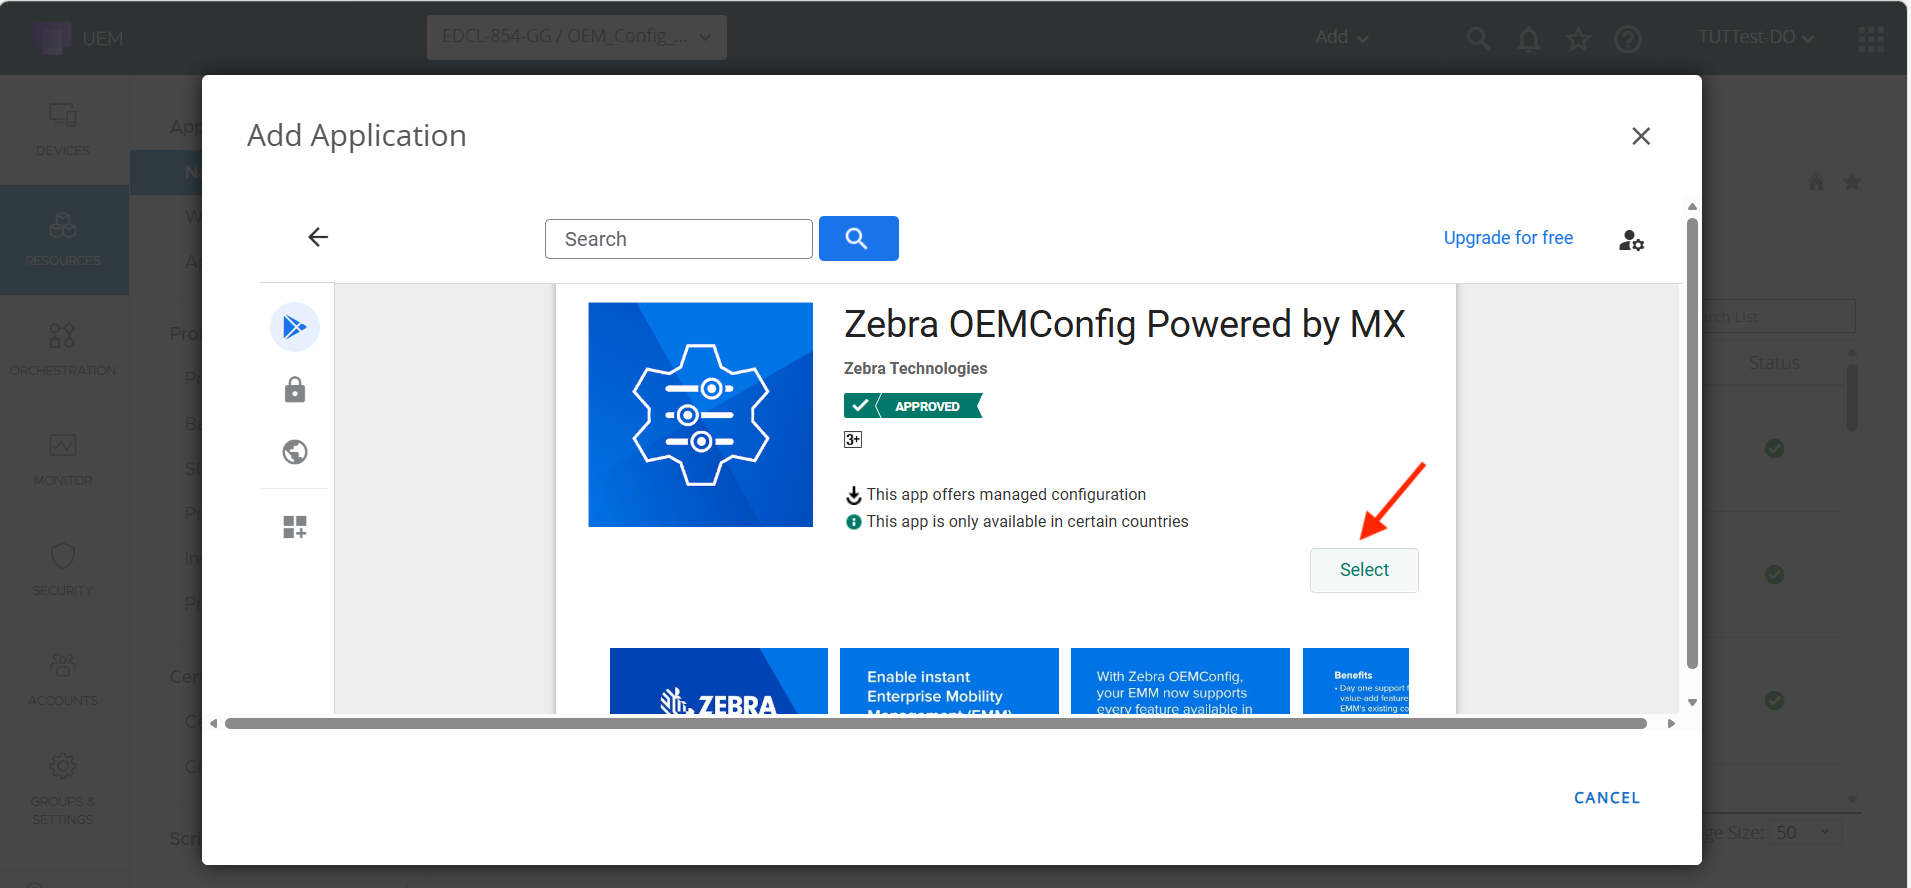
- Go to Resources > Native Apps. Click on the Public tab, then click Add Application.
- Search for the Zebra OEMCOnfig app. When it's displayed, click its edit icon.
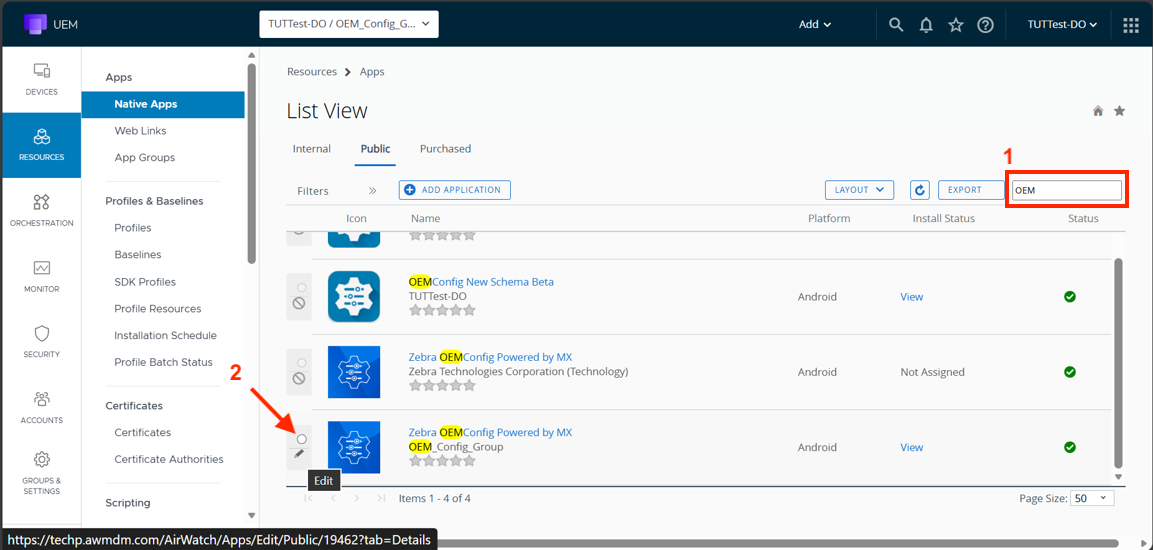
- Click Save & Assign.
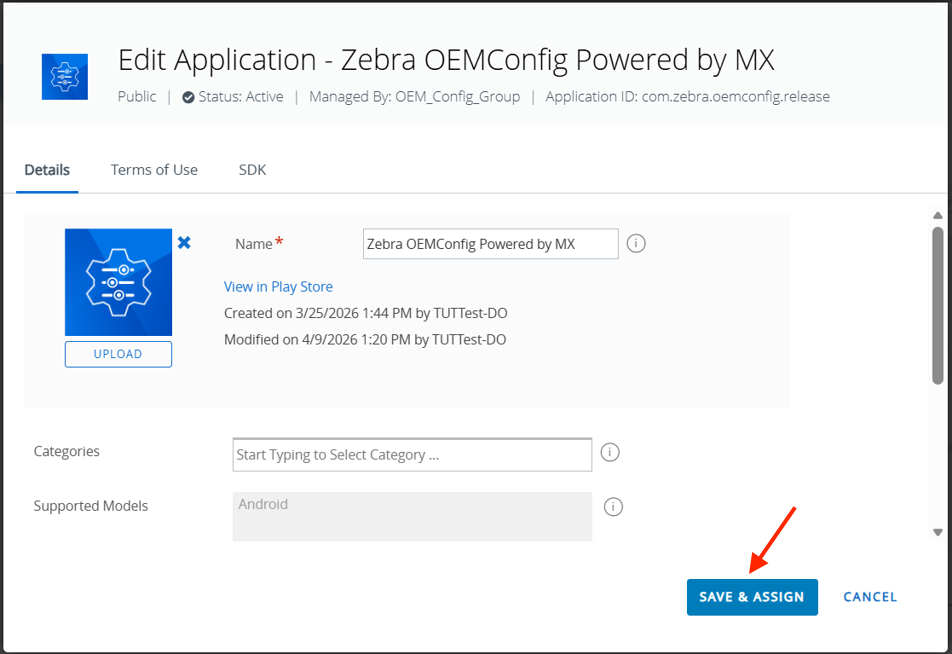
- Click Add Assignment.
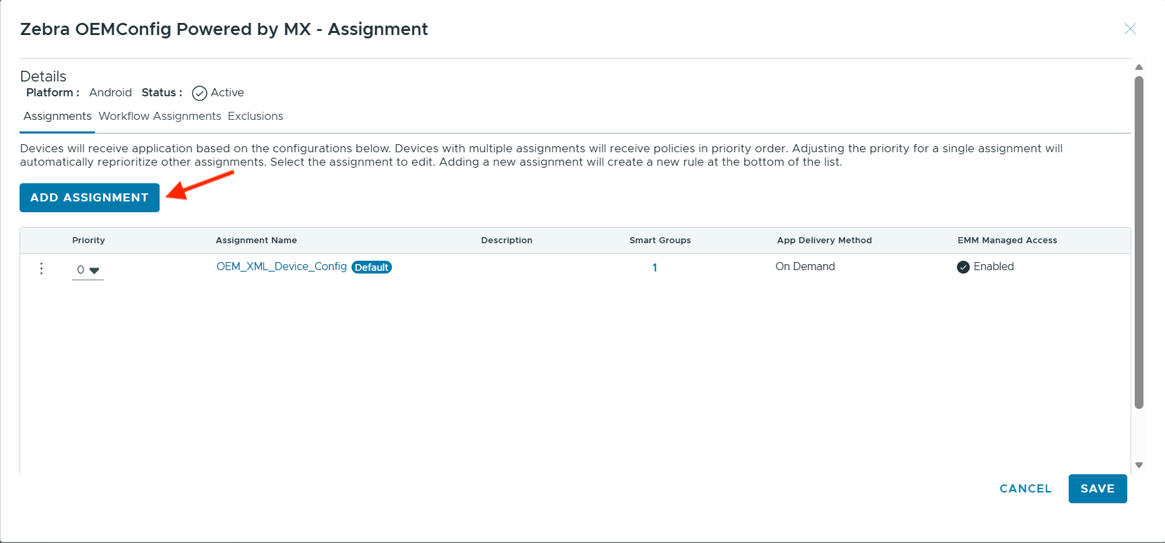
- Enter a name for the assignment. Select the assignment group. Select Auto for the App Delivery Method. Click Application Configuration.
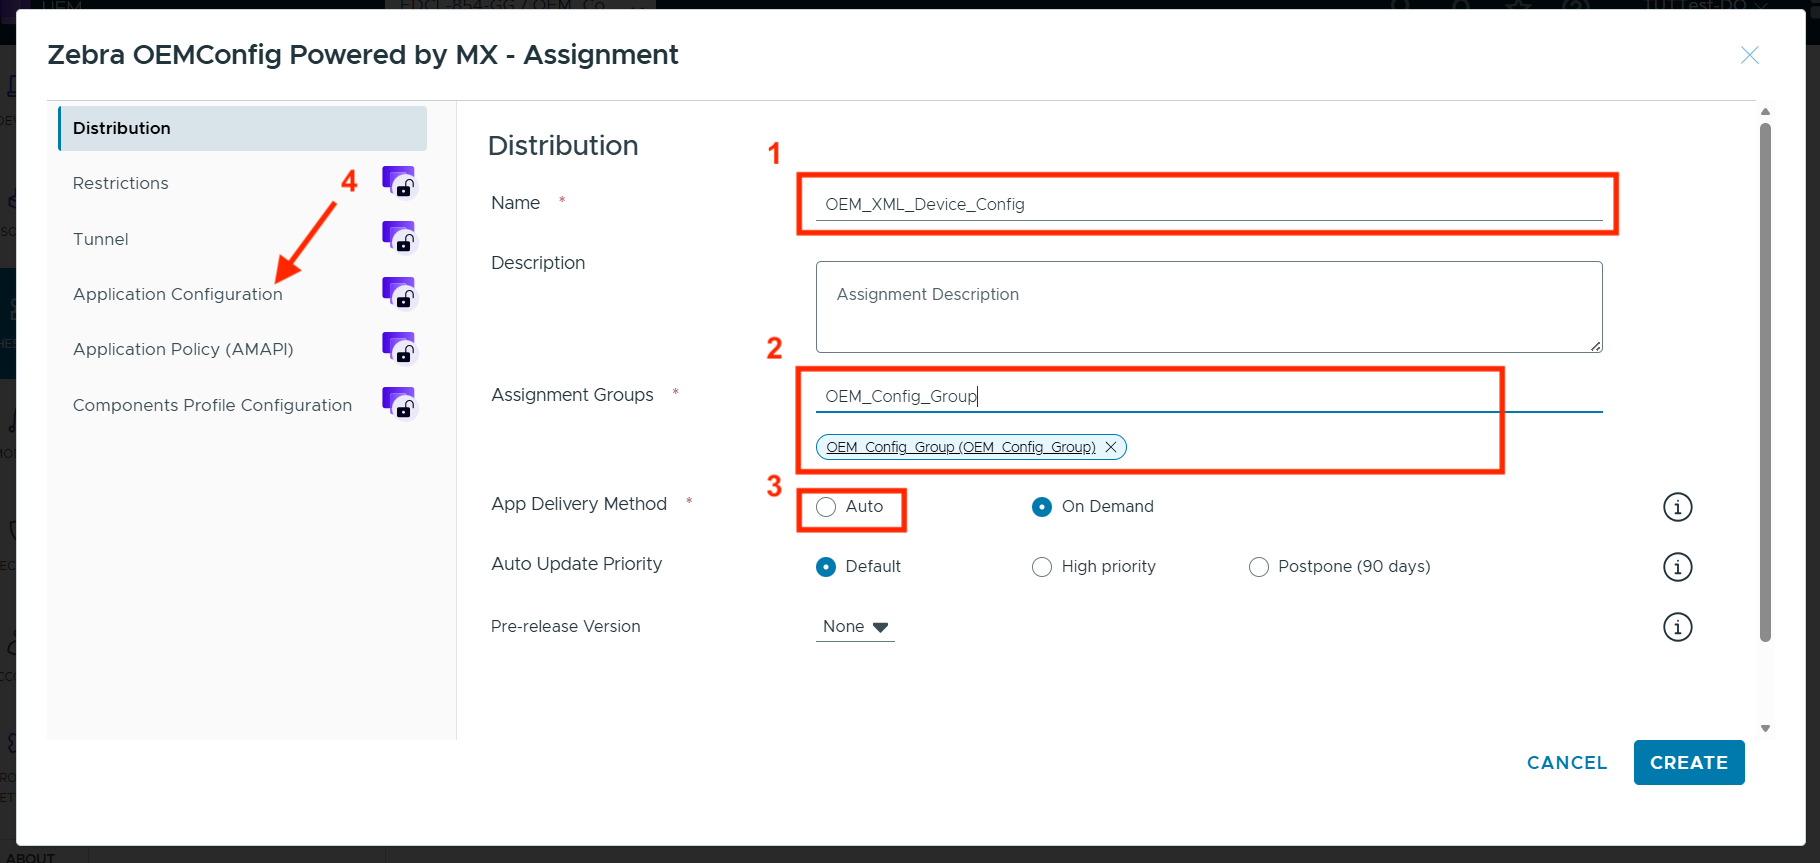
- Enable Managed Access and Send Configuration. Scroll down.
- Click Configure next to System Configuration.
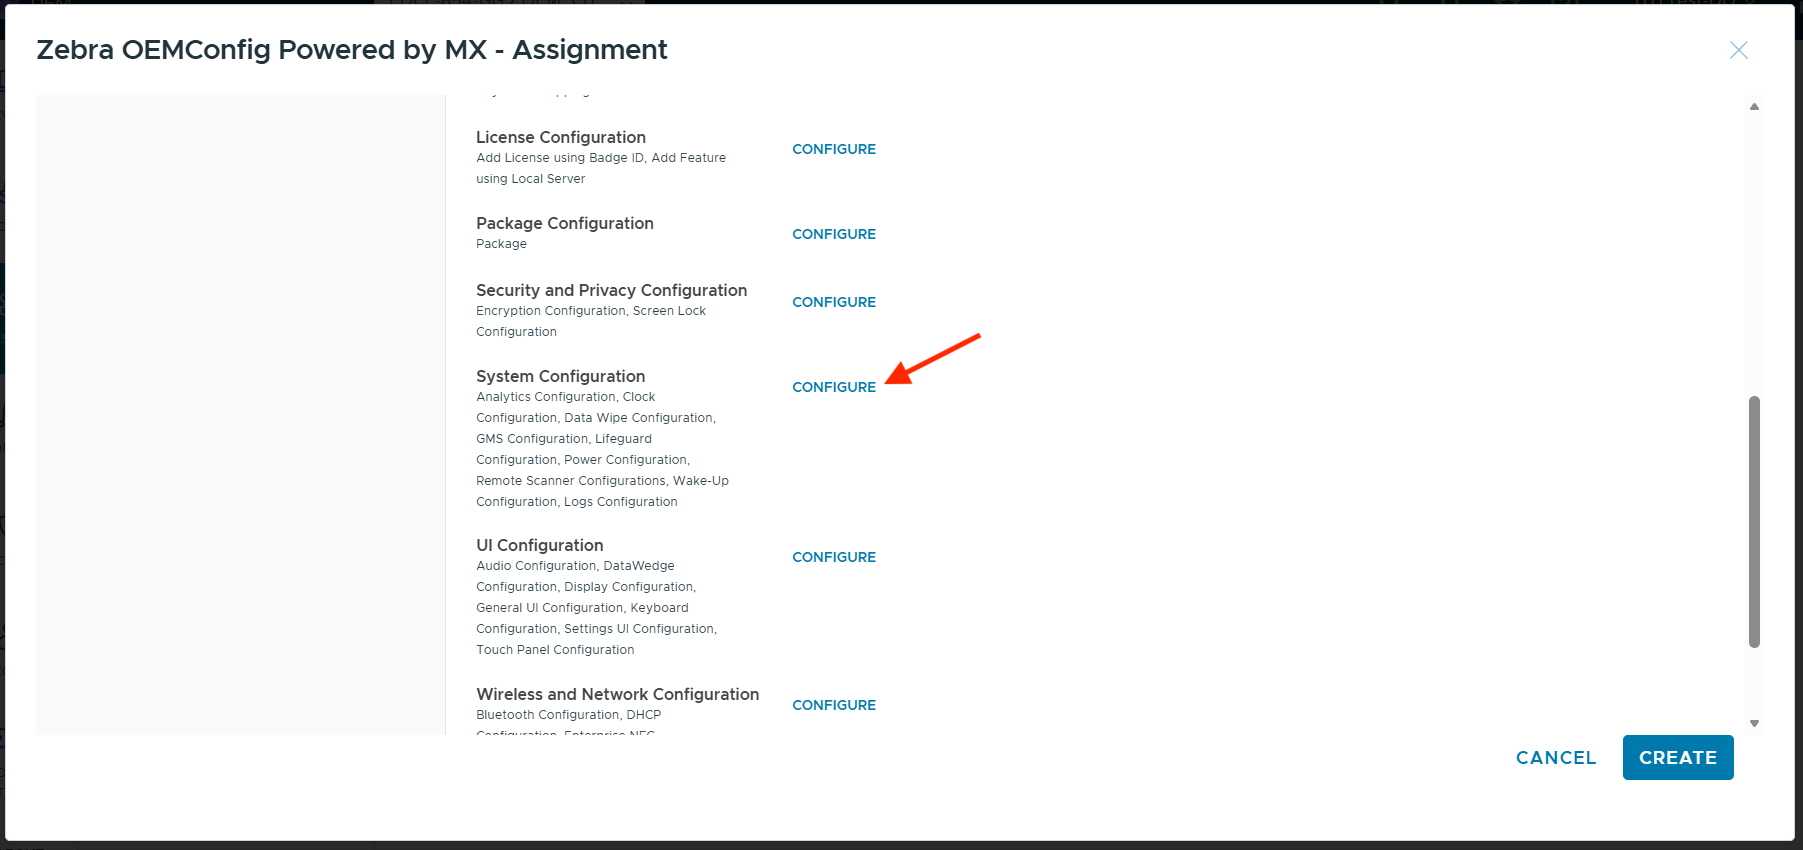
- Copy the content from the
.xmlfile downloaded earlier. Paste the copied text into the Pass-Through Command field. Click Save.
- Click Save.
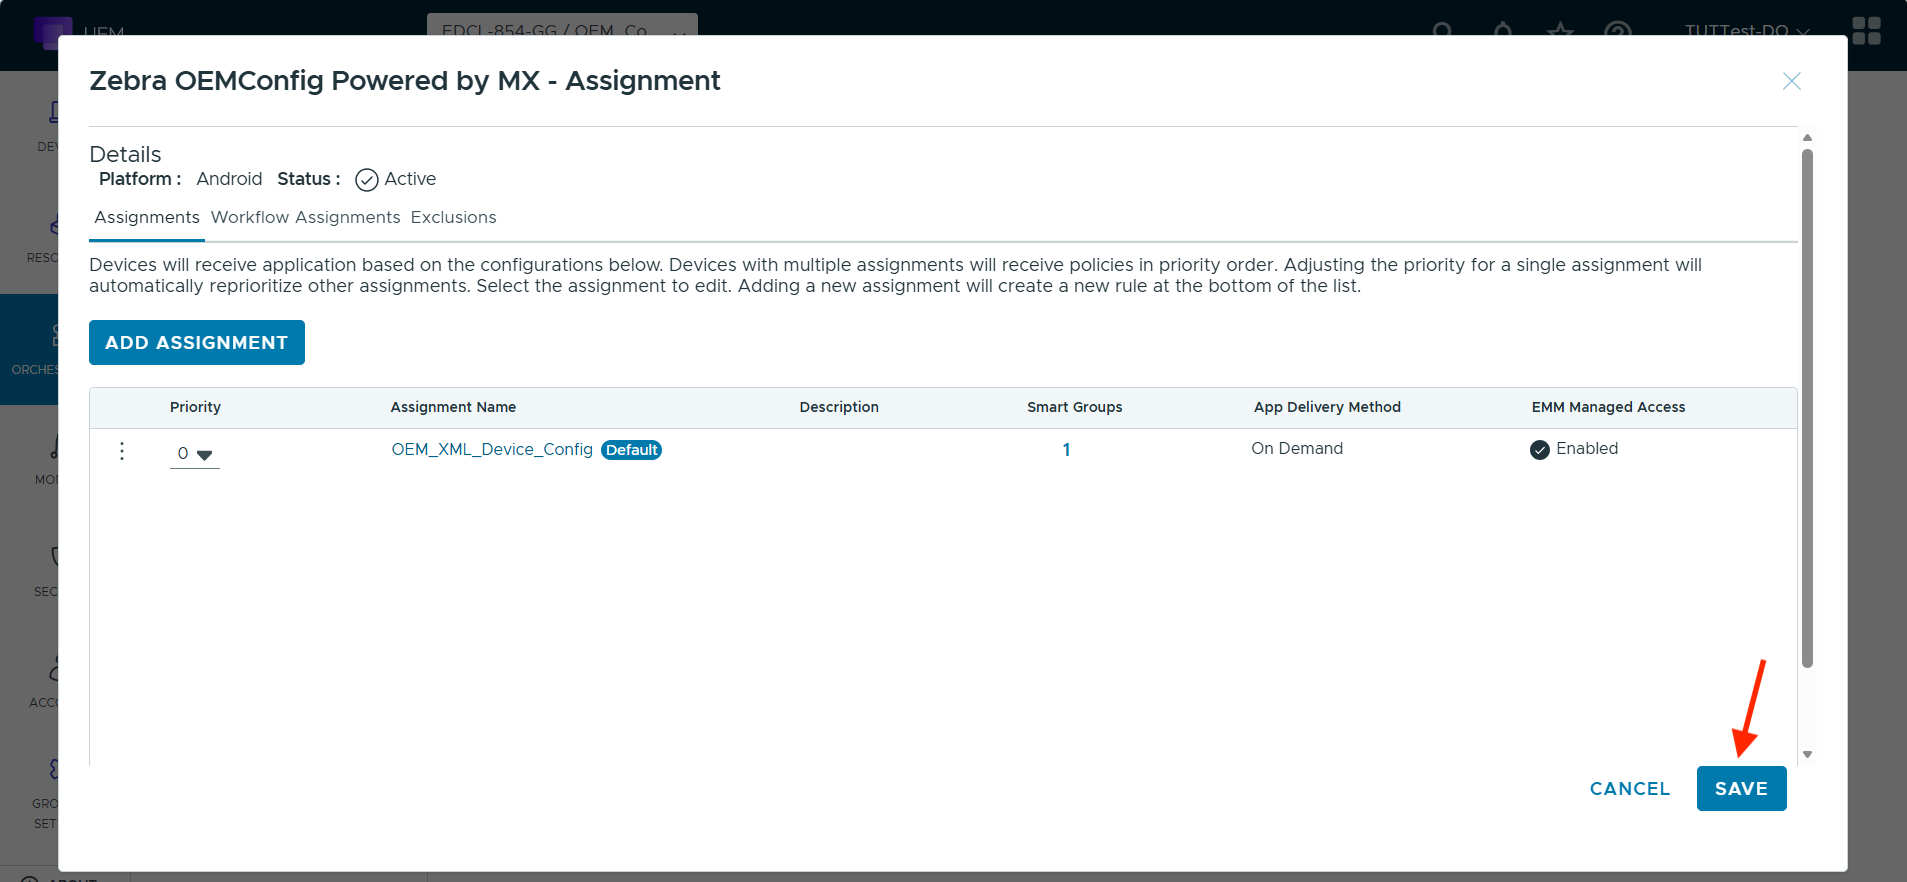
- Click Publish to deploy.
Part IV: Send Intents (Android 11 Only)
For Android 11 devices, follow these steps to send intents that grant the necessary permissions and start Device Guardian:
- Download the DeviceGuardian.xml file, which will be needed in a later step.
- In the Workspace ONE UEM web console, go to Orchestration > File Actions. Click Add Files/Actions.
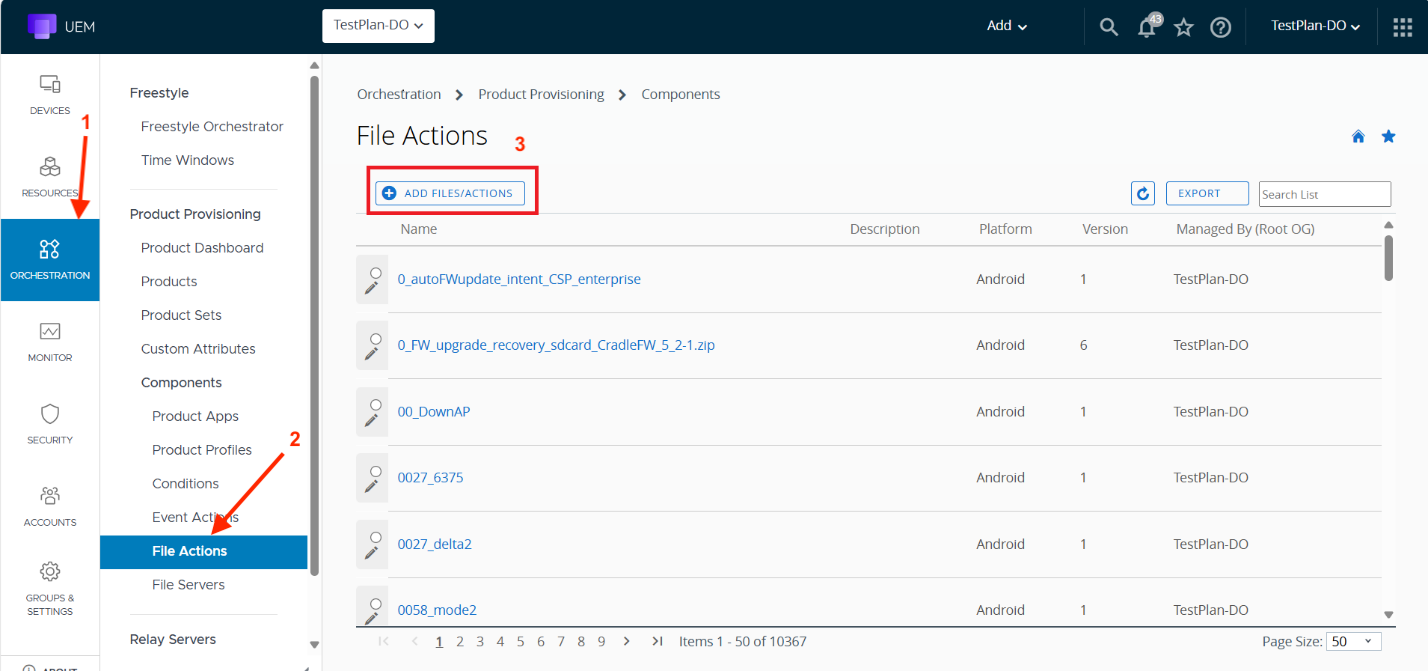
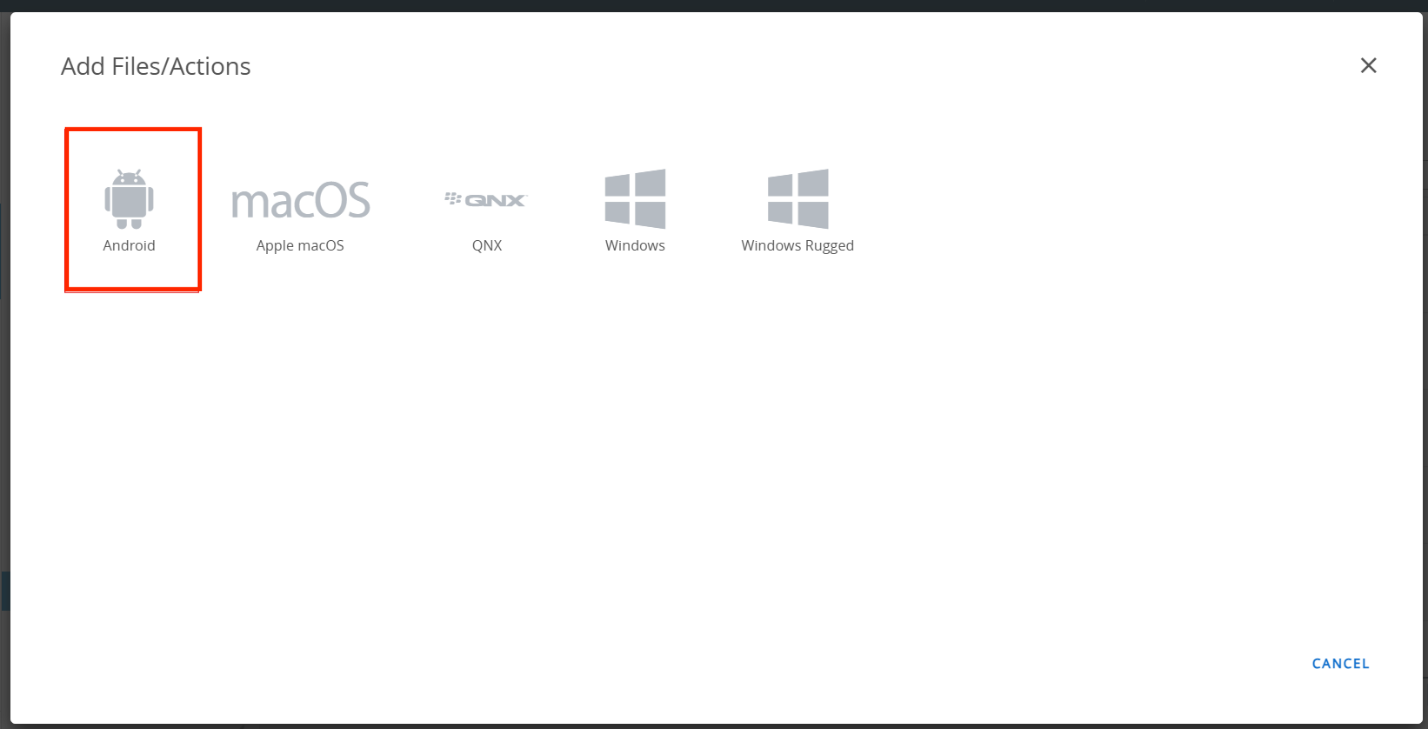
- Select Android.
- Enter a name for the File/Action and click the Files tab.
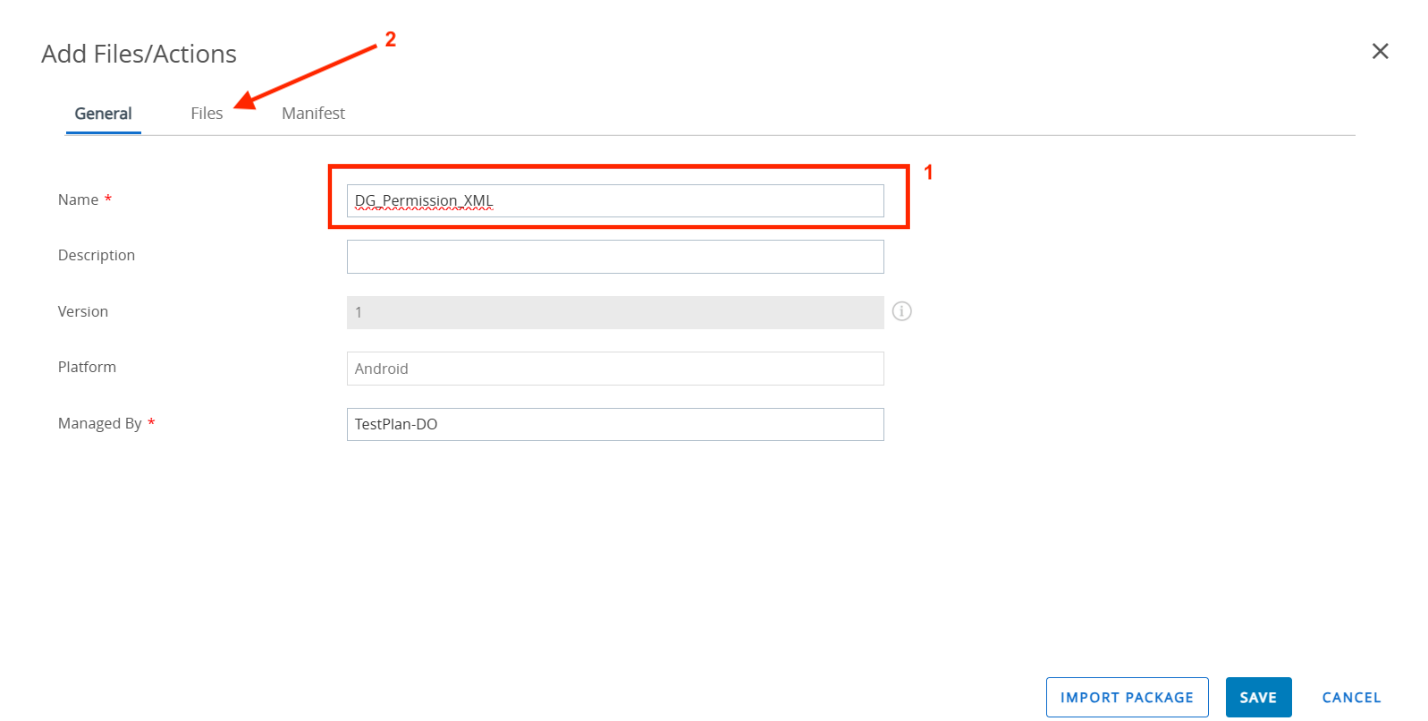
- Click Add Files.
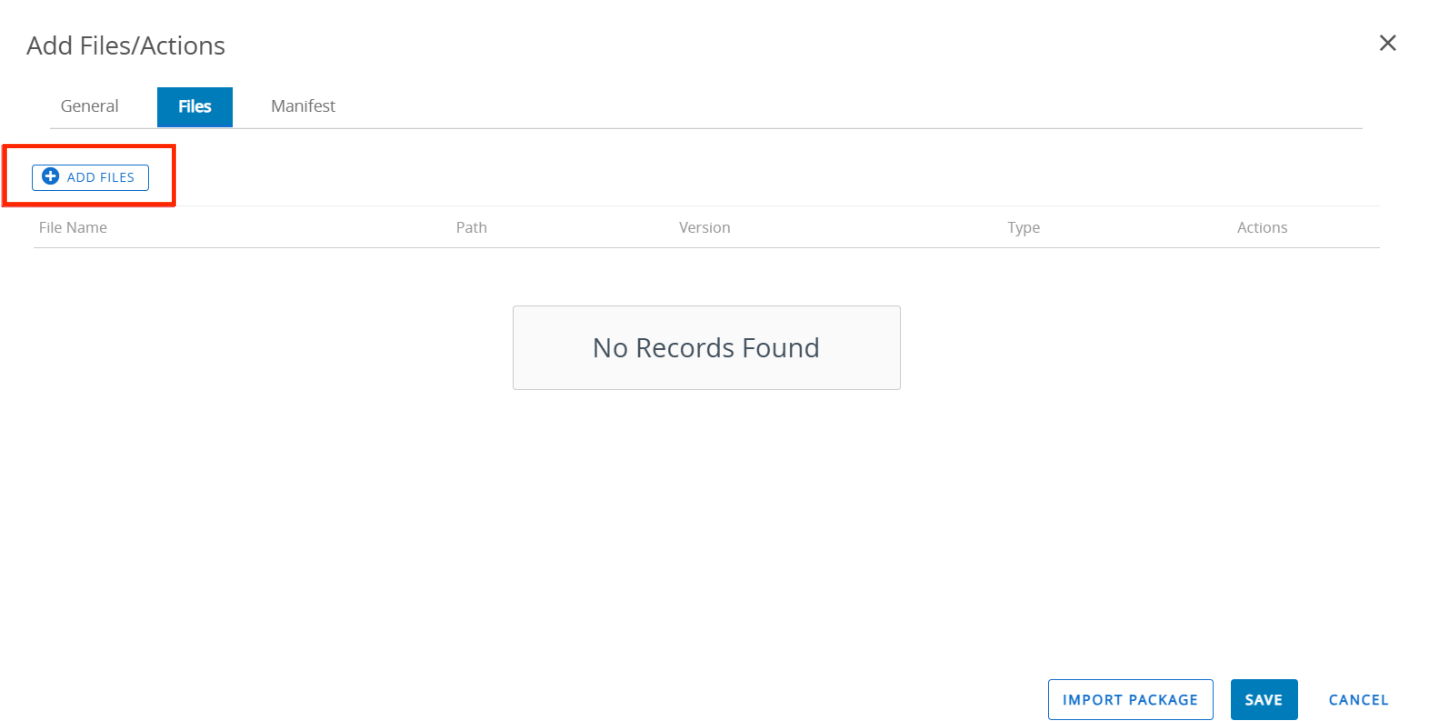
- Choose the
DeviceGuardian.xmldownloaded from step 1 and click Save.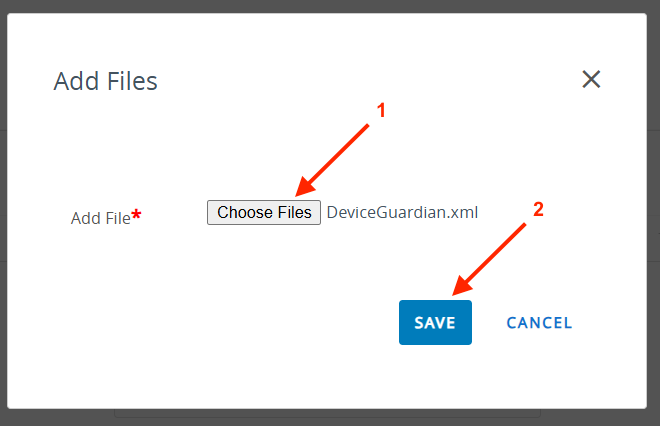
- Enter
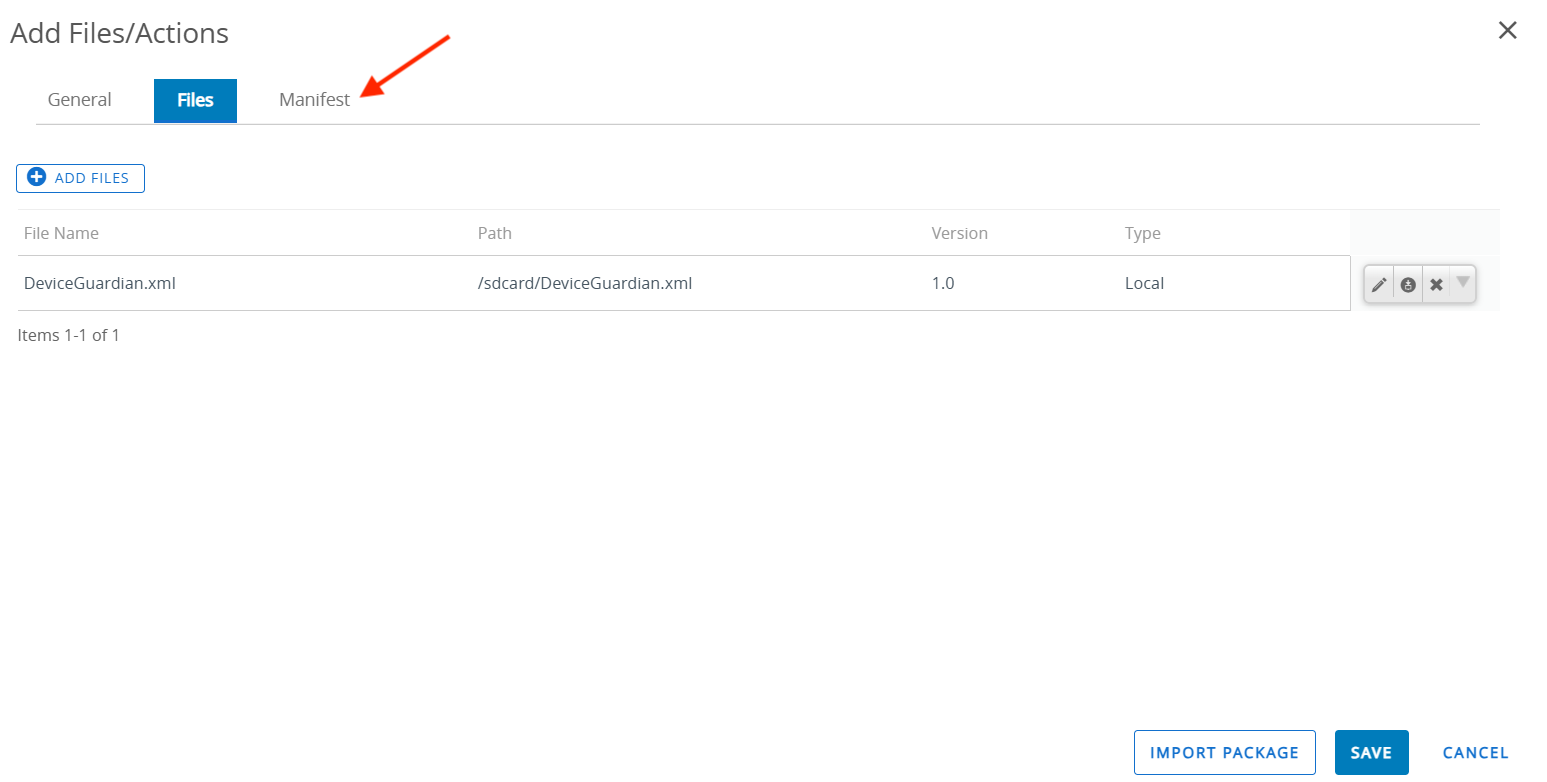
/sdcardfor the Download Path, and enter the version if needed. Click Save.
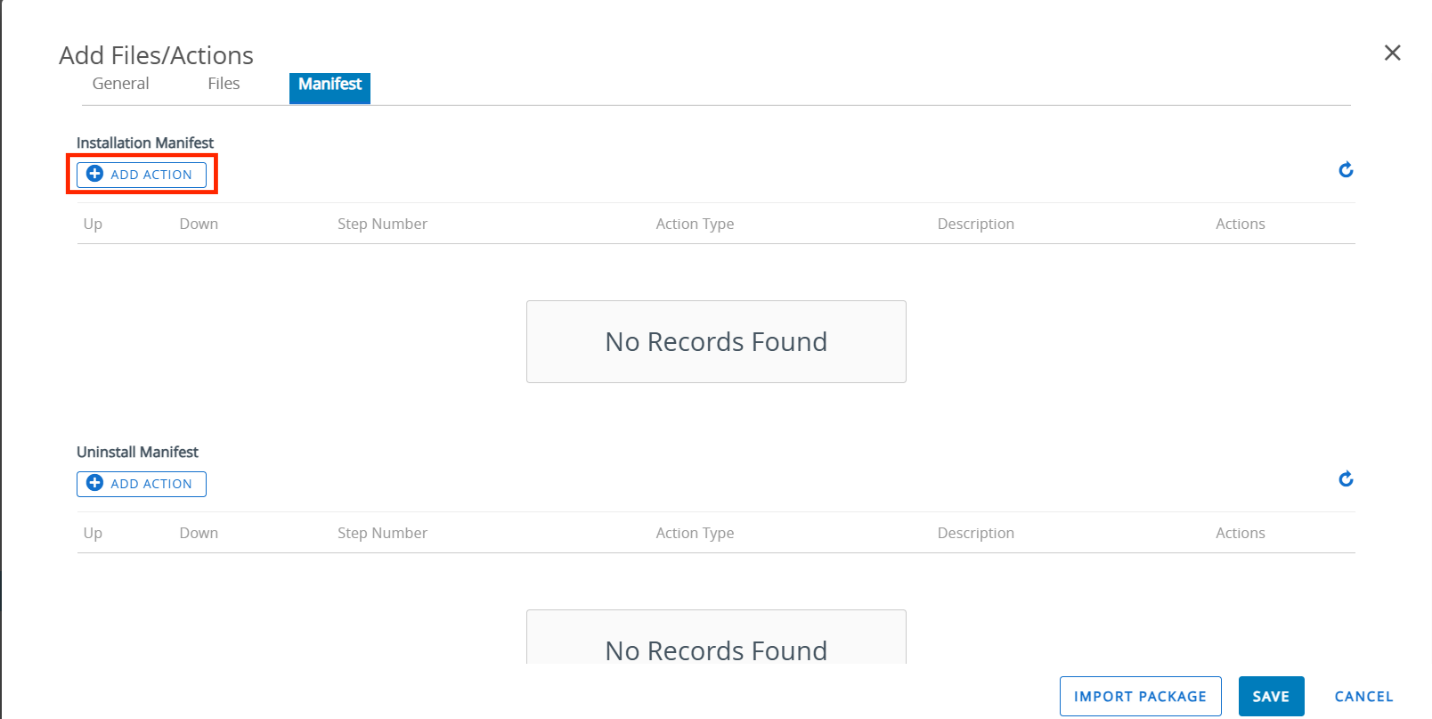
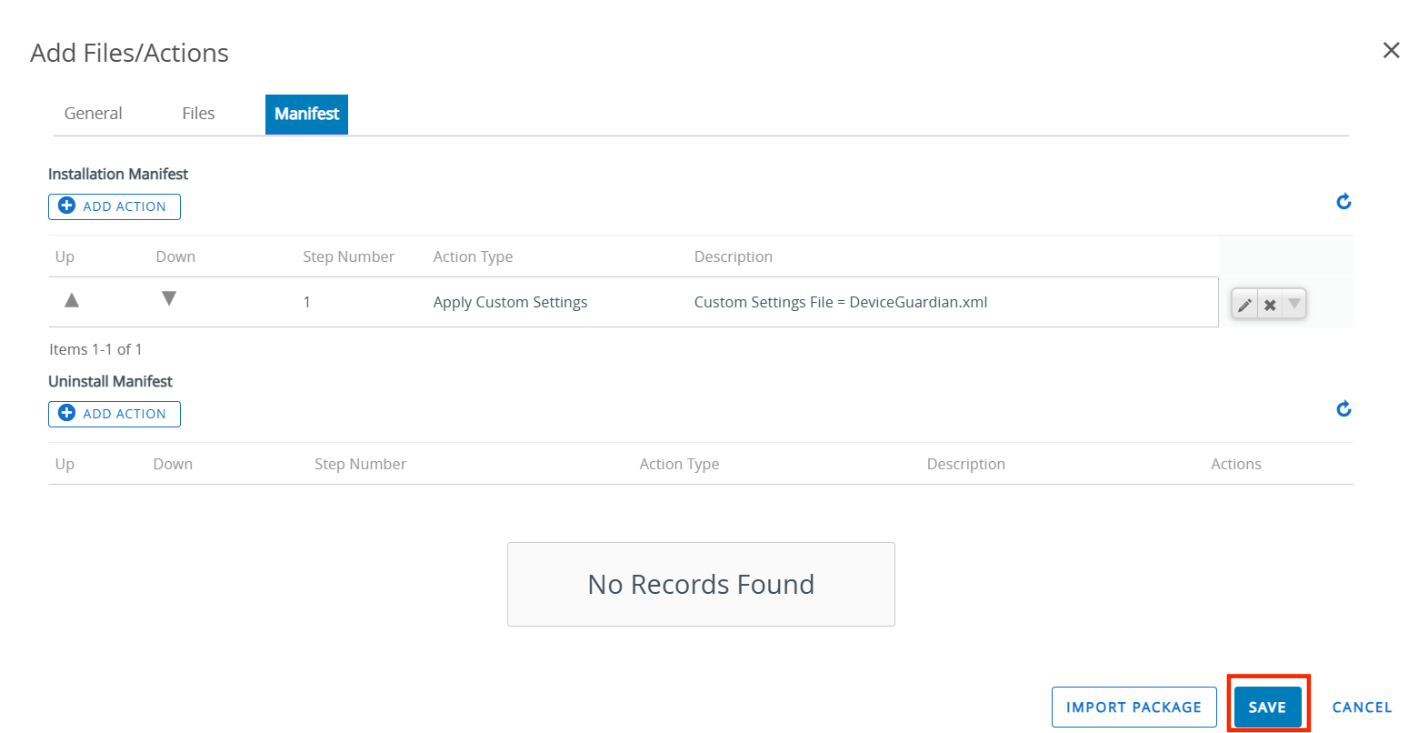
- The file is added. Click the Manifest tab.
- Under Installation Manifest, click Add Action.
- Select the following, then click Save.
- Action(s) To Perform: Apply Custom Settings
- File: DeviceGuardiana.xml
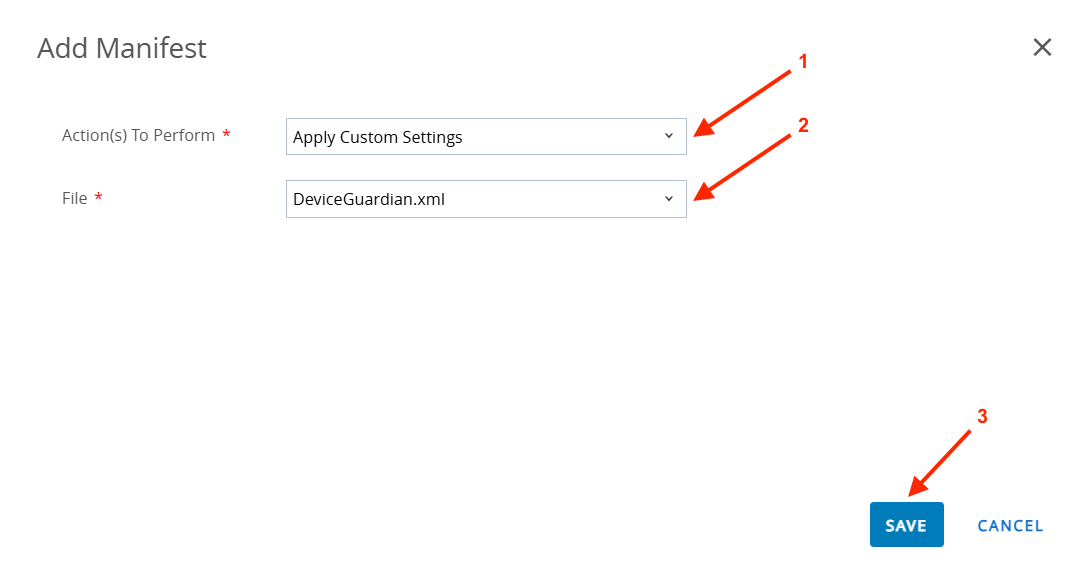
- The manifest is added. Click Save.
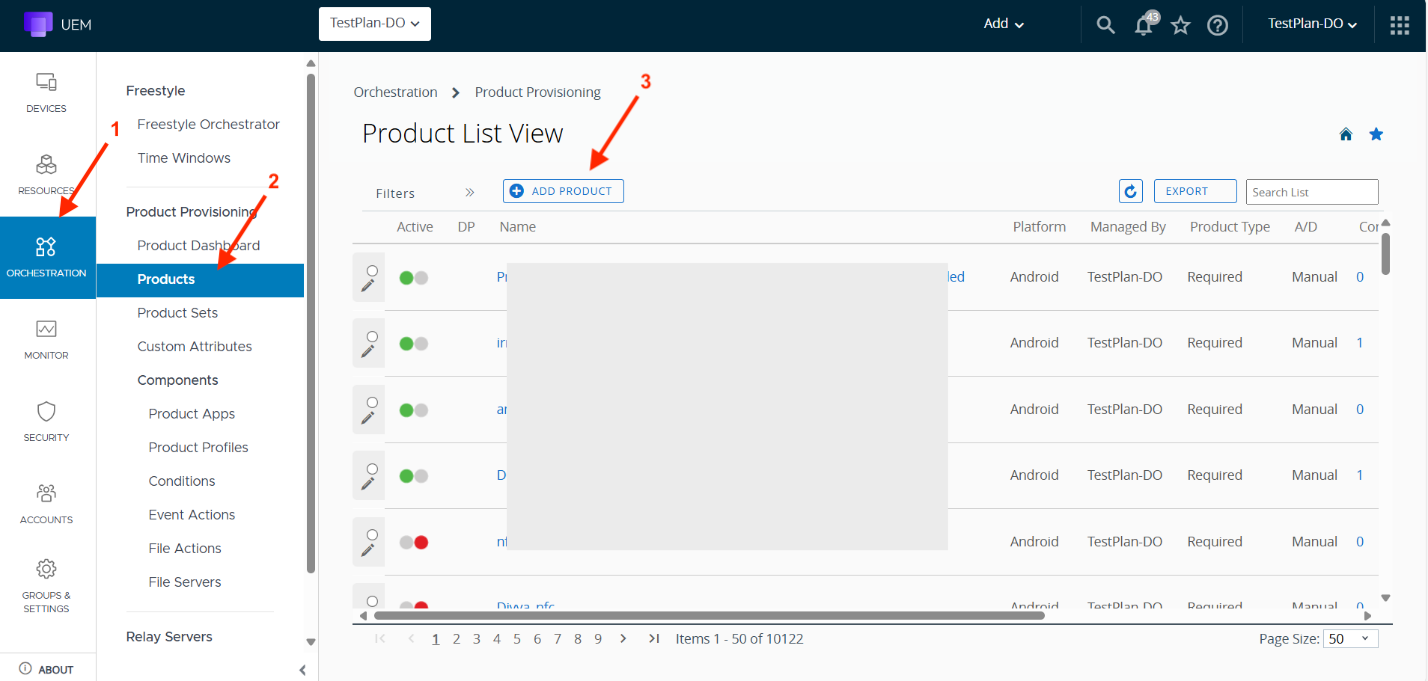
- The File/Action is created. Next, apply it to the device(s). Go to Orchestration > Product. Click Add Product.
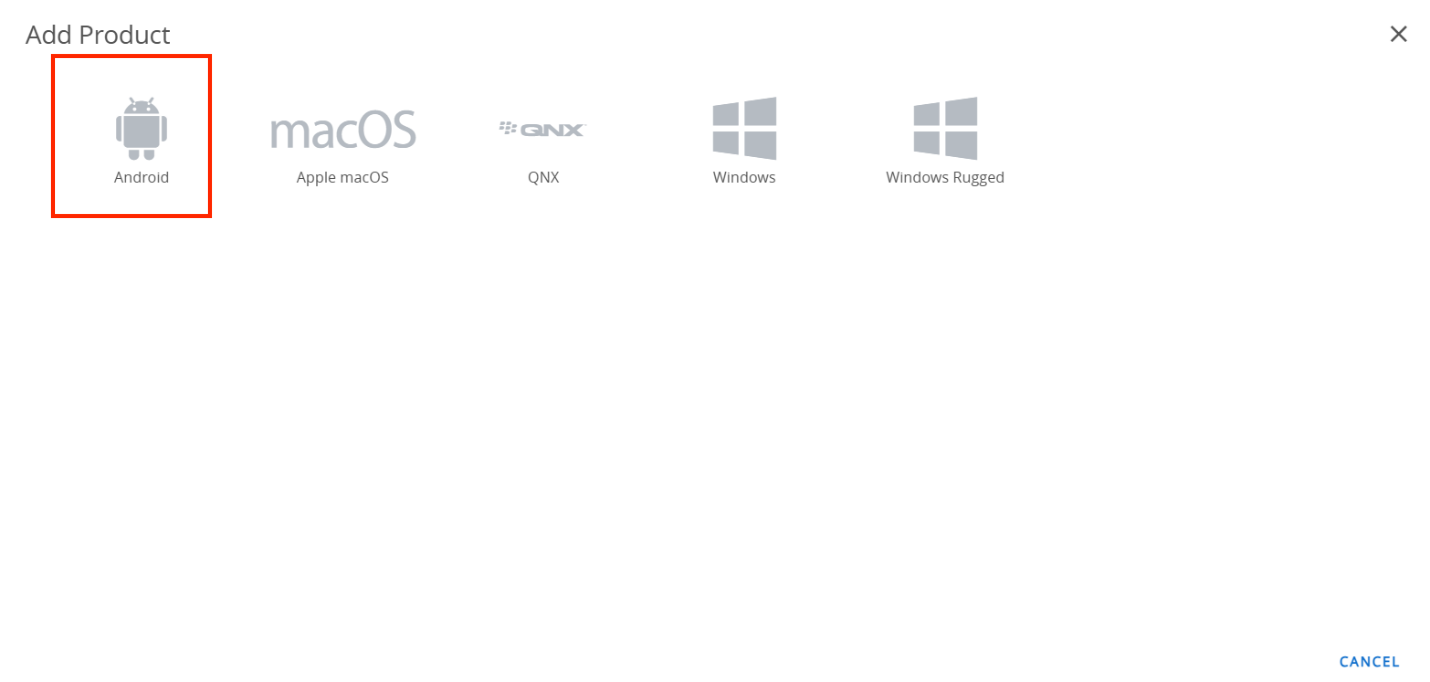
- Select Android.
- Enter a name and assign it to the appropriate Smart Groups. Click the Manifest tab.
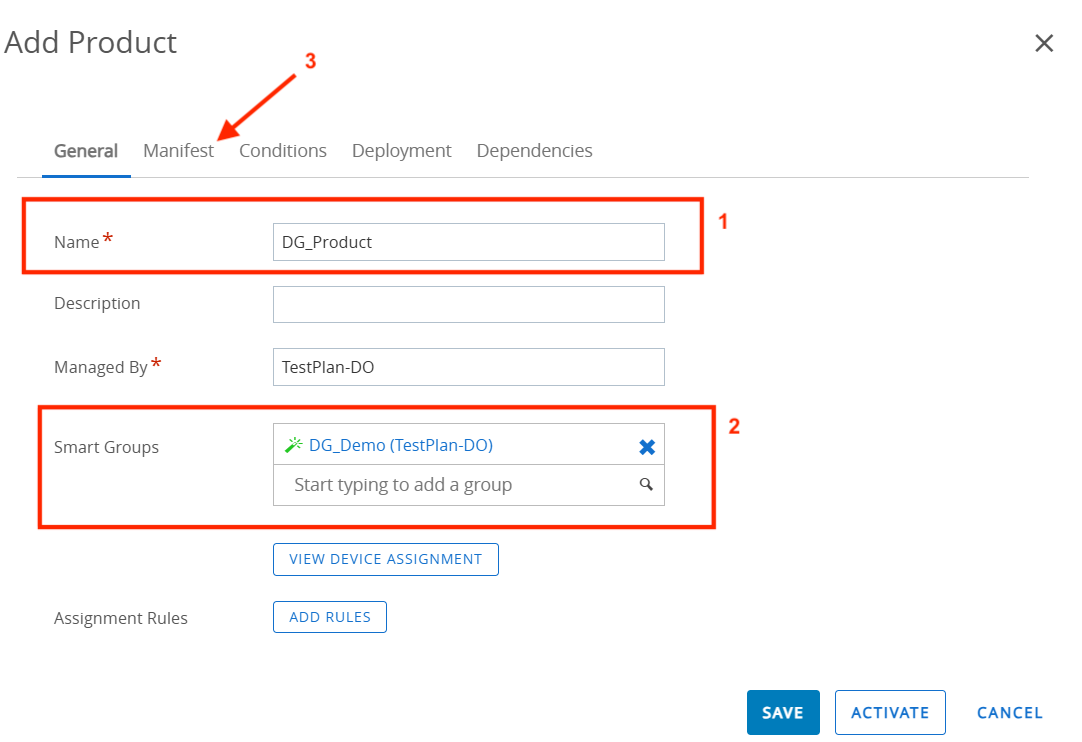
- Click Add.
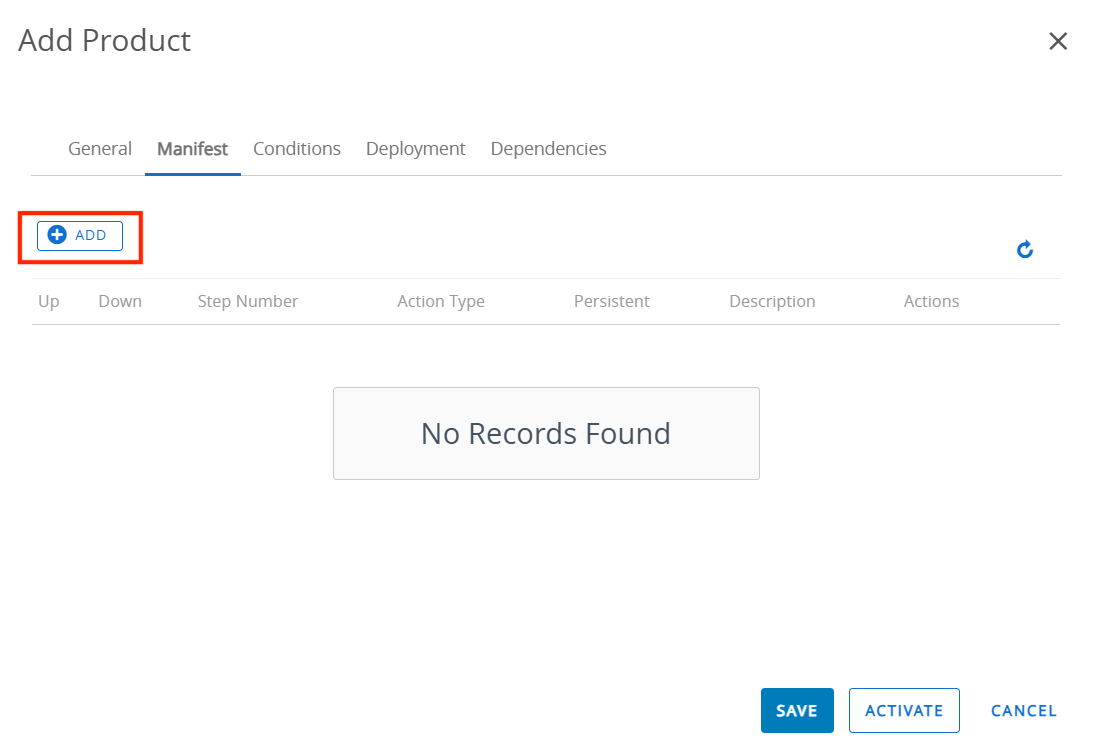
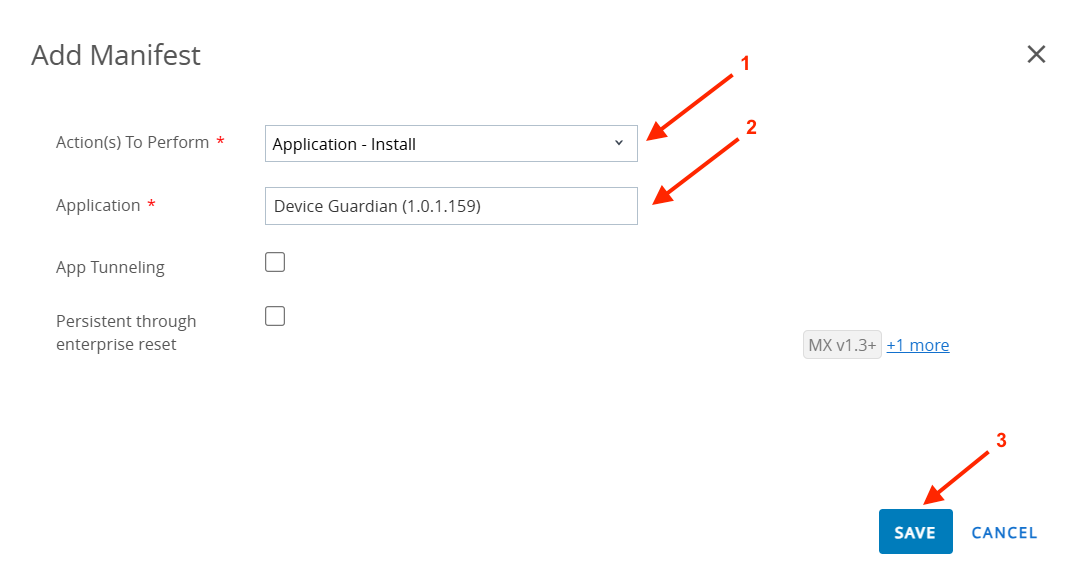
- Select the following options and click Save:
- Action(s) To Perform: Application - Install
- Application: Device Guardian
- The application is added to the manifest. Click Add again to include the XML file.
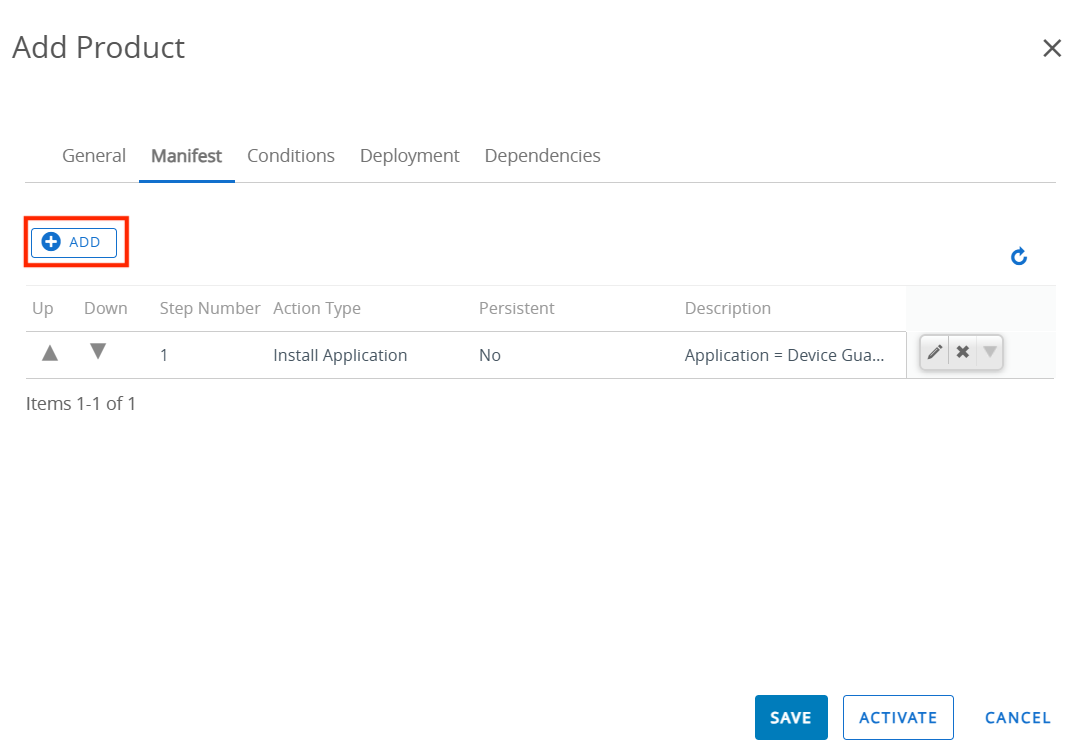
- Enter the following, then click Save:
- Action(s) To Perform: File/Action - Install
- Application: [Nme of XML file added]
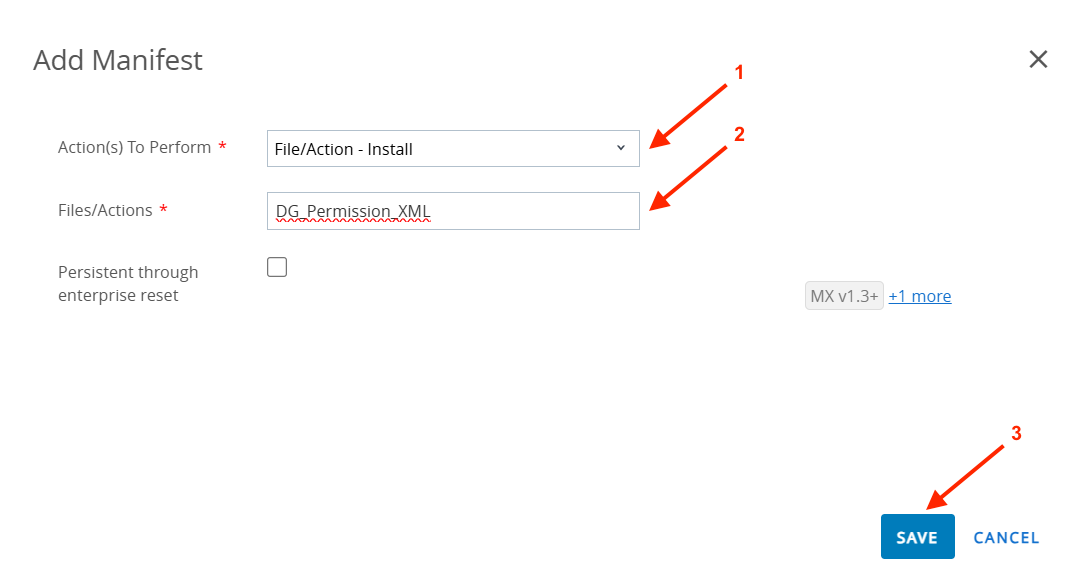
- Click Save.
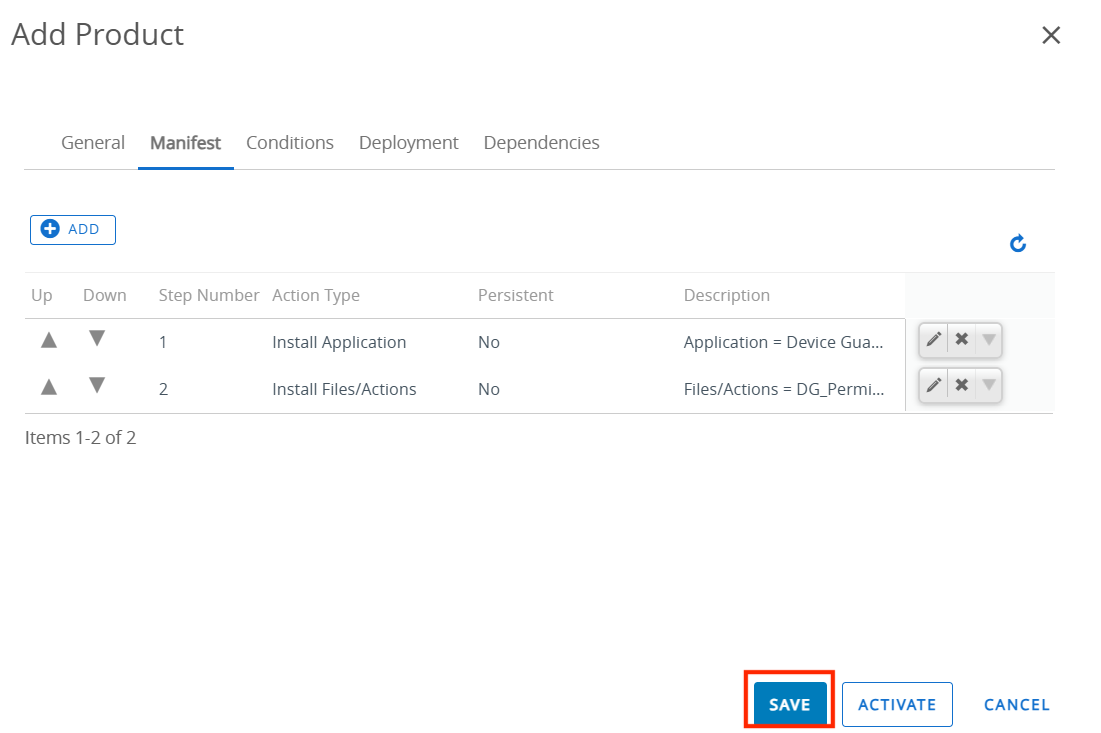
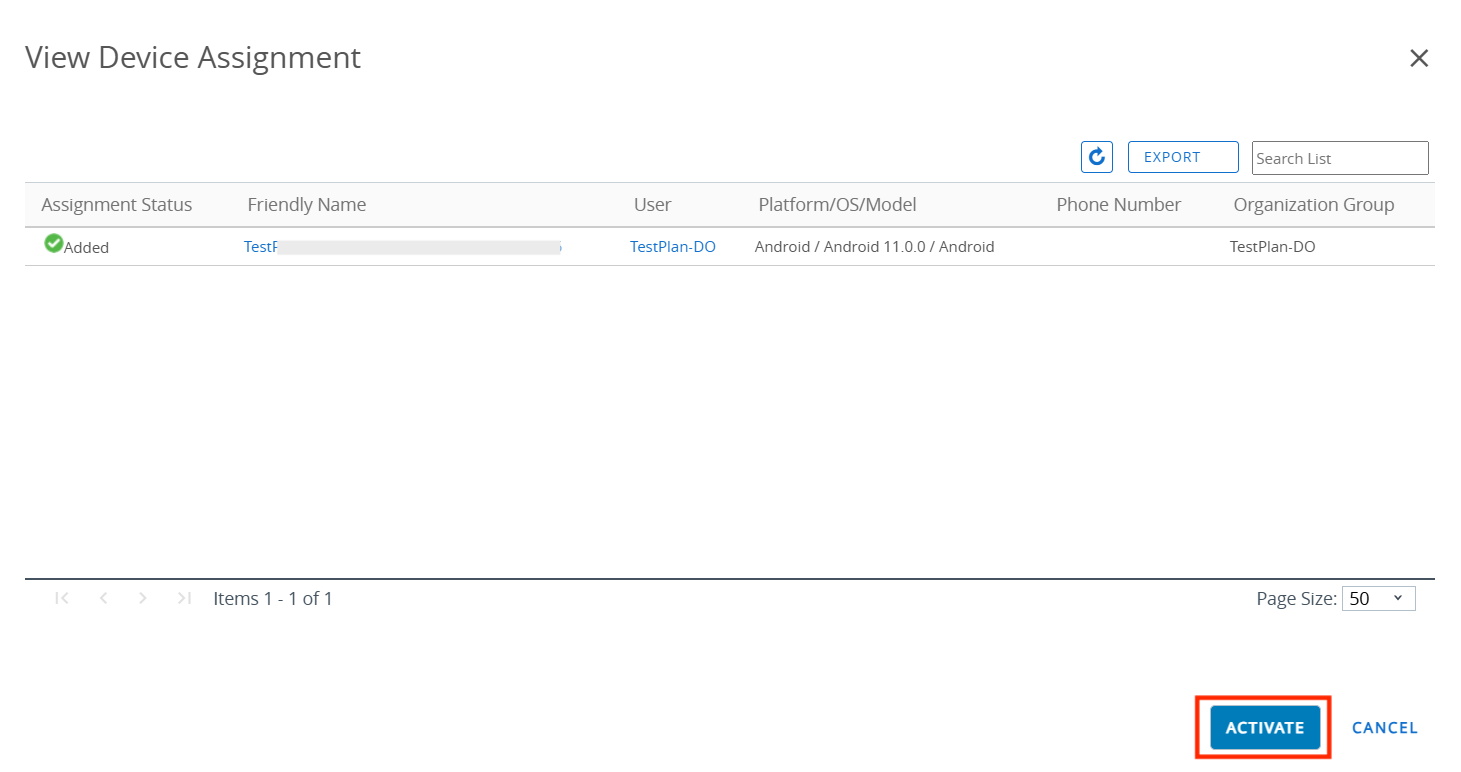
- Click Activate. The policy is applied to the selected device(s).
Part V: Install & Configure Identity Guardian (DGAM Only)
Identity Guardian is required for user authentication when using DGAM. When adding device users via Bulk Upload, follow these steps.
- Create an App Setup Profile for Identity Guardian.
- Select Yes when prompted to Configure App.
- In the Usage Mode section, Select AUTHENTICATION.
- In the Authentication Configuration section, select the following:
- Comparison Source: CLOUD
- Primary Authentication Factor: CLOUD_PASSCODE
- Fallback Authentication Method: ADMIN BYBASS PASSCODE
- Select the remaining options as desired.
- Deploy the Profile to the target device(s).
After deployment, the device user experiences the following screen progression when logging in:
Identity Guardian login process
Part VI: Install & Configure the ZDNA Cloud Client App (DGAM Only)
The Zebra DNA Cloud client is required to add device users in DGAM.
- Download the ZDNA Config Token:
- In the web portal, navigate to User Management > Device Users.
- Click ZDNA Config Token to download the file.
- Open the file and copy its contents.
- Apply the Token & Deploy the App via EMM: The general steps are provided below. For detailed instructions, see the Configure for a Mixed Population section within the ZDNA Cloud Setup guide and follow steps 1 to 3:
- Paste the copied token into Managed Configuration settings in ZDNA Cloud.
- Install and launch the app via EMM using one of these sources:
- Google Play
- Zebra.com
Using 42Gears SureMDM
Follow these steps to use 42Gears SureMDM to install DG/DGAM and apply a policy that enrolls the device with the DG/DGAM server.
Screen Variations Note: The screen UI may vary depending on the EMM version in use. Refer to your EMM user guide for additional guidance.
Part I: Enroll Device in SureMDM
Enroll the device in 42Gears SureMDM using the standard EMM procedure.
Part II: Install DG/DGAM
Choose one of the following installation methods:
Option A: Google Play
Use this procedure to install DG/DGAM through Google Play.
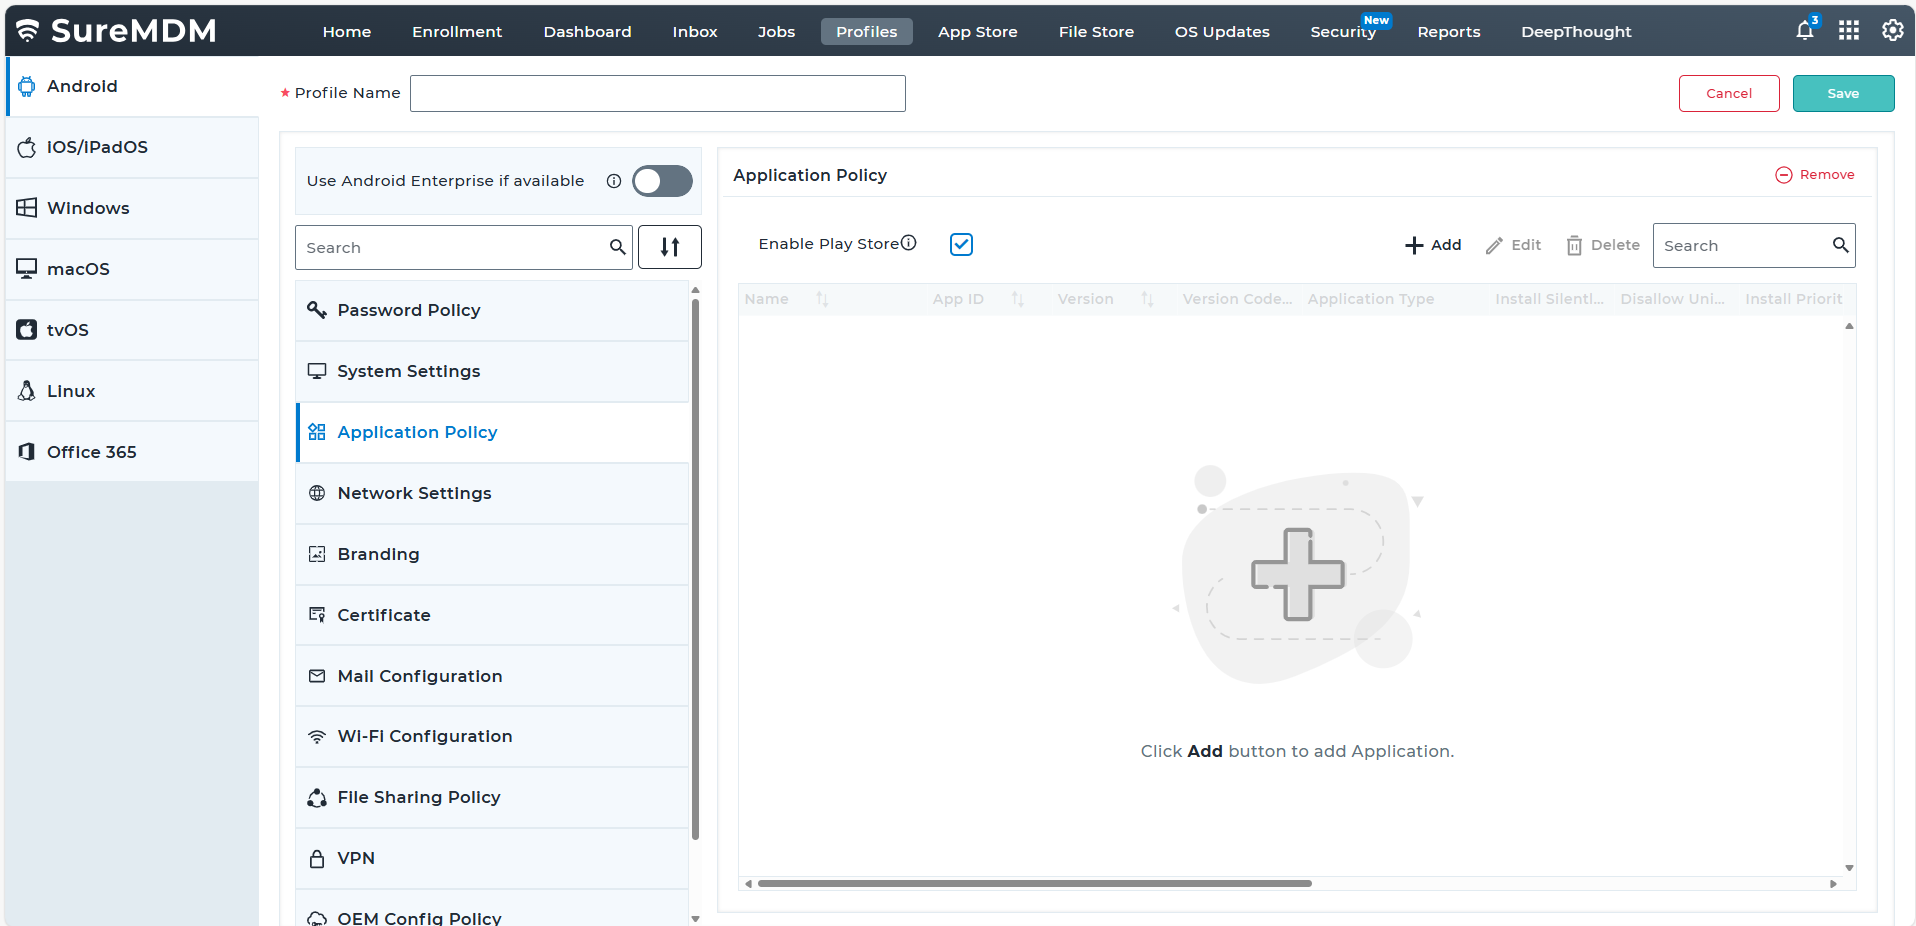
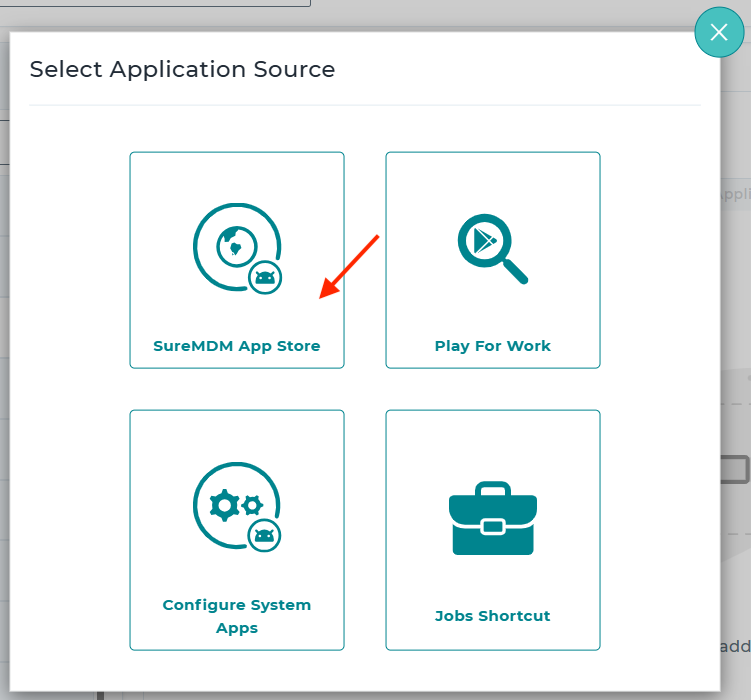
- In the 42Gears SureMDM web console, click on Profiles > Application Policy and click Add.
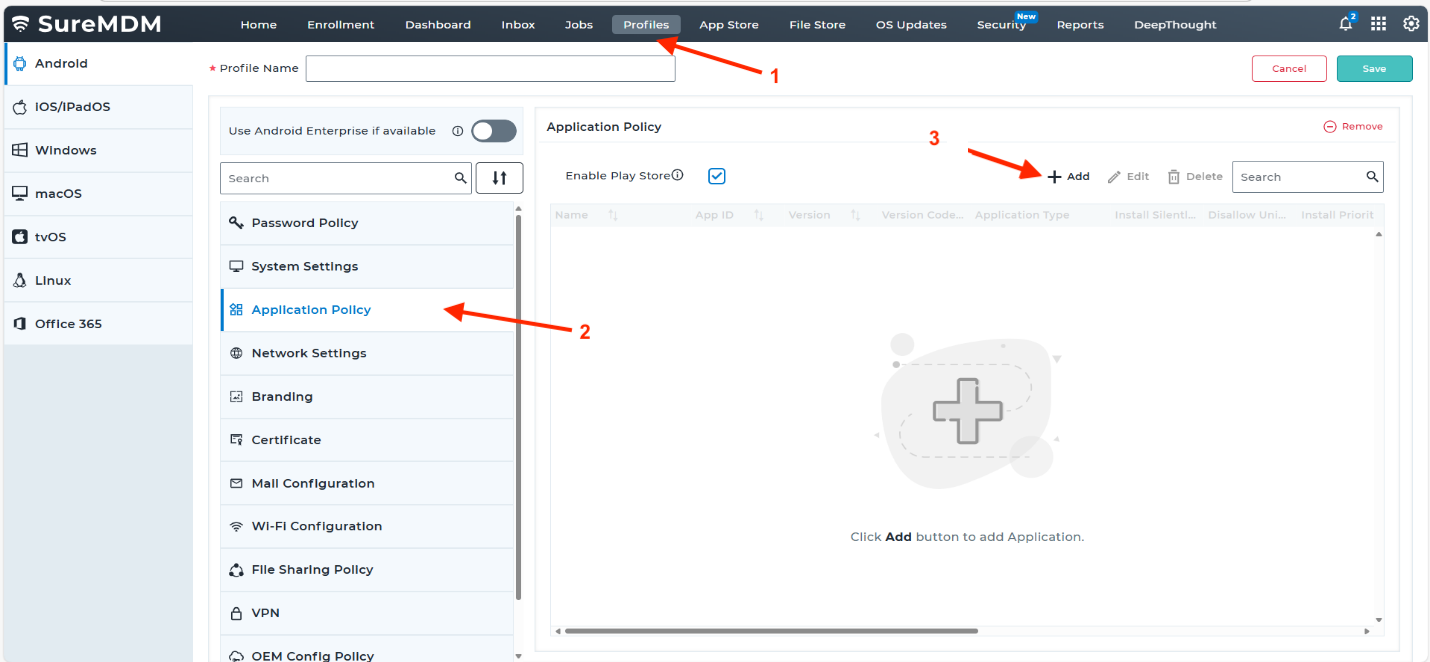
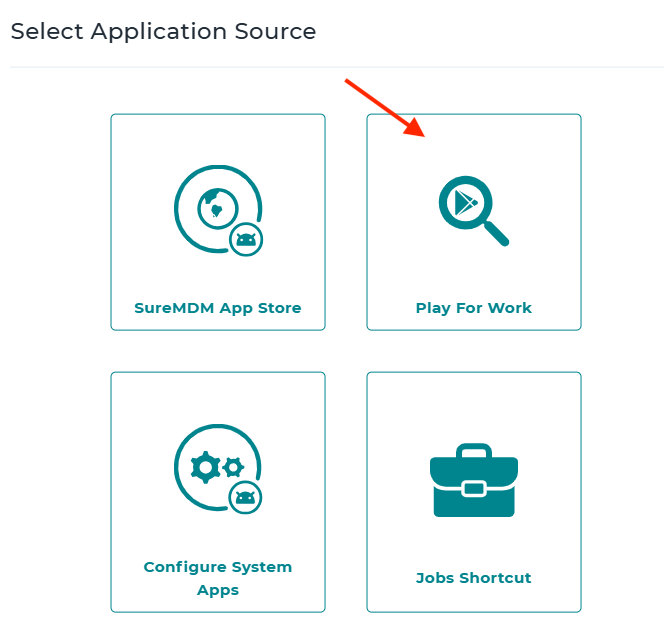
- For the Application Source, select Play For Work.
- Search for Device Guardian and click on the app.
- Click Select.
- Click both Configured buttons to de-select them.
- Enter a name for the configuration and click Save.
- Click Next.

- Click Grant All and click Save.
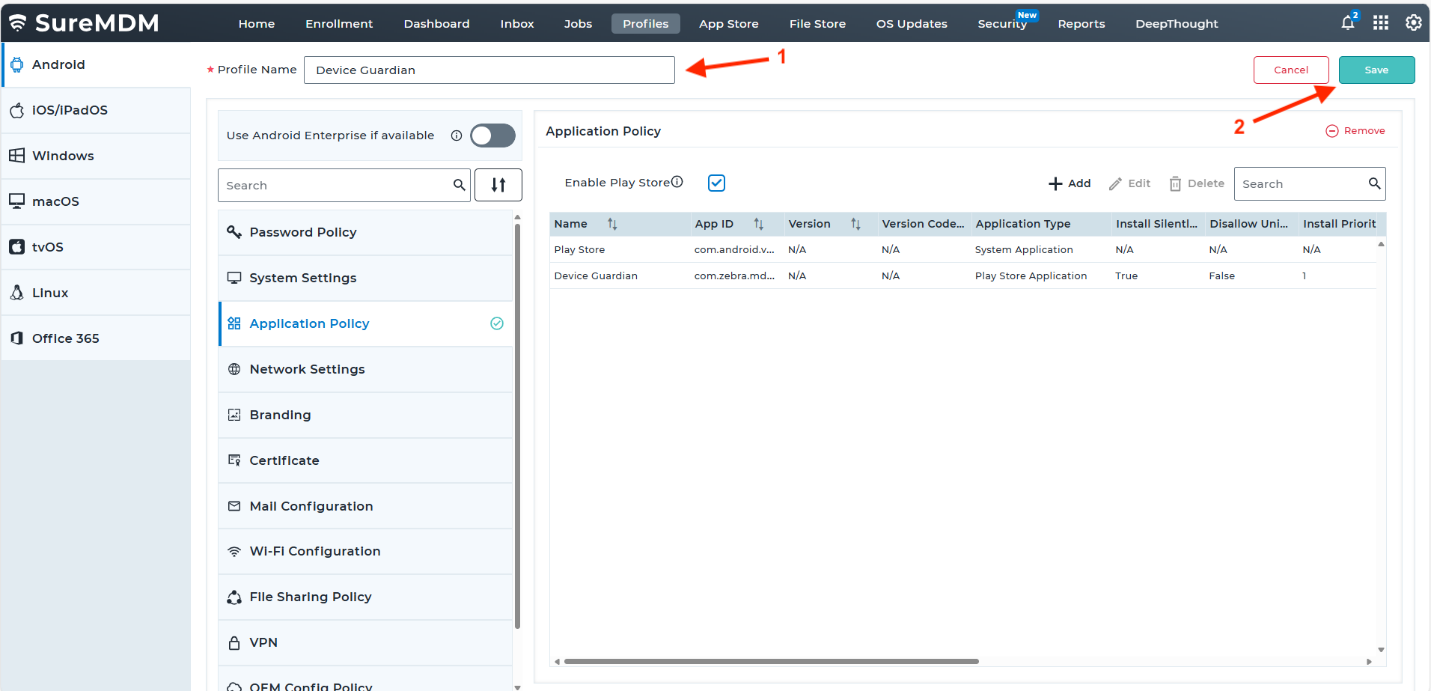
- Click Save.
- A success message confirms a successful operation.
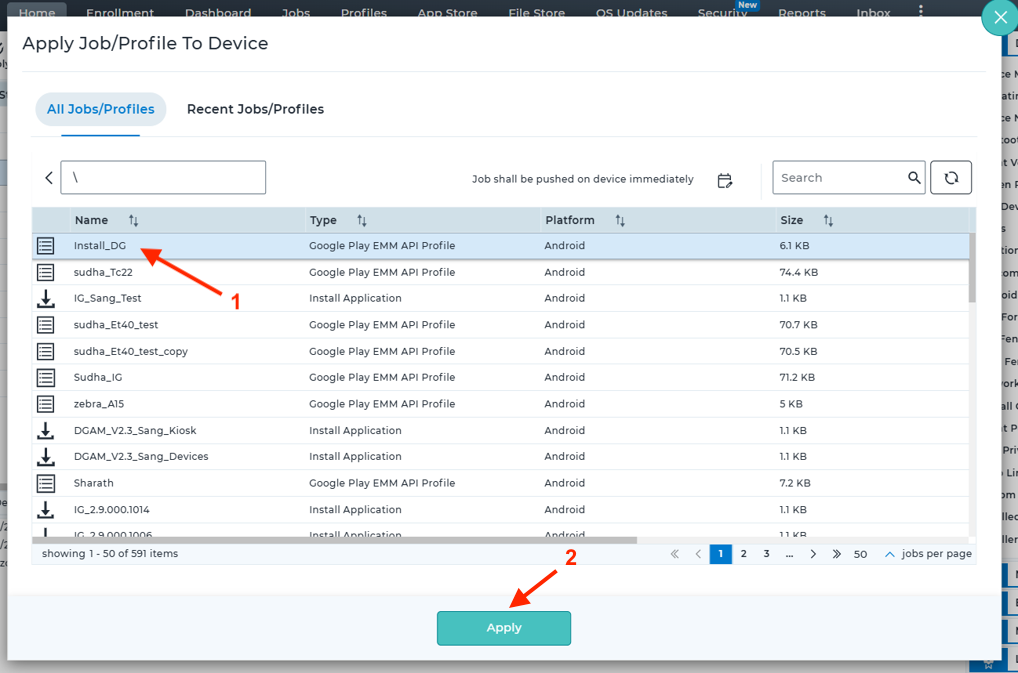
- Click Home. Select the target device group from the left panel. Select the target devices from the list displayed. Click Apply.
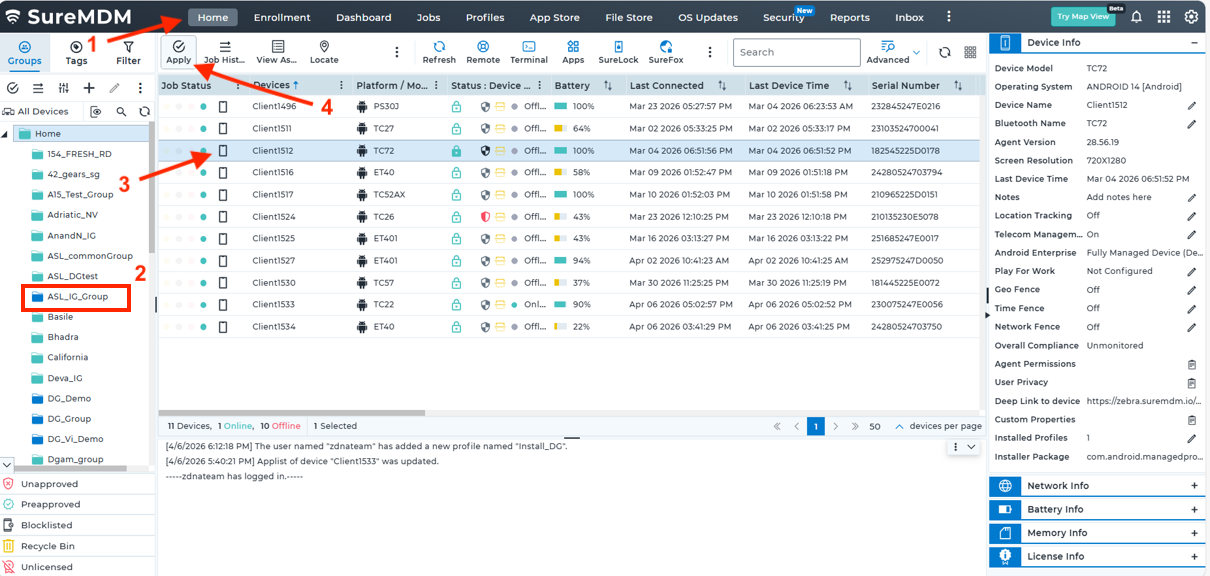
- Select the job created earlier and click Apply.
Option B: Managed Config through EMM
Use this procedure to install DG/DGAM from the EMM app store.
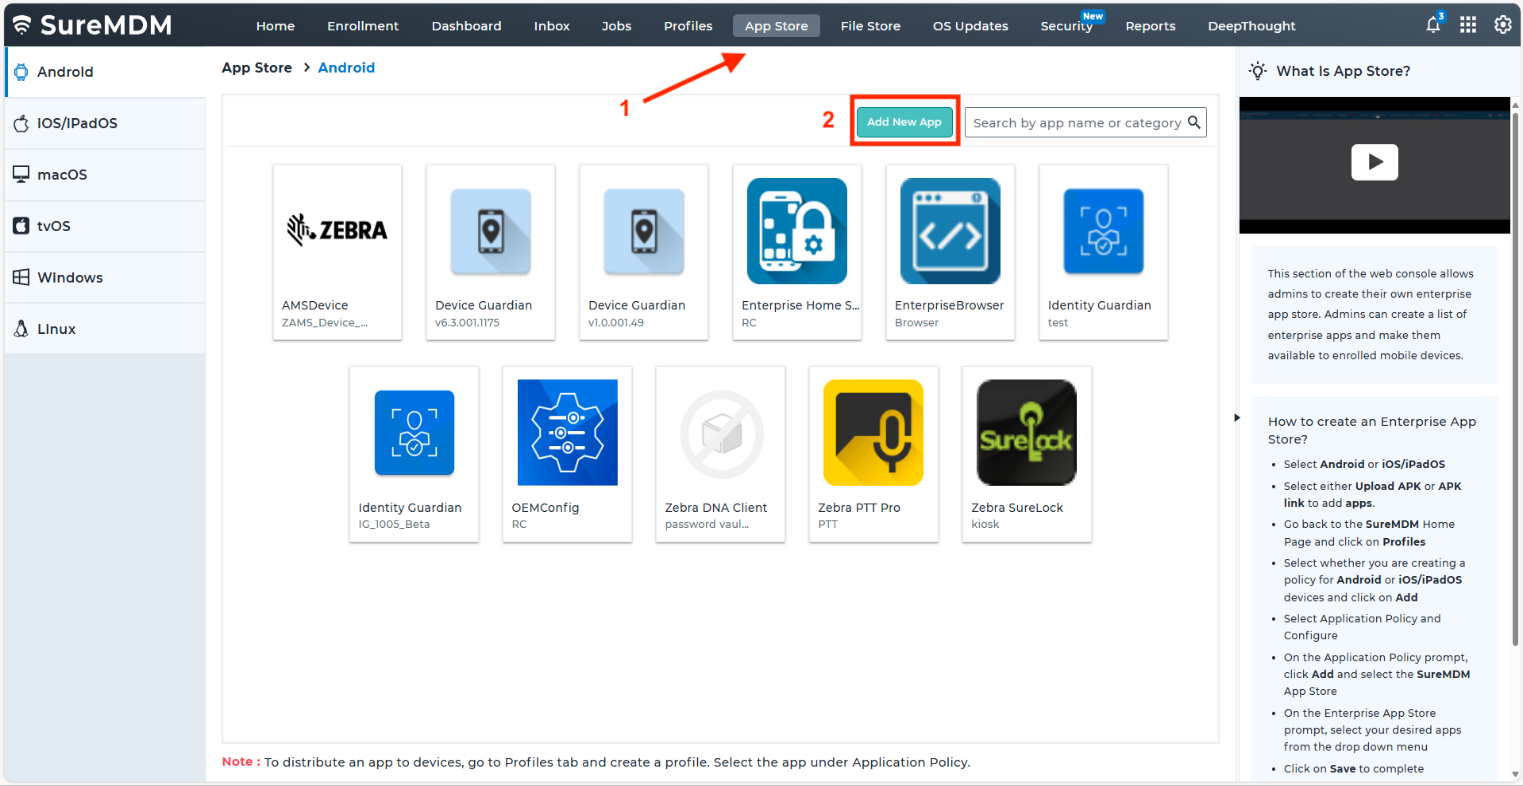
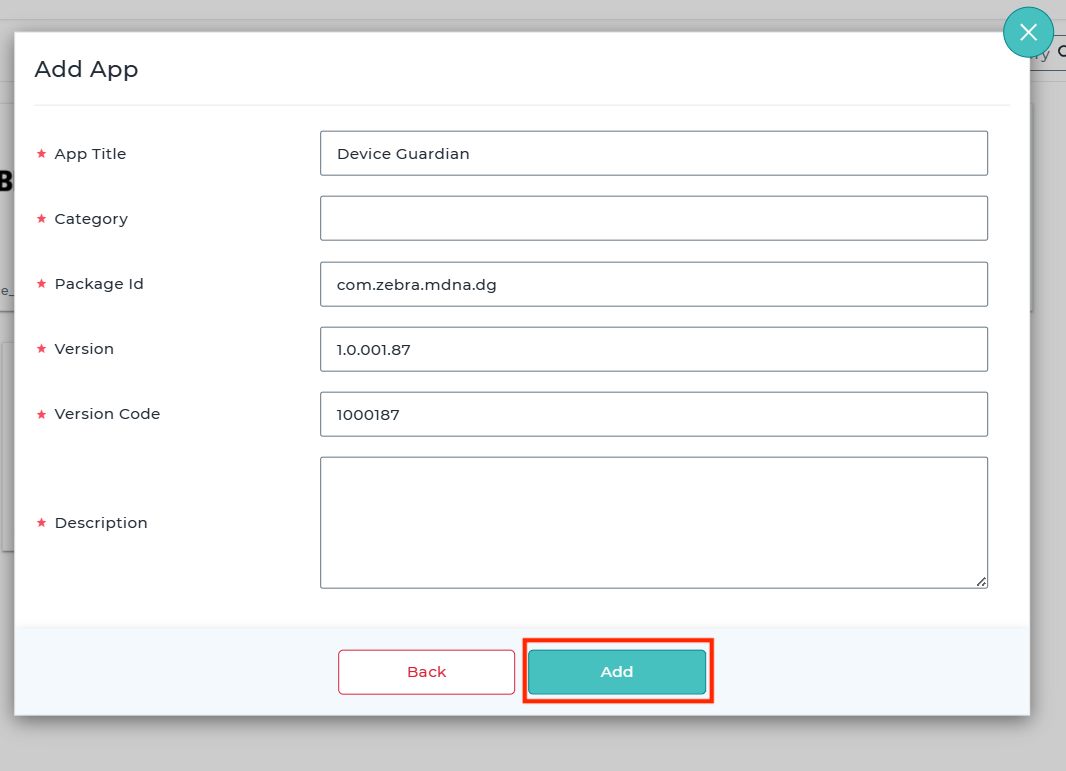
- In the 42Gears SureMDM web console, go to the Android App Store and click Add New App.
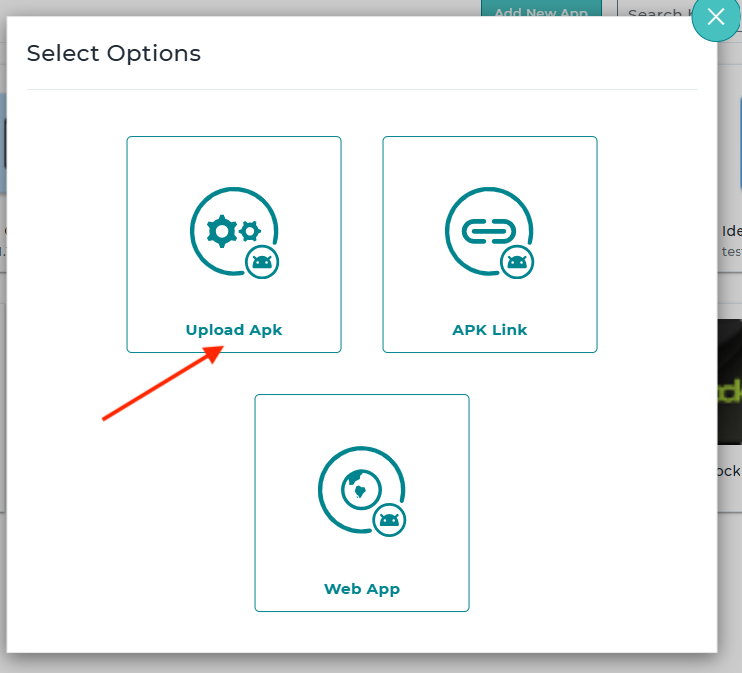
- Select Upload Apk.
- Upload the Device Guardian .APK.
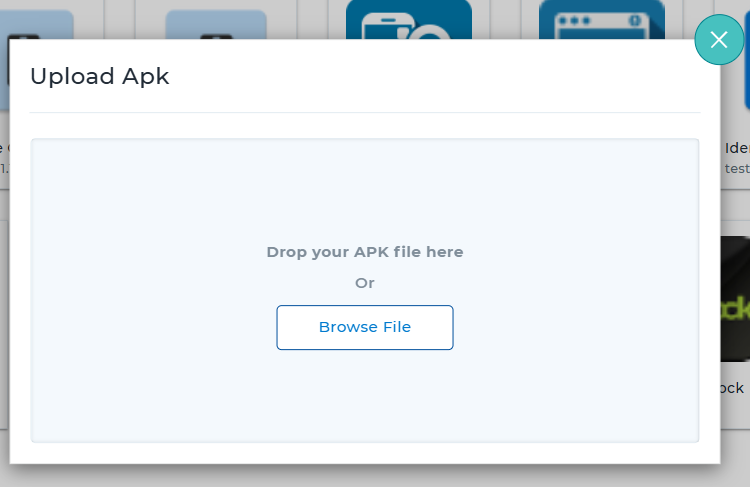
- Enter the required information. Click Add.
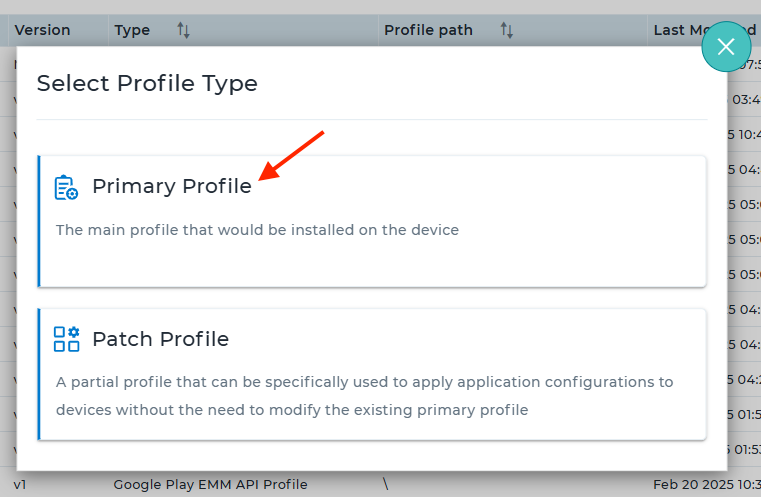
- Create the application policy. Click Profiles and Add.

- Select Primary Profile for the Profile Type.
- Click Configure.

- Click Add.
- Select SureMDM App Store.
- From the dropdown, select the Device Guardian app uploaded. Click Next.
- Enable Skip Configuration and click Done.
- Enable Launch App Upon Installation and click Add.
- The policy details are displayed in the table. Enter a name for the profile and click Save.
- A success message confirms a successful operation. Thew created profile is added to the table.
- From the top menu, click Home. Select the target device group from the left panel. Select the target devices from the list displayed. Click Apply.
Part III: Enroll Device in DG/DGAM
Choose one of the following methods to enroll devices in DG/DGAM:
- Option 1: StageNow Barcode: Enroll device with the scan of a barcode using StageNow.
- Option 2: XML File Use 42Gears SureMDM to deploy XML settings.
- Option 3: Managed .Config File: Deploy settings through 42Gears SureMDM's Managed Configuration framework.
Option 1: StageNow Barcode
Use this method to enroll a device with the DG/DGAM server by scanning a barcode.
- Download the device enrollment barcode
.pdffile from the Download Kit. - Launch the StageNow client on the device.
- Scan the barcode.
- If applicable, repeat these steps for the following:
- Kiosk - Use the enrollment barcode for kiosk
- Device Tracker - For devices with Device Tracker, use the Device Tracker enrollment barcode for device. Repeat this for Kiosks if needed.
Option 2: XML File
Use this method to deploy the enrollment settings via XML (with OEMConfig) through SureMDM. This enrolls the device with the DG/DGAM server.
- Download the XML Configuration for Device file from the Download Kit. The contents of this file is needed in a later step.
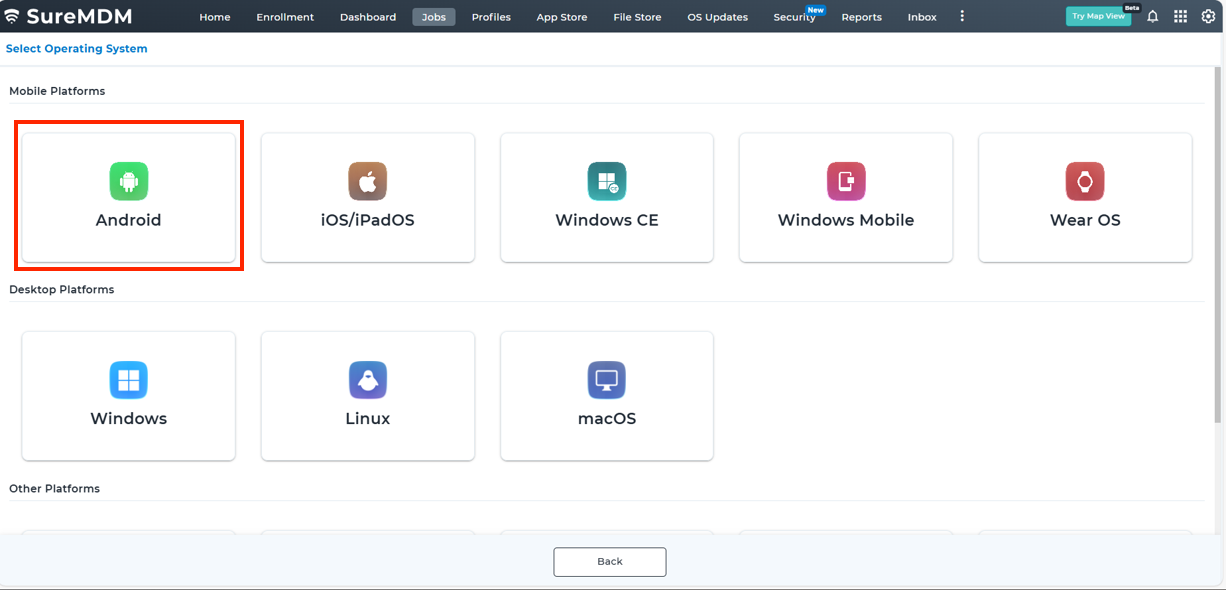
- In the 42Gears SureMDM web console, select Jobs from the top menu and click New Job > New Job.
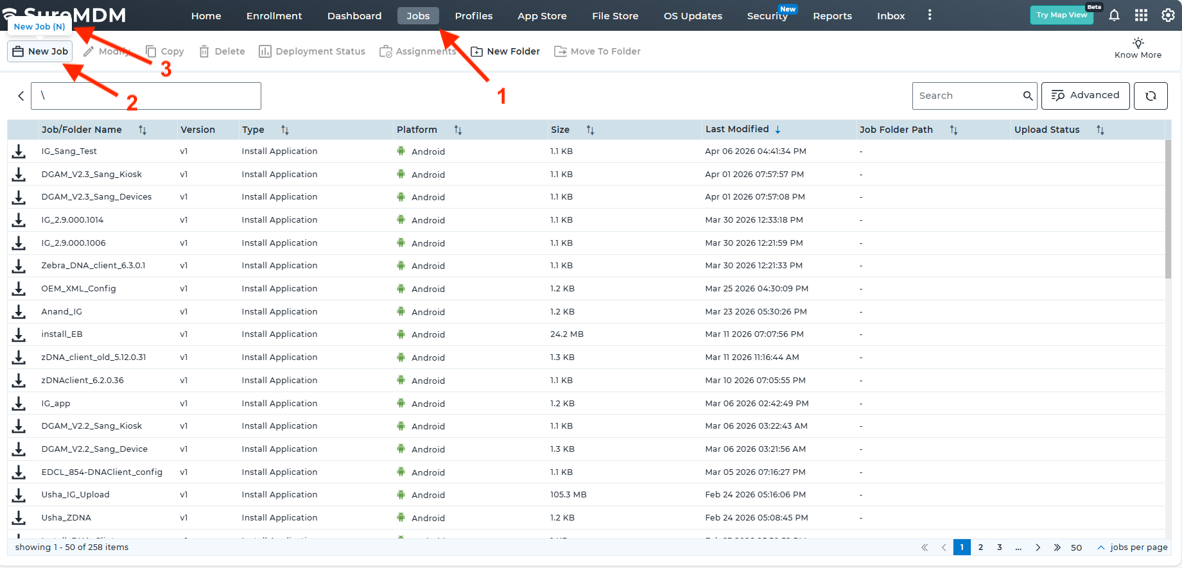
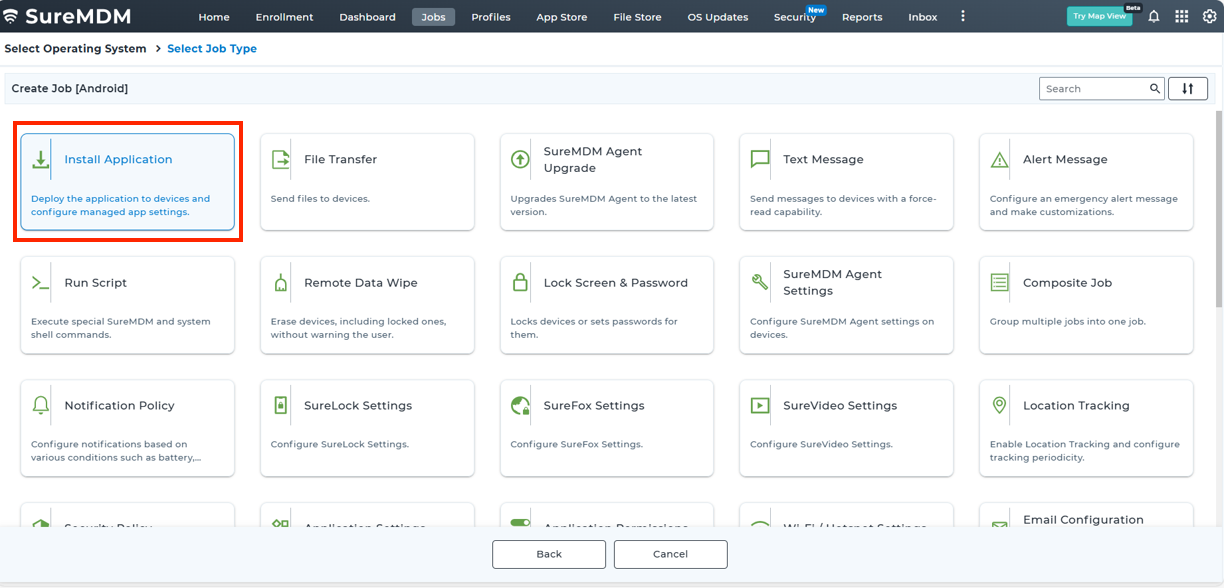
- Select Android.
- Select Install Application.
- Enter a name for the job nad click Add App.

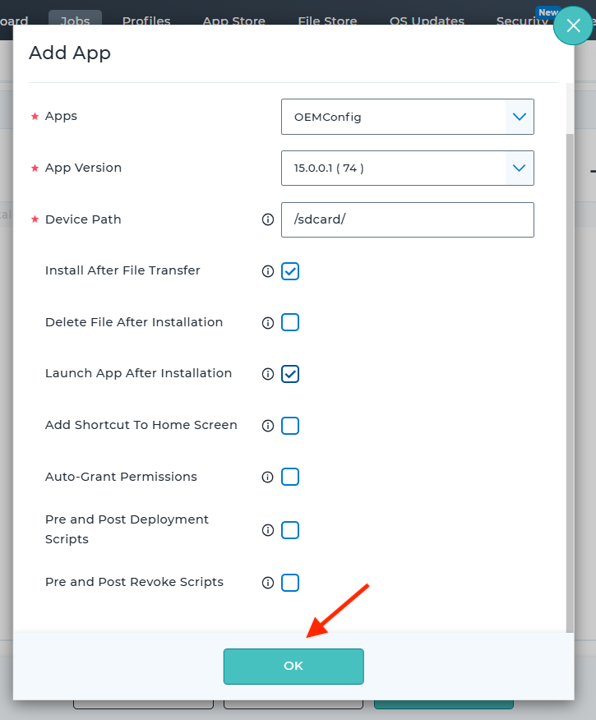
- Enter/select the following, then click Next.
- Apps: OEMConfig
- App Version: [Select the latest version]
- Device Path: /sdcard/
- Install After File Transfer: [Check to enable]
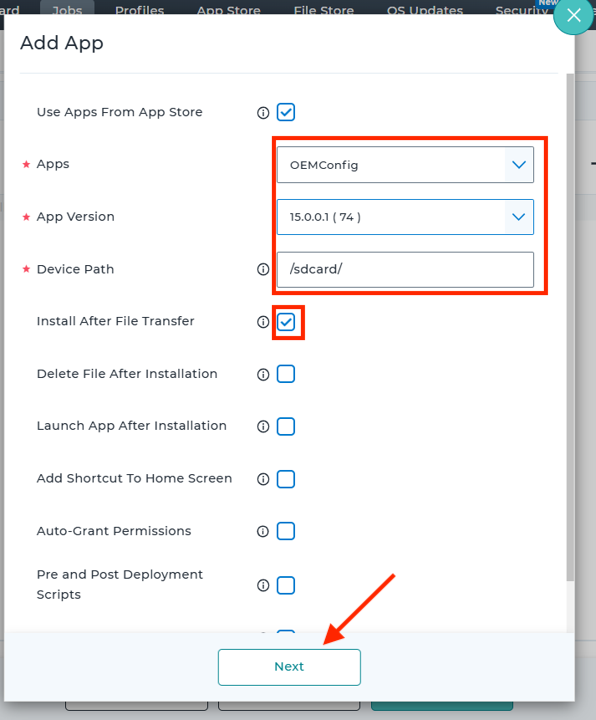
- Select System Configuration.
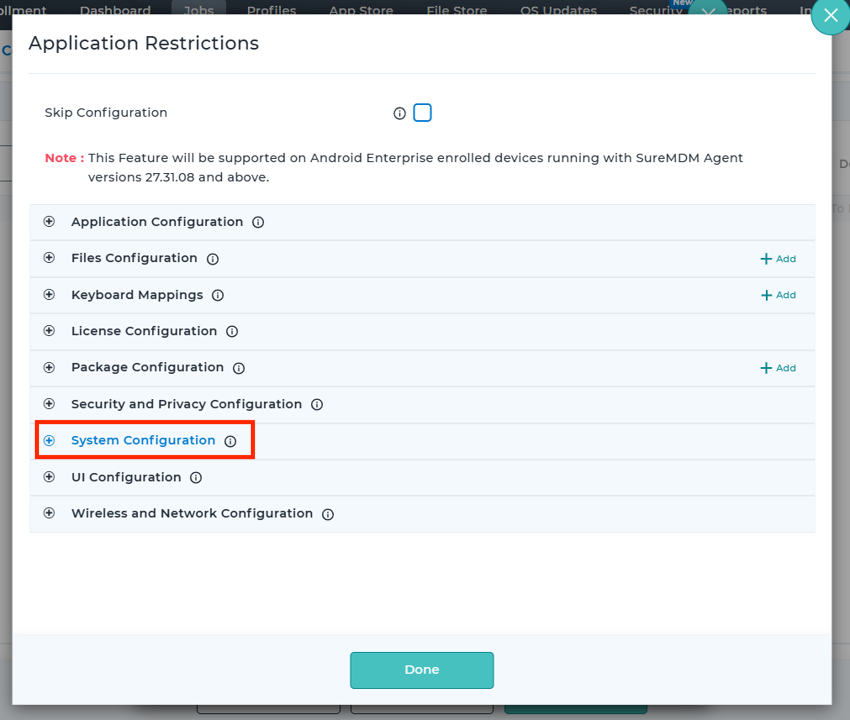
- Copy the content from the
.xmlfile downloaded earlier. Paste the copied text into the Pass-Through Command field. Click Next.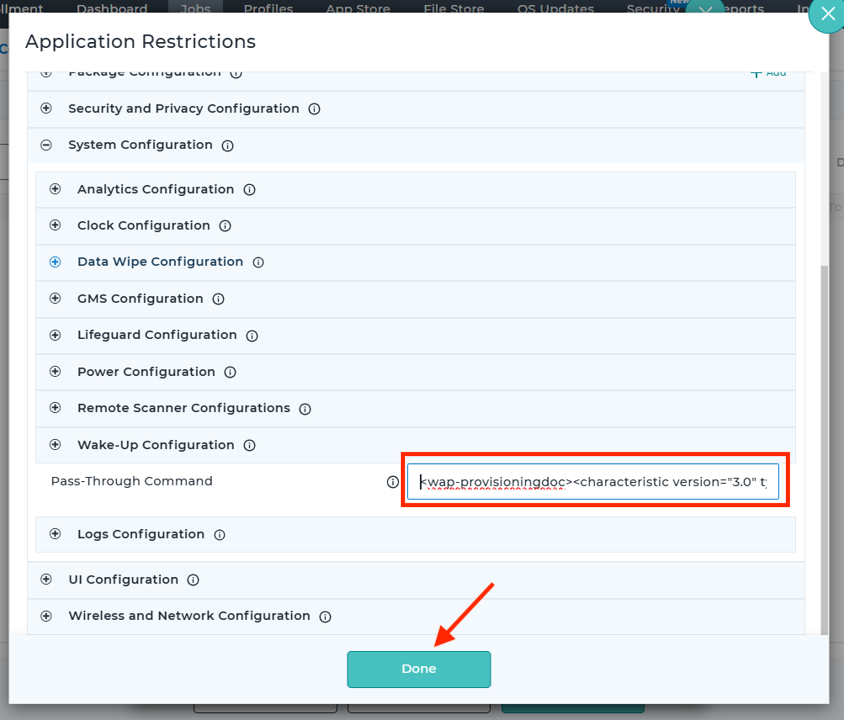
- Click OK.
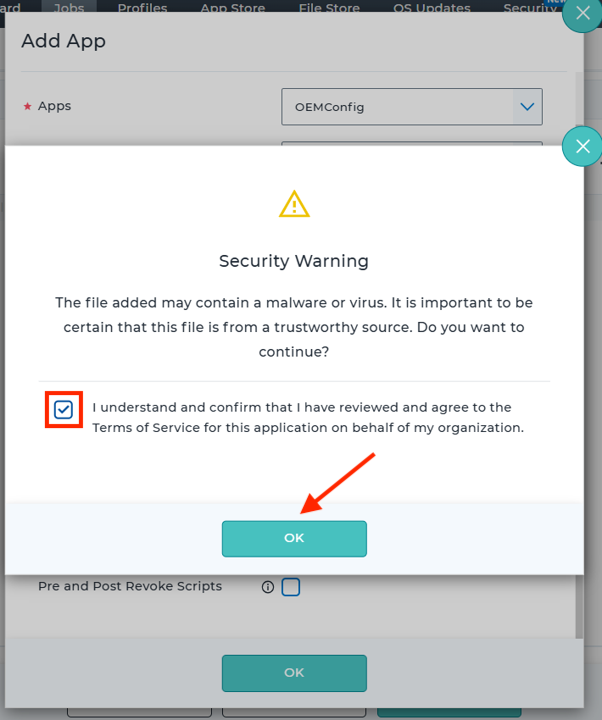
- Acknowledge the security warning and click OK to continue.
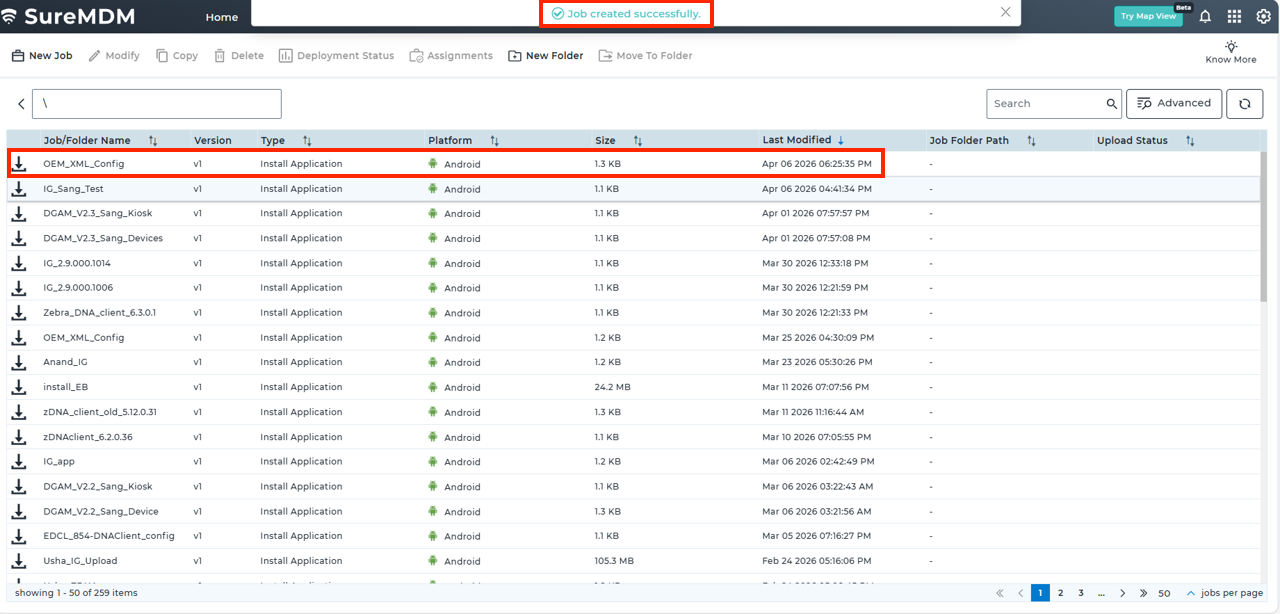
- Click Save.
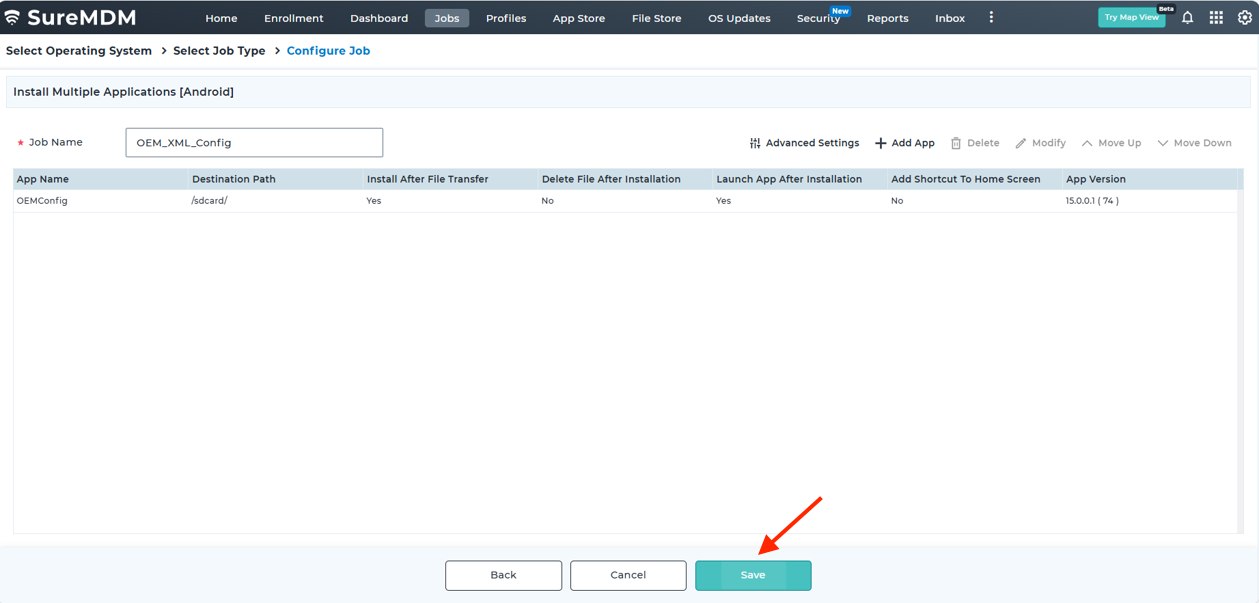
- When successful, a message appears showing the status and the job is added to the list.
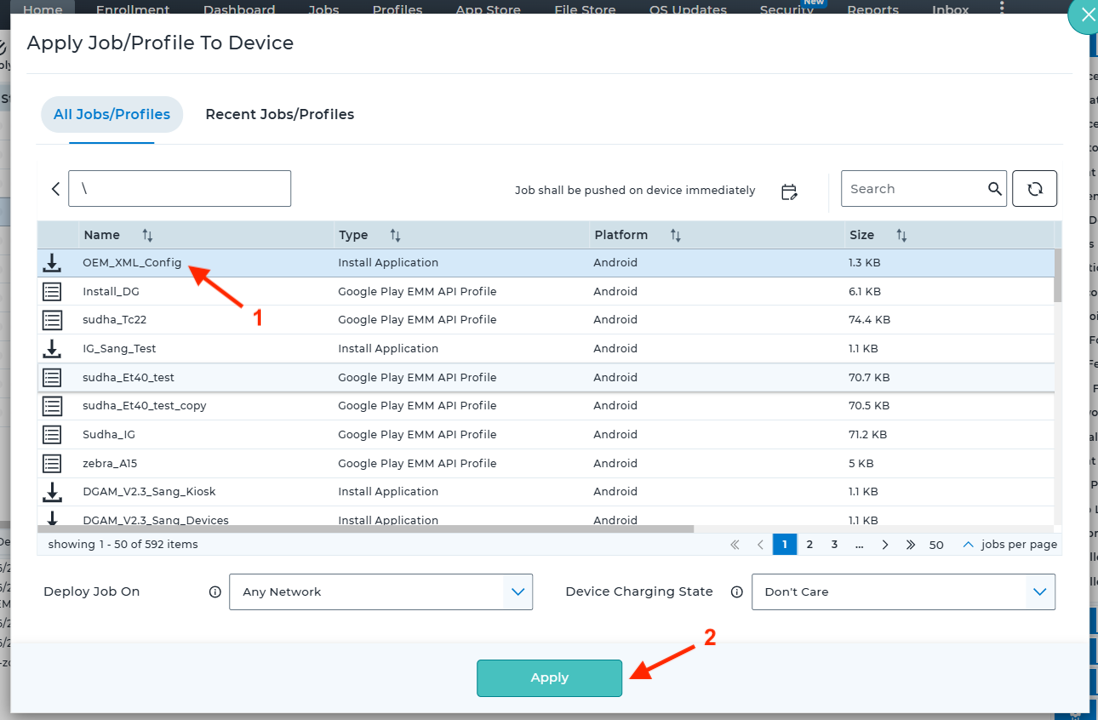
- From the top menu, click Home. Select the target device group from the left panel. Select the target devices from the list displayed. Click Apply.
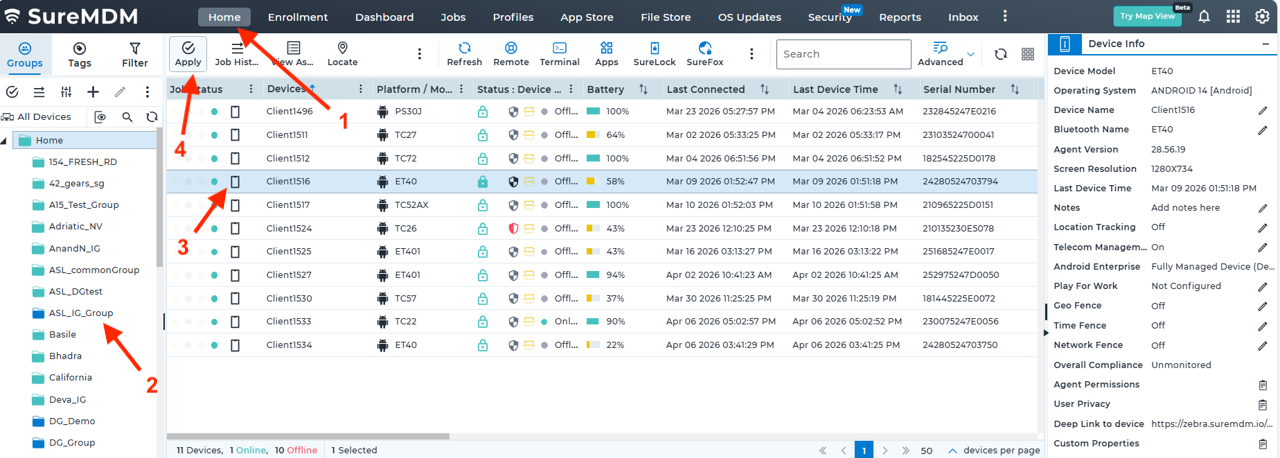
- Select the job and click Apply.
Option 3: Managed .Config File
Use this method to deploy the enrollment settings via Managed Configurations in 42Gear SureMDM. This enrolls the device with the DG/DGAM server.
- Download the
.configfile from the Download Kit. This.configfile containing the Managed Configuration settings is required for a later step. - In the 42Gears SureMDM web console, go to the Android App Store and click Add New App.
- Select Upload Apk.
- Upload the Device Guardian .APK.
- Enter the required information. Click Add.
- Create the application policy. Click Profiles and Add.
- Select Primary Profile for the Profile Type.
- Click Configure.
- Click Add.
- Select SureMDM App Store.
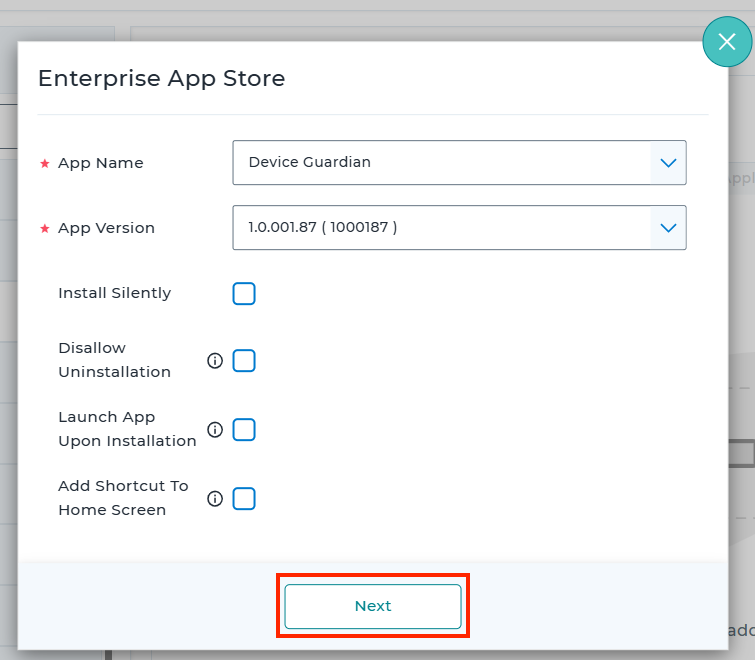
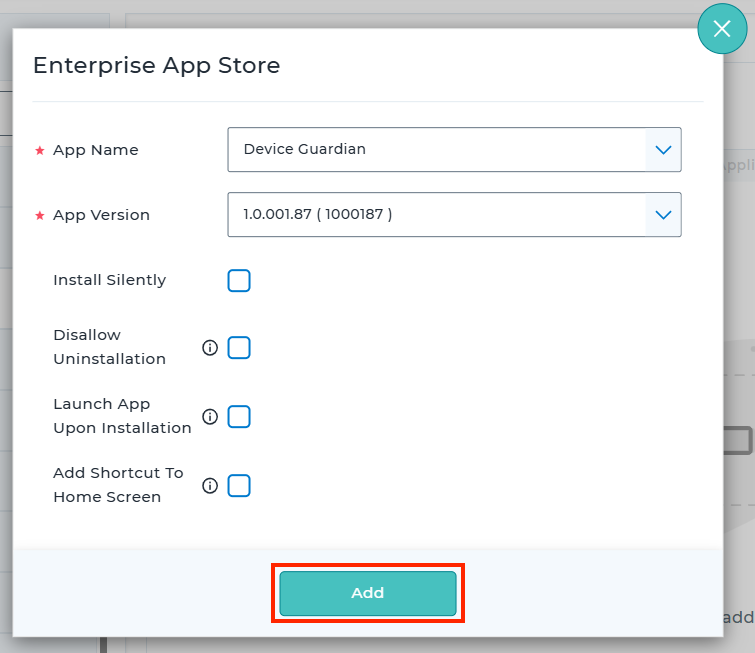
- From the dropdown, select the Device Guardian app uploaded. Click Next.
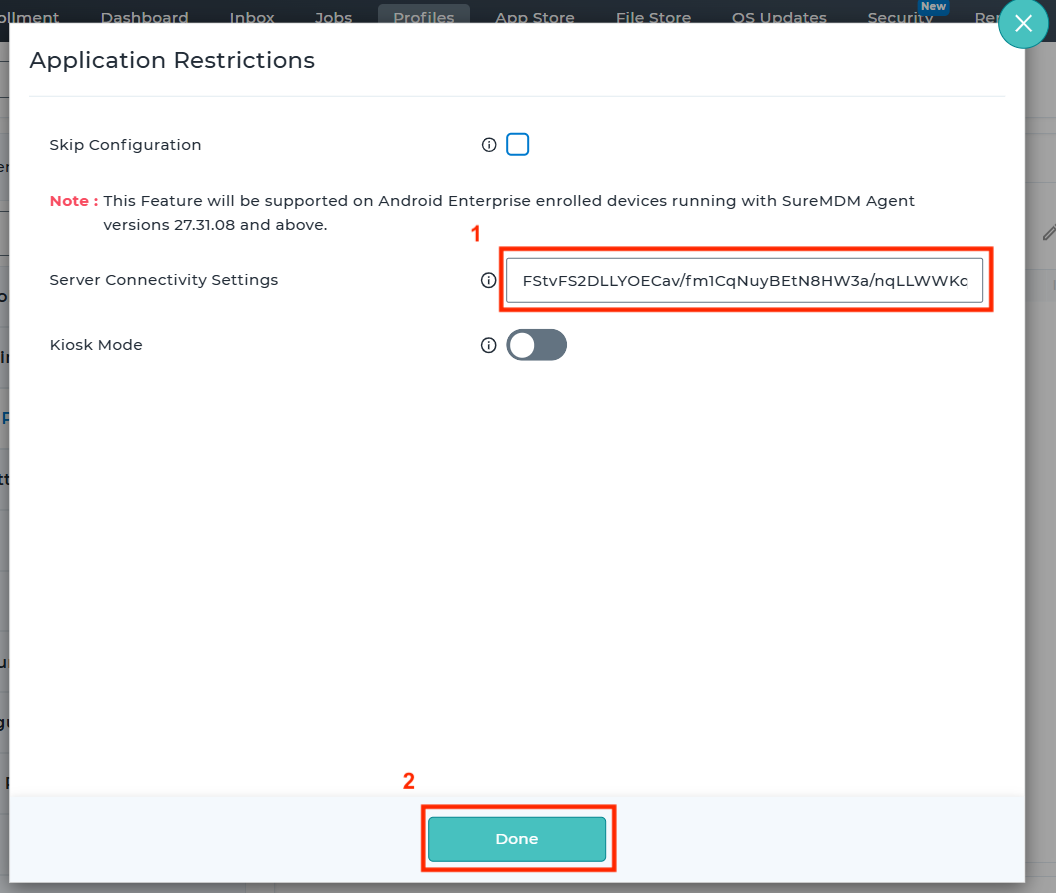
- Select or enter the required Device Guardian Managed Configurations; for information on these settings, see Managed Configurations. Ensure the following Server Connectivity settings are configured before clicking Done:
- Server Connectivity Settings: [Copy and paste the content from the Managed Configurations
.configfile from the earlier step.]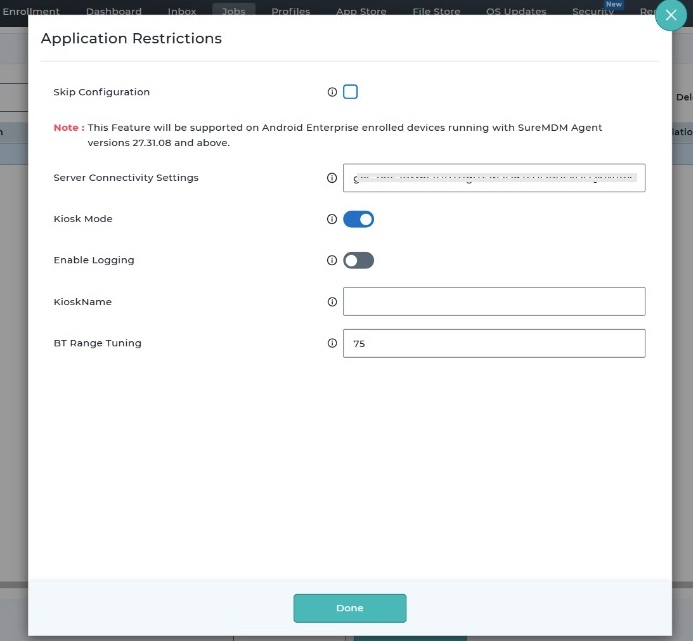
- Server Connectivity Settings: [Copy and paste the content from the Managed Configurations
- Select any desired options, then click Add.
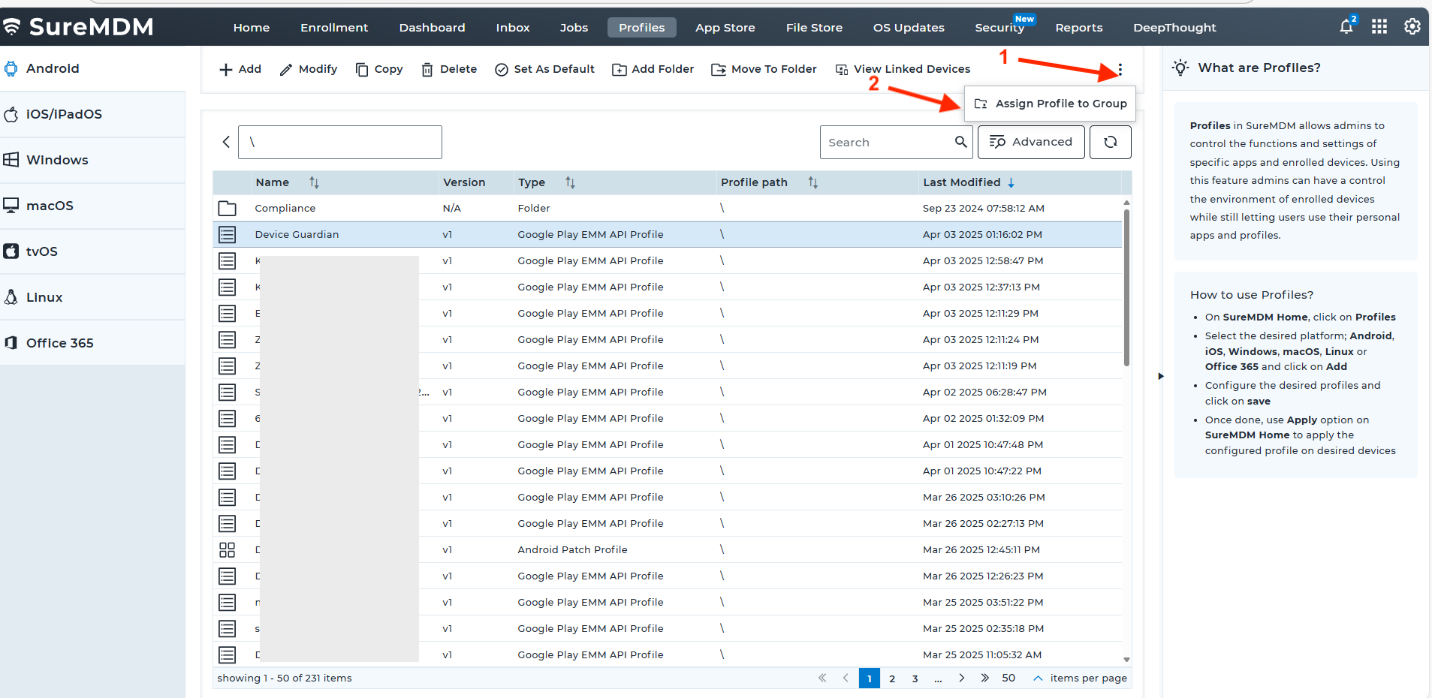
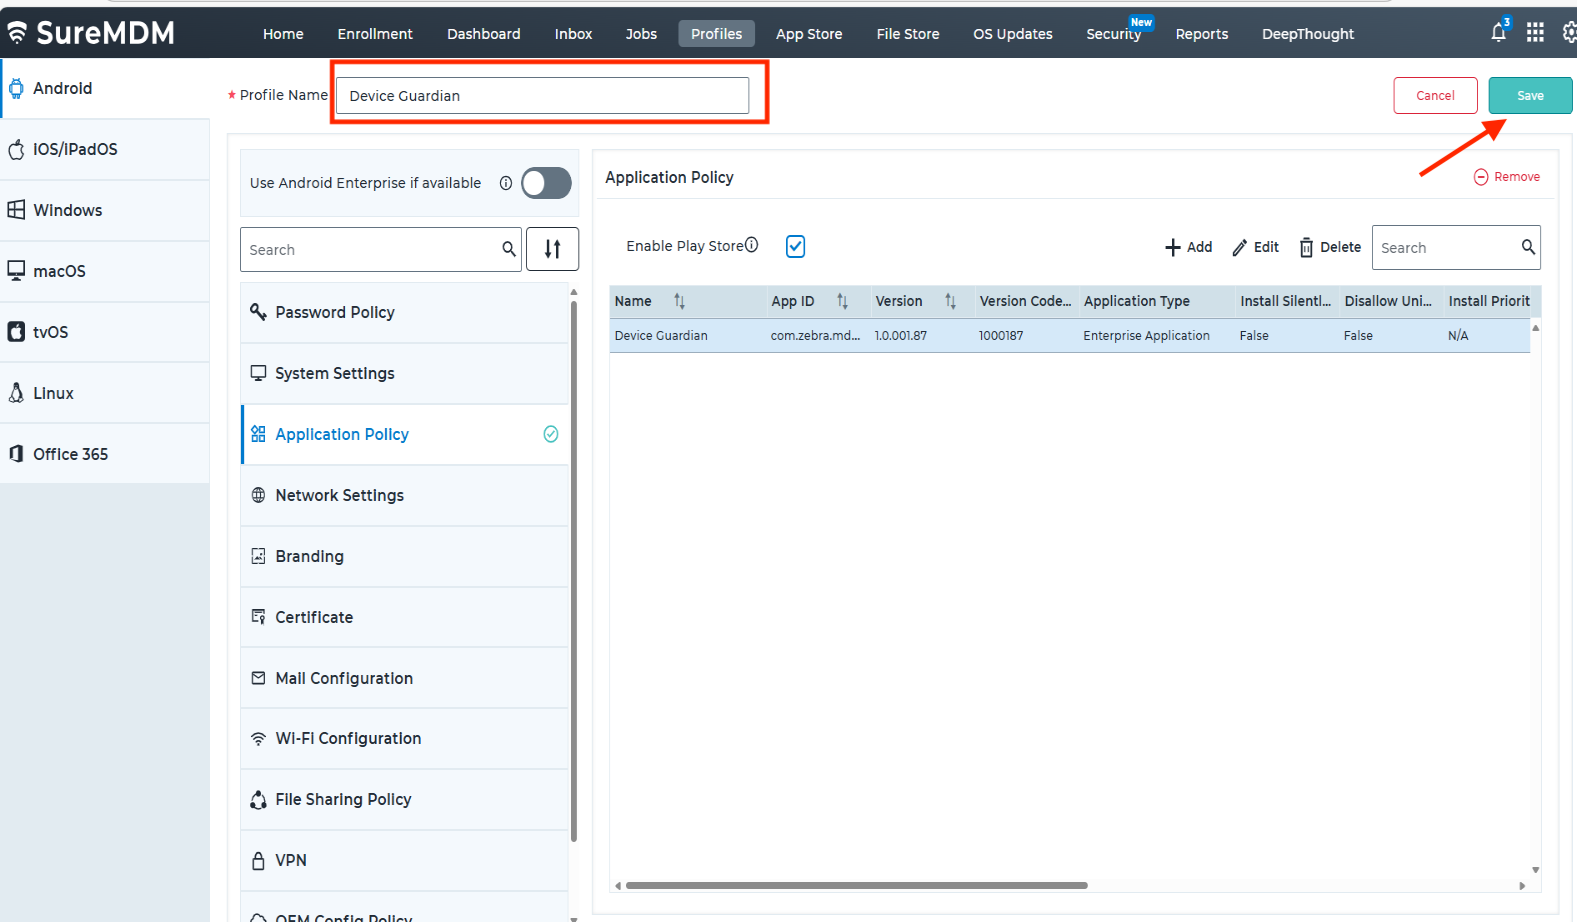
- Select the app policy created, enter a profile name and click Save.
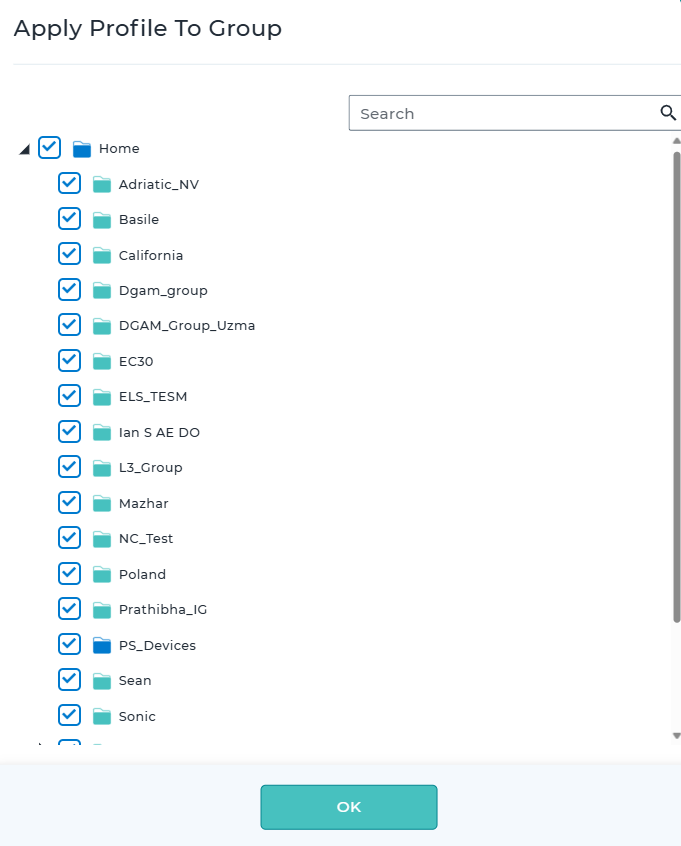
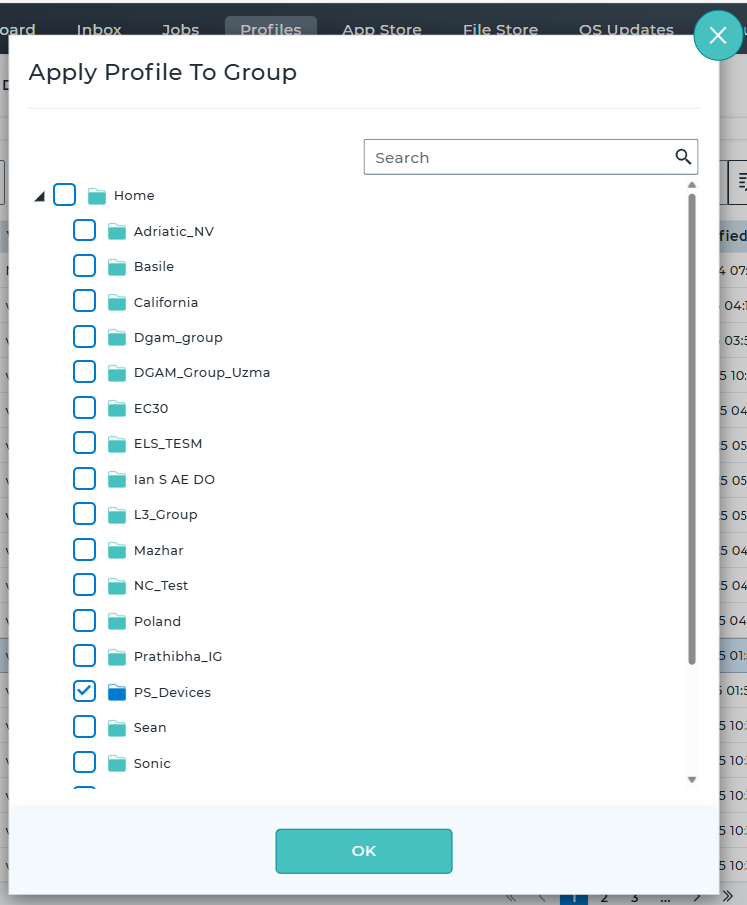
- From the top-right hamburger menu, select Assign Profile to Group.
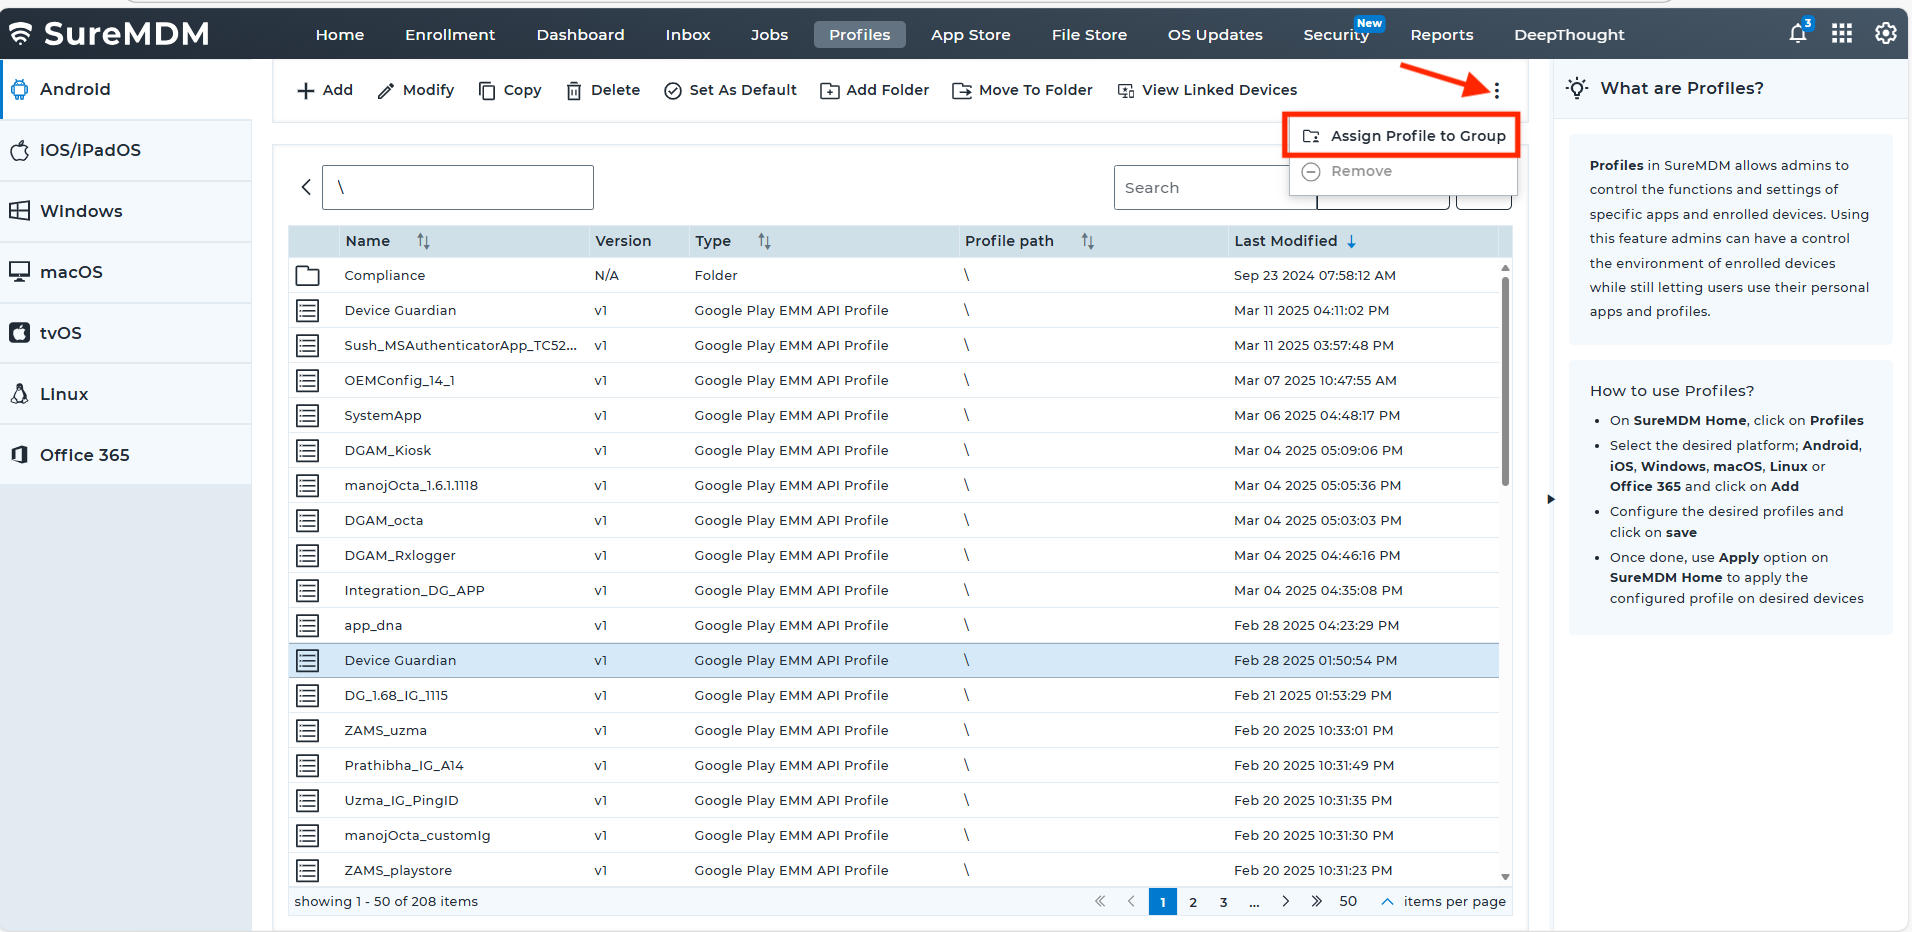
- Select the group and click OK. The policy is applied to the device.
Part IV: Install & Configure Identity Guardian (DGAM Only)
Identity Guardian is required for user authentication when using DGAM. When adding device users via Bulk Upload, follow these steps.
- Create an App Setup Profile for Identity Guardian.
- Select Yes when prompted to Configure App.
- In the Usage Mode section, Select AUTHENTICATION.
- In the Authentication Configuration section, select the following:
- Comparison Source: CLOUD
- Primary Authentication Factor: CLOUD_PASSCODE
- Fallback Authentication Method: ADMIN BYBASS PASSCODE
- Select the remaining options as desired.
- Deploy the Profile to the target device(s).
After deployment, the device user experiences the following screen progression when logging in:
Identity Guardian login process
Part V: Install & Configure the ZDNA Cloud Client App (DGAM Only)
The Zebra DNA Cloud client is required to add device users in DGAM.
- Download the ZDNA Config Token:
- In the web portal, navigate to User Management > Device Users.
- Click ZDNA Config Token to download the file.
- Open the file and copy its contents.
- Apply the Token & Deploy the App via EMM: The general steps are provided below. For detailed instructions, see the Configure for a Mixed Population section within the ZDNA Cloud Setup guide and follow steps 1 to 3:
- Paste the copied token into Managed Configuration settings in ZDNA Cloud.
- Install and launch the app via EMM using one of these sources:
- Google Play
- Zebra.com
Managed Configurations
Managed configurations are standardized features developed by Google and the Android community, enabling remote configuration of applications and devices through an Enterprise Mobility Management (EMM) system, such as Zebra DNA Cloud, that supports this specification.
App features that can be managed using Managed Configurations are defined in the its schema. For Device Guardian, the schema becomes available once the APK is uploaded to the EMM, either as an Enterprise app or through its app store. The schema defines the app's configurable features and provides the necessary information to present the app's management interface in the EMM console. This data-driven interface allows new features and their corresponding UI attributes to be delivered as soon as they become available. The interface may vary slightly depending on the EMM system in use.
This section discusses the Managed Confgurations available for Device Guardian, as seen in your supported EMM, and serves as an extension to the Installation procedure for your specific EMM.
Managed Configuration Options:
| Name | Description | Value(s) |
|---|---|---|
| Server Connectivity Settings | Enter the server configuration data. | [Copy and paste the content from the Managed Configurations .config file available in the Device Enrollment Download Kit] |
| Kiosk Mode | Enable or disable kiosk mode. Enable this option if the device is a kiosk. | Enable Disable |
| Enable Logging | Enable or disable logging feature. Log messages are directed to Android Debug Bridge (adb). | Enable Disable |
| KioskName or Kiosk’s DisplayName | Registers the device to the specified kiosk. | [Enter string] |
| BT Range Tuning | Adjust the Received Signal Strength Indicator (RSSI) threshold to control the Bluetooth range between a device and the kiosk. This enables devices to automatically log out when placed in a powered cradle within the kiosk's range and triggers an alarm if the device is moved out of range while the user is still logged in. Default value: 75. • Prerequisite: The Bluetooth Proximity setting must be enabled during site creation. • Adjustment Options: Increasing this value extends the Bluetooth detection range from the kiosk. Decreasing the value reduces the range, limiting the detection radius. Caution: Various factors can affect beacon signal strength, such as environmental conditions and device placement. It is essential to manually fine-tune this setting to align with your specific environment and meet your business requirements. |
[Integer value] |
Uninstallation
To uninstall Device Guardian from the device, remove the Device Guardian client app manually or through an EMM.
Server Termination
To terminate the Device Guardian cloud server, contact Zebra services. This removes the cloud server instance and deletes all data stored.