All references to Device Guardian within this guide also apply to Device Guardian Access Management, unless explicitly stated otherwise.
Overview
This guide discusses Device Guardian (DG) and DG Access Management (DGAM) APIs. It utilizes a content provider interface to securely retrieve and share data between applications. The content provider URI consists of four components: <Scheme:>//<Authority>/<API>/<Data>
- Scheme - Identifies the URI accessing a content source, typically represented as
content://. - Authority - The name of the provider authority, usually formatted as
packagename.provider. - API - The path that differentiates the content data.
- Data - The key pointing to specific data within the path.
Example of content provider URI: content://com.zebra.mdna.els.provider/<API>/<data>
Replace <API> and <data> with the appropriate strings for specific use cases.
Requirements
Modify AndroidManifest.xml: In your application's AndroidManifest.xml, include the necessary permission and the
<queries>tag to specify the Identity Guardian package name:<uses-permission android:name="com.zebra.mdna.els.permission.PROVIDER" /> <queries> <package android:name="com.zebra.mdna.els" /> </queries>Allowlist Your App: For security, your app must be on Identity Guardian's allowlist using AccessMgr CSP from Zebra Device Manager (ZDM). Create a profile via StageNow to configure your app's allowlist. Set the following parameters:
- Operation Mode: "Single User without Whitelist"
- Service Access Action: "Allow Caller to Call Service"
- Service Identifier: <delegation scope of the API category>
- Specify Caller Package Name: <enter app package name, e.g.: com.company.appname>
- Caller Signature: <select signature file that contains the app certificate>
For information on generating a signature file, see Caller Signature in the Access Mgr CSP documentation. After creating the StageNow profile, use StageNow to scan the generated barcode or deploy the XML file via Enterprise Mobility Management (EMM) software.
Add APIs to Your App's Allowlist: Identity Guardian APIs must be added to your application's allowlist.
Prerequisites:
- Download SigTools.jar. This is used to generate the certificate to create a signature file for security purposes.
- Place your .APK app and SigTools.jar in the same folder on your host computer.
- Download StageNow. This is used to create the profile to allowlist the APIs.
Procedure:
To allowlist Identity Guardian APIs in your app using StageNow:
From the command line, navigate to the directory containing your .APK and "SigTools.jar.".
Generate the certificate by executing the following command, replacing "LOB_app.apk" with your .APK file's name:
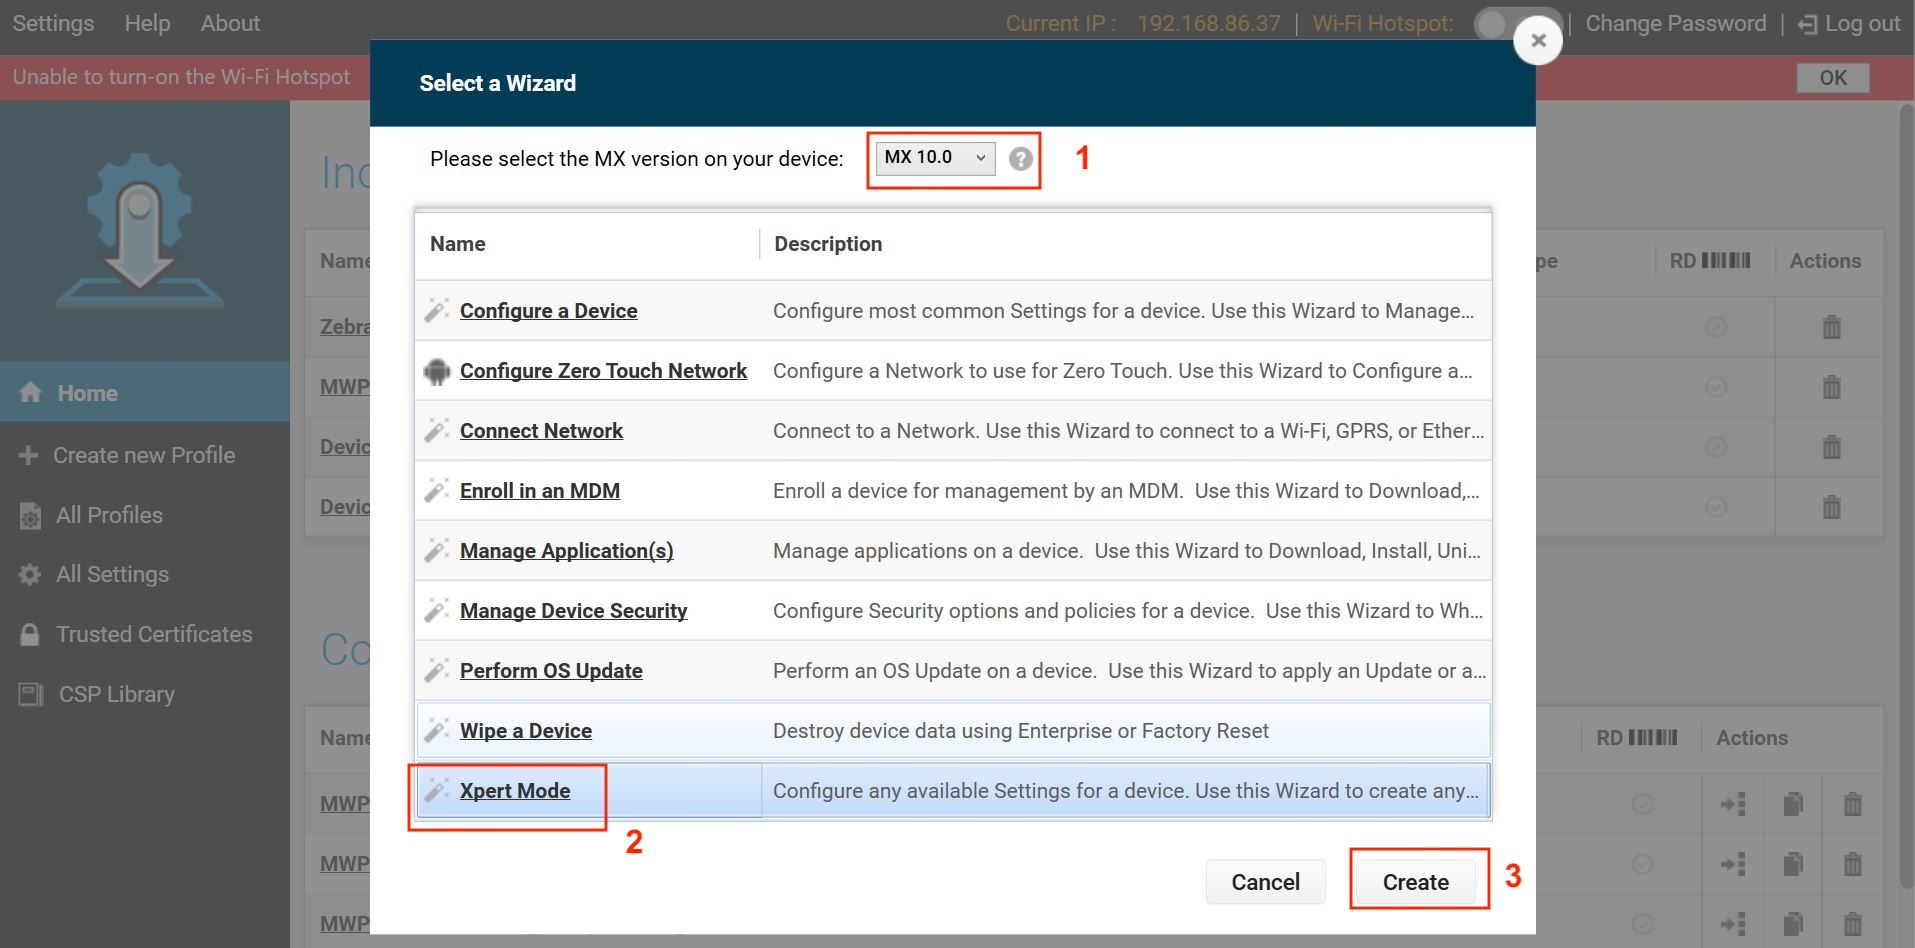
java -jar SigTools.jar getcert -inform apk -outform der -in LOB_app.apk -outfile app.crtFrom your host system, open StageNow and click on Create New Profile.
Select the MX version that matches or exceeds the one on your device. Refer to the MX documentation for guidance on how to determine the version.
Select Expert Mode and click Create.
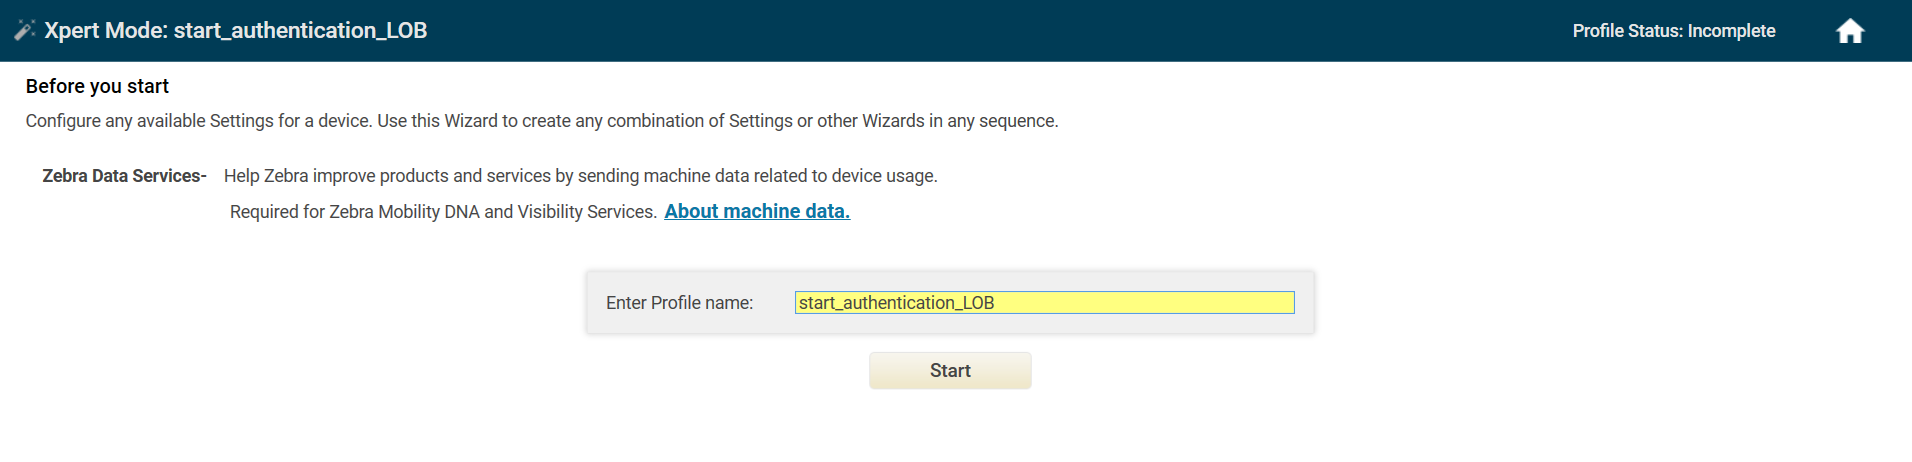
Enter a profile name and click Start.
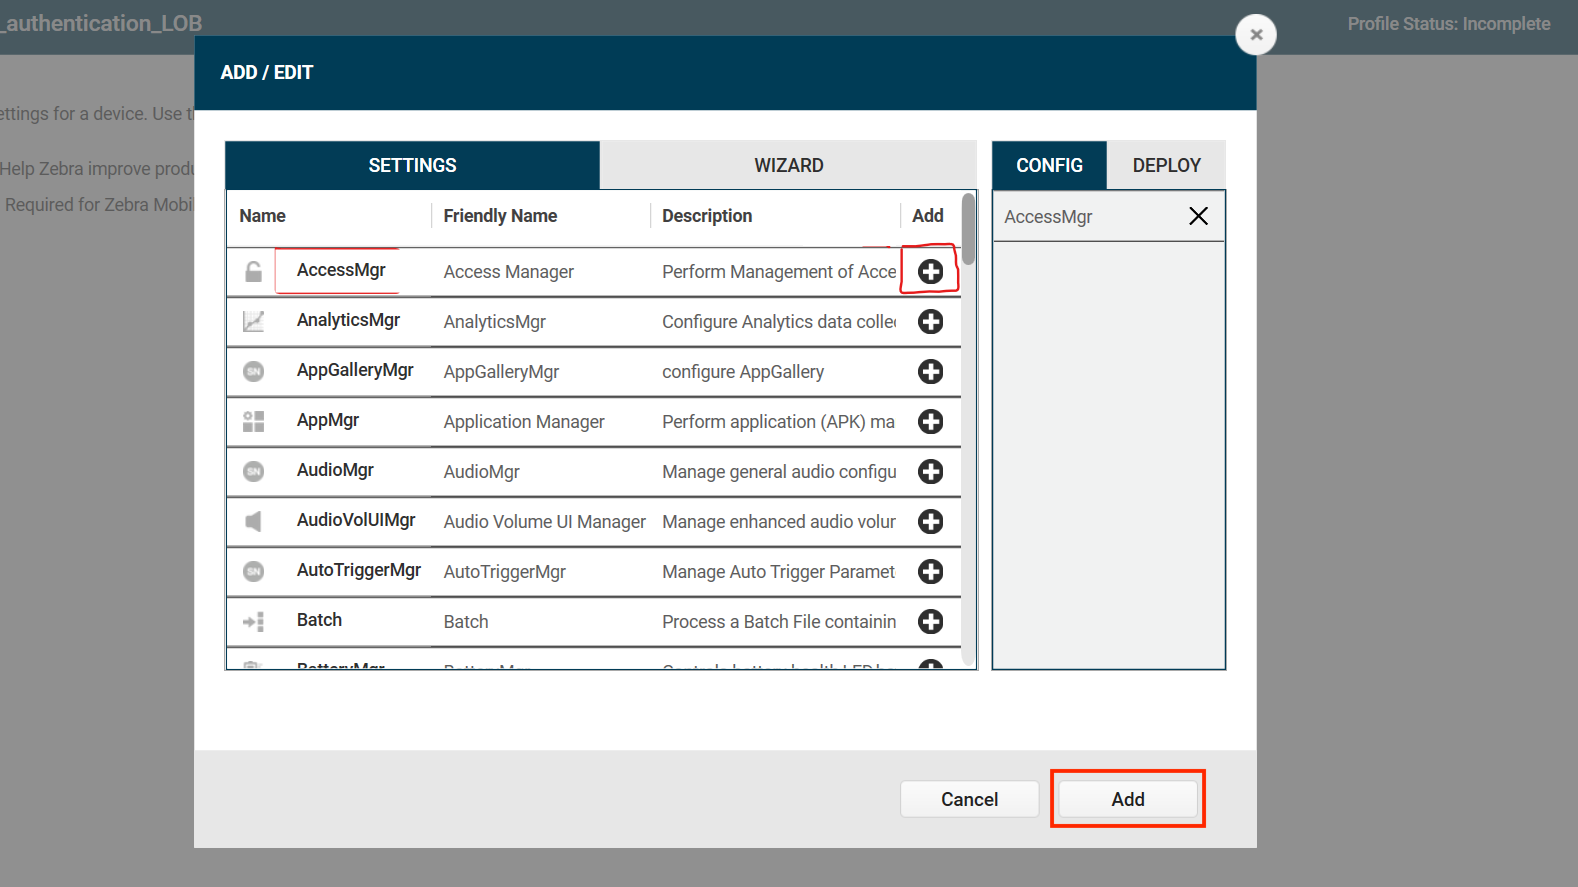
Click the plus (+) sign next to AccessMgr. This adds AccessMgr to the Config tab on the right side. Click Add.
Enter/select the following for AccessMgr:
- Service Access Action: Allow Caller to Call Service
- Service Identifier: [Enter the API URI, see step 11. For example:
content://com.zebra.mdna.els.provider/currentsessionorcontent://com.zebra.mdna.dg.provider/devicestate] - Caller Package Name: [Enter the package name for your .APK app file.]
- Caller Signature: [Browse to the .CRT certificate generated from step 2 above.]
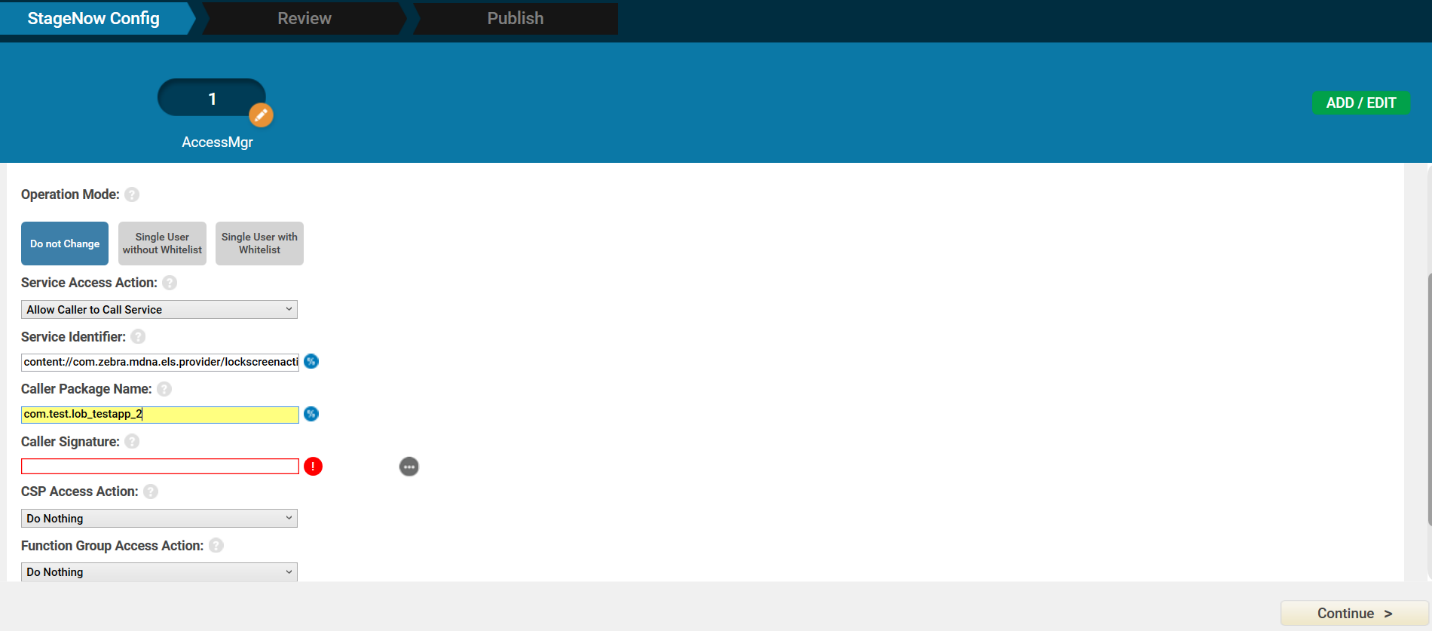
Click Continue.
Click Complete Profiles.
Repeat steps 3 to 10 for each API to allowlist in your app, replacing Service Identifier with the desired API URI:
- content://com.zebra.mdna.els.provider/currentsession (Device Check-out/Check-in)
- content://com.zebra.mdna.dg.provider/devicestate (Device State)
After creating the StageNow profiles, use one of the following methods based on the desired tool for device deployment:
- StageNow: Generate the appropriate barcode for your Android system version from the StageNow profile. Open StageNow client on the device and scan the barcode(s) generated from the installation, configuration and/or BLE profile.
- EMM: Export each StageNow XML file from the StageNow installation, connection and BLE profiles. Do not edit the XML file - it can cause unexpected behavior. Send the XML using either OEMConfig or MX to configure the app and grant all required permissions. The installation profile and server connectivity profile XML files must be used separately.
Device Check-out/Check-in
Description: When Identity Guardian is used for accountability, this updates the device status to check-out or check-in based on the user's sign-in or sign-out actions within Identity Guardian.
Content URI: content://com.zebra.mdna.els.provider/currentsession
Parameters:
| Key | Type | Description/Value | Requirement |
|---|---|---|---|
| user_id | [string] | User identifier for the person signing in, in string format. | Mandatory if signing in a user |
| signed_in_state | [bool] | Signed in/out state as an integer: • 1 - True: User signed in (checked out) the device, updating signin_time and ignoring signout_time.• 0 - False: User signed out (checked in) the device, updating signout_time and ignoring signin_time. |
Mandatory |
| signin_time | [string] | Time stamp indicating the user's sign-in time in string format: “yyyy-dd-MM HH:mm:ss.SSSZ”. E.g., "2023-10-04 10:53.381+0530" | Mandatory if signing in a user |
| signout_time | [string] | Time stamp indicating the user's sign-out time in string format: “yyyy-dd-MM HH:mm:ss.SSSZ”. E.g., "2023-10-04 10:53.381+0530" | Mandatory if signing out a user |
Response:
RESULTbundle:If successful:
{"status":"SUCCESS","message":"successfully executed"}If unsuccessful:
{"status":"FAILURE","message":"error desc"}The “message” value will vary depending on the error encountered.
Null - Returned if the content provider does not implement the call.
Exceptions:
- NullPointerException – Thrown if the URI or method is null.
- IllegalArgumentException – Thrown if the URI is not known.
Sample Code
This sample code demonstrates how to send the device check-out/check-in parameters.
    public void getDataForCurrentUser() {
        ContentResolver contentResolver = getContentResolver();
        Uri uri = Uri.parse("content://com.zebra.mdna.els.provider/");
        String METHOD_NAME = "currentsession";

        Bundle bundle = new Bundle();
        bundle.putString("user_id", "pd3445");
        bundle.putBoolean("signed_in_state", true);
        bundle.putString("signin_time", getCurrentDateAndTimeFormat(System.currentTimeMillis()));
        bundle.putString("signout_time", “”);

        Bundle response = contentResolver.call(uri,METHOD_NAME,null,bundle);
        if (response != null && response.containsKey("RESULT")) {
            Log.i(TAG, response.getString("RESULT"));
        }
    }
Device State
Device Guardian exposes a content provider to set a device’s tracking state to either Missing (To Be Found") or In Service (not missing). This is useful for those who prefer direct control over these states rather than relying on Device Guardian's standard operations or automated rules for these state changes.
Content URI: content://com.zebra.mdna.dg.provider/devicestate
Parameters:
| Key | Type | Description/Value | Requirement |
|---|---|---|---|
| device_state | [int] | Device State represented as an integer: • 0 - IN SERVICE: The device is not missing. • 1 - TO_BE_FOUND: The device is missing. |
Mandatory |
| state_change_time | [string] | Time stamp of the state change in string format: “yyyy-dd-MM HH:mm:ss.SSSZ”. E.g., "2023-10-04 10:53.381+0530" | Mandatory |
| state_change_reason | [string] | Reason why the device was marked as missing. Note: Any third-party application can modify the state_change_reason. If a third-party application sets a reason, it has the ability to overwrite or clear it; however, these modifications cannot be made directly through Device Guardian. |
Optional |
Response:
RESULTbundle:If successful:
{"status":"SUCCESS","message":"Device state saved successfully"}If unsuccessful:
{"status":"FAILURE","message":"error desc"}The “message” value will vary depending on the error encountered.
Null - Returned if the content provider does not implement the call.
Exceptions:
- NullPointerException – Thrown if the URI or method is null.
- IllegalArgumentException – Thrown if the URI is not known.
Sample Code
The sample code below demonstrates how to call the device state content provider:
    Uri uri = Uri.parse("content://com.zebra.mdna.dg.provider/");
    String METHOD_NAME = "devicestate";
    ContentResolver cr = getContentResolver();
    Bundle bundle = new Bundle();

    Integer intDeviceState = 1; //set device to missing state
    String stateChangeReason = ""; // optional

    bundle.putInt("device_state", intDeviceState);
    bundle.putString("state_change_reason", (stateChangeReason == null) ? "" : stateChangeReason);


    // Add current date time in yyyy-dd-MM HH:mm:ss.SSSZ format for state_change_time
    bundle.putString("state_change_time", getFormattedCurrentDate());

    try {
        Bundle response = cr.call(uri, METHOD_NAME, null, bundle);
        if (response != null && response.containsKey("RESULT")) {
            if (response.getString("RESULT").equals("SUCCESS")) {
                if (response.containsKey("status")) {
                // To access the success message: response.getString("status");
                }
            } else {
                result.setText(response.getString("RESULT"));
                // To access the result message of an unsuccessful call: response.getString("RESULT");
            }
        }
    }
    catch (Exception e) {
        e.printStackTrace();
    }
Sample helper function to format the date:
    static String getFormattedCurrentDate() {
        Date currentDate = new Date();
        SimpleDateFormat dateFormat = new SimpleDateFormat("yyyy-dd-MM HH:mm:ss.SSSZ");
        dateFormat.setLenient(false);

        // Format the date
        String formattedDate = dateFormat.format(currentDate);
        return formattedDate;
    }