Overview
This section covers the Zebra DNA Cloud (ZDNA) setup process and the first few steps for its use. For complete details about ZDNA usage, see the Usage Guide.
Setup Synopsis
- Configure the organization's network
- Register with Zebra.com and create a Zebra DNA Cloud "instance"
- Create at least one "New Device Setup" Profile
- Enroll one or more devices using the setup Profile made in Step 3
- Apply license(s) to device(s)
System Requirements
Admin Console
- Computer with Windows 10 or later
- Google Chrome (v101.0 or later) Pop-ups must be enabled
- An account on Zebra.com (Register now)
- Firewall or network proxy server configured as required (see below)
Supported Devices
- Zebra device(s) running Android 11 (or later) updated as follows:
- 6490-platform devices:
11-12-31.00-RG-U00-STD-ATH-04(or later) - ET40/ET45 tablet:
11-13-14.00-RG-U00(or later) - SDM660-platform:
11-26-05.00-RG-U00(or later) - TC15 devices:
11-14-13.00-RG-U00(or later) - TC53/TC58 devices:
11-12-31.00-RG-U00(or later) - WS50 wearable:
11-19-19.00-RN-U00(or later)
- 6490-platform devices:
- Updated device software as indicated in the Admin Requirements section of the Usage Guide
- OPTIONAL: Management of a mixed-owner device population requires the following LifeGuard updates:
- 6375 (ET40, ET45):
GO_FULL_UPDATE_11-23-29.00-RG-U00-STD-GSE-04.zip(or later) - 6375 (TC15):
GR_FULL_UPDATE_11-23-23.00-RG-U00-STD-GRT-04.zip(or later) - 6490 (TC53, TC58):
AT_FULL_UPDATE_11-21-27.00-RG-U03-STD-ATH-04.zip(or later) - SDM660-platform (see all):
HE_FULL_UPDATE_11-35-05.00-RG-U00-STD-HEL-04.zip(or later)
- 6375 (ET40, ET45):
See all Zebra devices by platform
See all Zebra devices supported by Zebra DNA Cloud
NOTICE: Devices intended to be fully managed using Zebra DNA Cloud must be factory fresh (or factory-reset) before enrollment to ensure that all features work correctly. This is not applicable to devices managed using a third-party EMM solution and that use ZDNA to deploy Zebra apps and OS updates, monitor battery health and perform other administrative functions.
Naming Conventions in this Guide
- Setup Profile - A group of settings relating to an app and/or one or more app configuration files.
- Settings Profile - A group of settings for configuring one or more devices.
- Job - A task to update the Android version running on one or more devices.
I. Configure Network
The Zebra DNA client app communicates with the ports and domain names listed below.
The client network must be configured using wildcards as follows:
- Open an HTTPS port (443 by default) between device client and app servers
- Allow these domain names through the firewall or proxy server:
*.zebra.com†connectivitycheck.gstatic.com*.googleapis.com†*.firebaseio.com†*.cloudfunctions.net†*.firebaseapp.com†ts.dnac.zebra.com*.linodeobjects.comapi.linode.com/v4/object-storage/bucketsapi.linode.com/v4/object-storage/keysapi.linode.com/v4/regionsdevice-https.savannacore.zebra.com- NEW ->
content.swengagement.zebra.com - NEW ->
data.swengagement.zebra.com
† The asterisk character (*) indicates a wildcard, which accepts any value for a particular section of a port assignment. If wildcards are NOT supported by the system (or are otherwise prohibited by the organization), please contact Zebra Support for special instructions.
Remote Support
For organizations planning to view and/or control device screens remotely, the following WebSockets port and domain must remain accessible:
wss://global.vss.twilio.com/signaling
II. Register with Zebra.com
This part of the process is required for all DNA Cloud users in an organization.
Already have a login for Zebra.com? Skip to Section IV.
Create Zebra.com Account
1. Visit Zebra.com and click the "Login" link:
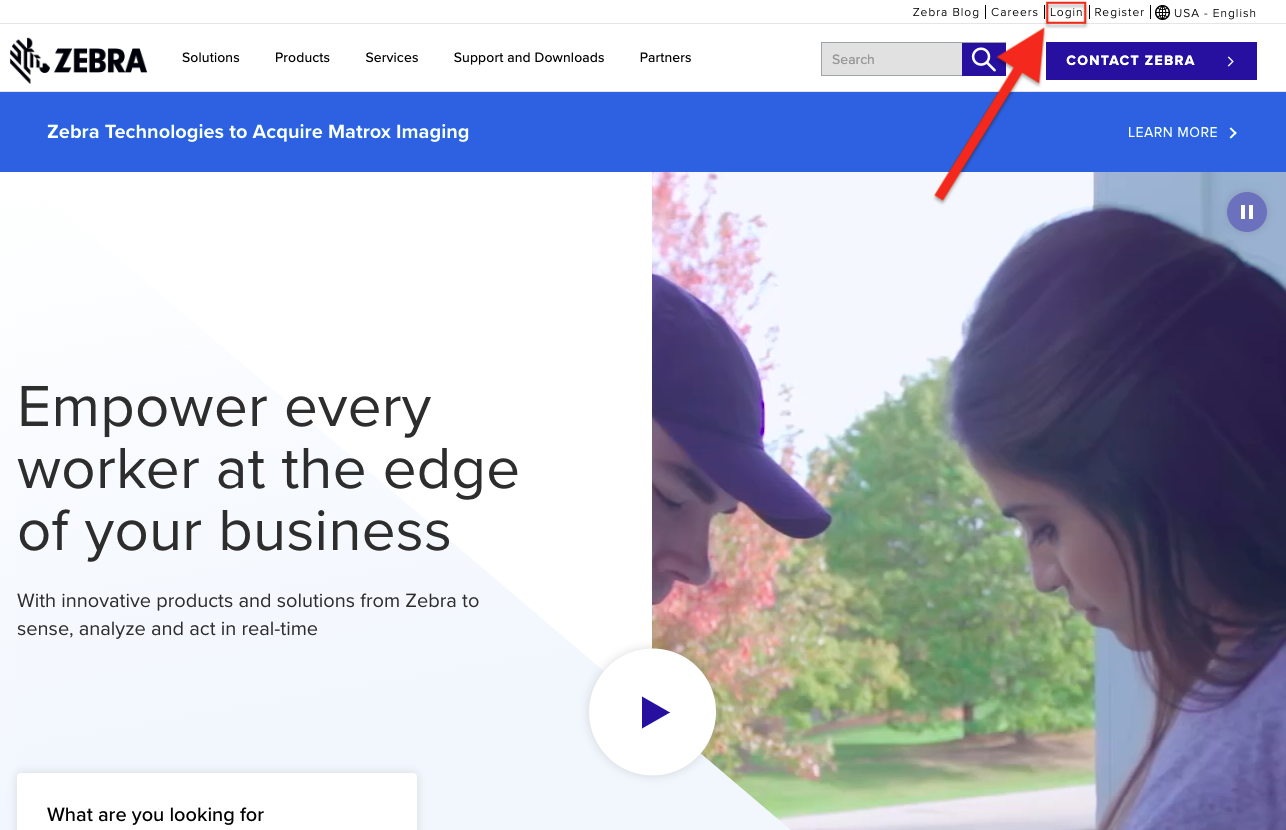 Click image to enlarge; ESC to exit.
2. Click "Register Now" and follow the prompts:
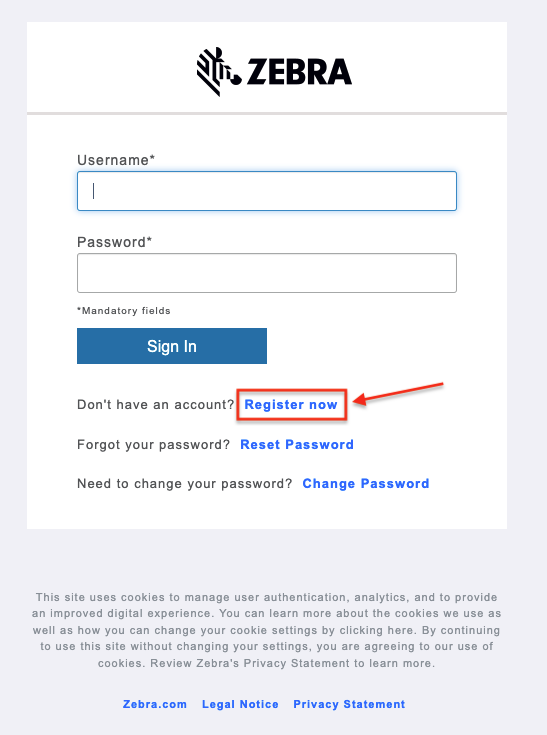 Click image to enlarge; ESC to exit.
3. Enter and confirm an email address to be associated with the account.
Then click "Submit" button:
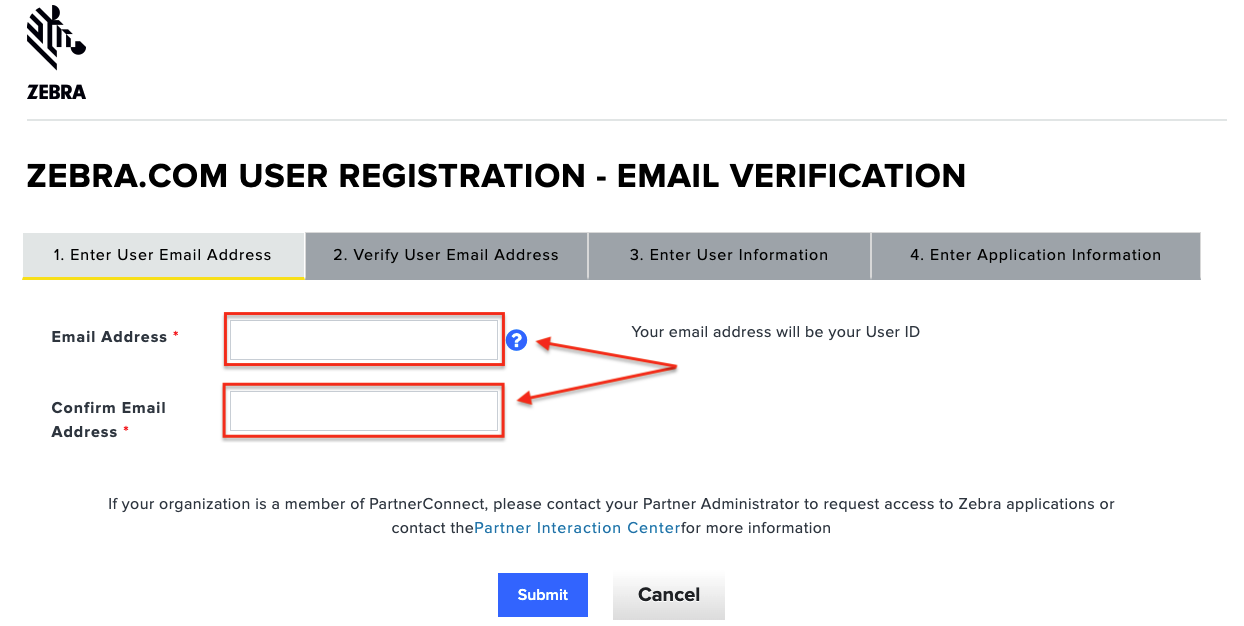 Click image to enlarge; ESC to exit.
4. After receiving a confirmation email, return to the login screen and log in.
Continue to follow prompts and click "OK" where necessary.
Be sure to click "Sign In" just once to avoid errors.
 Click image to enlarge; ESC to exit.
5. Select "My Zebra" from the user menu:
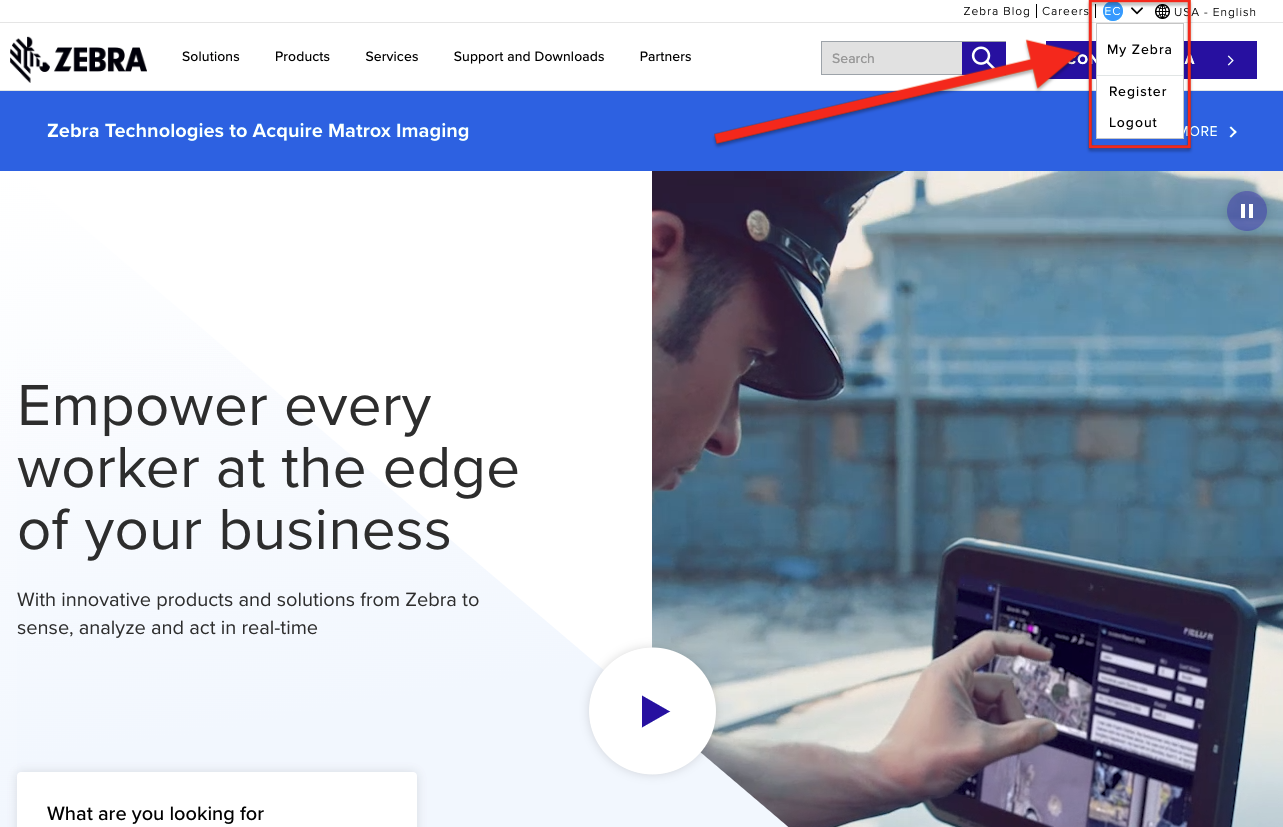 Click image to enlarge; ESC to exit.
6. Click on the desired app to launch:
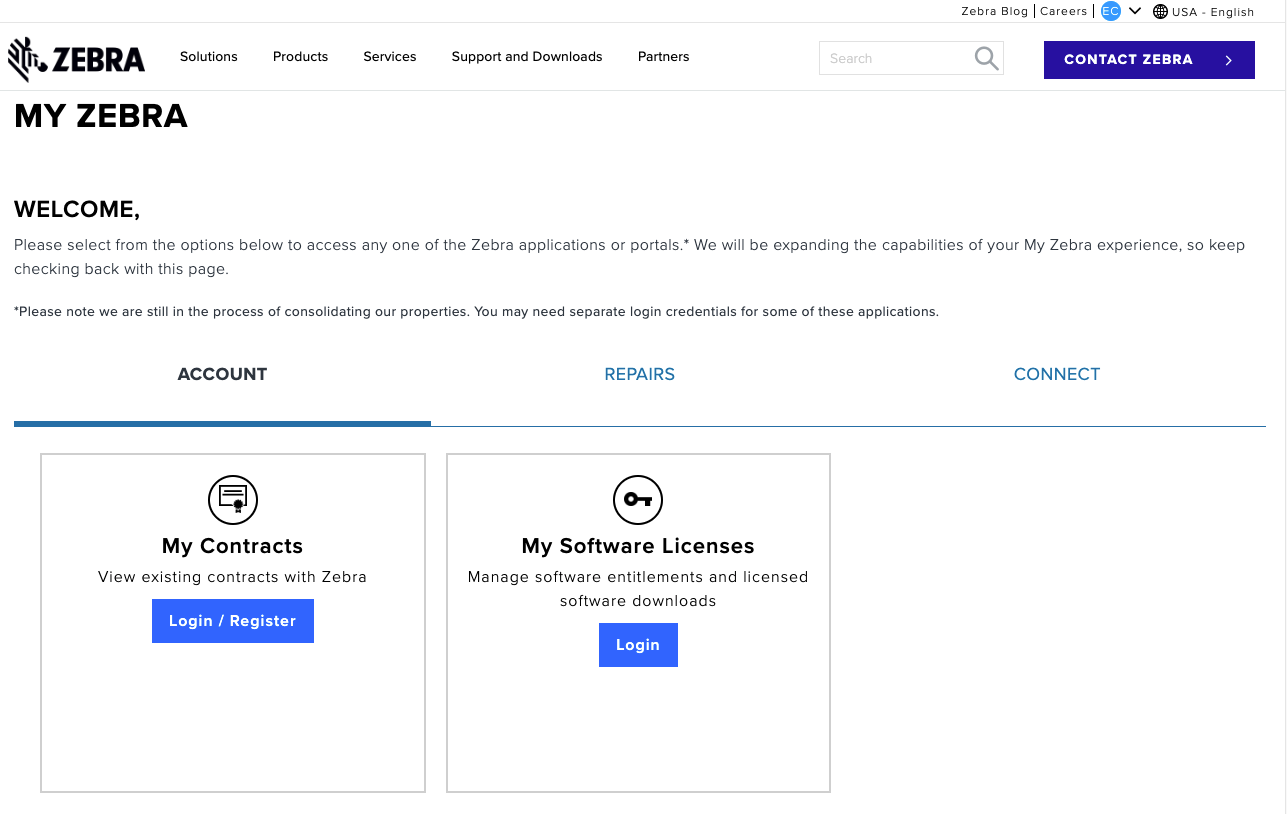 Click image to enlarge; ESC to exit.
If a link to ZDNA does not appear, use Chrome to visit DNAcloud.zebra.com.
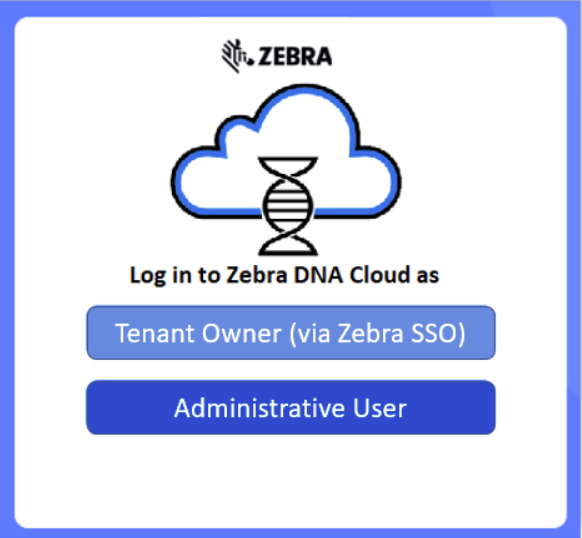
7. Log in using the Zebra SSO credentials.
 Click image to enlarge; ESC to exit.
III. Manage Users, Roles
The Super Admin (formerly Tenant Owner) creates DNA Cloud Users in the system using email addresses registered during the process above. Admins can perform all tasks within the system and create Roles as needed to restrict a user's access to specific ZDNA features.
For Identity Guardian user information, see Identity Guardian Setup, below.
Create Users
If the creation of Users, Roles and/or connected services (i.e. Google Drive) is NOT required at this time, skip to Step IV to begin enrolling devices.
Instructions for the login screen below are found in the Legacy Login section.
 Deprecated. This process is scheduled to be discontinued soon.
To Create a User:
1. Point a browser to the Zebra DNA Cloud server log in using Zebra.com credentials:
Click image to enlarge; ESC to exit.
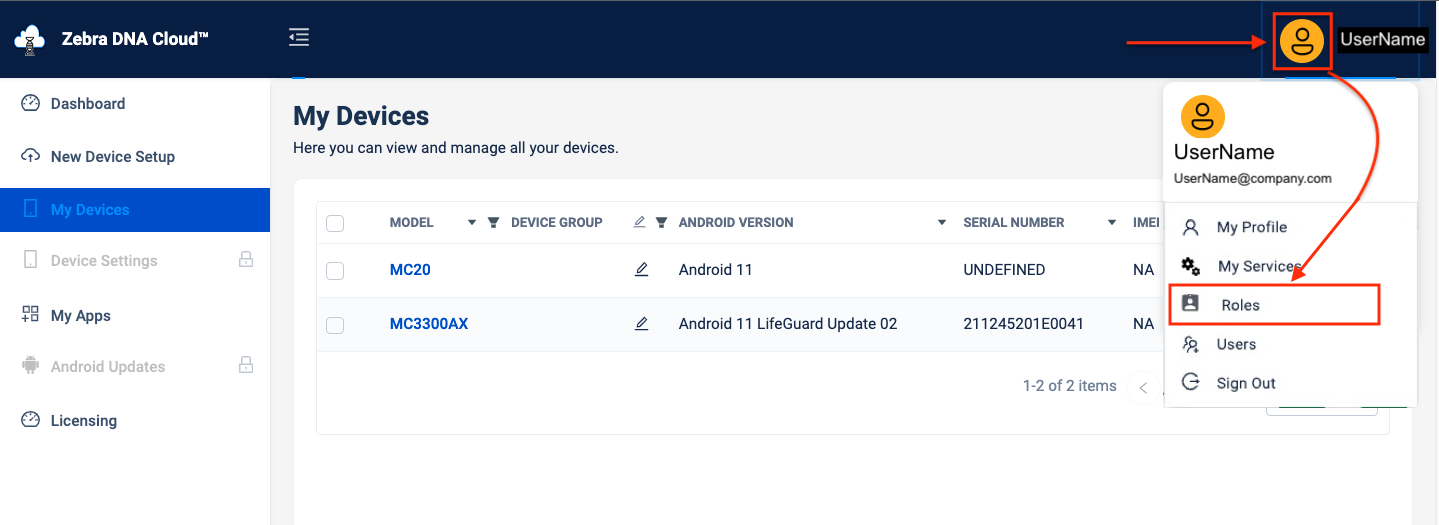
2. Click user icon for menu and select "Manage All Users" from the menu:
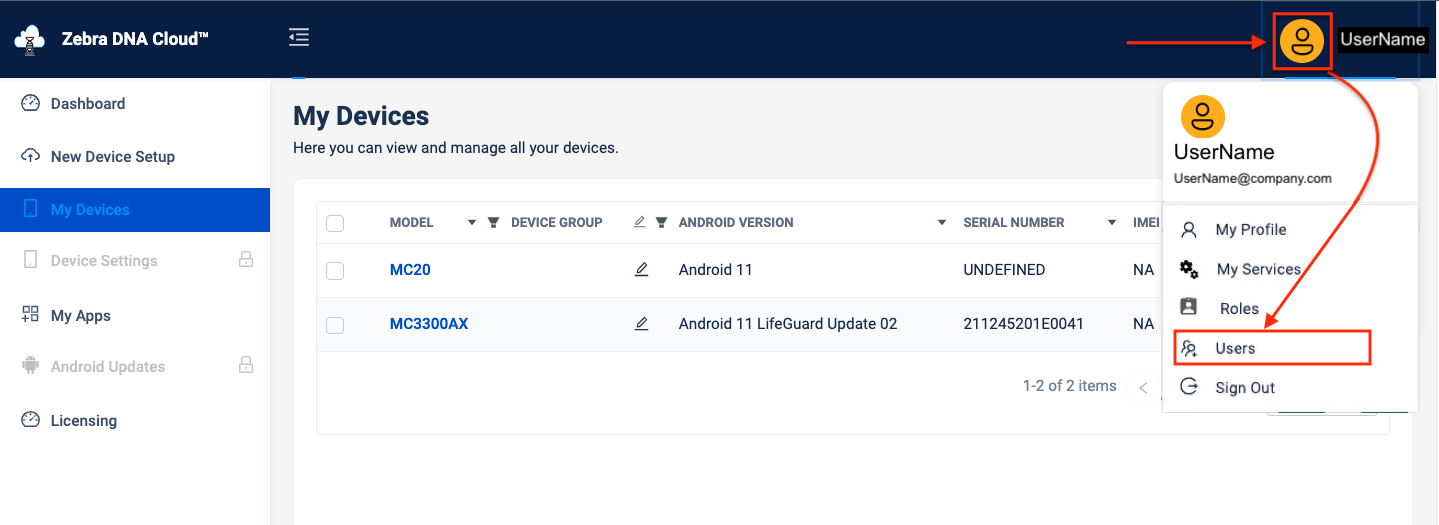 Click image to enlarge; ESC to exit.
3. In All Users screen, click "Add User":
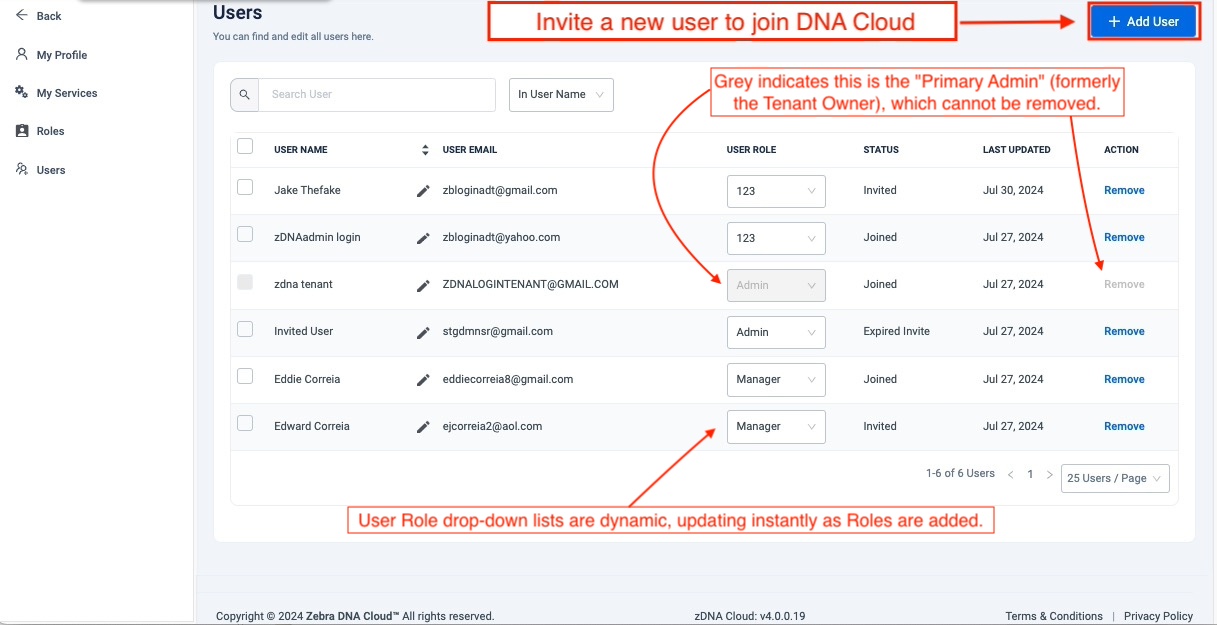 Click image to enlarge; ESC to exit.
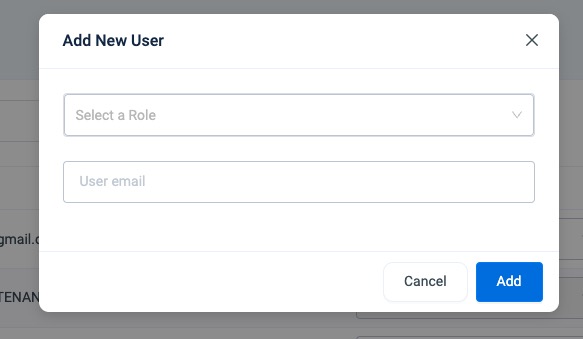
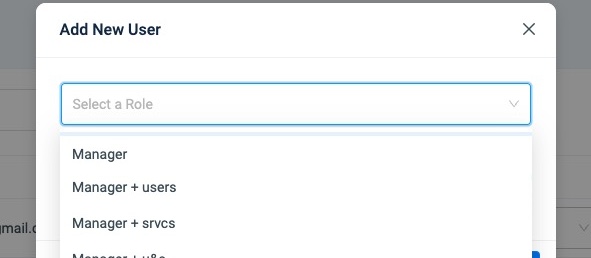
4. Select the user's Role from the drop-down and their email address (both are required). Then click "Add"; An invitation to join DNA Cloud is sent to the address.
Before any Roles are created by an organization, only the Admin and Manager Roles are available for selection. If one or more custom Roles are desired, Create Roles before proceeding. The Roles drop-down list updates instantly upon creation.
 Click image to enlarge; ESC to exit.
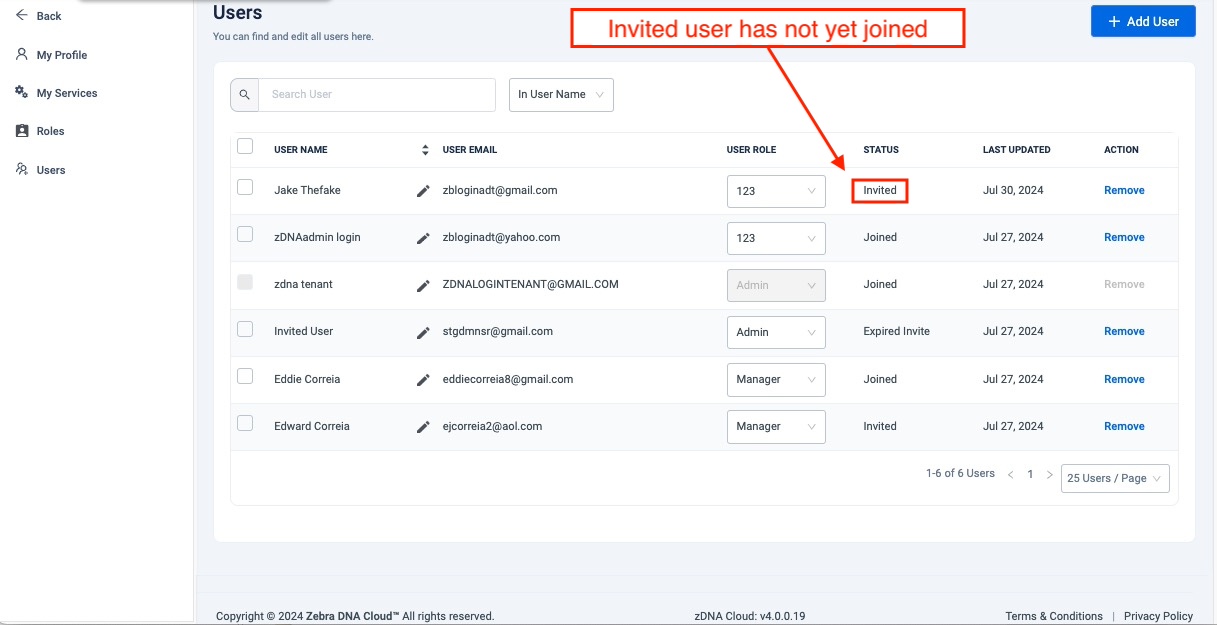
5. Prior to enrolling, newly invited users appear as "invited" the list of Users (as seen in the image below).
User-name Notes
• User names appear automatically for invited users already registered with Zebra.com.
• Names of unregistered invitees appear as "Invited User" until they register (required).
• To edit a user name, click the icon.
• User name fields accept alphanumeric, Unicode and some special characters.
 Click image to enlarge; ESC to exit.
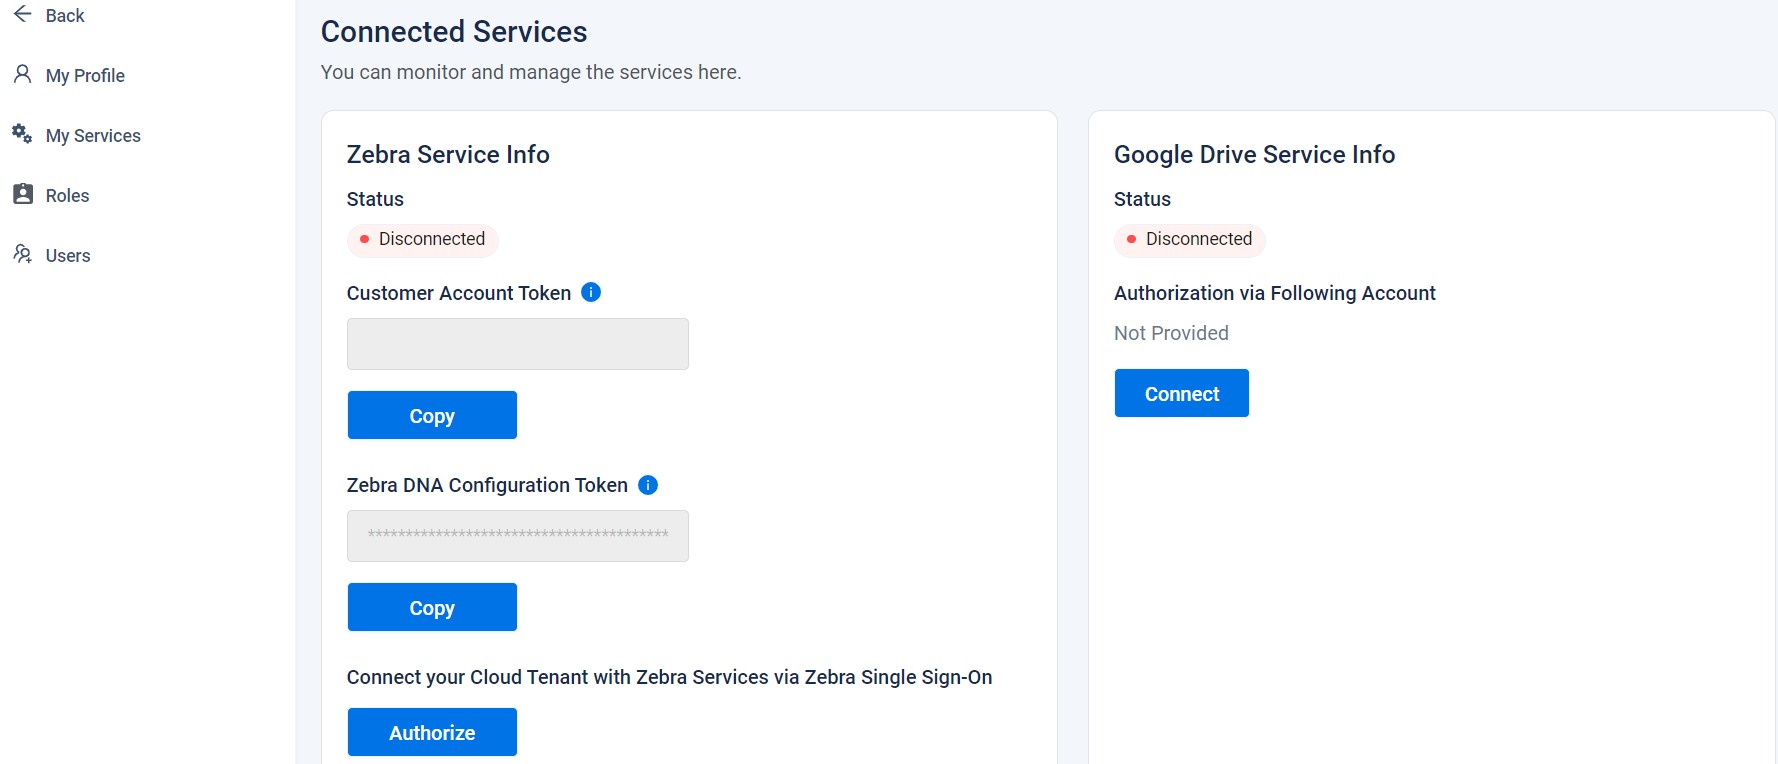
6. In the My Services section, click "Connect" on the desired service(s) and follow prompts.
Services activated here are available for use in setup Profiles, but only an Admin can create, edit or disable them. See My Services notes below.
Before connection of services:
 Click image to enlarge; ESC to exit.
After connection of services:
 Click image to enlarge; ESC to exit.
If the Google Drive account is disconnected, the term “Tenant Owner” might be displayed on the Google Drive and User Page tooltips when hovering over the Browse button (and over the disabled Remove button for Admins). When the account is connected, the term also might be seen in the Google Drive Service Info section. In documentation for ZDNA 4.0 (and later), the Tenant Owner is referred to as the Super Admin.
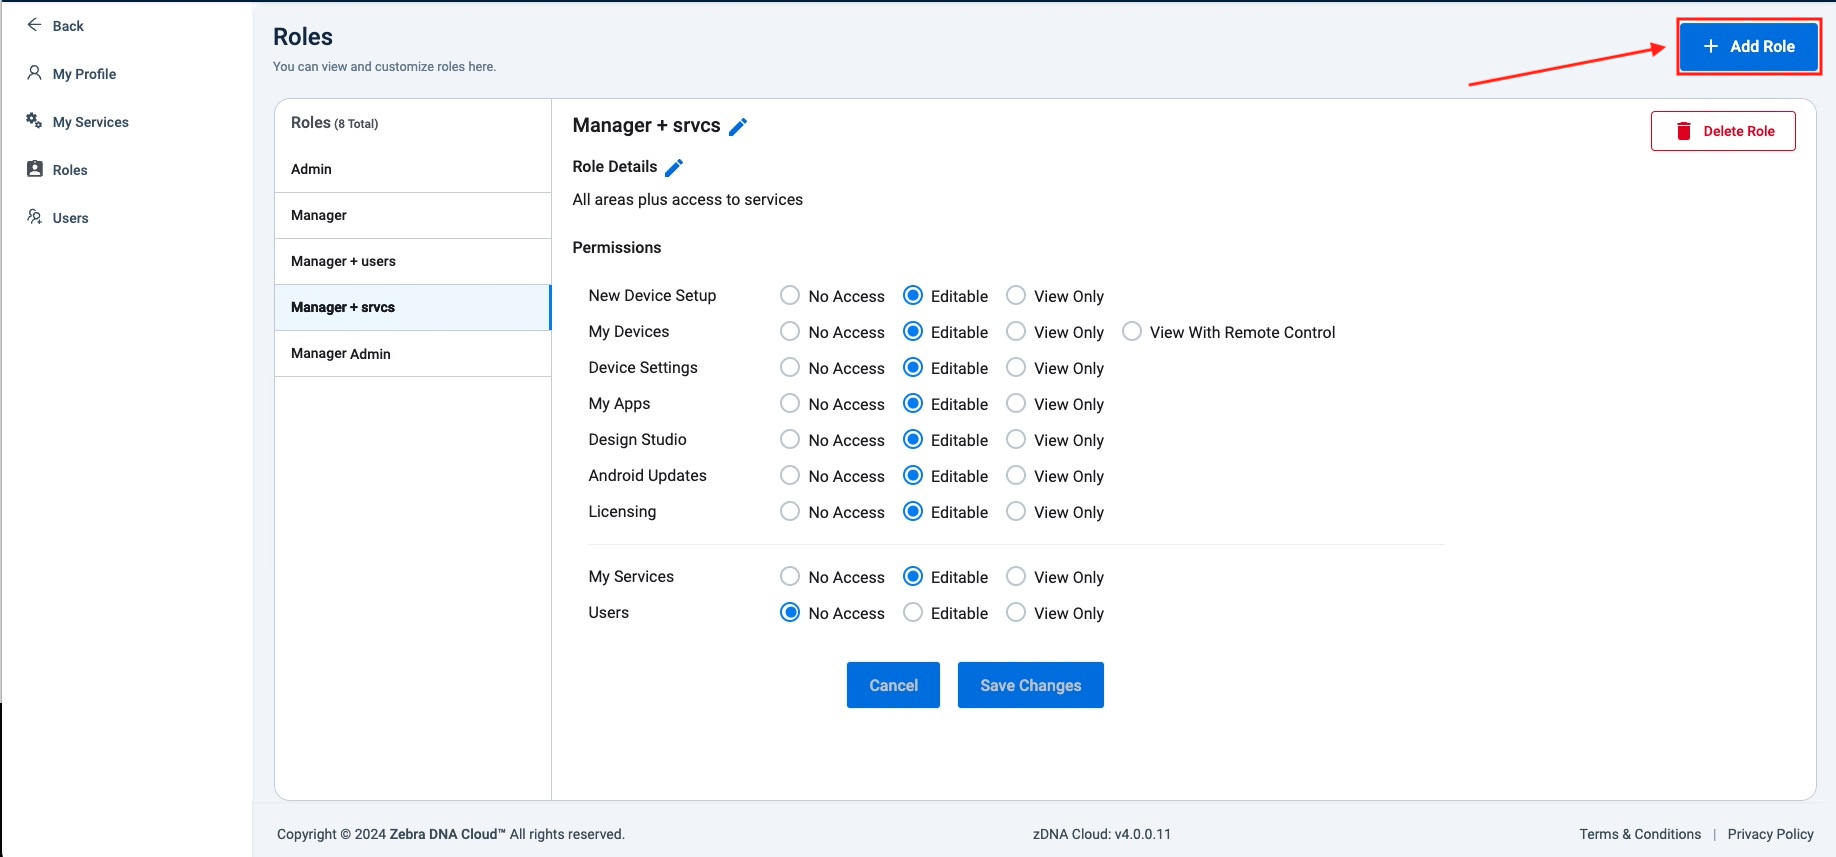
Create Roles
ZDNA 4.0 (and later) supports User Roles, allowing Admins to configure ZDNA user access to specific DNA Cloud features while preventing access to others. Configurable features and access levels are shown below.
Configurable Features
- New Device Setup
- My Devices
- Device Users (Identity Guardian users only)
- Device Settings
- My Apps
- Android Updates
- Licensing
- Remote RxLogger
- My Services*
- Users*
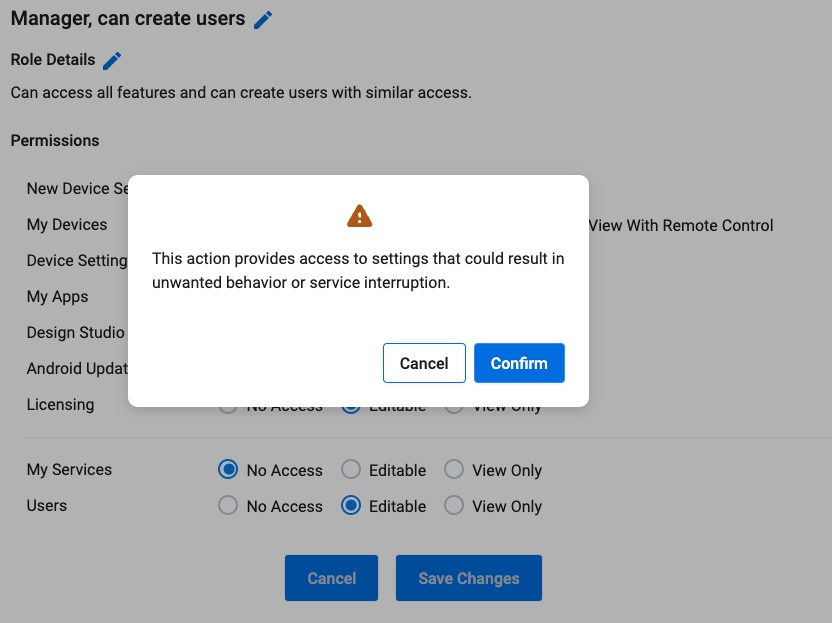
* Designated as sensitive, prompting a warning when granting permission.
The ZDNA Dashboard is visible to all Users regardless of Role. Android Updates and New Device Setup sections appear "greyed out" for users with "No Access" permission.
Roles are visible only to the Super Admin and to users assigned the Admin Role.
Access Levels
- No Access - Section name appears “greyed out” in the navigation pane and is unresponsive to clicks (default for areas deemed "sensitive"). A tool tip displays “permission required” when hovering.
- Editable - Full access to all section features (default for areas not deemed "sensitive").
- View Only - Section is visible when clicking its name in the navigation pane but permits no interaction except to download (where applicable). A tool tip displays “permission required” when hovering over unavailable features.
- View with Remote Support - Same as "View Only" plus the ability to perform the "Remote Support" action (applies only to "My Devices" section).
Rules and Behaviors
- Changes to Role permission(s) take effect the next time the user logs in.
- Users can view their assigned Role on their User Profile page.
- The Super Admin (formerly Tenant Owner)* has full access to all areas and features; this Role cannot be changed or deleted.
- The "Manager" Role cannot be deleted; its default permissions can be edited.
- Only an Admin can create additional users with Admin-level permissions.
- The Roles section is accessible ONLY by the Admin and users assigned the Admin Role.
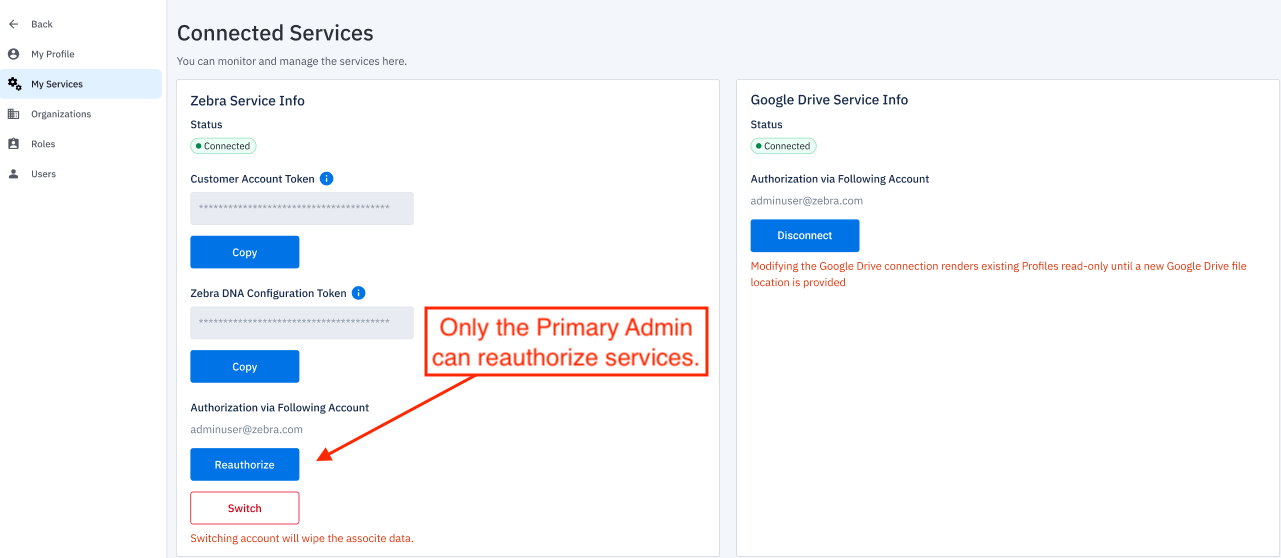
- Only the Super Admin can reauthorize services.
- Only an Admin can grant Admin permission; Managers and manager-level custom roles cannot grant Admin permission to themselves or other users.
* The Admin (formerly the Tenant Owner) has privledges above all others. This user is referred to in documentation as the "Super Admin" to differentiate it from users assigned the Admin Role. Such users are referred to simply as "Admins" in TechDocs.
To Create a Role:
1. Log in as an Admin, click the user icon and select "Roles" from the menu:
 The 'Admin' Role has full access to all features and cannot be edited.
Click image to enlarge; ESC to exit.
The 'Admin' Role has full access to all features and cannot be edited.
Click image to enlarge; ESC to exit.
2. Click the "Add Role" button:
 Click image to enlarge; ESC to exit.
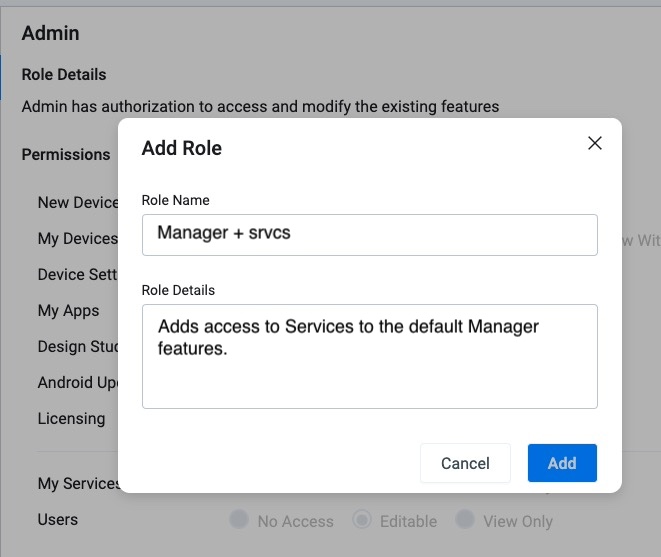
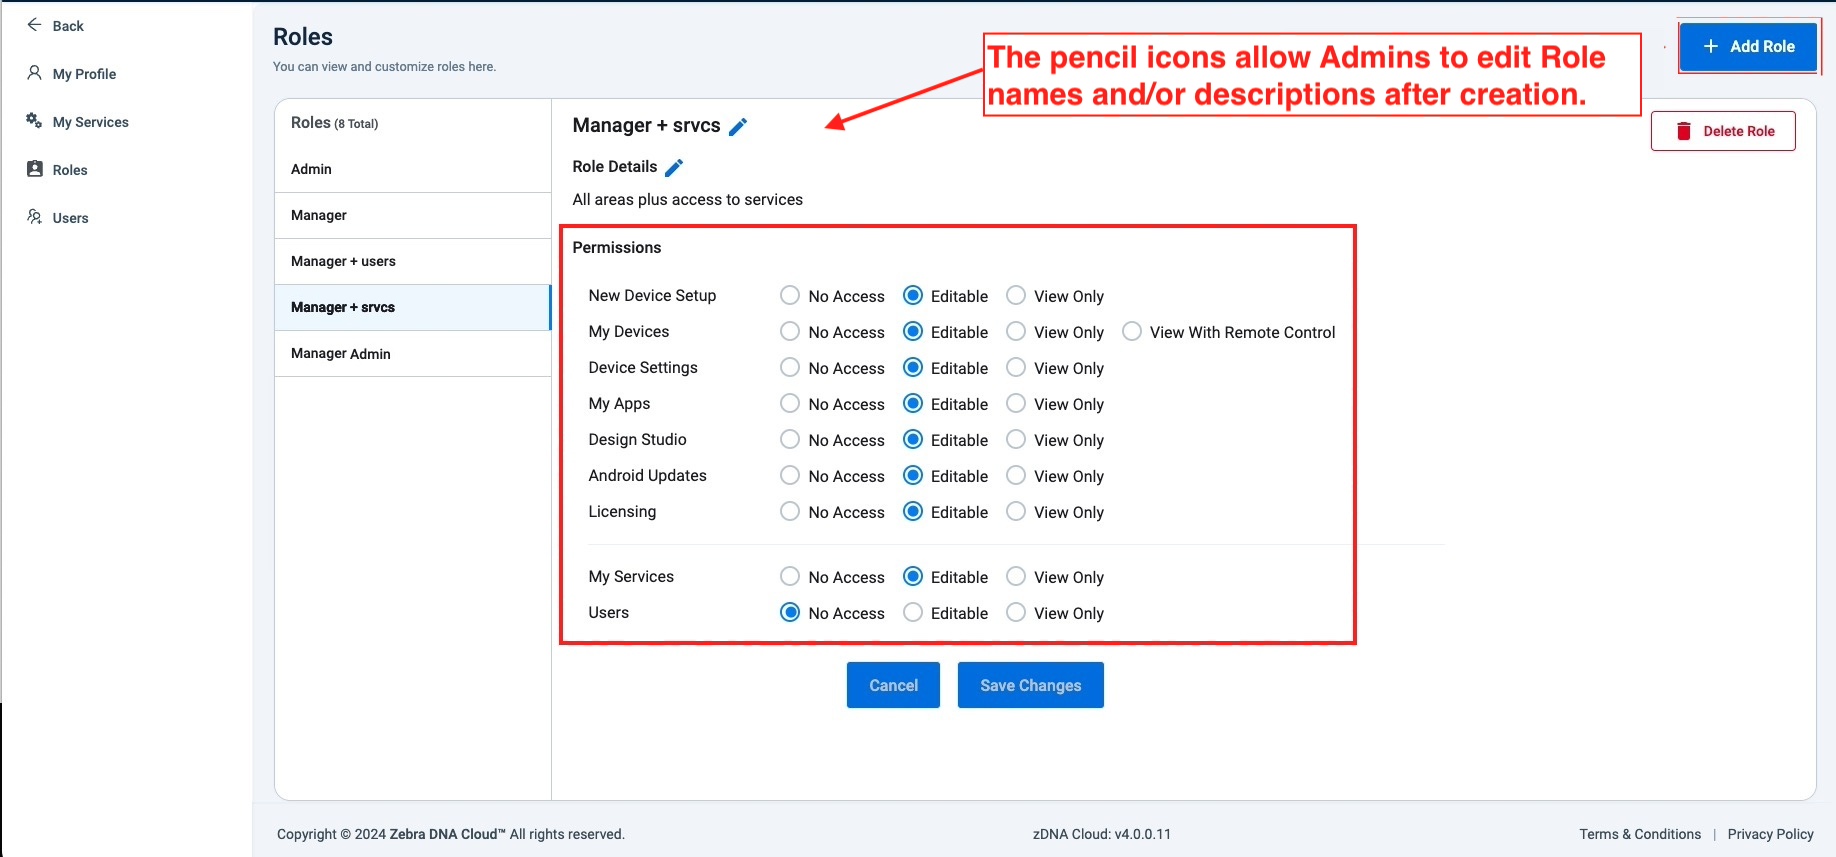
3. Enter a name and a brief description, if desired. When finished, click "Add" button.
Description may contain up to 250 characters.
 Click image to enlarge; ESC to exit.
4. With the new Role highlighted, select the desired Permissions for each feature as needed for the user role.
When finished, click "Save Changes" button.
 Click image to enlarge; ESC to exit.
5. A warning appears if granting permission to sensitive services.
Click "Confirm" to proceed.
 Click image to enlarge; ESC to exit.
The new Role can now be assigned when creating new Users:
 Click image to enlarge; ESC to exit.
Zebra recommends adding no more than 20 Roles for maximum system performance.
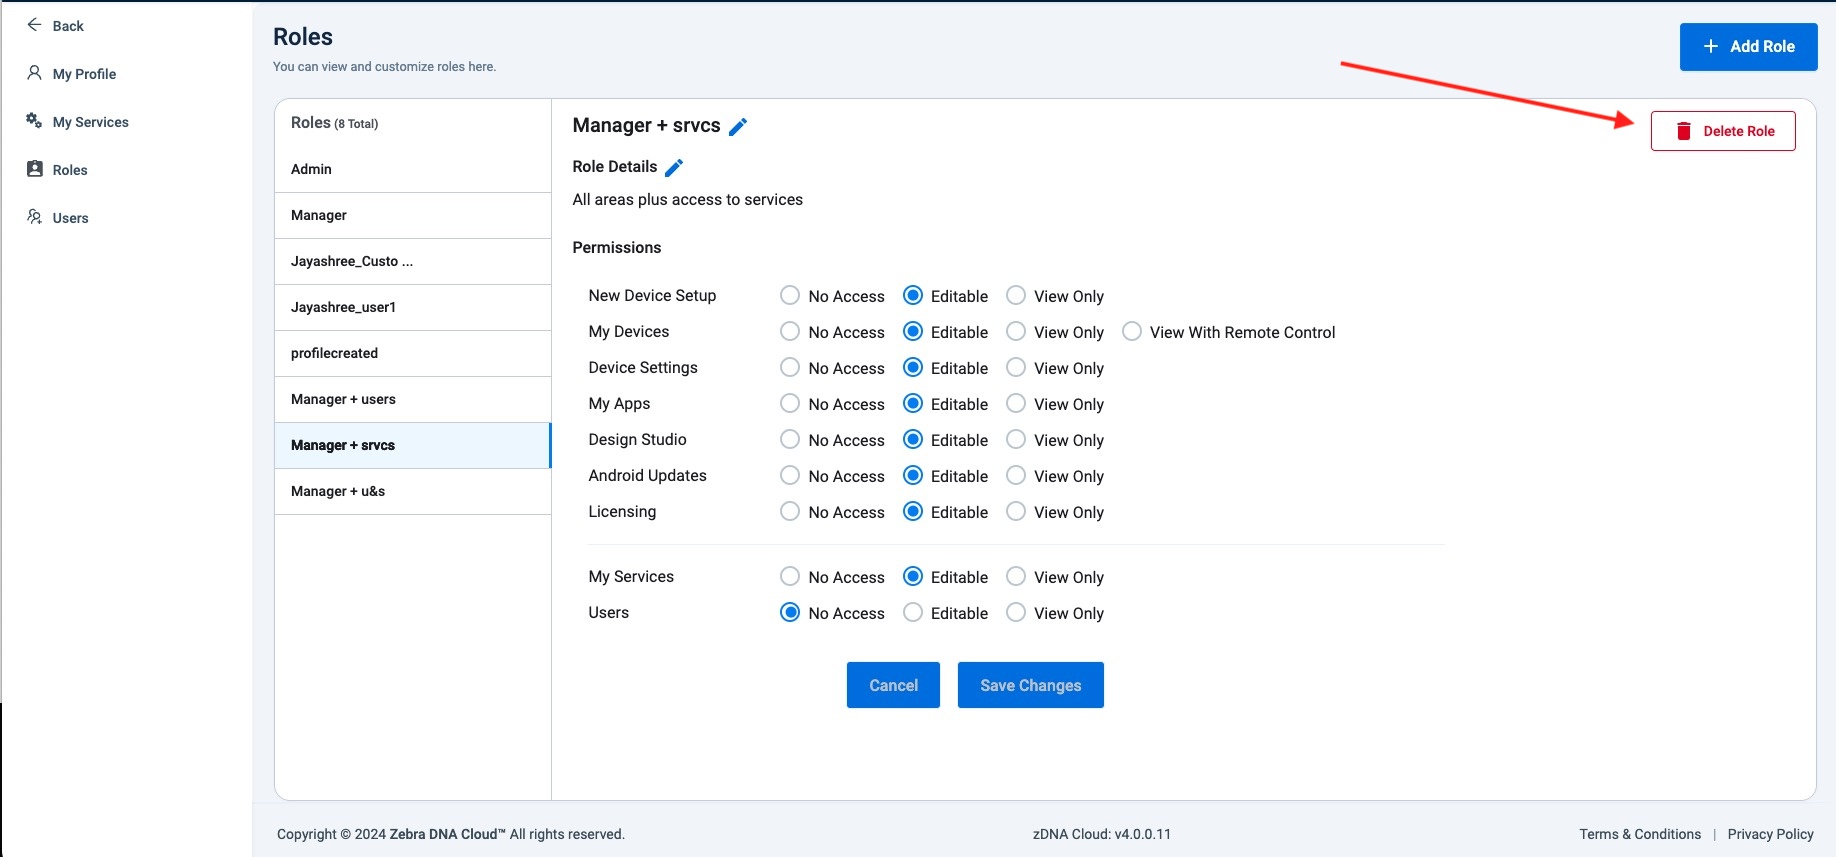
To Delete a Role:
1. Log in as an Admin, click the user icon and select "Roles" from the menu:
Click image to enlarge; ESC to exit.
2. With the unwanted Role highlighted, click the "Delete Role" button:
 Click image to enlarge; ESC to exit.
3. A warning appears, similar to the image below.
To delete the selected Role: Check "Confirm" and click "Delete"
To cancel: Click outside the message box
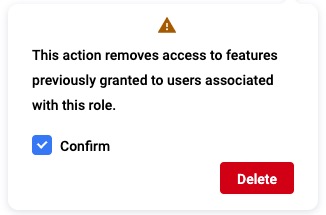 Click image to enlarge; ESC to exit.
Users associated with a deleted Role automatically inherit default permissions for the "Manager" Role, which could increase their access.
Legacy Login
Click image to enlarge; ESC to exit.
The legacy login process is deprecated and scheduled to be discontinued soon. Until then, the legacy login dialog (above) remains operational and behaves as described below.
Legacy Login Behavior
- Users assigned an Admin role can log in as an "Administrative User" with their current credentials.
- Such users can modify their own role and those of other Admins and Managers.
- These users have the same permissions as the Super Admin but cannot:
- Modify Super Admin permissions or settings
- Reauthorize Zebra Services
Return to Create Users section.
My Services
The My Services section contains information about connection services associated with a ZDNA instance. Such services are governed by the rules and behaviors listed below.
Service Rules and Behaviors
- Settings for connected services (i.e. Google Drive) are available only to Admins and to users with a Role that has been granted permission to access the "My Services" section.
- Managers and other roles NOT granted permission to access My Services can browse files accessible through connected services ONLY if an Admin had previously established the connection and logged into the service through ZDNA.
- If an Admin logs out of a connected service, all users lacking access to My Services are denied access to that service until an Admin logs in again.
- Roles with permission to access My Services can perform all My Services-related actions using their own credentials.
- Changes to a Google Drive account could cause Profiles accessing that account to be seen as "read only" by users accessing those Profiles (indicated by ). To resolve this condition, the Profile(s) must be edited by a user with My Services permission to reflect the new connected service information.
Zebra strongly recommends using dedicated accounts for access to connected services from within ZDNA. Sharing accounts and/or login credentials among users and Roles is strongly discouraged, and could result in unexpected disruptions in ZDNA services for some or all users.
Switching Google Accounts
If it becomes necessary to switch among multiple Google accounts for managing files deployed to the ZDNA server, use the process shown below to switch from one to another.
To switch Google accounts:
In the ZDNA console, click on the User Account drop-down (upper-right corner) and click My Services. A screen appears similar to the image below.
Click "Disconnect" if the account was already connected. Otherwise, skip to Step 2.
 Click image to enlarge; ESC to exit.
Click "Connect" and follow prompts for Google login.
When prompted, select both boxes (as shown, below) and click "Continue" to proceed: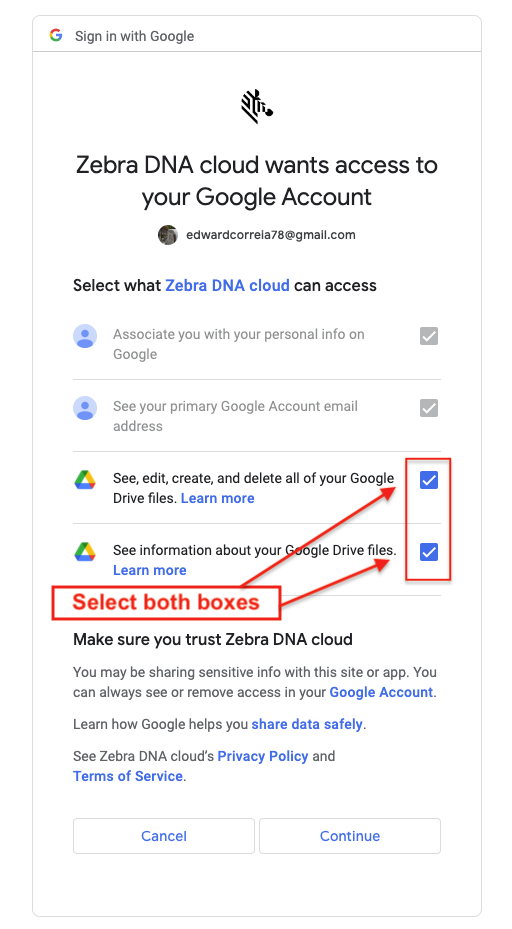 Click image to enlarge; ESC to exit.
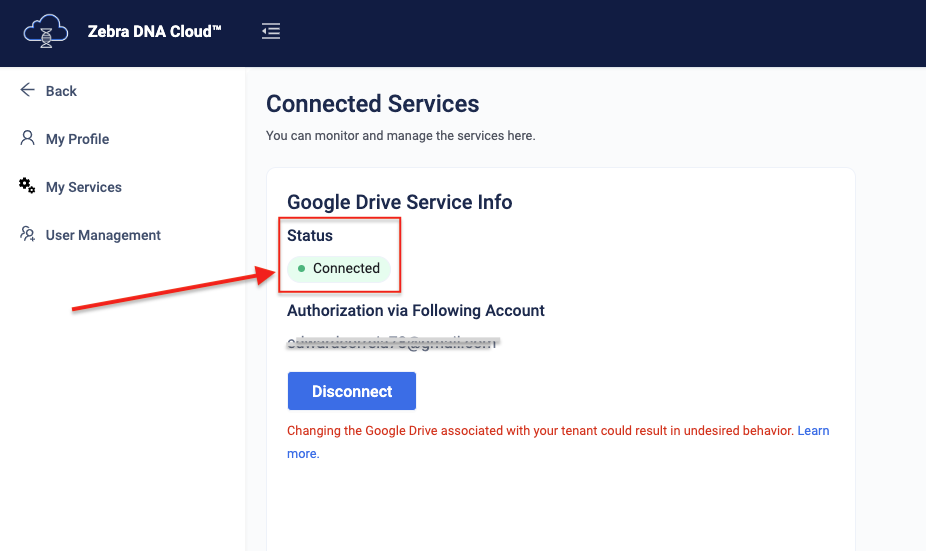
A screen as below indicates a successful connection:
 Click image to enlarge; ESC to exit.
IV. New Device Setup
The New Device Setup process creates the minimum settings required to allow a device to communicate with the internet for further configuration and management by ZDNA or a third-party EMM system (DNA Cloud 2.6 and later). This process also downloads the ZDNA client app to the device and enrolls it in the ZDNA system. To stage a device with these settings, create a new Settings Profile and use the device to scan the barcode that appears at the end of the process.
This process can be repeated for different device types, network configurations, office locations, etc.
After enrolling a device, Zebra recommends downloading the resulting enrollment barcode sheet (
For bulk selection, up to 55 characters can be entered for the Device Name field NOT including the naming auto-counter.
ZDNA 6.3 added support for an increased range of special characters for name and password fields of Wi-Fi APN and SSID parameters.
Restrictions apply. See known issues on the About page for details.
Create Enrollment Profile
Zebra DNA Cloud supports "mixed-owner populations" of devices, which includes some devices owned by ZDNA, and others owned by the company's EMM system. This allows administrators to use ZDNA to manage all devices in a single console, with access to some ZDNA features for all devices. Which features?
When managing mixed populations, some features are NOT available on all devices. Learn more before proceeding.
Mixed-population management might require a software update. See Supported Devices of Requirements section, above.
To create an enrollment Profile:
After logging in as an Admin, proceed to Step 1.
Click image to enlarge; ESC to exit.
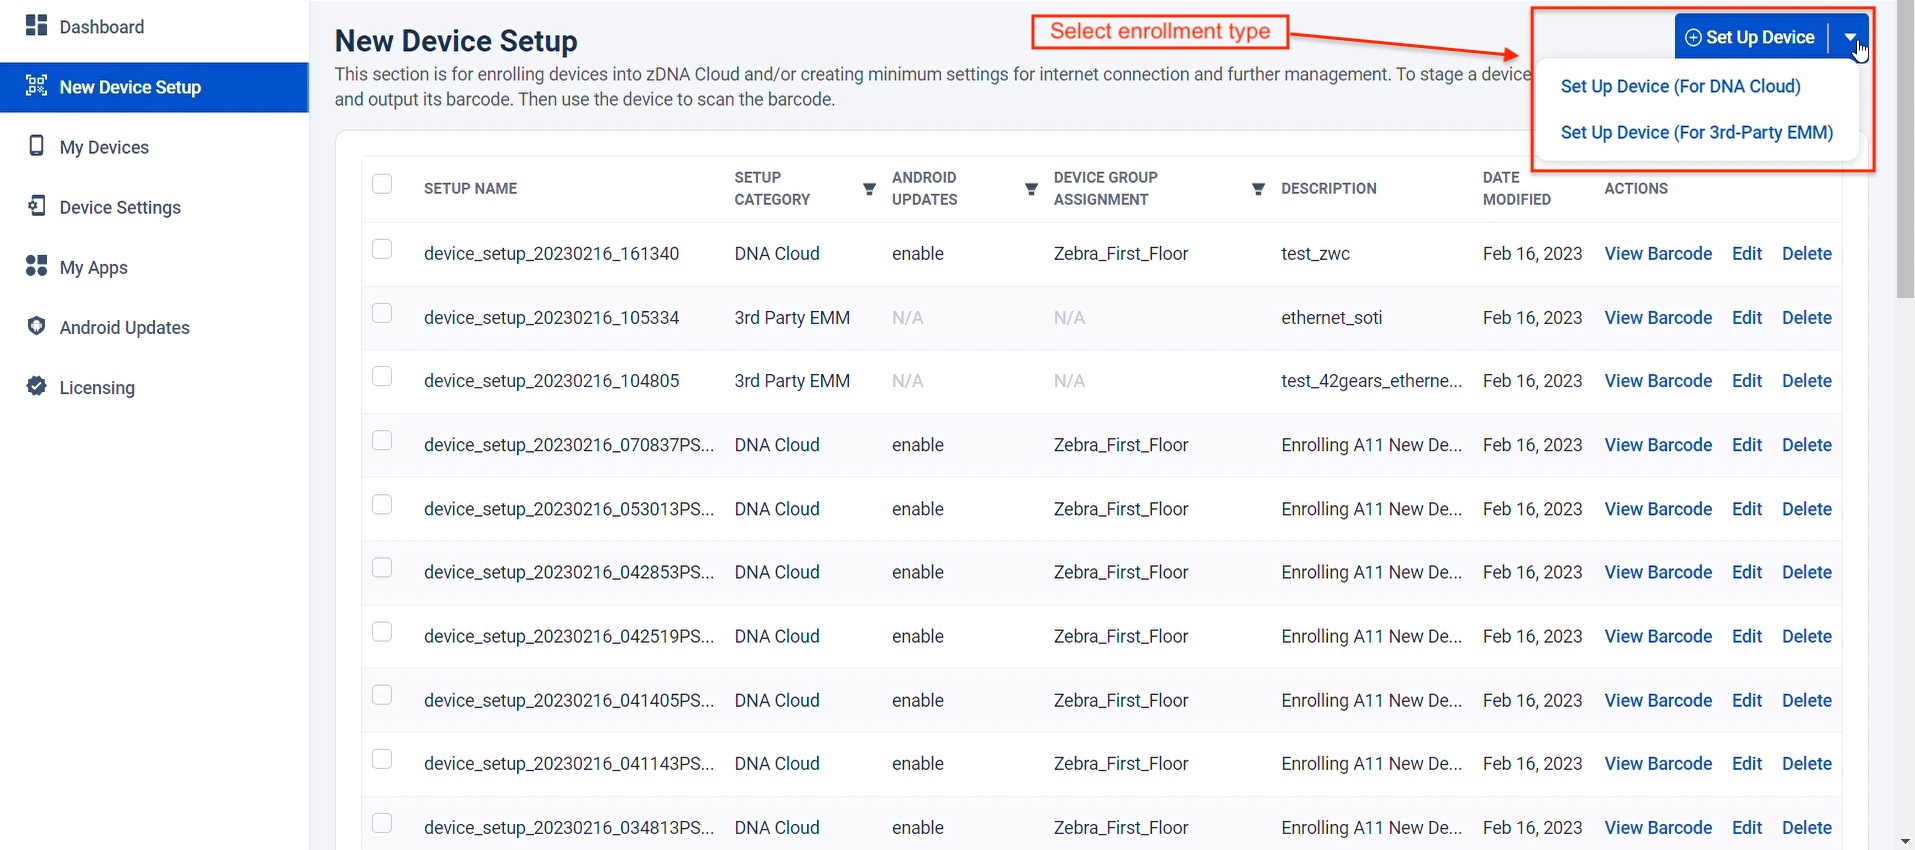
1. In the New Device Setup section, click the "Set Up Device" button and select Enrollment Type.
IMPORTANT: If managing "mixed populations" of devices (see above), select "Set up Device (for 3rd Party EMM)" to proceed.
 Click image to enlarge; ESC to exit.
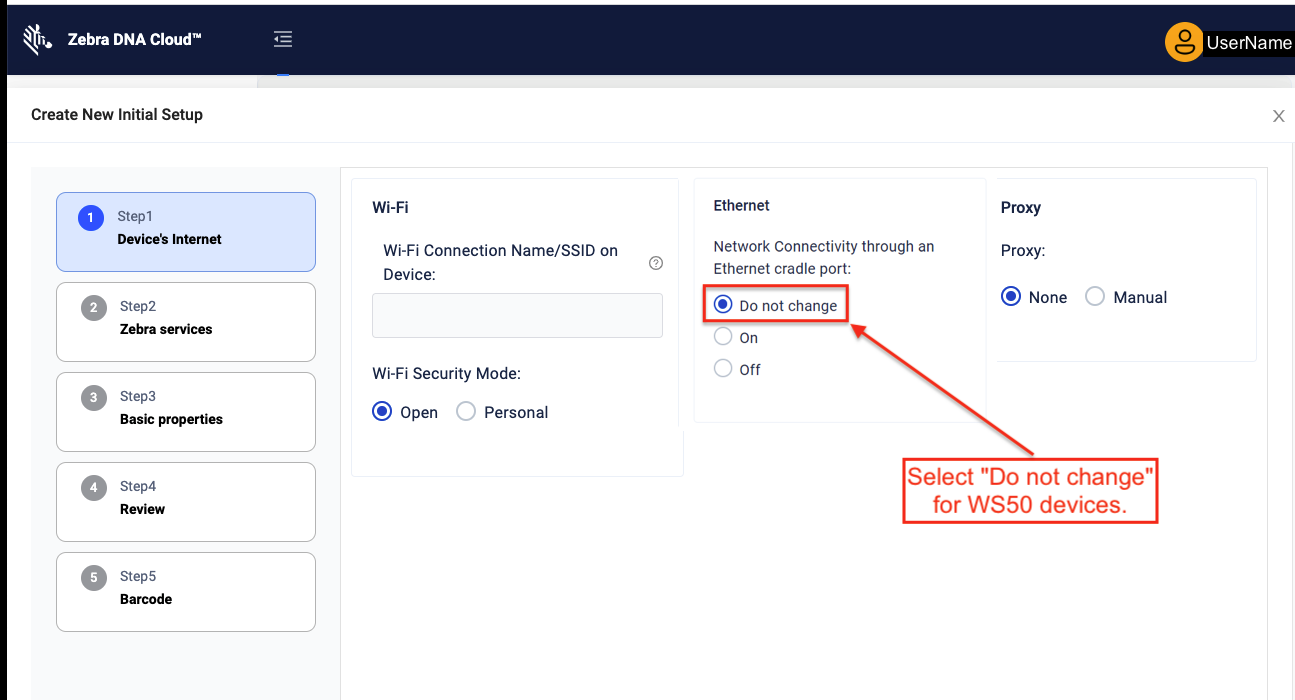
2a. Enter the network and Proxy settings for the device in its intended location.
To use existing internet connectivity settings on target device(s): SKIP TO STEP 3.
For WS50 devices: Always select "Do not change."
Click "Next" button when finished.
 Click image to enlarge; ESC to exit.
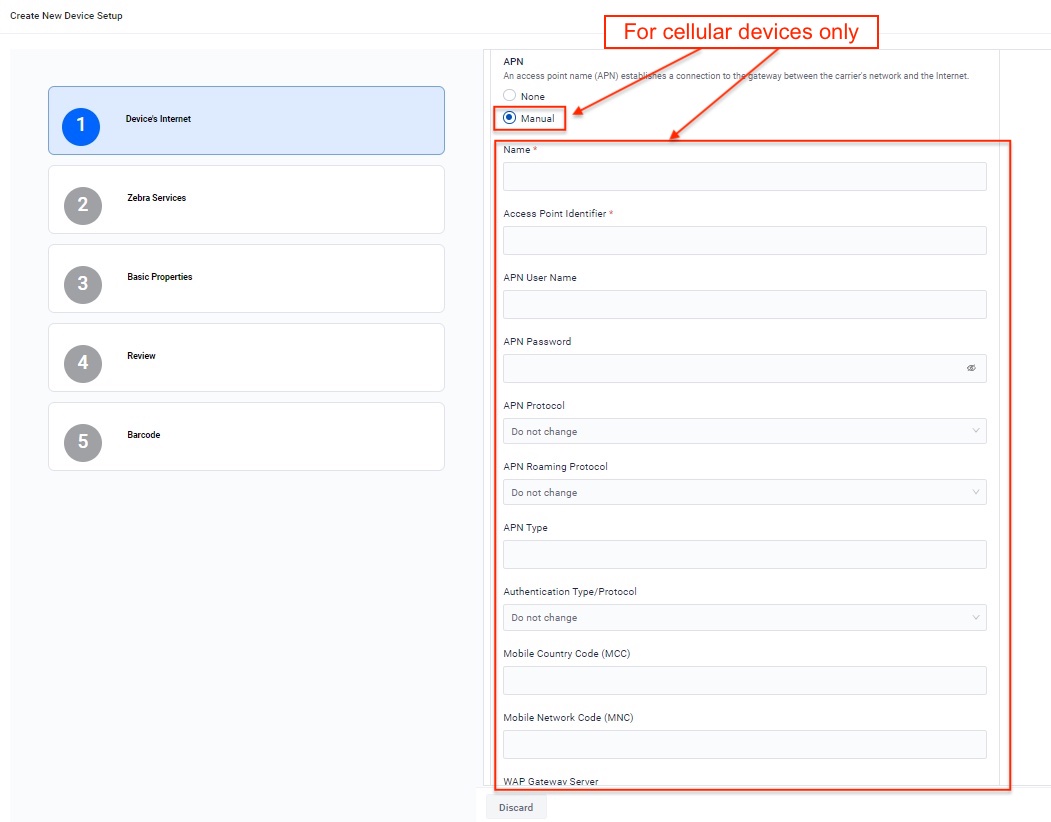
2b. For non-cellular devices, confirm default "None" in the APN section and SKIP TO STEP 3.
Select "Manual" and enter the Access Point Name (APN) and other carrier network information for the device in its intended location.
Only ONE (1) APN can be entered during initial setup. Multiple APNs can be added later using the Advanced Settings Wizard or a company's own EMM.
Errors could result when staging non-cellular devices if information is entered in this section.
Click "Next" button when finished.
 Click image to enlarge; ESC to exit.
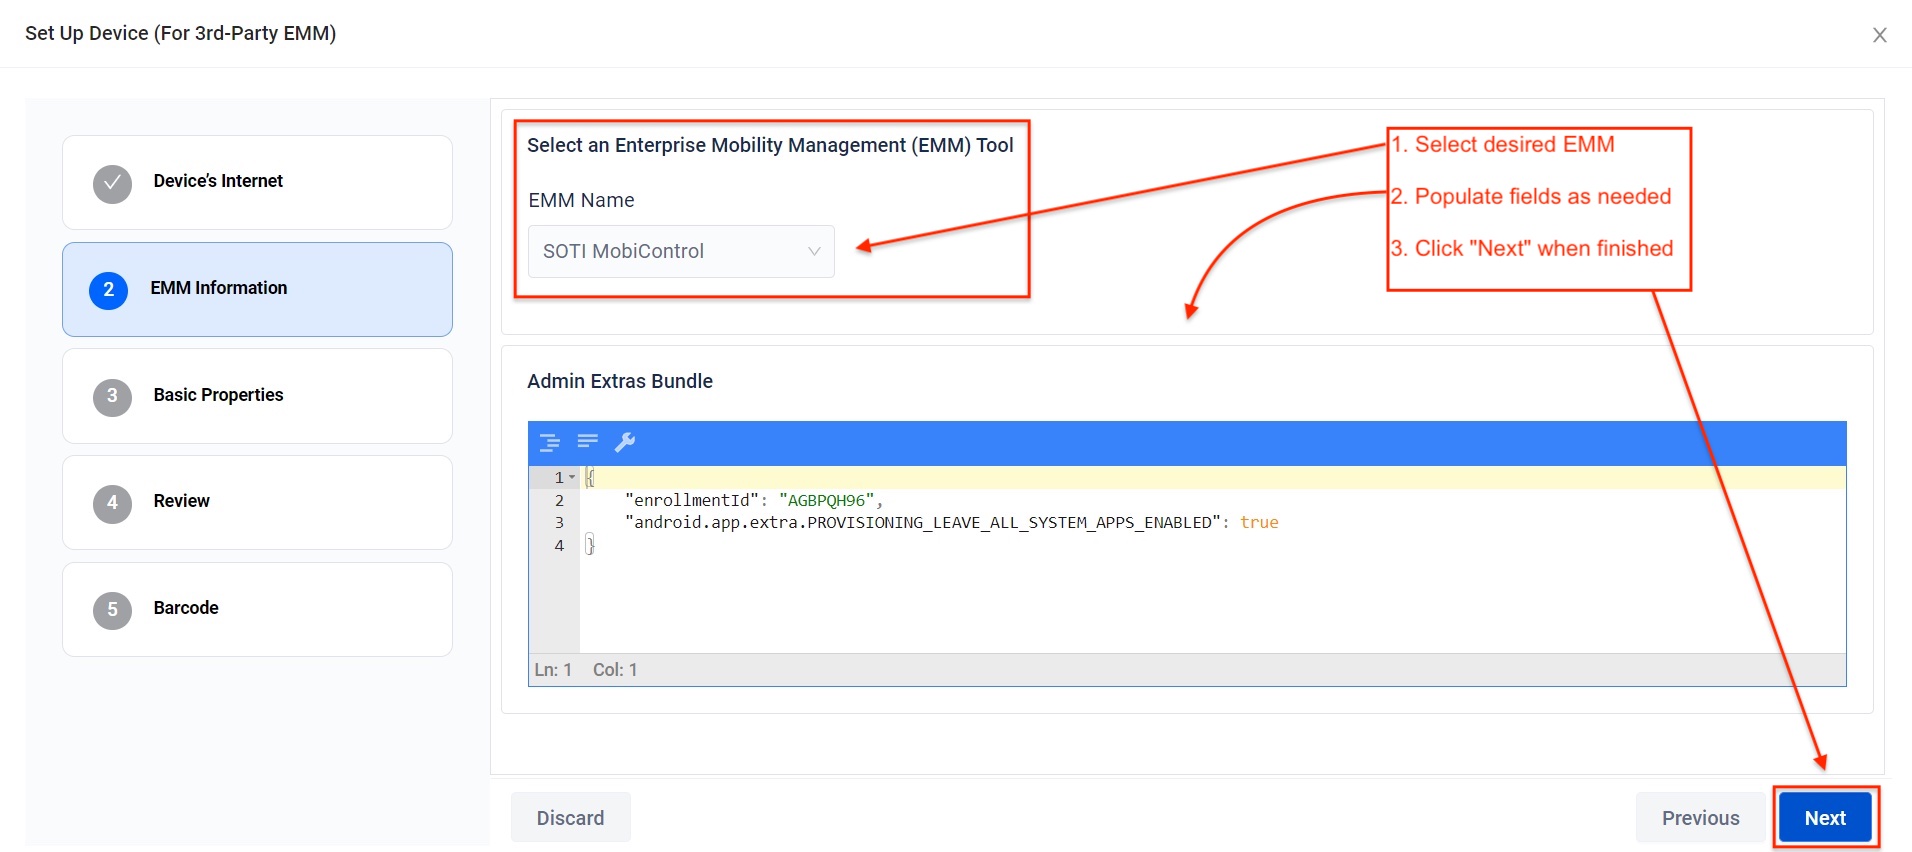
3a. For third-party EMM enrollment: Select the EMM in use and populate fields as required.
If the desired EMM system is not listed, select "Custom" and enter values as needed for the EMM system in use.
If a device was previously enrolled in ZDNA, a Factory Reset MUST be performed on the device before it can be enrolled into any third-party EMM.
When finished, click "Next" button and SKIP TO STEP 4.
 Click image to enlarge; ESC to exit.
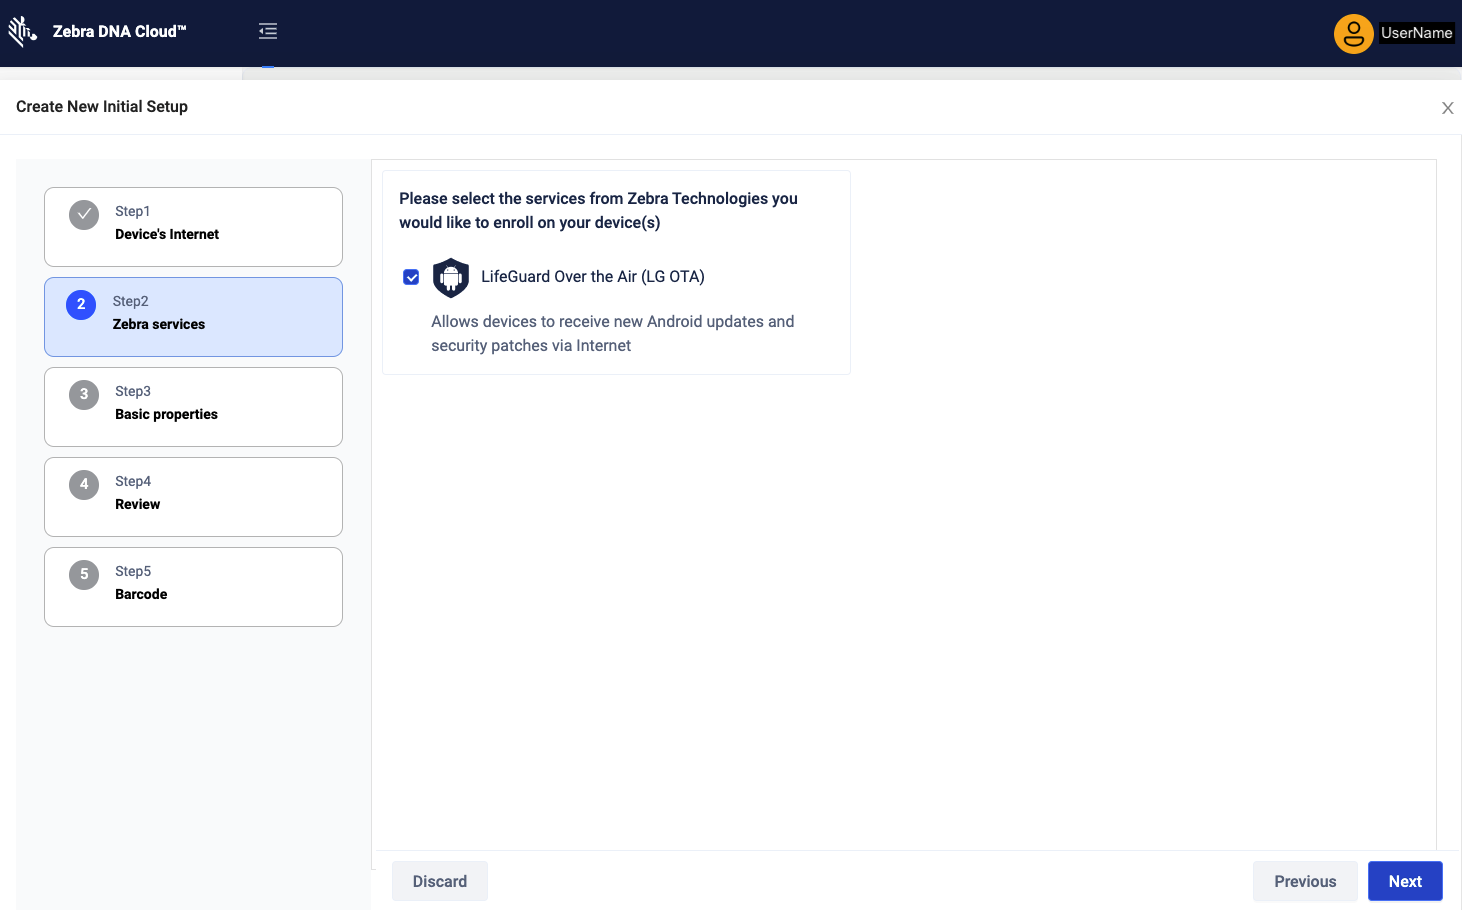
3b. For ZDNA enrollment: Leave "LifeGuard Over the Air" box CHECKED (default).
Unchecking this box PREVENTS the device from being maintained using the Android Updates feature through ZDNA.
Click "Next" button when finished.
 Click image to enlarge; ESC to exit.
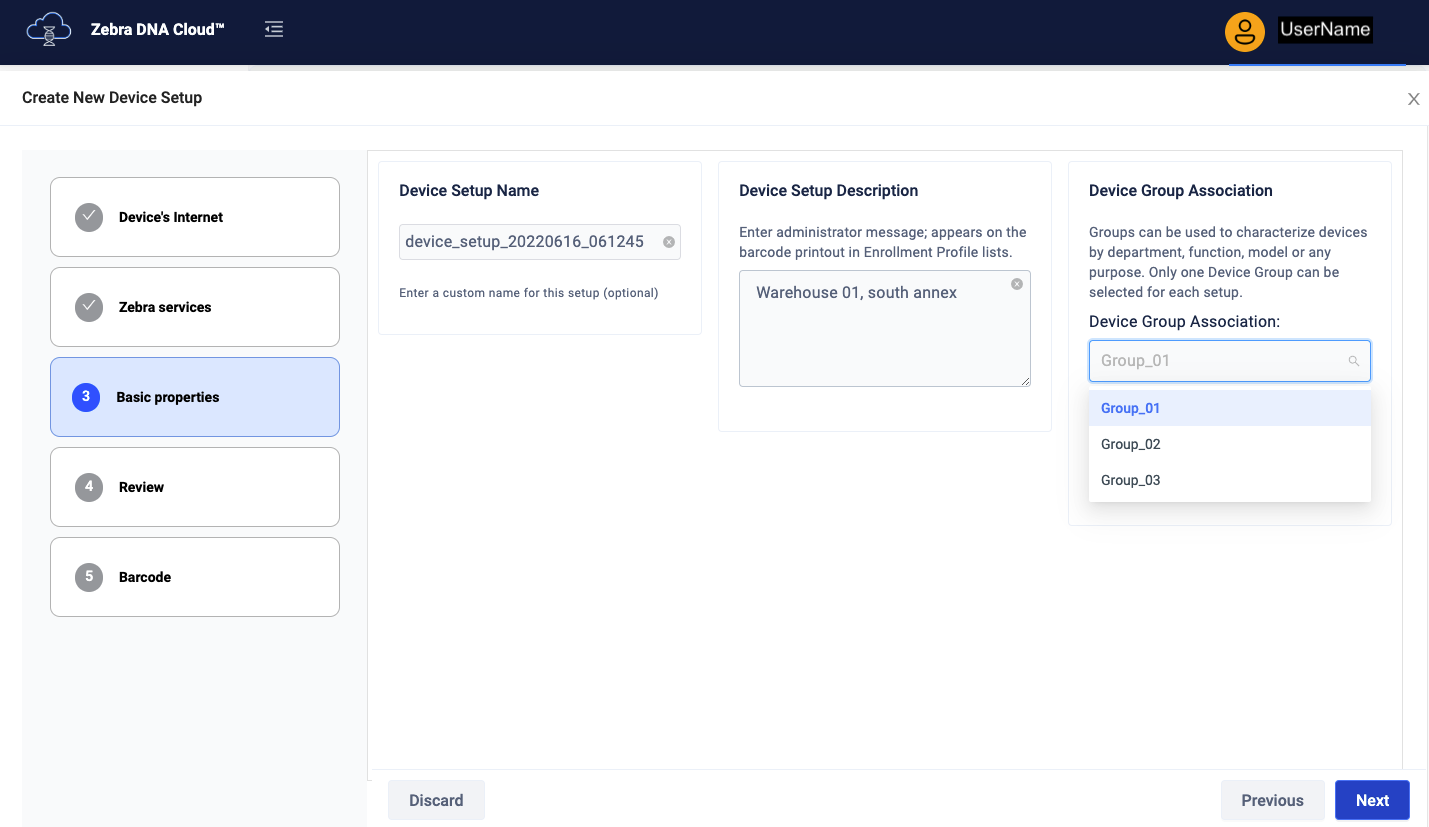
4. Enter the following information as indicated below:
a. Enrollment Profile Name - use auto-generated name or enter a custom name.
b. Administrator message - to appear on barcode page and Profile listings as enrollment guidance.
c. Device Group Association - helps organize devices by model, function, dept. etc.
Click "Next" button when finished.
 Click image to enlarge; ESC to exit.
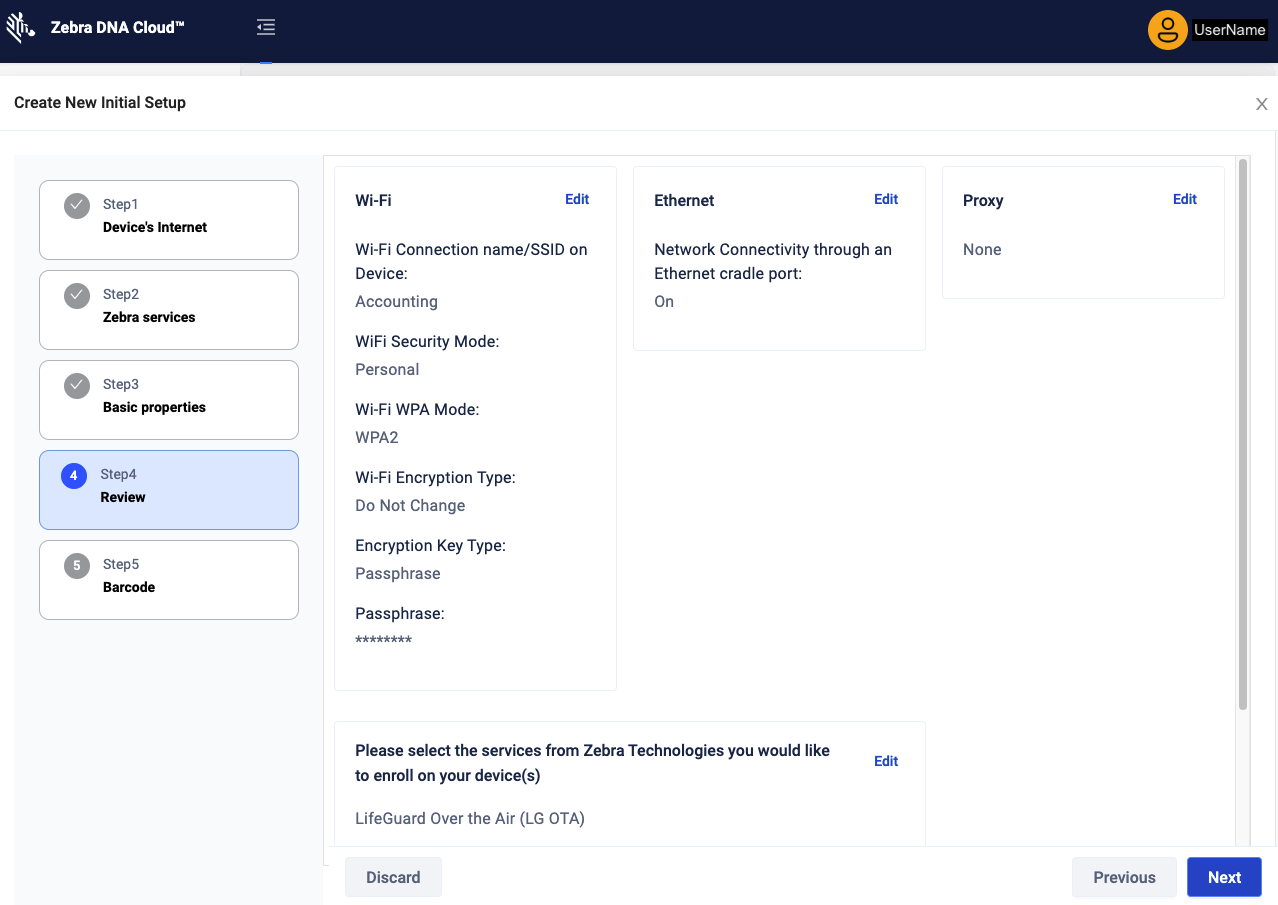
5. Review settings. If necessary, click "Edit" to modify.
Click "Next" button when finished.
 Click image to enlarge; ESC to exit.
6. With the StageNow app running on the device, scan the generated barcode to configure and enroll the device.
When finished click "Done" button.
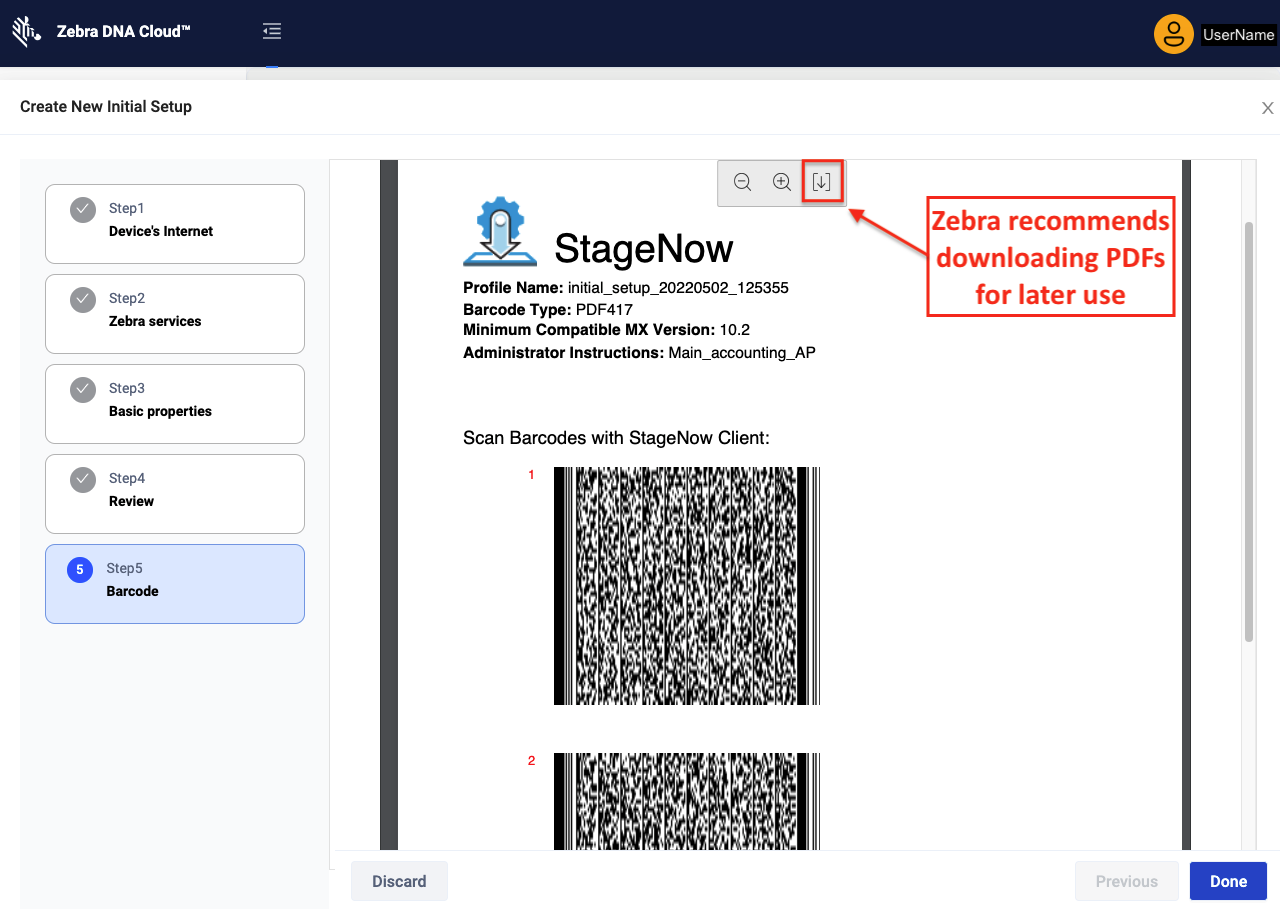 Click image to enlarge; ESC to exit.
Initial device staging and enrollment are complete.
IMPORTANT: To help ensure success, the enrollment process sets device screen timeout to 30 min. To prevent excessive battery drain, Zebra recommends resetting the Screen Timeout Interval to a shorter period after devices are enrolled.
Zebra recommends downloading barcodes (PDFs) for distribution and/or later enrollment. Barcode PDFs can be distributed for application in the field.
Configure for a Mixed Population
For organizations managing a mixed-owner device population, the ZDNA client app must be manually installed and configured after the device(s) are enrolled in the company's own EMM system. This process is required to allow EMM-enrolled devices to coexist and be managed along with ZDNA-enrolled devices from the same ZDNA console.
NOTE: management of a mixed-owner device population might require a device software update. See Supported Devices in Requirements section, above.
After enrolling in a third-party EMM:
In the My Services screen (within the User Profile), copy the Zebra DNA Configuration Token:
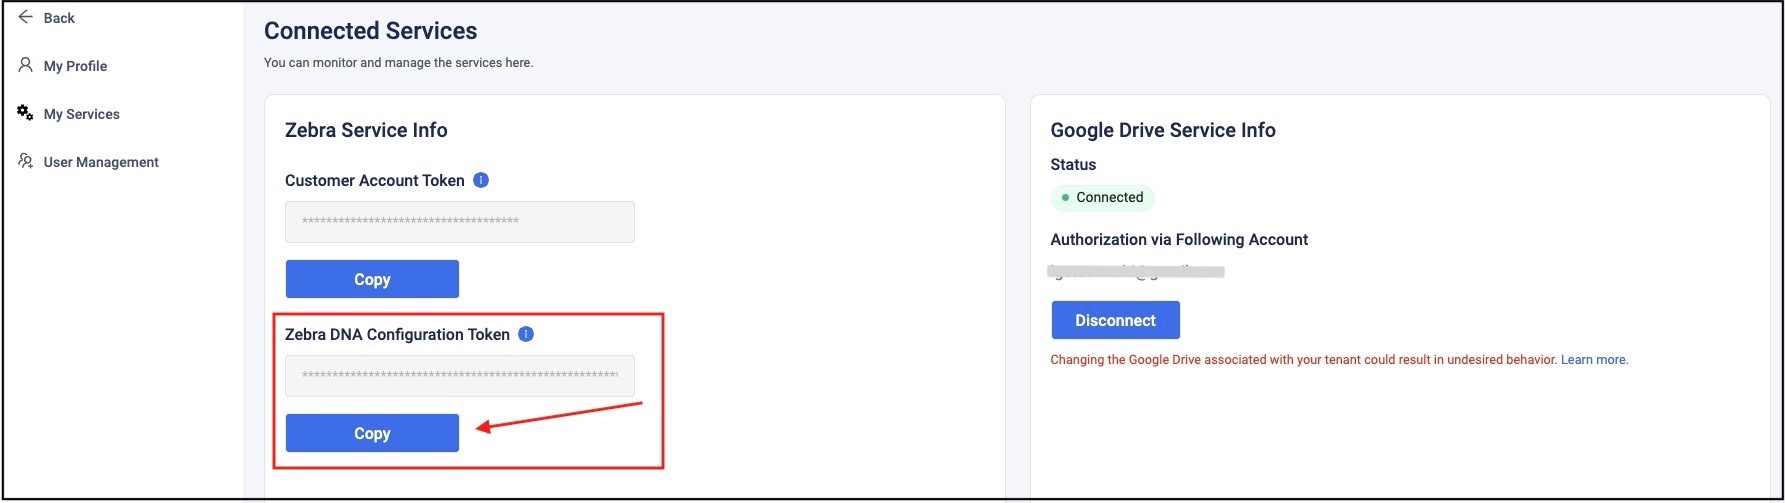 Click image to enlarge; ESC to exit.
In the EMM system, install and configure the Zebra DNA Cloud client app (available from Google Play) using the Zebra DNA Configuration Token copied in Step 1. Apply the token through Managed Configurations for Zebra DNA Cloud Configuration. Go to Application Configuration > Zebra DNA Configuration Token and paste the copied token.
Use the EMM to install and launch the ZDNA client on the device(s).
Use the EMM to add and configure “Zebra OEMConfig powered by MX” (available from Google Play).
To initialize the ZDNA Client service, open the OEMConfig EMM console and go to System Configuration > Configure and paste the following XML into the XML Pass-through command:
<wap-provisioningdoc>
  <characteristic version="10.5" type="Intent">
    <parm name="Action" value="StartActivity" />
    <parm name="ActionName" value="android.intent.action.MAIN" />
    <parm name="Package" value="com.zebra.zebradna" />
    <parm name="Class" value="com.zebra.zebradna.MainActivity" />
  </characteristic>
</wap-provisioningdoc>
In the My Services screen (within the User Profile), copy the Customer Account Token:
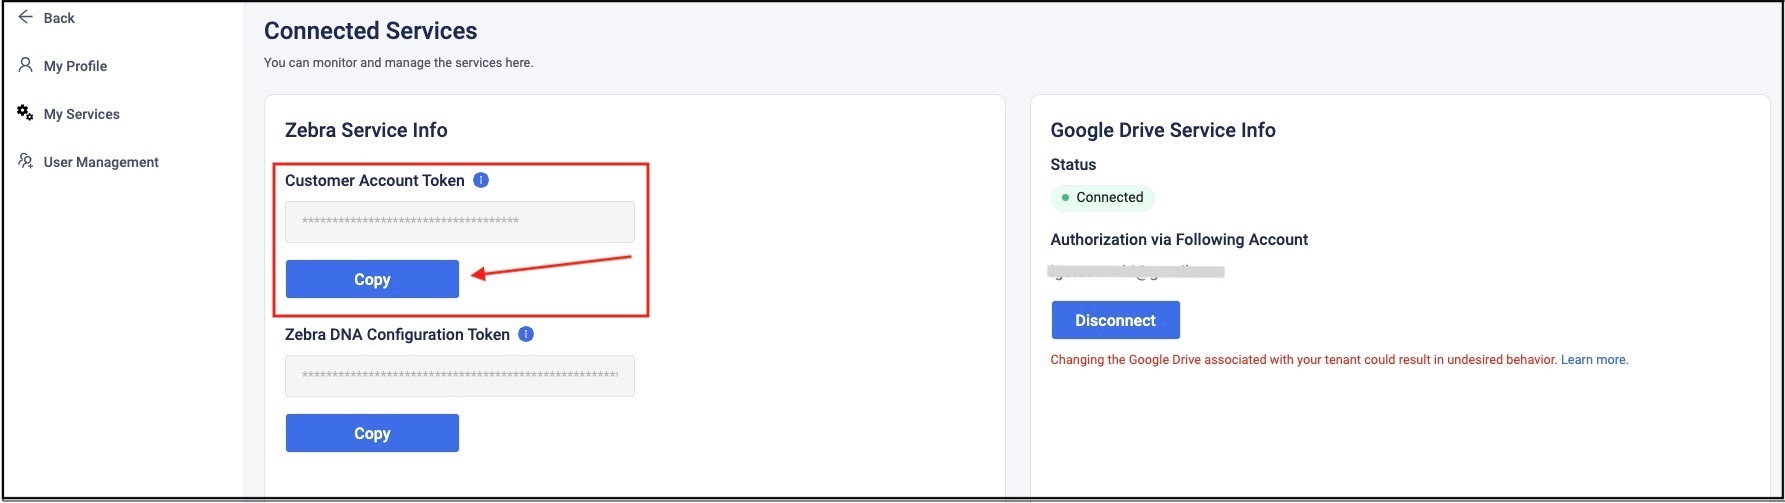 Click image to enlarge; ESC to exit.
In the EMM system, install and configure the Zebra Enrollment Manager (available from Google Play) using the Customer Account Token.
This is done through Managed Configurations exposed by Enrollment Manager:
Go to Application Configuration > Claim device > Claim device token and paste the customer account token where prompted.
This enrolls the device in ZDNA and activates LifeGuard services.
The device is now configured to coexist in mixed-owner populations.
Confirm Enrollment
In the ZDNA Console:
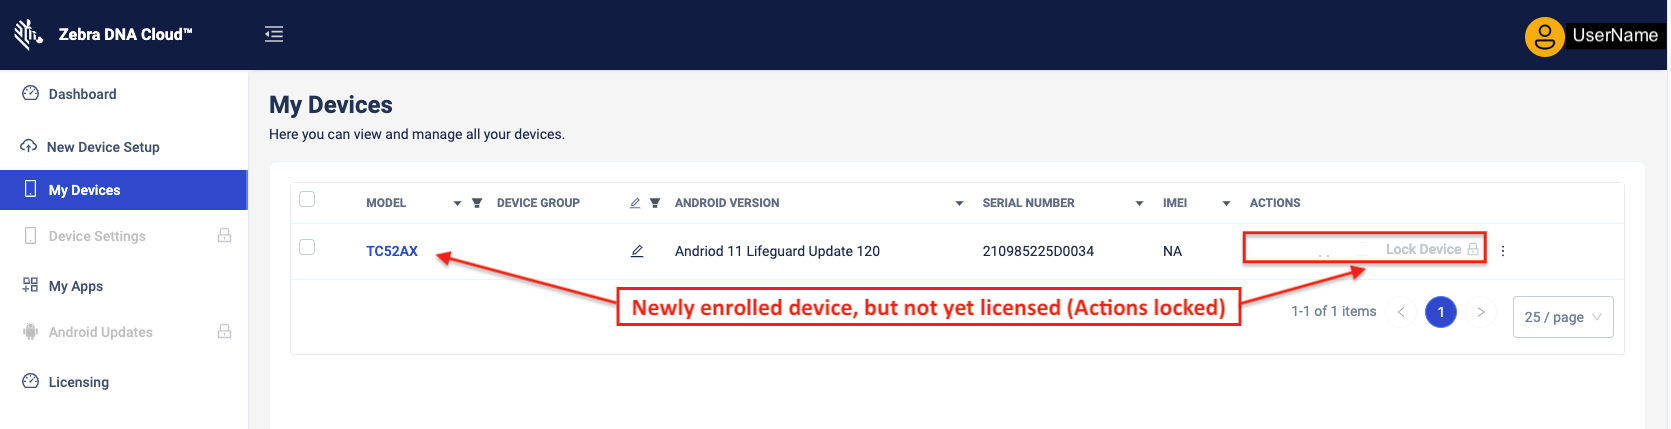
Device(s) enrolled in ZDNA appear on the "My Devices" page:
 Click image to enlarge; ESC to exit.
On the Device:
Devices newly enrolled into ZDNA indicate in the Notification Bar that the DNA Service is running:
![]() Click image to enlarge; ESC to exit.
Click image to enlarge; ESC to exit.
V. License Device(s)
To enable remote configuration and management though ZDNA, each device must be licensed.
Please refer to the Licensing Section for further instructions.
Identity Guardian Setup
ZDNA 5.9 (and later) allows admins to create and/or import users of Identity Guardian, Zebra's biometric device authentication solution. Users can be managed completely from within the Device Users section of the DNA Cloud console. This includes passcode-based IG enrollment, for which users are created with manually entered or auto-generated passcodes that can then be issued to Identity Guardian users for authentication.
The following is a step-by-step guide for deploying Identity Guardian preconfigured to devices and creating user credentials for logging into the devices using a passcode. For TechDocs sections that already include detailed instructions, links are provided to the relevant sections.
Deploy Identity Guardian:
- Create an App Setup Profile for Identity Guardian (2.2.000.1082 or later).
- Select "Yes" when prompted to Configure App, which opens the following options:
- In Usage Mode section: Select "AUTHENTICATION"
- In Authentication Configuration section:
Comparison Source: "CLOUD"
Primary Authentication Factor: "CLOUD_PASSCODE"
Fallback Authentication Method: "ADMIN BYBASS PASSCODE"
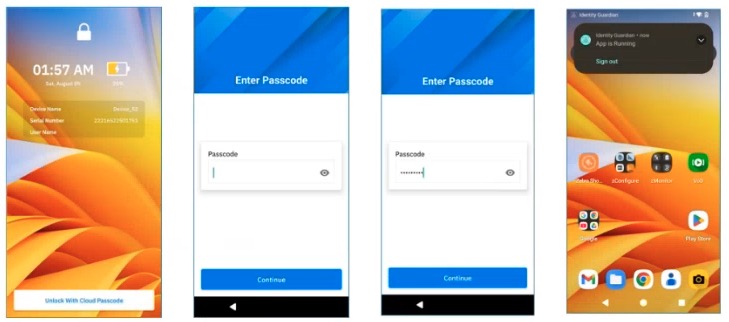
Select remaining options as desired. - Deploy the Profile to device(s).
After deployment, the device user sees the following screen progression when starting up:
 Click image to enlarge; ESC to exit.
Go to the full Identity Guardian Setup docs.
Create Users with Passcode Login
Create an Individual User:
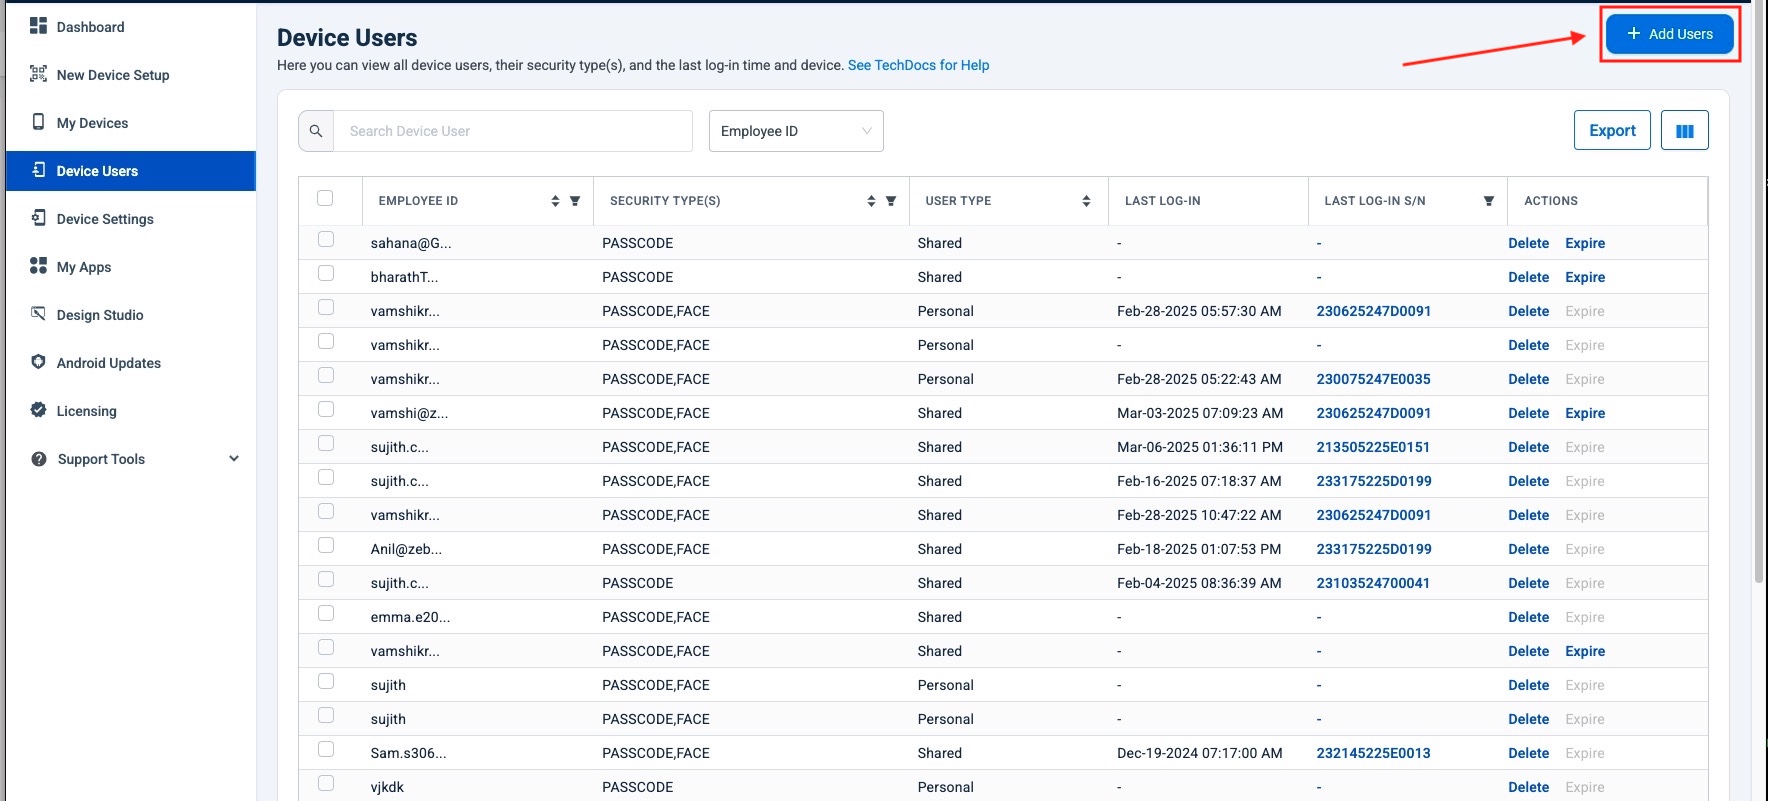
In the Device Users section, click the "Add Users" button in upper-right corner:
 Click image to enlarge; ESC to exit.
Select "Add a single user" from the drop-down:
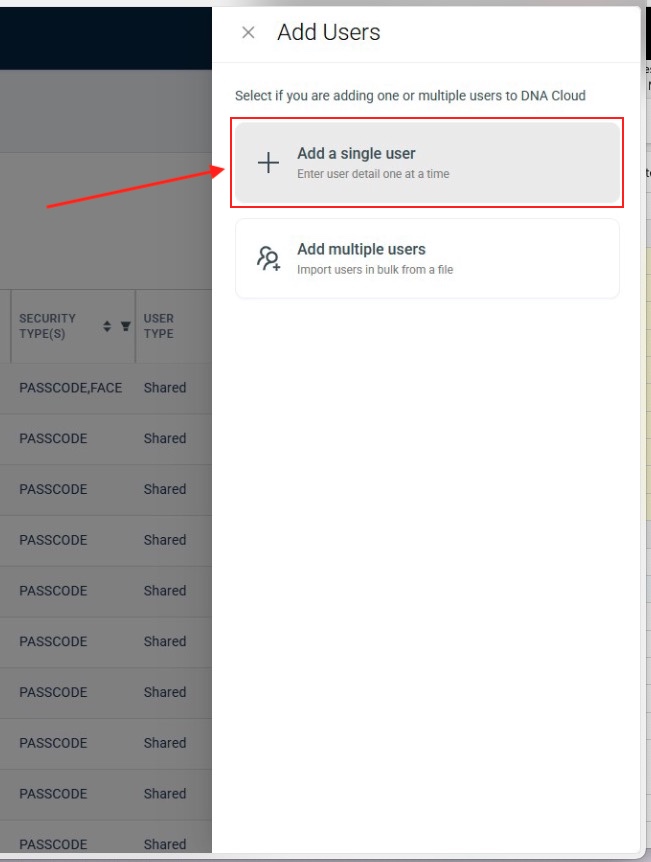 Click image to enlarge; ESC to exit.
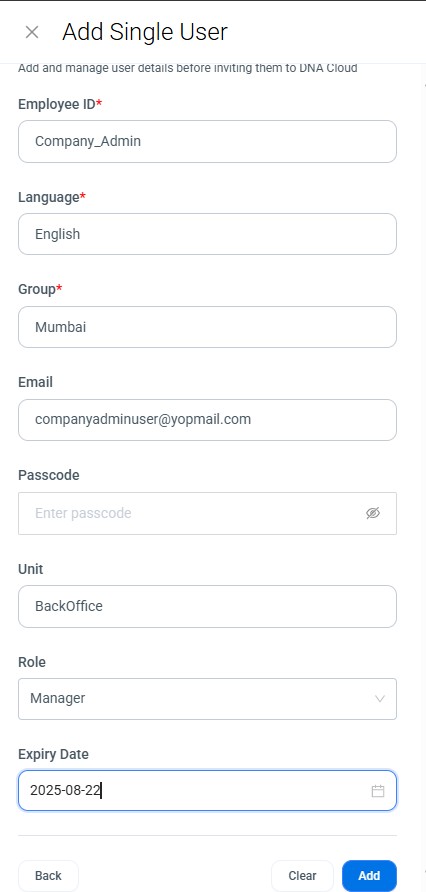
Populate fields as needed. Click "Add" button when finished:
 Click image to enlarge; ESC to exit.
- PRO TIPS:
- Leaving passcode field blank causes the system to automatically generate one.
- Entering an email address causes the system to send passcode to user upon enrollment.
Import IG Users in Bulk:
ZDNA allows users to be imported in bulk from a properly formatted .csv file (3MB max). Zebra recommends importing no more than 500 users at a time.
In the Device Users section, click the "Add Users" button in upper-right corner:
Click image to enlarge; ESC to exit.
Select "Add Multiple Users" from the drop-down:
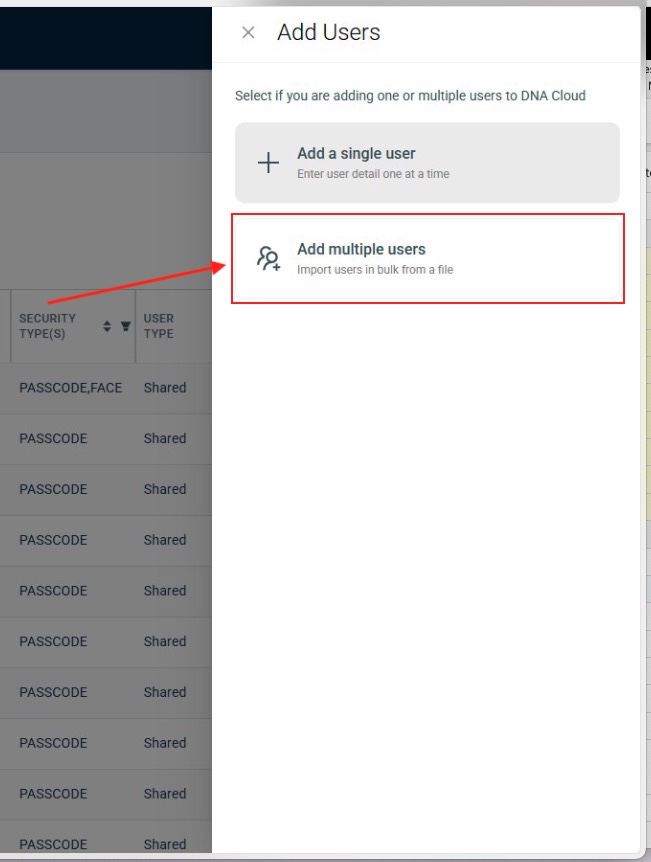 Click image to enlarge; ESC to exit.
OPTIONAL: From the next screen, download the
.csvtemplate file, which demonstrates the expected formatting: Click image to enlarge; ESC to exit.
Drag and drop
.csvfile(s) containing users to import as shown: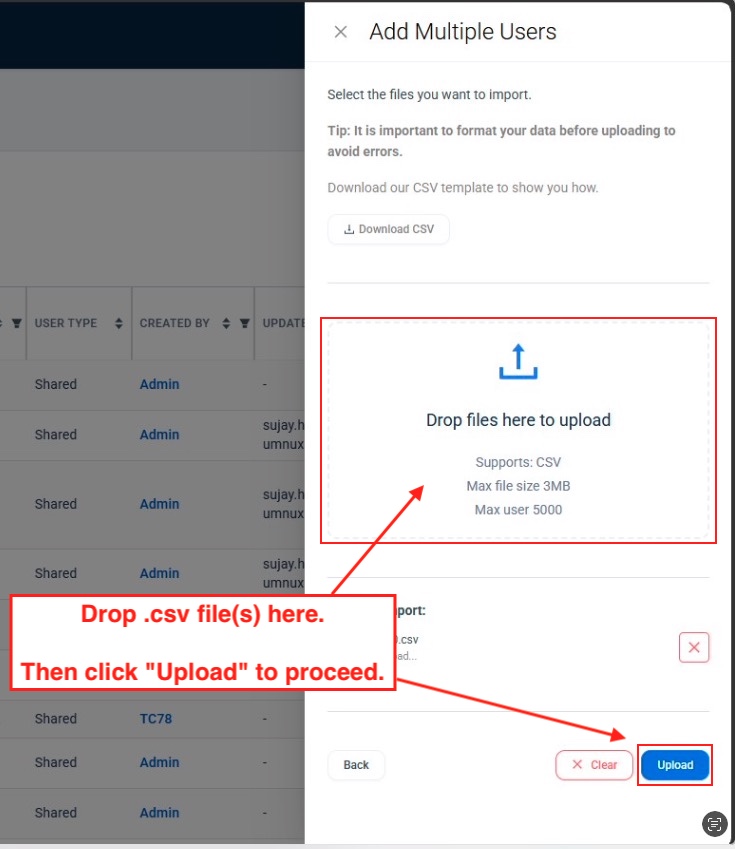 Click image to enlarge; ESC to exit.
To view the status, click "View Import Jobs" link:
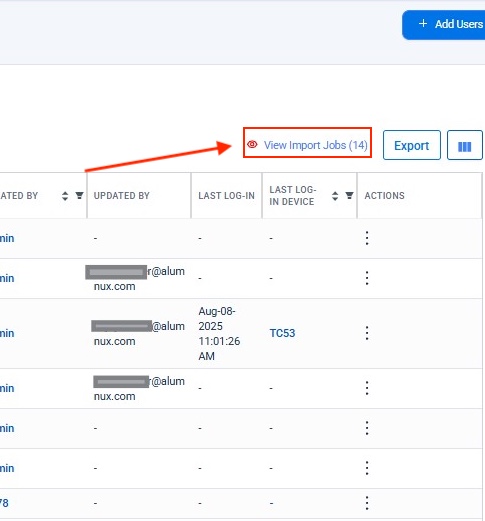 Click image to enlarge; ESC to exit.
A list of import jobs appears, with the most recent on top:
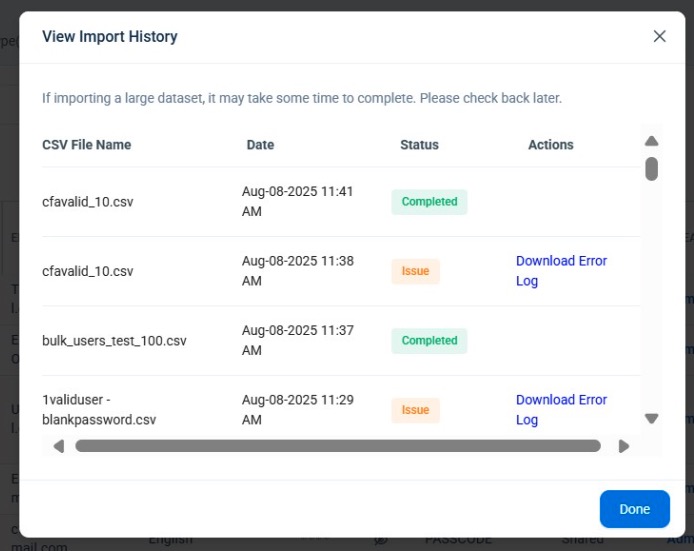 Click image to enlarge; ESC to exit.
After a successful operation, imported users appear with others in the Device Users section.
Import File Information
Import File Template, Sample Data
  EmployeeId,Language,Group,Email,Passcode,Unit,Role,ValidThrough
  E12345,English,A1,,,$$,,,
  E67890,Spanish,B2,john@example.com,123456,Finance,Associate,
  E11223,French,C1,susan@example.com,abcdef,!Marketing!,Manager,2023-12-31
  E44556,German,D4,,,$$,,,
  E78901,Chinese,E5,jane@example.com,123!789,HR,Manager,
  E23456,Japanese,F6,,,$$,,2024-05-12
  E34567,Korean,G7,alice@example.com,pass@123,,Associate,
  E45678,Italian,H8,,,$$,,,
  E56789,Russian,I9,bob@example.com,789xyz@,,Manager,2023-11-23
  E67890,Hindi,J10,,,$$,,,
  E78901,Portuguese,K11,mike@example.com,$$9876,,Associate,2024-06-15
  E89012,Arabic,L12,,,$$,,,
  E90123,Bengali,M13,linda@example.com,#pass789,Sales,Manager,
  E01234,Vietnamese,N14,,,$$,,,
  E12345,Thai,O15,steve@example.com,passcode!,IT,Associate,
Field Definitions, Limits
| Field Name | Description | Status | Notes |
|---|---|---|---|
| EmployeeId | ID number unique to each user | Required | Accepts alphanumeric and special characters . _ - % + @ |
| Language | Language seen in the ZDNA console (has no effect on the DNA Client app) | Required | Max. 50 alphanumeric characters |
| Group | Group name assigned to user at enrollment | Required | Max. 50 alphanumeric characters |
| User email address to which to send passcode, if specified | Optional | Default = none | |
| Passcode | Code required to unlock device | Optional | Must be 6–10 alphanumeric and/or special characters ! @ # $ % ^ & - _ ? |
| Unit | Business unit or department of user | Optional | Accepts up to 50 alphanumeric characters; default = none |
| Role | User role within DNA Cloud determines access to console features | Optional | Accepts "Associate" or "Manager" only |
| ValidThrough | Expiration date for allowing user access to device | Optional | Accepts YYYY-MM-DD format |
Each passcode entered in bulk MUST be unique. Users found with a duplicate passcode are added with no passcode.
Server Capacities
The DNA Cloud system is capable of managing many tens of thousands of objects in its databases. The table below breaks out the individual capacities of each of its function areas. Numbers accompanied by an asterisk (*) are Zebra-recommended maximums for optimal performance; the supported number might be greater.
| Section | Feature | Description | Maximum |
|---|---|---|---|
| Profile Deployment | Master Profiles | Master Profiles contain multiple Sub-profiles, which can be for app setup (installation, configuration and/or data deployment) and for configuring device settings. Master Profiles also provide control over the order of Sub-profile execution. | 15* |
| Sub-profiles | In each Master Profile, Zebra recommends including no more than 20 device-setting Sub-profiles and 10 app-setup Sub-profiles. | 30 | |
| Target Devices | Allows selection of devices targeted to receive a deployment. | 2,500 | |
| Bulk Actions | Applies to Remove Action for Master Profiles, each of which should contain no more than 30 Sub-profiles and 2,500 target devices. | 3 | |
| New Device Setup | Setup Profiles | Setup Profiles contain initial setup details for device enrollment, such as enrollment system (DNA Cloud, third-party EMM system, etc.), assigned Group and whether to enable Android OS updates. | 1,000 |
| My Devices | Device List | List of enrolled devices by device name, plus OS version, serial number, battery health, presence and other information. | 50,000 |
| Bulk Action | Allows Actions to be performed on multiple devices at one time. | 100 | |
| Groups | Allows devices with similar attributes to be administered together. Adding a device to a Group automatically deploys settings associated with that Group to the device. | 2,500 | |
| Group Naming | Applies to naming and deletion Actions on device-setting and app-setup deployment Profiles, each of which can contain a maximum of 2,500 target devices. | 10 | |
| Device Naming | The Device Details screen can contain up to 63 characters for each individual device. | 63 | |
| Export | Allows data stored in the My Devices section to be exported to a .csv file for further processing and/or backup storage. |
10,000 | |
| Device Settings | Settings Profiles | Contains device settings such as Wi-Fi login credentials, display preferences, etc., each of which can be deployed to and activated on a maximum of 2,500 target devices. Zebra recommends including no more than 20 profiles in any single deployment. |
200 |
| Target Devices | Allows selection of devices targeted to receive a deployment. | 2,500 | |
| Bulk Actions | Applies to Delete and Reapply Actions for device settings Profiles, each of which can contain a maximum of 2,500 target devices. | 100 | |
| Target Device Listing | List of all devices available for targeting. A maximum of 2,500 target devices can be selected from this list. | 50,000 | |
| App Setup | App Setup Listing | List of all app setup Profiles, each of which contains one or more apps and/or data files for deployment to a maximum of 2,500 target devices. | 200 |
| Target Devices | Allows selection of devices targeted to receive a deployment. | 2,500 | |
| Target Device Listing | List of all devices available for targeting. A maximum of 2,500 target devices can be selected from this list. | 50,000 | |
| Bulk Actions | Applies to Remove and Reapply Actions for app setup Profiles, each of which can contain a maximum of 2,500 target devices. | 100 | |
| Android Update | Device Listing | List of enrolled Android devices along with update status, current version, security patch date and other information. | 50,000 |
| Deployment Profile Listing | List of Android update Profiles for deployment, each of which can contain a maximum of 2,500 target devices. | 100 | |
| Automation Profile Listing | List of automation processes created by an administrator to govern Android device updates. | 100 | |
| Deployment Result Listing | Displays the results of deployed Android updates. | 100 | |
| Automation Result Listing | Displays the results of executed Android automation processes. | 100 | |
| Licensing | License Allocation | Interface for license allocation via automation, assigned Group or device model. | 50,000 |
| CLS ID | Interface for the addition of CLS IDs containing the maximum number of individual device licenses. | 50,000 | |
| License Refresh | Interface for refreshing, renewing or extending licenses. | 50,000 | |
| License Listing | List of all licenses added to the system, along with CLD ID, allocation count and expiration date. | 50,000 | |
| Allocation | List of target devices to which to allocate licenses. | 1000 | |
| License Group | List of Groups to which to allocate licenses. | 10 | |
| License Model | List of device models to which to allocation licenses. | 10 | |
| User Management | Users | List of all DNA Cloud users along with their role, status and date of their most recent system access. | 100 |
| Identity Guardian | Active Device Users | List of all registered device users with creation and last-login date, security and user type, role, status, etc. | 100,000 |
| Expired Device Users | List of all former device users with creation and last-login date, security and user type, role, status, etc. | 125,000 | |
| Expiration and Deletion Events | Applies to bulk-expire and/or bulk-removal of device users from the system during any 24-hour period. | 10,000 |
* Zebra-recommended maximum for optimal performance.
DNA Cloud SSO
Zebra DNA Cloud now employs a single sign-on (SSO) for logging into the console, streamlining the process and eliminating separate log-ins for the Admin (formerly Tenant Owner) and Managers (formerly Administrative Users). To log in using the dialog seen below, all users are required to register an email address with Zebra.com. It can be the address they're currently using to access DNA Cloud or a new one. The process* is detailed below, and is the same for a new or existing address. This process is NOT required for users with an email address already registered with Zebra.com.
DNA Cloud SSO login screen. Click image to enlarge; ESC to exit.
* The DNA Cloud SSO process varies from that of section II. Register with Zebra.com, above.
Register with Zebra SSO
1. Visit Zebra.com and click the "Login" link:
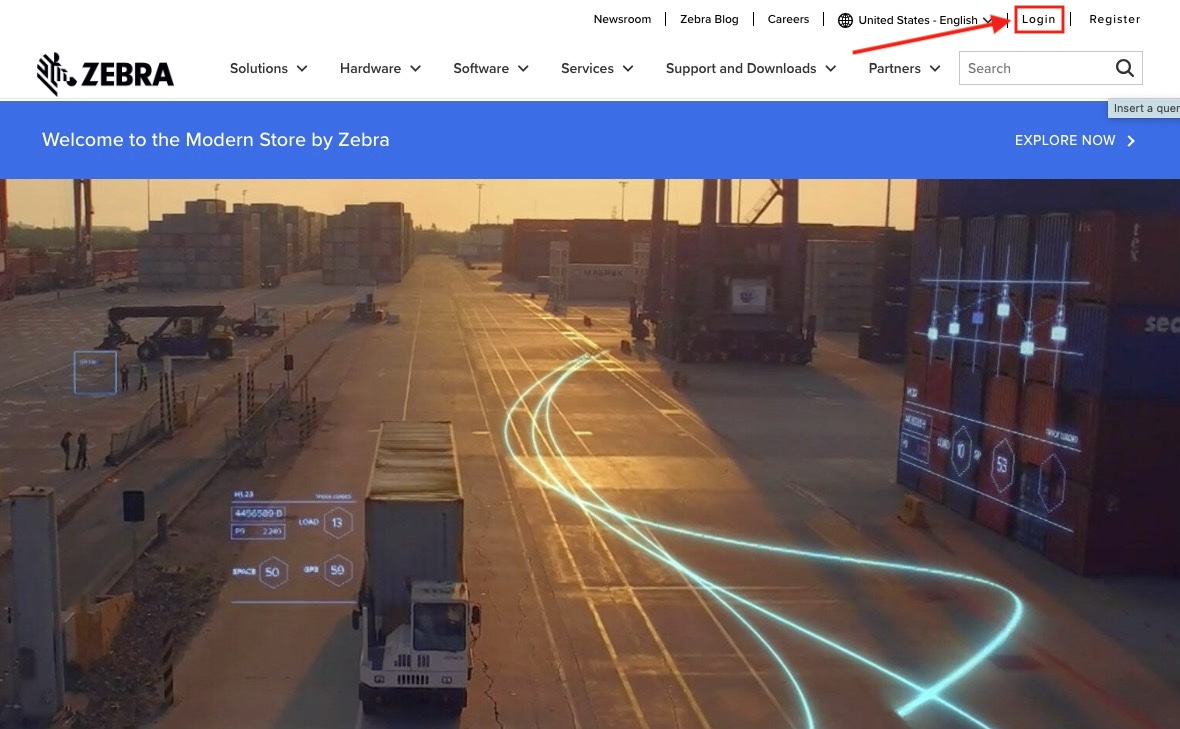 Click image to enlarge; ESC to exit.
2. Click "Register Now" and follow the prompts:
Click image to enlarge; ESC to exit.
3. Enter an email address to be associated with the account and click "Next" button.
Open the email's inbox and look for a confirmation email from "Zebra Service Do Not Reply."
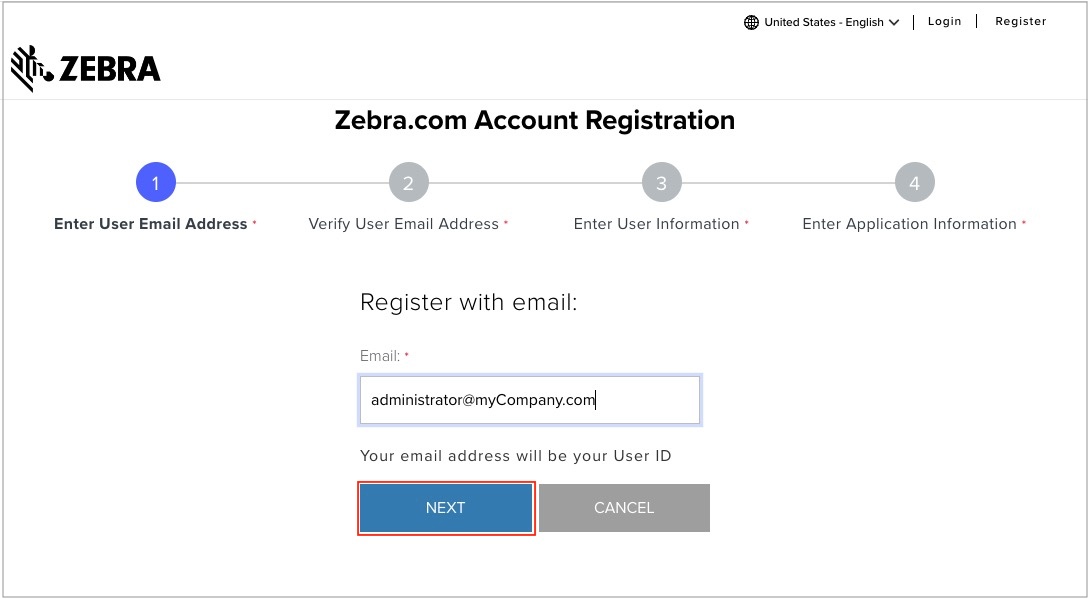 Click image to enlarge; ESC to exit.
4. Enter the verification code from the confirmation email and click "Next" button.
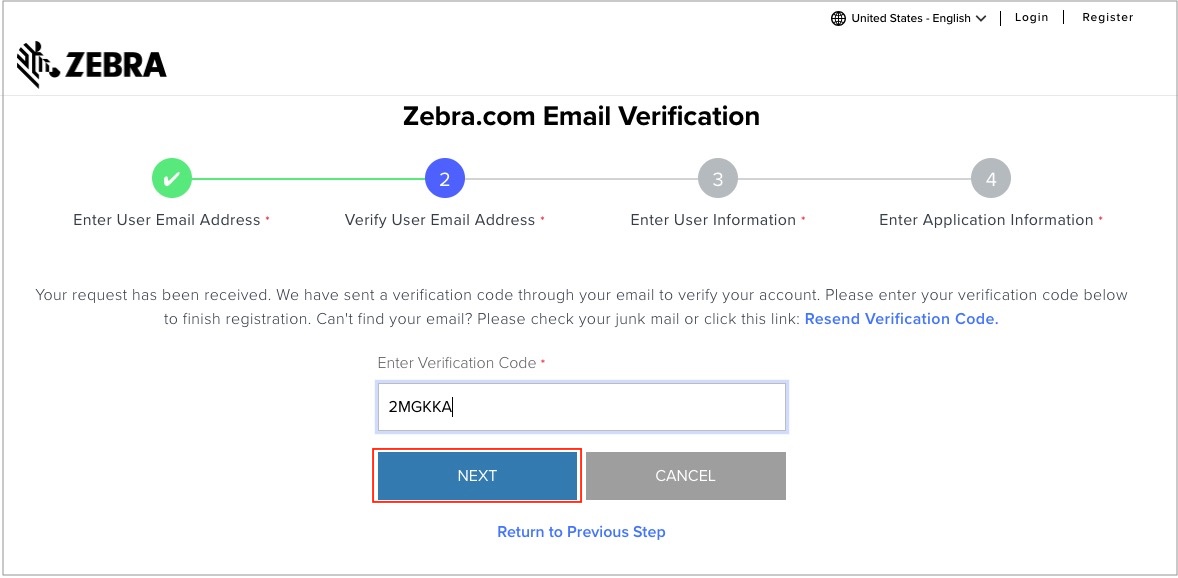 Click image to enlarge; ESC to exit.
5. Enter the information as indicated and click "Next" button.
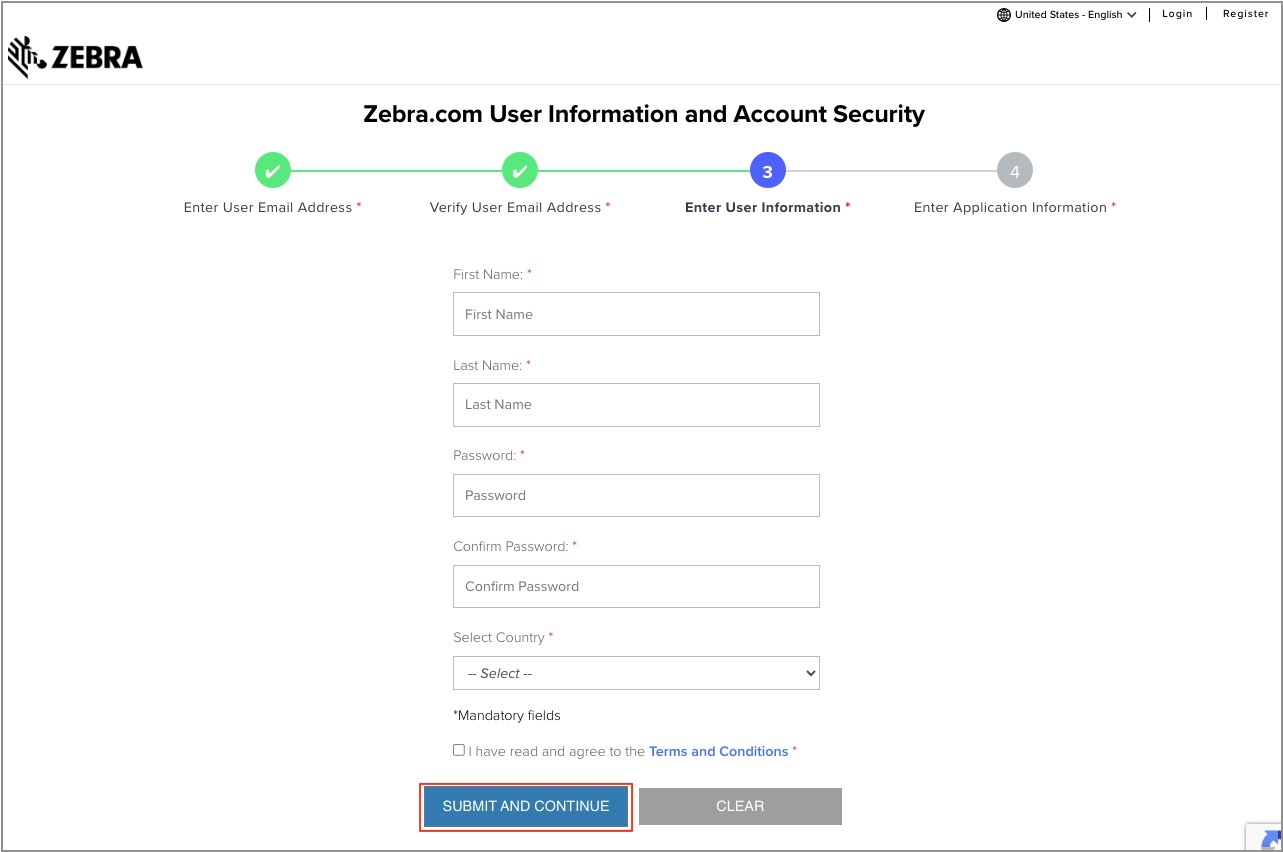 Click image to enlarge; ESC to exit.
6. Select options as needed. When finished, click "Submit" button.
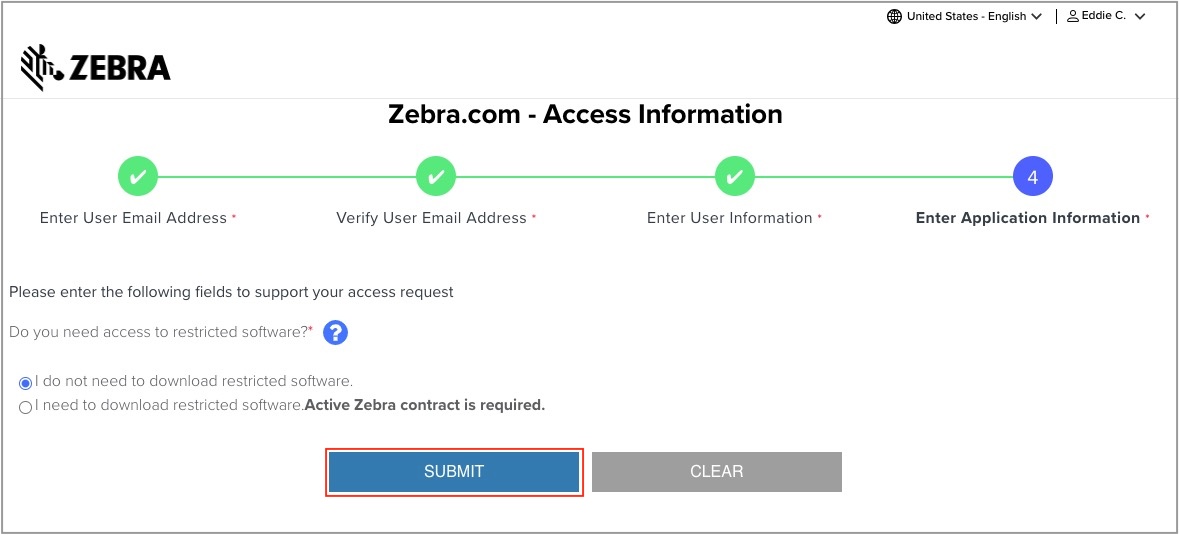 Click image to enlarge; ESC to exit.
Upon successful registration, a message appears similar to the image below:
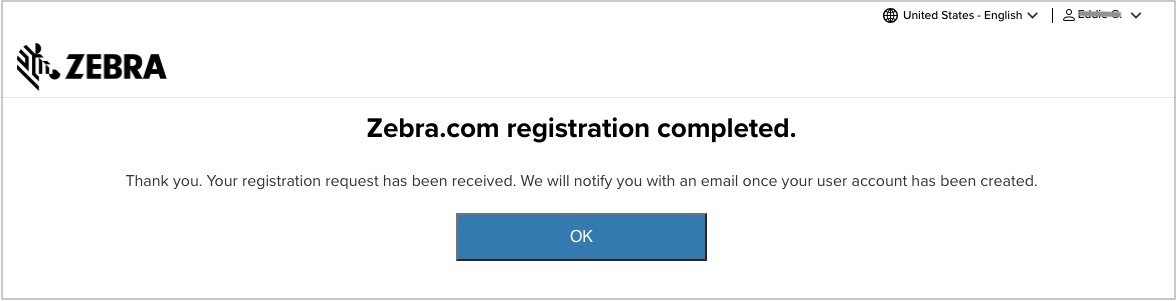 Click image to enlarge; ESC to exit.
The email address can now be used to access DNA Cloud and other Zebra online resources.
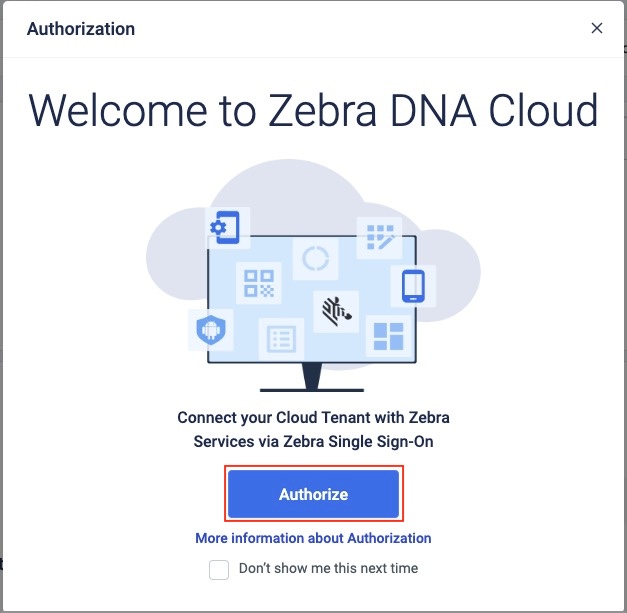
Authorization
SSO Login
For the Admin (formerly Tenant Owner), when first logging into DNA Cloud following the registration process above, the Admin is prompted with a screen (as shown below) to complete a simple, one-time authentication process:
 Click image to enlarge; ESC to exit.
- Initiate by clicking "Authorize"
- On the next screen, click "Confirm"
- Next, click "Allow"
Authorization is complete; all operations can proceed as normal.
Authorization Notes
- If authorization fails or a prompt is dismissed prematurely, the process repeats at subsequent logins until successful.
- After dismissing the prompt, authorization also can be completed on the My Services page.
- Device Settings, Licensing and Android Updates features appear "greyed out" on unauthorized systems.
- Successful authorization is indicated by a status of "Connected" on the My Services page.
Also See
- Usage Guide | A complete guide to ZDNA administrative tasks
- Licensing Guide | Manage, allocate and reclaim licenses for apps and device
- FAQ | Frequently asked questions about ZDNA