All references to Device Guardian within this guide also apply to Device Guardian Access Management, unless explicitly stated otherwise.
Overview
The Device Guardian (DG) and DG Access Management (DGAM) web portal empowers administrators to manage devices, access points (APs) and sites, as well as generate reports of managed assets. For Device Guardian to operate, administrators must register devices, access points and sites prior to use. This can be performed manually or by importing data via a .CSV file. The portal also offers additional configuration options such as automation, notifications, map-based location tracking and Bluetooth scanners.
System Parameters:
- Maximum device support: 100,000 devices
- Maximum web portal support: 500 sites and 25,000 devices
- Maximum .CSV import: 25,000 records
Note: Importing .CSV files approaching the 25,000 maximum can require a considerable period of time. To import files more quickly, Zebra recommends importing records in groups of 1,000.
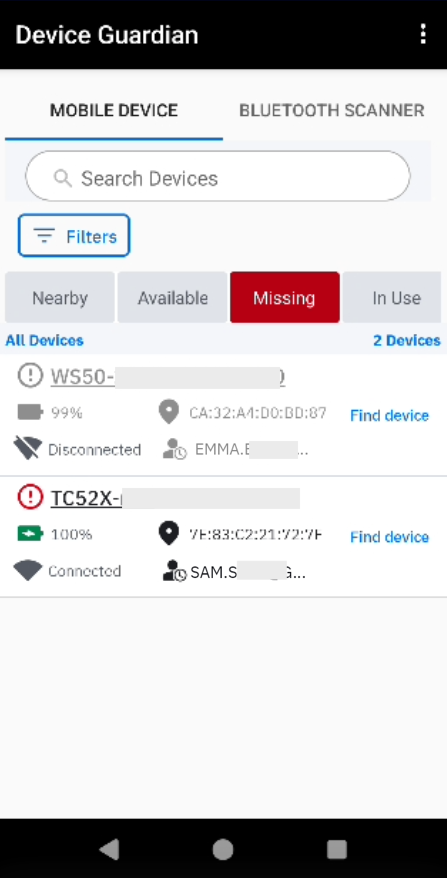
Device Guardian supports three user roles: administrator, manager and user/associate. User functions and capabilities presented by the Device Guardian app vary based on the assigned role:
|
|
|
||
|
Administrator View status of devices across all locations |
Manager View status of devices within their location |
User/Associate View missing devices that need to be found |
Note: Secondary Bluetooth Low Energy (BLE) configuration is part of the Install & Setup.
Administrator Role
Administrator functions and capabilities presented through the Device Guardian web portal:
- Administrator dashboard to manage and view assets at the corporate-level and site-level:
- Device dashboard to view devices at the corporate-level
- Site Search
- All Manager and Associate capabilities
Manager Role
Manager functions and capabilities presented through the Device Guardian web portal:
- Manager dashboard to manage (if permitted) and view assets at the site-level:
- Mark a device for retrieval ("To Be Found") (To Be Found)
- Mark a device out of service (decommission) with a note
- Device or AP Search
- All Associate capabilities
User/Associate Role
User/Associate functions and capabilities presented through the Device Guardian web portal:
- View marked devices for retrieval ("To Be Found")
- Find devices using the BLE proximity meter and audio chirp
- Mark devices as found or cannot be found
Single Sign-On (SSO)
Device Guardian integrates with single sign-on (SSO) providers, enabling users to authenticate on devices using their SSO login credentials through Zebra's Identity Guardian. Identity Guardian, which is a separate installation from Device Guardian, manages device access and tracks device custody, ensuring user accountability. SSO integration applies to both web portal and device logins.
Requirements:
- Identity Guardian v2.0 or higher must be installed separately on devices, configured with SSO Authentication Configuration.
Compatible SSO Providers:
- Ping Identity - OAuth 2.0 with PKCE or Mutual-TLS
- Microsoft Entra ID - Client secret or Mutual-TLS
- Okta - Client secret or TLS
For integration with Mutual-TLS client certificates, refer to Mutual-TLS Certificate Generation & Deployment.
SSO Role-Based Mapping:
- Use SSO Defined Roles - This option automatically transfers role-based mpping from your SSO provider to Device Guardian, eliminating the need to manually create admin and manager roles within Device Guardian.
- Without This Option - Admin and manager roles must be explicitly created in Device Guardian; see Add User.
User Experience Post-SSO Device Login:
- Managers and Administrators - After launching Device Guardian, their respective dashboards are displayed.
- Associate Users - After launching Device Guardian, the Missing screen is displayed.
SSO Behavior Notes:
- Simultaneous Logins - If the same SSO credentials are used to log into the web portal in separate web browser instances simultaneously, logging out of one instance prevents renders the other instance non-operational.
- First-time login to Chrome - When using Chrome for the first time on the device and attempting to login with SSO, the following steps are required before proceeding:
Accept the Google Terms of Service.
Select the desired option when prompted to turn on sync.
If the device is running Android 8, the SSO login page may reappear after a successful loggin. Tap the back button to access the Device Guardian dashboard.
Note: If Identity Guardian is not installed, SSO login will not be functional on devices. However, admins and managers can still login to Device Guardian using their non-SSO credentials.
Mutual-TLS Certificate Generation & Deployment
When ready to activate SSO OAuth 2.0 using Mutual-TLS client certificates, gather the required certificate files and related information:
- Certificate private key (.key file) from the certificate owner
- Certificate password (saved in passphrase.txt) used to generate the private key
- SSL certificate issued by the CA (.p7b file)
- SSL certificate (.pfx file) converted from P7B
- Public certificate (.crt file) generated from PFX format
- Certificate expiration date
Steps to generate the SSL certificates are provided below. After all the certificate information is gathered, contact Zebra technical support to raise a ticket for SSO integration with Device Guardian. Zebra services will request the above information and follow-up with next steps.
To generate the SSL certificates, perform the following:
Create a certificate CER file with the following command:
openssl pkcs7 -print_certs -in ssl_certificate.p7b -out ssl_certificate.cerwhere "ssl_certificate.p7b" is the certificate issued by the CA.
Create an SSL certificate in PFX format using the following command:
openssl pkcs12 -export -in ssl_certificate.cer -inkey private.key -out ssl_certificate.pfxwhere "private.key" is the private key from the certificate owner and "ssl_certificate.cer" is the file generated from step 1. Save the private key password in passphrase.txt. When prompted, enter the certificate password and specify the export password using the same password as the certificate password.
Generate a public certificate in CRT format with command:
Openssl pkcs12 -in ssl_certificate.pfx -clcerts -nokeys -out dtrk_sso_public.crt
Action is required to activate SSO for integration with Device Guardian after Zebra services enables SSO in the cloud server. Only activate SSO when all devices have Device Guardian 5.1 or higher. Follow the SSO integration steps and then create SSO users if role-based mapping is not in use. When SSO is activated, only SSO users can login; non-SSO users cannot login.
SSO Integration
Follow these steps to integrate SSO with Device Guardian - it is important to perform the step to create an SSO user:
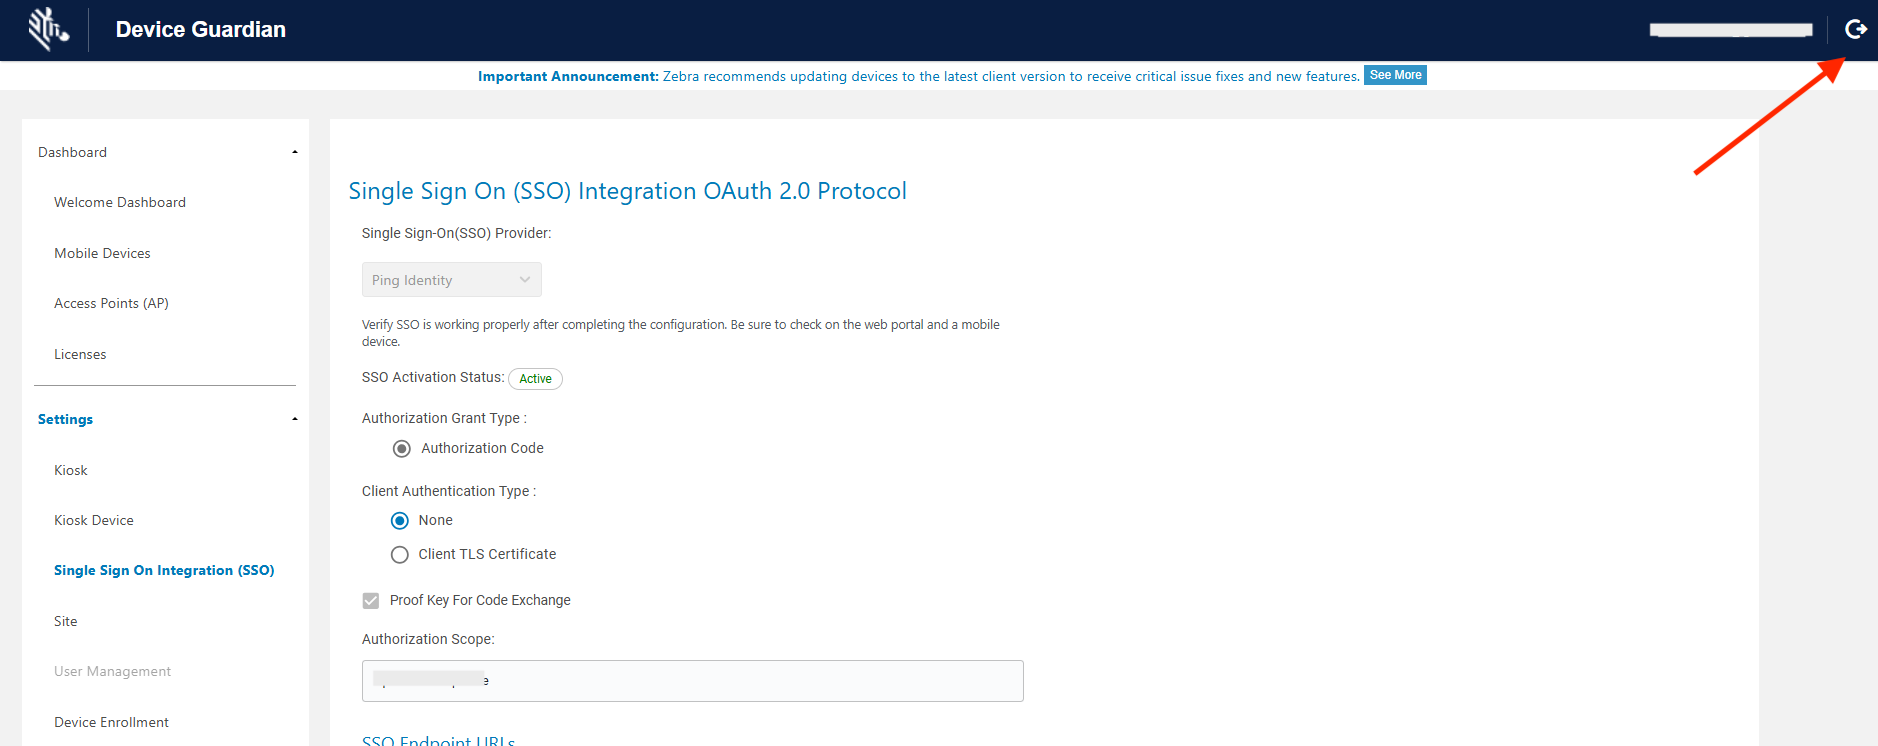
- In the browser, launch the Device Guardian web portal using the URL supplied. Login using the super administrator credentials provided by Zebra. Enter the User ID and Password. Click Log In.
- After login, click Settings > Single Sign On Integration (SSO).
- In the SSO Provider dropdown, select the appropriate provider:
- Ping Identity
- Microsoft
- Okta
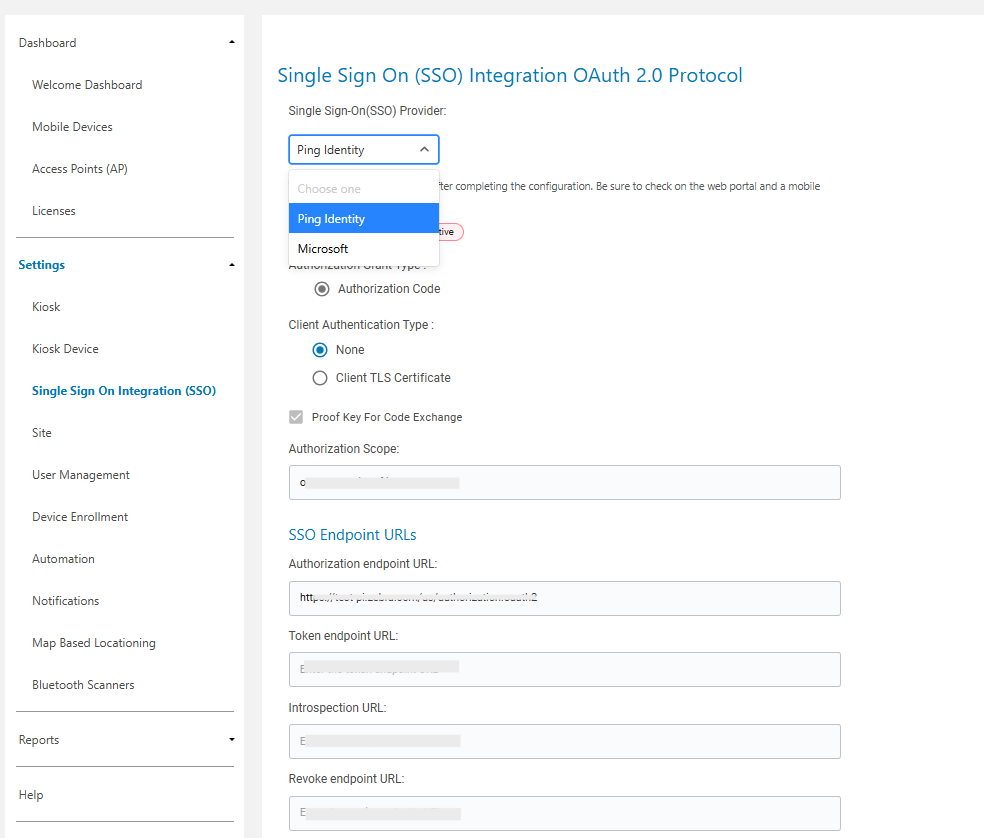
- Follow the guide specific to your SSO provider:
For Microsoft:
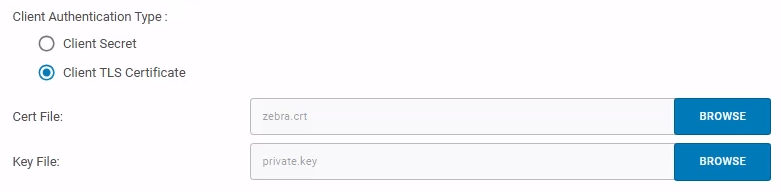
- Client Authentication Type - Select one of the following based on the SSO authentication:
- Client TLS Certificate - Uses client certificates for mutual authentication and secure communication between a client app and an identity provider.
- Cert File - Browse to and upload a valid certificate file.
- Key File - Browse to and upload the private key file.
- Client Secret - Uses a client ID and a client secret to authenticate a client app with an identity provider.
- Authorization Scope - Specifies the permission and access level that an app is requesting from an identity provider on behalf of a user. Use one of the following formats based on your SSO setup:
- Tenant ID followed by
/.default. For example:abc123/.default openid email profile
- Tenant ID followed by
- SSO Endpoint URLs - Enter the appropriate information based on the SSO server settings:
- Authorization endpoint
- Token endpoint
- Logout endpoint (known as End Session endpoint)
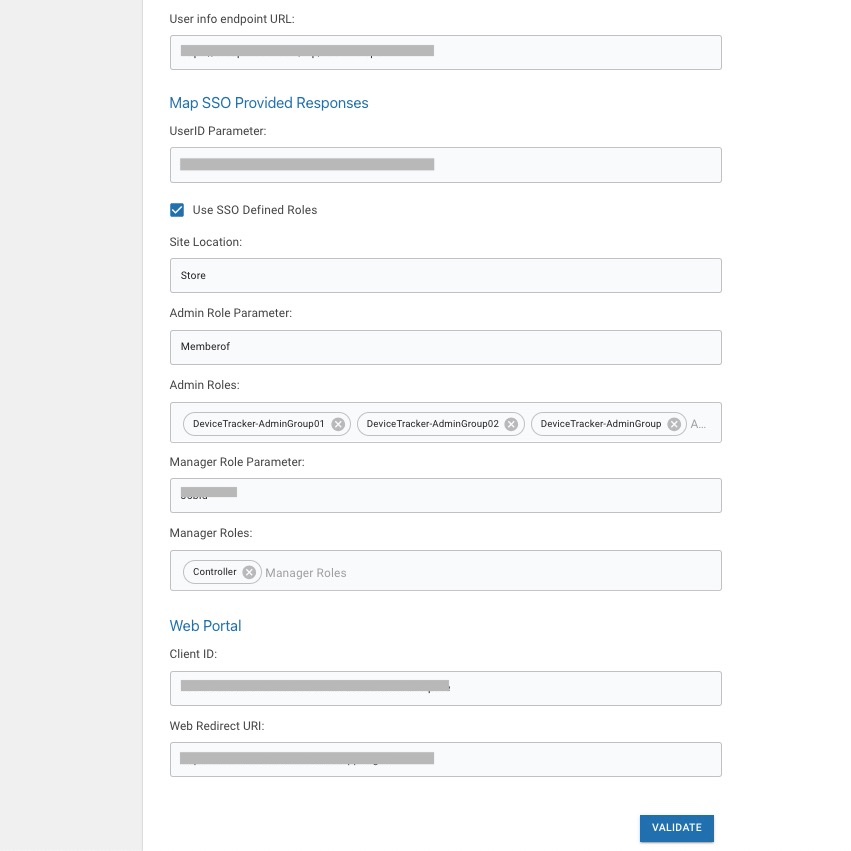
- User info endpoint
- Map SSO Provided Responses - If using role-based mapping, enter the following information based on your SSO parameters:
- UserID Parameter - An identifier for the user that is configured in SSO and returned from the SSO response upon authenticating the user. This is added as an optional claim under Token Configuration, e.g. “upn”.
- Use SSO Defined Roles - Enable this option to utiltize the roles defined in your SSO system, thereby eliminating the need to manage users through Device Guardian. When enabled, it employs role-based mapping to automatically assign the administrator and manager user roles according to your SSO definitions. If disabled, the admin and manager users must be defined in the Manage Users section.
- Site Location - Site parameter that determines the location or site of the user. For Microsoft Entra ID, navigate to Applications > Enterprise Applications. Search for the server instance and open it. From the menu, click “Single sign-on”. Enter the custom claim from “Attributes & Claims” which maps the user to the specified location (e.g. “Site” which maps to “user.department”).
- Admin Role Parameter - Parameter that identifies whether the user is an admin. Enter the default claim: “roles”.
- Admin Roles - Names of the admin-related roles as specified in App Roles from your SSO provider, which maps to the user profile attribute, e.g., job title.
- Manager Role Parameter - Parameter that identifies whether the user is a manager. Enter the default claim: “roles”.
- Manager Roles - Names of the manager-related roles as specified in App Roles from your SSO provider, which maps to the user profile attribute, e.g. job title.
- Register the web portal by entering the following:
- Client ID - Enter the Application (client) ID.
- Redirect URI - Enter the web portal URL with “/login” appended.
- Click Validate and proceed to step 5.
For Ping Identity: - Client Authentication Type - Select one of the following based on your SSO authentication:
- None - - If selected, the option Proof Key For Code Exchange is enabled.
- Client TLS Certificate - Uses client certificates for mutual authentication and secure communication between a client app and an identity provider. If selected, the option Proof Key For Code Exchange is disabled.
- Authorization Scope - Specifies the permission and access level that an app is requesting from an identity provider on behalf of a user.
- SSO Endpoint URLs - Enter the appropriate information based on the SSO server settings:
- Authorization endpoint
- Token endpoint
- Introspection
- Revoke endpoint
- Logout endpoint
- User info endpoint
- Map SSO Provided Responses - If using role-based mapping, enter the following information based on your SSO parameters:
- UserID Parameter - An identifier for the user that is configured in SSO and returned from the SSO response upon authenticating the user.
- Use SSO Defined Roles - Enable this option to utilize the roles defined in your SSO system, thereby eliminating the need to manage users through Device Guardian. When enabled, it employs role-based mapping to automatically assign the administrator and manager user roles according to your SSO definitions. If disabled, the admin and manager users must be defined in the Manage Users section.
- Site Location - Site parameter that determines the location or site of the user.
- Admin Role Parameter - Parameter that identifies whether the user is an admin.
- Admin Roles - Names of the admin-related roles as specified in App Roles from your SSO provider, which maps to the user profile attribute, e.g., job title.
- Manager Role Parameter - Parameter that identifies whether the user is a manager.
- Manager Roles - Names of the manager-related roles as specified in App Roles from your SSO provider, which maps to the user profile attribute, e.g. job title.
- Register the web portal by entering the following:
- Client ID - Enter the Application (client) ID.
- Redirect URI - Enter the web portal URL with “/login” appended.
- Click Validate and proceed to step 5.
For Okta: - Client Authentication Type - Select one of the following based on the SSO authentication:
- Client Secret - Uses a client ID and a client secret to authenticate a client app with an identity provider.
- Client TLS Certificate - Uses client certificates for authentication and secure communication between a client app and an identity provider.
- Authorization Scope - Specifies the permission and access level that an app is requesting from an identity provider on behalf of a user.
- SSO Endpoint URLs - Enter the appropriate information based on the SSO server settings:
- Authorization endpoint
- Token endpoint
- Logout endpoint
- User info endpoint
- Map SSO Provided Responses - If using role-based mapping, enter the following information based on your SSO parameters:
- UserID Parameter - An identifier for the user that is configured in SSO and returned from the SSO response upon authenticating the user.
- Use SSO Defined Roles - Enable this option to utilize the roles defined in your SSO system, thereby eliminating the need to manage users through Device Guardian. When enabled, it employs role-based mapping to automatically assign the administrator and manager user roles according to your SSO definitions. If disabled, the admin and manager users must be defined in the Manage Users section.
- Site Location - Site parameter that determines the location or site of the user.
- Admin Role Parameter - Parameter that identifies whether the user is an admin.
- Admin Roles - Names of the admin-related roles as specified in App Roles from your SSO provider, which maps to the user profile attribute, e.g., job title.
- Manager Role Parameter - Parameter that identifies whether the user is a manager.
- Manager Roles - Names of the manager-related roles as specified in App Roles from your SSO provider, which maps to the user profile attribute, e.g. job title.
- For Client Secret, register the web portal by entering the following:
- Client ID - Enter the Application (client) ID.
- Client Secret - Enter the client secret created in the SSO provider.
- Redirect URI - Enter the web portal URL with “/login” appended.
- For Client TLS, register the web portal by entering the following:
- Client ID - Enter the Application (client) ID.
- Redirect URI - Enter the web portal URL with “/login” appended.
- Click Validate.
- Client Authentication Type - Select one of the following based on the SSO authentication:
- Make sure pop-up windows are not blocked in the browser. During the validation process, a status window appears followed by a login prompt. It is important to enter your login credentials to complete the validation process.
- When validation is successful, a confirmation prompt appears asking if you would like to activate SSO.
- Click Yes.
- A confirmation message appears indicating successful SSO configuration activation.

- IMPORTANT: The admin must add at least one SSO admin user. See Add SSO User. Otherwise, if the admin logs out before adding the SSO admin user, no admin user can login due to the lack of an SSO admin user registered.
- Sign out from the non-SSO session. In the top right, click on the signout icon.
- The SSO login page appears. Enter the user credentials to login. Click Sign In.
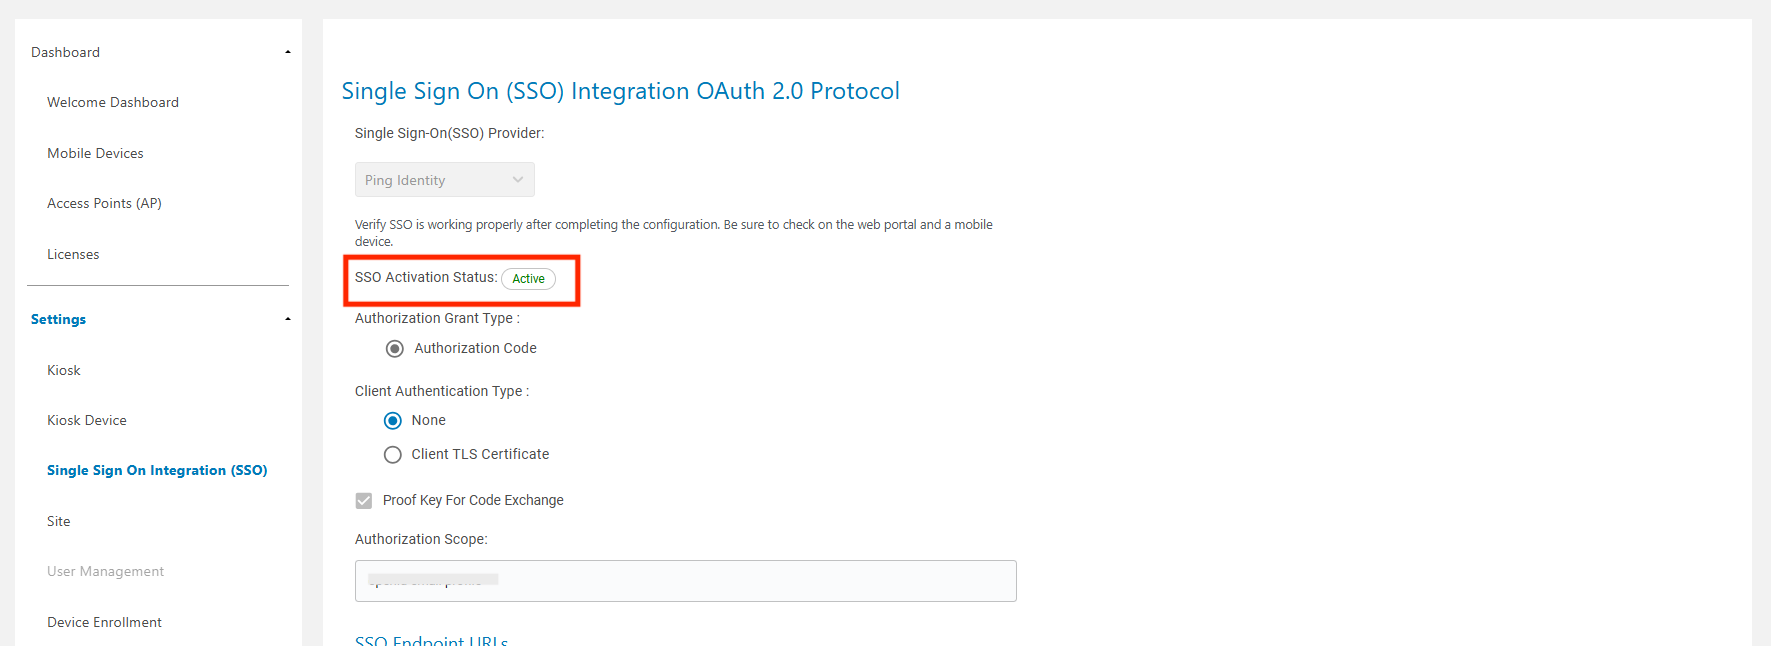
- Click on Settings > Single Sign On Integration (SSO). The SSO Activation Status shows Activated.
Device Enrollment
Device enrollment is a mandatory first step to configure devices and kiosks to communicate with the organization's Device Guardian server.
Important: All devices must be enrolled before they can be found by Device Guardian or used to find other devices.
Re-enrolling to a Different Server
If a device needs to be moved from one Device Guardian server to another, its current configuration must be cleared. To successfully re-enroll a device:
- Enroll the device to the new server using the Download Kit.
- On the device, go to Settings > Apps > Device Guardian.
- Select Storage and tap Clear Storage or Clear Data.
- Relaunch the Device Guardian application.
Device Enrollment screen
Download Kit
The Download Kit is .zip archive containing the files required for device enrollment to the DG/DGAM cloud server. The contents of the archive vary based on the installation path.
All installations: Every installation package includes these base files:
- Configuration File (
.config) - Enrolls a device or kiosk with the server via Zebra DNA Cloud or an EMM; see the Installation Guide for instructions. - Enrollment Files for Mobile Devices:
- Device Enrollment Barcode (
.pdf) - For device enrollment via Zebra's StageNow tool. - Device XML Configuration - For device enrollment via an EMM.
- Device Enrollment Barcode (
- Enrollment Files for Kiosks:
- Kiosk Enrollment Barcode (
.pdf) - For kiosk enrollment via Zebra's StageNow tool. - Kiosk XML configuration - For kiosk enrollment via an EMM.
- Kiosk Enrollment Barcode (
Additional Files For Upgrades: When upgrading from the previous Device Tracker (DT) product, the Download Kit includes additional files to help migrate existing devices and kiosks to the new server.
- Upgrading to DG or DGAM: The Download Kit includes two additional files for migrating existing mobile devices:
- DT Device Enrollment Barcode (
.pdf) - For migrating existing devices via StageNow. - DT Device XML configuration - For migrating existing devices via an EMM.
- DT Device Enrollment Barcode (
- Upgrading to DGAM only: The Download Kit provides all files previously mentioned, plus two more files for migrating existing kiosks:
- DT Kiosk Enrollment Barcode (
.pdf) - For migrating existing kiosks via StageNow. - DT Kiosk XML configuration - For migrating existing kiosks via an EMM.
- DT Kiosk Enrollment Barcode (
NOTE: When following the installation guide for kiosks, ensure that Kiosk Mode is enabled in the Managed Configuration deployed through the EMM.
Manager Permissions
- Allow managers to modify Device Name - If enabled, permits managers to edit device names through their dashboard.
- Allow managers to modify Access Points - If enabled, permits managers to edit access points through their dashboard.
Shortcut links:
- Add or modify mobile devices - Opens Dashboard > Mobile Devices view from the left menu in the web portal.
- Add or modify access points - Opens Dashboard > Access Points view from the left menu in the web portal.
- Add or modify sites - Opens Dashboard > Sites view from the left menu in the web portal.
Site Assignment
Devices can be assigned to sites either manually, based on the CSV file upload, or automatically, based on the AP the device is connected to.
NOTE: The Site Assignment feature is not applicable to kiosks.
To select the method of device registration:
- Log in to the web portal as an administrator.
- Click Settings > Registration from the left menu.
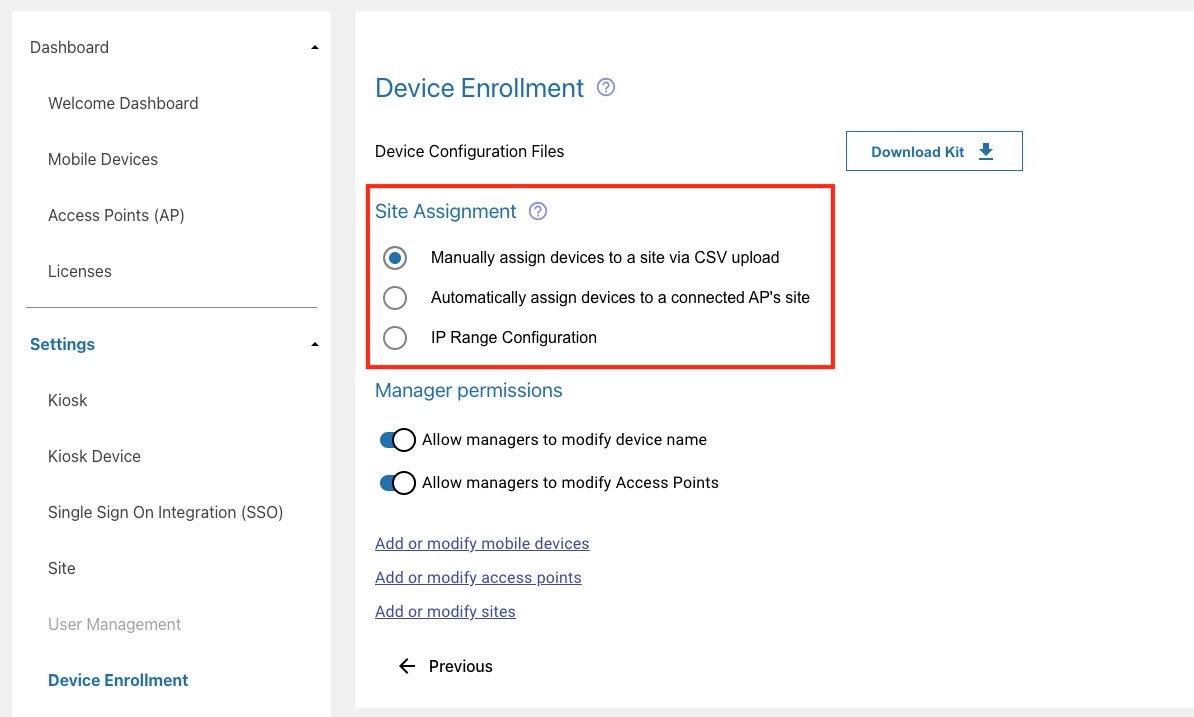
- Under Site Assignment. select the desired device registration method:
a. Manually assign devices to a site via CSV upload (default)
Manually assign sites to devices by uploading a CSV file that includes the site name for the device to be assigned, see Import Devices.
b. Automatically assign devices to a Connected AP's site
Prerequisite: Register the site to an AP.
When a device connects to an AP, it is automatically assigned a site based on the AP it is connected, provided that the AP is registered with a site. Administrators cannot manually edit the site name for a device because of this automatic assignment. If an AP is not assigned to a site, the device will not receive a site name and will be listed under Unassigned Devices in the site list.
c. IP Address Range Configuration
Allow an IP address range (IPV4) to be defined for a specific site. The device is automatically assigned to that site if its IP address falls within that range. Go to Manage Sites to specify the IP address range for a site. Once a device is assigned to a site, it will not become unassigned unless there is manual intervention, e.g. when decommissioning the device.- If a device is previously within range of a site and moves to another site whose range is not specified, it remains assigned to the original site.
- If a device is disconnected, it remains assigned to the previous site.
- Click Save.
Note: If the option to automatically assign devices is enabled, it overwrites the sites that are manually assigned via CSV file upload and any further CSV uploads cannot take into effect.
Manage Users
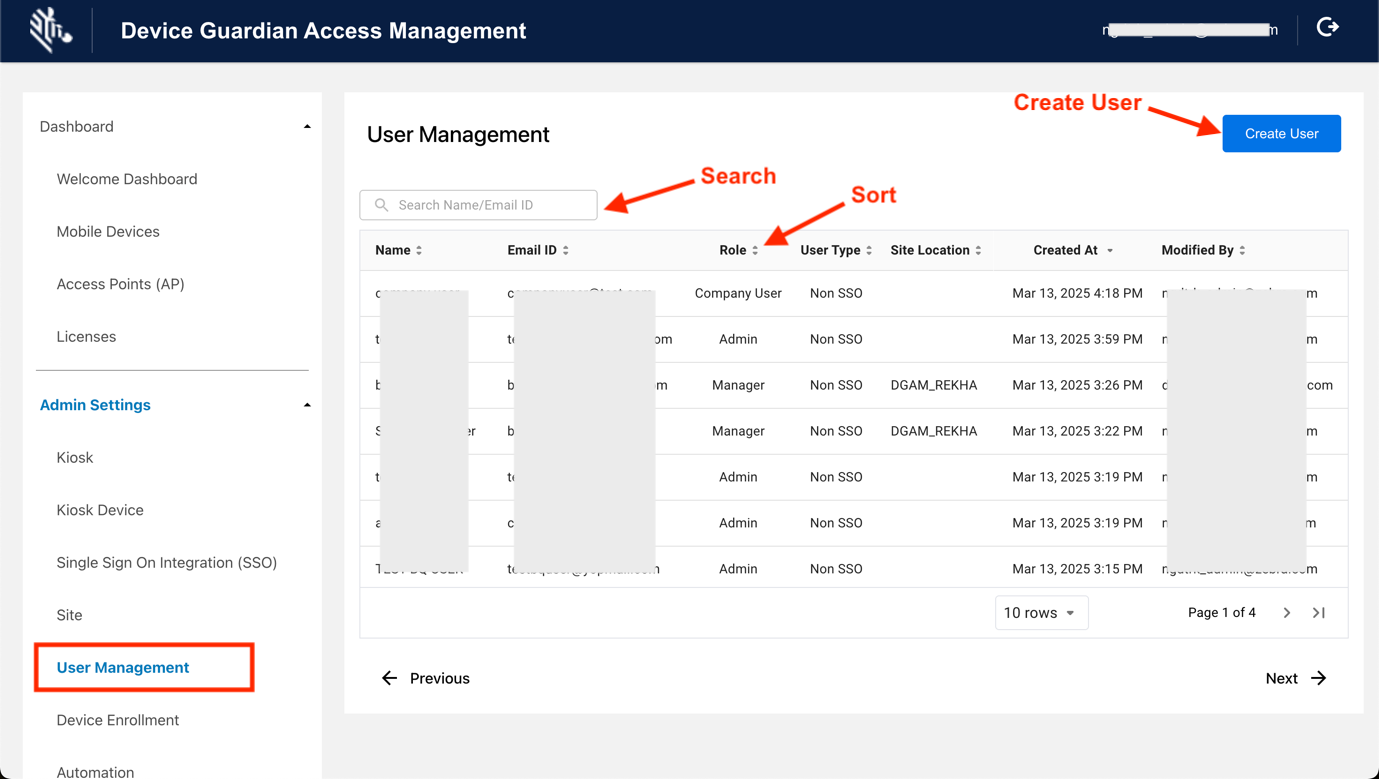
The User Management screen (under Admin Settings > User Management) is used to create and manage two types of user accounts:
- Web Portal Users - Accounts for accessing the administrative web portal.
- Device Users - Accounts for using the application on a device. Applies to
DGAM Only.
The following sections outline how to manage each user type.
Web Portal Users
Web portal users are assigned one of the following roles, which defines their permissions:
- Admin - Manages all web portal users across the entire organization.
- Manager - Restricted to managing web portal users within their assigned site.
- Company User - View-only access of web portal users across the entire organization.
After a non-SSO user is created, an email is automatically sent to the user prompting them to set a password. This link expires within 1 hour.
The user interface for managing web portal users differs depending on the app in use:
- Device Guardian - User management is handled directly on the main User Management screen.
Guide for DG Web Portal User Management - Device Guardian Access Management - Web portal users are managed under the Admin Users tab within User Management.
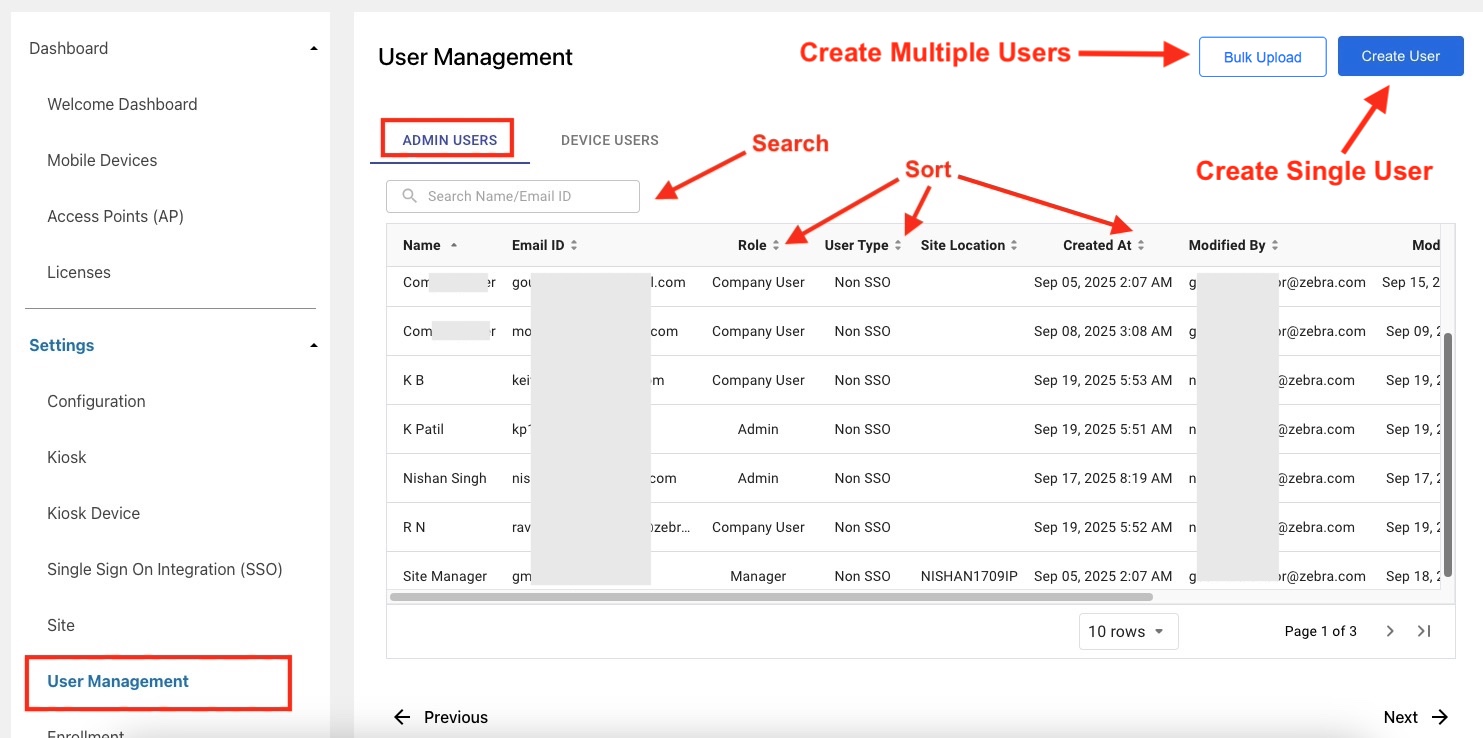
Guide for DGAM Web Portal User Management
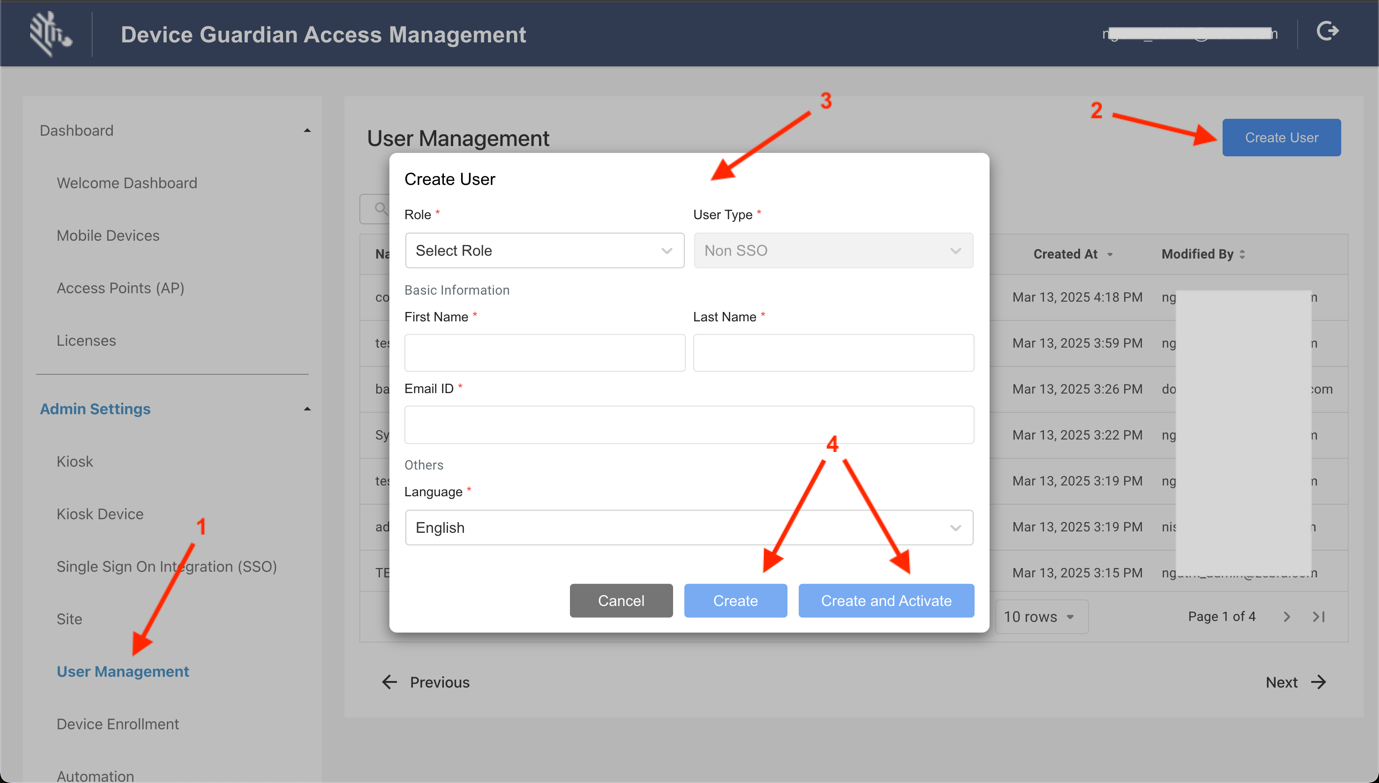
Steps to create an individual user:
Log in to the web portal as an administrator or manager.
Go to Admin Settings > User Management. Click Create User.
Assign a Role to the user:
- Administrator - Manages devices across all sites and can recover devices; see Administrator Role.
- Manager - Manages devices within their assigned site and can recover devices; see Manager Role.
- Company User - Responsible for device recovery; see User/Associate Role.
Select the User Type, if applicable:
- Non-SSO - If SSO is not activated, all administrators and managers are added as non-SSO users. User accounts are managed through User Management in the web portal, and an email address serves as the user ID.
- First-time use: Non-SSO users must set a password to access the system. During onboarding, the primary admin is automatically registered based on their email address. To set a password, open the web portal, click Forgot Your Password, enter the registered email address when prompted, and submit the request. An email will be sent with a link to set the password. After login, all admins or managers can be added.
- SSO - For environments with SSO activated:
- If Use SSO Defined Roles is enabled, admin and manager roles are defined by the SSO, eliminating the need for manual user creation. The User Management option is grayed out in the web portal.
- If Use SSO Defined Roles is disabled, administrators and managers must be added manually through User Management in the web portal. Ensure the User ID entered matches the one provided by the SSO provider.
- Non-SSO - If SSO is not activated, all administrators and managers are added as non-SSO users. User accounts are managed through User Management in the web portal, and an email address serves as the user ID.
- If SSO is not activated, only maintain non-SSO users.
- If SSO is activated, maintain SSO users exclusively.
Enter the other required user information.
Click one of the following:
• Create - Adds the user without sending an email for password creation, as the user will not need to log in. This is generally intended for the Company User role.
• Create and Activate - Adds a user and sends an email prompting password creation to enable user login. This is required for Administrator and Manager roles.
Important: While SSO can be deactivated, Zebra recommends maintaining user consistency based on the SSO activation status.
Create user guide
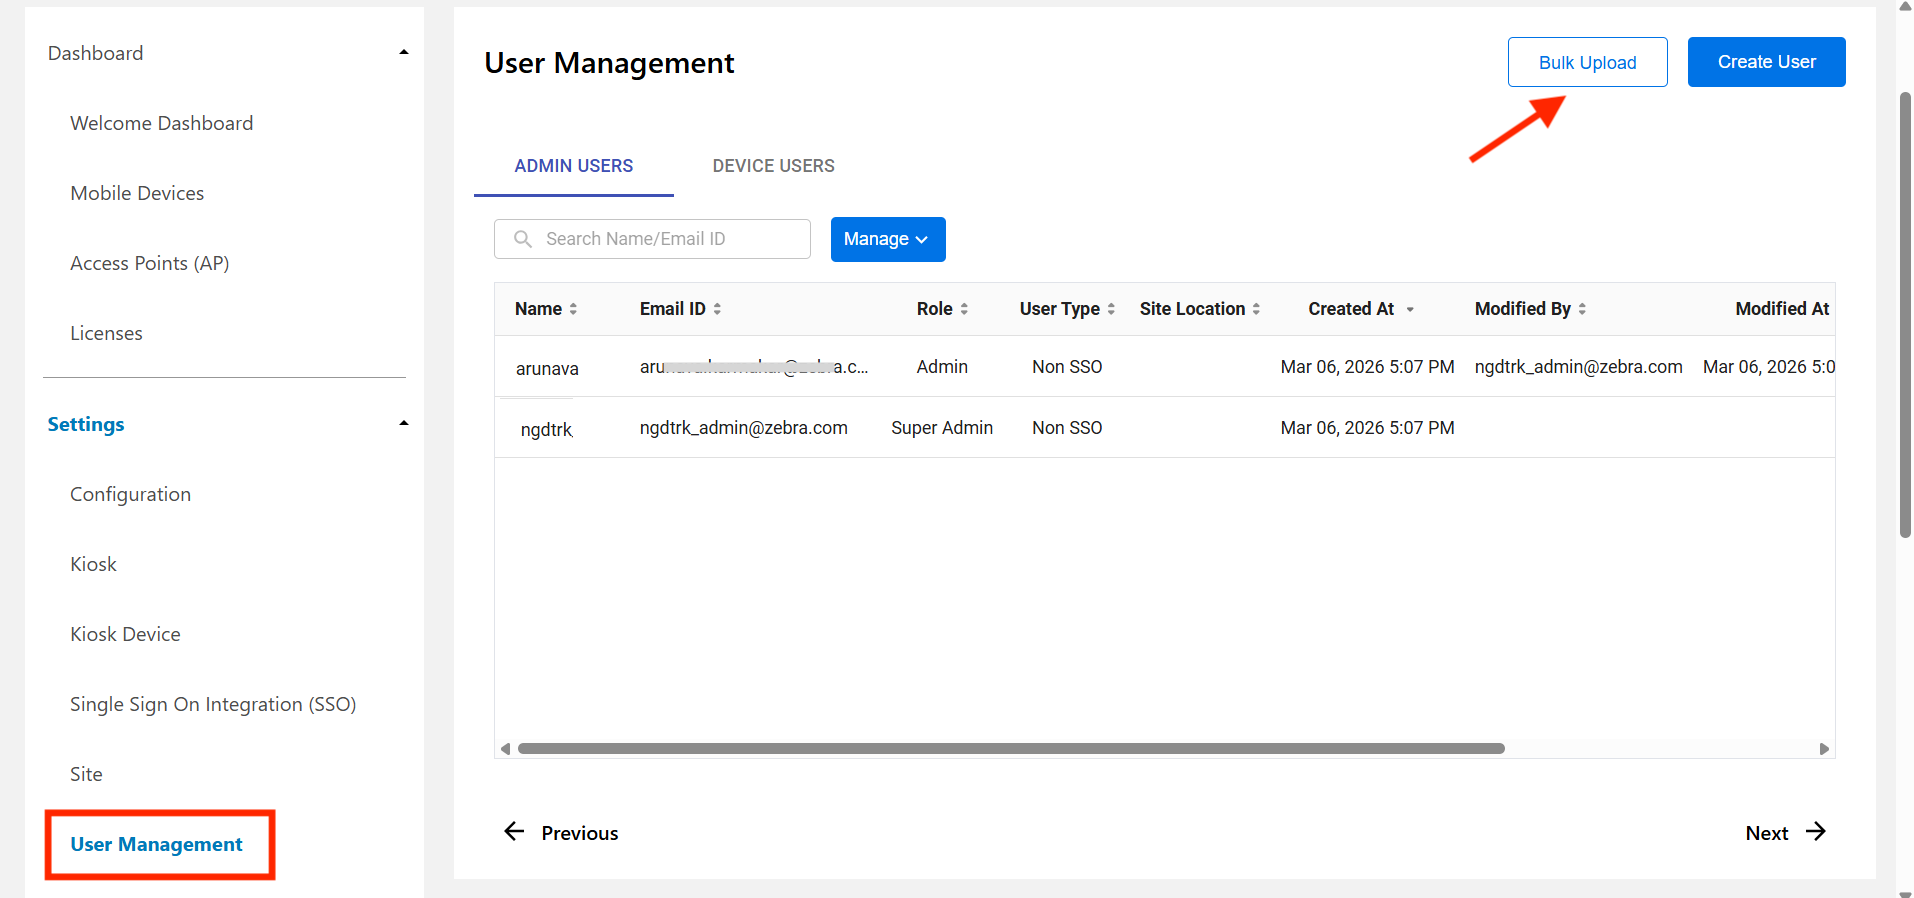
Bulk Upload Web Portal Users
The bulk upload feature is designed to add multiple Admin and Manager users at once. This operation can only be performed by an existing Admin from the User Management page. The types of users an administrator can add depends on whether their own account uses Single Sign-On (SSO).
"Add User" Privileges by Admin Type:
| Admin Type | Supported User Types to Add |
|---|---|
| Admin with SSO | • Non-SSO Admin • SSO Admin (without role-based mapping) • Non-SSO Manager • SSO Manager (without role-based mapping) |
| Admin without SSO | • Non-SSO Admin • Non-SSO Manager |
File Preparation: To perform a bulk upload, first create a .csv file containing the user data.
File Constraints:
- Maximum File Size: 10 MB
- Maximum Rows: 25,000
Required Header Fields:
| Header Field | Required? | Description |
|---|---|---|
firstName |
Yes | Alphabetic only, up to 50 characters. Special characters are not allowed. |
lastName |
Yes | Alphabetic only, up to 50 characters. Special characters are not allowed. |
email |
Yes | Must be a valid and unique email address. |
role |
Yes | Must be either "admin" or "manager" |
siteName |
Conditional | Required only if role is "manager" |
authType |
Yes | Must be either "sso" or "non-sso" |
language |
Yes | Must be either "en" (English) or "fr" (French). |
Sample .csv File Content:
    firstName,lastName,email,role,siteName,authType,language
    John,Doe,john.doe@example.com,admin,,sso,en
    Jane,Smith,jane.smith@example.com,manager,MainOffice,non-sso,fr
    Michael,Brown,michael.brown@example.com,admin,,non-sso,en
    Emily,Davis,emily.davis@example.com,manager,NorthBranch,sso,en
    Robert,Johnson,robert.johnson@example.com,admin,,sso,fr
    Jessica,Taylor,jessica.taylor@example.com,manager,SouthBranch,non-sso,en
    William,Anderson,william.anderson@example.com,admin,,non-sso,fr
    Sarah,Thomas,sarah.thomas@example.com,manager,WestDivision,sso,en
    David,Wilson,david.wilson@example.com,admin,,non-sso,en
    Mary,Moore,mary.moore@example.com,manager,EastDivision,non-sso,fr
    Christopher,Jackson,chris.jackson@example.com,admin,,sso,en
    Patricia,White,patricia.white@example.com,manager,CentralOffice,sso,fr
    James,Harris,james.harris@example.com,admin,,non-sso,en
    Linda,Martin,linda.martin@example.com,manager,Headquarters,non-sso,fr
    Thomas,Thompson,thomas.thompson@example.com,admin,,sso,en
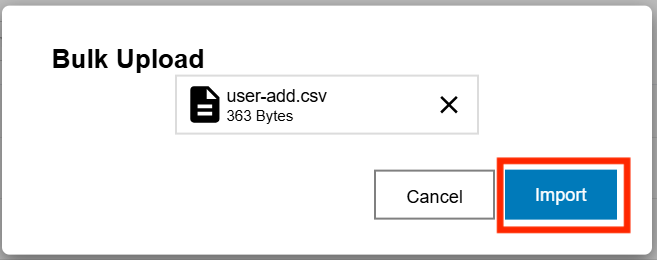
To add admin or manager users in bulk: Note: The following procedure applies to both DG and DGAM. The screenshots are taken from the DGAM interface, but they are similar for DG.
- In the web portal, go to User Management.
- Click Bulk Upload.
- Click Selected Files and browse to the prepared
.csvfile. Alternatively, drag and drop the file into the window. Click Import.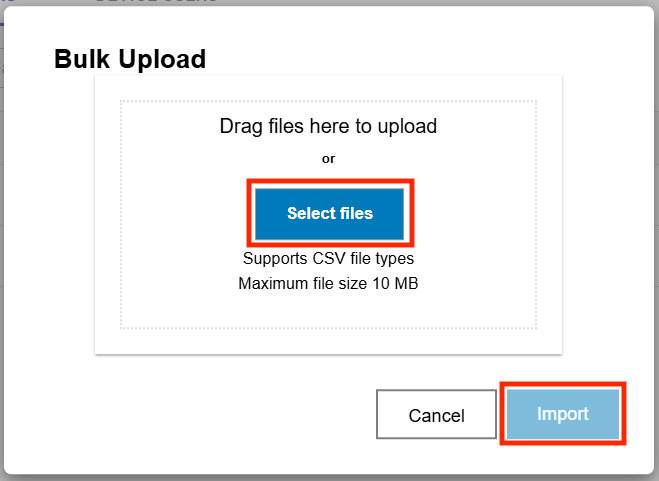
- A message appears indicating whether the import was successful.
If any errors are encountered, see CSV Import Errors.
Bulk Delete Users
Only users with the Admin role can remove users in bulk from the User Management page. This capability is the same for all administrators, regardless of whether they use SSO. An admin can bulk-delete any Admin or Manager user type (both SSO and Non-SSO).
File Preparation: To perform a bulk upload, first create a .csv file containing the user data.
Required Header Fields:
| Header Field | Required? | Description |
|---|---|---|
email |
Yes | Must exactly match an existing user. |
role |
Yes | Must match the user’s role. |
authType |
Yes | Must match the user’s current auth type. |
Sample .csv File Content:
    email,role,authType
    alice.jones@example.com,admin,sso
    bob.smith@example.com,manager,non-sso
    carol.wilson@example.com,admin,non-sso
    david.brown@example.com,manager,sso
    eve.davis@example.com,admin,sso
To remove admin or manager users in bulk: Note: The following procedure applies to both DG and DGAM. The screenshots are taken from the DGAM interface, but they are similar for DG.
- In the web portal, go to User Management.
- Click Manage > Delete.
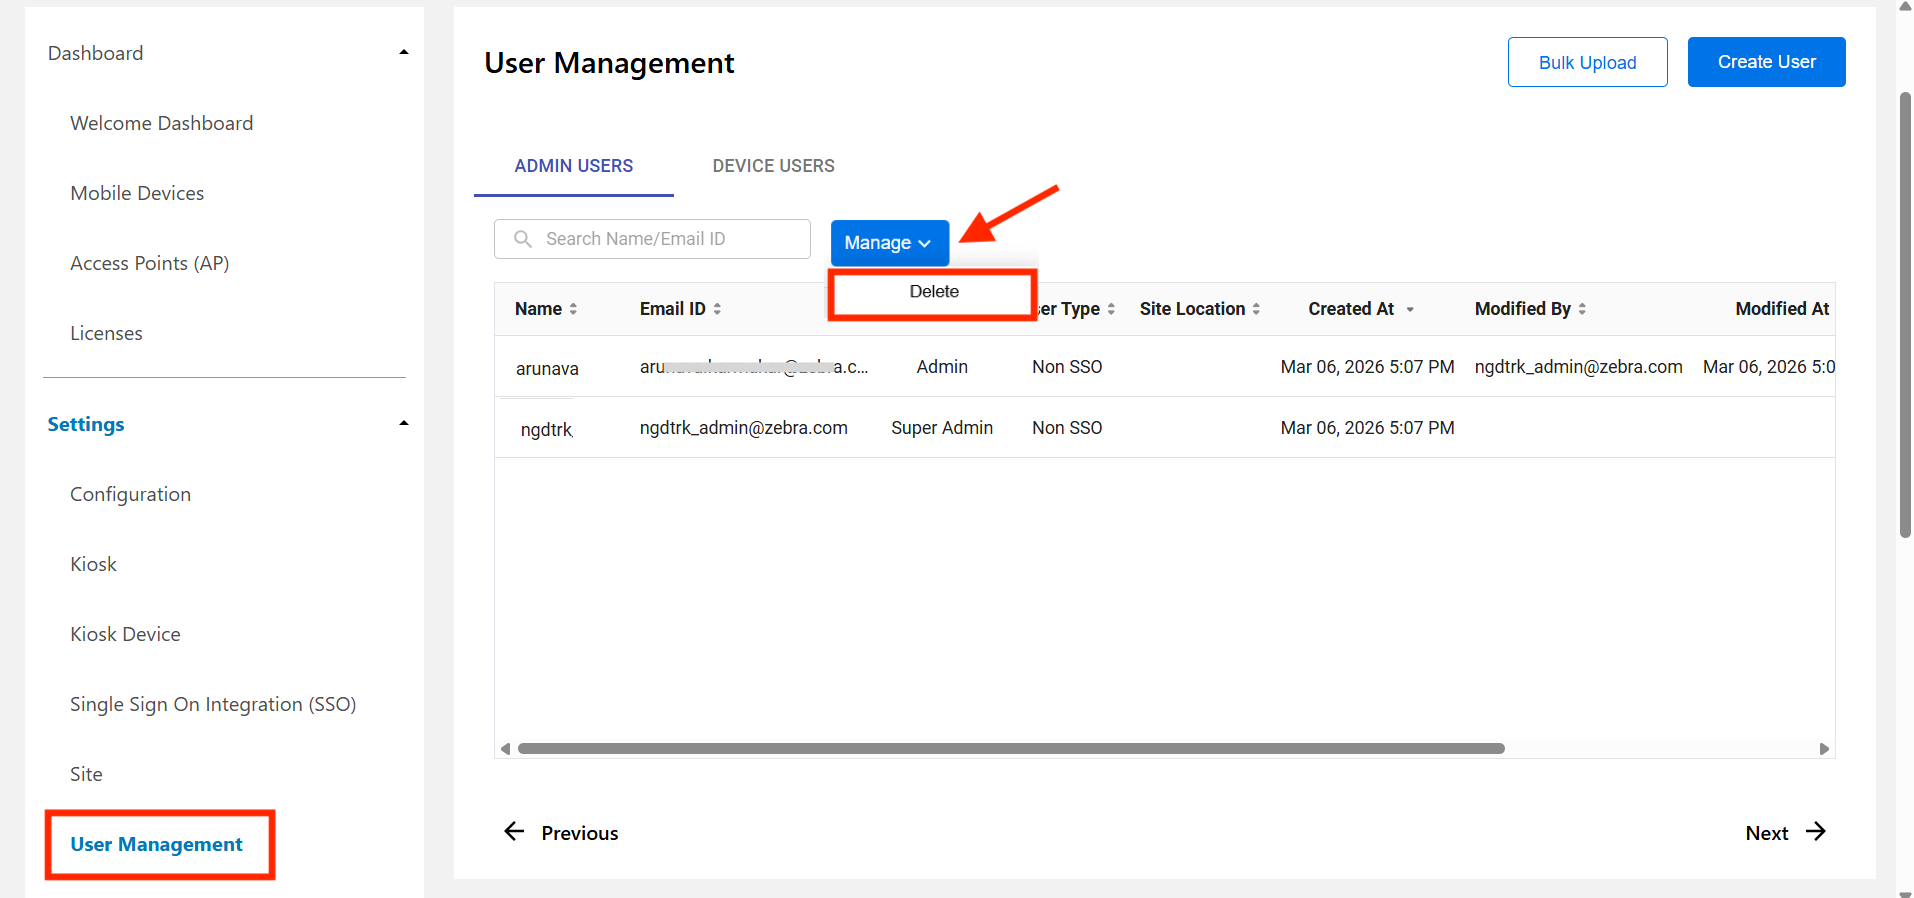
- Click Selected Files and browse to the prepared
.csvfile. Alternatively, drag and drop the file into the window. Click Import. - Click Delete. A message appears indicating whether the import was successful.A message appears indicating whether the import was successful.

If any errors are encountered, see CSV Import Errors.
CSV Import Errors
The following guide describes potential errors that may occur during the CSV import process. Review the error message, identify the potential cause, and apply the recommended solution.
| Error Message / Scenario | Potential Cause | Solution |
|---|---|---|
| File Format and Structure Errors | ||
File too large or File Limit Exceeded |
The .csv file is larger than the 10 MB limit, or it contains more than 25,000 rows. |
Reduce the file size. If necessary, split the data into multiple files and import them separately. |
Incorrect headers |
The column headers in the .csv file do not exactly match the required fields (e.g., firstName, lastName). |
Verify that all column headers in the file match the provided template. Headers are case-sensitive. |
Only CSV Allowed or Invalid CSV File |
The uploaded file is not in a valid .csv format, or it may be corrupted. |
Ensure the file is saved with a .csv extension and is properly formatted. Re-exporting the file from your spreadsheet application can often fix corruption issues. |
| Data Integrity and Field Value Errors | ||
Duplicate emails |
The .csv file contains two or more rows with the same email address. |
Each user must have a unique email address. Remove any duplicate email entries from the file. |
Invalid email format |
An email address is not in a standard format (e.g., user@example.com). |
Review and correct all email addresses to ensure they are valid. |
Missing required field or Required |
A mandatory field, such as firstName or role, is empty for one or more users. |
Ensure all required fields have a value for every row in the file. |
Required Field: SiteName |
The siteName field is empty for a user whose role is set to manager. |
The siteName field is mandatory for all users with the manager role. Populate this field for all managers. |
Must Be Empty or Unexpected non-empty field |
The siteName field contains a value for a user whose role is set to admin. |
The siteName field must be empty for users with the admin role. Remove the value from this field. |
Invalid Format |
A field contains a value that does not meet the expected constraints (e.g., role is something other than admin or manager). |
Correct the field's value to match the allowed options (e.g., for language, use only en or fr). |
| User and System Validation Errors | ||
Users Already Exist |
The email address is already registered in the system. | Remove the existing users from the .csv file. If modification is required, use the appropriate update process, not the bulk add feature. |
User not found for deletion or Users Not Found |
The email and authType do not match an existing record. |
Verify the user's email address and authentication type are correct. Check for typos or case-sensitivity issues. |
Non SSO User Cannot Create SSO Users |
An administrator who logs in without SSO is attempting to add users with an authType of sso. |
This action is not permitted. The bulk upload must be performed by an administrator who logs in with SSO. |
Current User |
The .csv file for a bulk deletion includes the currently logged-in administrator. |
An administrator cannot delete their own account. Remove the current user's entry from the file. |
Unexpected Import Error |
A general or unknown error occurred on the server during the import. | Wait a few moments and try the import again. If the issue persists, contact support for assistance. |
Search Admin User
Administrators or managers can be searched based on user ID. To search for a user:
- Log in to the web portal as an administrator or manager.
- Go to Admin Settings > User Management.
- In the search field below User Management, enter the user ID to search. Press the enter key.
- The search results are displayed. If searching for an email address for non-SSO users, the entire email address must be entered.
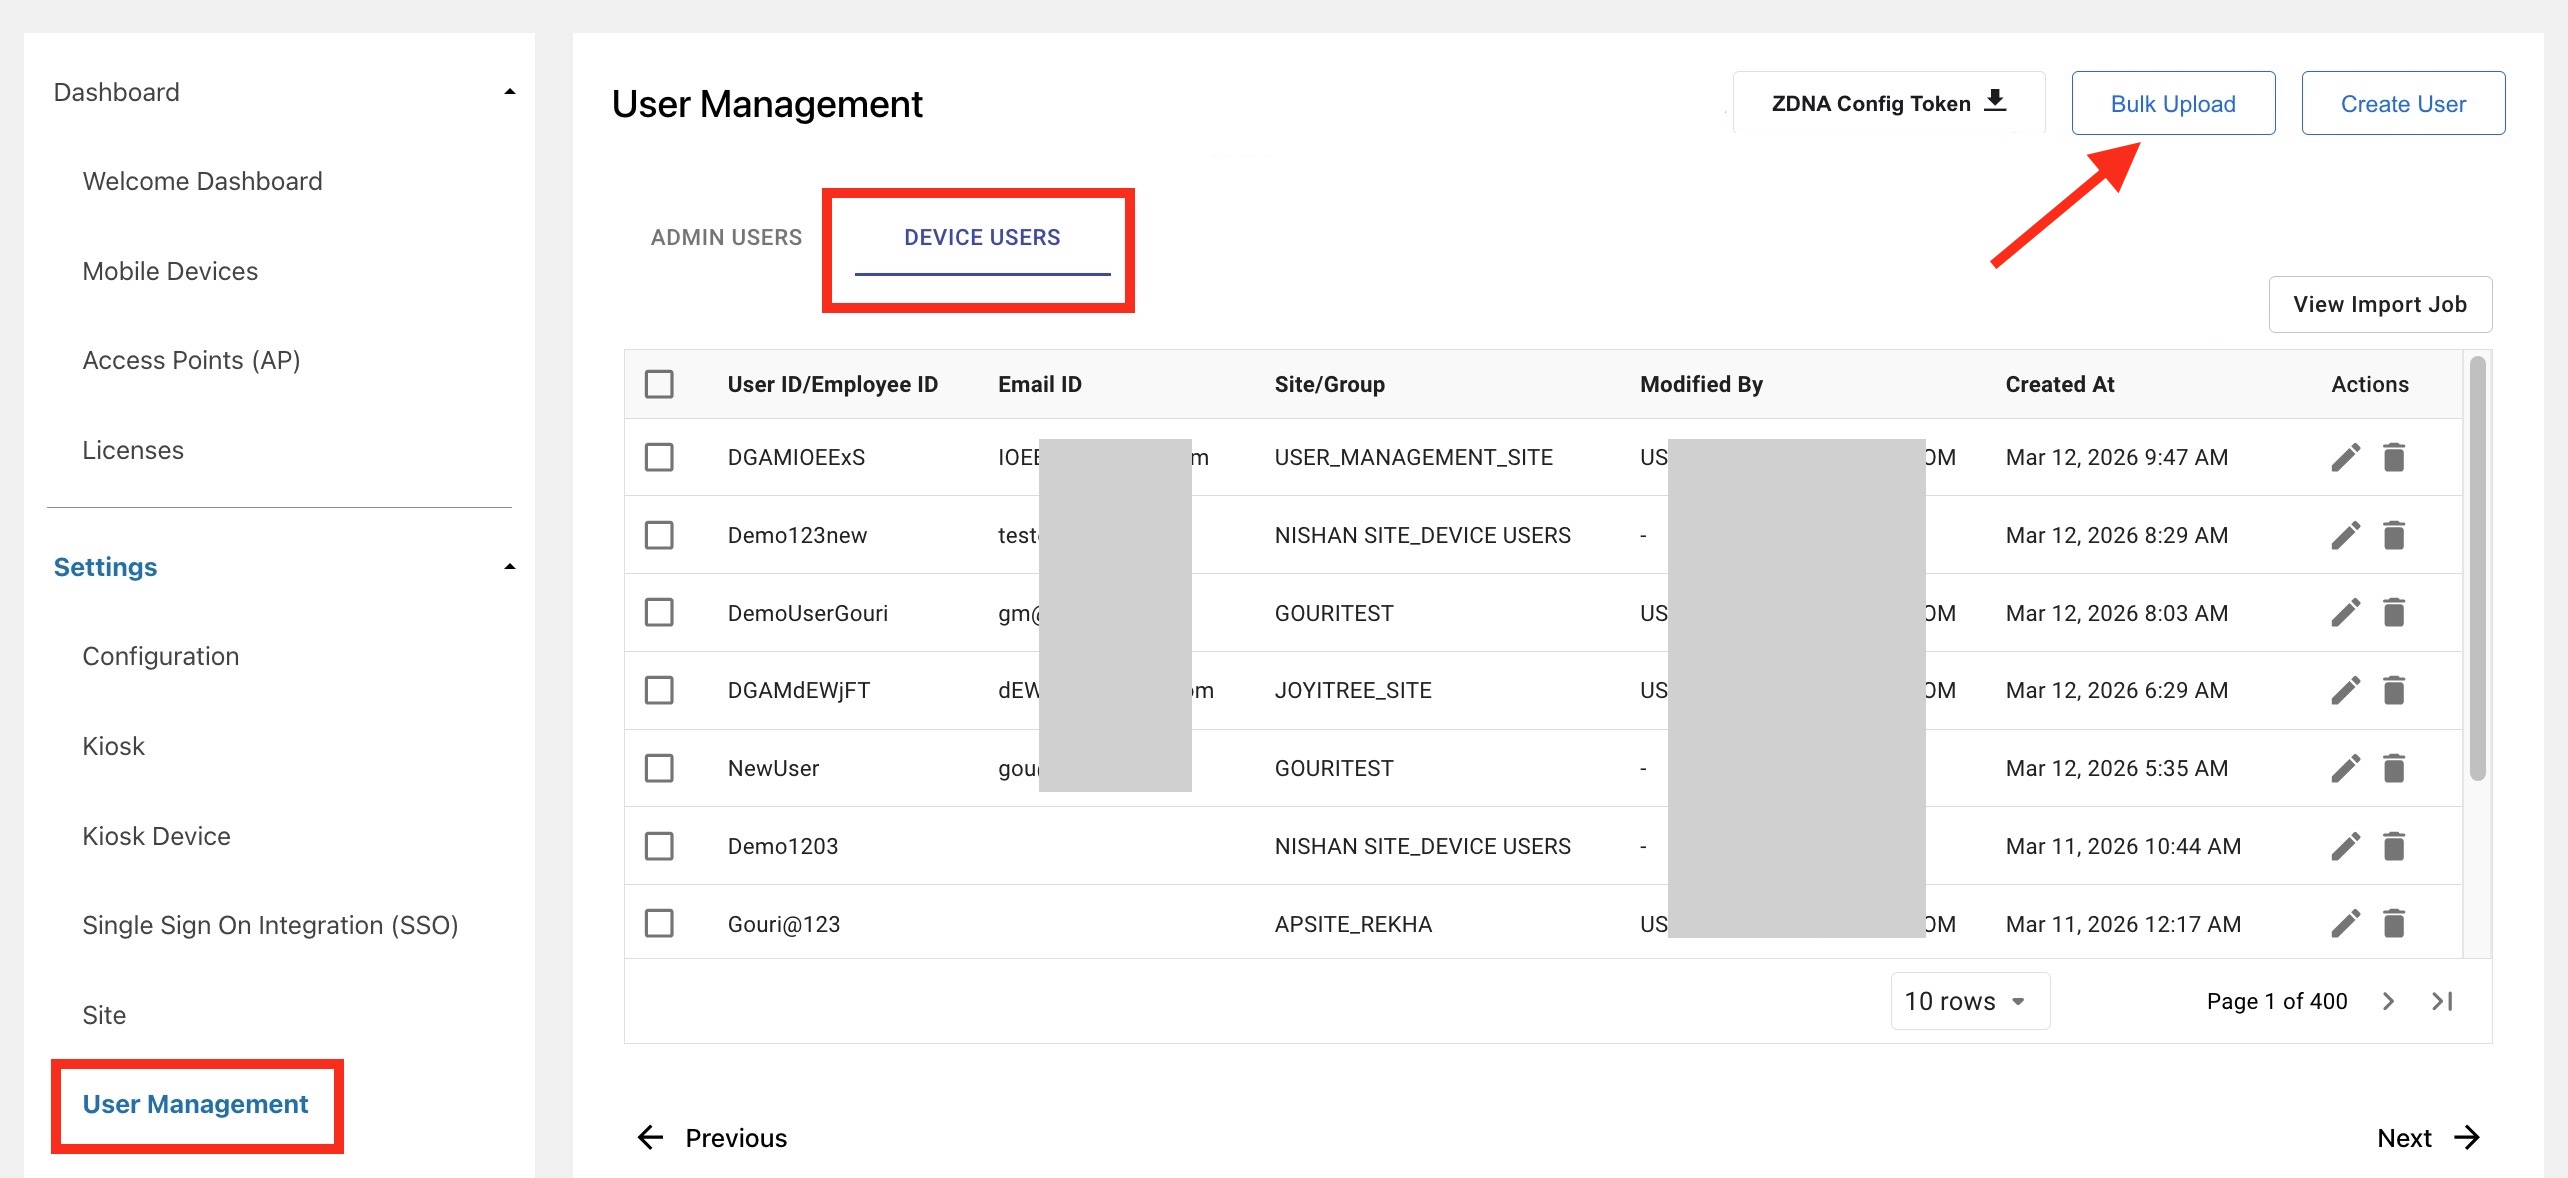
Device Users
This section applies to
DGAM Only.
Device Users are defined as associates or end-users who authenticate and log in to devices using a passcode. This classification specifically excludes administrative or managerial roles. Administrators manage both Device Users and other Administrator Users through the web portal. This section focuses on creating Device Users.
Guide for Admin Users
Create Device User
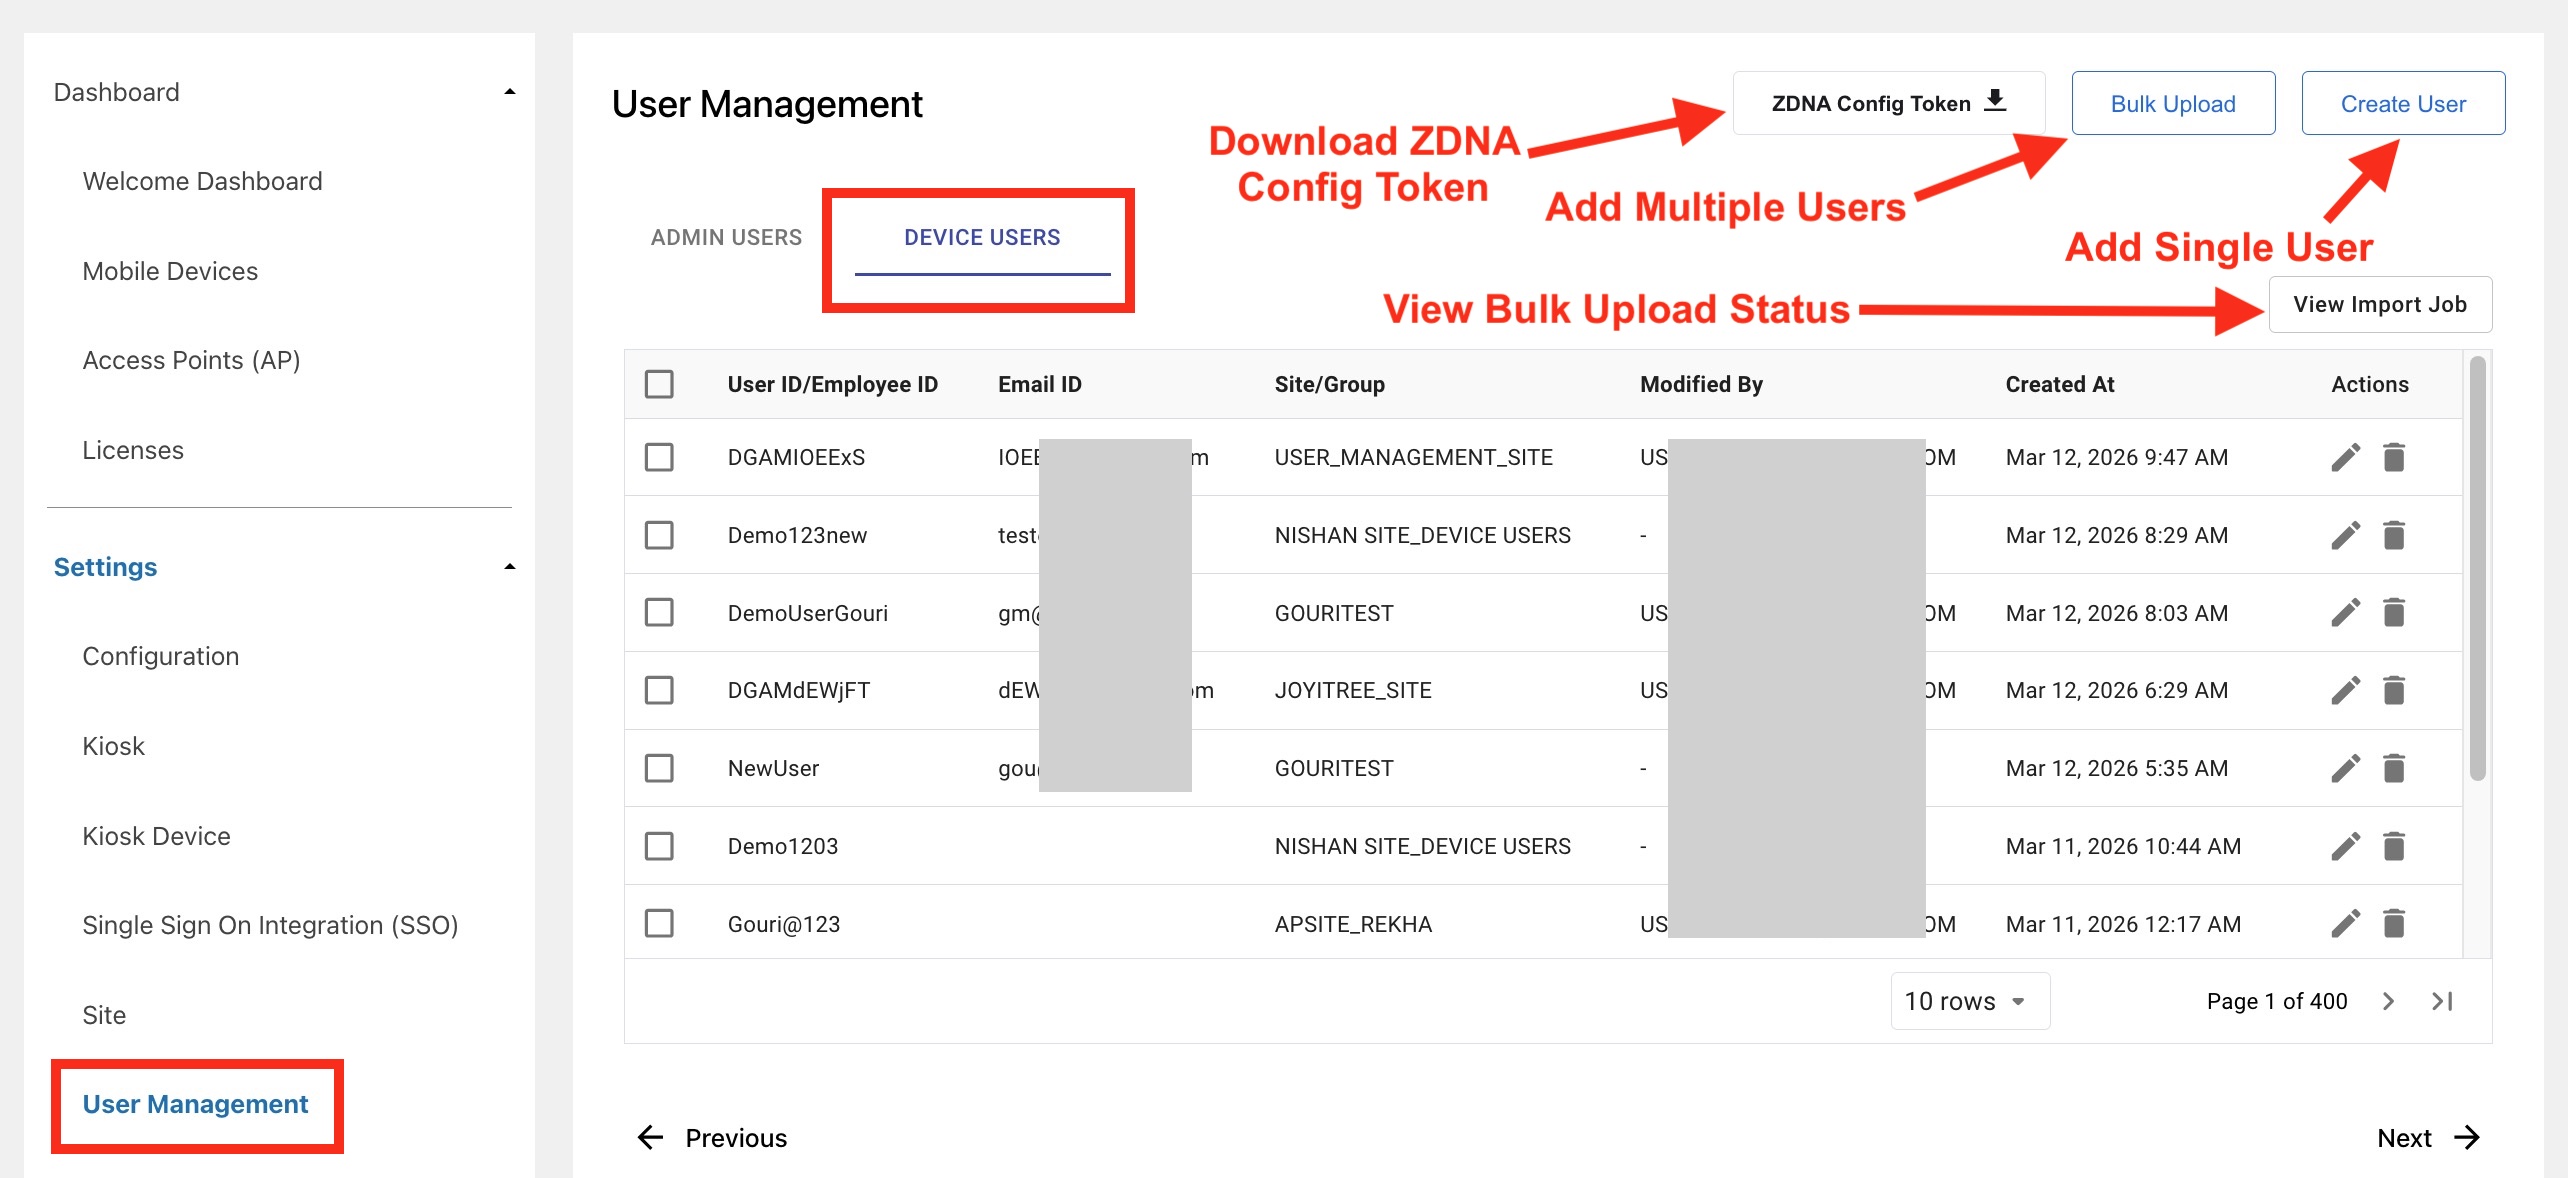
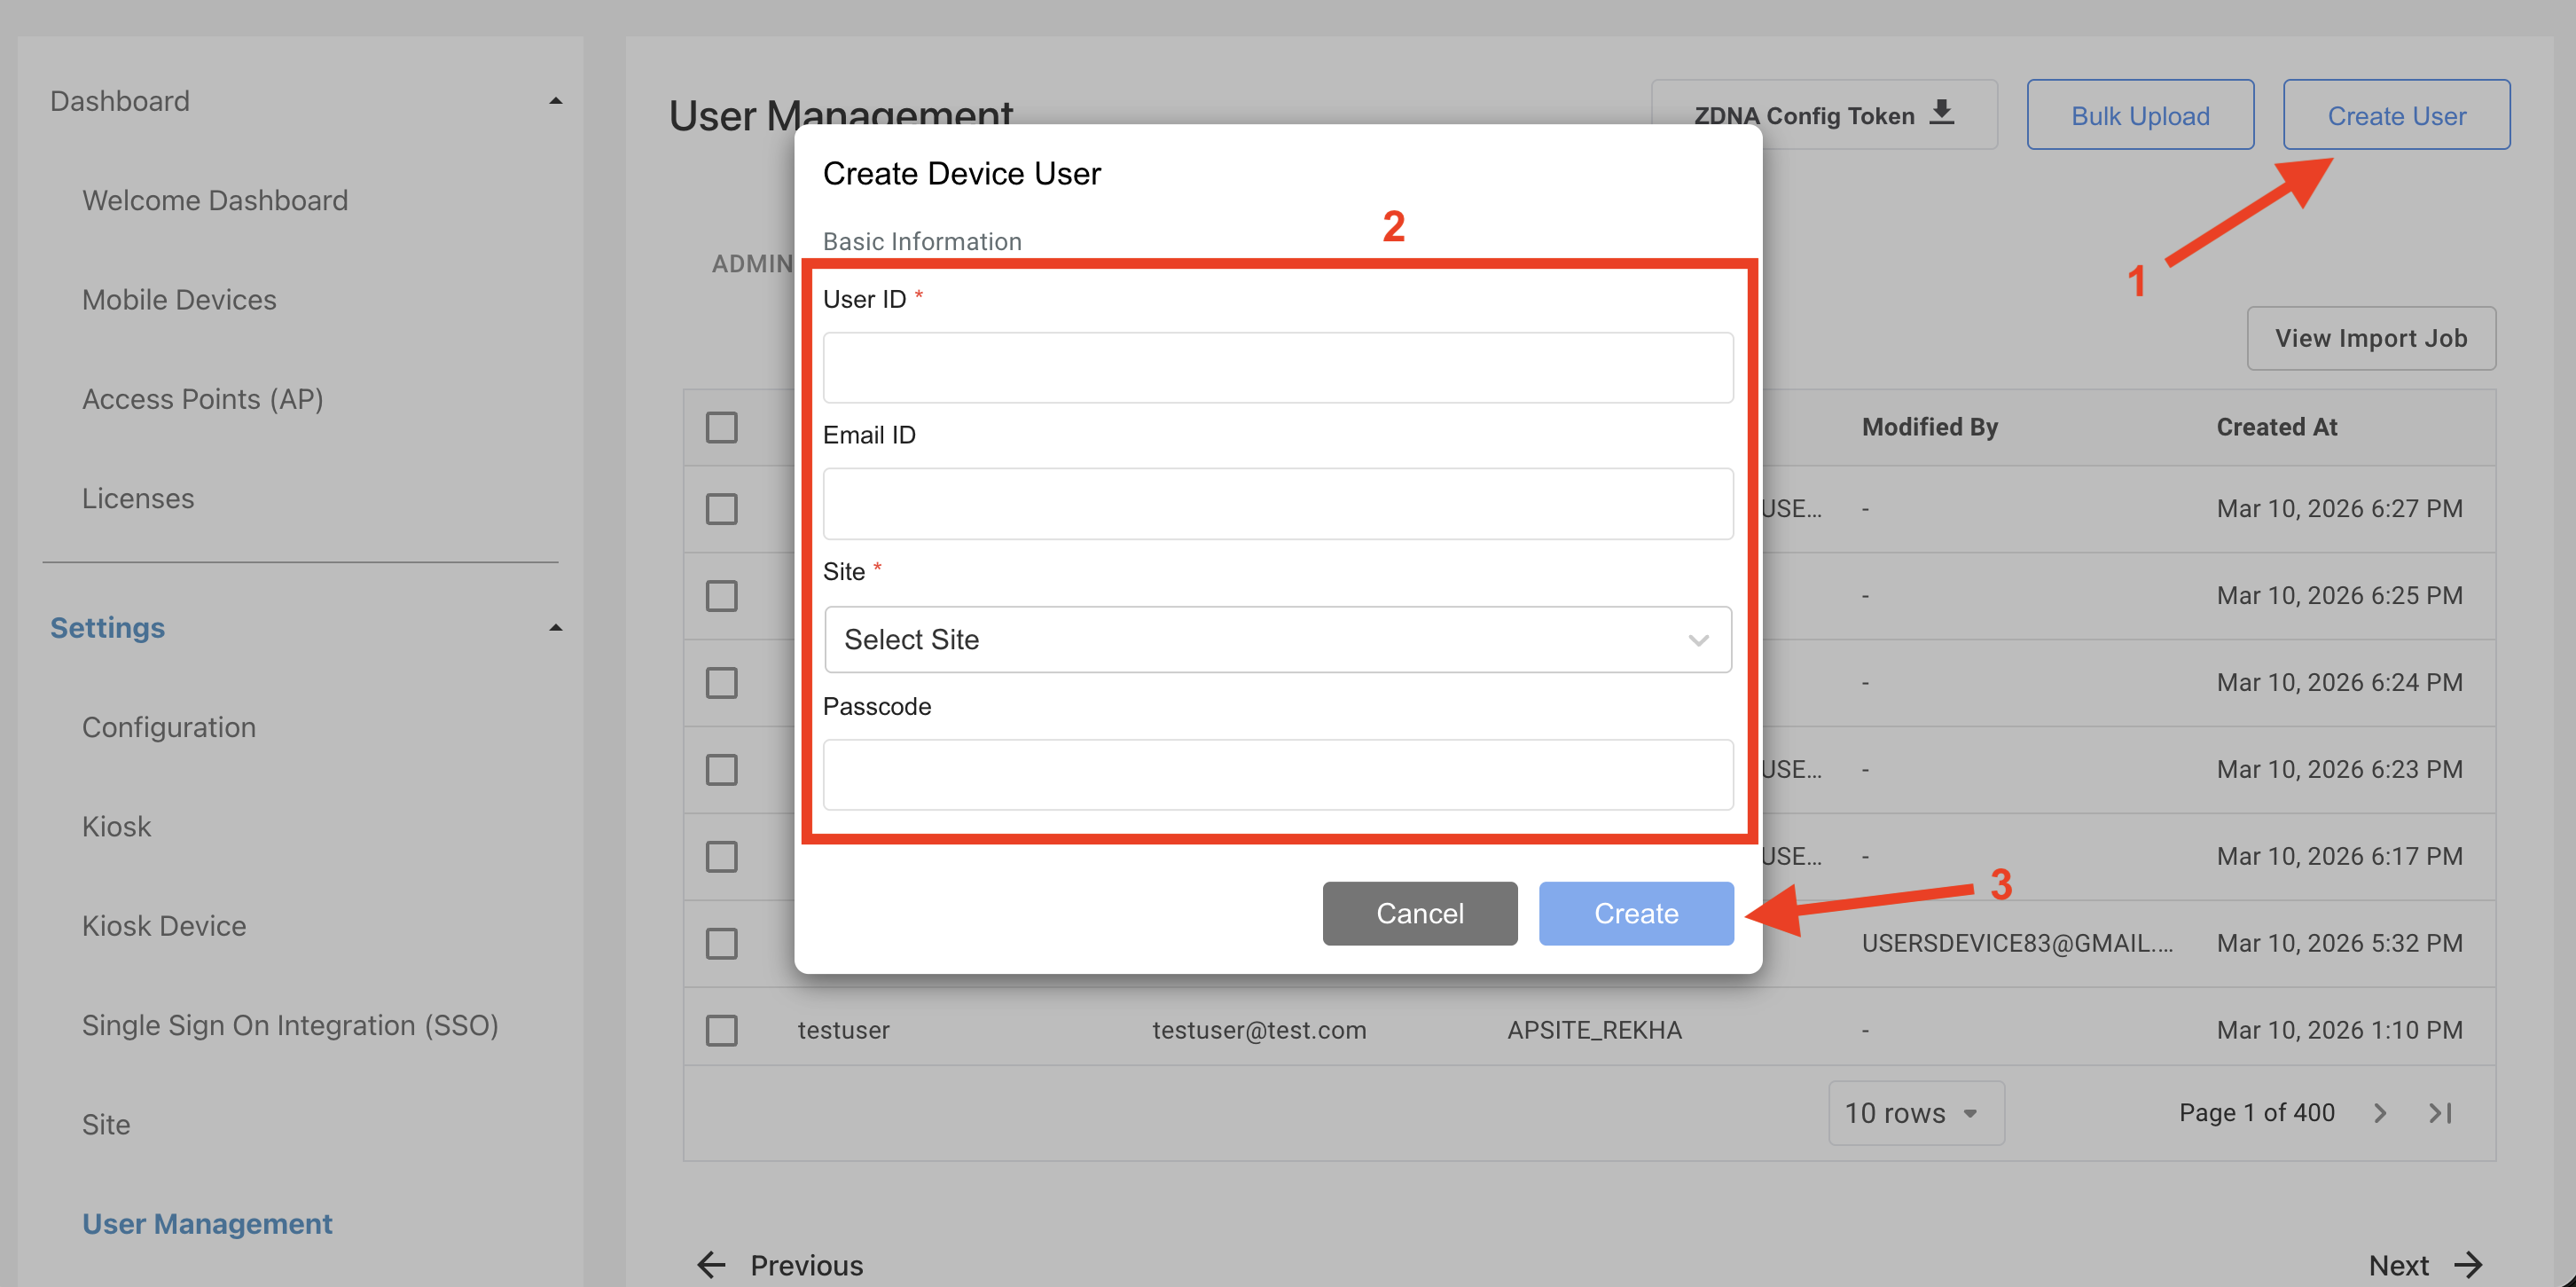
To create a single device user:
- From the Device Users screen, click Create User.
- Enter the necessary information, then click Create.
Note: After setting a passcode, the administrator must securely transmit it to the user through their preferred communication method (e.g., email).
Bulk Upload Users
Use the Bulk Upload feature to add or update multiple device users at once.
Important: This method is required when Identity Guardian is configured with “CLOUD” as the Comparison Source and “CLOUD_PASSCODE” as the Primary Authentication Factor.
Device Setup for Bulk Upload
Before adding device users via Bulk Upload, the following components must be set up on the devices:
- Apply the ZDNA Config Token (
.txtfile) with ZDNA Cloud. This token is required to connect devices to Zebra DNA Cloud. - Install and launch the ZDNA Cloud Client.
- Install and Configure Identity Guardian. This is required for user authentication.
For detailed instructions, see the respective EMM sections in the Setup guide.
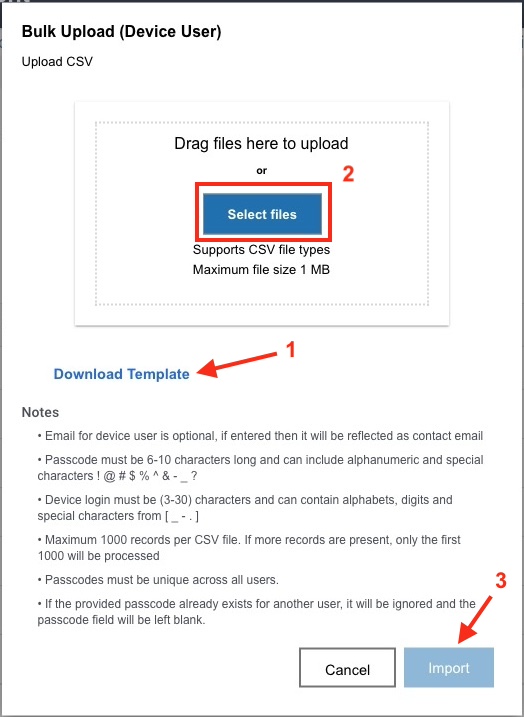
Bulk Upload Users
To add or update multiple users at once through the web portal:
- From the Device Users screen, click Bulk Upload.
- Click Download Template to download the
.csvfile. - Open the template and fill in the necessary information. Save the file.
Caution: The Site Name information in the.CSVfile must be entered accurately to avoid login issues. Each email and passcode must be unique. Duplicate entries are automatically cleared. - Click Select files and choose the completed template file.
- Click Import. A confirmation message reports that status of the upload.
 Bulk Upload steps 2 to 5
Note: A single import operation can process a maximum of 5,000 user records.
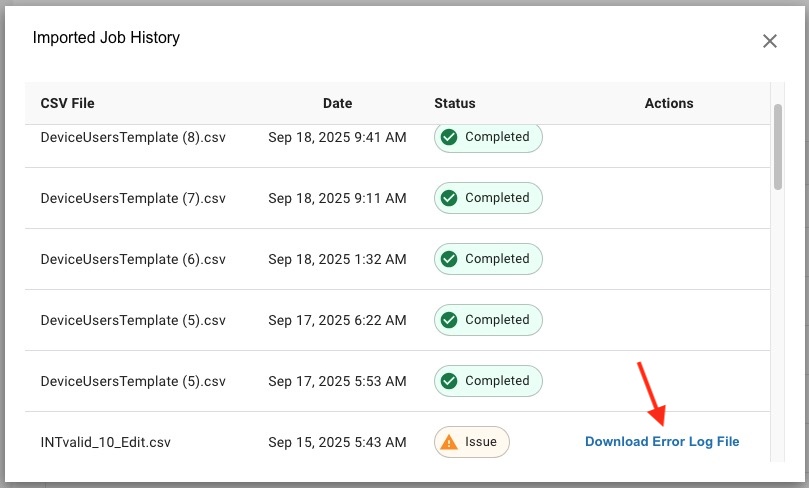
Import Status
After performing a bulk upload, check the status of the import by following these steps:
Click View Import Job from the Device Users screen.
A history of uploaded
.CSVfiles appears, including the time stamp and status:- Completed - The upload was successful.
- Issue - The upload failed. For more details, click Download Error Log File.
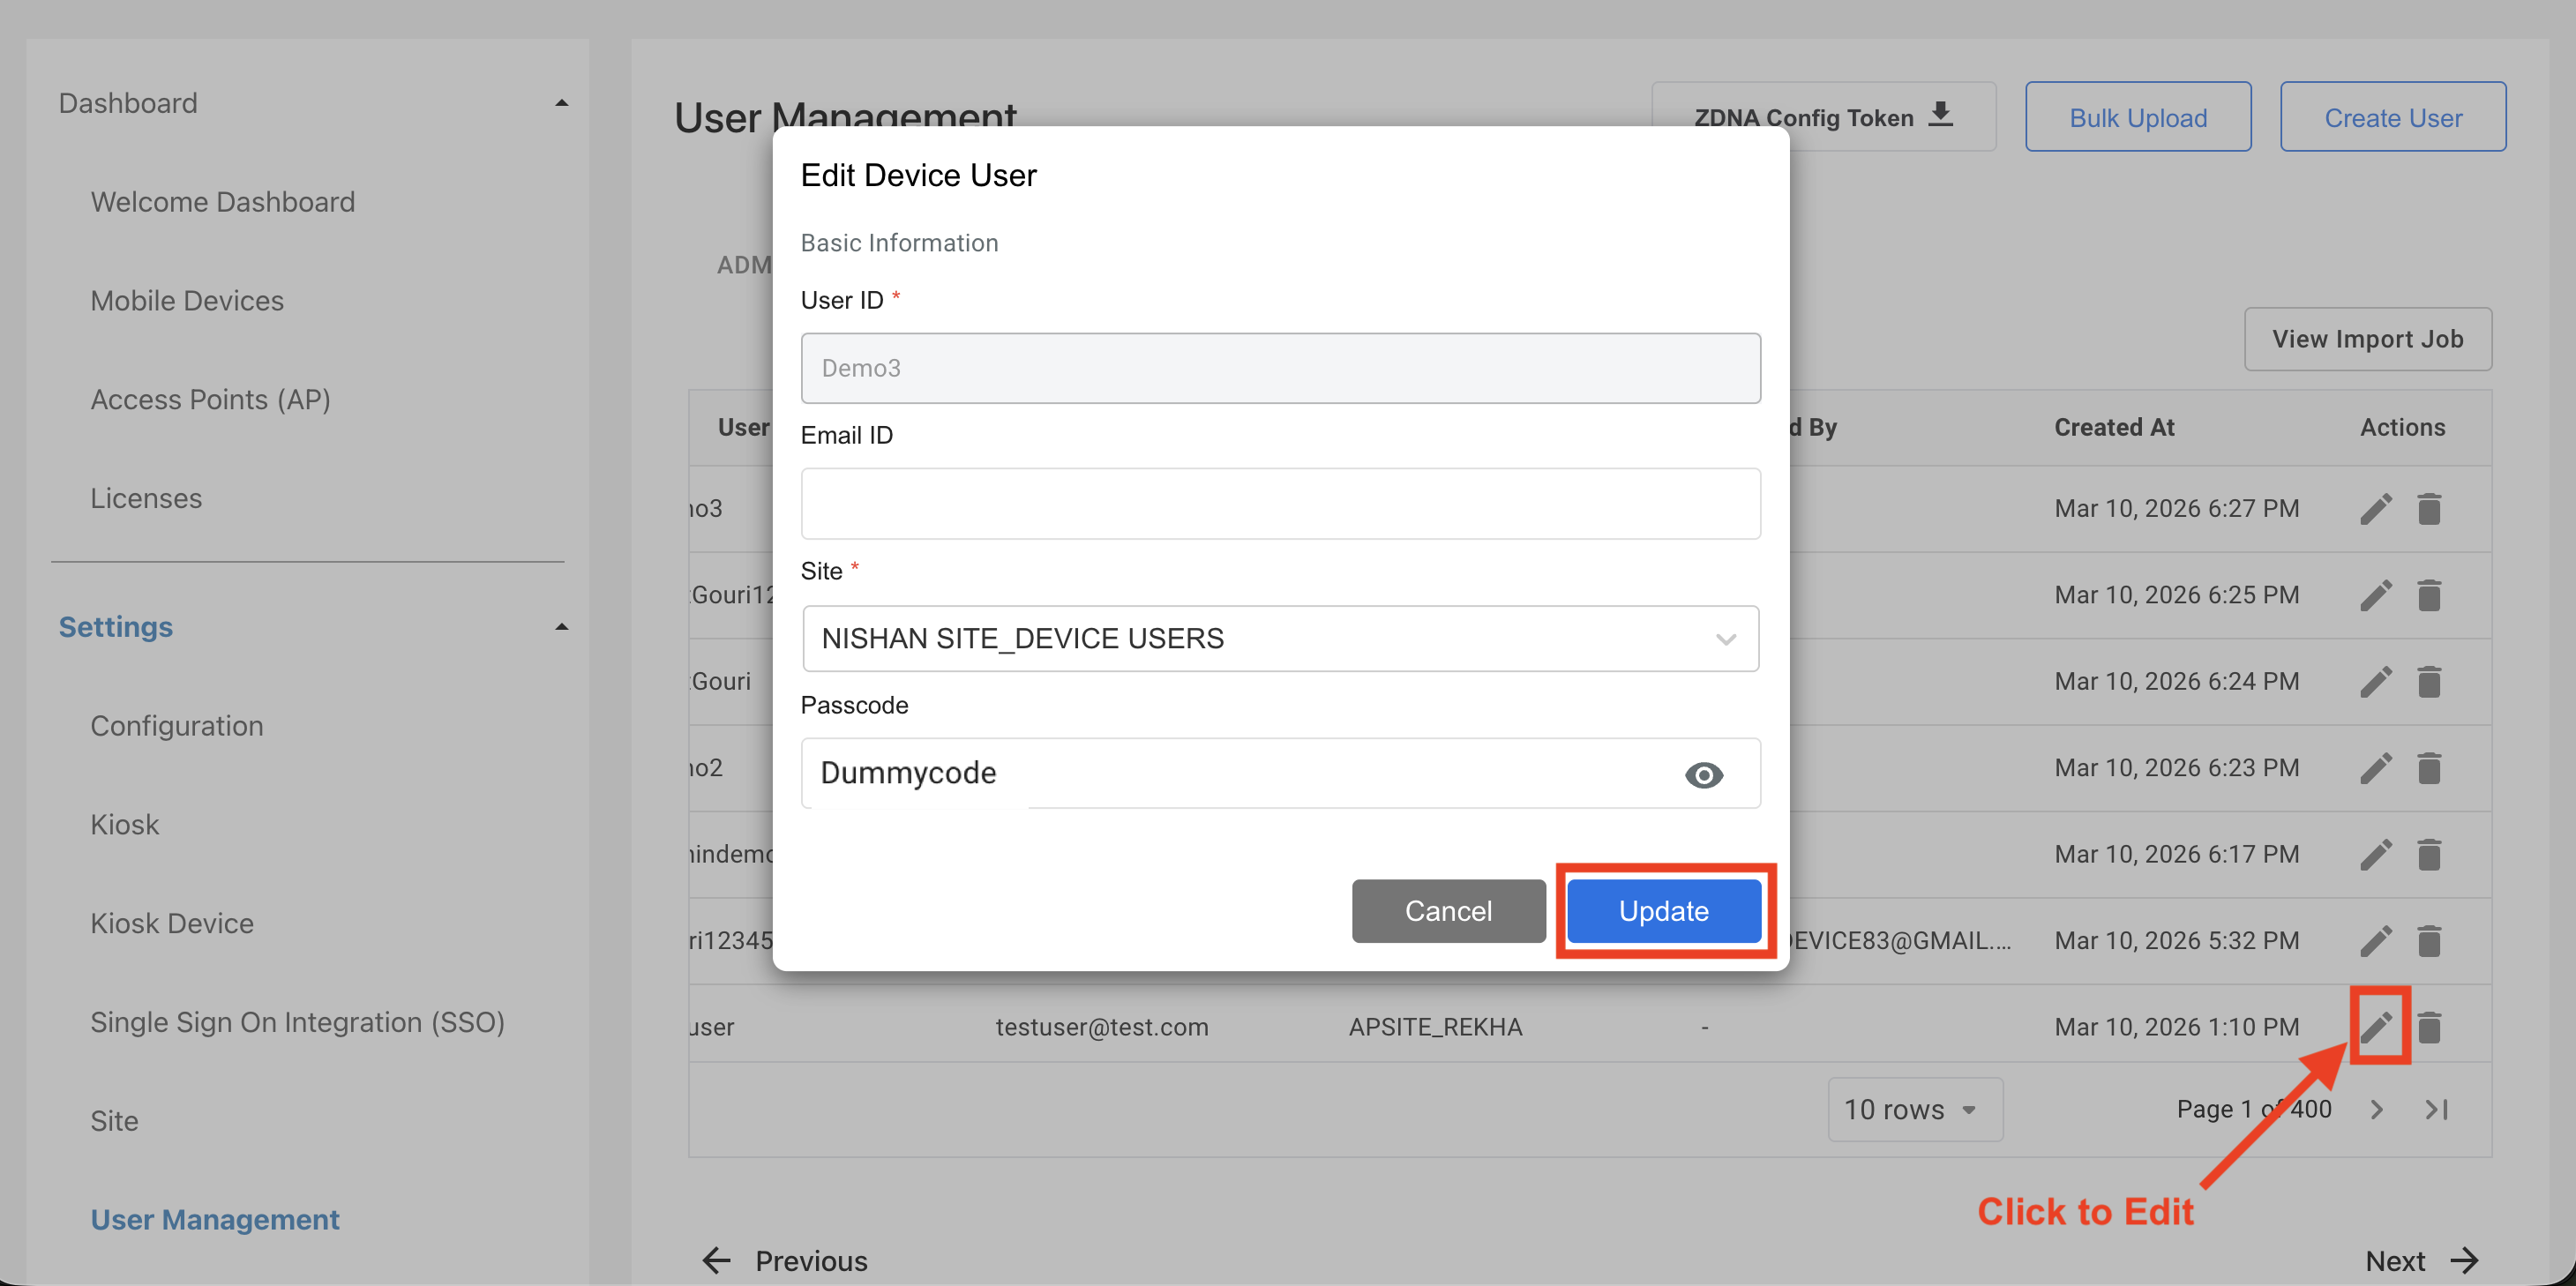
Edit Device User
- From the Device Users screen, click the edit icon next to the user to modify.
- Update the necessary information, then click Update.
Delete Device User
There are two methods to delete users:
- Delete Single User:
- From the Device Users screen, click the delete icon next to the user to remove.
- Click Yes to confirm.
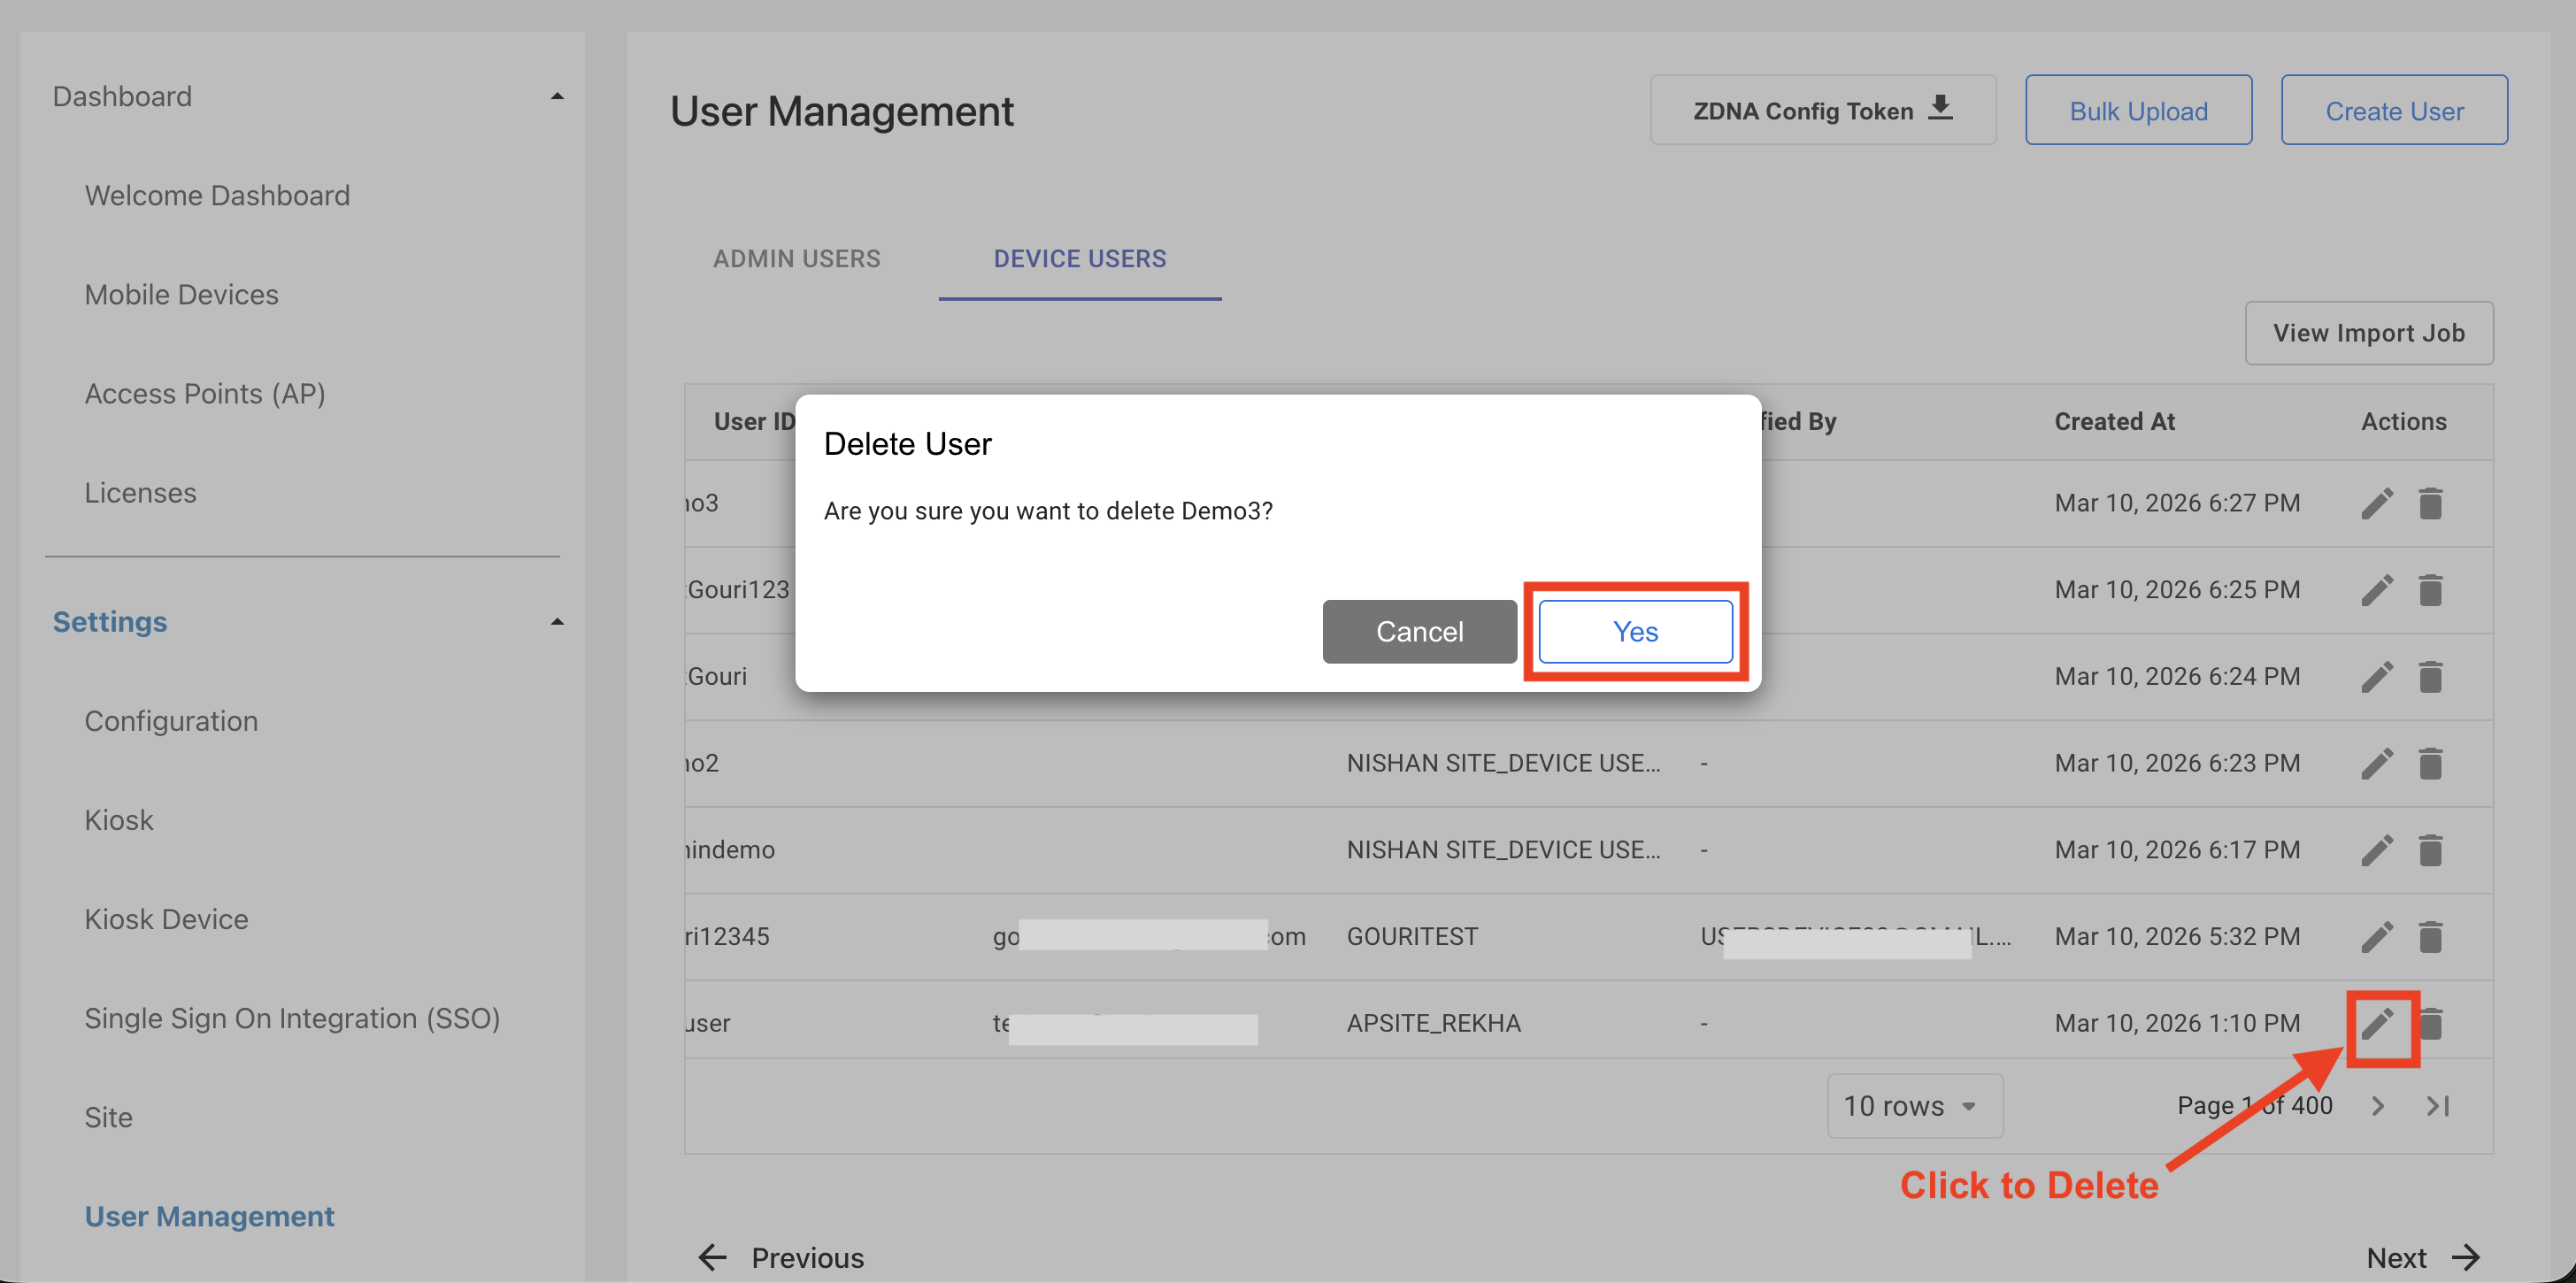
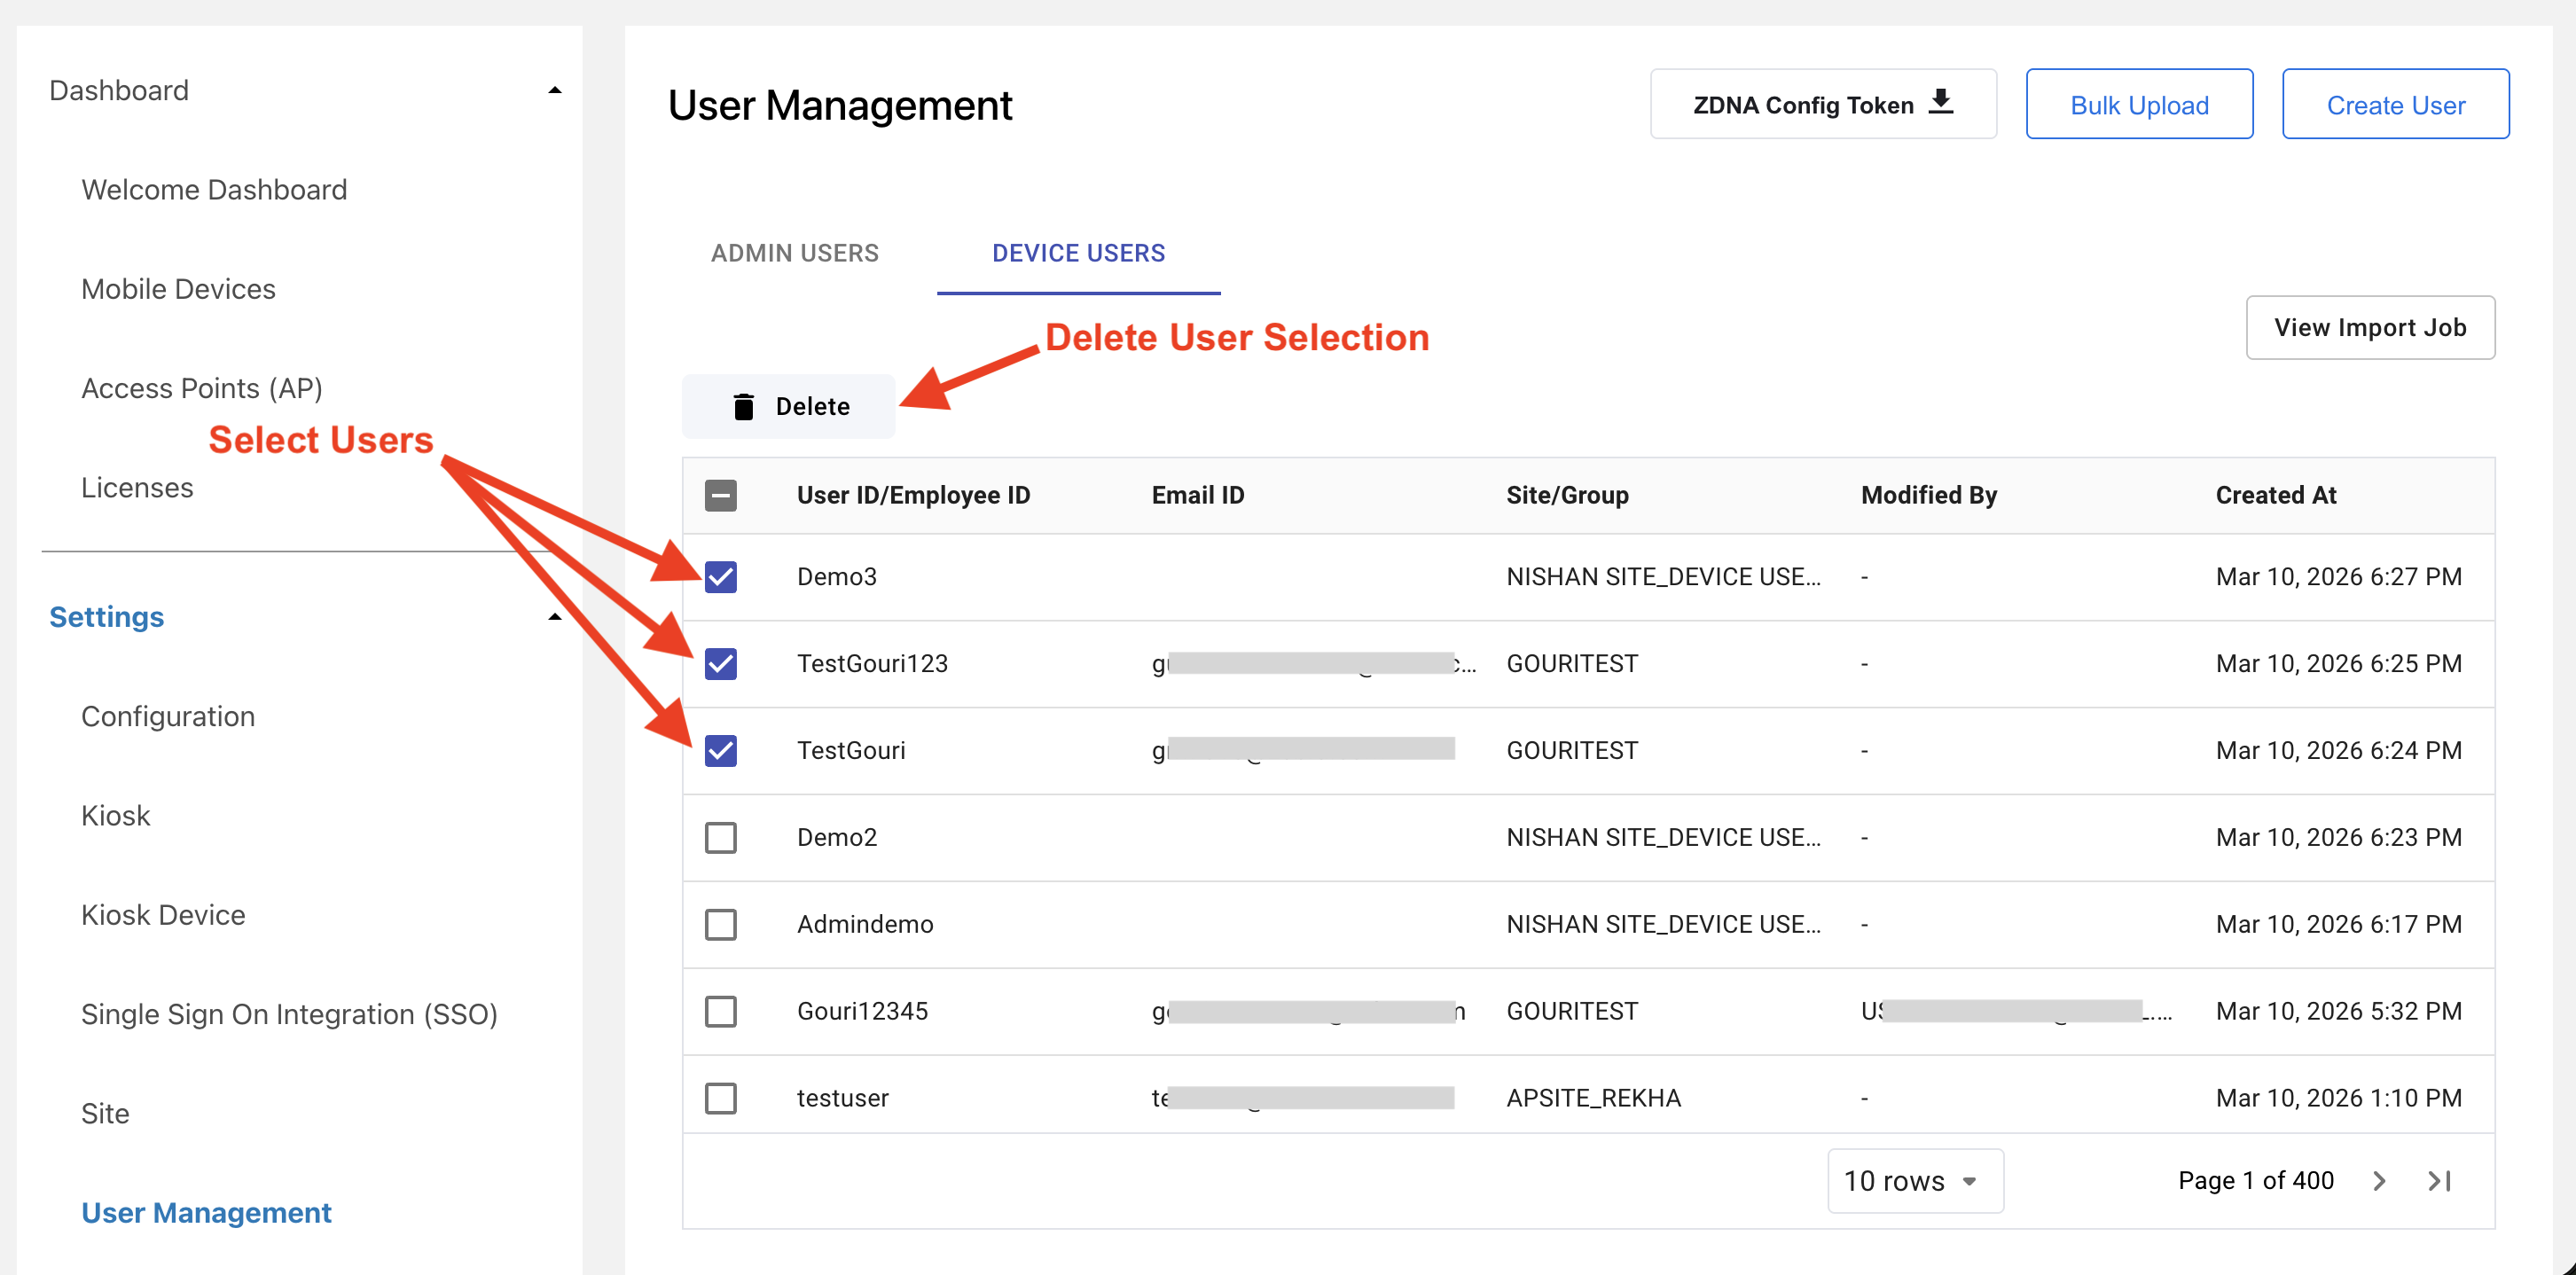
- Delete Single or Multiple Users:
- From the Device Users screen, select the user(s) to remove.
- Click the Delete button.
- Click Yes to confirm.
Reset Password
There are two methods for resetting a password:
- Via the Login Page of the Web Portal - This option also allows setting a password for initial login.
- Using the Edit User screen - Accessible through the web portal interface
Web Portal
Steps for Admin or Manager Users to set or reset the password via the web portal:
- On the web portal login page, click Forgot your password.
- Enter your email address then click Reset Password.
- A message appears indicating that a password reset email has been sent.
- Open the email and click on the provided reset link.
- Enter the new password, ensuring it meets the following guidelines:
- Minimum length: 6 characters
- Allowed characters: Any combination of letters, numbers and symbols (ASCII-standard)
Edit User Screen
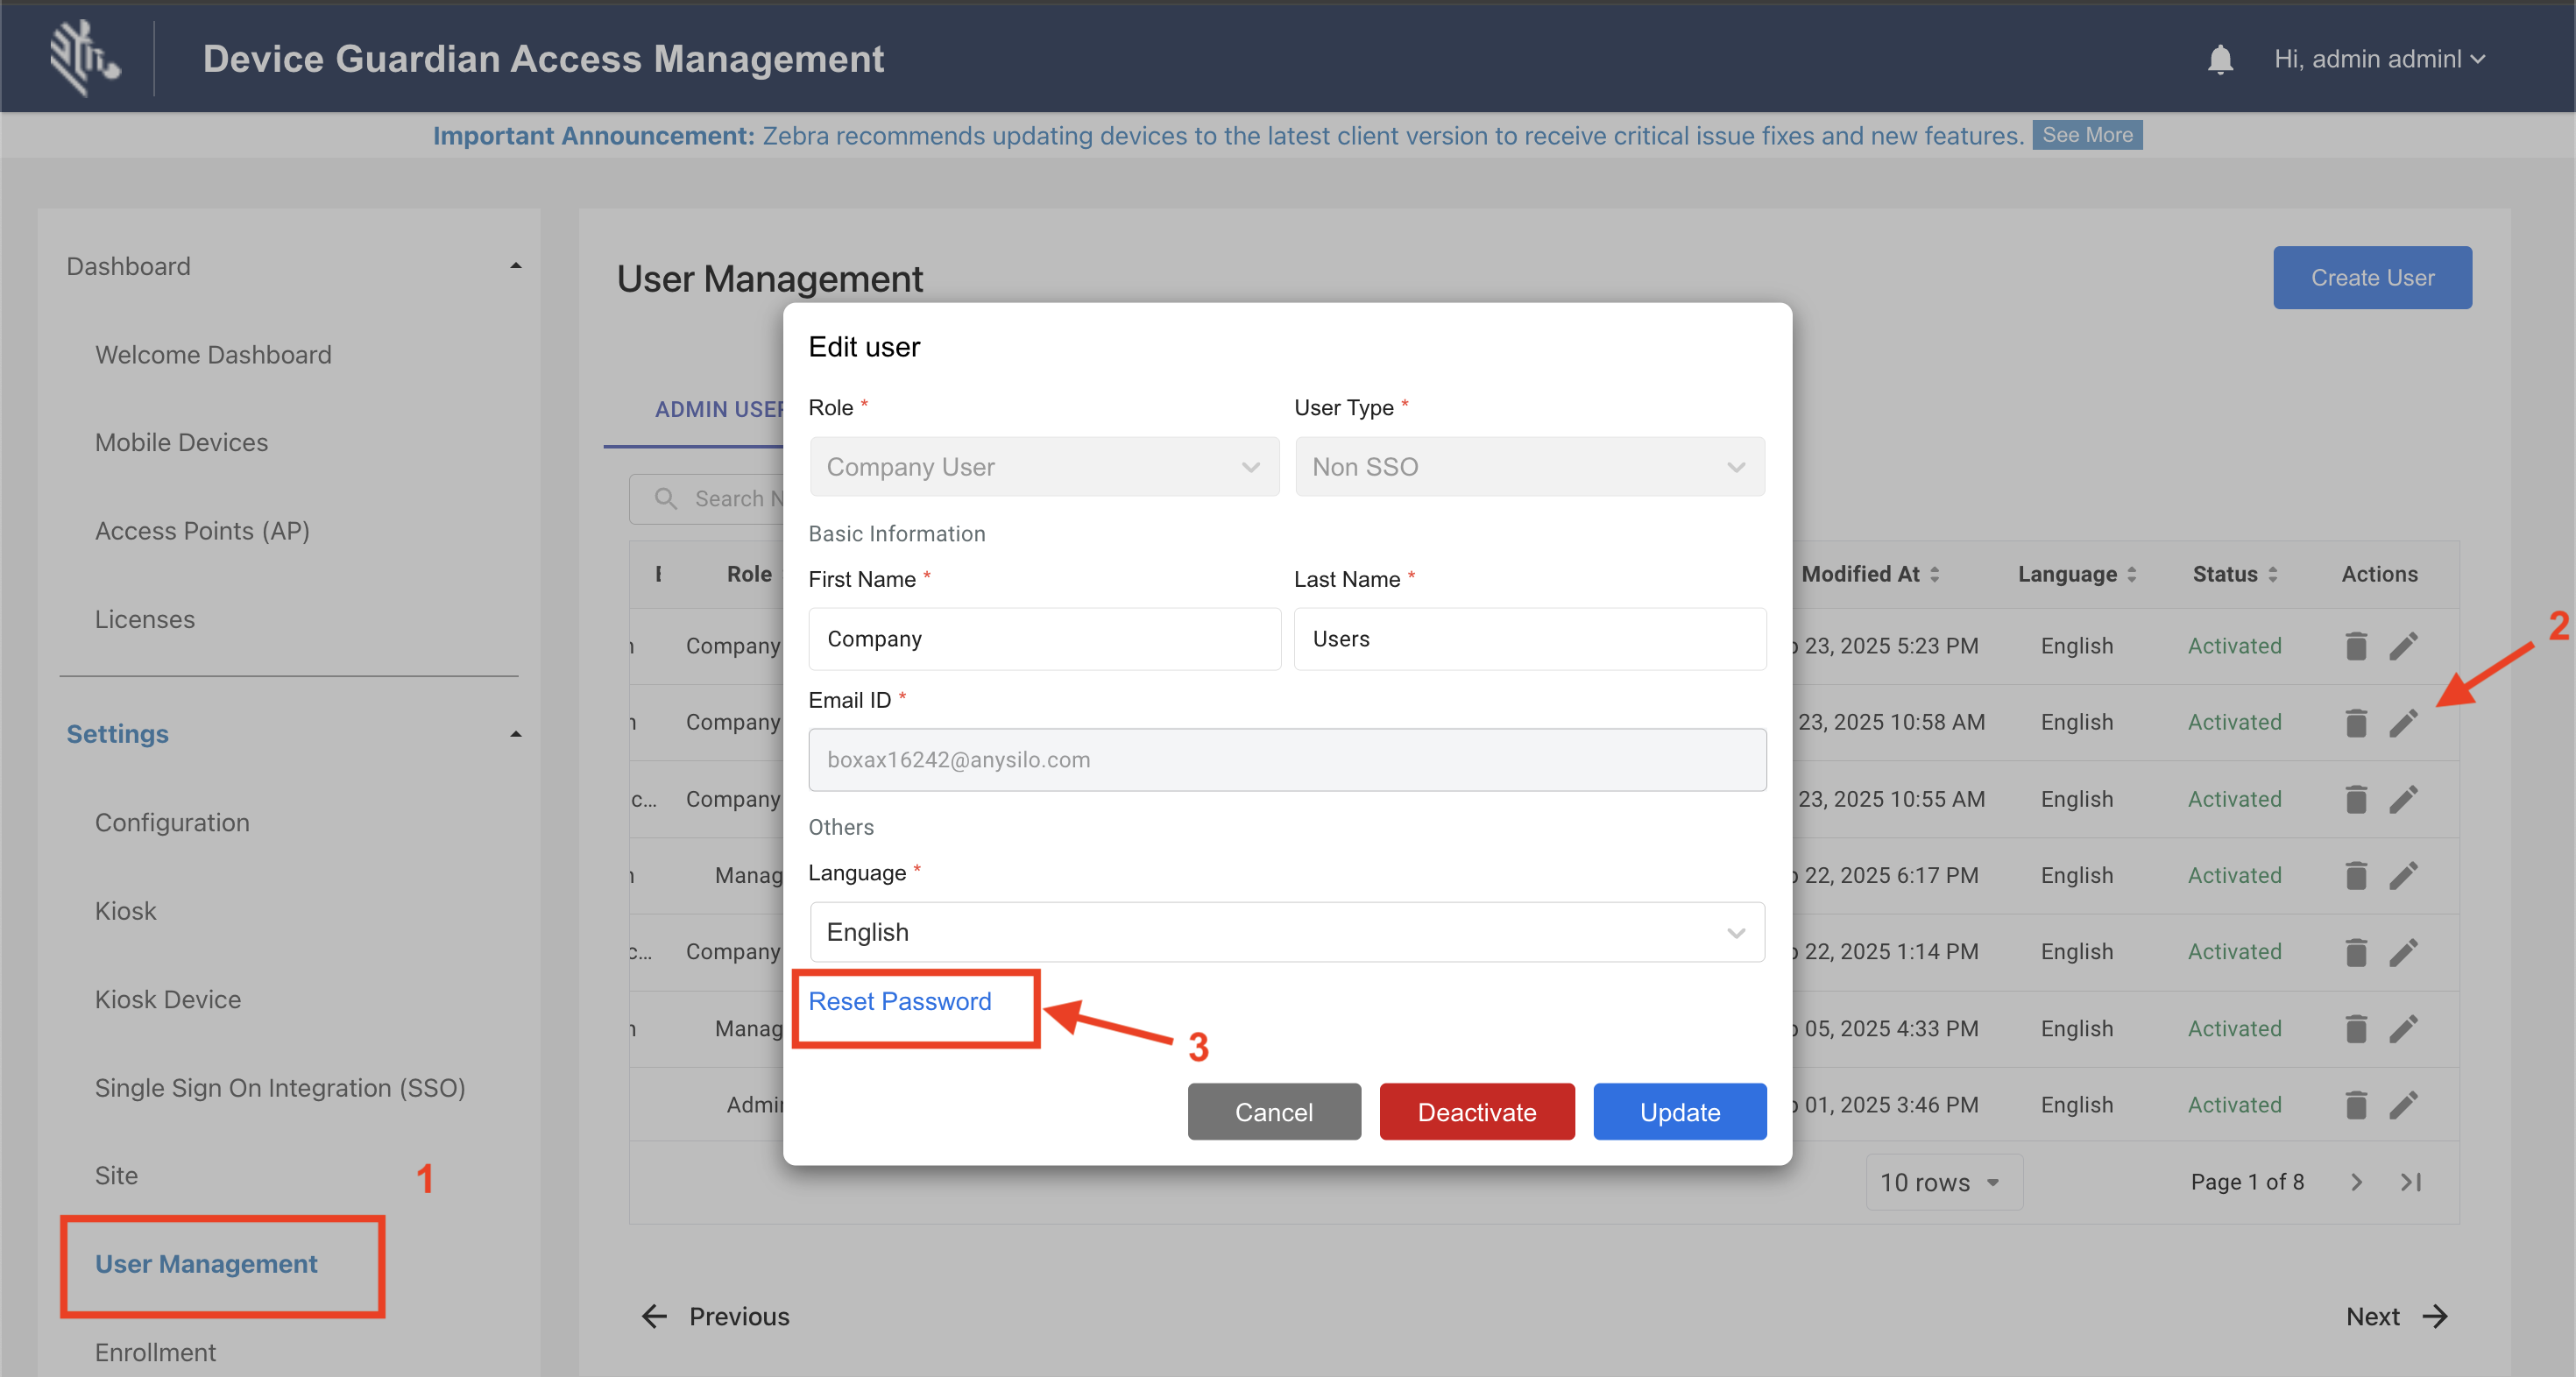
Steps for Admin Users to reset a password for any user through the Edit User screen:
In the web portal, navigate to Settings > User Management.
Locate the user and click the edit icon in the Actions column.
Click Reset Password.
A password reset email is sent to the user, and the reset link remains valid for 1 hour.
Open the email and click on the reset link.
Enter a new password, ensuring it meets the following guidelines:
- Minimum length: 6 characters
- Allowed characters: Any combination of letters, numbers and symbols (ASCII-standard)
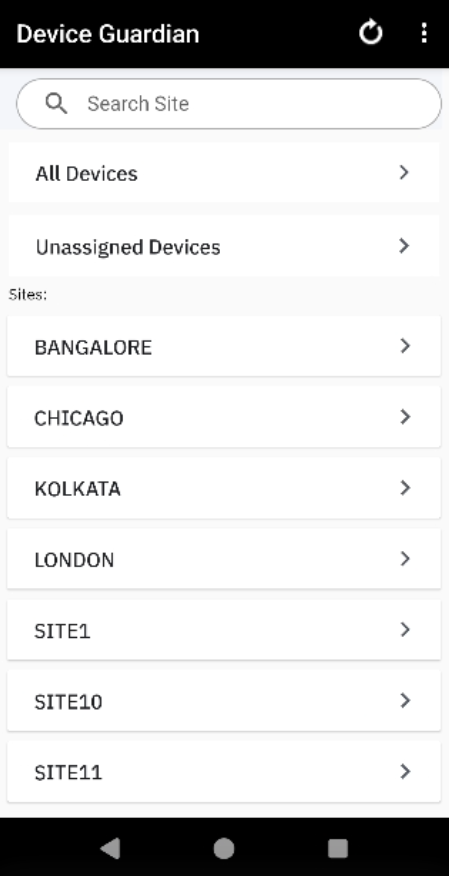
Manage Sites
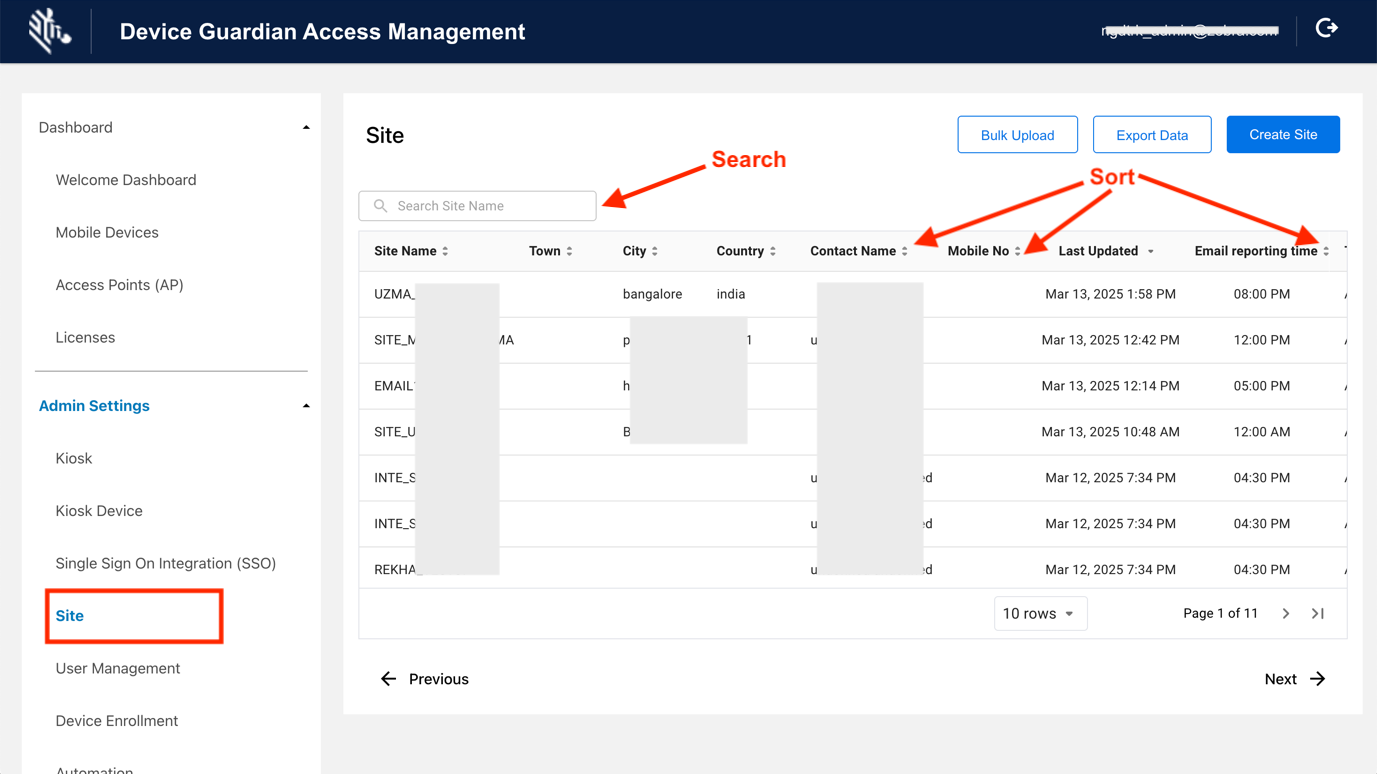
Administrators register sites (under Admin Settings > Site) to specify locations within an organization, facilitating in device tracking and the retrieval of missing devices. Sites can be individually added, modified, or deleted. Additionally, a bulk upload option is available to add multiple sites using a .CSV file and an export feature is available to export the data.
Site guide
The site data includes:
- Site Name - Name of the site
- Town - Town where the site is located
- City - City where the site is located
- Country - Country where the site is located
- Contact Name - Contact person for the site
- Mobile No - Mobile number for the contact person
- Last Updated - Timestamp of the last edit or update to the site information
- Reported Time - Time when the End of Day Report is generated
- Time Zone - Designated time zone of the site
- Categories - Selected categories included in the report, chosen during site creation:
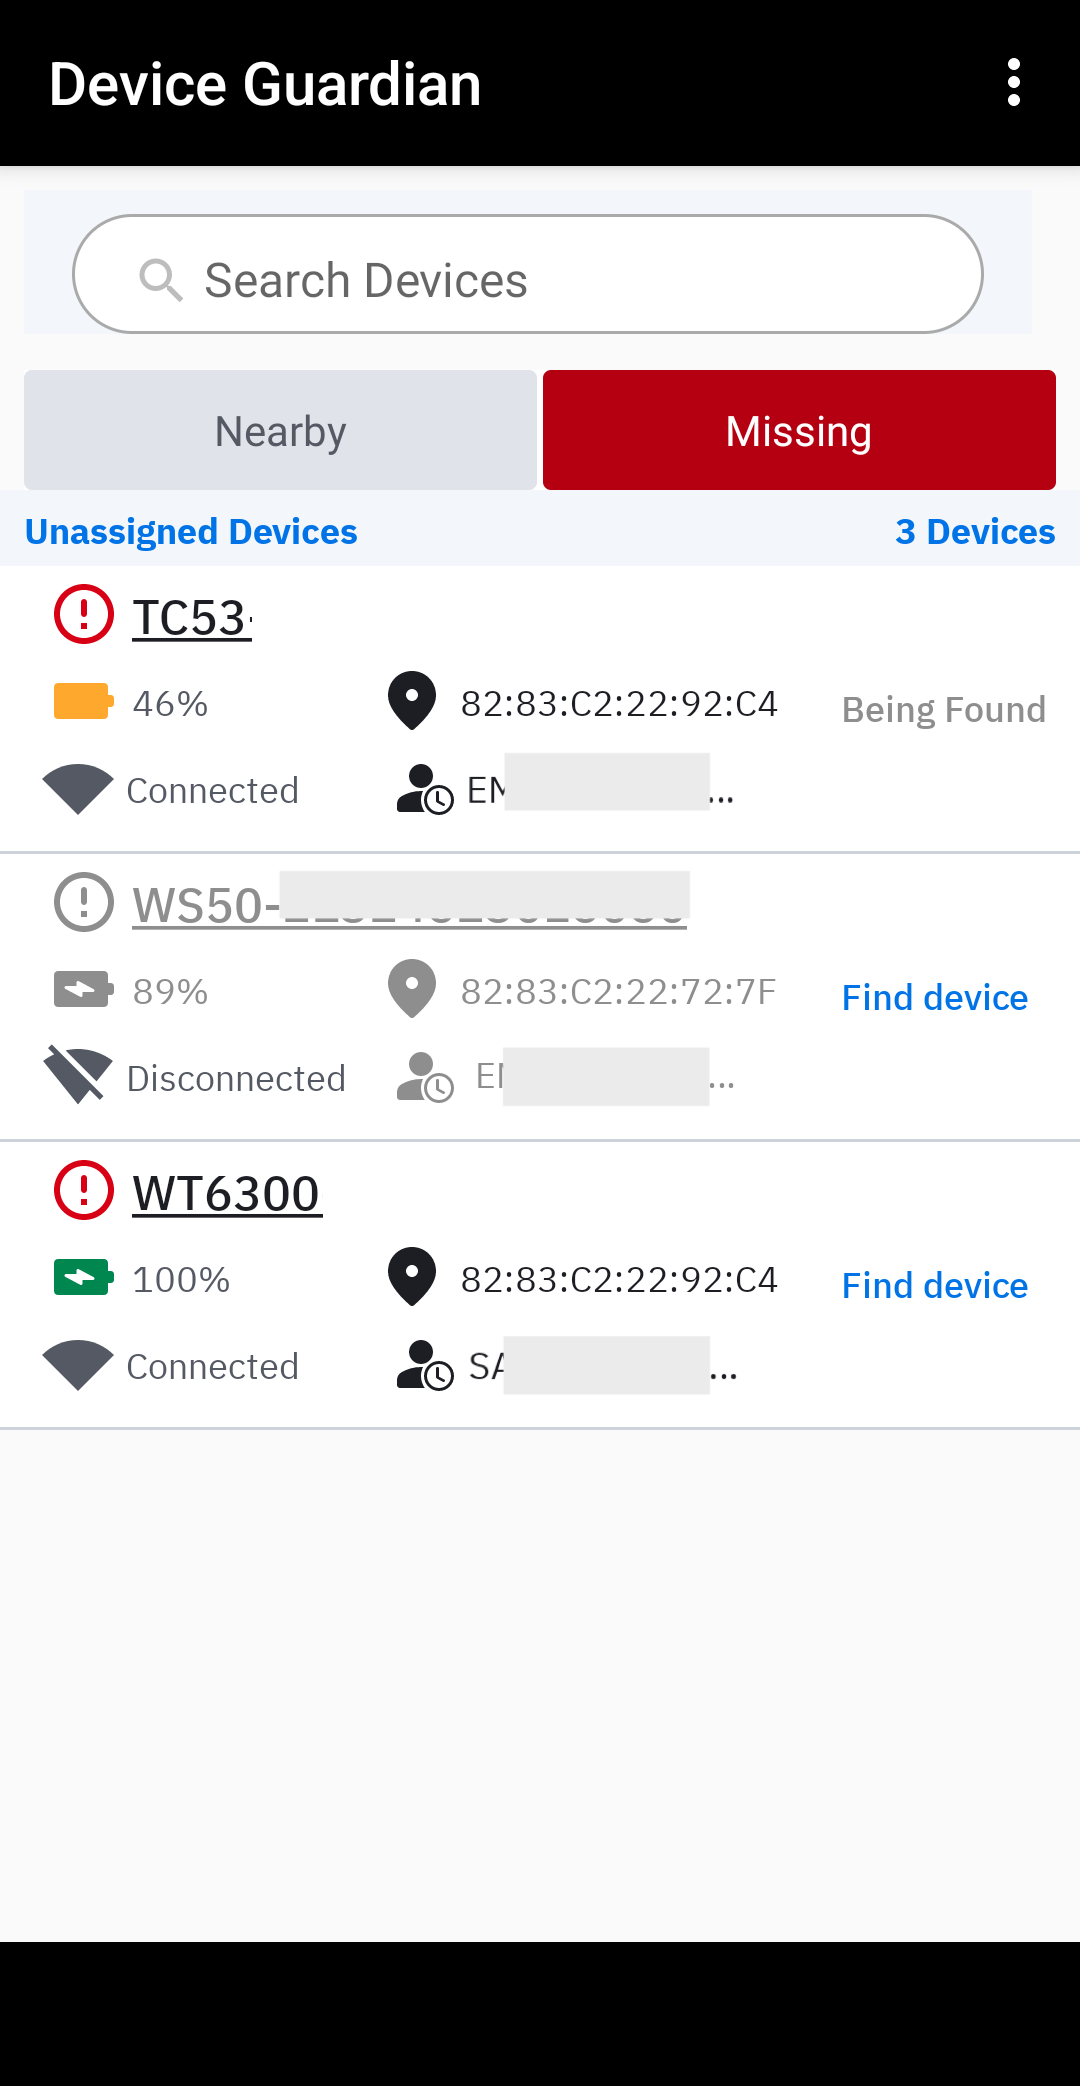
- Being Found - Device is marked missing ("To Be Found") and is in the process of being recovered
- Cannot Find - Device could not be located after a search
- Charging - Device is powered on and charging
- Checked Out - A user is signed into the device with Identity Guardian
- Decommissioned - Device is removed from the active device pool
- Discharging - Device is powered on, draining battery power without charging
- Disconnected - Device has been offline from the server for at least approximately 12 minutes
- Found - Previously missing has been recovered
- Idle - Device is not charging and remained inactive for the duration of the Device Idle threshold
- Low Battery - Device has reached the lower power threshold, requiring charging
- Moved Out/In Site(s) - Device has moved between sites
- Never Connected - Device is registered but has never connected to the server
- To Be Found - Device is marked as missing and waiting for action to be taken for recovery
- Email Subscription - Indicates whether End of Day Reports are sent to the recipients listed in the Email List column
- Email List - Lists manager and admin email addresses designated to receive the End of Day Reports
- Start IP Address - Specifies the starting IP address of the range assigned to the site. This is applicable when IP Address Range is selected for Site Assignment.
- End IP Address - Specifies the ending IP address of the range assigned to the site. This is applicable when IP Address Range is selected for Site Assignment.
- Attach CSV - Specifies whether the report email includes a .CSV file attachment
Bulk Upload
A .CSV file can be uploaded to add, edit, or delete relevant site data. The data fields include:
| Data | Description | Required |
|---|---|---|
| SiteName | Site name or location. Supported characters are alphanumeric. Special supported characters: _-@%&*!+^()=?:
|
Yes |
| timeZone | Time zone of site location, case-sensitive, see supported Time Zones. | Yes |
| scheduledReportTime | Specified time to generate the daily End of Day Report to the specified recipients in the emailList field, using a cron time expression * * * * *, where only the first 2 parameters are required:• The first parameter sets the minute. Valid values are 0 or 30, allowing the report to be sent on the hour or half hour. • The second parameter sets the hour from 0 to 23 in 24-hour military time. For example 30 21 * * * generates a report at 9:30 PM. |
Yes |
| EmailSubscribed | Indicates whether users are subscribed to receive the End of Day Report. Value: TRUE/FALSE | Optional |
| emailList | Comma separated list of email addresses to receive the End of Day Report. | Optional |
| snapshotReportCategories | Comma-separated list of categories or device states to report for the End of Day Report. Category names are not case sensitive. An example of a comma-separated category list: To Be Found,Being Found,Cannot Find,Charging,Discharging,Low Battery,Idle,Checked Out,Disconnected,Never Connected,Decommissioned,Moveinout,Accessories |
Optional |
| attachCSV | Indicates if report attachments are added to the email for the End of Day Report. Value: TRUE/FALSE | Optional |
| startIPAddress | Specifies the start IP address range for the site, applicable if IP Address Range is configured for Sitet under Settings > Registration in the web portal. | Optional |
| endIPAddress | Specifies the end IP address range for the site, applicable if IP Address Range is configured for Site Assignment under Settings > Registration in the web portal. | Optional |
Sample .CSV file content (Note: No spaces between fields or after commas):
    SiteName,timeZone,scheduledReportTime,EmailSubscribed,emailList,snapshotReportCategories,attachCSV,startIPAddress,endIPAddress
    New York,America/New_York,30 21 * * ,TRUE,admin@my_company.com,"To Be Found,Being Found,Cannot Find,Low Battery,Disconnected,Never Connected,Decommissioned,Moveinout,Accessories",TRUE,10.30.1.50,10.30.1.100
Steps to add multiple sites at once:
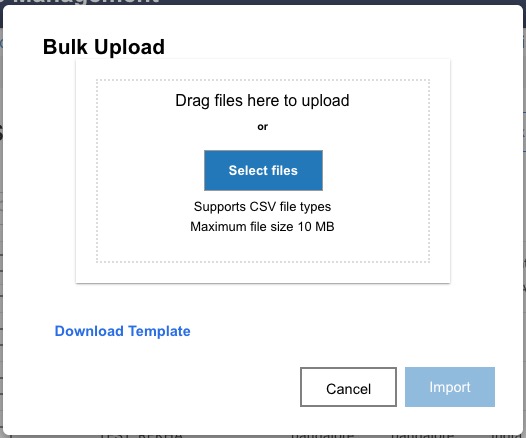
- In the web portal, go to Admin Settings > Site. Click Bulk Upload, then select Add.
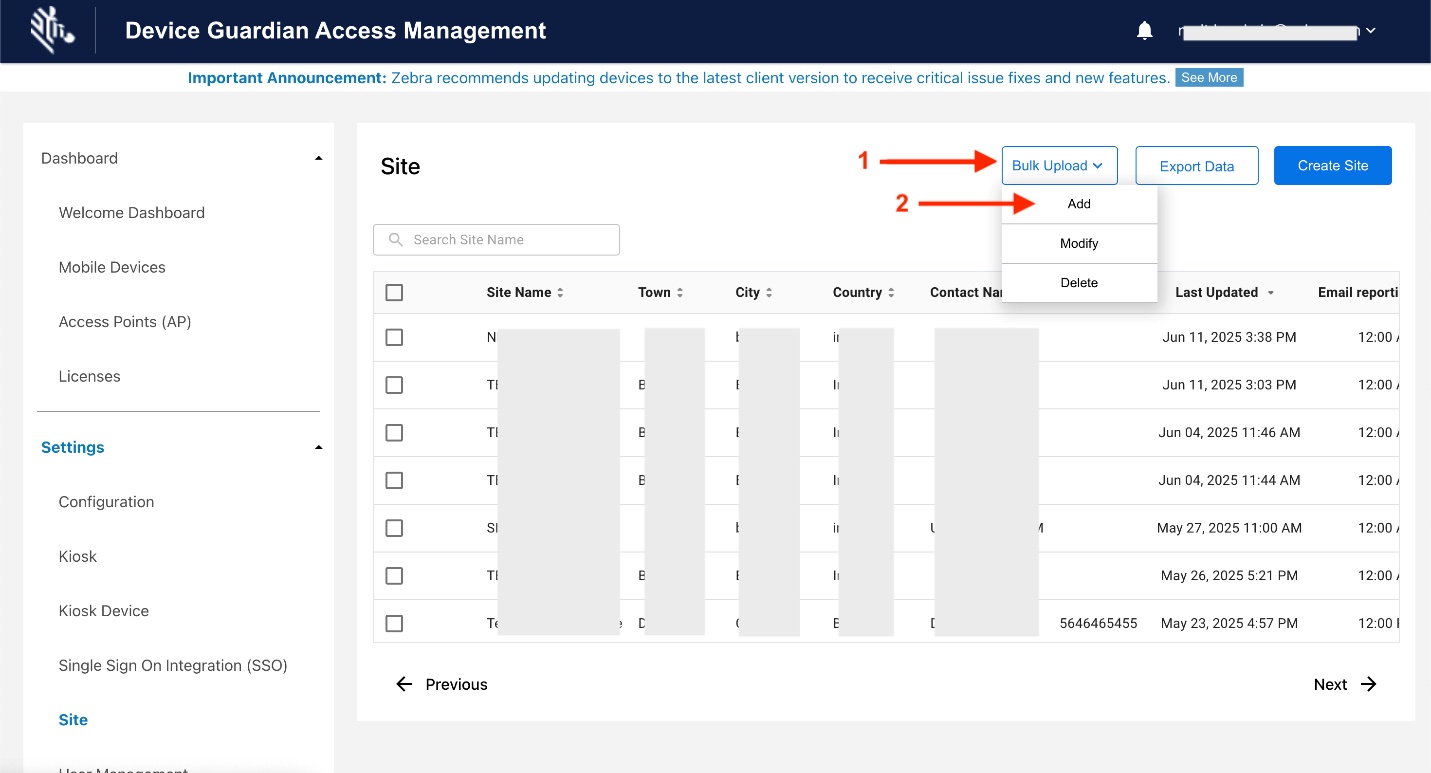
- If a formatted file is not yet available, click Download Template to retrieve a populated template with sample data. Replace the sample data with the required data, and save the file.
- Click Select files to browse for the
.csvfile containing the data, or drag and drop the file into the window. - Click Import to upload the data and add the new sites.
Steps to edit site data in bulk:
- Prepare a .CSV file containing the necessary information for each site to modify, following the instructions above.
- In the web portal, go to Admin Settings > Site. Click Bulk Upload, then select Add.
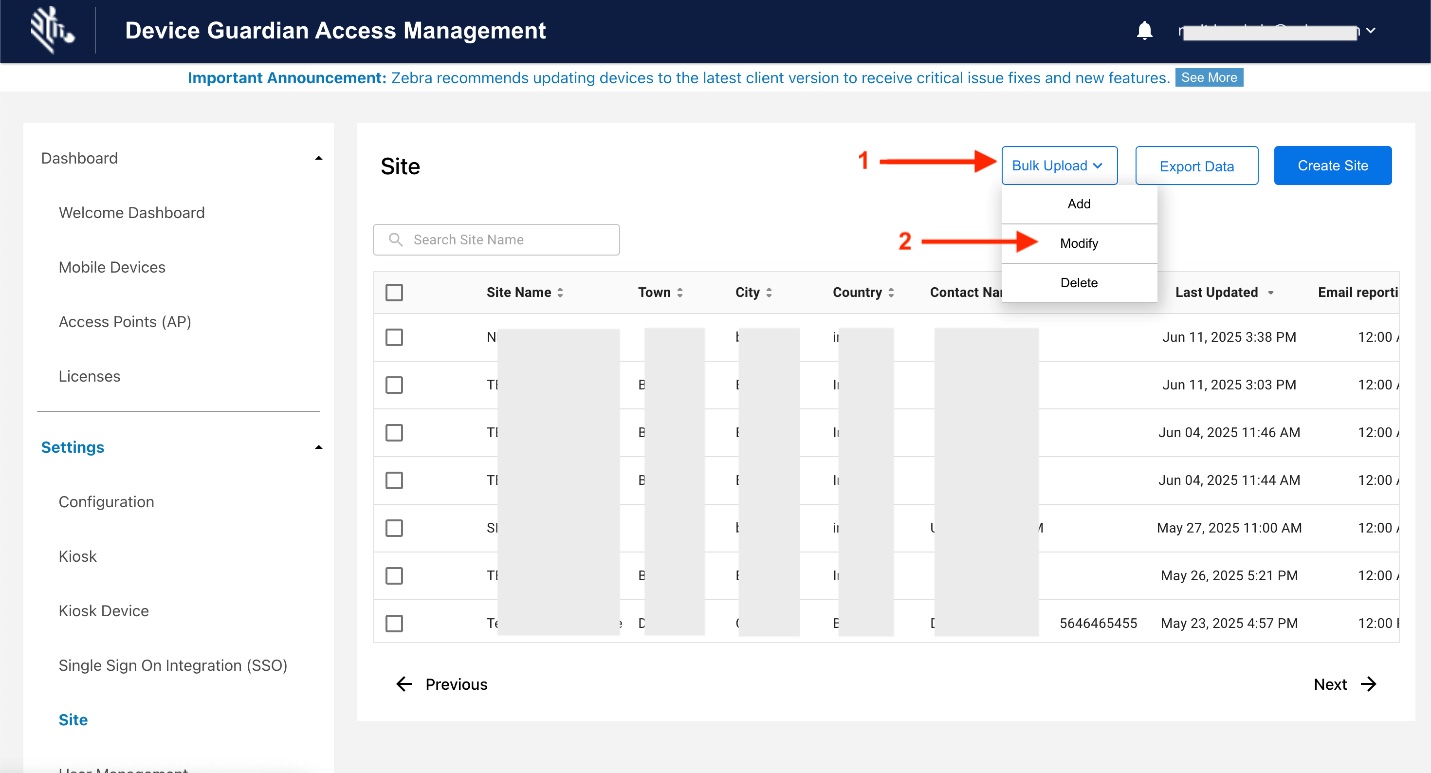
- Upload the .CSV file, then click Import to upload the modified data.
Steps to remove site data in bulk:
- Prepare a .CSV file containing the necessary information for each site, following the instructions above.
- In the web portal, go to Admin Settings > Site. Click Bulk Upload, then select Add.
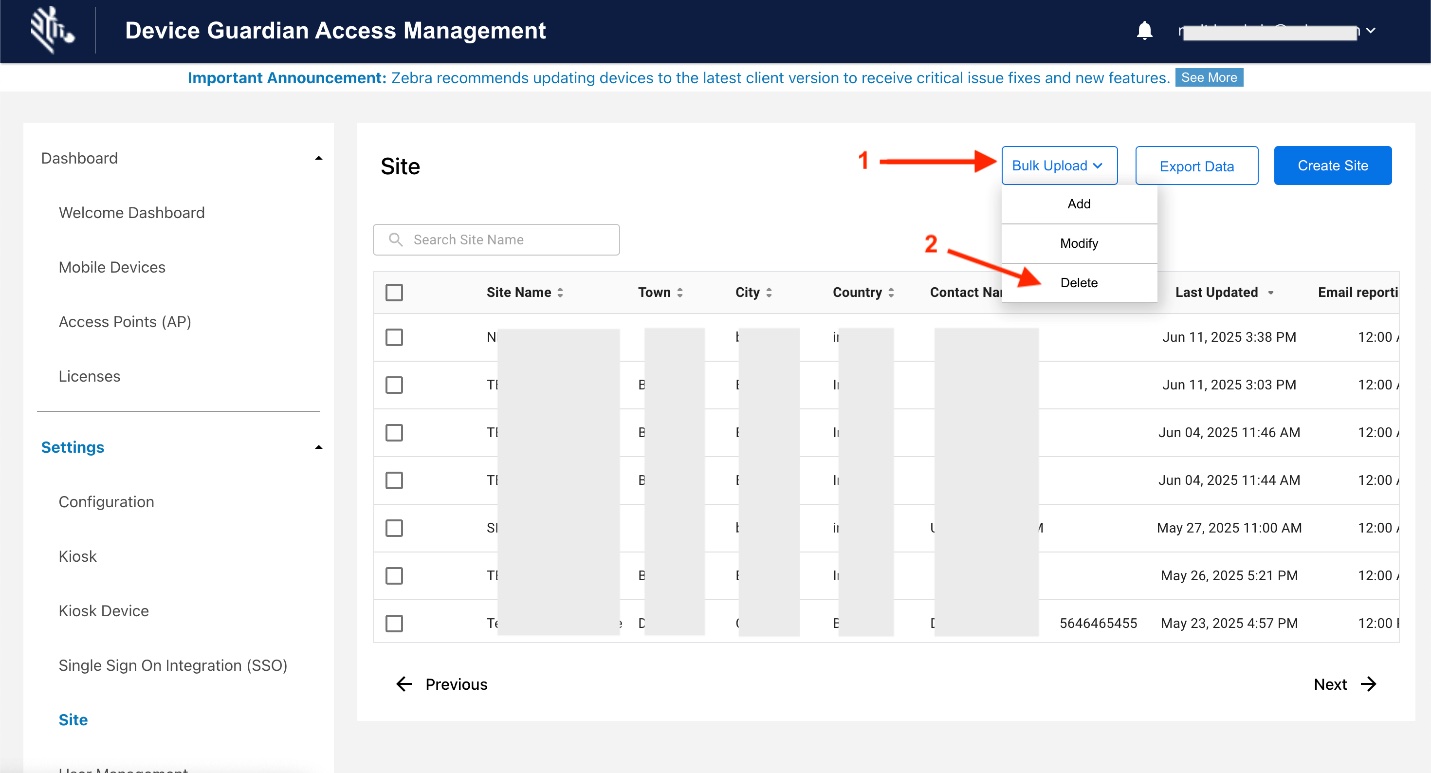
- Upload the .CSV file, then click Import to remove the data from the site table.
Export Data
The Export Data button exports the displayed data into a .CSV file.
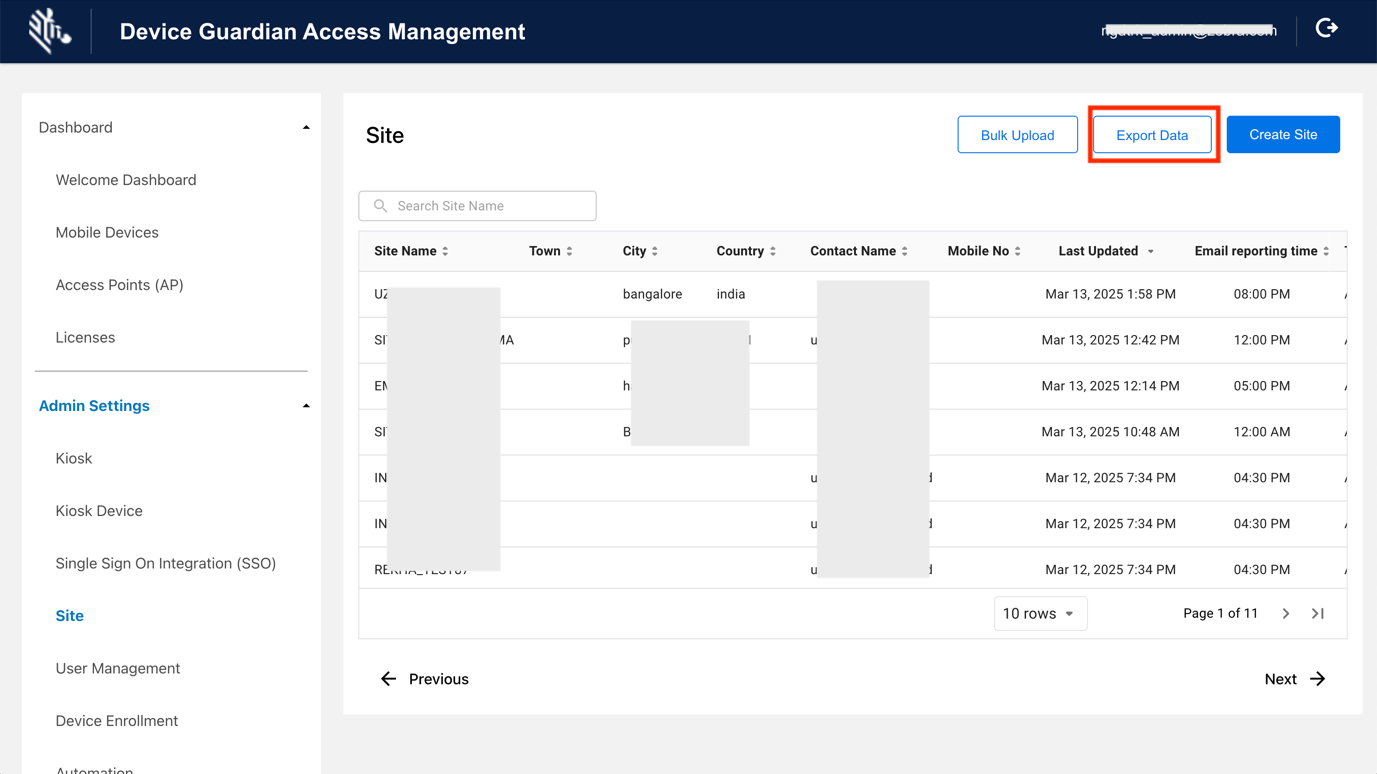
Export site data
Create Site
Creating a Site allows administrators to group devices logically and enforce location-specific security, tracking, and reporting behaviors. During site configuration, specific Device Return Rules can be established to tightly control where devices are returned, utilizing Bluetooth proximity to trigger alarms if a device is docked at the incorrect kiosk or outside a designated area. Alternatively, standalone Bluetooth Proximity settings can be enabled to automate user logouts upon docking and trigger alarms for unauthorized device movement. Additionally, site settings provide the ability to automate daily End-of-Day (EOD) summary reports to monitor device health and inventory, as well as configure IP Ranges for automatic, network-based site assignments.
Steps to create a site:
- In the web portal, go to Admin Settings > Site. Click Create Site.
- Enter the required information in the fields.
- (Optional) For Device Guardian Access Management, choose a Device Return Rule to determine how devices are returned to kiosks.
Feature Limitation: The Device Auto Assignment feature can operate with either Device Return Rule or Bluetooth Proximity, but not both at the same time.- Default - Devices are reported as returned to their originating kiosk, even if returned to a different kiosk.
- Return Device to Same Kiosk - Devices must be returned to their originating kiosk. When docked in a cradle, the device verifies its proximity (within Bluetooth range) to its assigned kiosk. If it is not within the vicinity, it enters a "Missing" state and triggers an audible alarm to alert the user. Furthermore, if a device is returned to a different (incorrect) kiosk, an alarm is triggered when placed on the cradle, and an error message appears on the device indicating it must be returned to the correct kiosk. The alarm terminates when the device is removed from the incorrect kiosk. Certain Identity Guardian settings are required †.
- Return Device To Different Kiosk - Devices can be returned to any kiosk within the same site, and their availability is updated to reflect the kiosk to which they are returned. When docked in a cradle, the device verifies its proximity (within Bluetooth range) to any kiosk within the same site. If it is not within the vicinity, it enters a "Missing" state and triggers an audible alarm. Certain Identity Guardian settings are required †.
- (Optional) If IP Range Configuration is selected for Site Assignment, enter the Start IP Address and End IP Address.
- (Optional) To send daily summary reports, toggle to enable Subscribe Reports via Email. This exposes additional fields:
- Generate EOD Report(s) (At) - Select the time to have the reports generated. The reports are sent on a daily basis.
- Select Reports - Select the specific device state information to be included in the report(s) (e.g., At Risk Checked Out, Low Battery, Missing, Select All, etc.)
- Include Attachments (.CSV) in Email - Select if it is desired to add an attachment to the email.
- (Optional) Enable Bluetooth Proximity to automatically log out users when a device is placed in a powered cradle within its kiosk’s Bluetooth range, and to trigger an alarm if the device is removed and taken beyond this range without logging in; the alarm deactivates when the user either returns within range or logs in. Certain Identity Guardian settings are required ‡.
Feature Limitation: This feature cannot operate concurrently with the Device Return Rule; only one of these options can be enabled at a time. - Click Create.
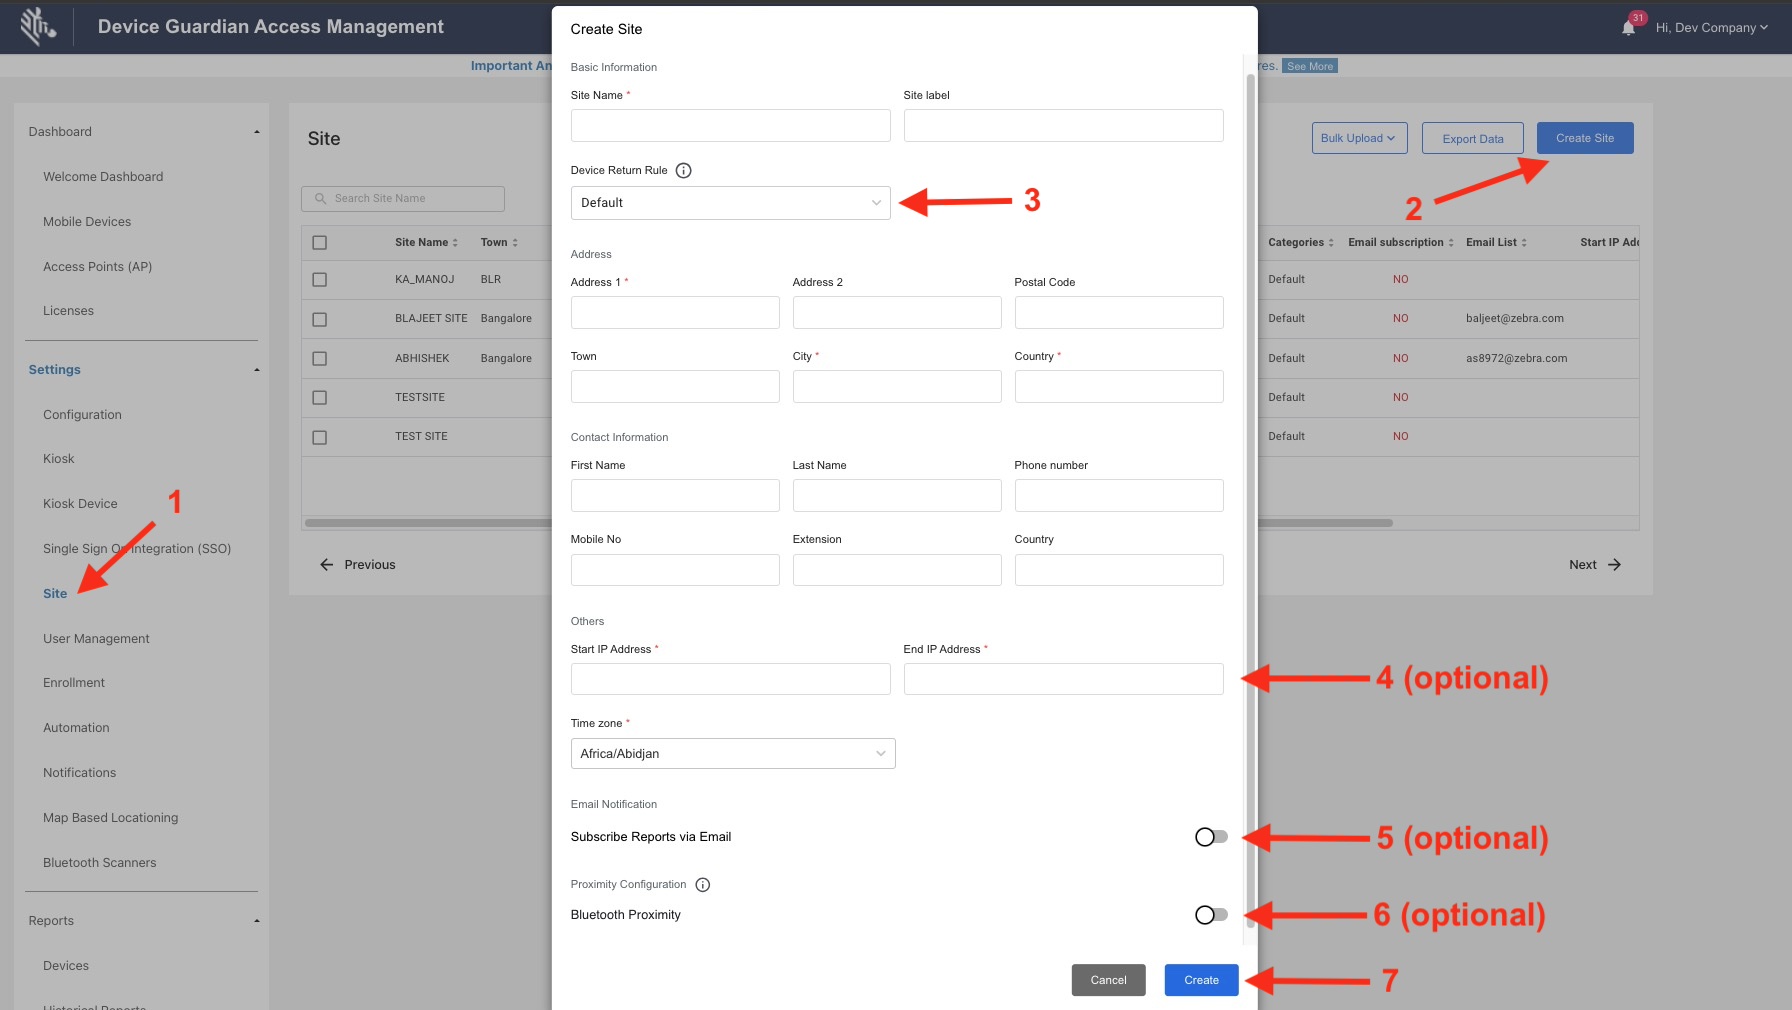
Guide to create a site
† Requires Identity Guardian Managed Configuration settings to allow Device Guardian Access Management to control forced logout. Configure the following settings:
- Under Lock Screen Configuration, for Lock-screen Event Options:
- On Unlock:
- Verification Setup: NONE
- Alternative Verification Setup: NONE
- On Reboot:
- Verification Setup: NONE
- Alternative Verification Setup: NONE
- On AC Power Connected:
- Verification Setup: NONE
- Alternative Verification Setup: NONE
- On AC Power Disconnected:
- Verification Setup: NONE
- Alternative Verification Setup: NONE
- Under Authentication Configuration for Force Logout Options:
- On Lock: false
- On Reboot: false
- On AC Power Connected: false
- On AC Power Disconnected: false
- On Force Lock: false
‡ Requires Identity Guardian Managed Configuration settings to allow the error screen to be displayed when a device is returned to the incorrect kiosk. In the Lock Screen Configuration, configure the following:
- Apps Allowed On Lock Screen:
- Package Name: com.zebra.mdna.dg
- Activity Name: com.zebra.mdna.dg.ui.WrongKioskActivity
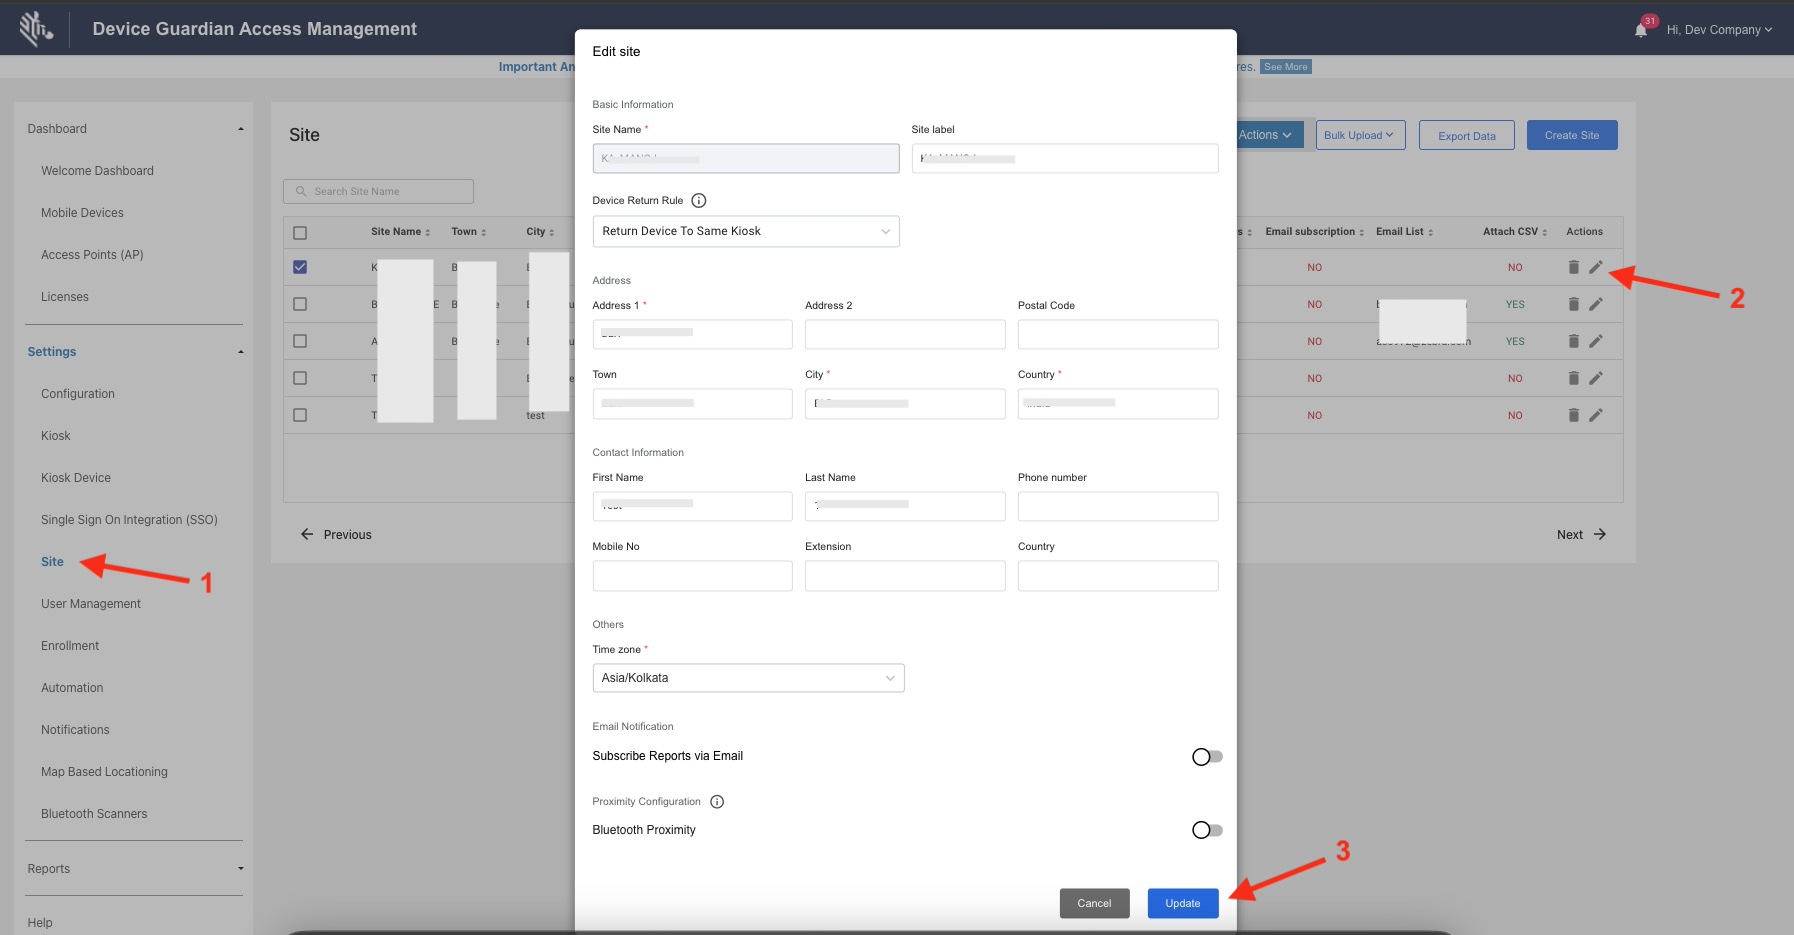
Modify Site
Steps to modify a site:
- In the web portal, go to Admin Settings > Site.
- Under the Actions column, click the edit icon for the select site to update.
- Make the necessary edits and click Update. The site's information is updated.
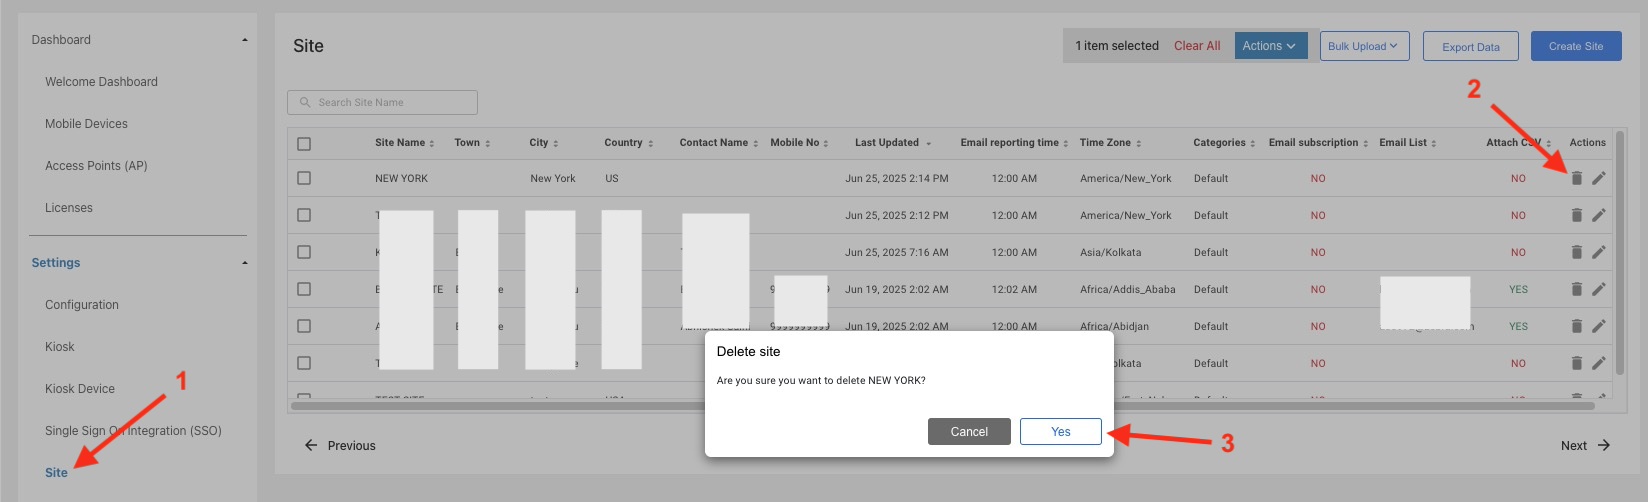
Delete Site
Steps to delete a site:
- In the web portal, go to Admin Settings > Site.
- Under the Actions column, click the garbage icon for the select site to remove.
- A confirmation message appears. Click Confirm. The site is removed from the table.
Manage Access Points
Register access points with friendly names to aid in identifying device location within a site when finding devices. Add, modify, or delete APs either manually or by importing a .CSV file with the AP information through the web portal.
CSV File
A sample .CSV file is supplied by Zebra for the administrator to populate with the appropriate data. Importing data either modifies or adds entries to the existing database, unless deleting an AP, which removes the AP record. The data fields are:
| Data | Description | Required |
|---|---|---|
| SiteName | Site name or location. Supported characters are alphanumeric. Special characters supported: _-@%&*!+^()=?:
|
Yes |
| BSSID | MAC address of the wireless access point. A wildcard character * can be used to register multiple APs simultaneously. Supported wildcard patterns include:
|
Yes |
| AssetName | Name used by IT admin for drawings, labeling of hardware, etc. |
Optional |
| LocationFriendlyName | Access point location friendly name, useful to identify general device location. Supported characters are alphanumeric. Special supported characters: ><:_-@#$%&*!+.^()[]=?
|
Yes |
Sample AP .CSV file content:
    SiteName,BSSID,AssetName,LocationFriendlyName
    New York,14:a7:2b:24:cc:a5,Inventory#1,Back Area
When modifying the .CSV file, keep the header information intact and replace the sample data with the appropriate data desired. It is particularly important for the AP location friendly name to be easily understood for users to determine the location within the facility when finding a device. The .CSV file cannot be UTF-8 encoded, otherwise an error can occur; it must be saved in a normal comma separated values format.
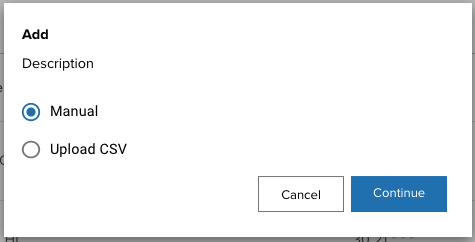
Add Access Points
Register access points either manually or by uploading the .CSV file.
Manual
To register access points manually:
- Log into the web portal as an administrator.
- From the left menu, under Dashboard select Access Points.
- Click Manage. From the dropdown, select Add.
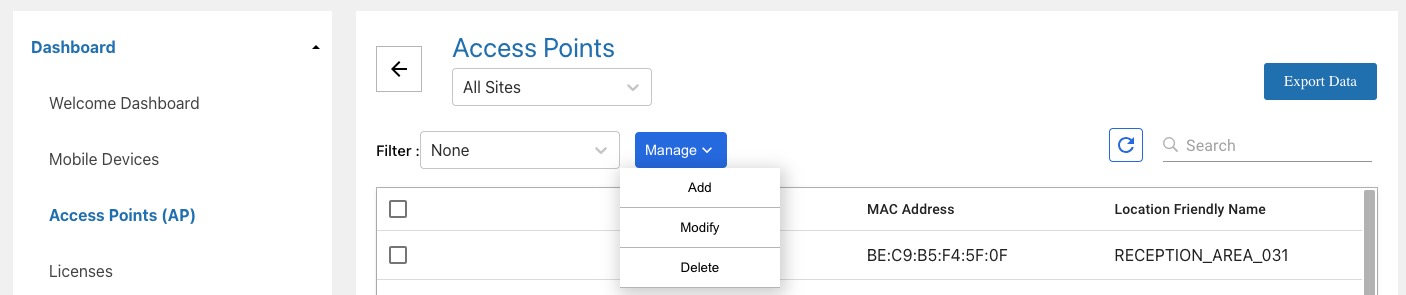
- Click Manual.
- Provide the following information:
- Site - Select site location of AP or enter the site name in the search field. A limited number of sites is listed in the dropdown. If needed, see Manage Sites for the site name.
- MAC Address - Enter MAC address of AP. A wildcard character
*can be used to register multiple APs simultaneously. Supported wildcard patterns include:- Last character of the final octet:
AA:BB:CC:DD:EE:F* - The entire final octet:
AA:BB:CC:DD:EE:*
- Last character of the final octet:
- Asset Name - (Optional) Enter asset name used by IT admin for drawings, labeling of hardware, etc.
- AP Location - Enter location friendly name, useful to identify general device location
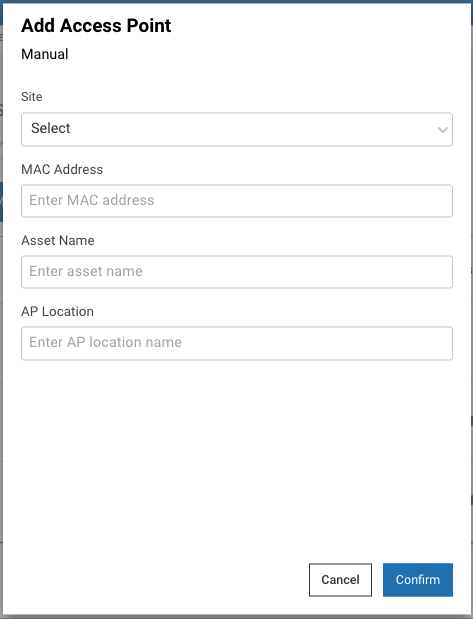
- Click Continue. The AP is added.
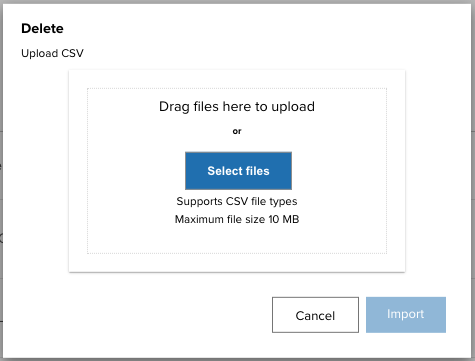
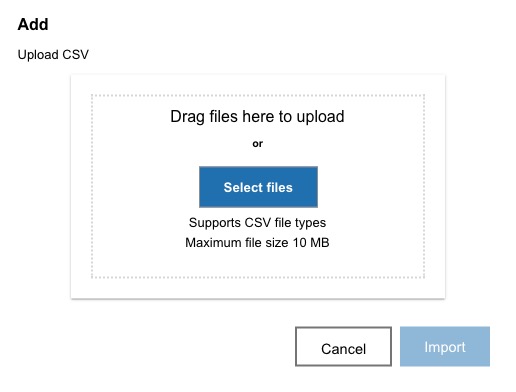
Upload CSV
To register access points, add the AP information to the .CSV file then follow these steps to import the file:
- Log into the web portal as an administrator.
- From the left menu, under Dashboard select Access Points.
- Click Manage. From the dropdown, select Add.
- Select Upload CSV and click Continue.
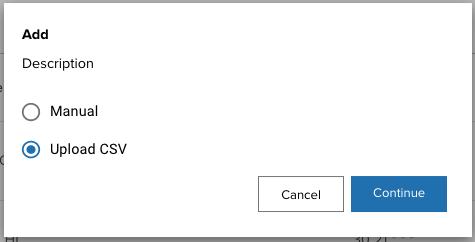
- Click Select files and browse to the desired .CSV file, or drag and drop the .CSV file.
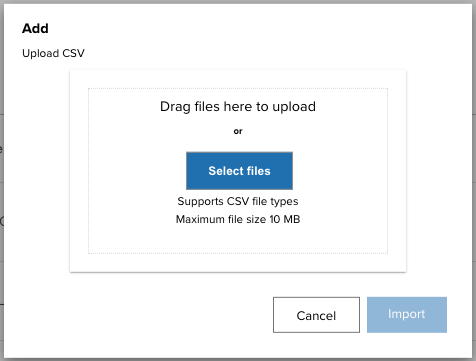
- The selected file name is displayed. Click Import.
- If successful, a message appears indicating the import was successful.
Modify Access Points
Modify access points either manually or by uploading the updated .CSV file.
Manual
To modify an access point manually:
- Log into the web portal as an administrator.
- From the left menu, under Dashboard select Access Points.
- Check the box next to the AP to modify. The Actions menu appears. Click Actions and select one of the following from the dropdown depending on the desired action:
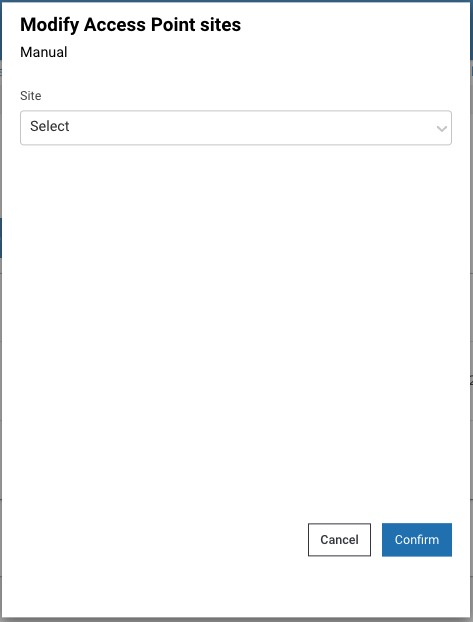
- Modify Site - Select the site to reassign the AP
- Modify Details - Modify AP information.
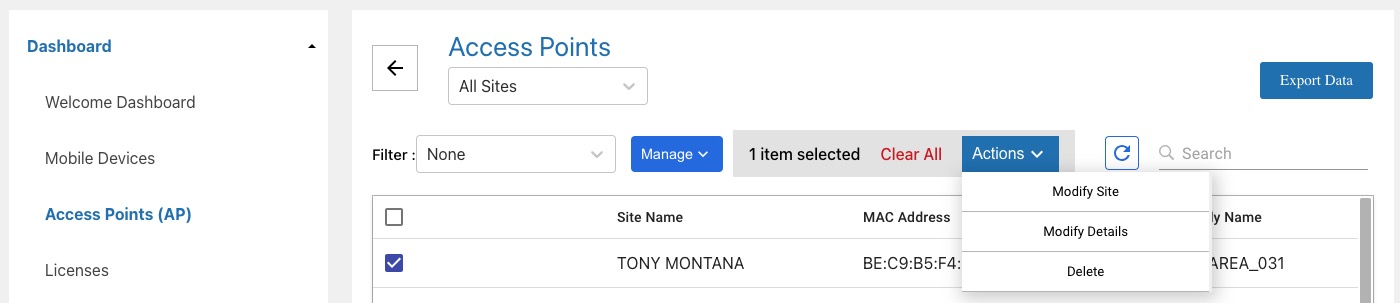
- If Modify Site is selected, select or enter the site to reassign the AP. A limited number of sites are listed. For the full site list, see Manage Sites.
- If Modify Details is selected, perform the following:
- Asset Name - Enter the new asset name for the AP
- AP Location - Enter the new location name for the AP
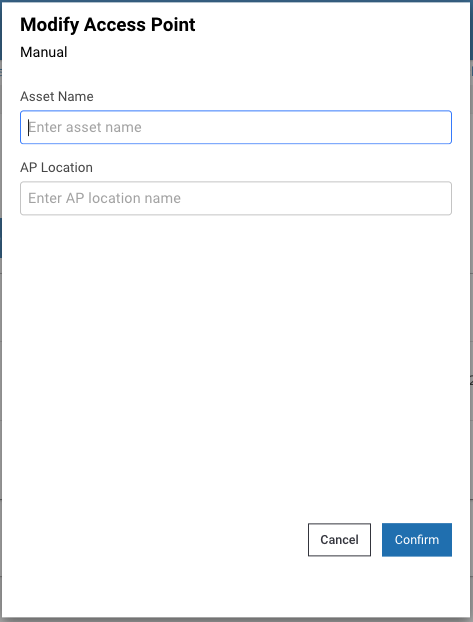
- Click Confirm. The AP is modified.
Upload CSV
To modify existing access points, upload a .CSV file containing one or more APs with the modified information.
- Log into the web portal as an administrator.
- From the left menu, under Dashboard select Access Points.
- Click Manage. From the dropdown, select Modify.
- Click Select files and browse to the desired .CSV file, or drag and drop the .CSV file.

- The selected file name is displayed. Click Import.
- If successful, a message appears indicating the import was successful.
Delete Access Points
Delete access points either manually or by uploading the modified .CSV file.
Manual
To delete an access point manually:
- Log into the web portal as an administrator.
- From the left menu, under Dashboard select Access Points.
- Check the box next to the AP to delete. The Actions menu appears. Click Actions and select Delete from the dropdown.
- Click Confirm. The AP is updated.
Upload CSV
To delete APs from the database, upload a .CSV file containing one or more AP information to remove.
- Log into the web portal as an administrator.
- From the left menu, under Dashboard select Access Points.
- Click Manage. From the dropdown, select Delete.
- Click Select files and browse to the desired .CSV file, or drag and drop the .CSV file.
- The selected file name is displayed. Click Import.
- If successful, a message appears indicating the import was successful.
Manage Devices
Assigning devices to a site is important for effective management. Administrators can register device information, including friendly names and site assignments, to facilitate the identification, tracking, and locating of devices. This registration can be performed manually or by uploading a .CSV file. Alternatively, devices can be automatically assigned to a site through automatic site assignment, either by the AP associated with the site to which the device is connected or by matching the device's IP address with a predefined IP range associated with the site.
CSV File
Add, modify, or delete devices by importing a .CSV file with the device information through the web portal. Or manually add devices through the dashboard. A sample .CSV file is supplied by Zebra for the administrator to populate with the appropriate data. Importing data either modifies or adds entries to the existing database, unless deleting a device, which removes the device record. The data fields are:
| Data | Description | Required |
|---|---|---|
| ModelNumber | Device model | Yes |
| SerialNumber | Device serial number | Yes |
| DeviceFriendlyName | Name used to identify device. Supported characters are alphanumeric. The following are supported special characters: _-@#$%&*!+.^()[]=?><:
|
Optional |
| SiteName | Site name or location where the device is assigned, useful when finding a device. Alternatively, automatically assign sites based on the AP the device is connected to, see Site Assignment. Supported characters are alphanumeric. The following are supported special characters: _-@%&*!+^()=?><:
|
Optional |
Sample device .CSV file content:
        ModelNumber,SerialNumber,DeviceFriendlyName,SiteName
        TC51,17009522509812,Inventory1,Chicago
        TC51,17009522509813,Inventory2,Los Angeles
When modifying the .CSV file, keep the header information intact and replace the sample data with the appropriate data desired. The .CSV file cannot be UTF-8 encoded, otherwise an error can occur; it must be saved in a normal comma separated values format.
Add Devices
Register devices either manually or by uploading the .CSV file to the Device Guardian server instance.
Manual
To register devices manually:
- Log into the web portal as an administrator.
- From the left menu, under Dashboard select Mobile Devices.
- Click Manage. From the dropdown, select Add.

- Select Manual and click Continue.
- Provide the following information:
- Site - Select the site to assign the device
- Model Number - Enter the model number of the device
- Serial Number - Enter the unique serial number of the device
- Device Name - Enter the friendly name used to identify the device e.g. this can be based on user role
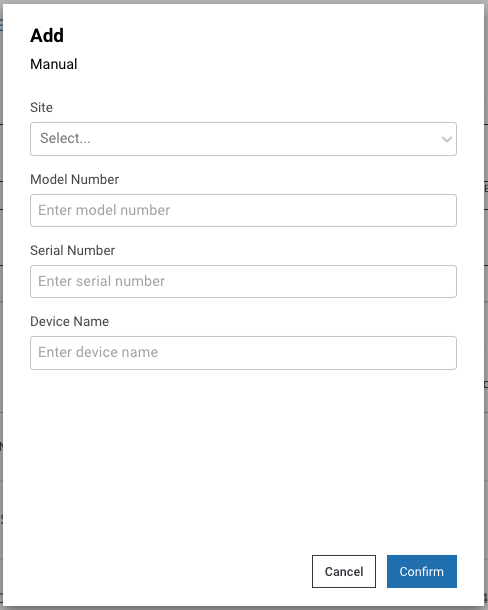
- Click Confirm. The device is added.
Upload CSV
To register devices by uploading the .CSV file, add the device information to the .CSV file then follow these steps to import the file:
- Log into the web portal as an administrator.
- From the left menu, under Dashboard select Mobile Devices.
- Click Manage. From the dropdown, select Add.
- Select Upload CSV and click Continue.
- Click Select files and browse to the desired .CSV file, or drag and drop the .CSV file.
- The selected file name is displayed. Click Import.
- If successful, a message appears indicating the import was successful.
Modify Devices
Modify devices either manually or by uploading the .CSV file.
Manual
To modify a device manually:
Log into the web portal as an administrator.
From the left menu, under Dashboard select Mobile Devices.
Check the box next to the device to modify. The Actions menu appears.
From the Actions dropdown, select the desired action based on the Edit or Tracking category (options may vary depending on the state of the device):
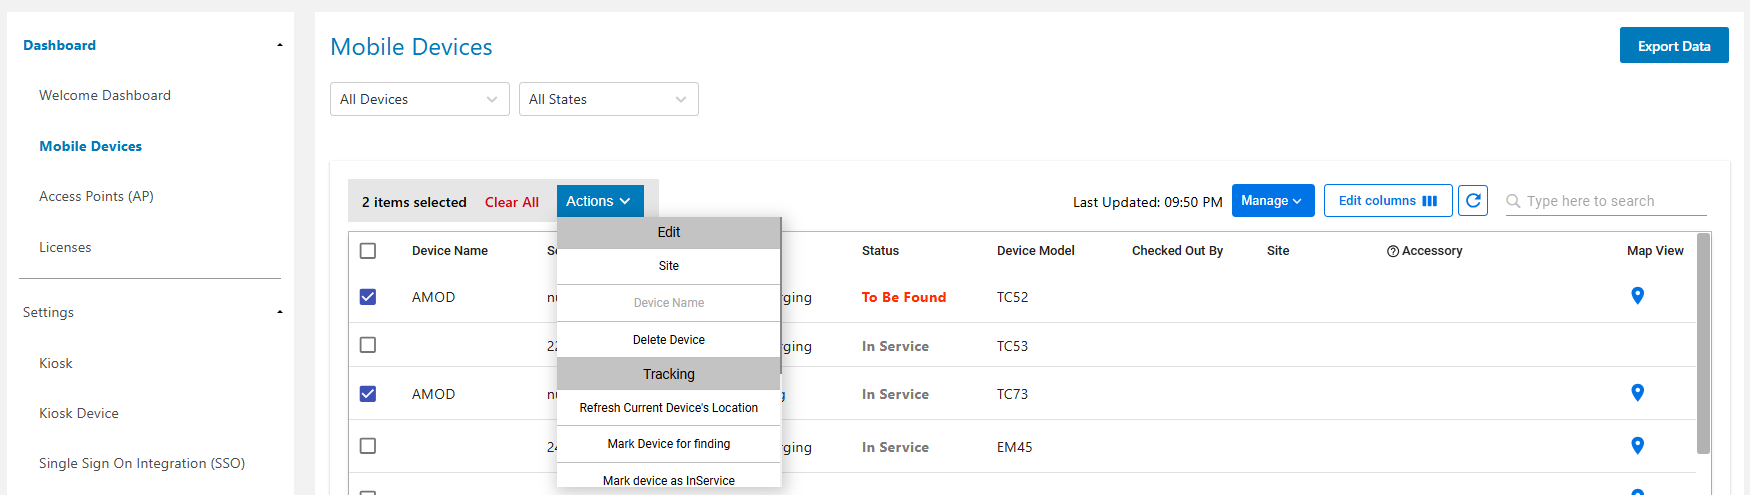 Edit:
Edit:- Site - Assign the device to a selected site.
- Access Point Friendly Name - Change the friendly name of the access point the device is connected to.
- Device Name - Change the user friendly device name.
- Delete Device - Delete the device record.
Tracking:
- Mark Device for Finding - This changes the device(s) status to To Be Found, placing the device in the To Be Found list used in the device search process.
- Mark Device as InService - The device status is changed from To Be Found back to In Service.
- Add Notes - A dialog box appears prompting to enter notes or comments for the selected device(s).
- Decommission Device - Removes the device(s) from the active device pool and places it out-of-service with the Decommissioned status.
- Recommission Device - Changes the device(s) status from the Decommissioned state (i.e. removed from the active device license pool) and recommissions the device back to the In Service state.
- Start Finding - Begins the device search process. Refer to Find a Device. This is visible only if the device is marked To Be Found. During the device search, click one of the following when appropriate:
- Stop Finding - Stops the device search process; changes the state of the device from Being Found back to To Be Found so another device can initiate the finding process.
- Play Sound - Emits a sound from the device being located; listen and follow the sound to locate the device.
- Found - Indicates the device is successfully located after conducting the device search.
- Cannot Find - Indicates the device could not be found after the search was conducted
Click Confirm. The device is updated.
Upload CSV
To modify existing registered devices, upload a .CSV file containing one or more devices with the modified information.
- Log into the web portal as an administrator.
- From the left menu, under Dashboard select Mobile Devices.
- Click Manage. From the dropdown, select Modify.
- Click Select files and browse to the desired .CSV file, or drag and drop the .CSV file.
- The selected file name is displayed. Click Import.
- If successful, a message appears indicating the import was successful.
Delete Devices
Delete devices either manually or by uploading the .CSV file.
Manual
To delete a device manually:
- Log into the web portal as an administrator.
- From the left menu, under Dashboard select Mobile Devices.
- Check the box next to the device(s) to delete. The Actions menu appears.
- From the Actions dropdown, select Delete Device:
- A confirmation dialog appears. Click Confirm to proceed.

Upload CSV
To delete devices from the database, upload a .CSV file containing the device(s) information to remove. Device Guardian should be uninstalled before deleting the device record.
- Log into the web portal as an administrator.
- From the left menu, under Dashboard select Mobile Devices.
- Click Manage. From the dropdown, select Modify.
- Click Select files and browse to the desired .CSV file, or drag and drop the .CSV file.
- The selected file name is displayed. Click Import.
- If successful, a message appears indicating the import was successful.
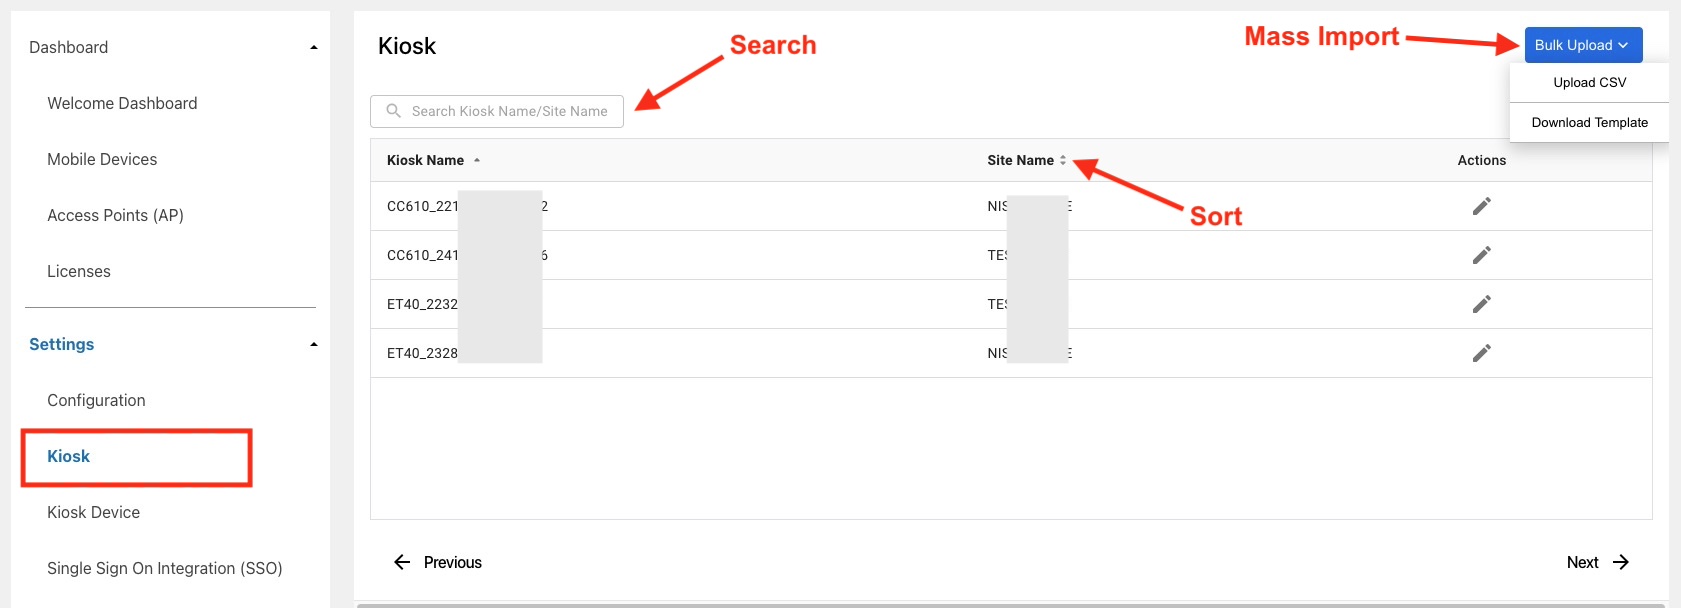
Manage Kiosks
This section applies to
DGAM Only.
The Kiosk (under Admin Settings > Kiosk) screen lists all kiosks enrolled with the server and their assigned site. A kiosk automatically appears here after the DGAM application is installed on it. For easier identification, kiosks are shown with their assigned "DisplayName." If a "DisplayName" is not set, the system defaults to showing the "DeviceModel_SerialNumber."
Available Actions:
Other Available Actions:
- Search: Find a specific kiosk by its name or assigned site.
- Sort: Sort applicable columns in ascending or descending order.
Kiosk guide
Bulk Upload/Update Kiosks
Bulk-assign kiosks to sites and define their display names using a csv file.
- In the Kiosk screen, click Bulk Upload.
- If a formatted file is not yet available, click Download Template to retrieve a populated template with sample data. Replace the sample data with the required data, and save the file.
- Click Select files to browse for the
.csvfile containing the data, or drag and drop the file into the window. - Click Import.
Export Kiosk Data
Downloads kiosk data as a .csv file. This export can also be used as a template for bulk uploads.
- In the Kiosk screen, click Export Data.
- Browse to the save location and click Save.
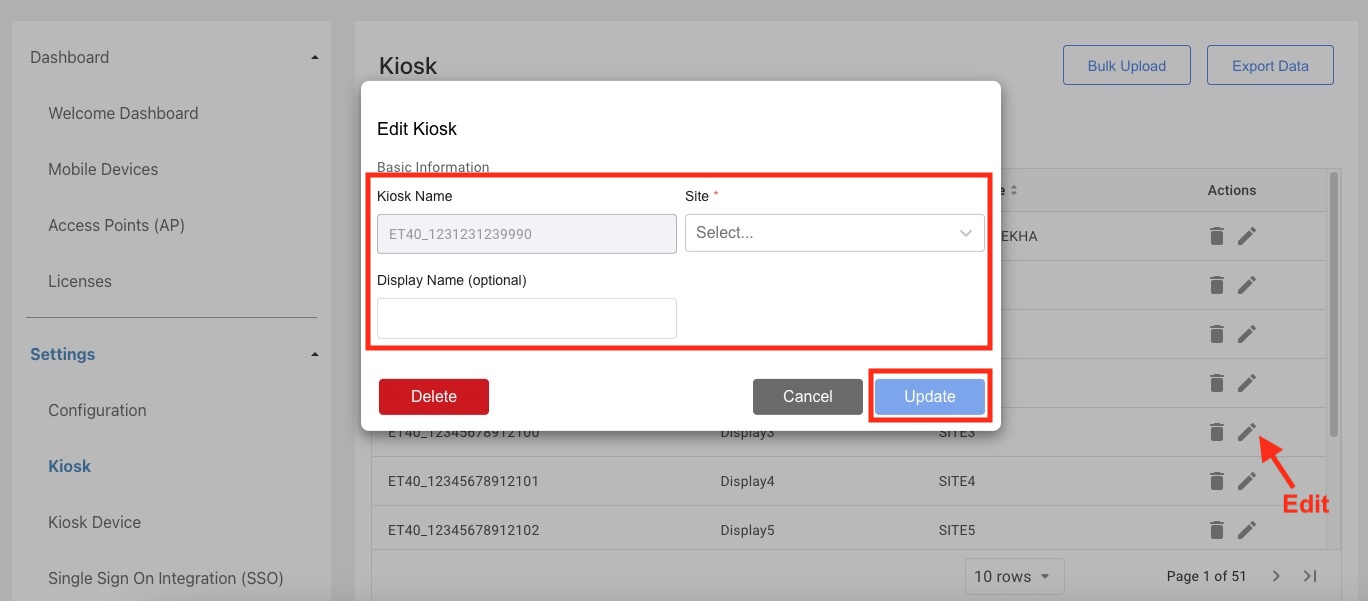
Modify Kiosk
Updates an existing kiosk:
- In the Kiosk screen, click the edit icon next to the kiosk to update.
- Make the necessary changes, then click Update to save the changes.
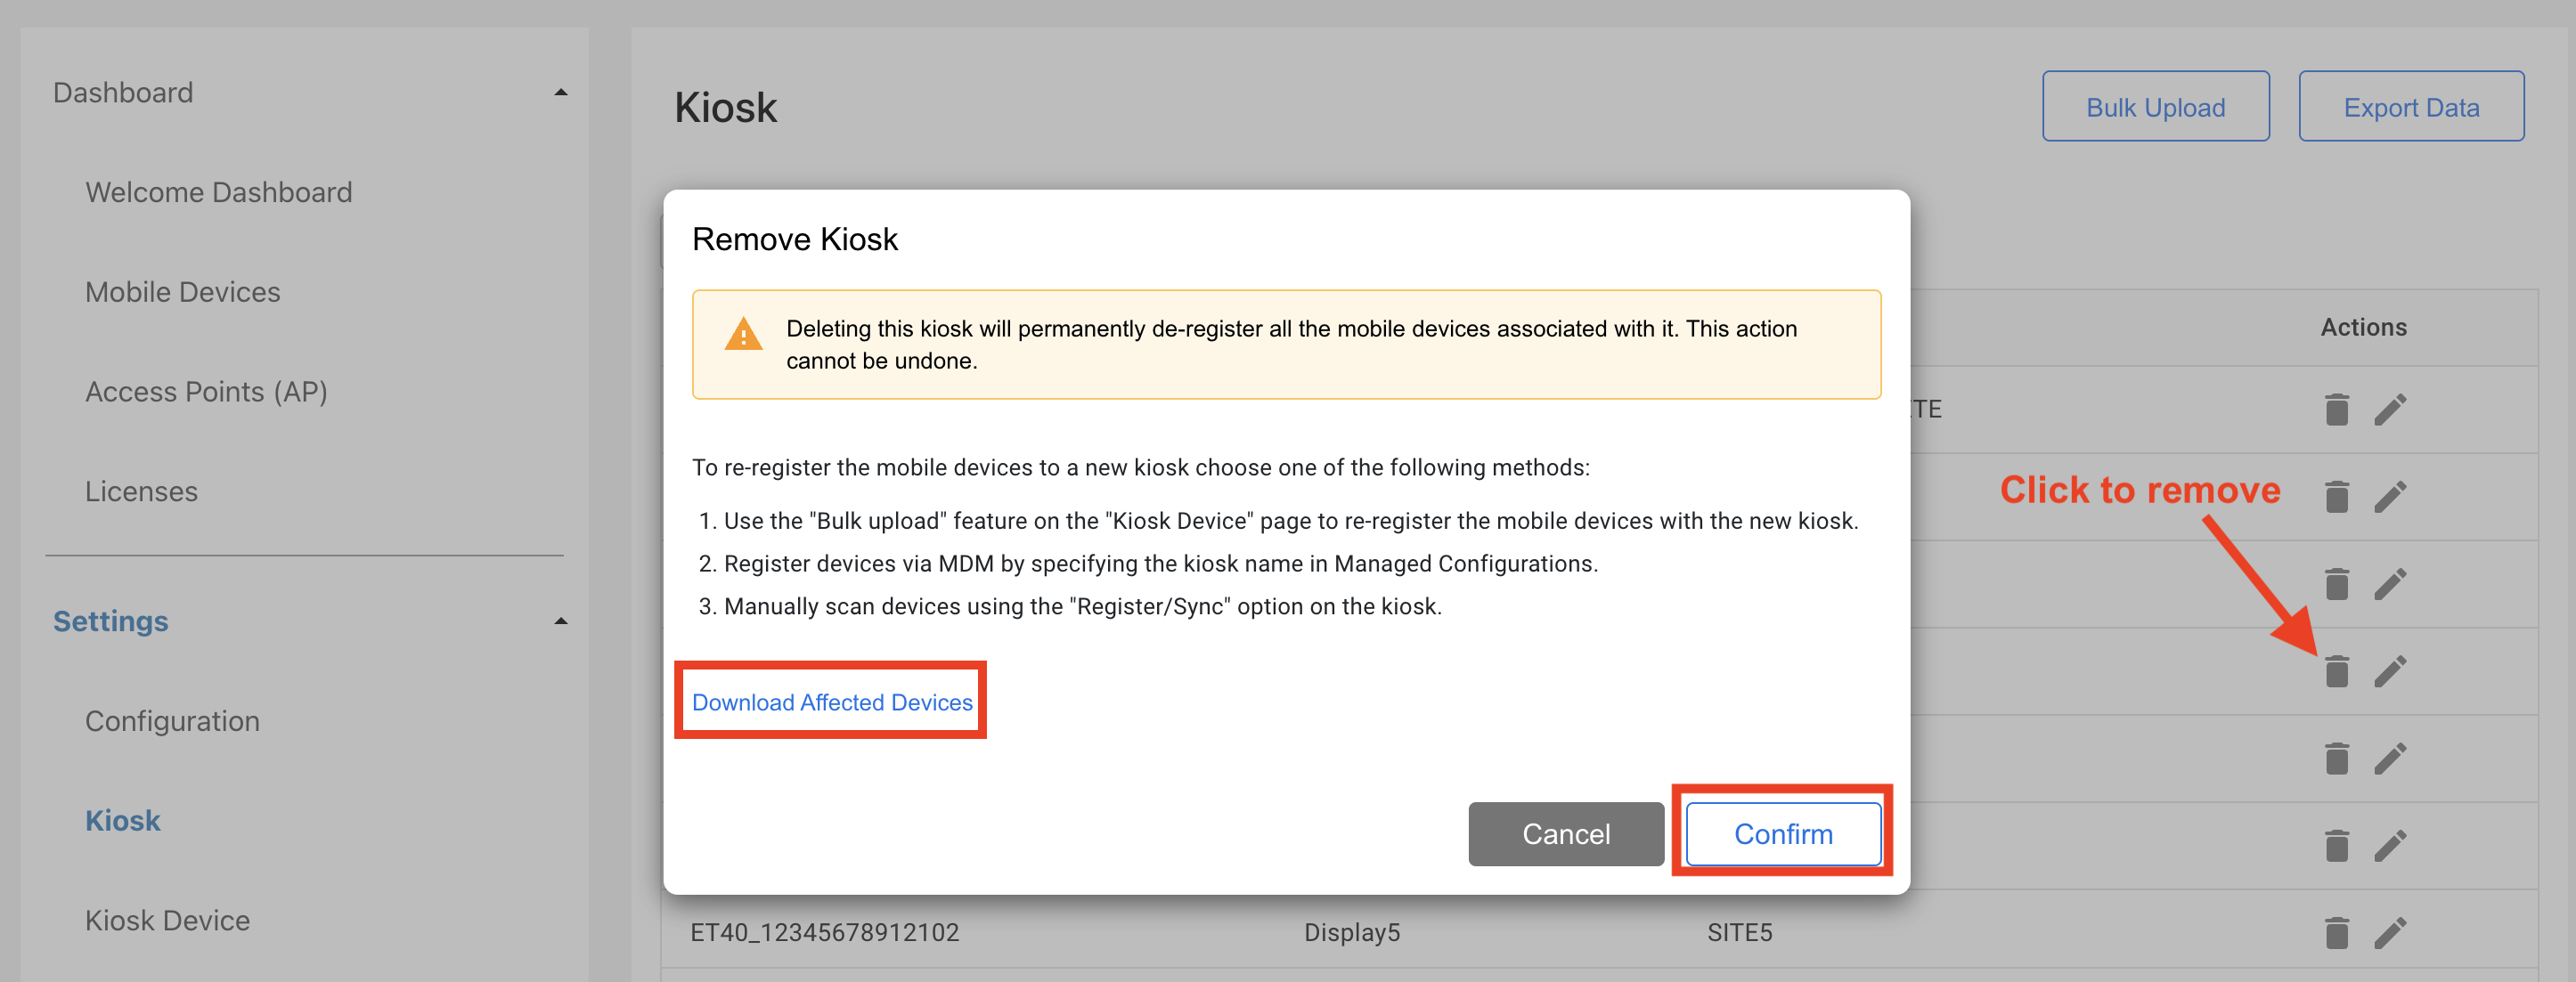
Delete Kiosk
Removes a selected kiosk. The kiosk must be in a connected state to be deleted. After deletion, the kiosk displays a blocking screen, preventing further use until it is reconfigured.
- In the Kiosk screen, click the delete icon next to the kiosk to remove.
- (Optional) To save a record of the devices associated with the kiosk, click Download Affected Devices. The data is exported as a
.csvfile. - (Optional) Follow instructions to re-register the associated devices to a new kiosk.
- Click Yes to confirm and delete the kiosk.
After a kiosk is deleted, DGAM displays a removal confirmation on the screen. To make DGAM operational again, it must be reinstalled.
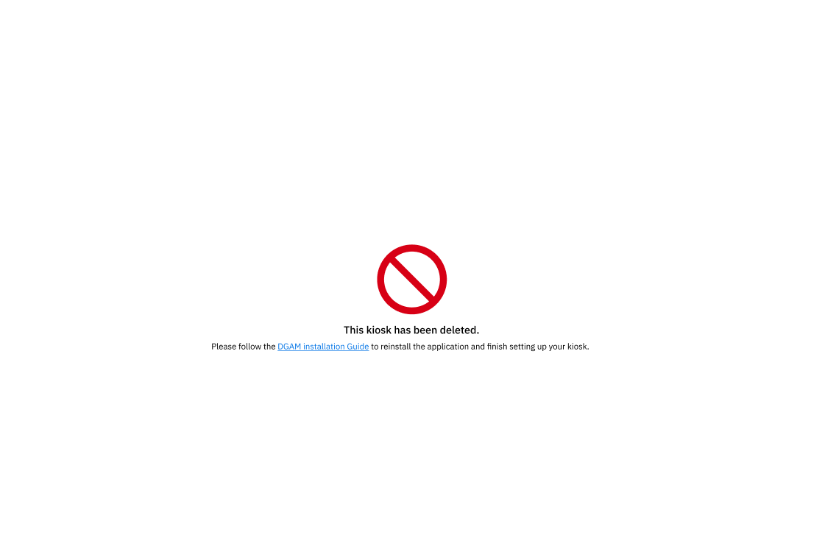 DGAM Screen on kiosk after deletion
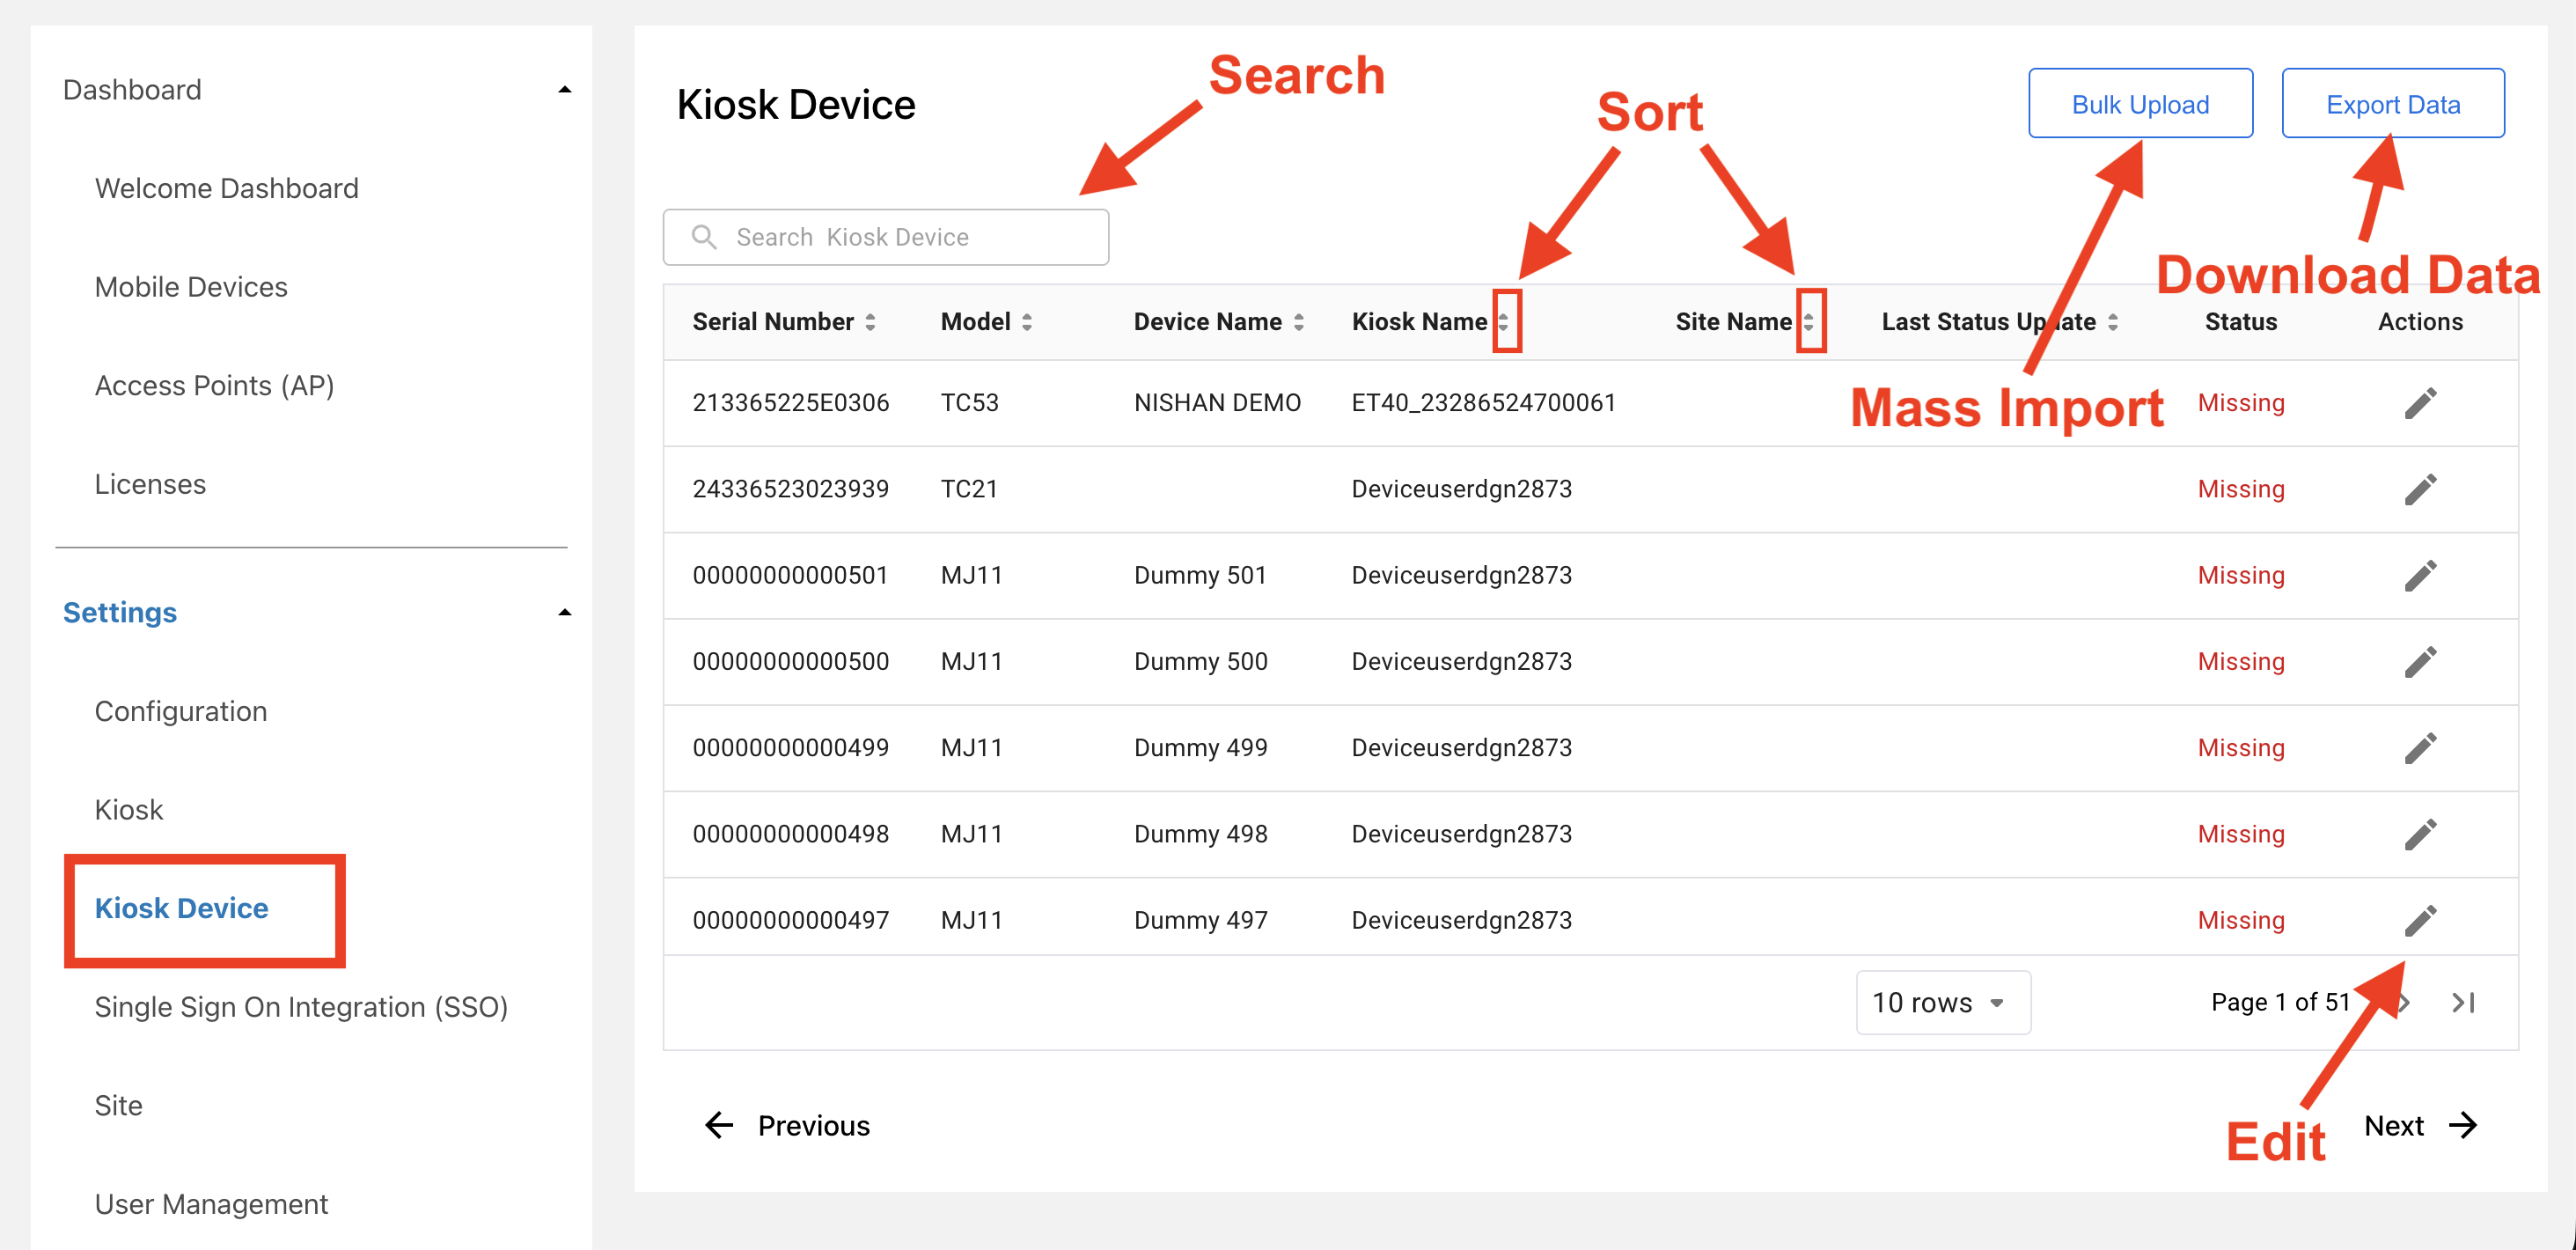
Manage Kiosk Devices
This section applies to
DGAM Only.
The Kiosk Device screen (under Admin Settings > Kiosk Device) lists all devices registered to a kiosk. For easier identification, Kiosks are identified by their assigned "DisplayName." If a "DisplayName" is not set, the system defaults to showing the "DeviceModel_SerialNumber."
Device Statuses:
- Available - The device is in its charging cradle, no user is signed in, and it is ready for use.
- In Use - A user has removed the device from the cradle and authenticated with Identity Guardian.
- Missing - The user logged out of the device and it has not been returned to the kiosk, or it could not be recovered.
Registering Devices to a Kiosk: There are three methods to register a device to a kiosk to allow device monitoring:
Other Available Actions:
- Update Kiosk Devices
- Export Kiosk Device Data
- Modify Kiosk Device
- Search: Find a specific kiosk device by its name.
- Sort: Sort applicable columns in ascending or descending order.
Kiosk Device guide
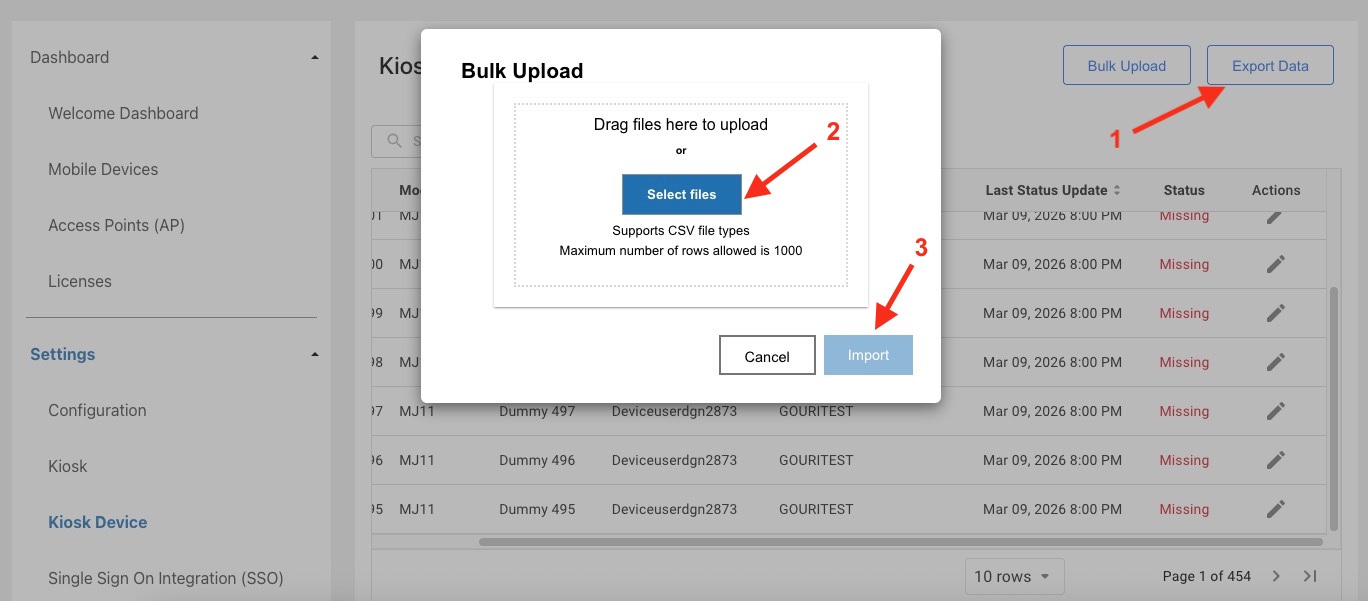
Bulk Upload/Update Kiosk Devices
Add or update multiple kiosk devices simultaneously via a .csv file upload.
Prerequisite: Prior to the upload, devices must be registered with the server and visible in the Mobile Devices Dashboard.
- In the Kiosk Device screen, click Bulk Upload.
- If a formatted file is not yet available, click Download Template to retrieve a populated template with sample data. Replace the sample data with the required data, and save the file.
- Click Select files to browse for the
.csvfile containing the data, or drag and drop the file into the window. - Click Import.
Export Kiosk Device Data
Download kiosk data as a .csv file. This export can also be used as a template for bulk uploads.
- In the Kiosk Device screen, click Export Data.
- Browse to the target folder, then click Save.
Modify Kiosk Device
Update an existing kiosk device:
- In the Kiosk Device screen, click the edit icon for the desired kiosk device to modify.
- Enter the appropriate information to update. Select one of the following for the Status:
- Available
- In Use
- Missing
- Click Update.
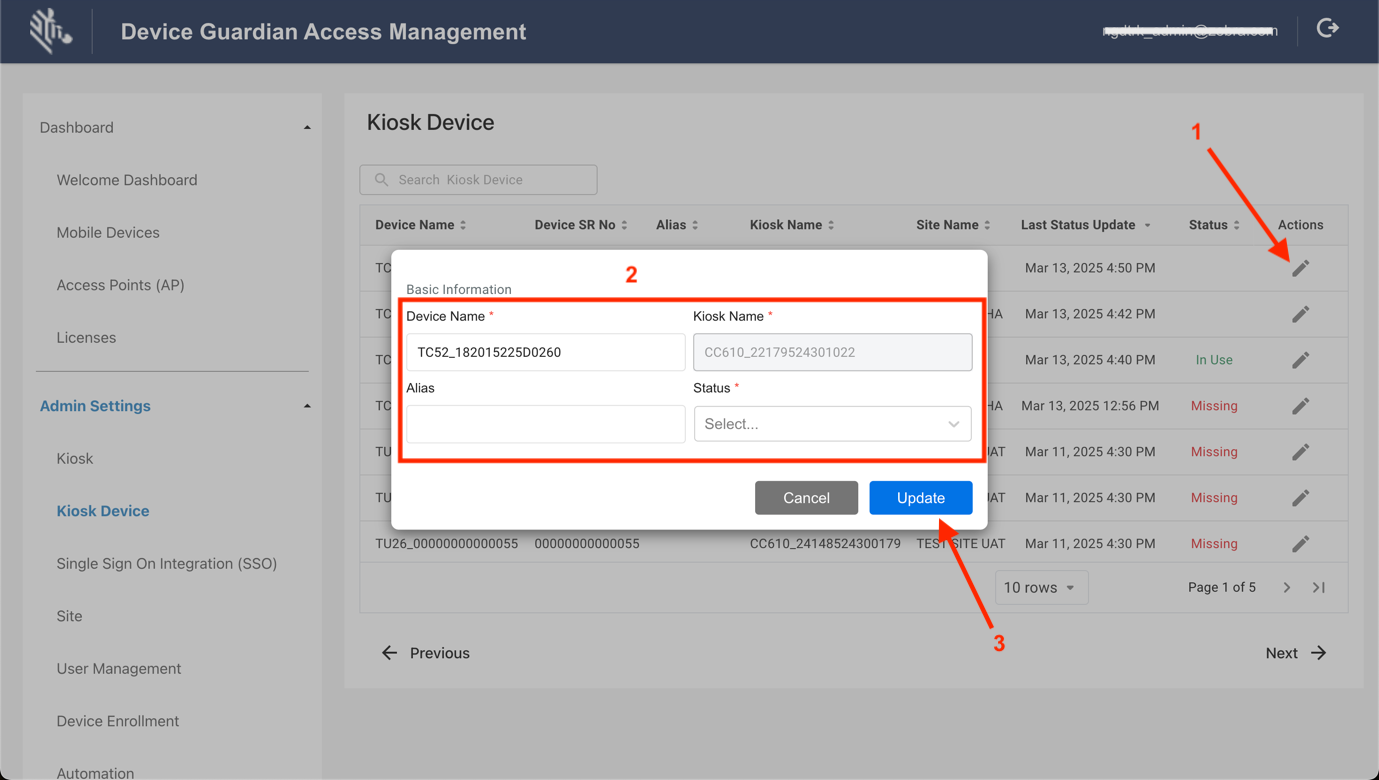
Steps to edit a device registered with a kiosk
Manual Device Registration
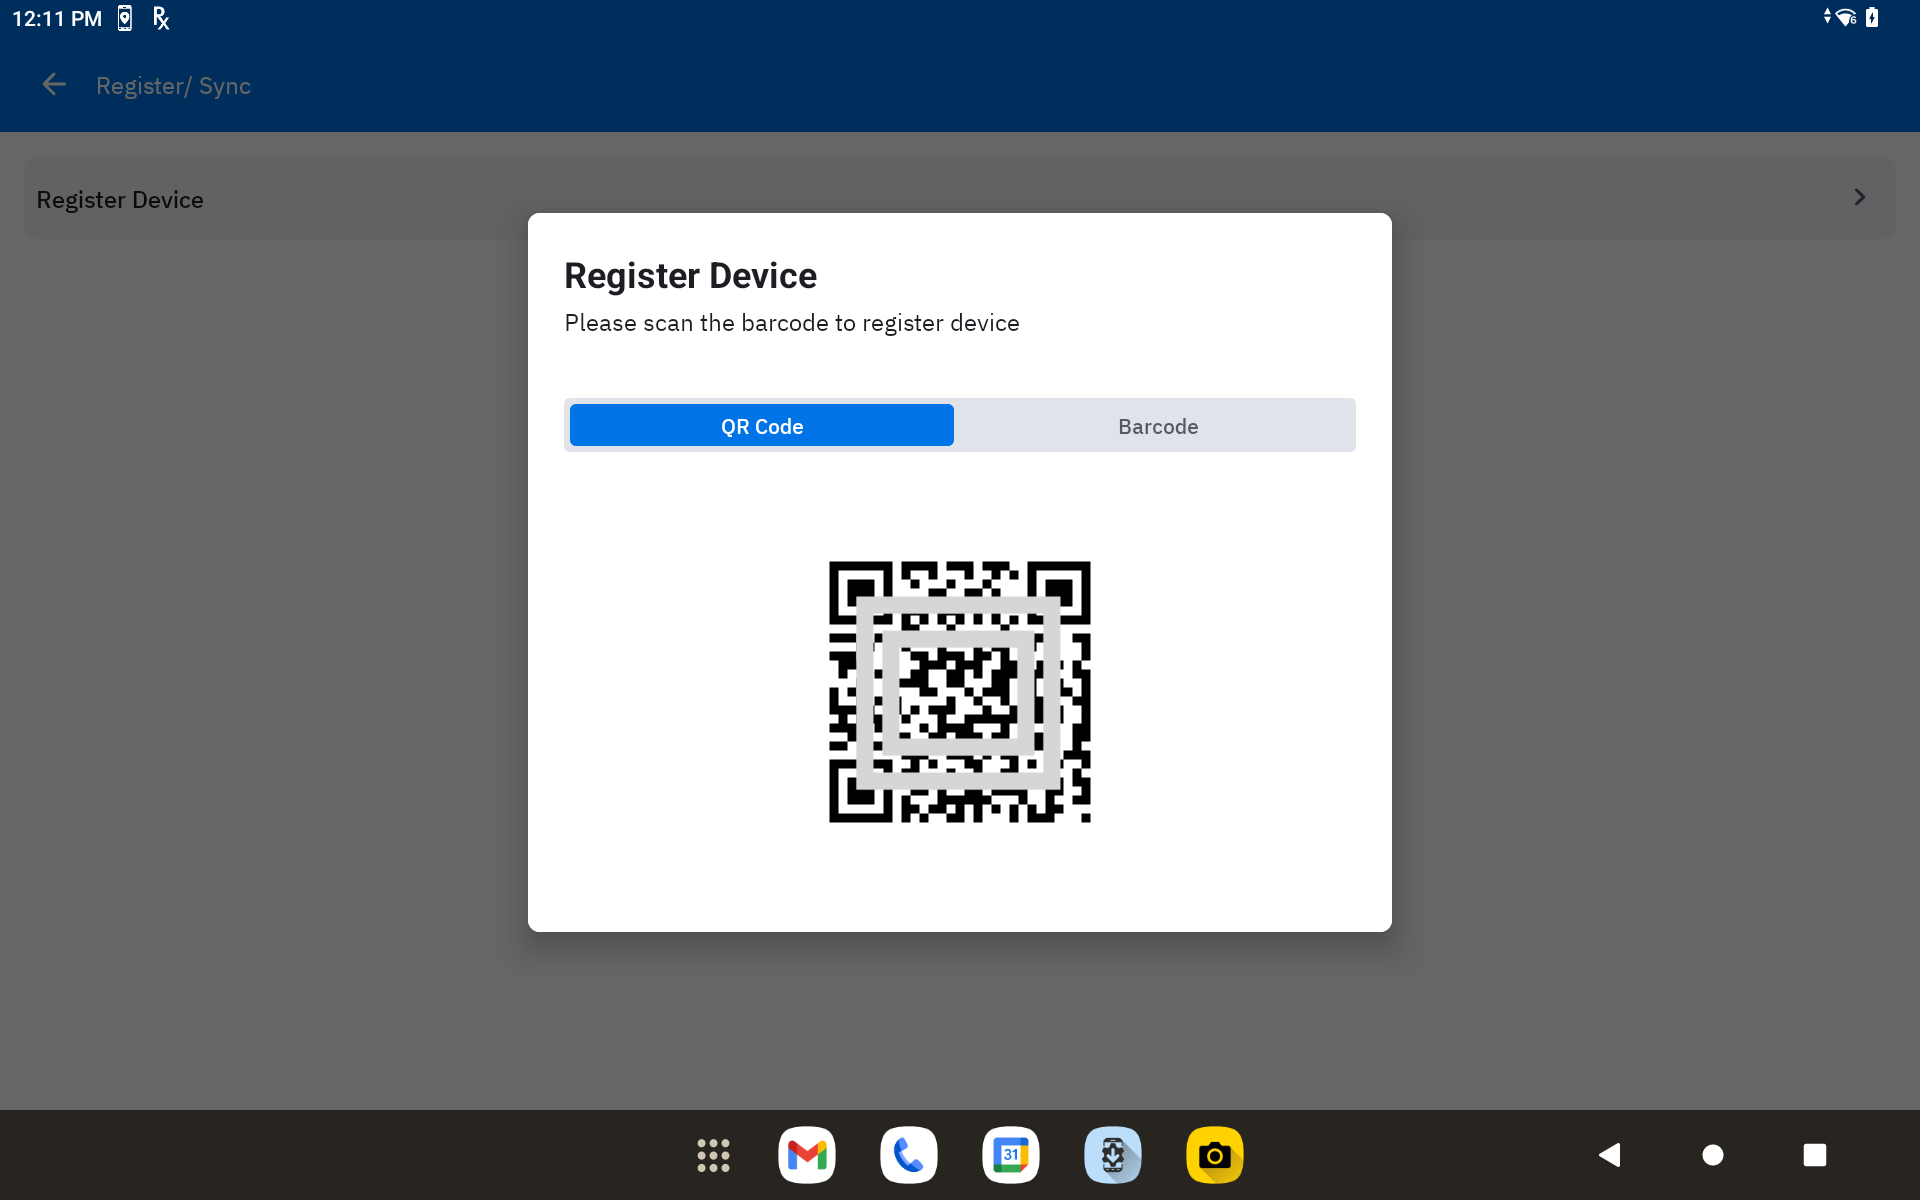
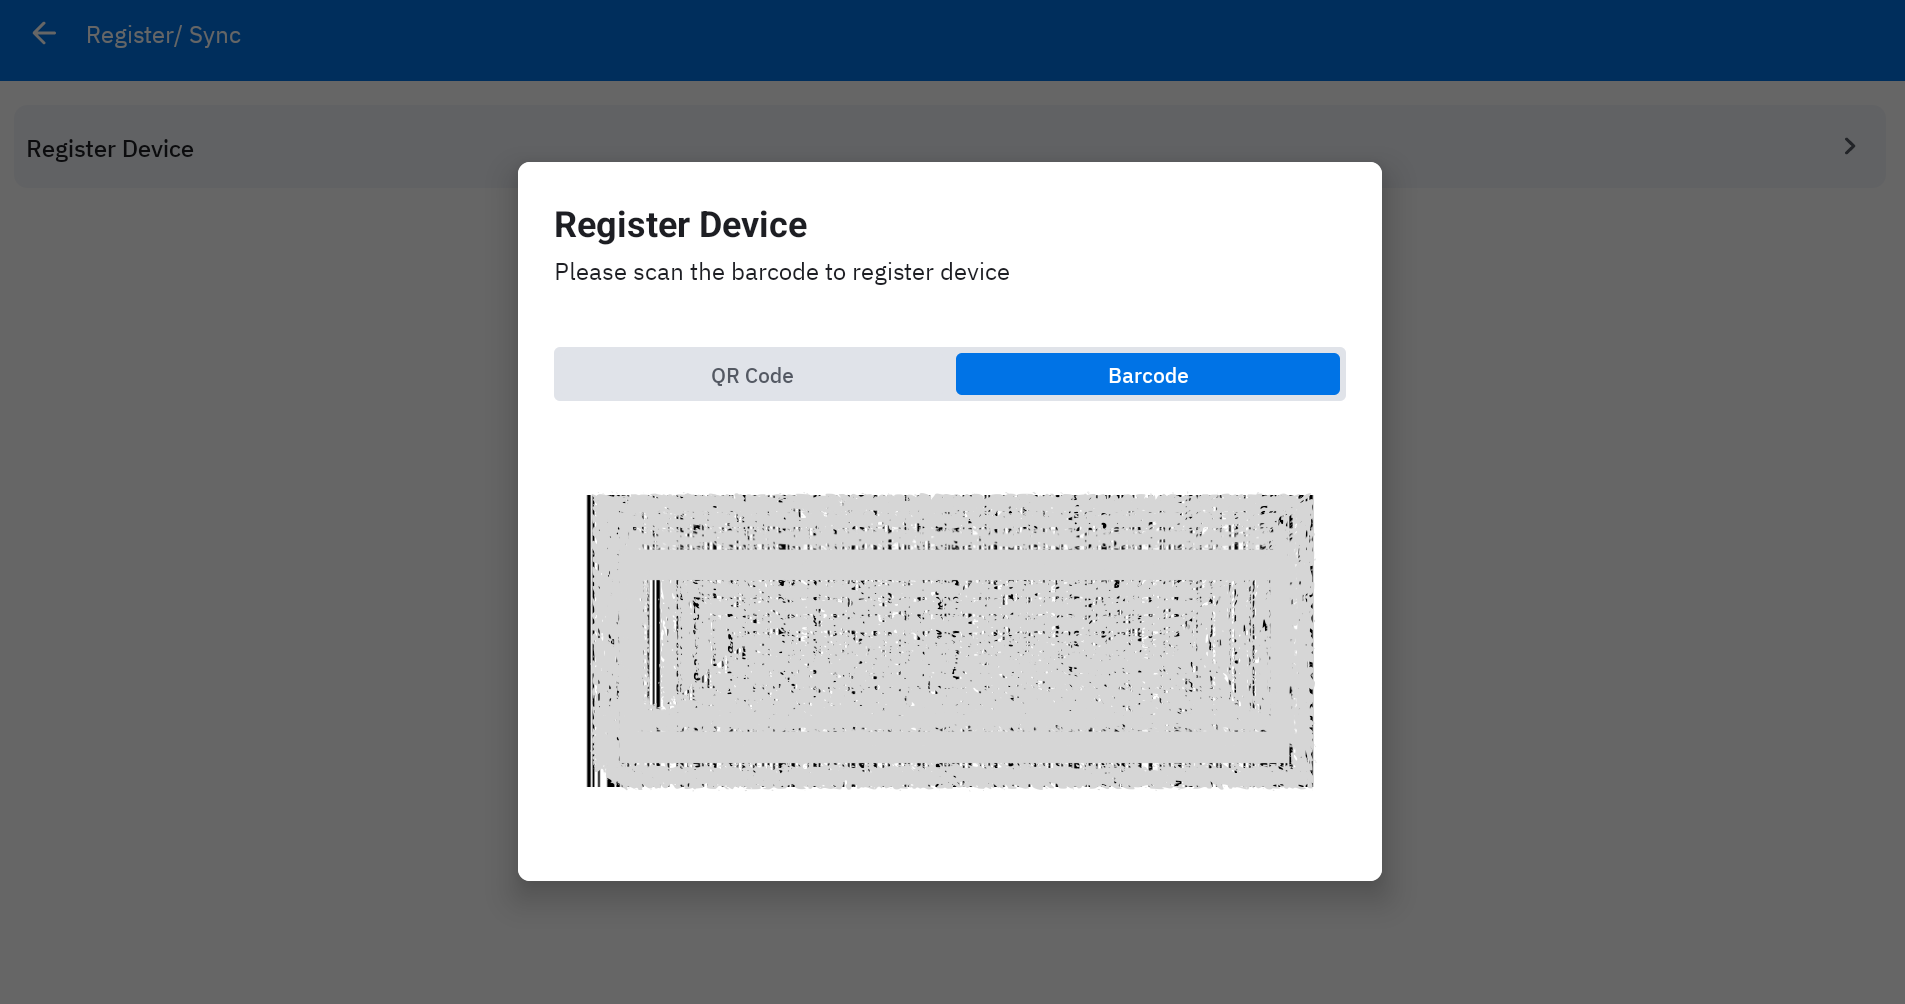
Manually register a device to a kiosk by using the device to scan a barcode displayed on the kiosk screen.
To register a device to the kiosk:
- On the mobile device, open the Device Guardian app.
- Tap the top-right menu and select Register to Kiosk.
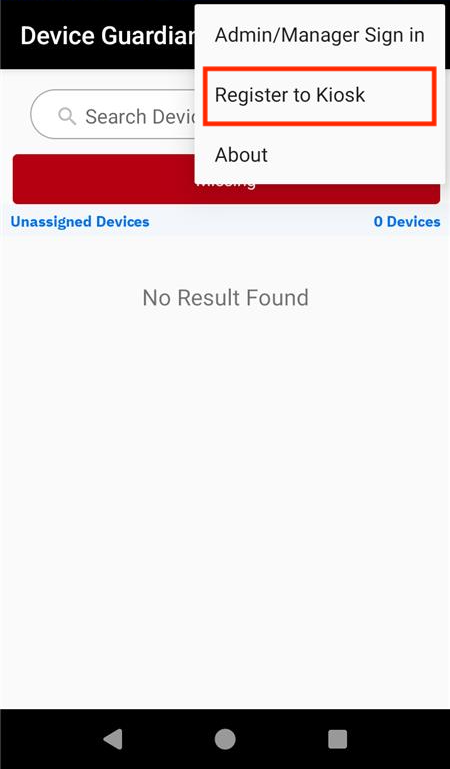
- A screen appears allowing you to scan a barcode.

- On the kiosk, tap the top-left menu.
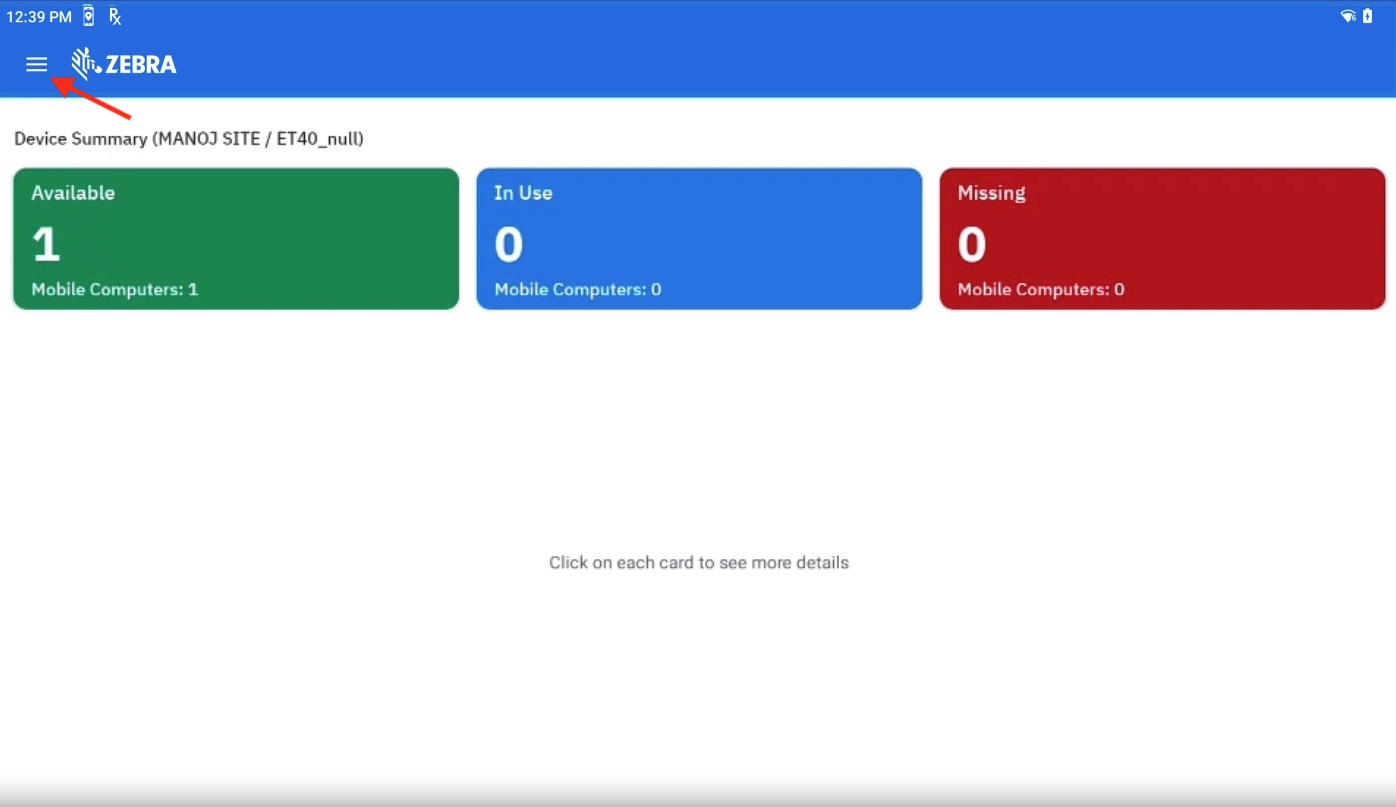
- Select Register / Sync.
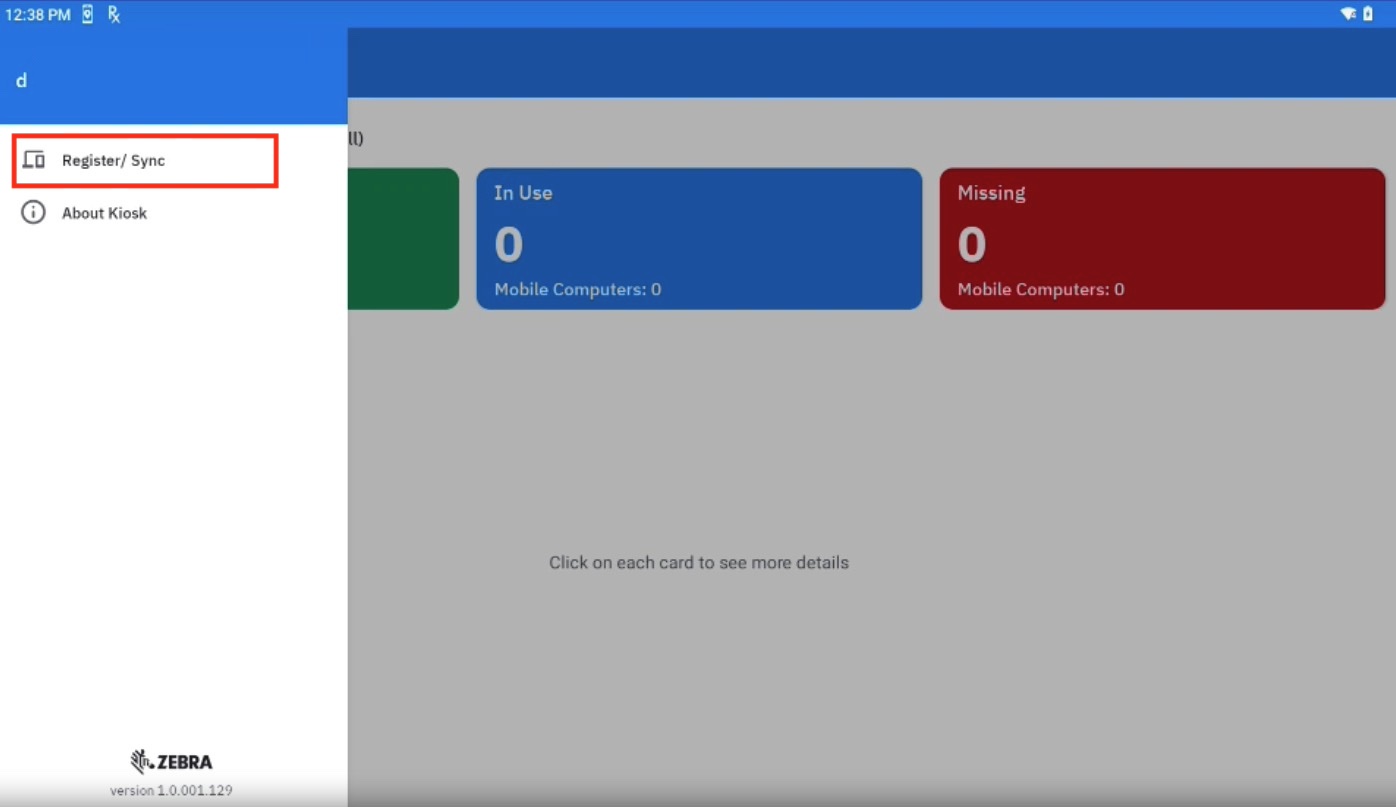
- Tap Register Device.
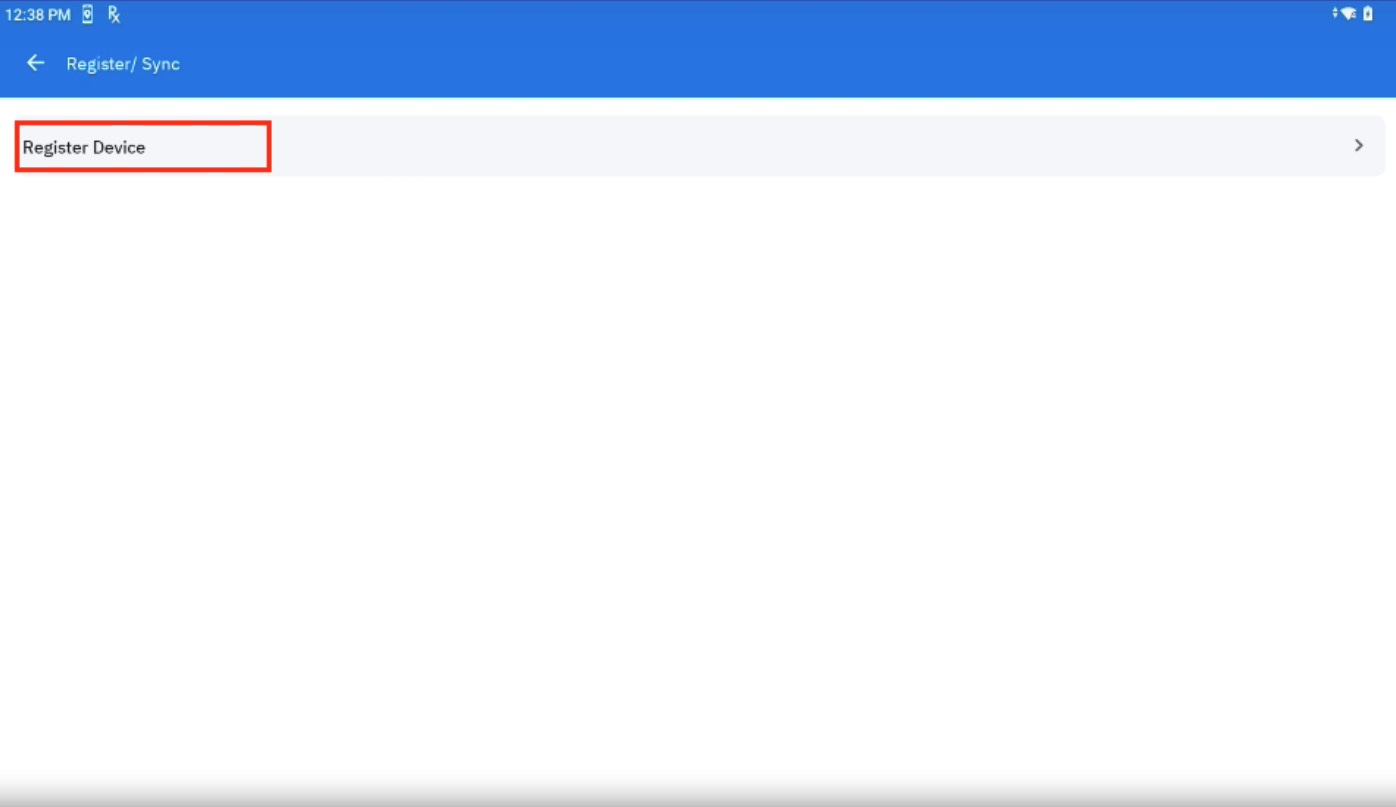
- While on the screen from step 3, use the mobile device to scan either the QR code or barcode, completing the device registration to the specific kiosk.
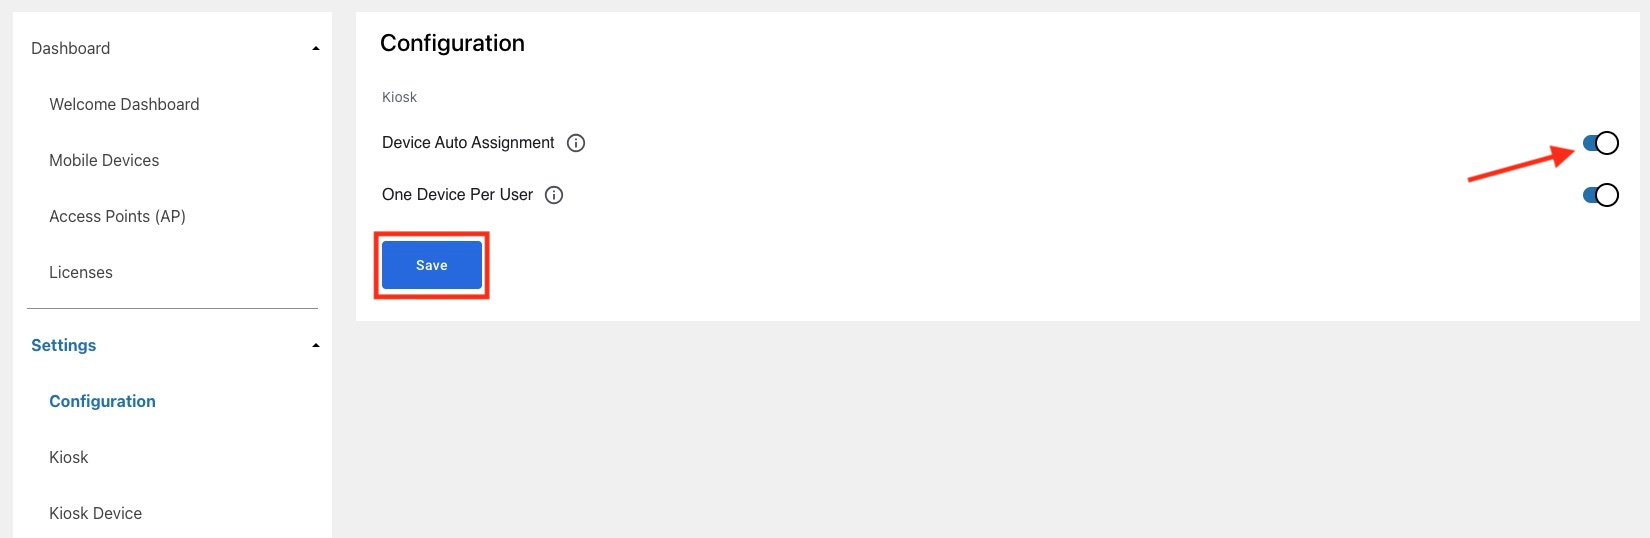
Device Auto Assignment
This section applies to
DGAM Only.
Device Auto Assignment (located under Settings > Configuration) automatically assigns a mobile device to the nearest charging kiosk within Bluetooth range. This eliminates the need for manual device registration to the kiosk. For this feature to work, both the kiosk and the mobile device must be assigned to the same site.
Feature Limitation: This feature can operate with Bluetooth Proximity or Device Return Rule, but not both at the same time.
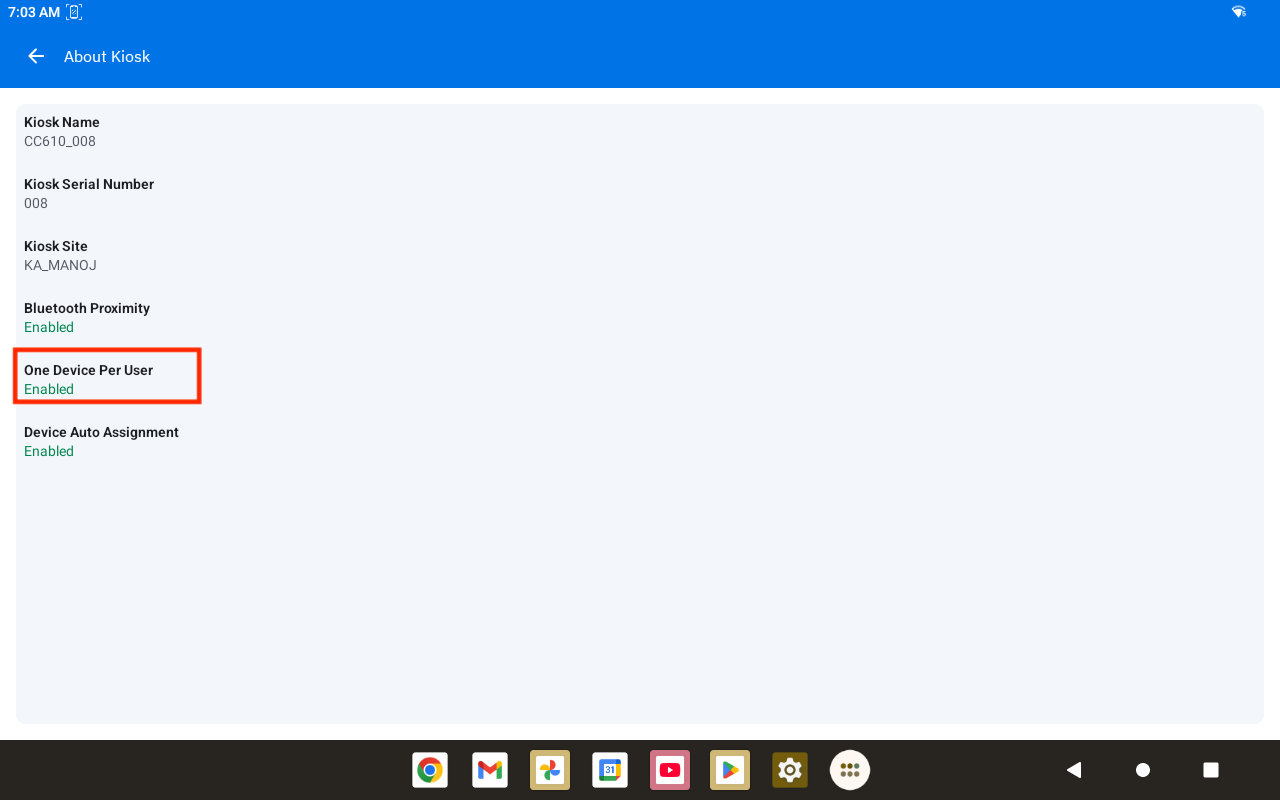
One Device Per User
This section applies to
DGAM Only.
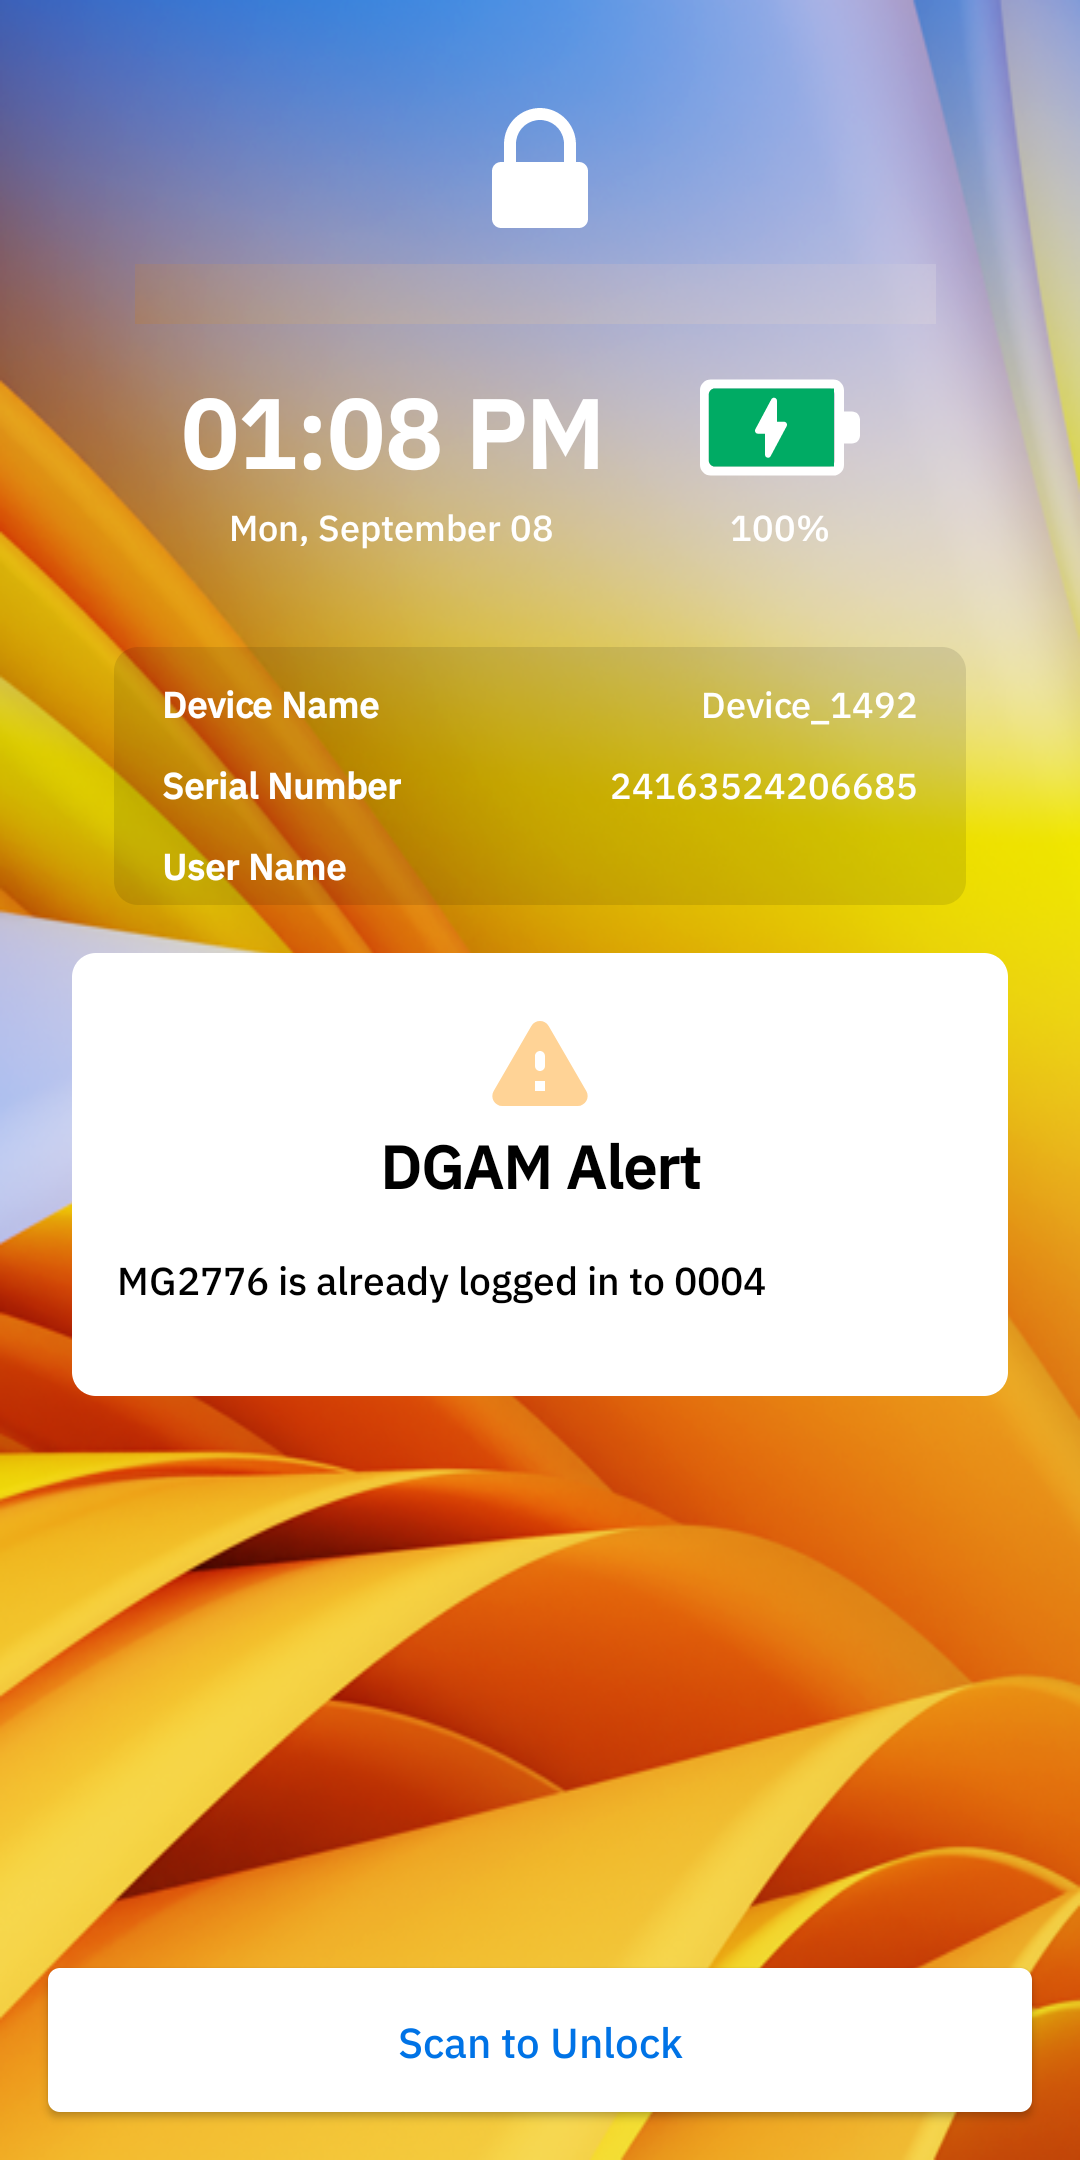
The One Device One User feature ensures that each user is restricted to logging into and using only one device at a time when managed by a kiosk. This functionality enhances security and device management by preventing multiple simultaneous logins across different devices.
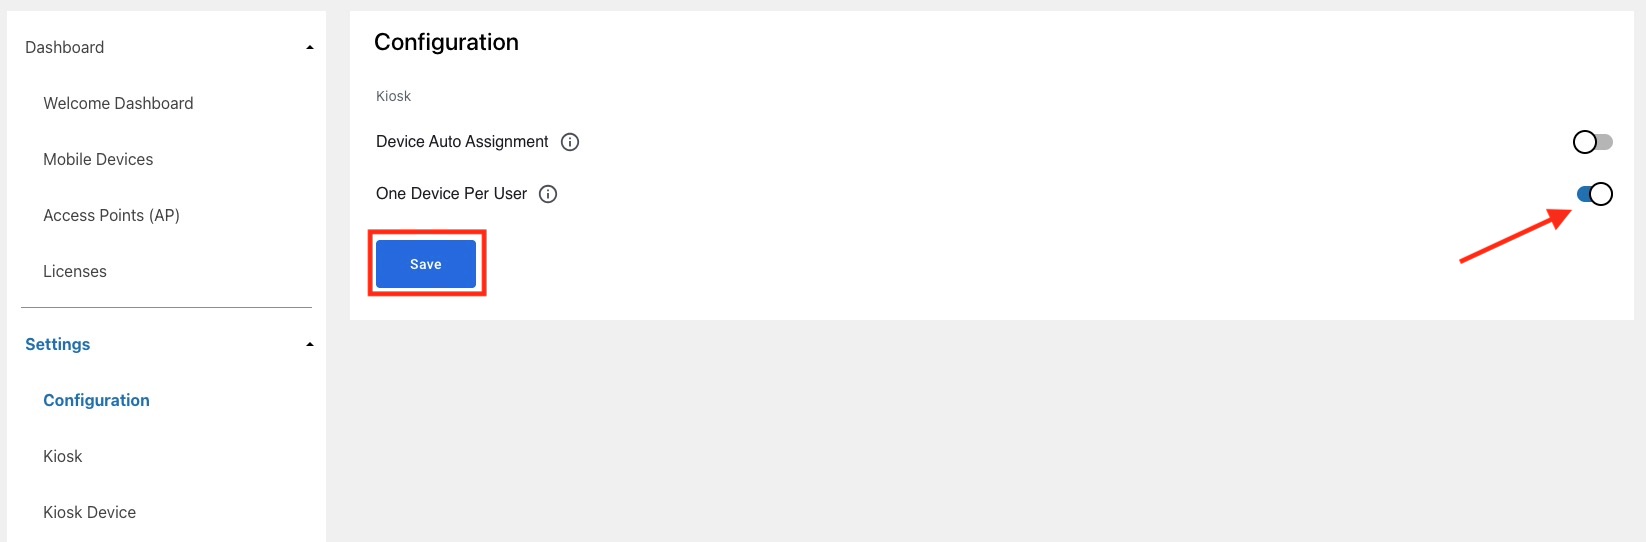
Note on Synchronization Latency: Enforcing the One Device Per User policy incurs a synchronization delay of up to 15 seconds. Rapid consecutive logins within this timeframe may result in successful authentication on multiple devices. Users must wait a minimum of 15 seconds after their first login to ensure the restriction is fully applied across the network.
Configuration
Enable or disable the One Device Per User feature through the web portal. Navigate to Settings > Configuration to access this setting.
Usage
Login Process:
- When a user attempts to log in, the system checks whether this feature is enabled.
- If enabled and the user is already logged into another device, the system blocks the new login attempt and displays an error message.
Logout Process: Upon logout, the user’s association with their current device is removed, allowing them to log in on another device.
Device Status Changes: If a device is marked as lost or decommissioned, the system automatically removes the user’s association with that device, enabling them to log in on another device without manual intervention.
Kiosk: The About screen in the kiosk indicates whether the One Device One User feature is enabled or disabled.
Automation
Device Guardian can be configured to automatically update device states based on specific conditions or thresholds. Set these thresholds and options to automate workflows by marking devices to certain states automatically. This helps locate devices before they lose battery power or while they are in use, eliminating the need for continuous monitoring and manual updates by administrators. For example, devices can be automatically marked To Be Found if they are checked out, low in battery, and not charging. This tags the device, indicating to users that it needs to be located.
For DGAM, at least one of the following options must be enabled in the Site Configuration for automation rules to function:
- Bluetooth Proximity
- Return Device To Same Kiosk or Return Device to Different Kiosk under Device Return Rule
When any of the specified automation rules are triggered, the device transitions to the Missing state, and an alert message is displayed, prompting the user to return the device back to the kiosk.
Note: The device must be connected to the Device Guardian server to receive automation settings. Any changes to automation settings on the server cannot be applied to disconnected devices.
Configure Automation Settings
To enable automation, set the related device thresholds and configuration:
Log in to the web portal as an administrator.
From the left menu, click Settings > Automation.
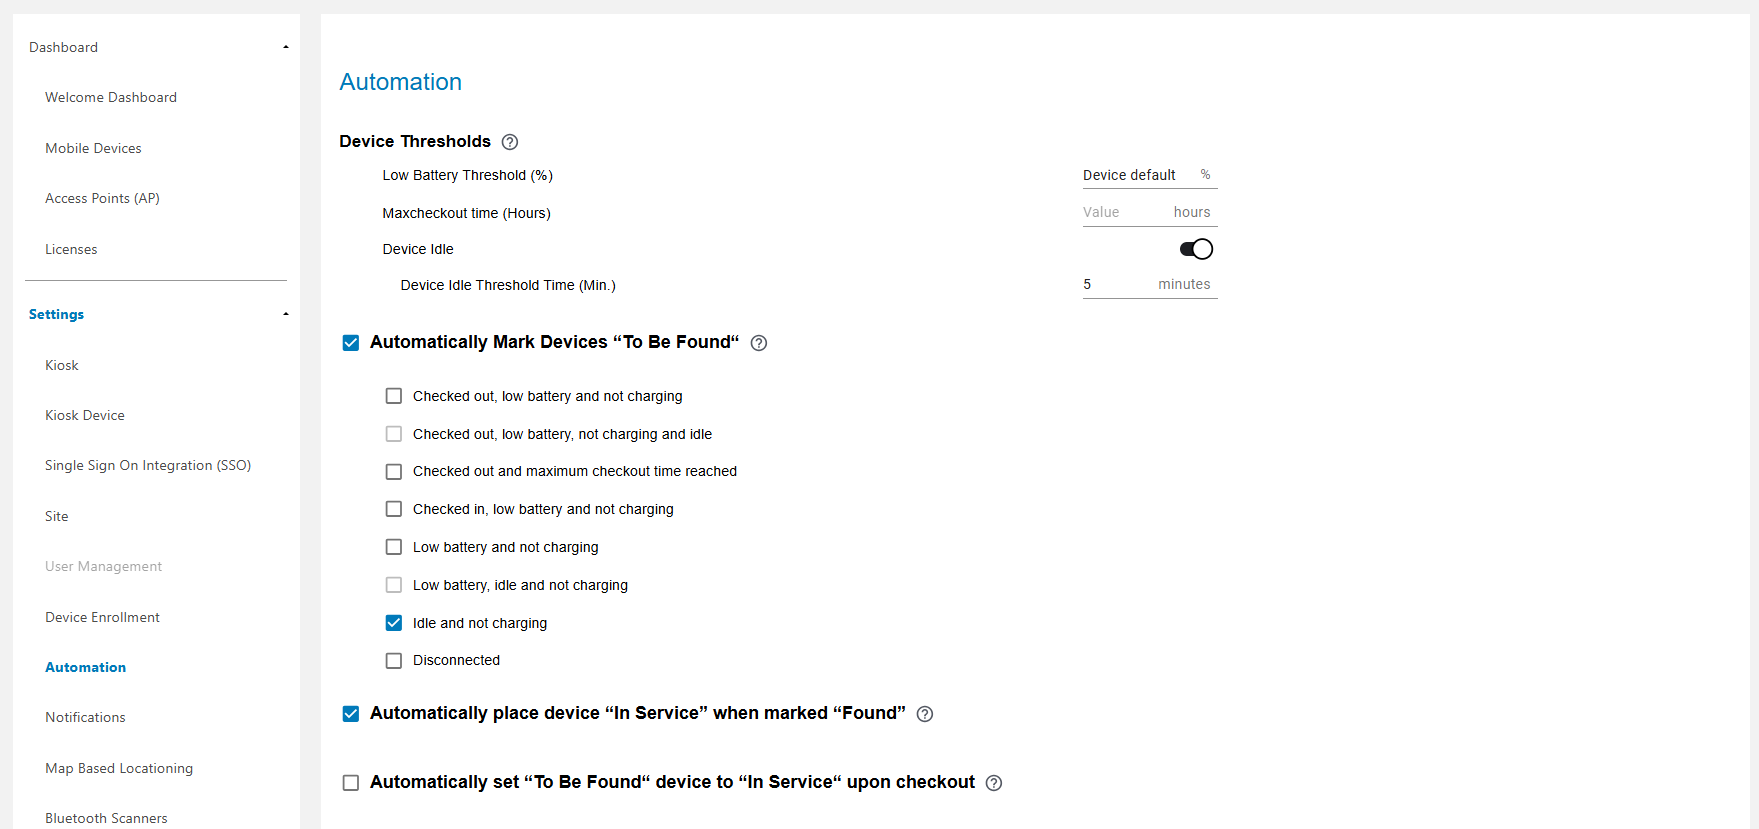
Set the Device Thresholds:
- Low Battery Threshold - Specify the percentage (%) of battery capacity when the device reaches the Low Battery condition. If no value is specified, it defaults to the device’s low battery threshold.
- Maximum Checkout Time (in Hrs) - Set the maximum duration for device checkout in hours. Once this time period is reached, the device is flagged with red text on the dashboard to alert the administrator. This is applicable when Identity Guardian is used for device authentication.
- Device Idle - Enable this option to monitor a device when it is stationary, or when there is no physical movement detected by the accelerometer.
- Device Idle Threshold Time - Specify the duration in minutes that the device should remain stationary before it is categorized as Idle. Default value: 15; minimum value: 5; maximum value: 10000.
Automatically Mark Devices "To Be Found" - Enable this option and select the state(s) or combination of states for the device to be automatically marked To Be Found when the selected state(s) is reached, rather than performing this manually. If a combination of states are selected, all conditions must be met for the device to be automatically marked To Be Found. If the selected state(s) is not reached, the device remains off the To Be Found list. Available states and combination of states:
- Checked out, low battery and not charging
- Checked out, low battery, not charging and idle
- Checked out and maximum checkout time reached
- Checked in, low battery and not charging
- Low battery and not charging
- Low battery, idle and not charging
- Idle and not charging
- Disconnected
After a device has been automatically marked To Be Found based on the above selection, if the device state changes and no longer satisfies the selected state(s), then To Be Found is removed from the device.
Important: During the finding process, before marking the device as Found, make sure one of the selected conditions is NOT satisfied (e.g. charge the device if "not charging" is selected). Otherwise, the device will return back to the To Be Found state after it is marked Found.
- Automatically place device "In Service" when marked "Found" - Enable this option to automatically place the device back “In Service” after it is located and marked Found. This eliminates the need to manually perform this action.
- Automatically set "To Be Found" device to "In Service" upon checkout - Enable this option to automatically place the device back In Service when a device in the To Be Found state is checked out. There is no need for the device to remain in the To Be Found state since the user has checked out the device.
- Click on Save.
Notifications
A variety of notifications are accessible through different channels:
- Device Notifications:
- Email Notifications
- Web Portal Notifications:
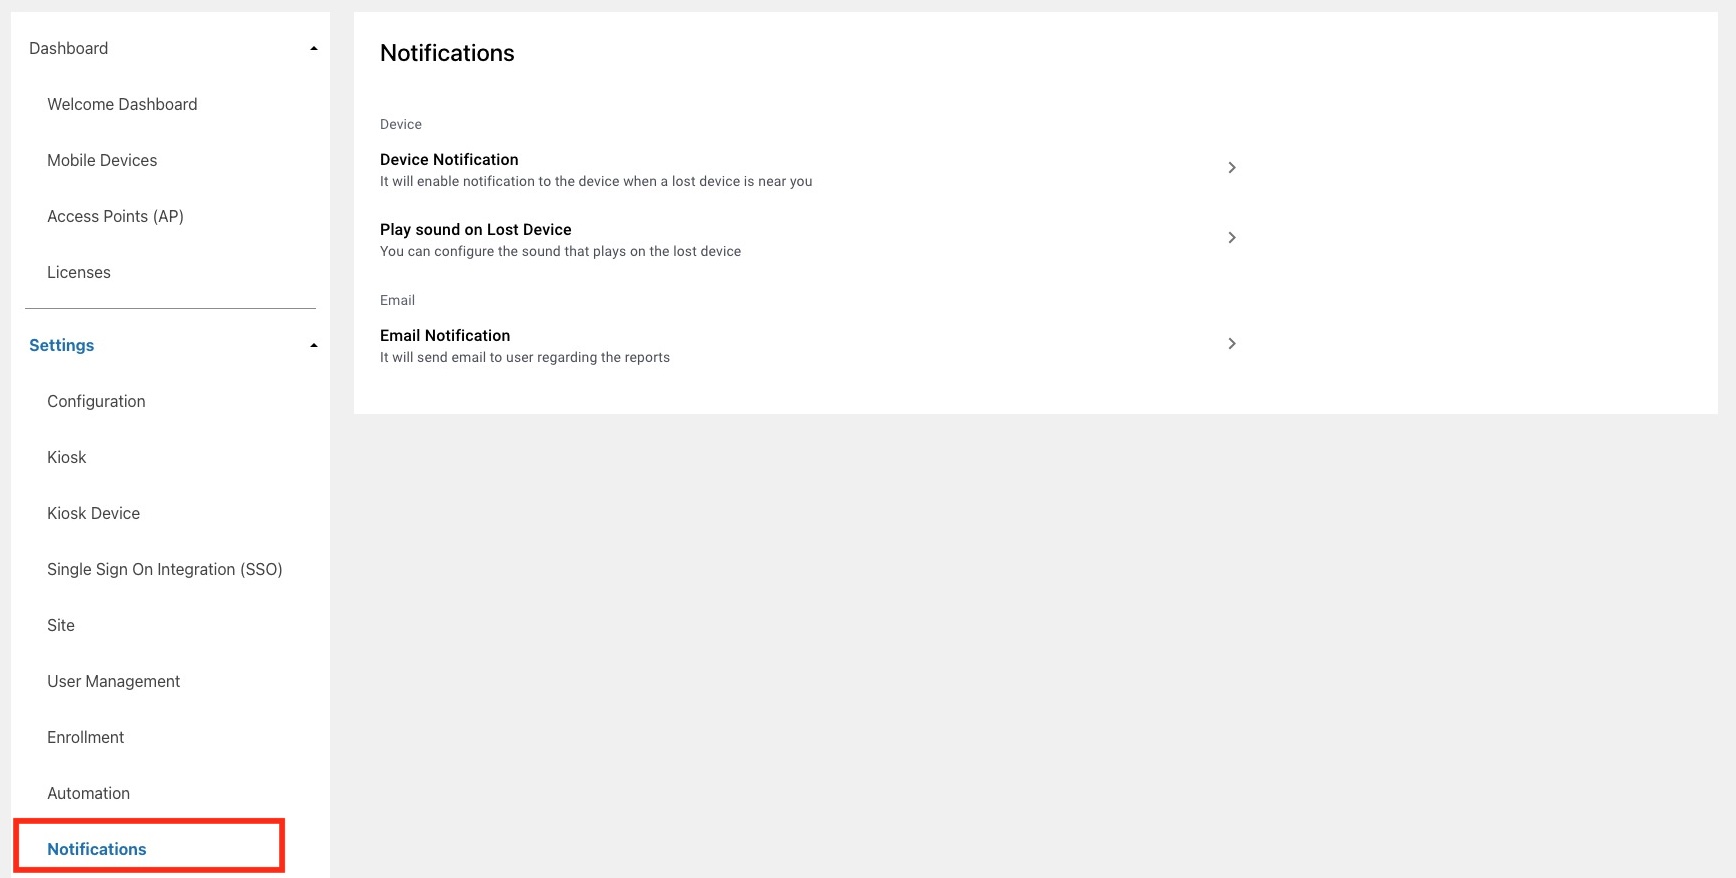
Notifications options
The following sections provide details on each notification method.
Missing Device
Missing Device Notifications control whether notification alerts are displayed on devices when another device from the same site is flagged as "To Be Found" (considered Missing). Missing devices remain visible in the web portal and device dashboards.
To toggle the Missing Device Notification:
- Log into the web portal as an administrator.
- Navigate to Notifications > Device Notifications.
- Toggle the Missing Device Notification settings:
- Enable: Displays notifications on devices when a device from the same site is flagged as "To Be Found" (Missing).
- Disable (default): Prevents missing device notifications from appearing on devices.
- Click Save to apply the changes.
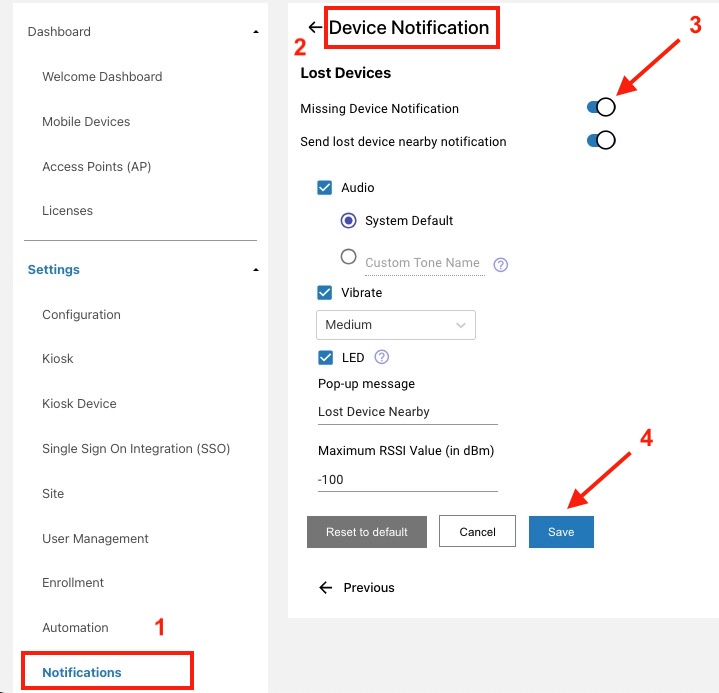
Lost Device Nearby
When a lost device is detected nearby, a Lost Device Nearby notification is triggered on the user's device to alert them. This optional feature aids in device recovery by proactively sending alerts when a lost device is within close range. The user can immediately take action to locate the lost device. Alerts can be sent via audio, vibration, LED, or Android notification, or a combination of these methods. See Lost Device Nearby for information on its use.
To enable this feature and configure its notification settings:
- Log into the web portal as an administrator.
- Click Settings in the left menu and click Notifications.
- Click on the Lost Device Nearby tab.

- Toggle to enable the option Send Lost Device Nearby Notification. This option is disabled by default.
- Select one or more of the following notifications to alert the user of a lost device detected within the vicinity:
- Audio - If enabled, the device emits an audio sound. Select one of the following options to specify the sound emitted:
- System Default - Emits the sound specified from the Default notification sound option in Android Sound settings.
- Custom Tone Name - Enter the tone name that matches with a notification sound listed from Default notification sound in Android Sound settings on the device.
- Vibrate - If enabled, the device vibrates based on the duration specified. Select one of the following durations:
- System Default
- Short
- Medium
- Long
- LED - If enabled, an LED notification is emitted on the scanning device. The default LED is blue.
- Pop-up Message - Define the content of the notification message to be displayed on the device that detects the missing device. By default, the message is: "Lost Device Nearby".
- Maximum RSSI Value (in dBm) - Enter the maximum signal strength for detecting when a device is within proximity of the receiving beacon. A less negative value indicates stronger signal strength and a longer detection range, while a more negative value signifies weaker signal strength and a shorter detection range. Due to various factors affecting beacon signal strength, it is essential to manually fine-tune this setting to suit your specific environment and devices. Zebra recommends adjusting this value based on your business requirements. Default value: -100; maximum value: -50.
- Audio - If enabled, the device emits an audio sound. Select one of the following options to specify the sound emitted:
- Click Save.
Reset to Default resets the Lost Device Nearby notification options to the default selection.
Play Sound
When attempting to locate a missing device, a notification event is triggered upon pressing the Play Sound button. This notification can be customized to play a specific tone, adjust the volume, and set the duration and interval of the sound played.
To enable Play Sound feature and configure its notification settings:
- Log into the web portal as an administrator.
- Click Settings in the left menu and click Notifications.
- Click on the Play Sound tab.
- Audio is enabled by default for the device to emit a sound when the Play Sound button is pressed.
- Select a sound to play and one or more options for the sound being played:
- System Default - Select this option to emit the sound specified from the Default notification sound option in Android Sound settings on the device.
- Device Guardian Sound - Select this option to play one of the custom Device Guardian tones:
- Device Guardian 1
- Device Guardian 2
- Device Guardian 3
- Device Guardian 4
- Device Guardian 5
- Use Sound File On Device - Specify the file name or path to an .MP3 sound file for audio notifications. If the file or path is missing or invalid, the default notification sound is played. Example file path:
/sdcard/sampleTone.mp3
Note: Zebra recommends storing the sound file in/sdcard/or another easily accessible location. - Volume Level - Select one of the following based on the desired volume level:
- 20%
- 40%
- 60%
- 80%
- 100%
- Play Duration - Select the length of time (in minutes) for the sound to be played repeatedly.
- Range: None to 20 minutes, in increments of 1 minute.
- Repeat Interval - Select the interval (in seconds) between each repeated sound within the specified duration:
- None
- 4 sec
- 6 sec
- 8 sec
- 10 sec
- 12 sec
- Click Save.
Reset to Default returns all Play Sound options to their default settings.
This section applies to
DGAM Only.
Email notification reports inform recipients with updates on devices registered to kiosks, providing information on either missing devices or all devices registered to the kiosk. These reports are delivered daily at a scheduled time from NPDVIQFNoReply@zebra.com and include a CSV attachment containing relevant device details, such as device name, serial number, and user name. The ability to manage email notifications depends on user role:
- Administrators - Add, view, edit, and delete email notification configurations across all sites.
- Managers - Add, view, edit, and delete email notification configurations within their designated site.
- Users/Associates - View email notification configurations within their designated site.
There are two types of reports:
- Missing: Details devices currently flagged as Missing
- End of Day Device Status Report: Provides device details for all devices (Available, In Use, and Missing).
Configuring email notifications:
- Navigate to Settings > Notifications > Email Notification. Available options depend on user role.
- To view, edit, and delete existing email notifications, click on the respective link in the web portal.
- To add a new email notification, click Add New Configuration and follow the subsequent steps.
- Enter the appropriate information, then click Save:
- Name: Enter a unique identifier for the configuration.
- Email Addresses: Enter recipient email addresses separated by commas.
- Site: Select the target site.
- Type of Report: Select one of the following:
- Missing - Details devices currently flagged as Missing
- End of Day Device Status Report - Details all devices (Available, In Use, and Missing)
- Status Reason (Only applicable when Type of Report is set to "Missing"): Select the specific trigger reason for the report:
- INVALID_LOGIN - Failed login attempt due to user login failure.
- NOT_RETURNED - Device was not returned to the kiosk.
- COMMUNICATION_LOST - Device lost communication with the kiosk.
- All of the above
- Scheduled At: Specify the daily delivery time.
- Type of Report (Only applies if Type of Report is set to "Missing"): Select the format and data depth for the report:
- Device Status Notification (last 24 hours) - Contains:
- Device Name
- Serial Number
- Last Update - Time of most recent update
- Battery Level (%)
- User Name
- Status: Missing
- Status Reason
- Missing Days - Number of days missing
- Site Name
- Detailed Device Status Notification (last 24 hours) - Contains all Device Status Notification data, plus:
- Cabinet Name - Name of kiosk
- Previous State Time - Timestamp of the previous state occurrence
- Previous State - Device's prior state: missing, on_charge, or in_use
- New State Time - Timestamp of when the device transitioned to its current state
- New State - Current state of the device: missing, on_charge, or in_use
- Detailed Device Notification - (last 6 months) - Contains all historical Detailed Device Status Notification data spanning the last 6 months.
- Device Status Notification (last 24 hours) - Contains:
 Email Notification - Missing Device Report
 Email Notification - End of Day Device Status Report
Bulk Upload
This section applies to
DGAM Only.
The title bar in the web portal includes a notification icon that shows events related to bulk uploads for Kiosks and Kiosk Devices. These notifications indicate whether a bulk upload has started, succeeded, or failed. If a failure occurs, the .CSV file can be downloaded. Notifications remain visible for 14 days before being automatically removed.

Map Based Locationing
Map Based Locationing provides the GPS coordinates of a device, regardless of whether it is located indoors or outdoors. It maps the device location, even when it is not connected to an access point. This feature is only supported on Android GMS devices.
The device location is updated based on the following events:
- Rebooting the device
- Establishing a connection to a Wi-Fi or cellular network
- Changes in the device charging state
- Low battery (at this point, the device location continues to update for every 2% battery drain)
- Manual refresh (e.g. from the web portal)
To enable Map Based Locationing:
- Log into the web portal as an administrator.
- Go to Settings > Map Based Locationing.
- Toggle to enable Map Based Locationing, then click Save.
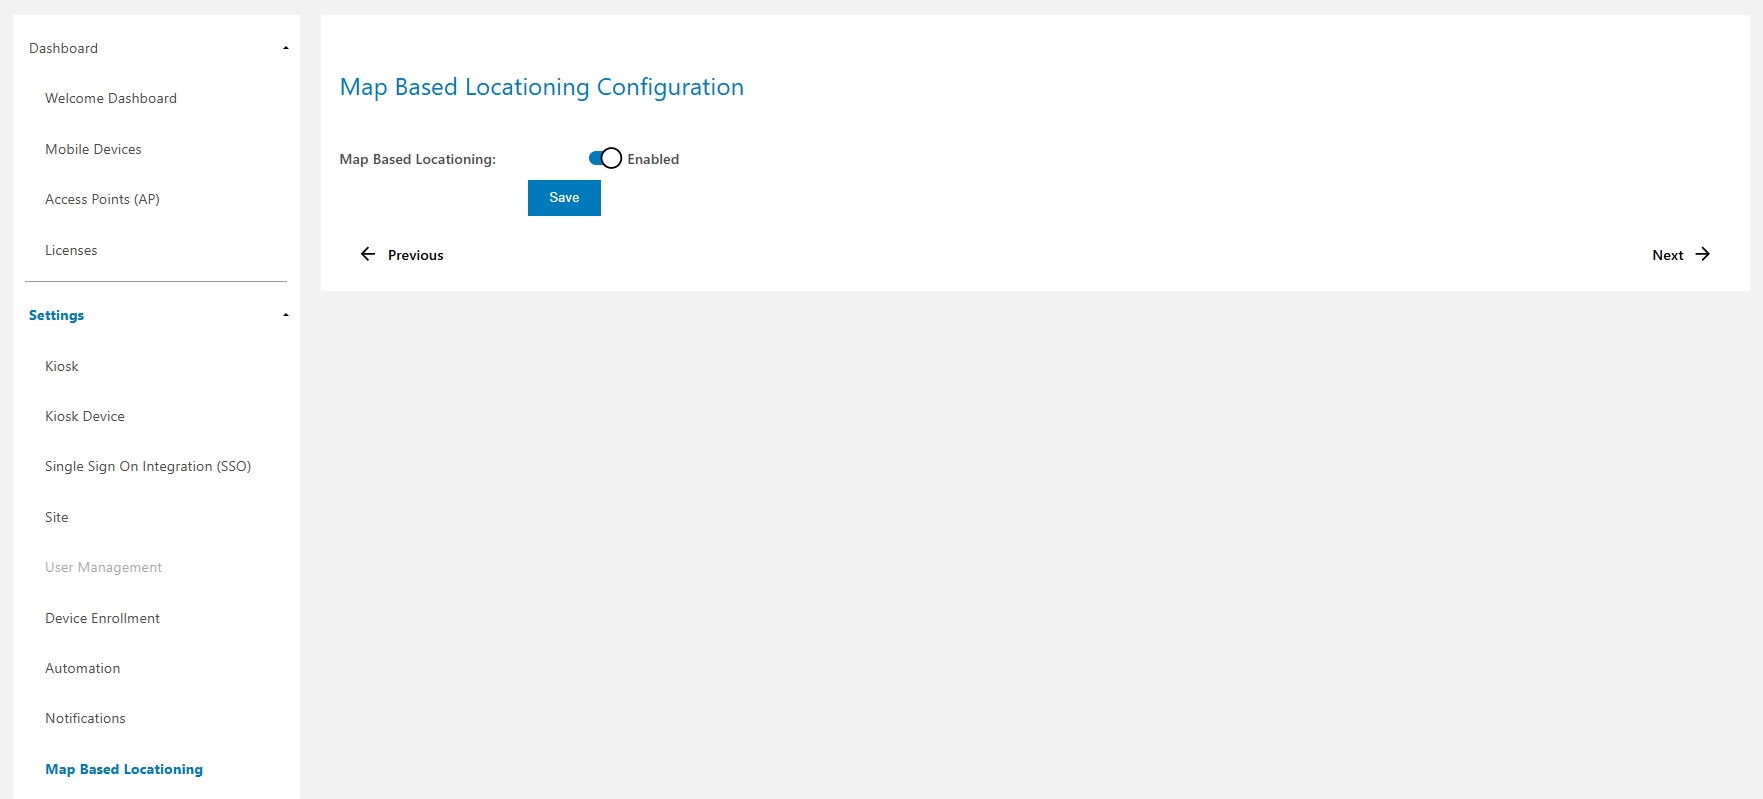
Enable Map Based Locationing
The GPS coordinates and mapped device location is viewable from the administrator dashboard.
Bluetooth Scanners
Track and locate missing Bluetooth scanners using the same device tracking procedure as other devices. When a Bluetooth scanner is paired with a host mobile computer, it becomes automatically registered in the system.
Additionally, the Virtual Tethering feature helps prevent device loss by alerting the user when a scanner nears the edge of its host's Bluetooth range. Customizable notifications can be sent to both devices and are automatically disabled once the connection is re-established. Only one Bluetooth scanner can be virtually tethered to a host device at a time.
Licensing Requirements:
- Accessory Licenses: Required for all Bluetooth scanners.
- Mobility DNA Enterprise License: Required for Zebra Professional-series devices to display the Virtual Tethering event notifications.
The supported Bluetooth scanners are:
- Zebra RS5100 Ring Scanners
- Zebra RS2100 and RS6100 Wearable Scanners
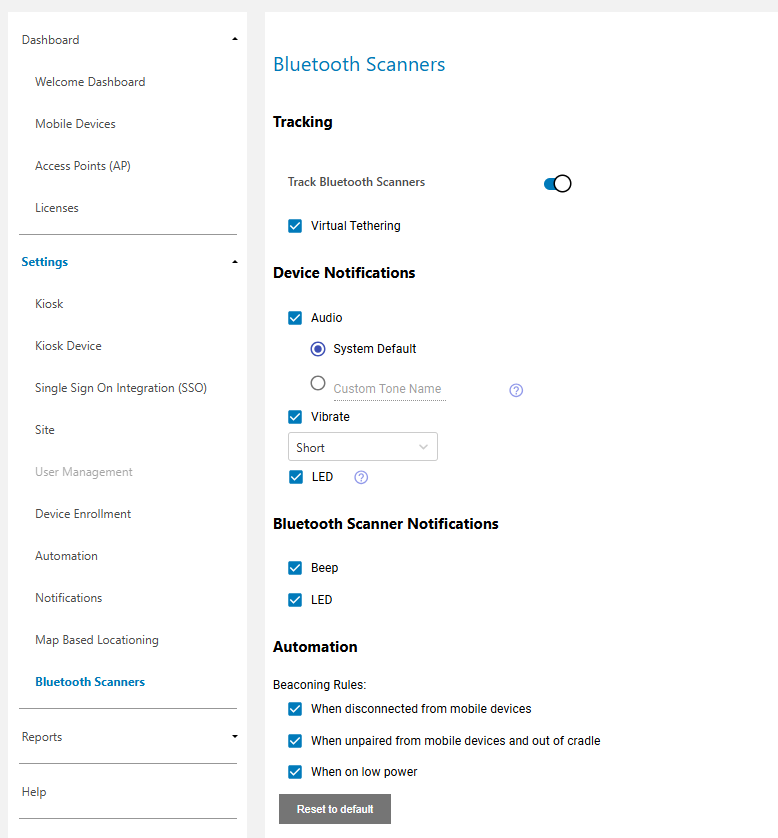
Note: Bluetooth scanners are not visible in the Device Guardian dashboard.
Enable Tracking
To enable Bluetooth Scanner Tracking:
- Log into Device Guardian web portal as an administrator.
- Go to Settings > Bluetooth Scanners.
- Toggle to enable the following:
- Track Bluetooth Scanners - allows Bluetooth scanners to be found with the track devices procedure
- Virtual Tethering - notifies the user if the Bluetooth scanner approaches the edge of the effective Bluetooth range, helping to maintain connectivity and avoid misplacement of the scanner

Device Notifications
Device Notifications control how the mobile computer is notified when searching for a Bluetooth scanner.
- Audio - when enabled, specifies the audible sound to be played. Choose one of the following:
- System Default - default system sound on the device
- Custom Tone Name - enter the name of one of the built-in ringtones from the device from Settings > Sounds > Notification sound
- Vibrate - when enabled, the mobile computer vibrates. Select a vibration pattern:
- System Default
- Short
- Medium
- Long
- LED - when enabled, the LED blinks
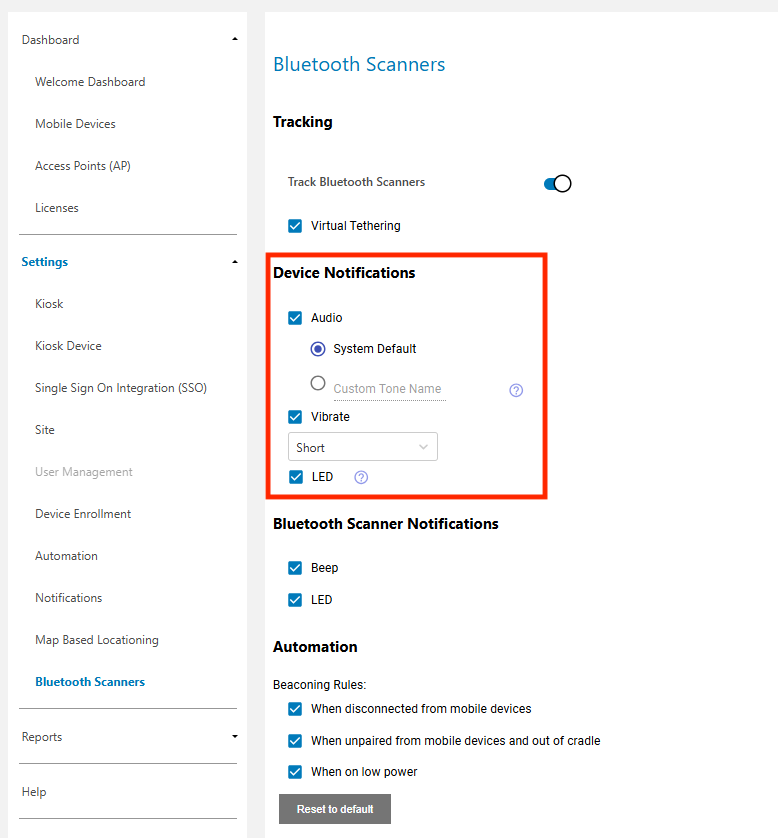
Bluetooth Scanner Notifications
Bluetooth Scanner Notifications control how the Bluetooth scanner is alerted when it is being found.
- Beep - when enabled, the Bluetooth Scanner emits a beep sound
- LED - when enabled, the Bluetooth Scanner LED blinks

Automation
Automation settings control the conditions to be met before the Bluetooth scanner is automatically marked "To Be Found." This triggers the Bluetooth scanner to start broadcasting its presence so it can be found by another device using the proximity meter.
Select one or more of the Beaconing Rules:
- When disconnected from mobile devices- The Bluetooth scanner immediately begins broadcasting its presence when it is out of Bluetooth range of the paired device. This allows the device to be found even when disconnected from the host mobile computer. Other mobile computer devices can also locate the Bluetooth scanner using the proximity meter.
- When unpaired from mobile devices and out of cradle - When a Bluetooth scanner is placed into a charging cradle, it automatically unpairs from its associated device and is removed from the "My Bluetooth Scanner" list. As a result, the user might forget to manually re-pair the Bluetooth scanner after undocking it from the cradle. To prevent this from occurring, enable this option, which causes the Bluetooth scanner to immediately begin broadcasting its presence when undocked from the cradle while unpaired.
- When on low power - The Bluetooth scanner immediately begins broadcasting its presence when the battery level falls below 30%. This option is enabled by default.
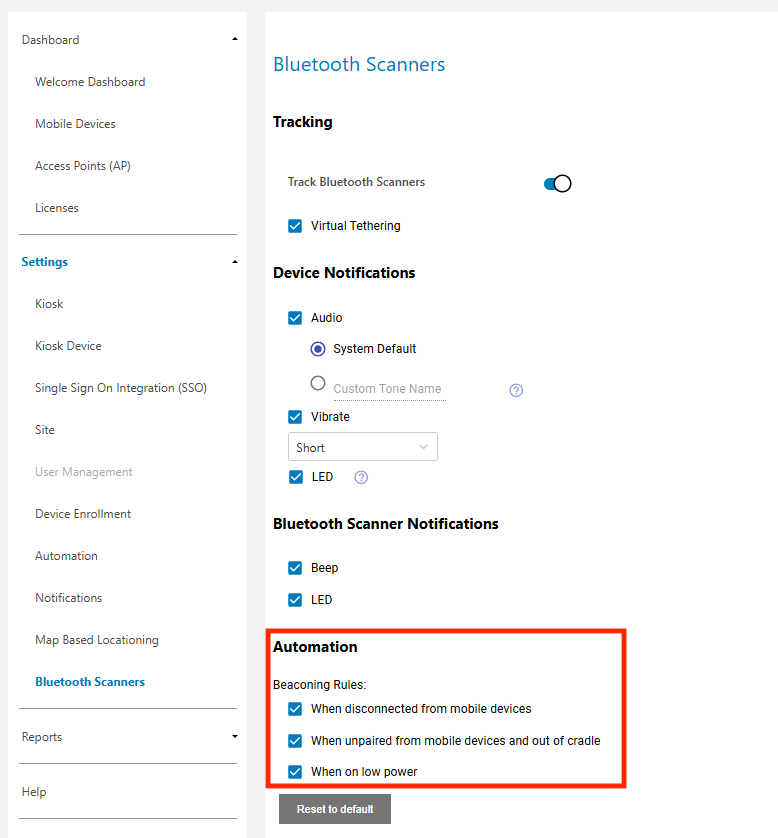
Secondary BLE
The Secondary Bluetooth Low Energy (BLE) feature is an optional setting that enables location detection of a device when it is powered off or has a critically low battery (5% or less). This works by having a seeking device listen for signals from the secondary BLE beacon on the device that is powered off or low on battery. As long as the battery is not fully depleted, the secondary BLE beacon continues to transmit.
See Secondary BLE Configuration to enable Secondary BLE.
My Profile
My Profile allows logged-in users to update their profile information, including changing their password. To access My Profile, click the dropdown arrow next to the username in the title bar of the web portal and select My Profile.
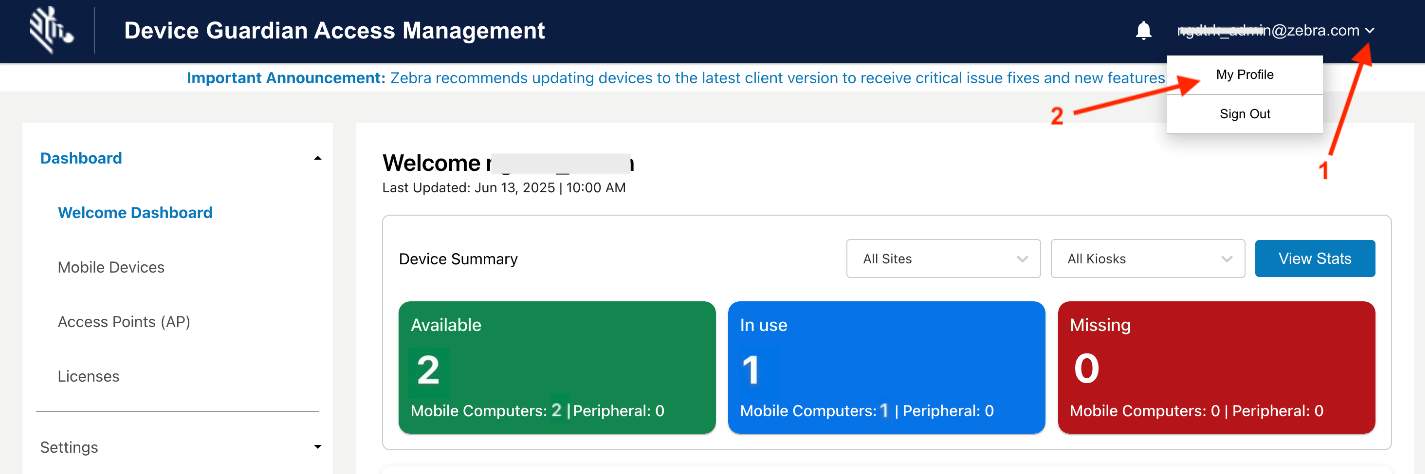
To update, enter the desired information in the following field(s), then click Update:
- First Name
- Last Name
- Current Password
- New Password
- Confirm Password
- Language
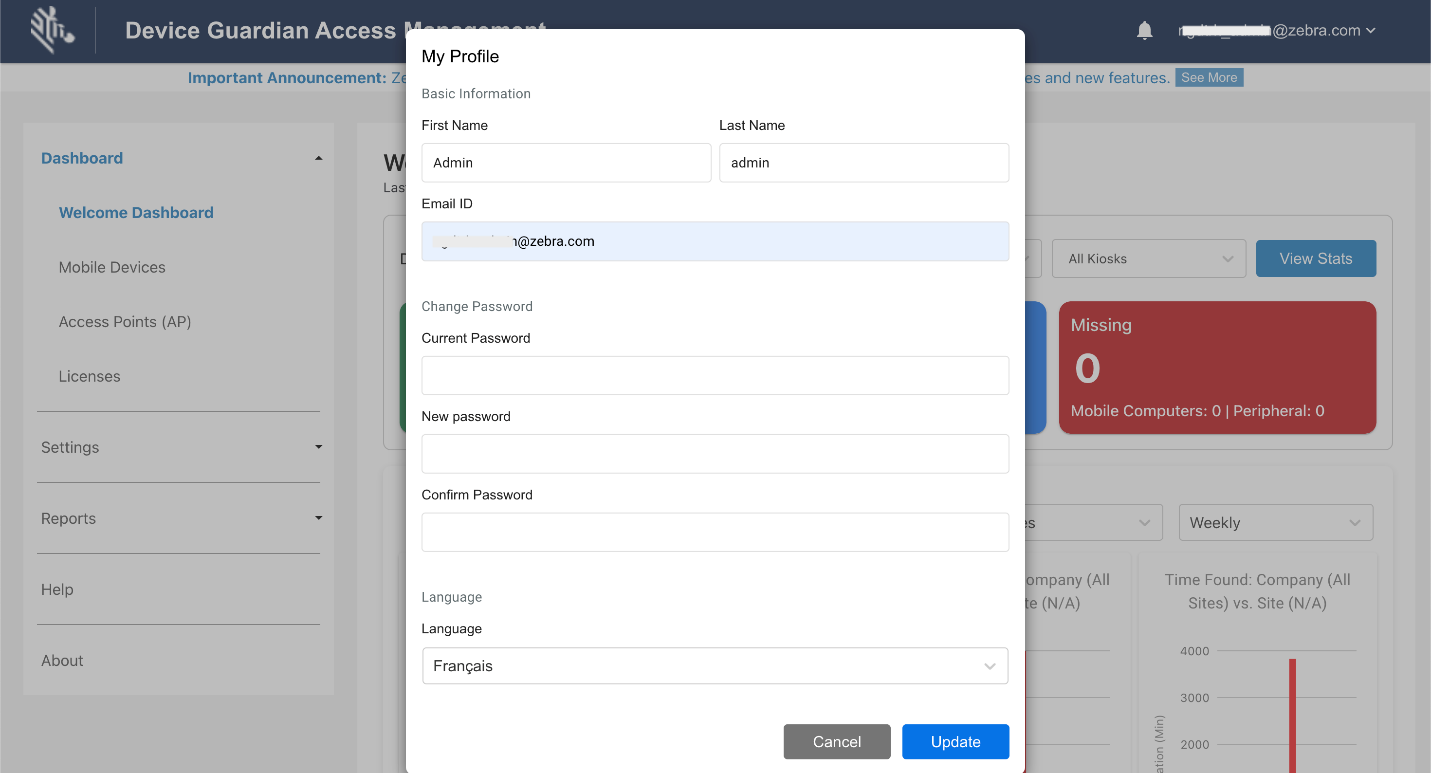
Diagnostics
For diagnostic purposes, logging can be enabled in Device Guardian to capture application and system information to Android logcat. RxLogger is a built-in tool on Zebra Android devices that collects data and event logs from logcat and stores them in a single location. If issues are encountered, a Zebra representative may request for the log files to be collected and supplied.
Using StageNow
To use StageNow to capture logging:
Open StageNow on the device.
Scan the barcode to enable Device Guardian logging and start RxLogger log capture:

Reproduce the issue.
Scan the barcode to disable Device Guardian logging and stop RxLogger log capture:

Logs are located in the RxLogger folder (default location: /sdcard/RxLogger).
Using EMM
To use EMM to capture logging, refer to the following XML content:
To enable logging:
<wap-provisioningdoc>
    <characteristic version="1.0" type="com.zebra.mdna.deviceguardiancloud">
        <parm name="EnableLog" value="1" />
    </characteristic>
</wap-provisioningdoc>
To disable logging:
<wap-provisioningdoc>
    <characteristic version="1.0" type="com.zebra.mdna.deviceguardiancloud">
        <parm name="EnableLog" value="0" />
    </characteristic>
</wap-provisioningdoc>
Send the desired XML content to the EMM using either OEMConfig or MX to configure the app.