Overview
Wireless Insights (WI) Agent captures wireless data from the Wireless Insights service and transmits it to Zebra DNA Cloud for dashboard visualization to help administrators ensure optimal wireless network performance. This guide provides instructions to install and configure the Wireless Insights Agent, tailored to the specific Enterprise Mobility Management (EMM) system in use or using Zebra DNA Cloud for deployment.
The legacy Wireless Insights server is scheduled to be decommissioned on August 24, 2026, rendering Wireless Insights agent apps prior to v3.0.5 inoperable. To avoid service disruption, all customers must install or upgrade to Wireless Insights v3.0.5 (or later) prior to this date.
Requirements
Core Requirements
- Upgrade Required: Install Wireless Insights Agent v3.0.5 or higher before August 24, 2026, to prevent service disruption due to legacy server decommissioning.
- Supported Device and Operating System: The device model and its Android/OS version must be listed on Compatible Hardware on the Zebra support portal.
Warning: Using an older OS version may result in suboptimal performance and require extra setup steps. For instructions, see Setup - EMMs Without Auto Options. - Wireless Insights License:
- A valid license is required; see Licensing for details.
- For Zebra Professional-series devices a Mobility DNA (MDNA) enterprise license is required.
Feature-Specific Requirements
- Wi-Fi VoIP Analysis: This feature supports the SIP-RTP protocol.
- Configuration for Non-Standard SIP Ports: If a SIP port other than
5060is used, the following steps are required for initial setup:- Send the intent to stop Voice Analysis.
- Send the intent to start Voice Analysis, specifying the custom SIP port.
- Configuration for Non-Standard SIP Ports: If a SIP port other than
- Unsupported Technologies for Wi-FI VoIP Analysis:
- Protocol: WebRTC or similar cloud-based protocols.
- VoIP Apps: Zebra Work Cloud Sync, Microsoft Teams, Zoom Phone.
Limitations
The Wireless Insights Agent is not compatible with devices configured for an Android Enterprise Work Profile, (formerly Corporate-Owned, Personally Enabled (COPE) Mode). This mode, which creates separate work and personal profiles on a single device, prevents the agent from functioning properly.
Prerequisites
Before proceeding, the following are met:
- Download Agent for EMM Deployment: If deploying the Wireless Insights Agent via an Enterprise Mobility Management (EMM) system, the
.apkmust first be downloaded. It is available from the Zebra support portal or the Google Play Store. - Establish Network Connectivity: The device must be configured with a network profile that allows a connection Wi-Fi and/or cellular.
Upgrading from a Previous Version
If upgrading an existing ZDNA deployment from Agent v2.x to v3.x or above, specific migration steps are required to ensure compatibility with the new ZDNA Cloud version. Refer to the migration guide within the ZDNA Cloud documentation.
Setup: ZDNA Cloud
This section offers guidance for the installation and configuration of the Wireless Insights Agent using Zebra DNA Cloud.
I. Enable Wireless Insights Service
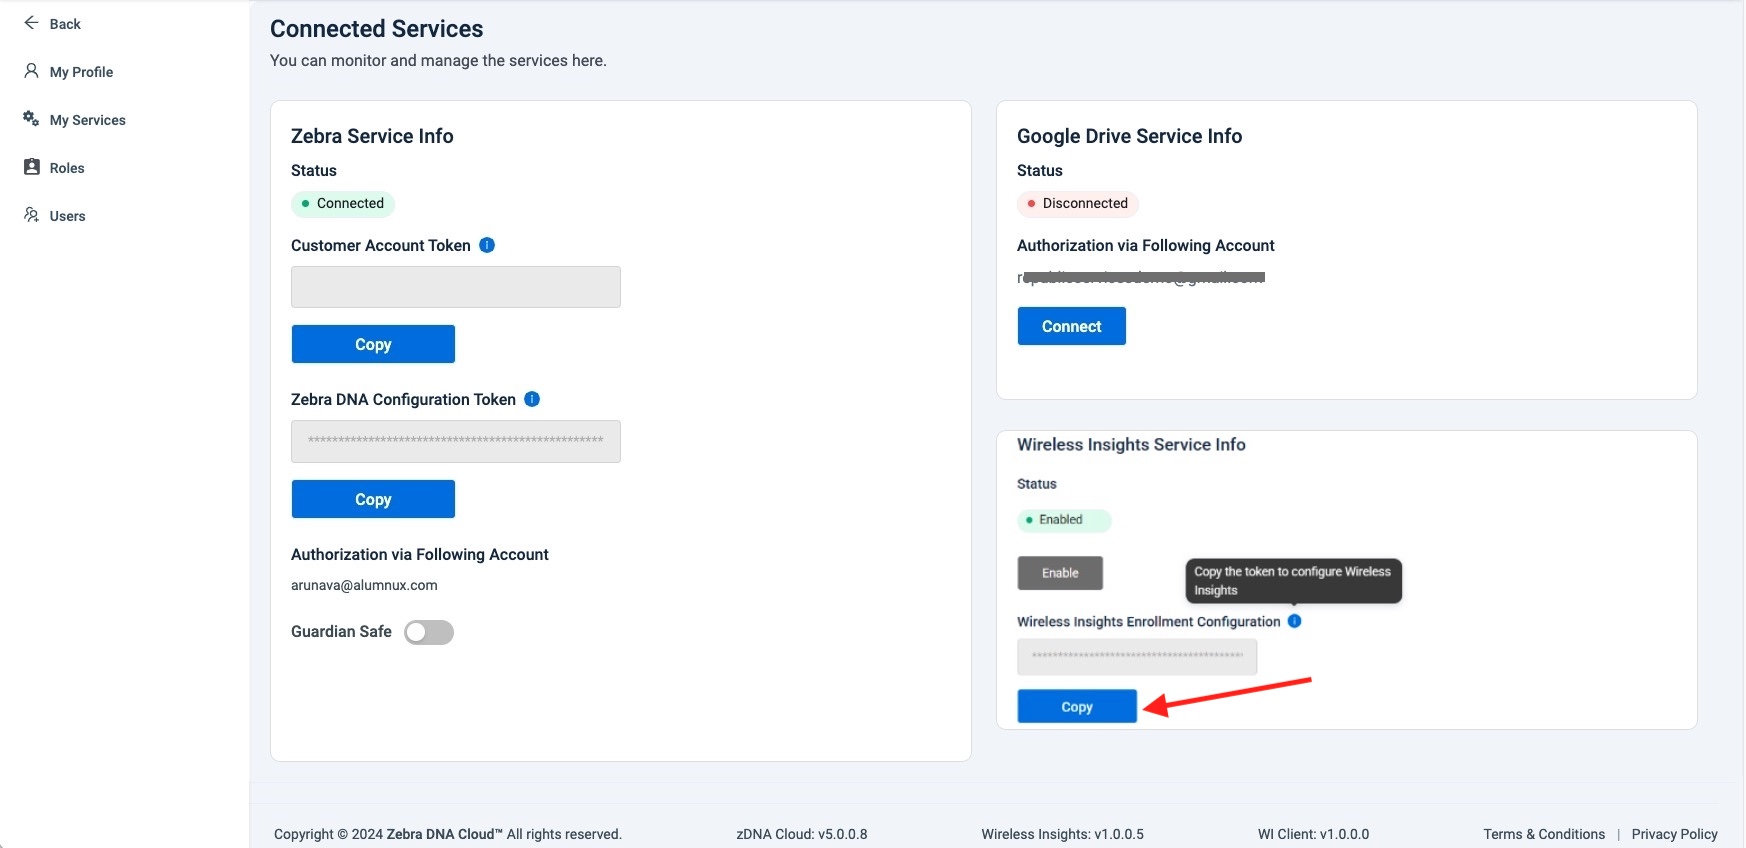
Activate the Wireless Insights service to allow the agent to collect wireless data. This configuration is required only once. In the Zebra DNA Cloud console, enable Wireless Insights.
After enabling the service, from the My Service screen, copy the Wireless Insights Enrollment Configuration for use in a later step.
II. Install and Configure Agent
Create and apply a policy to install the Wireless Insights Agent and configure it through Managed Configurations.
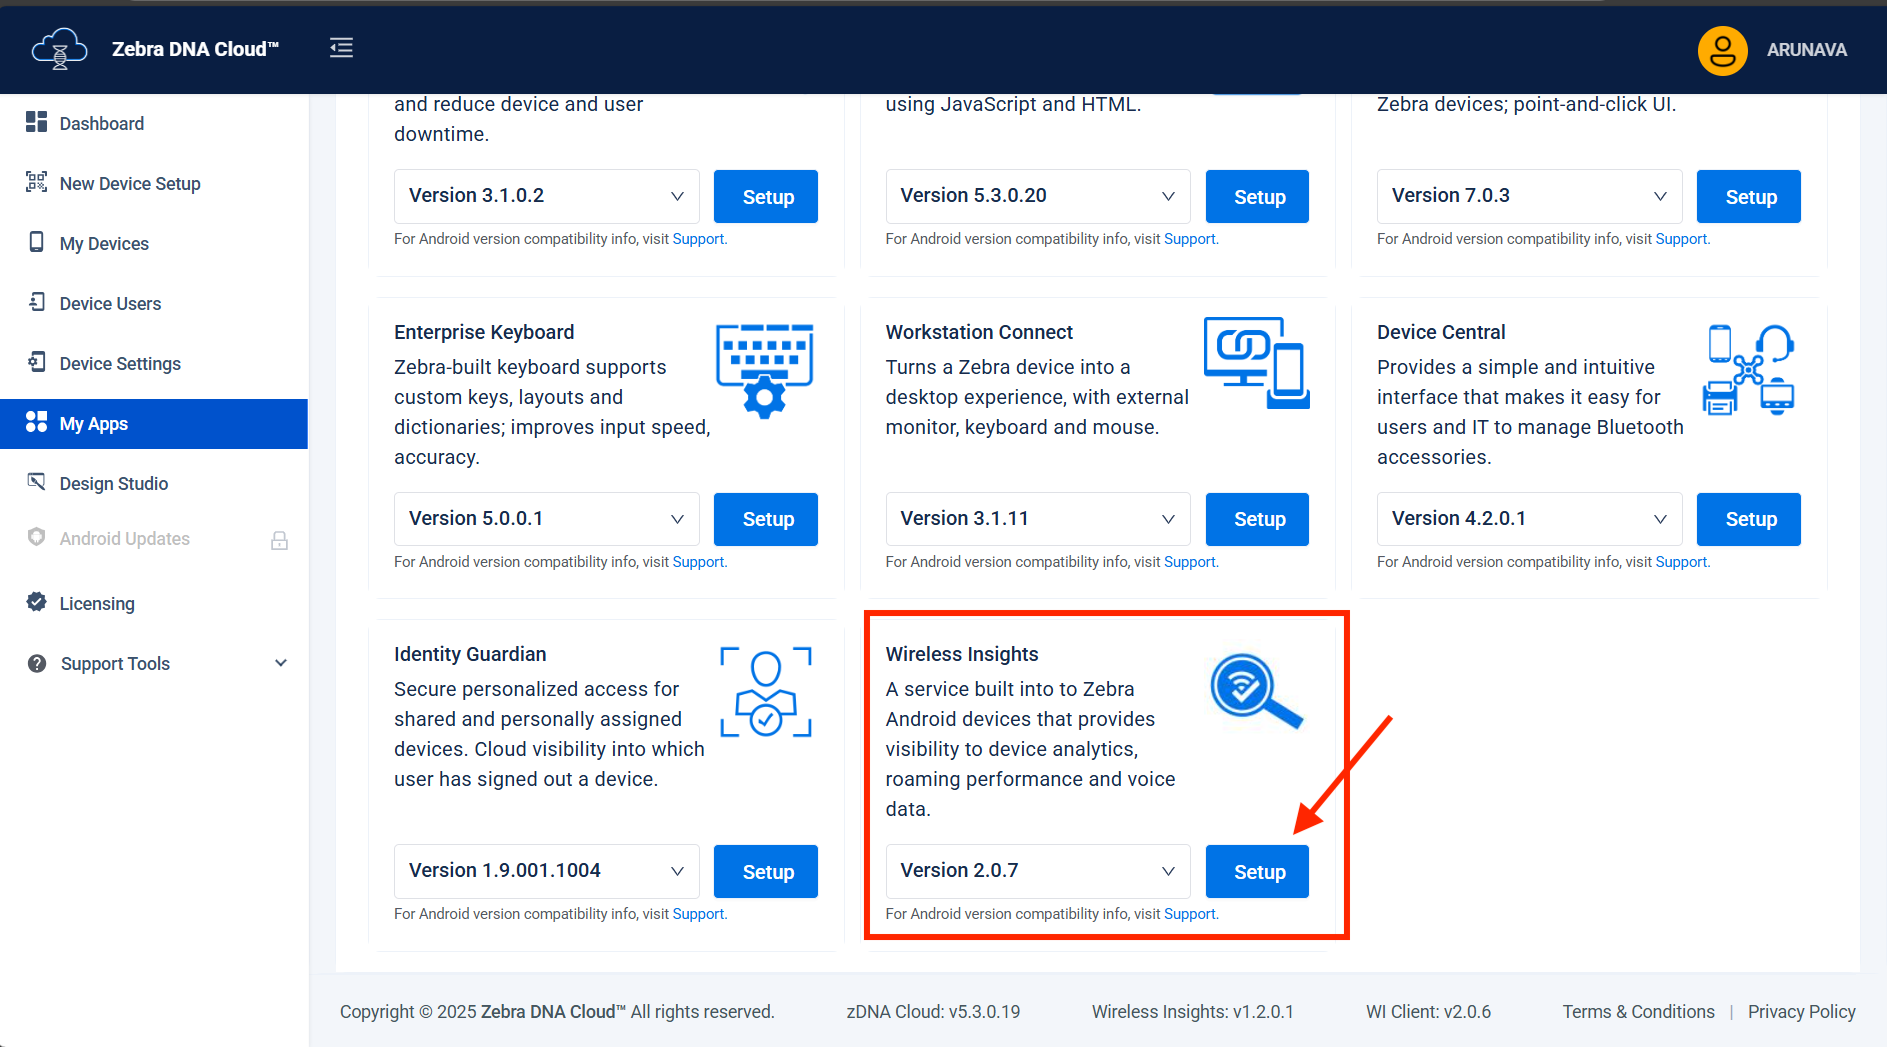
In the ZDNA Cloud web portal, go to My Apps > Zebra Collection. Locate Wireless Insights, select the version to install, and click Setup.
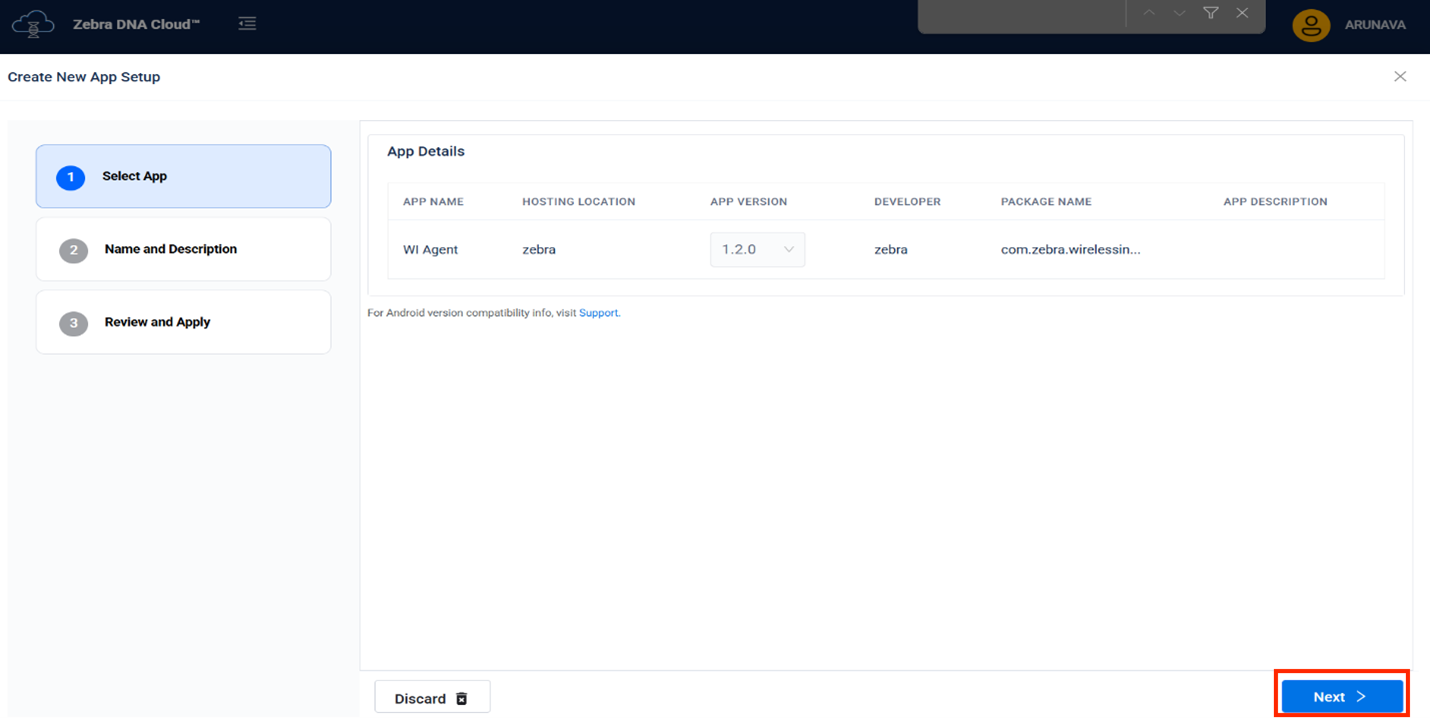
Click Next.
If desired, enter a description. Click Next.
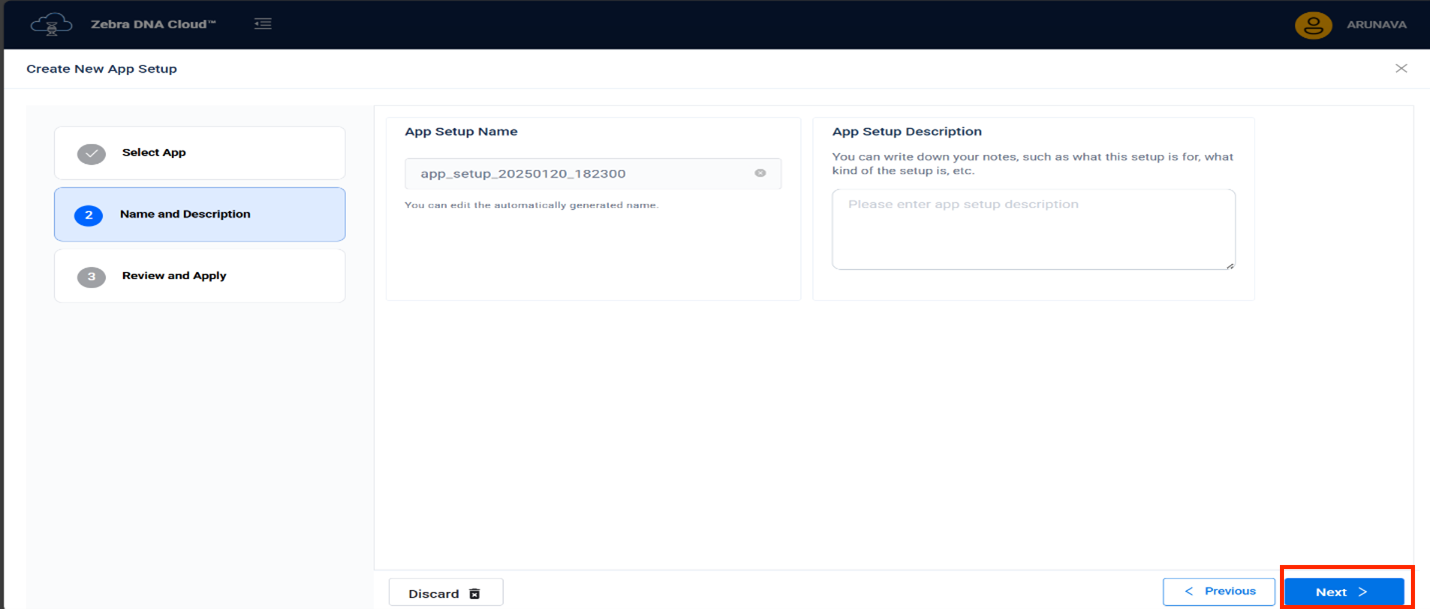
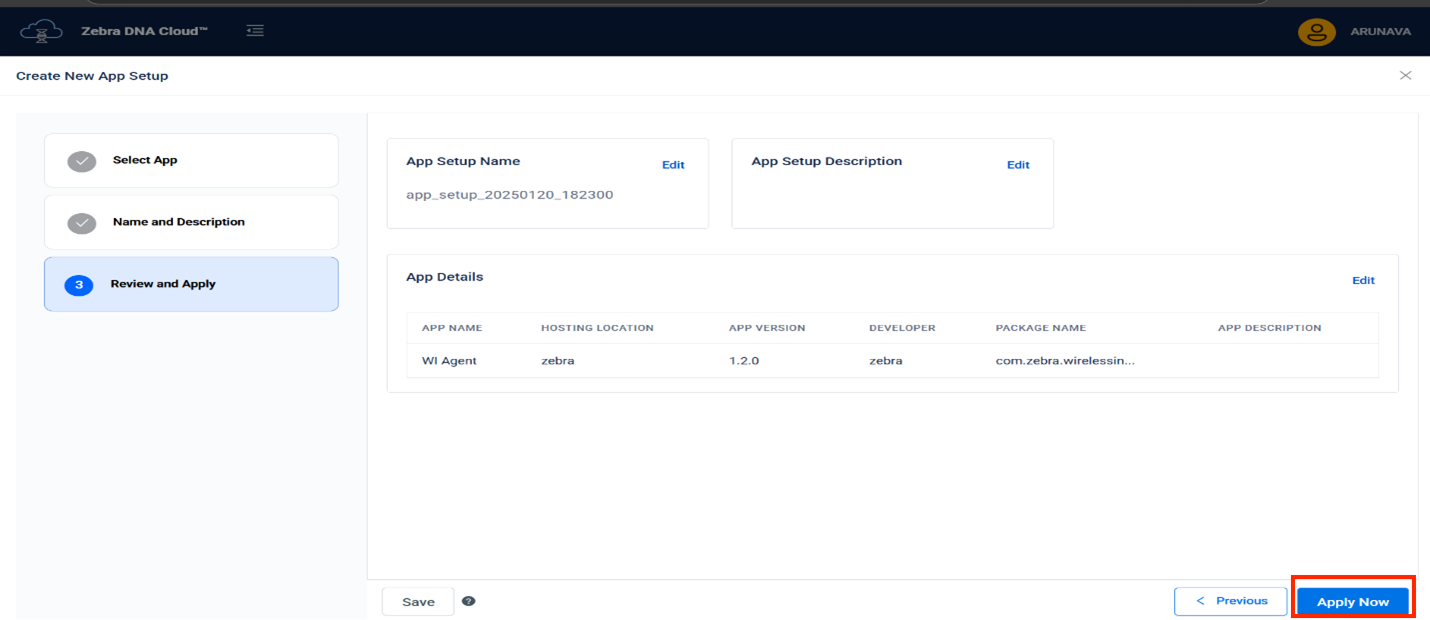
If desired, edit the App Setup Name. Click Apply Now.
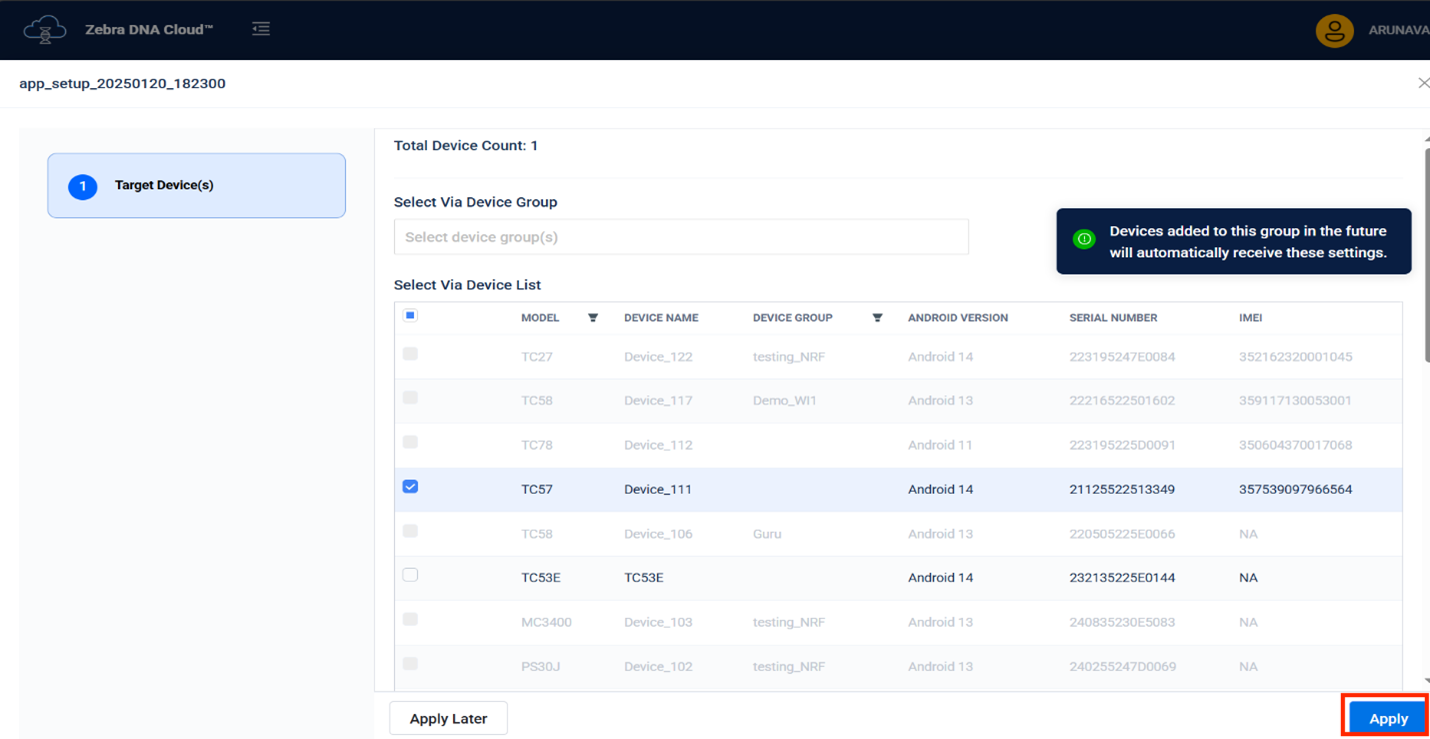
Select the target device(s). Click Apply.
Apply Delegation Scope: If the device is not updated to the latest LifeGuard Update (per the Requirements) or if the Wireless Insights Agent screen indicates that the device is unsupported, the Delegation Scope .XML file must be applied. This file authorizes the agent to operate with the Wireless Insights stack on the device. Follow these steps:
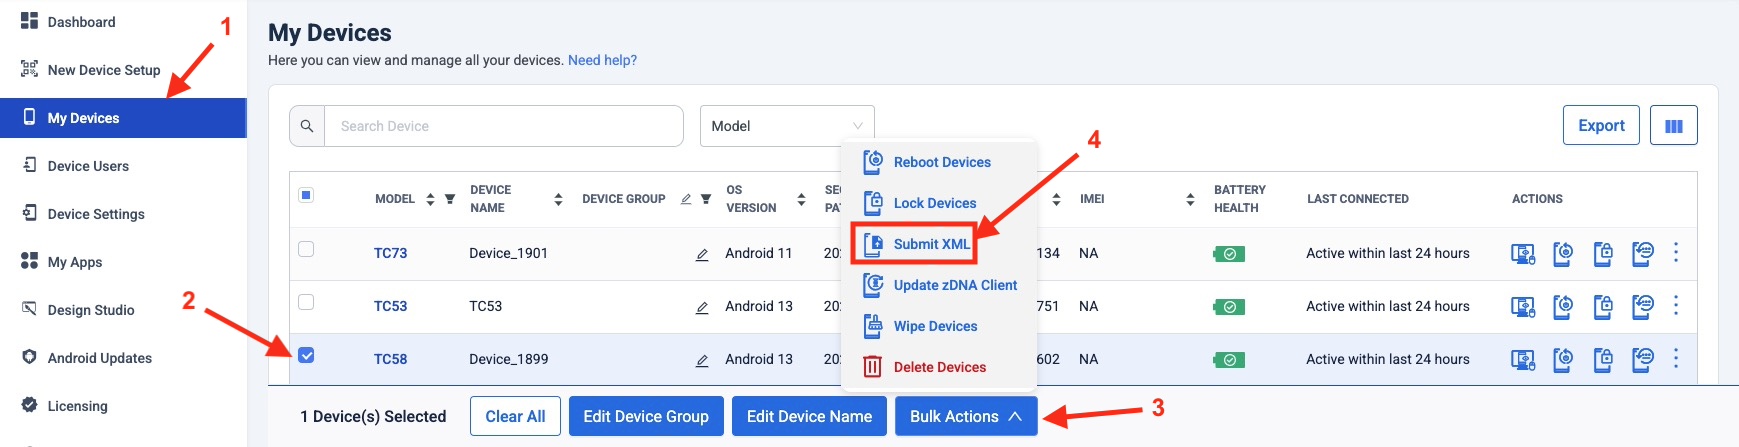
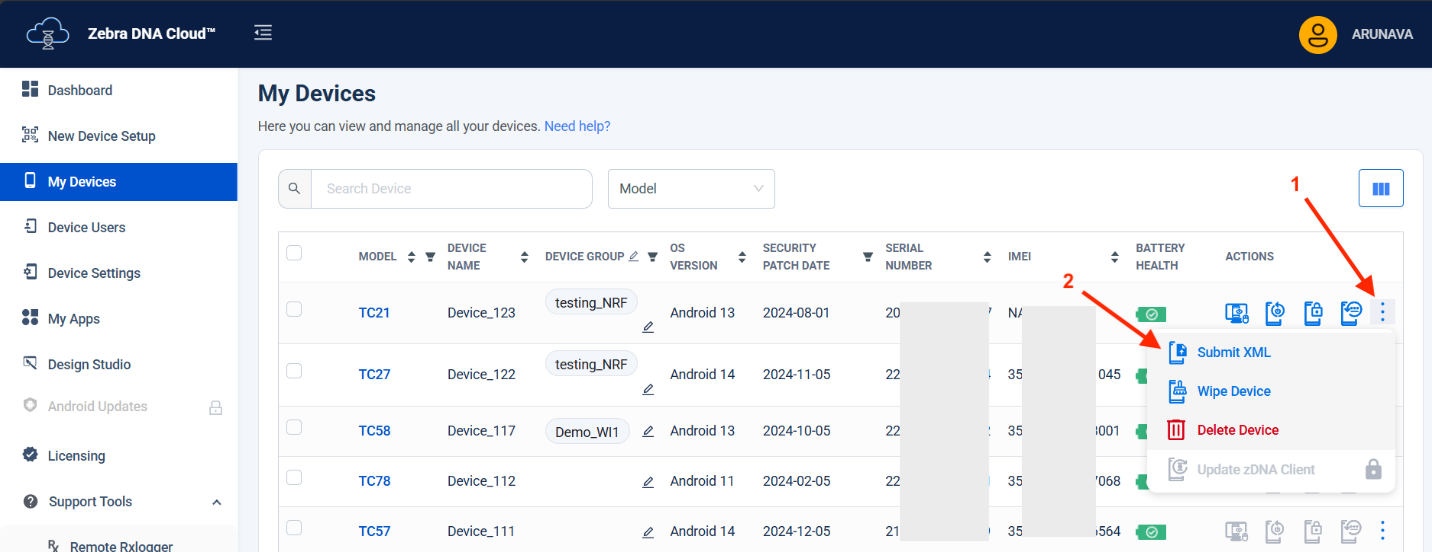
a. Navigate to My Devices from the left menu. Select the target device(s), click Bulk Actions, and then click Submit XML.
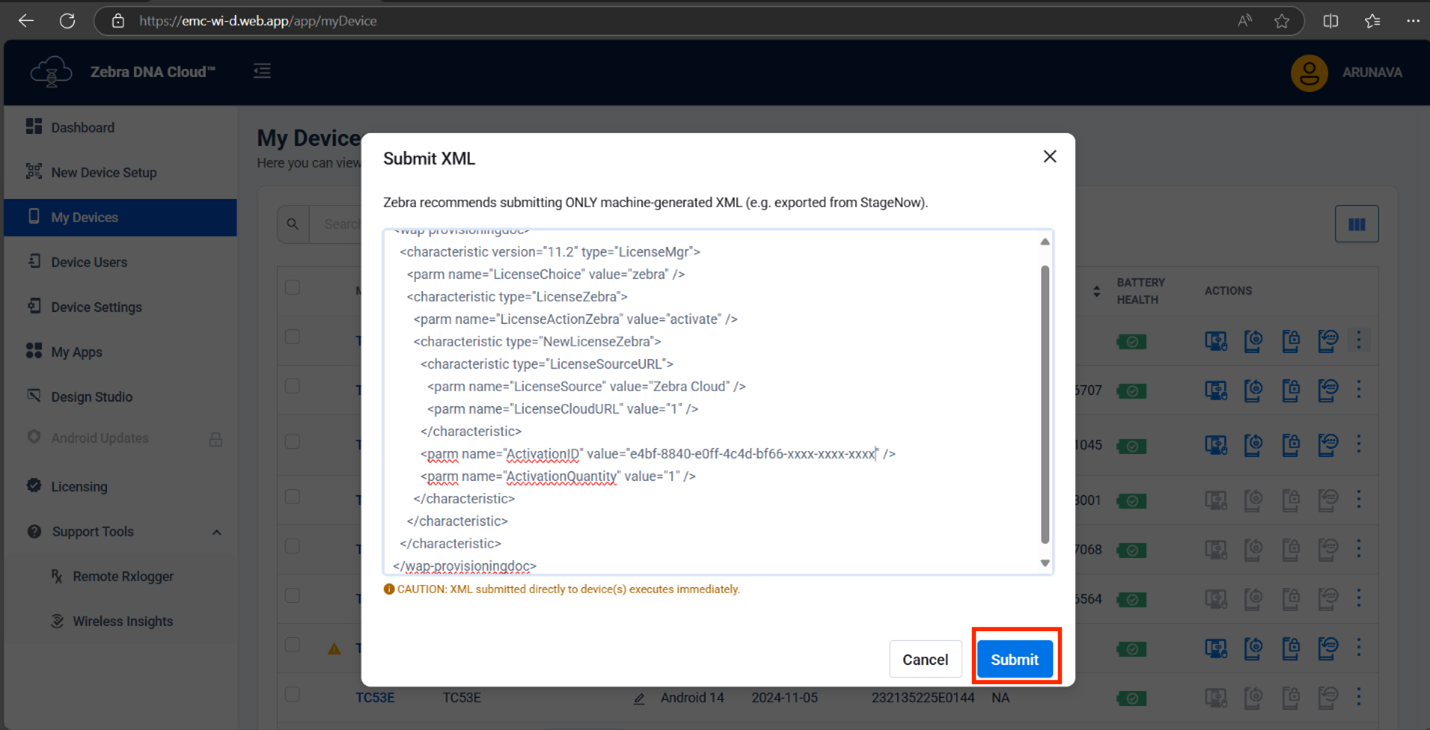
 b. Enter the .XML content below, then click Submit:
<wap-provisioningdoc>
  <characteristic version="11.5" type="AccessMgr">
    <parm name="ServiceAccessAction" value="4" />
    <parm name="ServiceIdentifier" value="delegation-zebra-wirelessinsight-api-service" />
    <parm name="CallerPackageName" value="com.zebra.wirelessinsights.agent" />
    <parm name="CallerSignature" value="MIIFhTCCA20CCSMxNhM5AtLvpzANBgkqhkiG9w0BAQsFADB/MQswCQYDVQQGEwJVUzERMA8GA1UECAwITmV3IFlvcmsxEzARBgNVBAcMCkhvbHRzdmlsbGUxIDAeBgNVBAoMF1plYnJhIFRlY2hub2xvZ2llcyBJbmMuMSYwJAYDVQQDDB1BbmRyb2lkIFVucHJpdmlsZWdlZCBLZXkgUm9vdDAeFw0yMzEwMjcxOTM1MTNaFw00ODExMjkxOTM1MTNaMIGJMQswCQYDVQQGEwJVUzELMAkGA1UECAwCTlkxEzARBgNVBAcMCkhvbHRzdmlsbGUxHzAdBgNVBAoMFlplYnJhIFRlY2hub2xvZ2llcyBJbmMxDDAKBgNVBAsMA0VNQzEpMCcGA1UEAwwgY29tLnplYnJhLndpcmVsZXNzaW5zaWdodHMuYWdlbnQwggIiMA0GCSqGSIb3DQEBAQUAA4ICDwAwggIKAoICAQDX9Ae0Q0gd/rvdq2AYyHwcehsFyuU/x7L5IWhb4deD8O0NN6Tf0pj7ckrAfAylJCgNB8Uq+//f6VUTGQIcuFdinZLgQu5CQfqhD4Znt1lxs7eaXLOu5sVSJBZPdW0p9rl7ti+sqS9zDXa/NAOQjXaBIXQ7PJRJpUSOmSKDlN0ciPioB32ayr5v8aR6oMRQdrYW9AhS2UfYiCt0nWSY05poWvvKHzq4LKq6Agy817EZklOSn18buIo8ujGMxT/O2++XNAOfuRKQmv8+R8GVDCMkh1e1Lb8tHxh9+011AdG93EqxCm/4D6Sz69PGTbSlY1Bn0/H46uulamY8DzeChArsKJVQyxzqAl7h838ZuMPXbkCT+z1XONue5rpOluM6nBJe00Z+97YT0SlaNvJG/g7r/YQddLB/VBQwh8NPIeHufO/gEhukkVzvq49ieU/NZj7CHjz+UXcmnDgGz6hhvfqOVsYmjEAzE8LRmOuelClm8jc7RnmF2g8Q+iApwuy5PA75xjAibeUbEqP6aCJy9XkyVt7JujzZd7G+KH4BVSKoj/it51X3N4JvXwCKe9Fpn8SPFcKOUuCehYFGO4+9DvAGbjbCwx9Q4G8iNpbSMoNd5CsHQFHzc6XsV/dh8Y7KzdcuEm0pahRdVYEBsTrMRl3dwxU28eRQnDMA6OH2bEql0QIDAQABMA0GCSqGSIb3DQEBCwUAA4ICAQBiop746XWulTB7kRBTQL34VvMUUTmrI5sw5wFC2WShu2T63+x0HNfDkW2gNhHcBUN5PW4QIY72CZ01ZA4lHII3Cx5OV0D3nCqsI7kf1JcJdKca3lMQhpjR+RNaPkl6cGwb2ySSMsu74qkFFHt338+NZCvxu/NkErV1M1K2cHJTdXaCvLuHTcSYRbR34dvfL7K0y340NCbIRRZOPWqhble84YBQ8SSSBWNTsR/VyXE/oXuuBIos4kX33DR+s5jEJB44qEWZrzhzPWScwkiPKqVcAaIimpcH1swO9xVbXZF6u9cWVB5iepC0J0gnbKrU4zIRqXNQs9TgYuNxwCNj/dvPzZNVITf33gzO2ePaycvV04cwJLc8bAexpEJJ8nvec9L3ewbunHfywVxT8wUqiXWLWaTjXASvkYxQGsRjFqWwGhgDar37+QYTUN4J7bgrYg/sKDdbdJyIr1tbdKepvh47QJ1aCFj77T1yWxdIu5cukfu6xgGCTK53UTxVdEz5s9ci3Ji/aQJQLH4ceQjV09gcmOj1IQ1QcKtwJBYaOg7yajJl4qo3THYeOJz6ae9okN6C2ECMFESj+f6txgImXZunzT6twiPYLweN+llJVRPZ09Z3FNgNcYWINzuYTn+YZxfgyQA4F9pEaCVA0HcGLUNyHvfRD3F/JXzx9TcD7ztWgA==" />
  </characteristic>
</wap-provisioningdoc>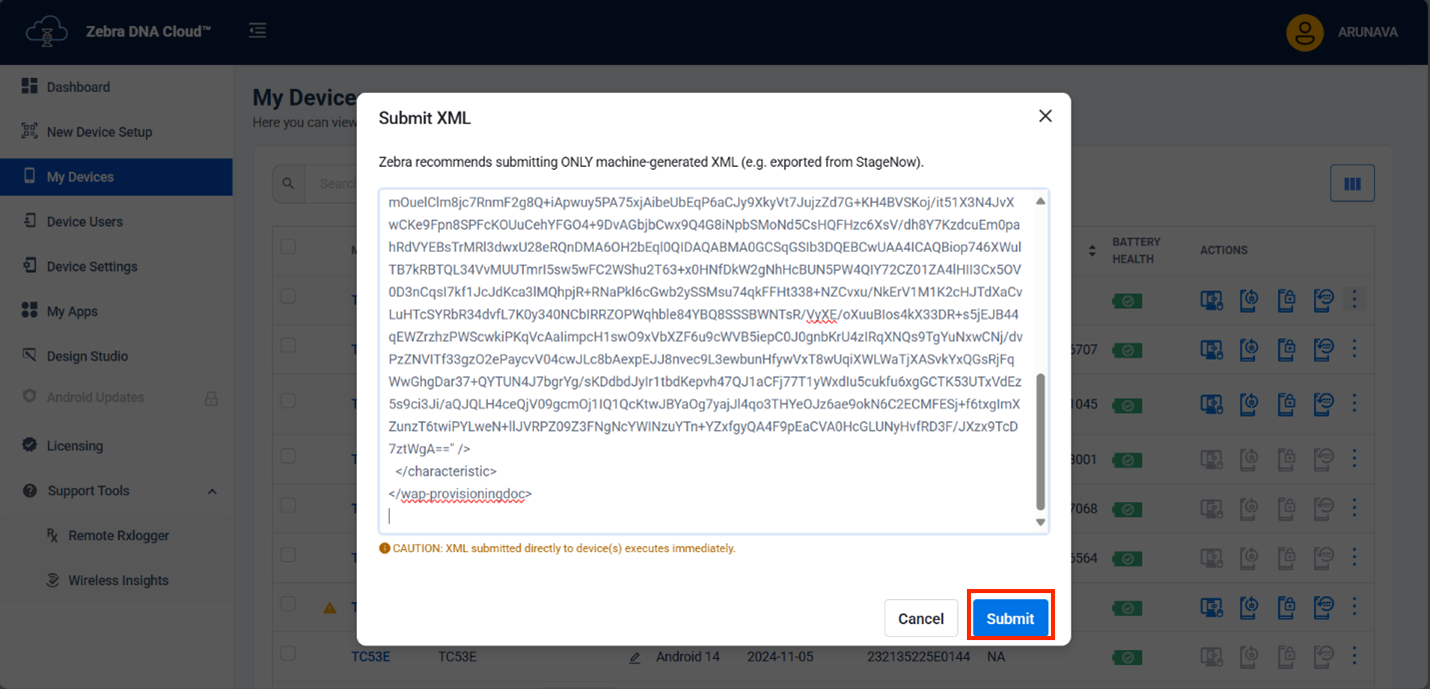
III. Apply License
Follow these steps to apply Wireless Insight licenses:
- Follow steps to Generate a License XML.
- In the ZDNA Cloud web console, go to My Devices in the left menu and choose one of the following actions:
• Locate the target device from the list, click the options menu at the end of the row, and select Submit XML.
• For multiple devices(s), select the target device(s), click Bulk Actions, and then click Submit XML.
- Paste the License .XML file content from step 1, then click Submit.
IV. Check Agent Connection
To verify the successful deployment and operation of the Wireless Insights Agent, follow these steps to check its connection status on both the device and within the ZDNA Cloud platform.
Device
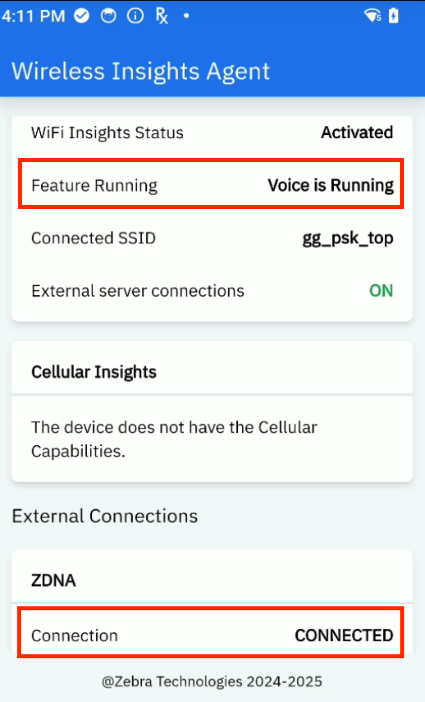
Ensure that the Wireless Insights Agent is connected to the ZDNA Cloud server by checking the following statuses in the Wireless Insights Agent:
Feature Running: Voice is Running
ZDNA Connection (under External Connections):
- Connected - Indicates the Wireless Insights Agent is successfully deployed
- Activated - Indicates the Wireless Insights license is applied
ZDNA Cloud
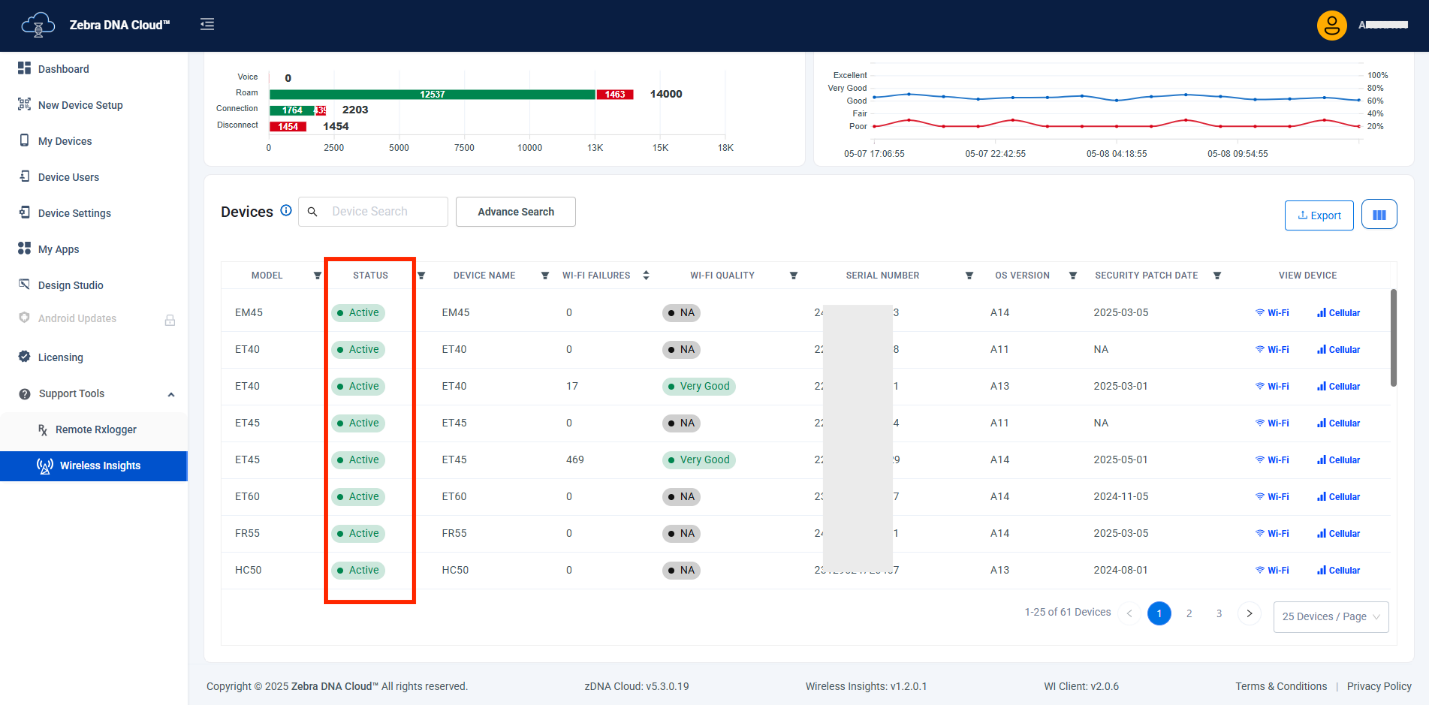
In the ZDNA Cloud web console, go to Support Tools > Wireless Insights from the left menu. Verify that the device status, whether in its assigned group or unassigned group, shows "Active." This confirms successful enrollment.
Setup: SOTI MobiControl
This section offers guidance for installing and configuring the Wireless Insights Agent with SOTI MobiControl.
If your EMM version does not support Managed Configurations or auto options, or if the devices are operating on an older OS version, refer to the Setup - EMMs Without Auto Options guide.
Screen Variations Note: The screen UI may vary depending on the EMM version in use. Refer to your EMM user guide for additional guidance.
I. Enable Wireless Insights Service
Activate the Wireless Insights service to allow the agent to collect wireless data. This configuration is required only once. In the Zebra DNA Cloud console, enable Wireless Insights.
After enabling the service, from the My Service screen, copy the Wireless Insights Enrollment Configuration for use in a later step.
II. Install and Configure Agent
Create and apply a policy to install the Wireless Insights Agent and configure it through Managed Configurations.
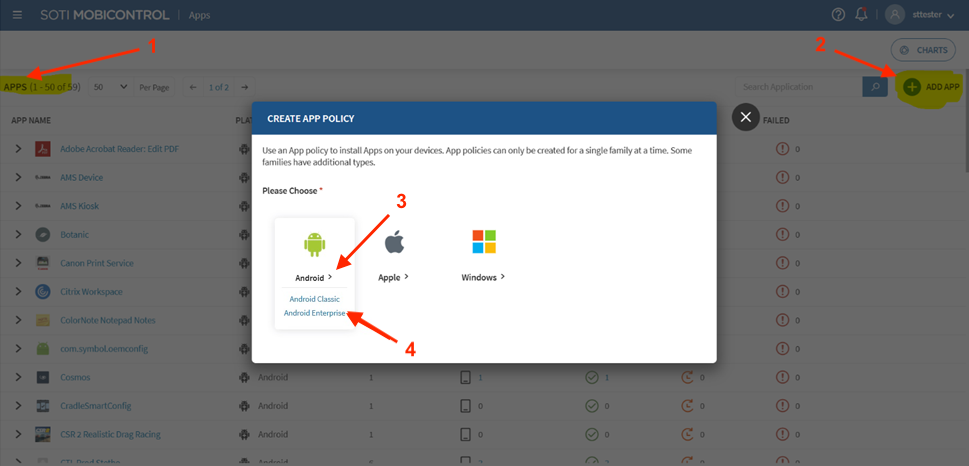
- In the SOTI MobiControl web console, go to APPS > ADD APP > Android > Android Enterprise.
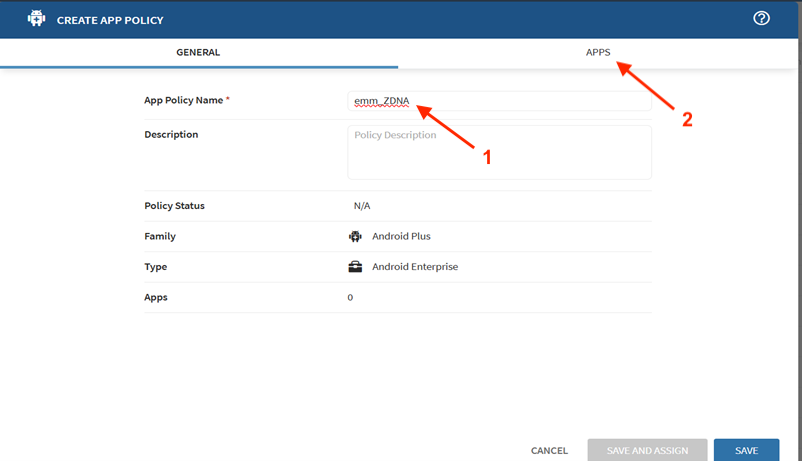
- Enter a name for the app policy, then click the APPS tab.
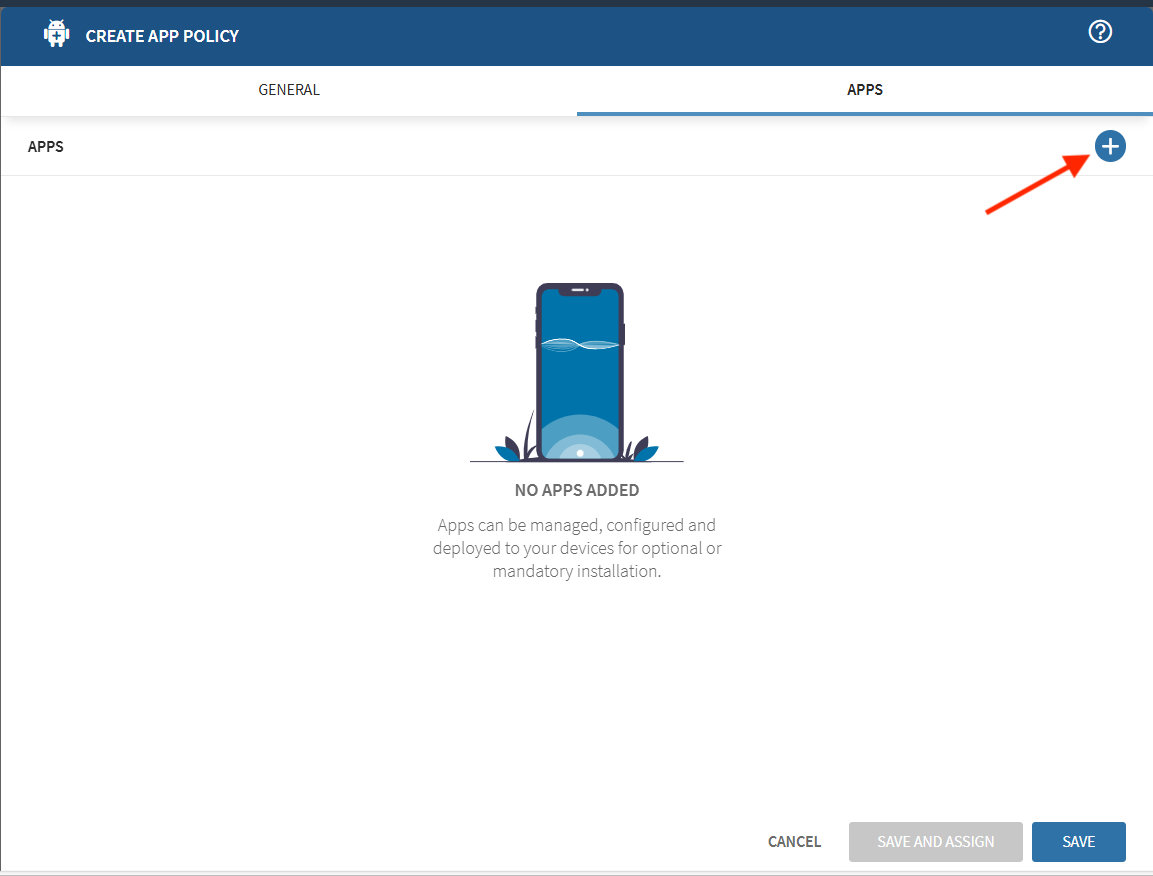
- Click +.
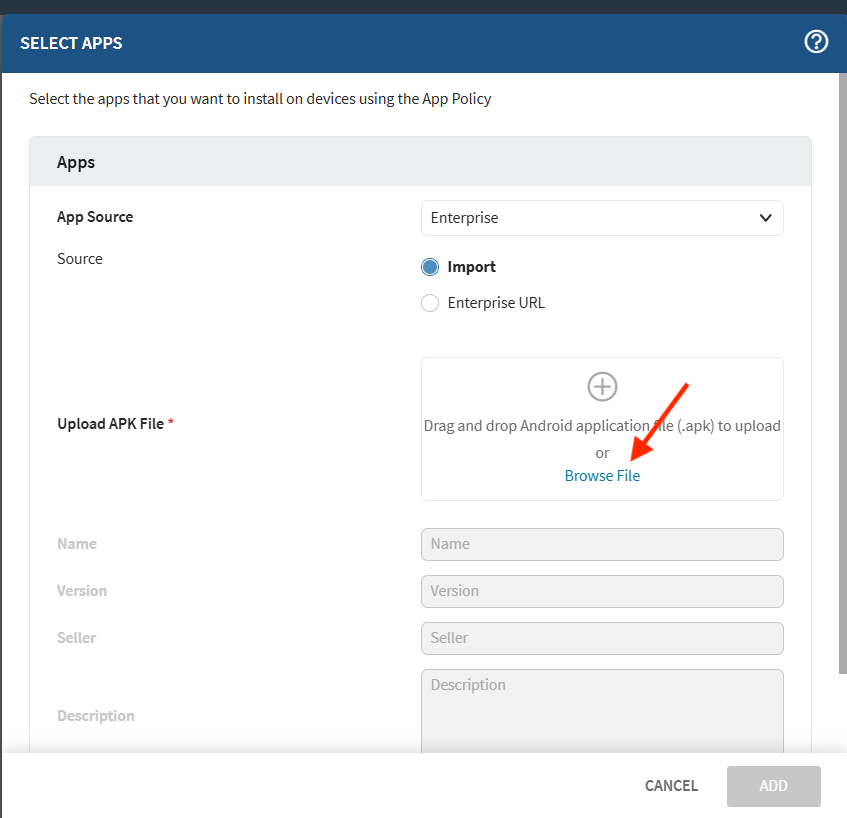
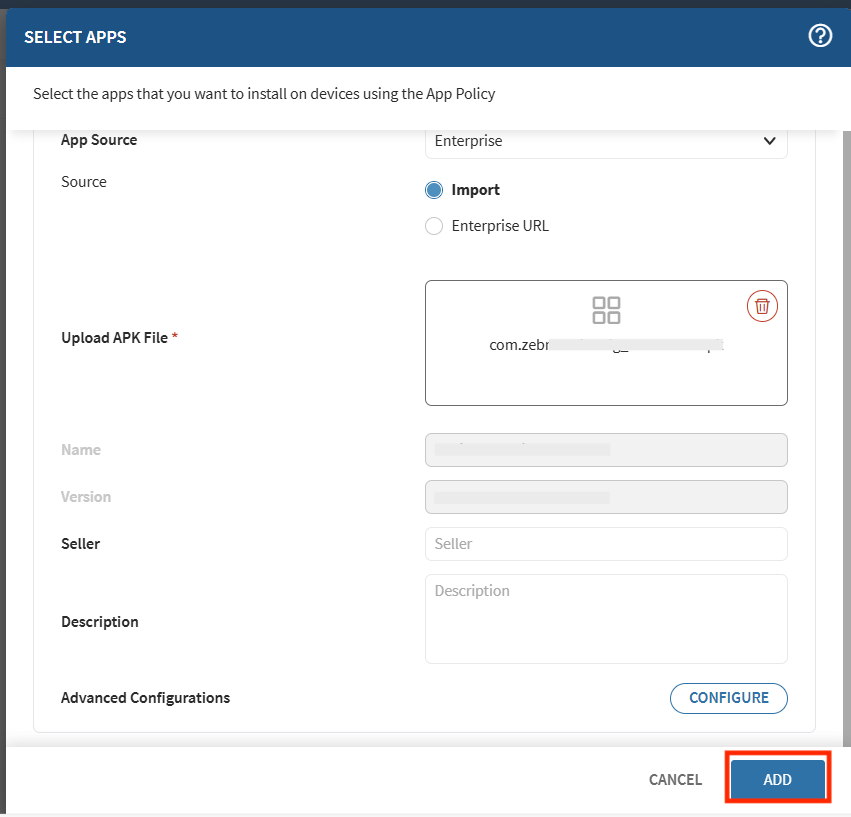
- For the App Source dropdown, select Enterprise.
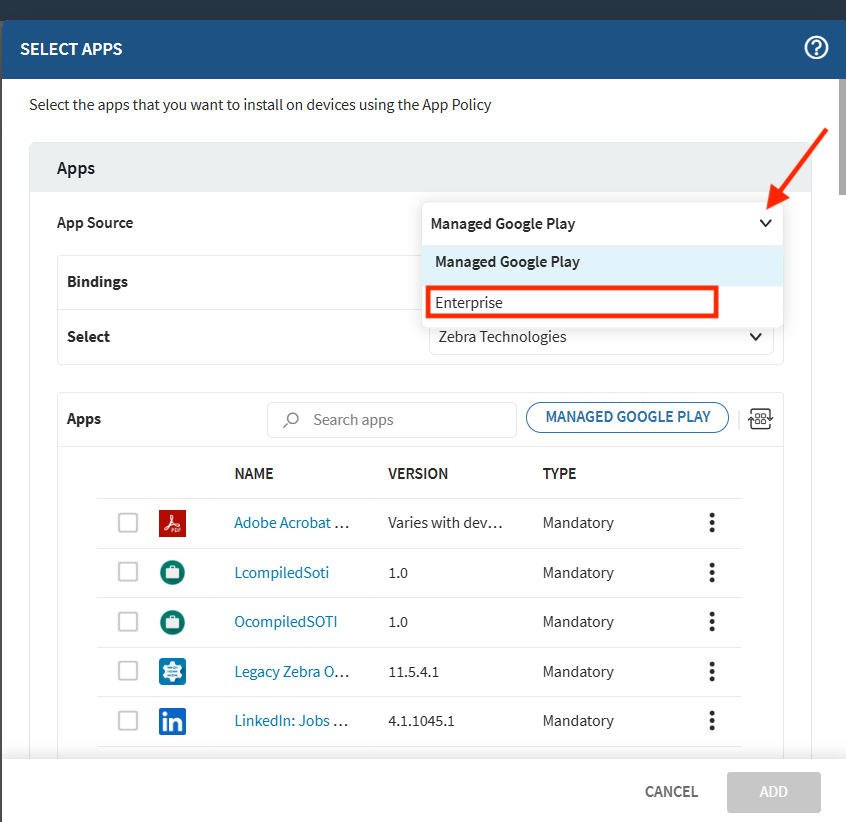
- By default, Import is selected for the Source. Click Browse File and select the Wireless Insights .APK file.
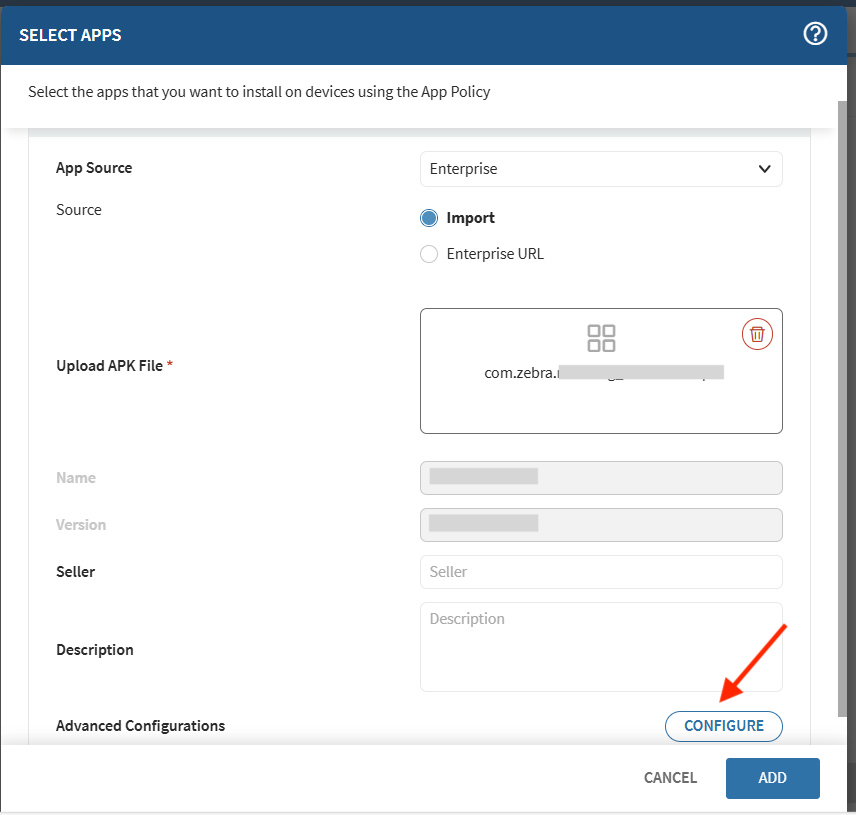
- After the file is uploaded, click Configure.
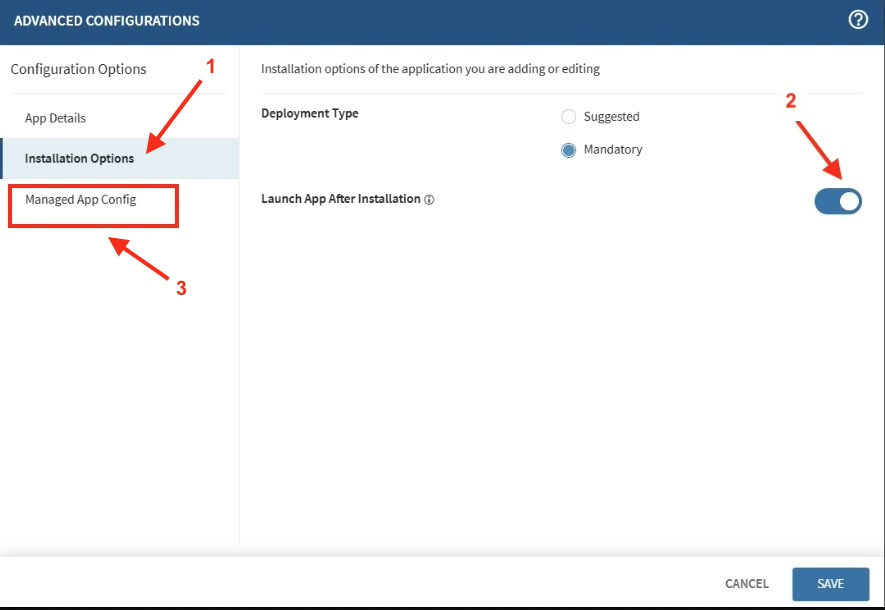
- Click Installation Options. Deployment Type is set to Mandatory by default. Toggle to enable Launch App After Installation and click Managed App Config.
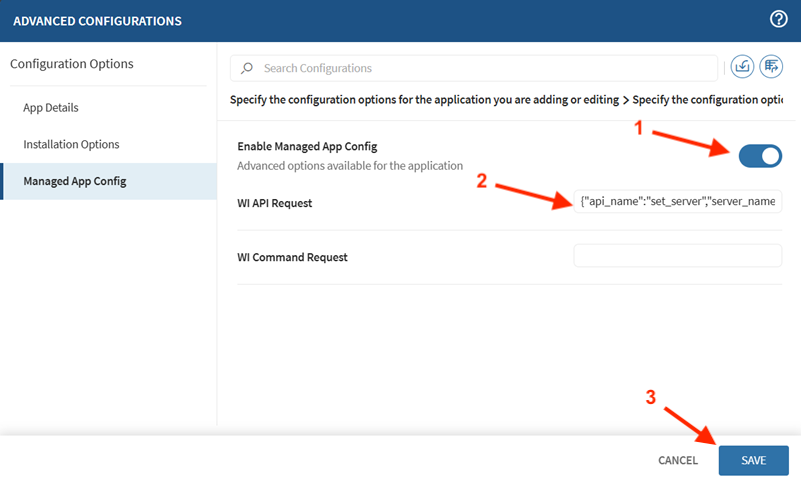
- Toggle on Enable Managed App Config. For WI API Request, paste the Wireless Insights Enrollment Configuration copied from ZDNA Cloud in step I. Click Save.
- Click Add.
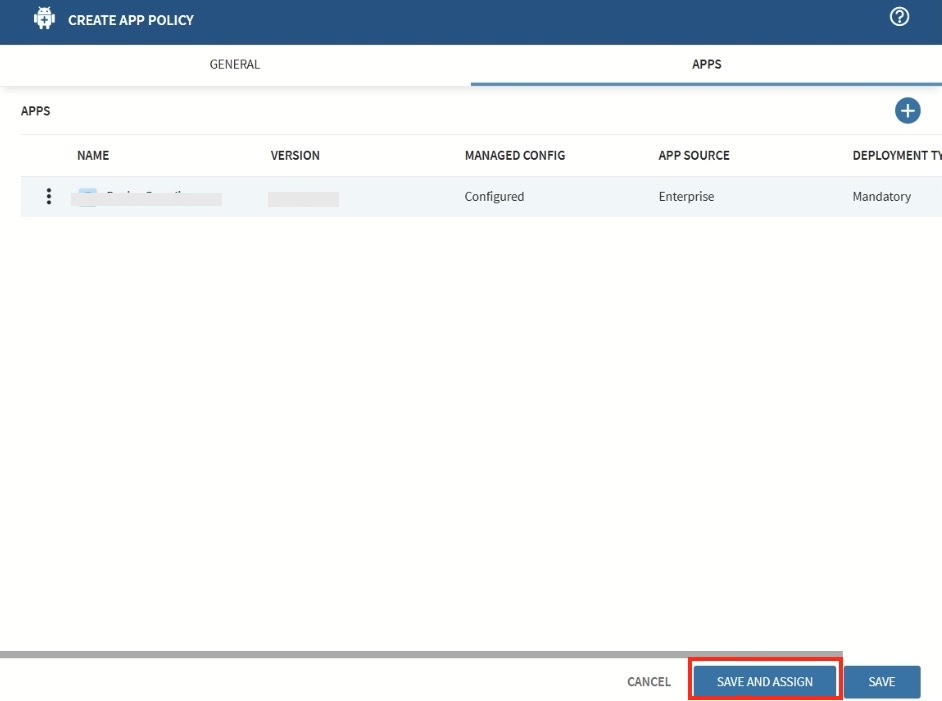
- The policy is created. Click Save and Assign.
- Search for the enrolled device and select it. Click Assign.
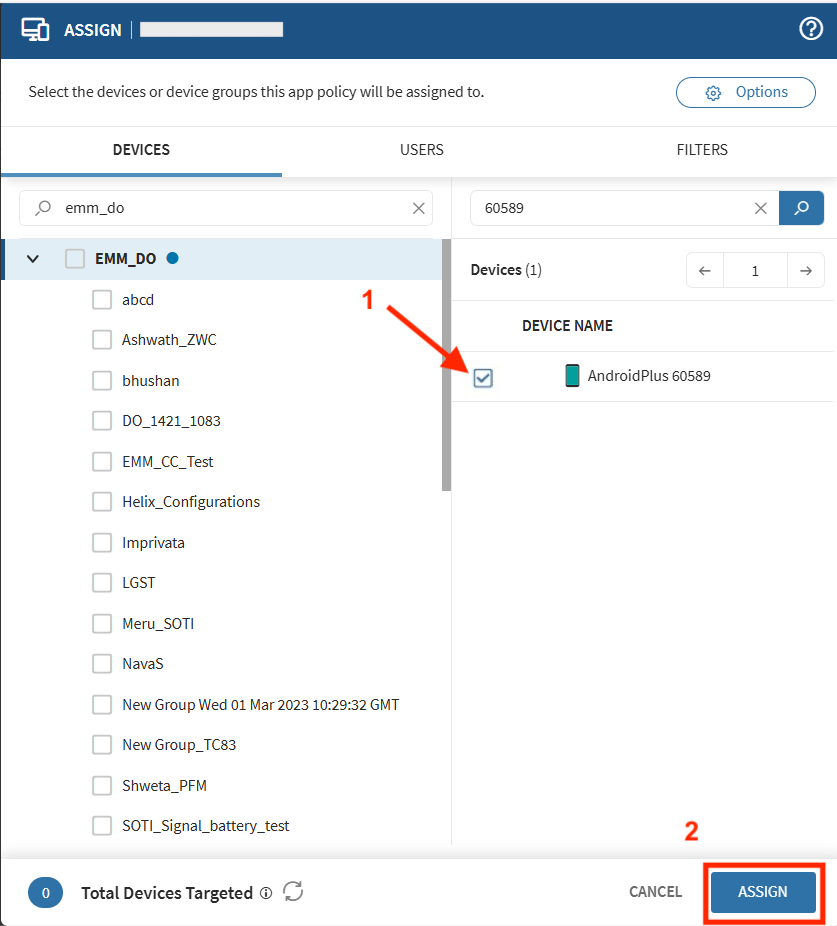
The Wireless Insights Agent is installed to all devices in the group and the Managed Configuration is applied to enroll the device to the ZDNA Cloud.
III. Apply License
To activate the Wireless Insights license in production environments (not required for trials), use one of the following methods:
- StageNow - Use StageNow to generate a barcode or XML that activates the license through the Cloud License Server (CLS). The XML can be deployed to devices through your EMM. For instructions, see Generate License XML.
- OemConfig with EMM - Use Zebra OEMConfig to obtain the license from CLS and deploy it to devices using your EMM. For instructions, see Activate CLS License via OEMConfig.
IV. Check Agent Connection
To verify the successful deployment and operation of the Wireless Insights Agent, follow these steps to check its connection status on both the device and within the ZDNA Cloud platform.
Device
Ensure that the Wireless Insights Agent is connected to the ZDNA Cloud server by checking the following statuses in the Wireless Insights Agent:
Feature Running: Voice is Running
ZDNA Connection (under External Connections):
- Connected - Indicates the Wireless Insights Agent is successfully deployed
- Activated - Indicates the Wireless Insights license is applied
ZDNA Cloud
In the ZDNA Cloud web console, go to Support Tools > Wireless Insights from the left menu. Verify that the device status, whether in its assigned group or unassigned group, shows "Active." This confirms successful enrollment.
Setup: Workspace ONE UEM
This section offers guidance for installing and configuring the Wireless Insights Agent with Workspace ONE Unified Endpoint Management (UEM), formerly known as AirWatch.
If your EMM version does not support Managed Configurations or auto options, or if the devices are operating on an older OS version, refer to the Setup - EMMs Without Auto Options guide.
Screen Variations Note: The screen UI may vary depending on the EMM version in use. Refer to your EMM user guide for additional guidance.
I. Enable Wireless Insights Service
Activate the Wireless Insights service to allow the agent to collect wireless data. This configuration is required only once. In the Zebra DNA Cloud console, enable Wireless Insights.
After enabling the service, from the My Service screen, copy the Wireless Insights Enrollment Configuration for use in a later step.
II. Install and Configure Agent
Create and apply a policy to install the Wireless Insights Agent and configure it through Managed Configurations.
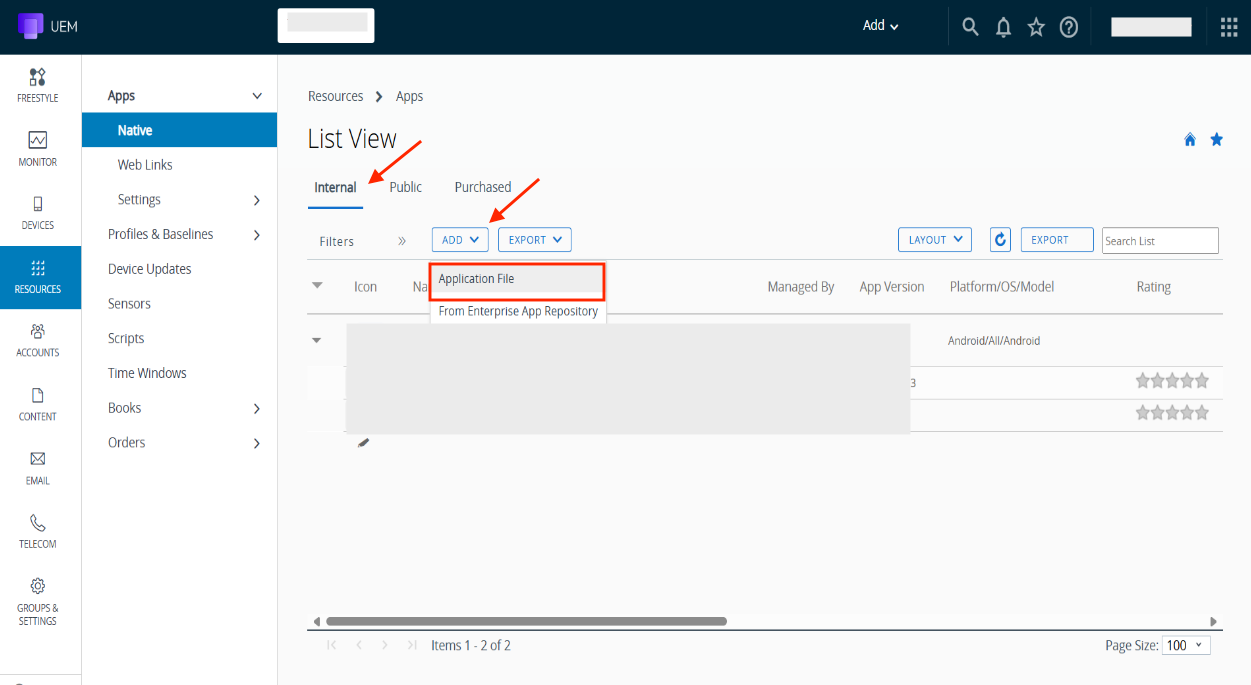
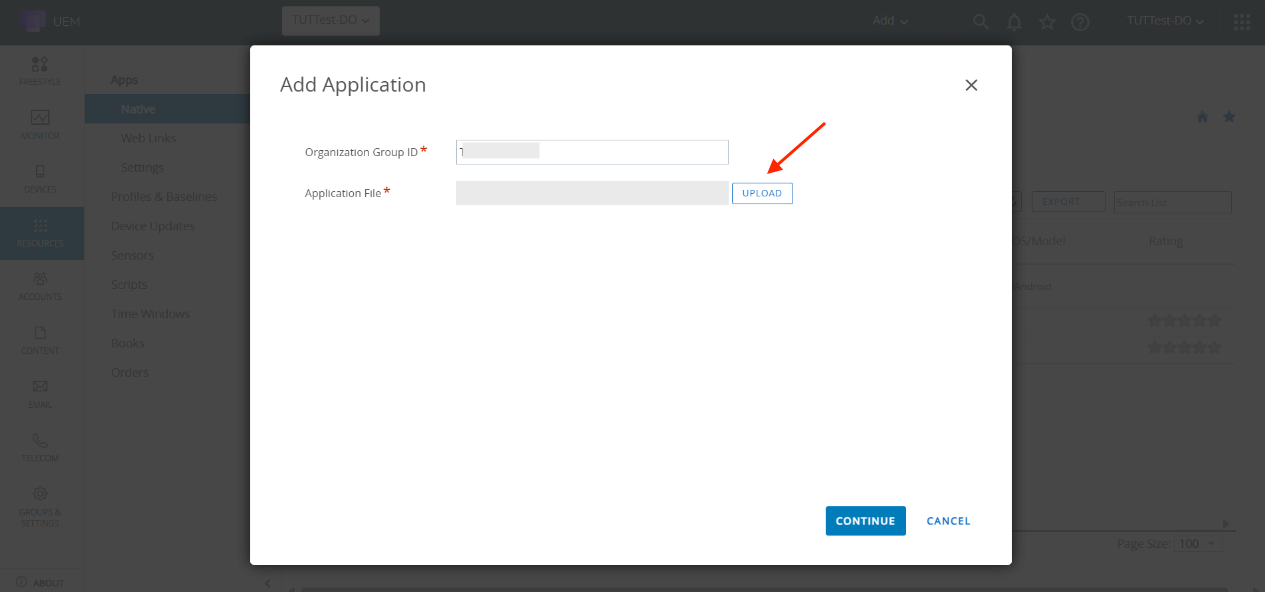
- In the Workspace ONE UEM web console, go to Resources > Native. Click Internal, then Add, and select Application File.
- Click Upload.
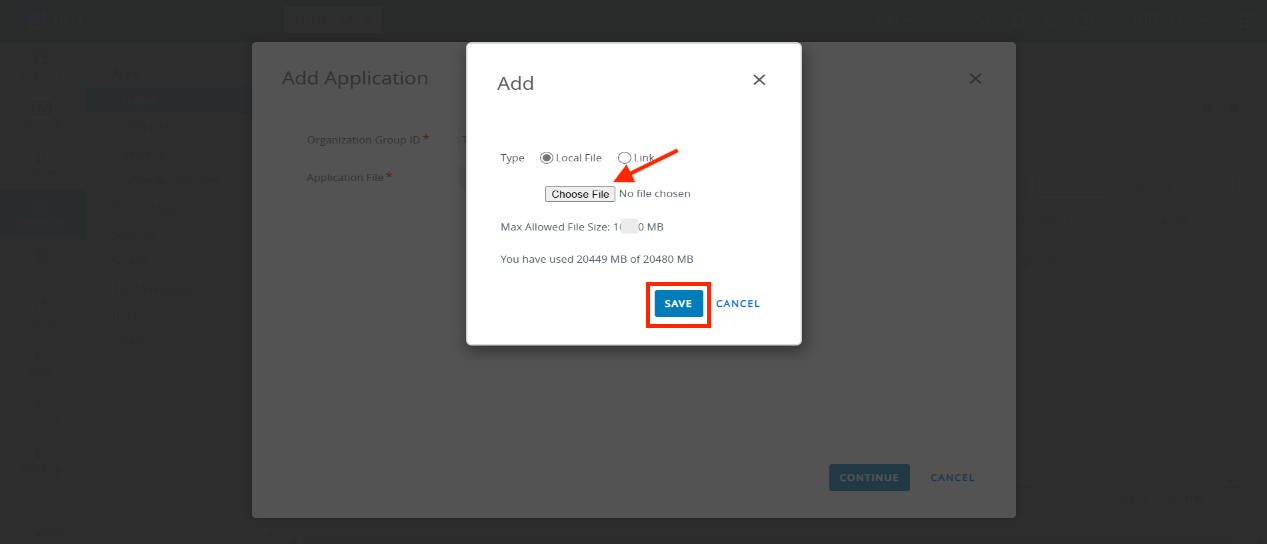
- Click Choose File. Select the Device Guardian .APK file to upload, then click Save.
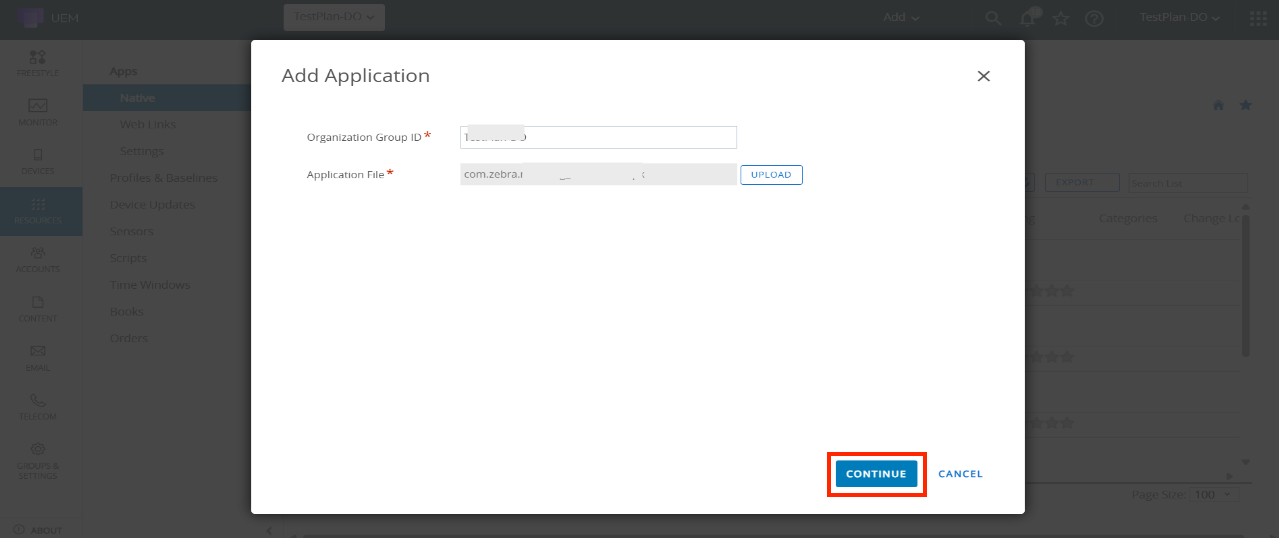
- The Application File is populated with the file name. Click Continue.
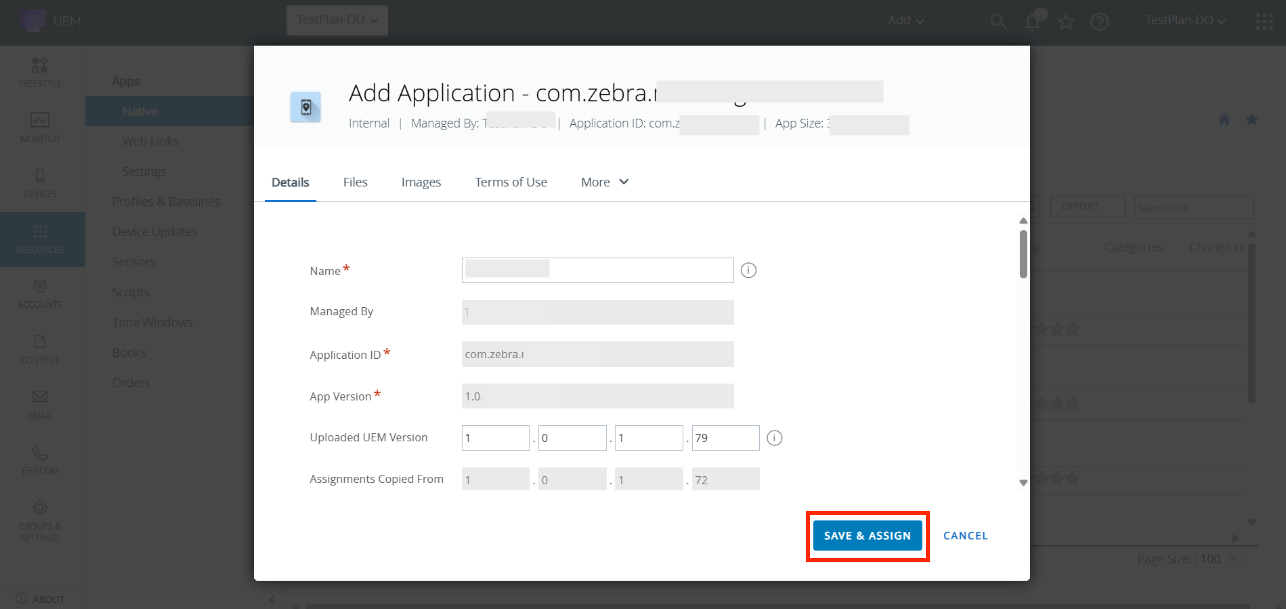
- Enter the application name and version. Click Save and Assign.
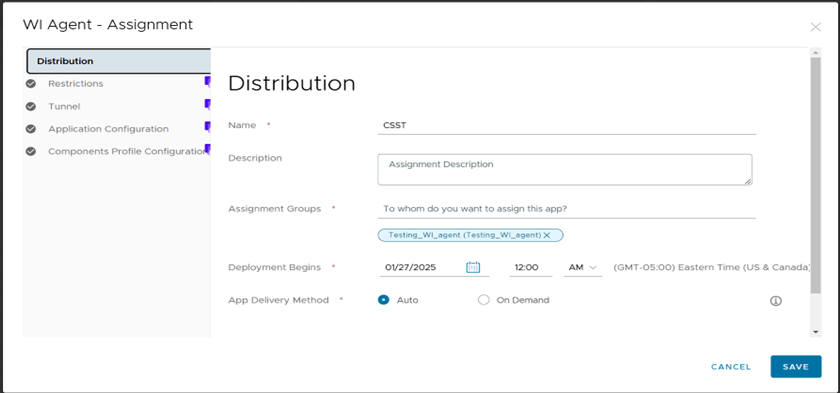
- In the Assignment screen, enter or select the following under Distribution:
- Name: [Enter an assignment name]
- Assignment Groups: [Enter group to assign the app]
- App Delivery Method: Auto
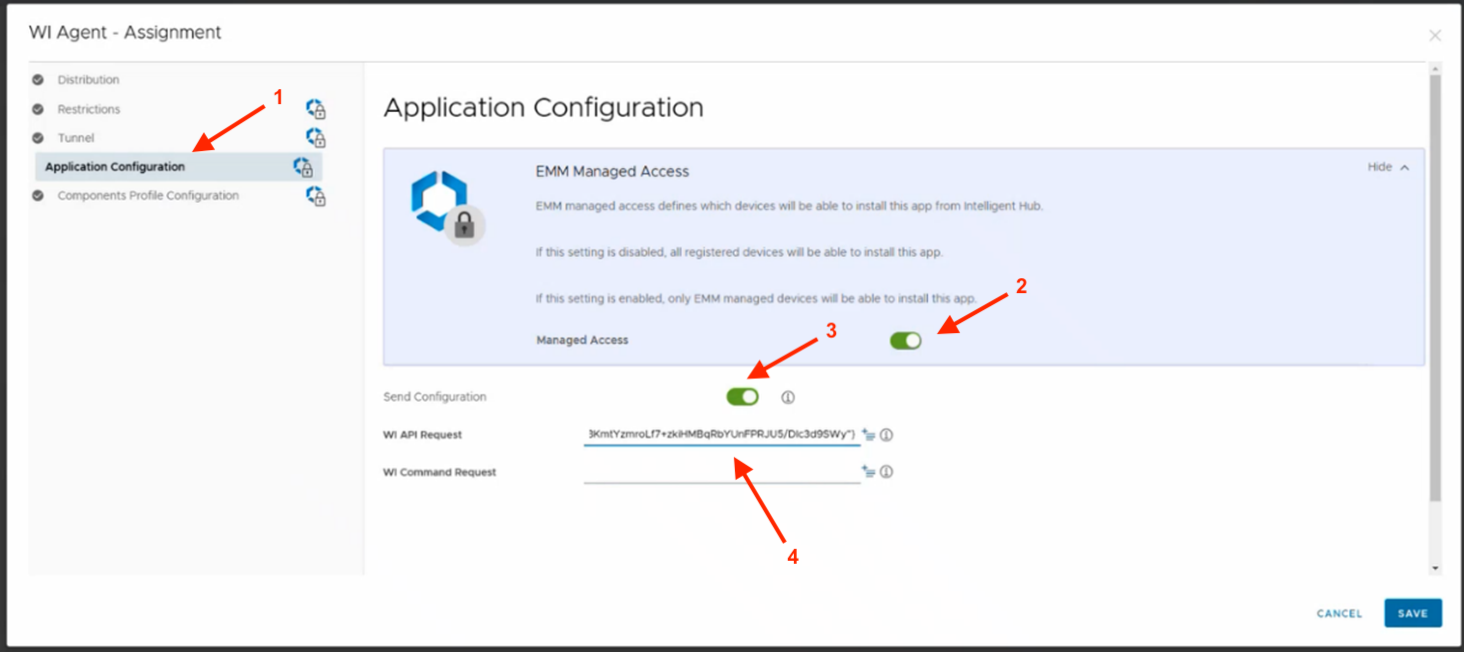
- Click Application Configuration. Enable Managed Access and Send Configuration. For WI API Request, paste the Wireless Insights Enrollment Configuration copied from ZDNA Cloud in step I. Click Save.
III. Apply License
To activate the Wireless Insights license in production environments (not required for trials), use one of the following methods:
- StageNow - Use StageNow to generate a barcode or XML that activates the license through the Cloud License Server (CLS). The XML can be deployed to devices through your EMM. For instructions, see Generate License XML.
- OemConfig with EMM - Use Zebra OEMConfig to obtain the license from CLS and deploy it to devices using your EMM. For instructions, see Activate CLS License via OEMConfig.
IV. Check Agent Connection
To verify the successful deployment and operation of the Wireless Insights Agent, follow these steps to check its connection status on both the device and within the ZDNA Cloud platform.
Device
Ensure that the Wireless Insights Agent is connected to the ZDNA Cloud server by checking the following statuses in the Wireless Insights Agent:
Feature Running: Voice is Running
ZDNA Connection (under External Connections):
- Connected - Indicates the Wireless Insights Agent is successfully deployed
- Activated - Indicates the Wireless Insights license is applied
ZDNA Cloud
In the ZDNA Cloud web console, go to Support Tools > Wireless Insights from the left menu. Verify that the device status, whether in its assigned group or unassigned group, shows "Active." This confirms successful enrollment.
Setup: EMMs Without Auto Options
Typically, EMMs offer Auto App Launch, Auto Grant Permissions, and Managed Configurations. If your EMM does not support these features or if the device is running an older OS version, follow this guide to install and configure Wireless Insights Agent.
I. Enable Wireless Insights Service
Activate the Wireless Insights service to allow the agent to collect wireless data. This configuration is required only once. In the Zebra DNA Cloud console, enable Wireless Insights.
After enabling the service, from the My Service screen, copy the Wireless Insights Enrollment Configuration for use in a later step.
II. (Optional) Deploy Delegation Scope XML
If the device has not been updated to the latest OS version (as specified in the Requirements), the Delegation Scope .XML file to authorize the agent to operate with the Wireless Insights stack must be applied on the device. Make sure the MXMF App is installed on the device prior to pushing .XML file. Create the .XML file with the XML content shown below and push it to the device(s). For instructions, see the guide to Deploy XML via EMM.
    <wap-provisioningdoc>
    <characteristic version="13.1" type="AccessMgr">
        <parm name="ServiceAccessAction" value="4" />
        <parm name="ServiceIdentifier" value="delegation-zebra-wirelessinsight-api-service" />
        <parm name="CallerPackageName" value="com.zebra.wirelessinsights.agent" />
        <parm name="CallerSignature" value="MIIFhTCCA20CCSMxNhM5AtLvpzANBgkqhkiG9w0BAQsFADB/MQswCQYDVQQGEwJVUzERMA8GA1UECAwITmV3IFlvcmsxEzARBgNVBAcMCkhvbHRzdmlsbGUxIDAeBgNVBAoMF1plYnJhIFRlY2hub2xvZ2llcyBJbmMuMSYwJAYDVQQDDB1BbmRyb2lkIFVucHJpdmlsZWdlZCBLZXkgUm9vdDAeFw0yMzEwMjcxOTM1MTNaFw00ODExMjkxOTM1MTNaMIGJMQswCQYDVQQGEwJVUzELMAkGA1UECAwCTlkxEzARBgNVBAcMCkhvbHRzdmlsbGUxHzAdBgNVBAoMFlplYnJhIFRlY2hub2xvZ2llcyBJbmMxDDAKBgNVBAsMA0VNQzEpMCcGA1UEAwwgY29tLnplYnJhLndpcmVsZXNzaW5zaWdodHMuYWdlbnQwggIiMA0GCSqGSIb3DQEBAQUAA4ICDwAwggIKAoICAQDX9Ae0Q0gd/rvdq2AYyHwcehsFyuU/x7L5IWhb4deD8O0NN6Tf0pj7ckrAfAylJCgNB8Uq+//f6VUTGQIcuFdinZLgQu5CQfqhD4Znt1lxs7eaXLOu5sVSJBZPdW0p9rl7ti+sqS9zDXa/NAOQjXaBIXQ7PJRJpUSOmSKDlN0ciPioB32ayr5v8aR6oMRQdrYW9AhS2UfYiCt0nWSY05poWvvKHzq4LKq6Agy817EZklOSn18buIo8ujGMxT/O2++XNAOfuRKQmv8+R8GVDCMkh1e1Lb8tHxh9+011AdG93EqxCm/4D6Sz69PGTbSlY1Bn0/H46uulamY8DzeChArsKJVQyxzqAl7h838ZuMPXbkCT+z1XONue5rpOluM6nBJe00Z+97YT0SlaNvJG/g7r/YQddLB/VBQwh8NPIeHufO/gEhukkVzvq49ieU/NZj7CHjz+UXcmnDgGz6hhvfqOVsYmjEAzE8LRmOuelClm8jc7RnmF2g8Q+iApwuy5PA75xjAibeUbEqP6aCJy9XkyVt7JujzZd7G+KH4BVSKoj/it51X3N4JvXwCKe9Fpn8SPFcKOUuCehYFGO4+9DvAGbjbCwx9Q4G8iNpbSMoNd5CsHQFHzc6XsV/dh8Y7KzdcuEm0pahRdVYEBsTrMRl3dwxU28eRQnDMA6OH2bEql0QIDAQABMA0GCSqGSIb3DQEBCwUAA4ICAQBiop746XWulTB7kRBTQL34VvMUUTmrI5sw5wFC2WShu2T63+x0HNfDkW2gNhHcBUN5PW4QIY72CZ01ZA4lHII3Cx5OV0D3nCqsI7kf1JcJdKca3lMQhpjR+RNaPkl6cGwb2ySSMsu74qkFFHt338+NZCvxu/NkErV1M1K2cHJTdXaCvLuHTcSYRbR34dvfL7K0y340NCbIRRZOPWqhble84YBQ8SSSBWNTsR/VyXE/oXuuBIos4kX33DR+s5jEJB44qEWZrzhzPWScwkiPKqVcAaIimpcH1swO9xVbXZF6u9cWVB5iepC0J0gnbKrU4zIRqXNQs9TgYuNxwCNj/dvPzZNVITf33gzO2ePaycvV04cwJLc8bAexpEJJ8nvec9L3ewbunHfywVxT8wUqiXWLWaTjXASvkYxQGsRjFqWwGhgDar37+QYTUN4J7bgrYg/sKDdbdJyIr1tbdKepvh47QJ1aCFj77T1yWxdIu5cukfu6xgGCTK53UTxVdEz5s9ci3Ji/aQJQLH4ceQjV09gcmOj1IQ1QcKtwJBYaOg7yajJl4qo3THYeOJz6ae9okN6C2ECMFESj+f6txgImXZunzT6twiPYLweN+llJVRPZ09Z3FNgNcYWINzuYTn+YZxfgyQA4F9pEaCVA0HcGLUNyHvfRD3F/JXzx9TcD7ztWgA==" />
    </characteristic>
    </wap-provisioningdoc>
III. Install and Configure Agent
Create and apply a policy to install the Wireless Insights Agent. Use one of the following guides:
IV. (Optional) Deploy Permissions and Launch XML
If Auto App Launch or Auto Grant Permissions is not available in your EMM, push the .XML containing the content shown below to launch the Wireless Insights Agent and grant the appropriate permissions. For instructions, see the guide to Deploy XML via EMM.
    <wap-provisioningdoc>
    <characteristic version="13.1" type="AccessMgr">
        <parm name="PermissionAccessAction" value="1" />
        <parm name="PermissionAccessPermissionName" value="ALL_DANGEROUS_PERMISSIONS" />
        <parm name="PermissionAccessPackageName" value="com.zebra.wirelessinsights.agent" />
        <parm name="PermissionAccessSignature" value="MIIFhTCCA20CCSMxNhM5AtLvpzANBgkqhkiG9w0BAQsFADB/MQswCQYDVQQGEwJVUzERMA8GA1UECAwITmV3IFlvcmsxEzARBgNVBAcMCkhvbHRzdmlsbGUxIDAeBgNVBAoMF1plYnJhIFRlY2hub2xvZ2llcyBJbmMuMSYwJAYDVQQDDB1BbmRyb2lkIFVucHJpdmlsZWdlZCBLZXkgUm9vdDAeFw0yMzEwMjcxOTM1MTNaFw00ODExMjkxOTM1MTNaMIGJMQswCQYDVQQGEwJVUzELMAkGA1UECAwCTlkxEzARBgNVBAcMCkhvbHRzdmlsbGUxHzAdBgNVBAoMFlplYnJhIFRlY2hub2xvZ2llcyBJbmMxDDAKBgNVBAsMA0VNQzEpMCcGA1UEAwwgY29tLnplYnJhLndpcmVsZXNzaW5zaWdodHMuYWdlbnQwggIiMA0GCSqGSIb3DQEBAQUAA4ICDwAwggIKAoICAQDX9Ae0Q0gd/rvdq2AYyHwcehsFyuU/x7L5IWhb4deD8O0NN6Tf0pj7ckrAfAylJCgNB8Uq+//f6VUTGQIcuFdinZLgQu5CQfqhD4Znt1lxs7eaXLOu5sVSJBZPdW0p9rl7ti+sqS9zDXa/NAOQjXaBIXQ7PJRJpUSOmSKDlN0ciPioB32ayr5v8aR6oMRQdrYW9AhS2UfYiCt0nWSY05poWvvKHzq4LKq6Agy817EZklOSn18buIo8ujGMxT/O2++XNAOfuRKQmv8+R8GVDCMkh1e1Lb8tHxh9+011AdG93EqxCm/4D6Sz69PGTbSlY1Bn0/H46uulamY8DzeChArsKJVQyxzqAl7h838ZuMPXbkCT+z1XONue5rpOluM6nBJe00Z+97YT0SlaNvJG/g7r/YQddLB/VBQwh8NPIeHufO/gEhukkVzvq49ieU/NZj7CHjz+UXcmnDgGz6hhvfqOVsYmjEAzE8LRmOuelClm8jc7RnmF2g8Q+iApwuy5PA75xjAibeUbEqP6aCJy9XkyVt7JujzZd7G+KH4BVSKoj/it51X3N4JvXwCKe9Fpn8SPFcKOUuCehYFGO4+9DvAGbjbCwx9Q4G8iNpbSMoNd5CsHQFHzc6XsV/dh8Y7KzdcuEm0pahRdVYEBsTrMRl3dwxU28eRQnDMA6OH2bEql0QIDAQABMA0GCSqGSIb3DQEBCwUAA4ICAQBiop746XWulTB7kRBTQL34VvMUUTmrI5sw5wFC2WShu2T63+x0HNfDkW2gNhHcBUN5PW4QIY72CZ01ZA4lHII3Cx5OV0D3nCqsI7kf1JcJdKca3lMQhpjR+RNaPkl6cGwb2ySSMsu74qkFFHt338+NZCvxu/NkErV1M1K2cHJTdXaCvLuHTcSYRbR34dvfL7K0y340NCbIRRZOPWqhble84YBQ8SSSBWNTsR/VyXE/oXuuBIos4kX33DR+s5jEJB44qEWZrzhzPWScwkiPKqVcAaIimpcH1swO9xVbXZF6u9cWVB5iepC0J0gnbKrU4zIRqXNQs9TgYuNxwCNj/dvPzZNVITf33gzO2ePaycvV04cwJLc8bAexpEJJ8nvec9L3ewbunHfywVxT8wUqiXWLWaTjXASvkYxQGsRjFqWwGhgDar37+QYTUN4J7bgrYg/sKDdbdJyIr1tbdKepvh47QJ1aCFj77T1yWxdIu5cukfu6xgGCTK53UTxVdEz5s9ci3Ji/aQJQLH4ceQjV09gcmOj1IQ1QcKtwJBYaOg7yajJl4qo3THYeOJz6ae9okN6C2ECMFESj+f6txgImXZunzT6twiPYLweN+llJVRPZ09Z3FNgNcYWINzuYTn+YZxfgyQA4F9pEaCVA0HcGLUNyHvfRD3F/JXzx9TcD7ztWgA==" />
    </characteristic>
    <characteristic version="13.5" type="AppMgr">
        <parm name="Action" value="LaunchApplication" />
        <parm name="ApplicationName" value="WI Agent" />
    </characteristic>
    </wap-provisioningdoc>
V. (Optional) Apply Managed Config through Intent
If Managed Configurations are not supported by your EMM, after launching the Wireless Insights Agent, use the following intent to send the managed configuration:
“am broadcast -a 'com.zebra.wirelessinsights.agent.ACTION_CONFIGURE_EXTERNAL_CONNECTION' --es 'message' '<Wireless Insights Enrollment Configuration>’”
For <Wireless Insights Enrollment Configuration>, paste the encrypted Wireless Insights Enrollment Configuration copied from step I.
VI. Apply License
To activate the Wireless Insights license in production environments (not required for trials), use one of the following methods:
- StageNow - Use StageNow to generate a barcode or XML that activates the license through the Cloud License Server (CLS). The XML can be deployed to devices through your EMM. For instructions, see Generate License XML.
- OemConfig with EMM - Use Zebra OEMConfig to obtain the license from CLS and deploy it to devices using your EMM. For instructions, see Activate CLS License via OEMConfig.
VII. Check Agent Connection
To verify the successful deployment and operation of the Wireless Insights Agent, follow these steps to check its connection status on both the device and within the ZDNA Cloud platform.
Device
Ensure that the Wireless Insights Agent is connected to the ZDNA Cloud server by checking the following statuses in the Wireless Insights Agent:
Feature Running: Voice is Running
ZDNA Connection (under External Connections):
- Connected - Indicates the Wireless Insights Agent is successfully deployed
- Activated - Indicates the Wireless Insights license is applied
ZDNA Cloud
In the ZDNA Cloud web console, go to Support Tools > Wireless Insights from the left menu. Verify that the device status, whether in its assigned group or unassigned group, shows "Active." This confirms successful enrollment.
Guide: Deploy XML via EMM
This section provides guidance on submitting .XML file content outlined in Setup instructions for EMMs Without Auto Options subsections that required XML submission, specific to the EMM in use - SOTI MobiControl or Workspace ONE UEM. XML content submissions include:
- Delegation Scope
- Permissions and Launch Agent
SOTI MobiControl
Follow the instructions below to push an .XML file using SOTI MobiControl:
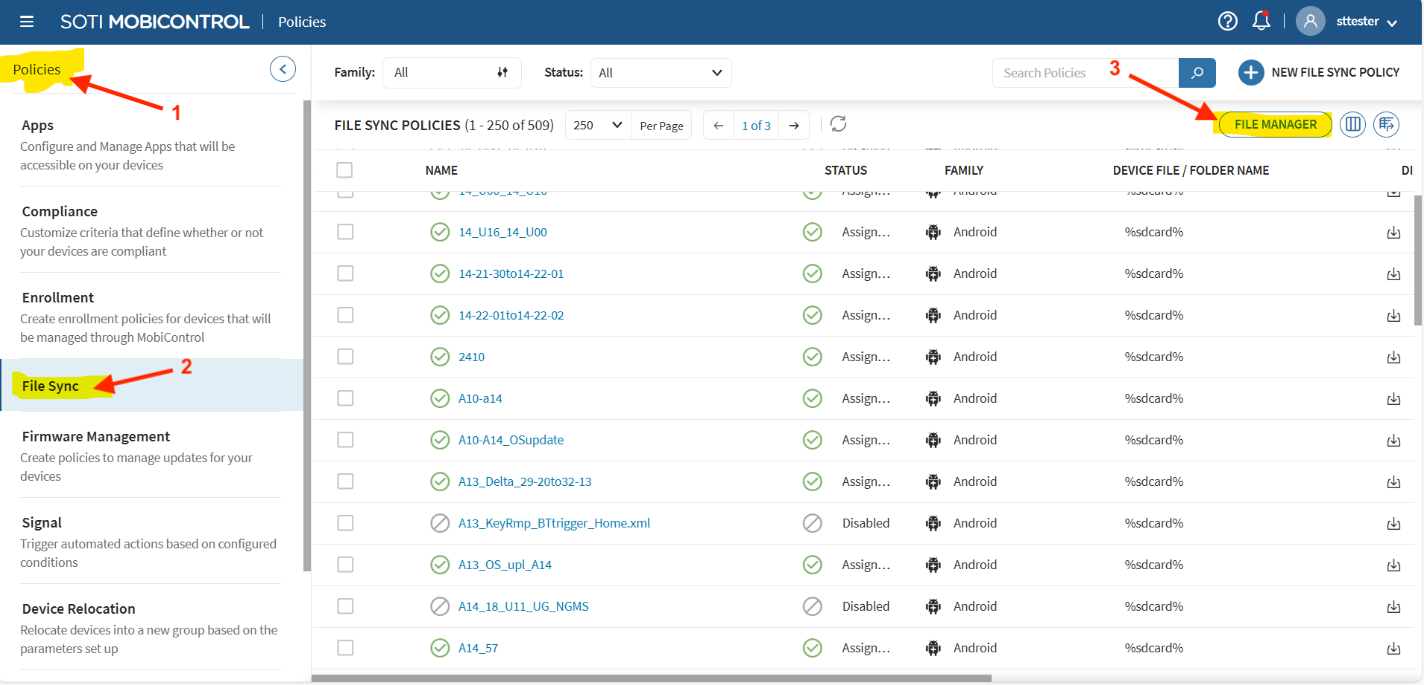
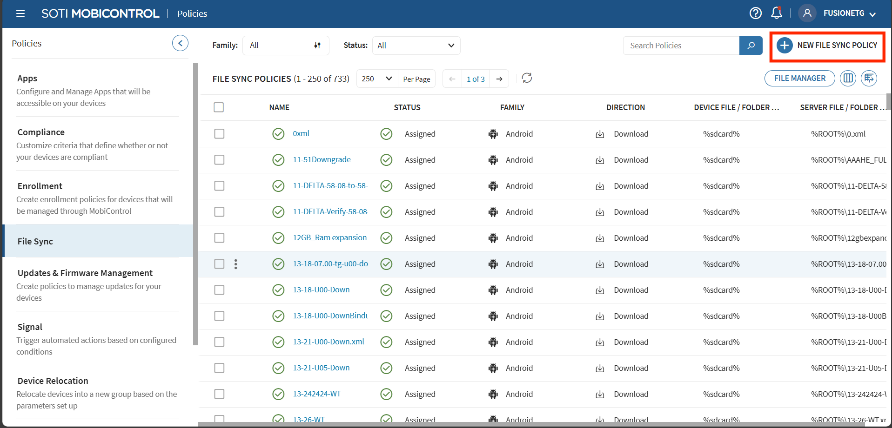
- In the SOTI MobiControl web console, go to Policies > File Sync and click File Manager.
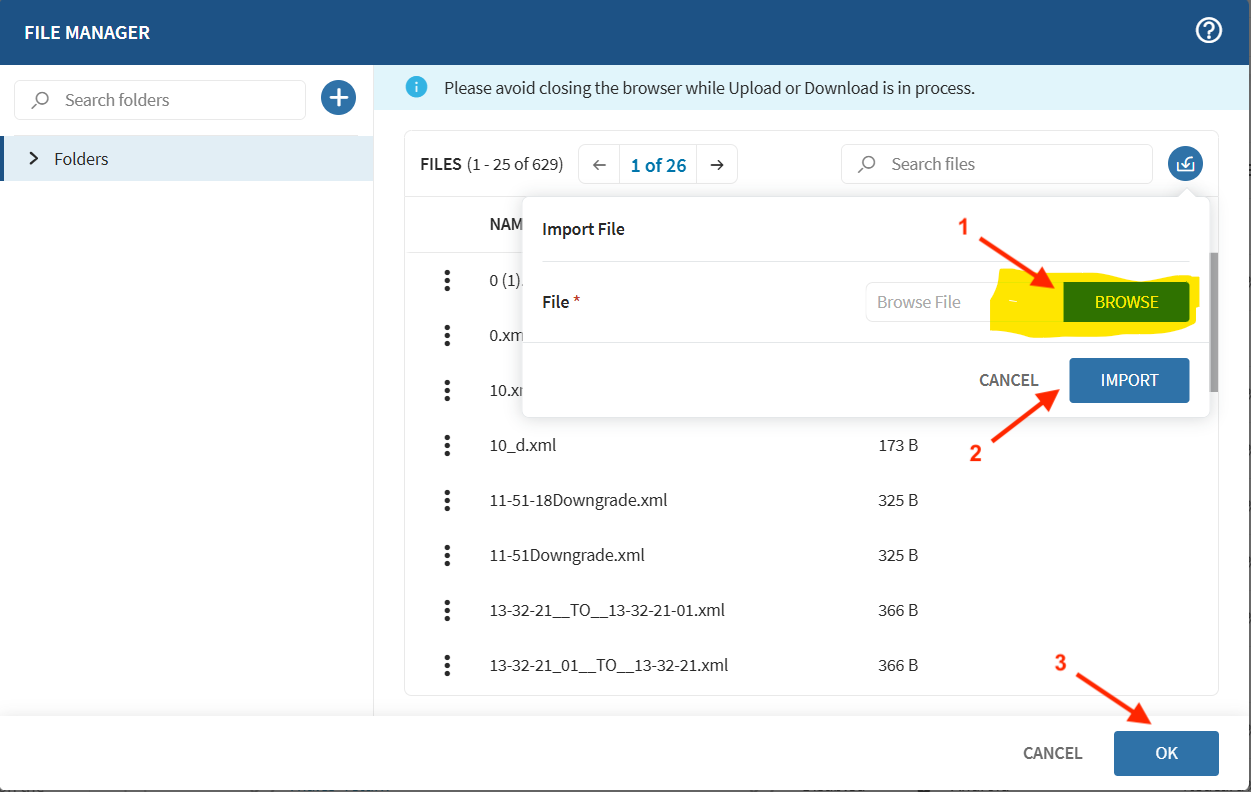
- Click Browse, select the desired .XML file to submit, click Import, then click OK.
- Click New File Sync Policy.
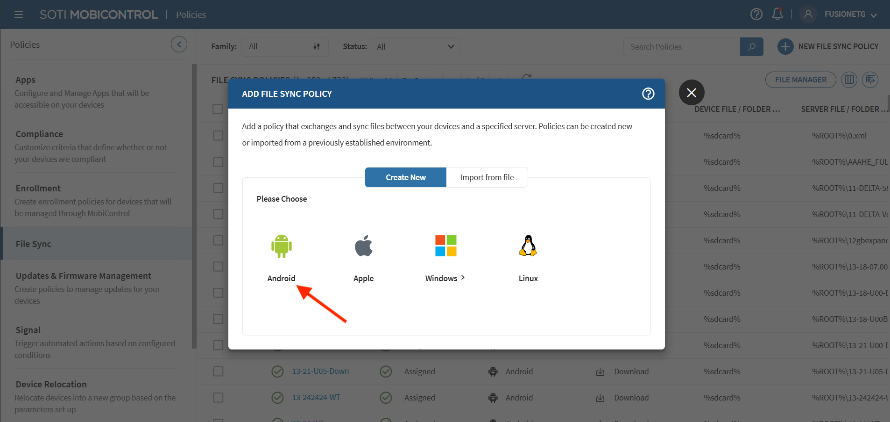
- Click Android.
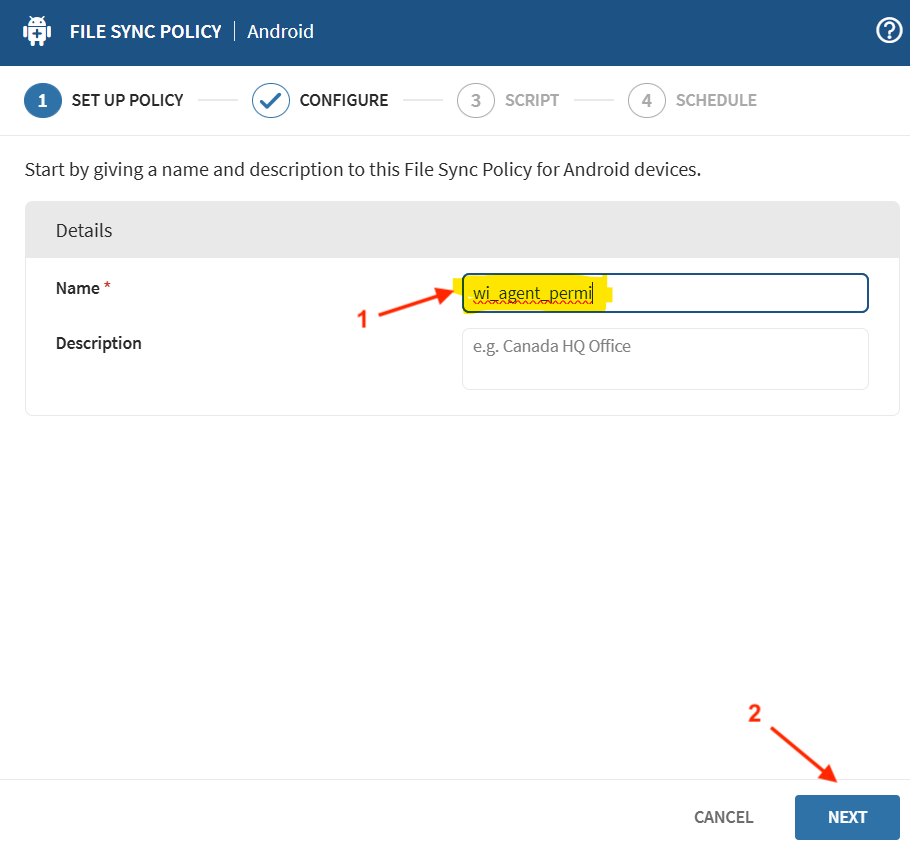
- Enter a name for the policy and click Next.
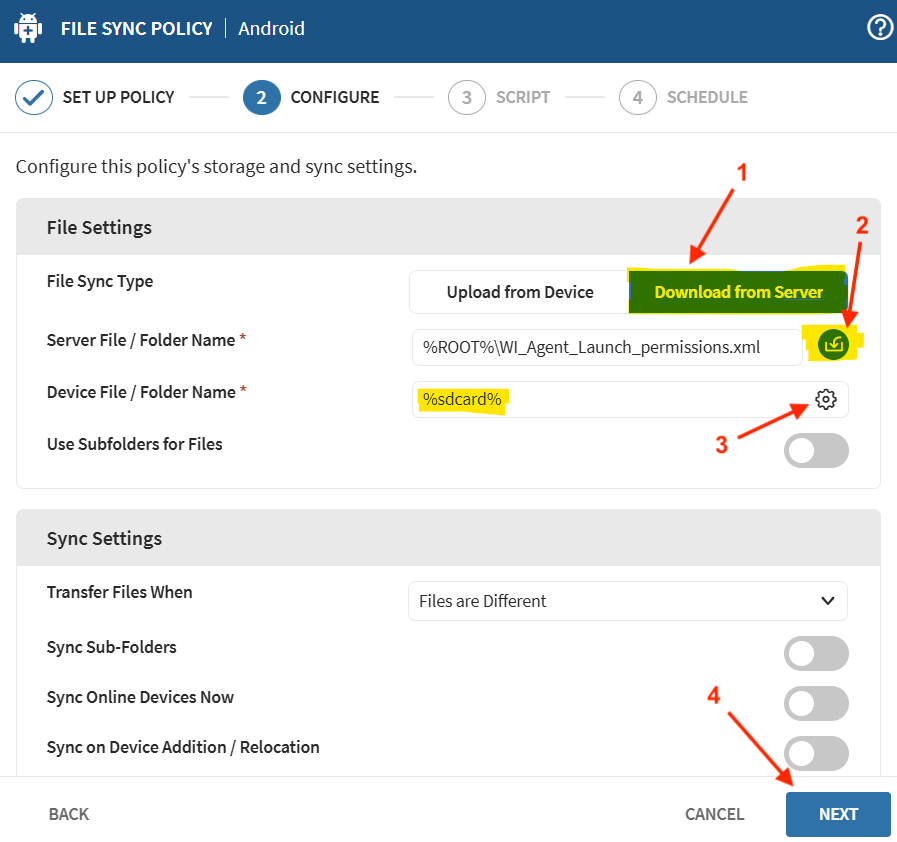
- Click Download from Server, select the .XML file, select the appropriate folder, and click Next.
- Enter/select the following, then click Next:
- Enable Post-Sync Script: [toggle on]
- Script Type: Custom
- Script Editor:
mxconfig sdcard/WI_Agent_Launch_permissions.xml - Execute Script Only if Files Transmitted: [toggle on]
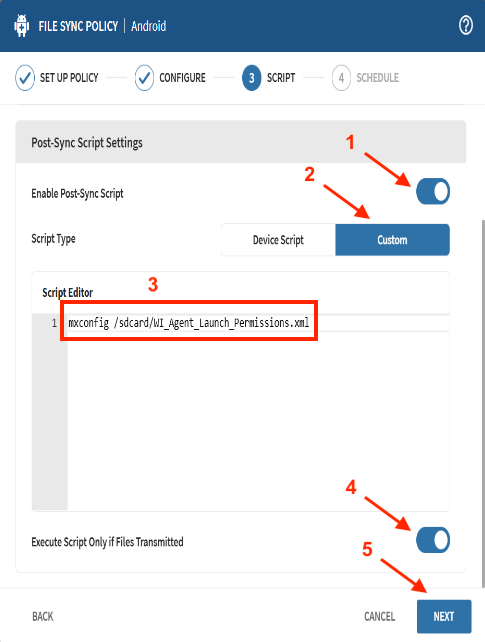
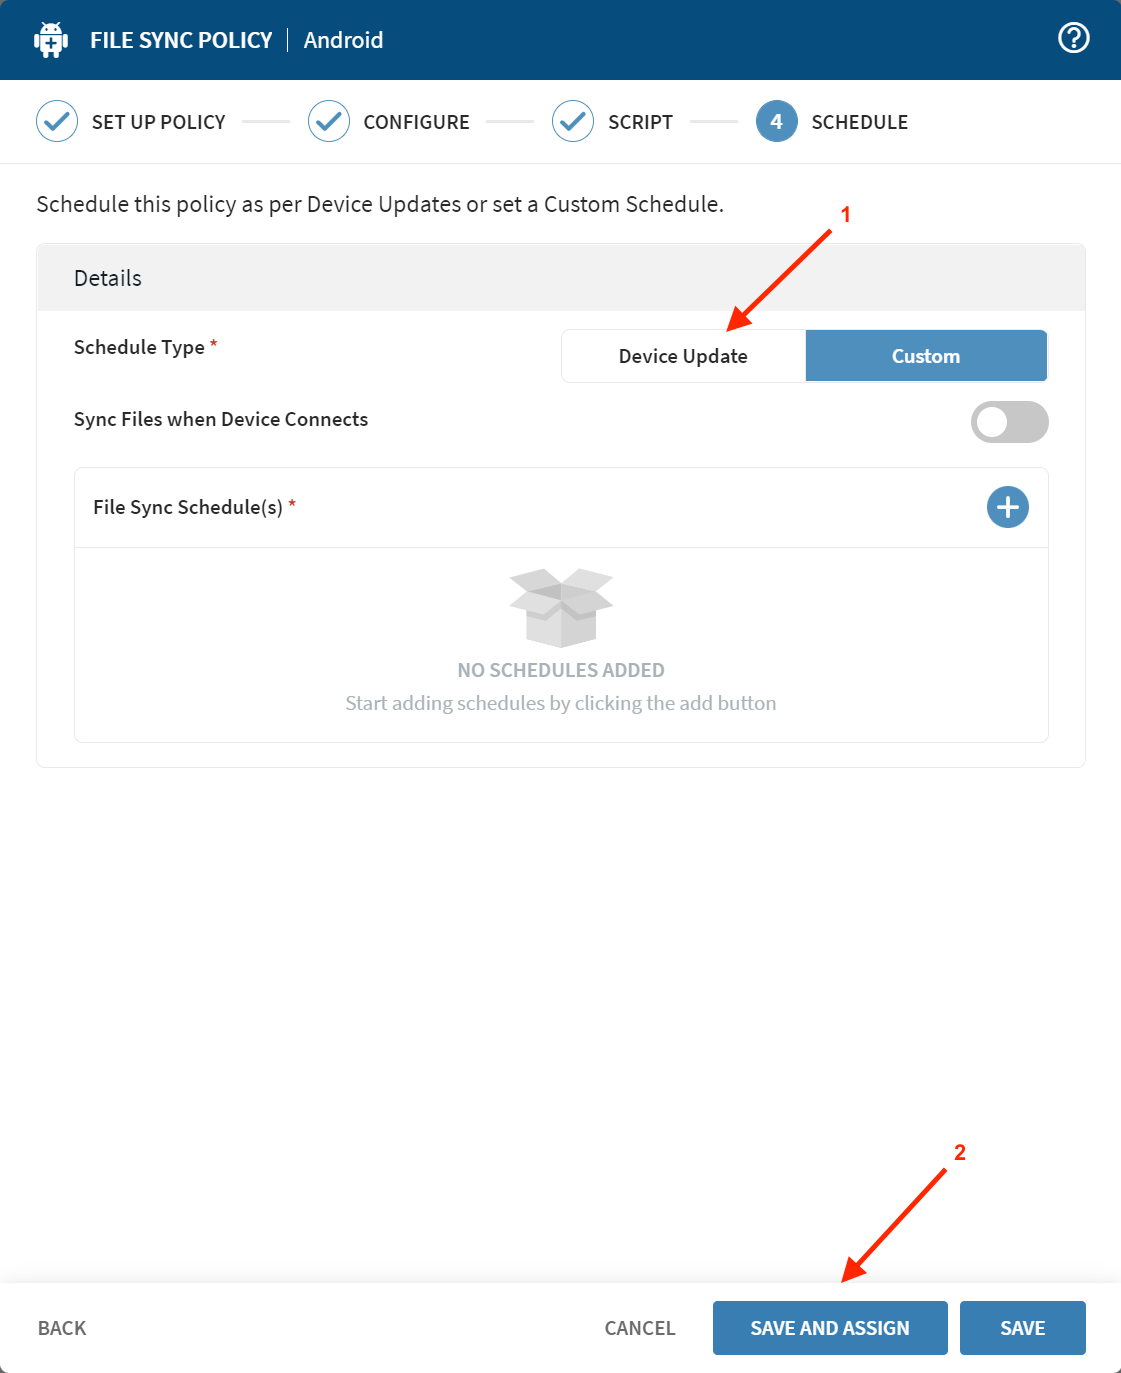
- Click Device Update and then click Save and Assign.
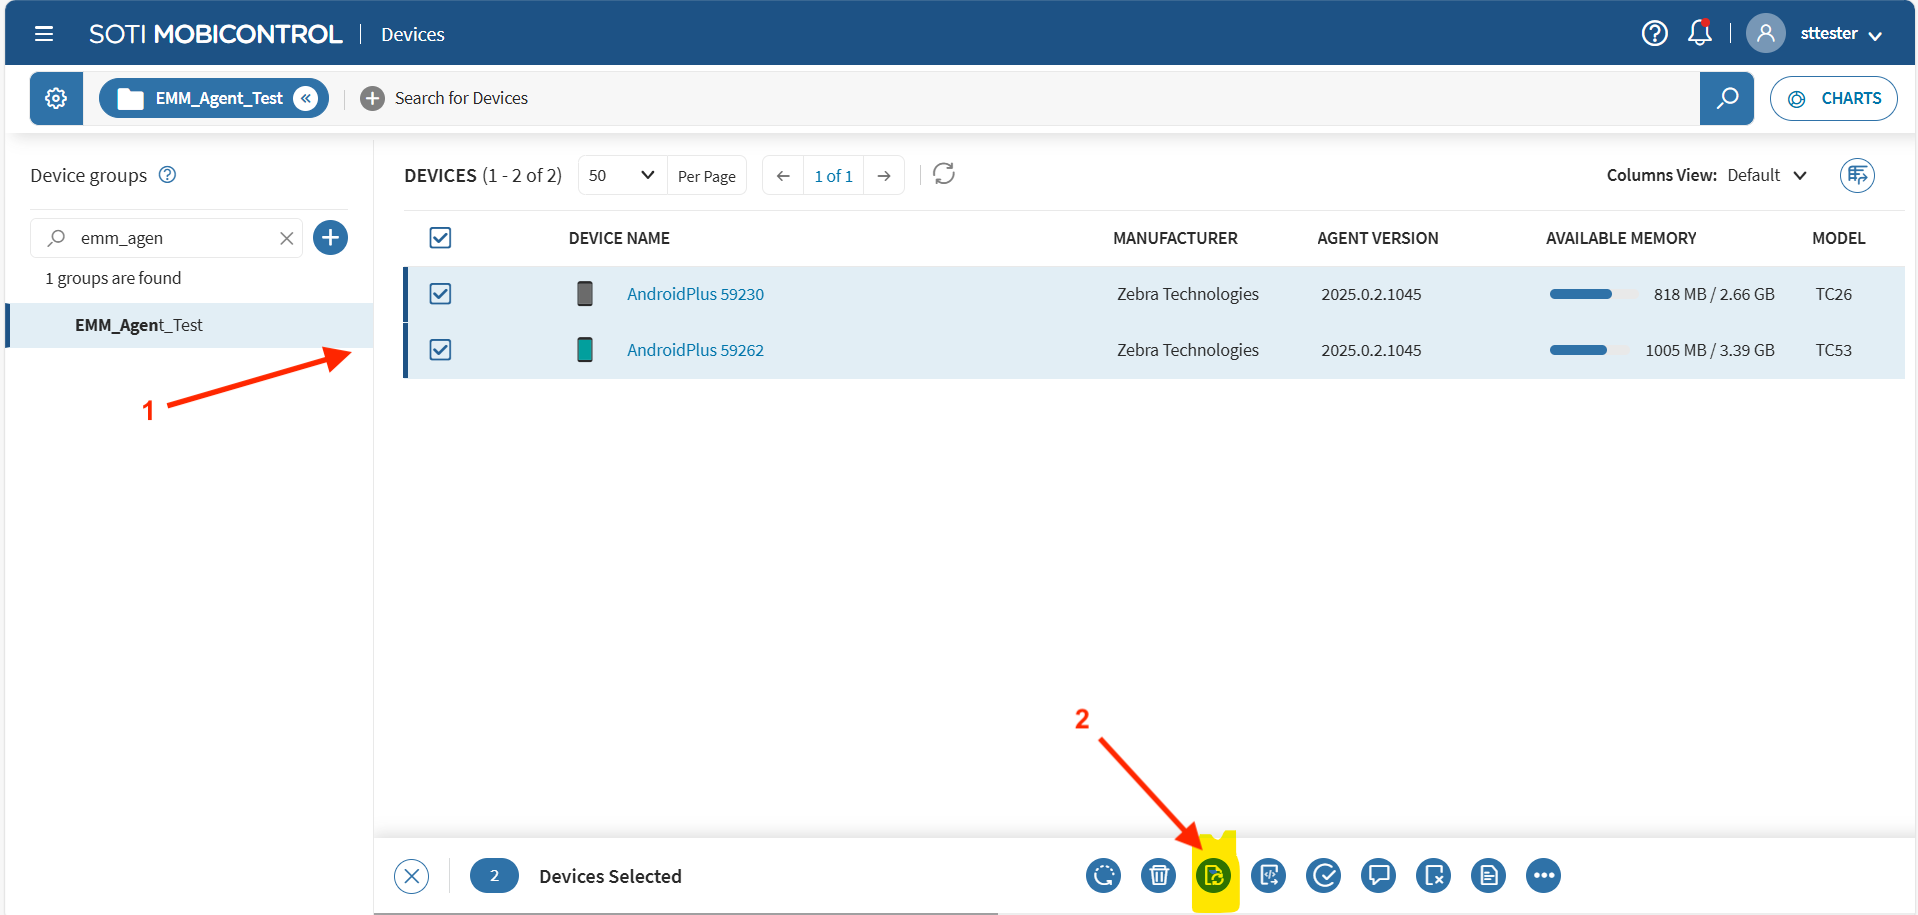
- Select the group or device(s) to apply the .XML file. Click the file sync icon from the bottom menu.
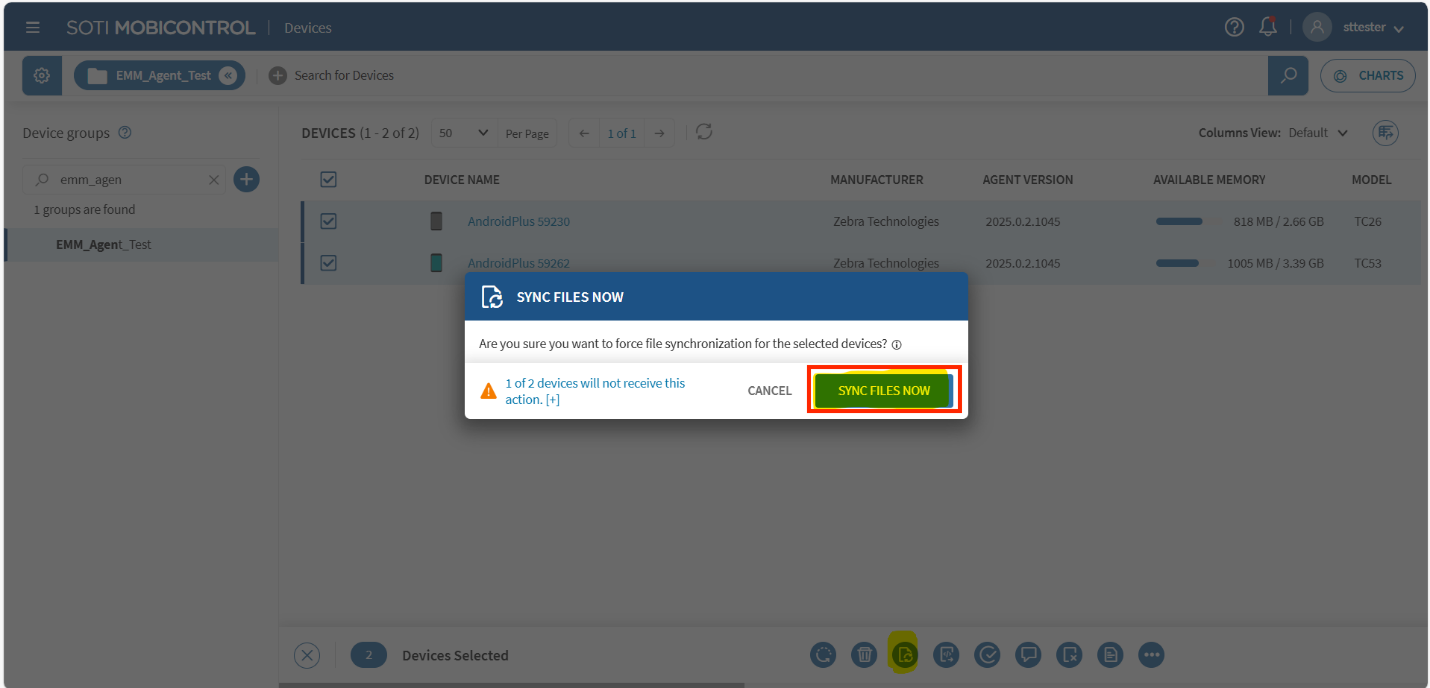
- Click Sync Files Now to initiate the file synchronization.
Workspace ONE UEM
Follow the instructions below to push an .XML file using Workspace ONE UEM:
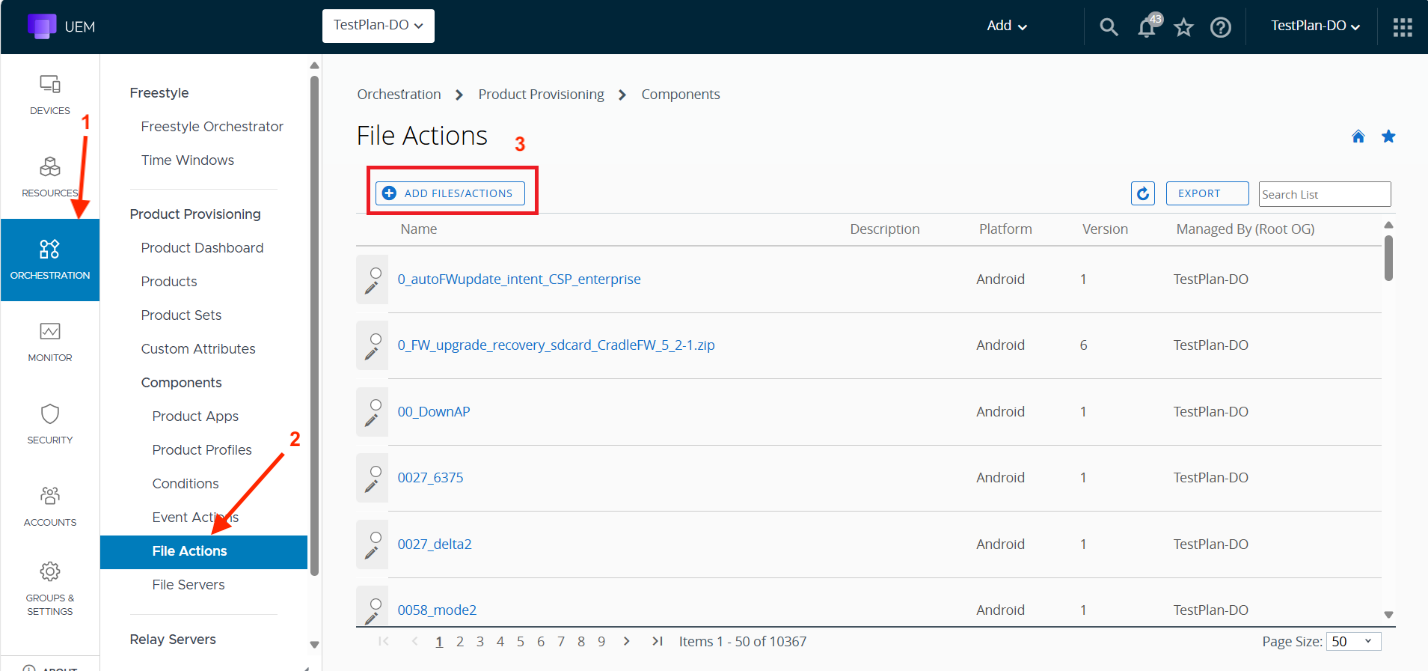
- In the Workspace ONE UEM web console, go to Orchestration > File Actions. Click Add Files/Actions.
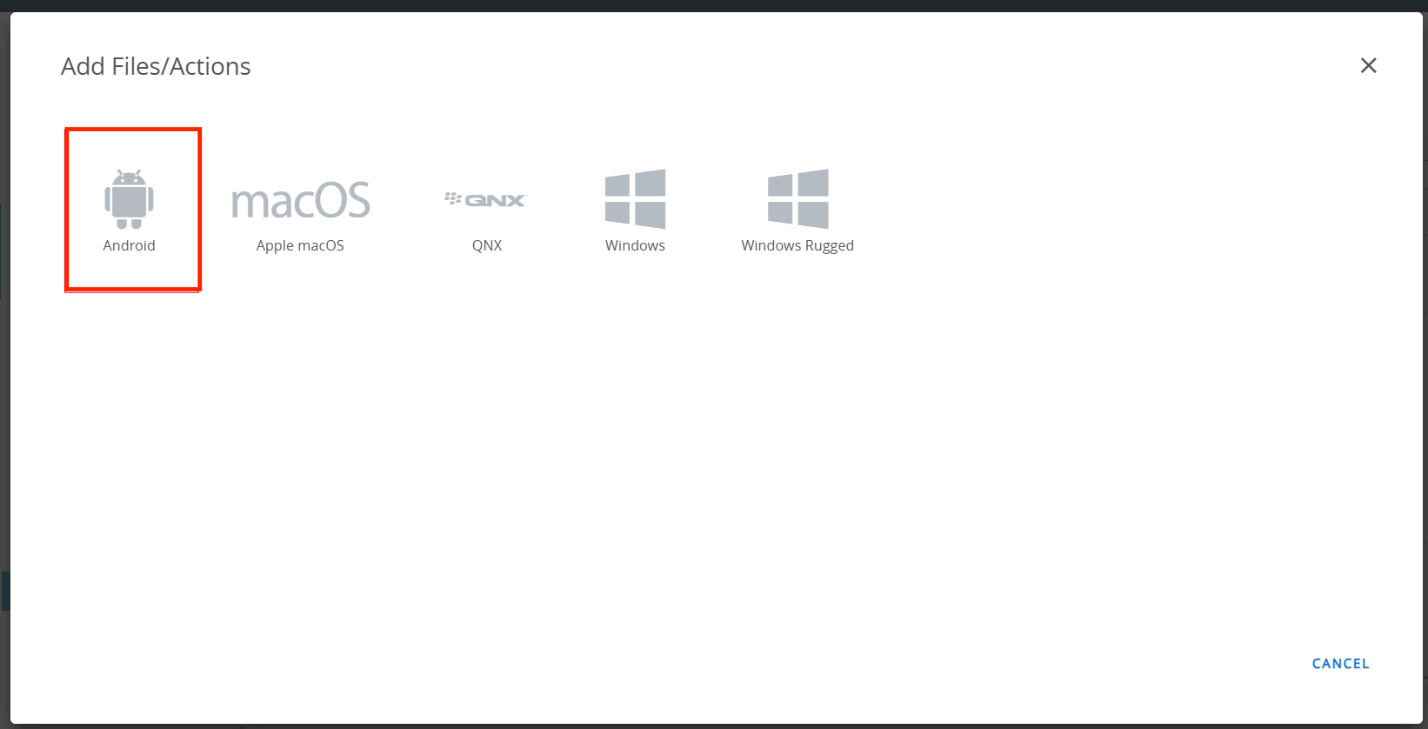
- Select Android.
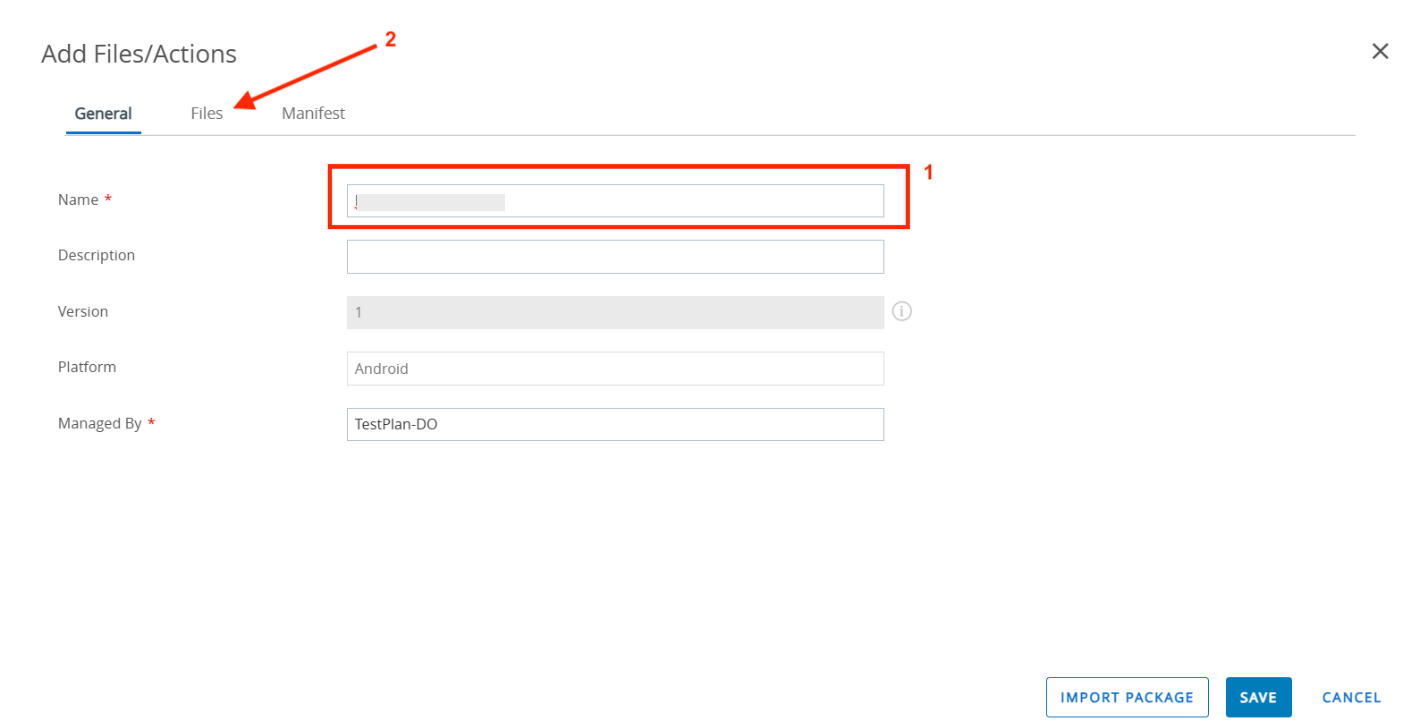
- Enter a name for the File/Action and click the Files tab.
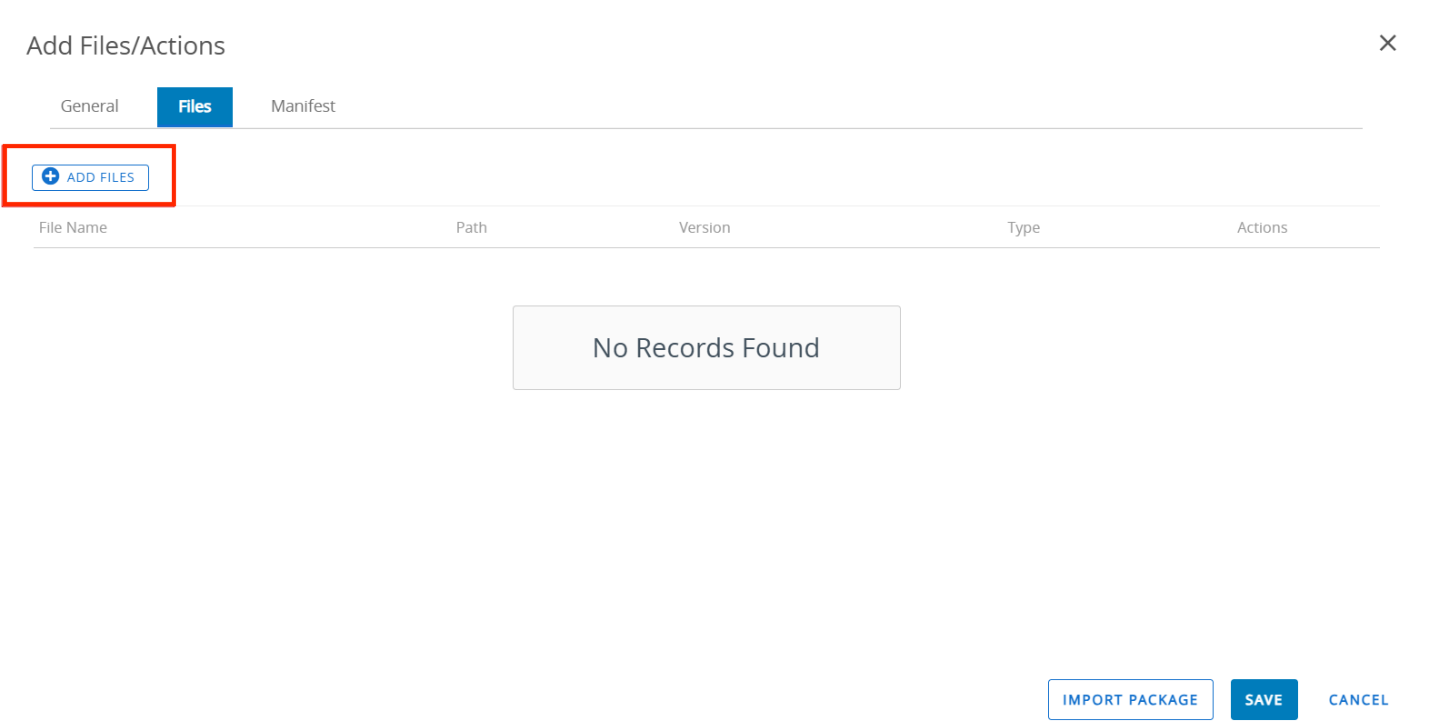
- Click Add Files.
- Choose the
.xmland click Save.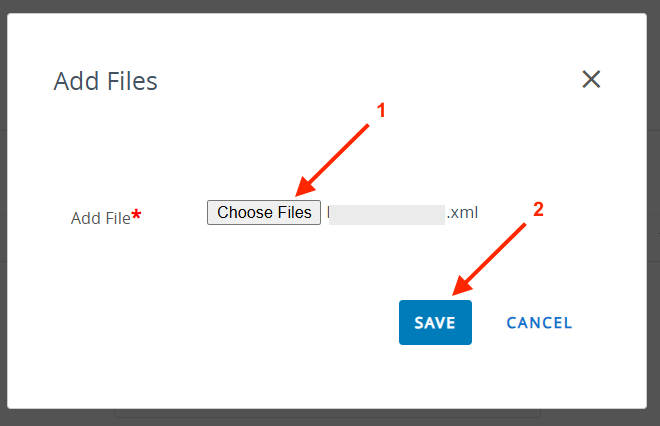
- Enter
/sdcardfor the Download Path, and enter the version if needed. Click Save.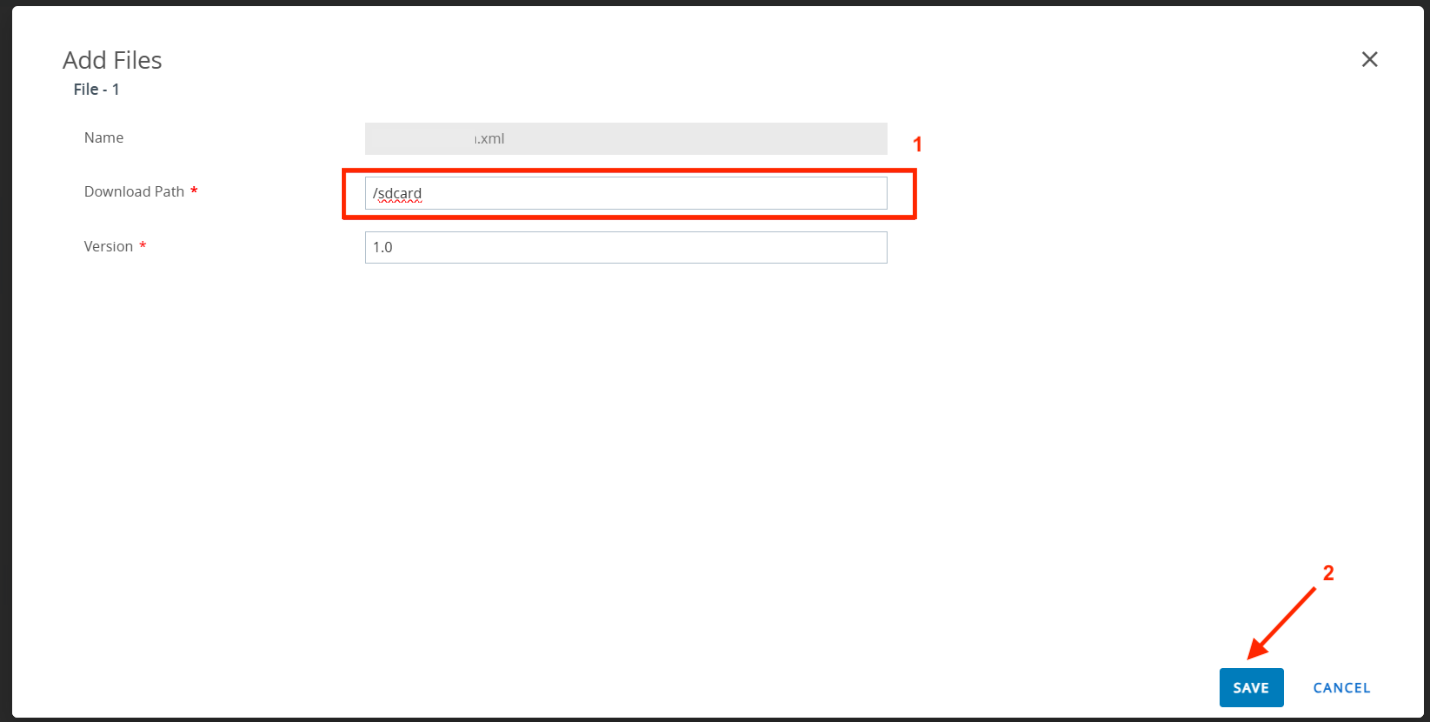
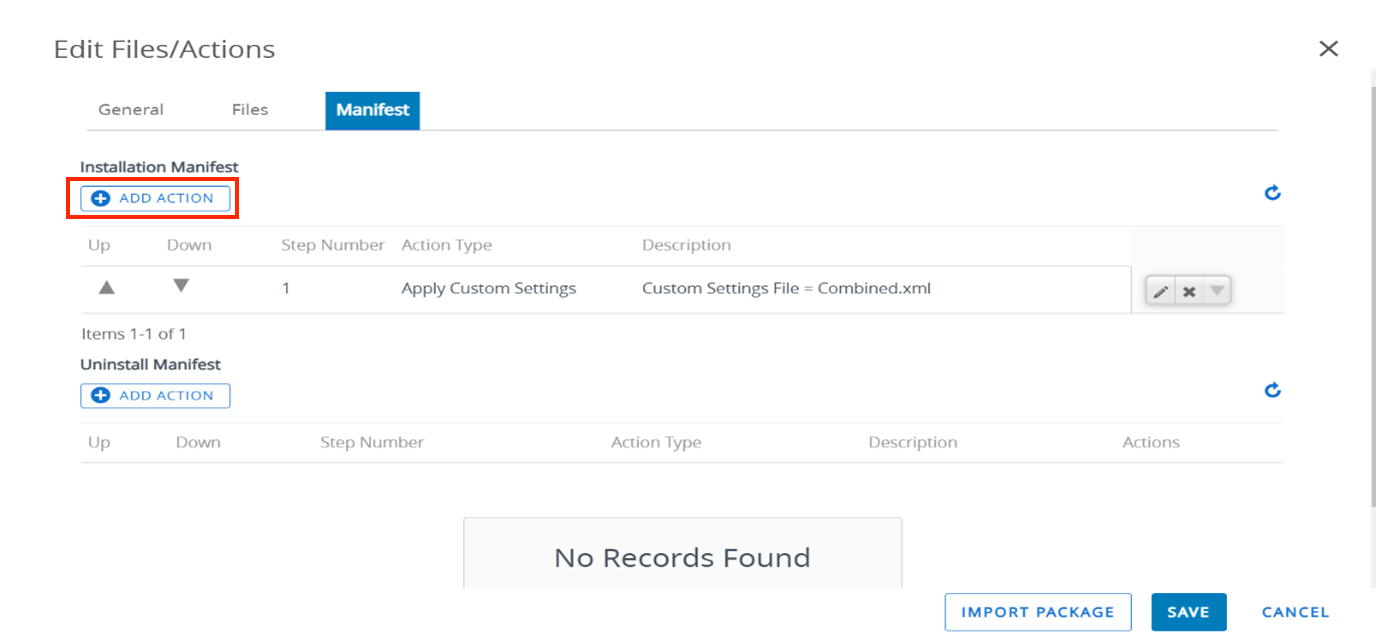
- The file is added. Click the Manifest tab. Under Installation Manifest, click Add Action.
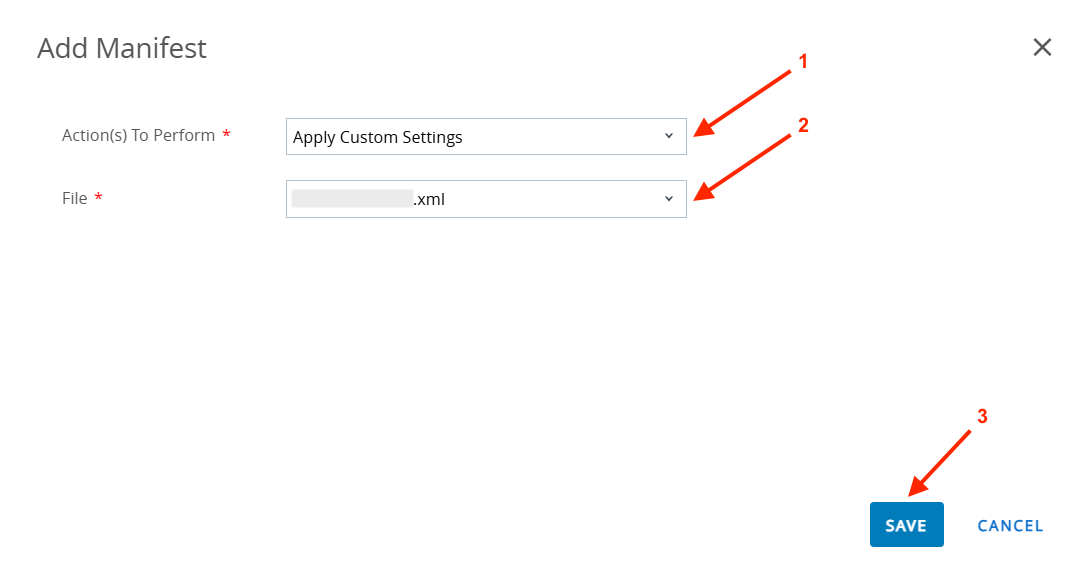
- Select the following, then click Save.
- Action(s) To Perform: Apply Custom Settings
- File: [Choose the .XML file]
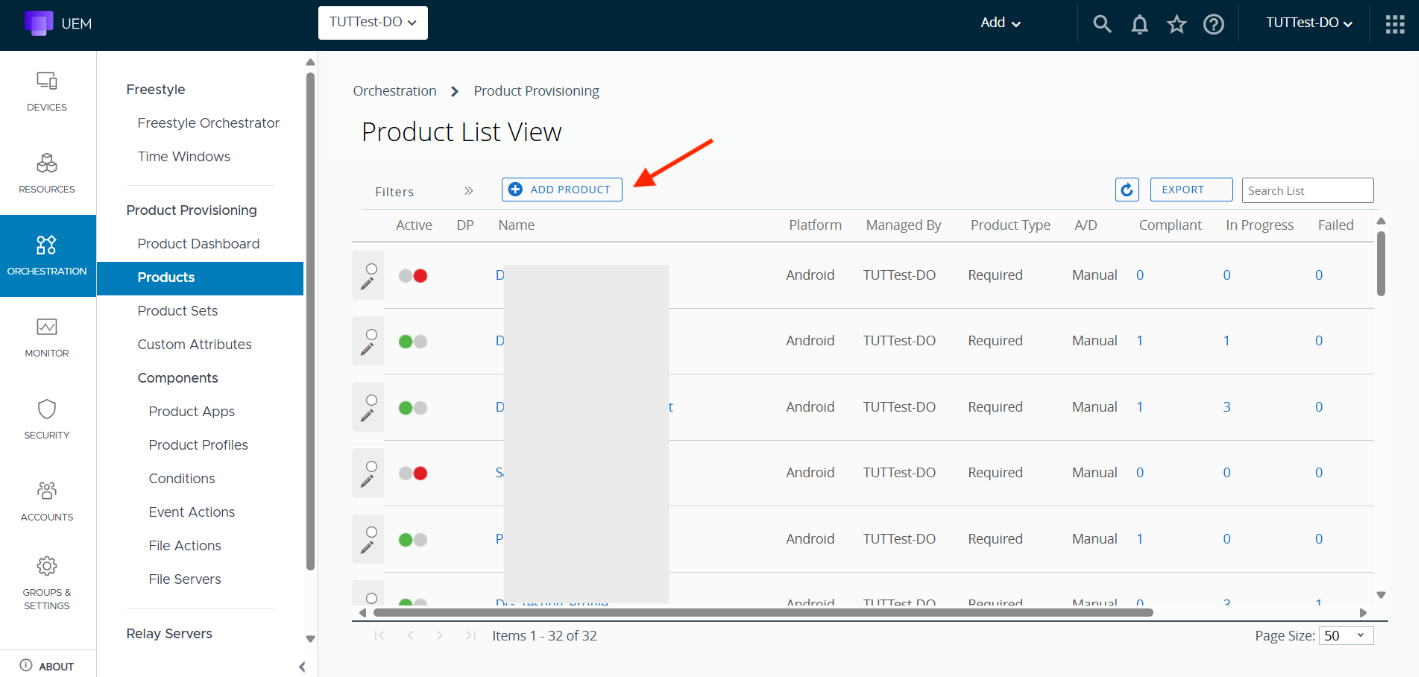
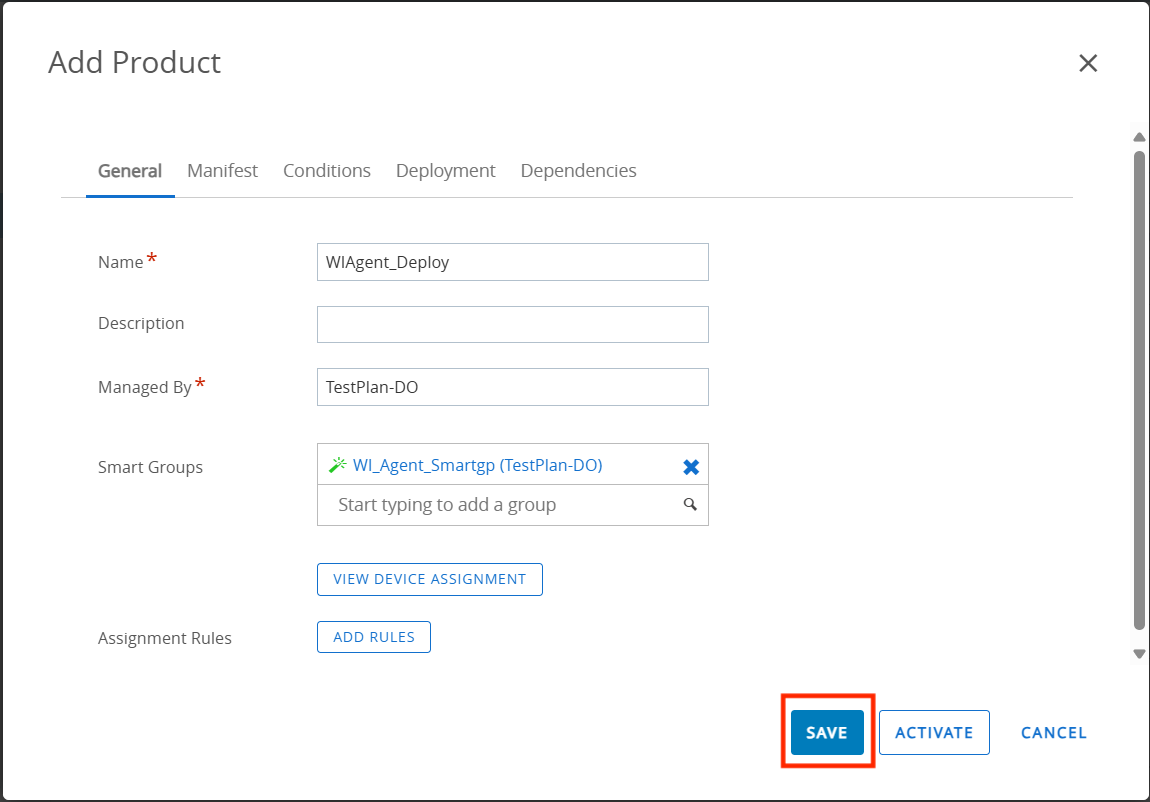
- Create a product using the file/action just created. Go to Orchestration > Products and click Add Product.
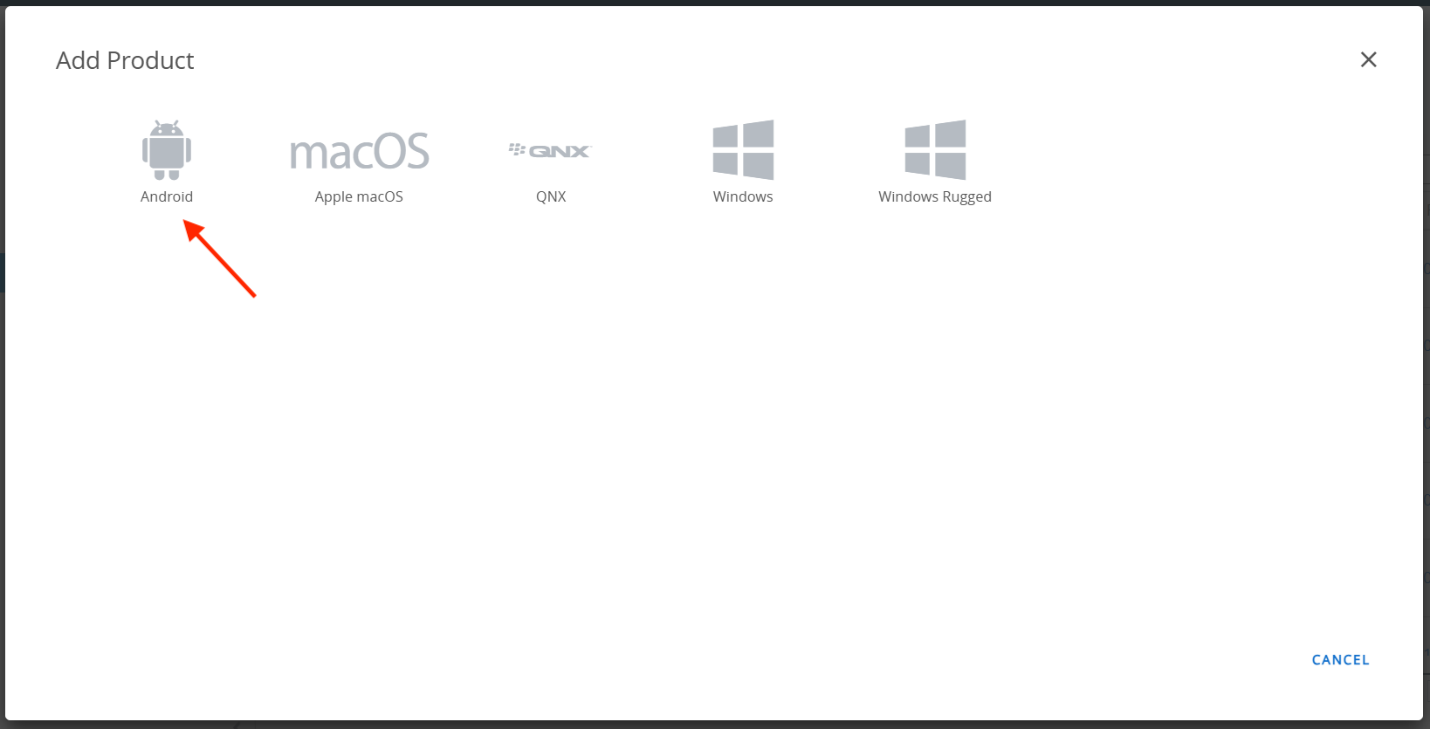
- Select Android.
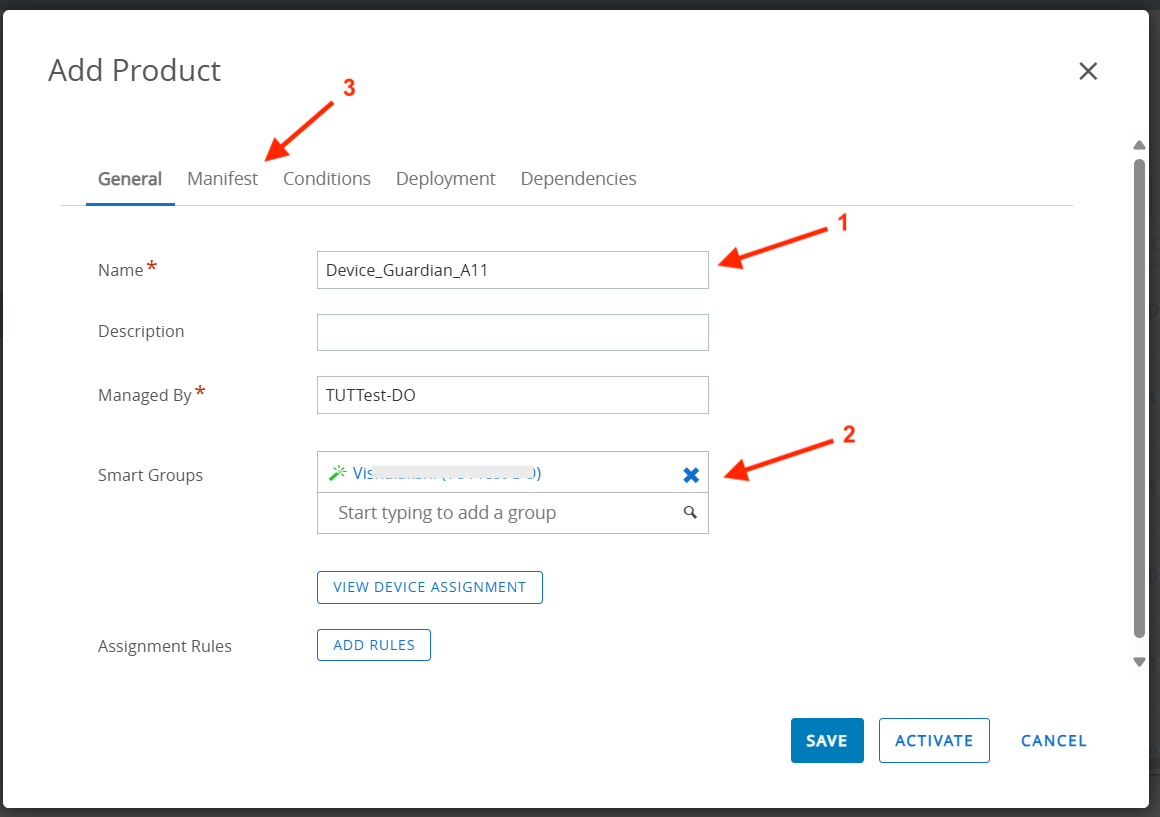
- Enter a name, assign a Smart Group, and click on the Manifest tab.
- Click Add.
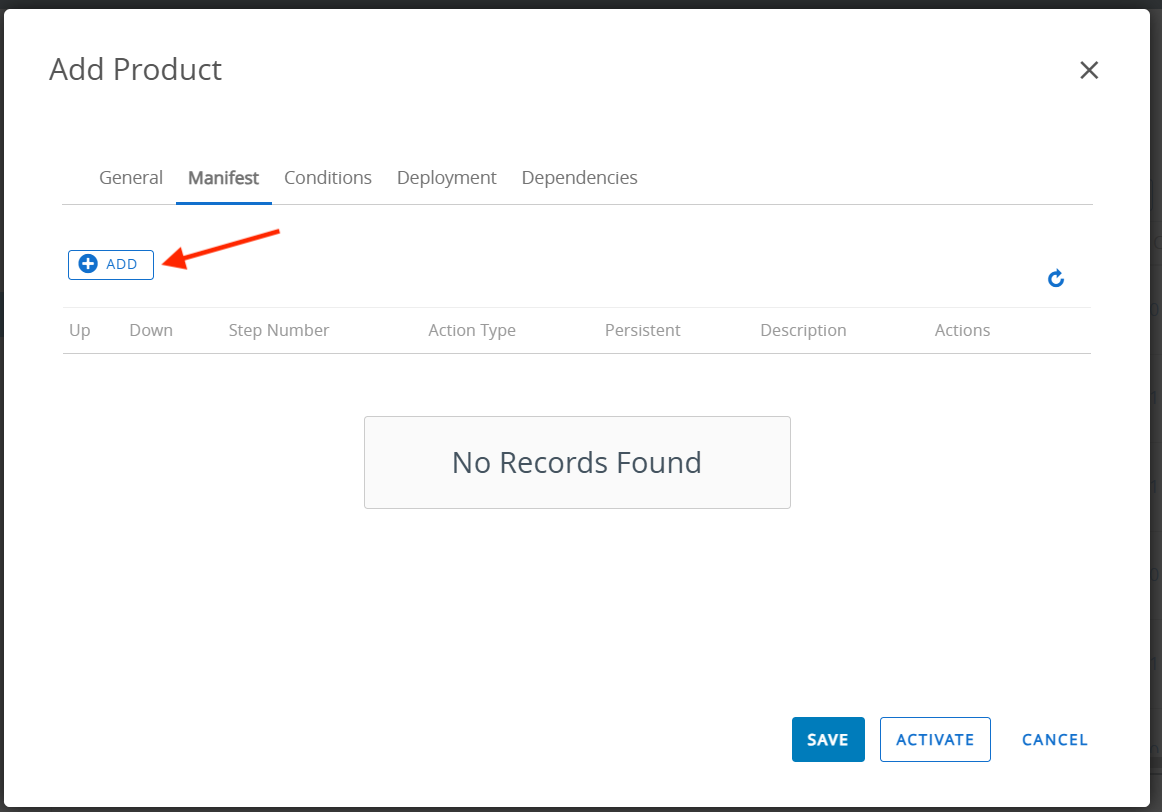
- Select the following and click Save.
- Action(s) To Perform: File/Action - Install
- Files/Actions: [Select the File/Action created from step 9.]
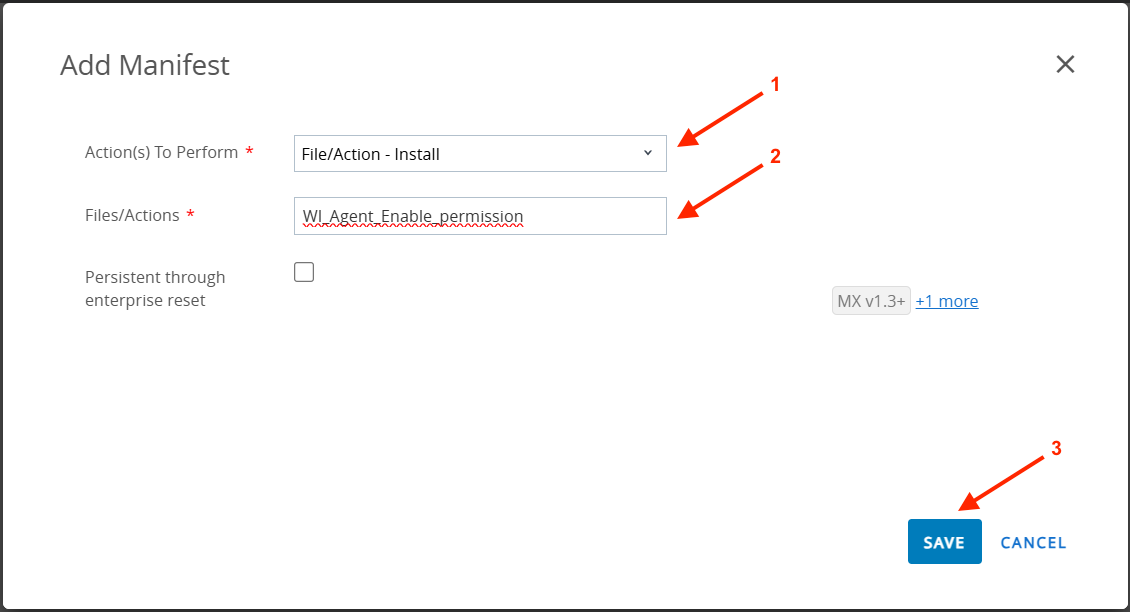
- Click Save.
- Deploy the product created. Go to Orchestration > Products (under Product Provisioning). Search for the product created. Select the product, click More Actions, and select Reprocess.
Note: If the product is in the deactivated state, it must be activated before reprocessing.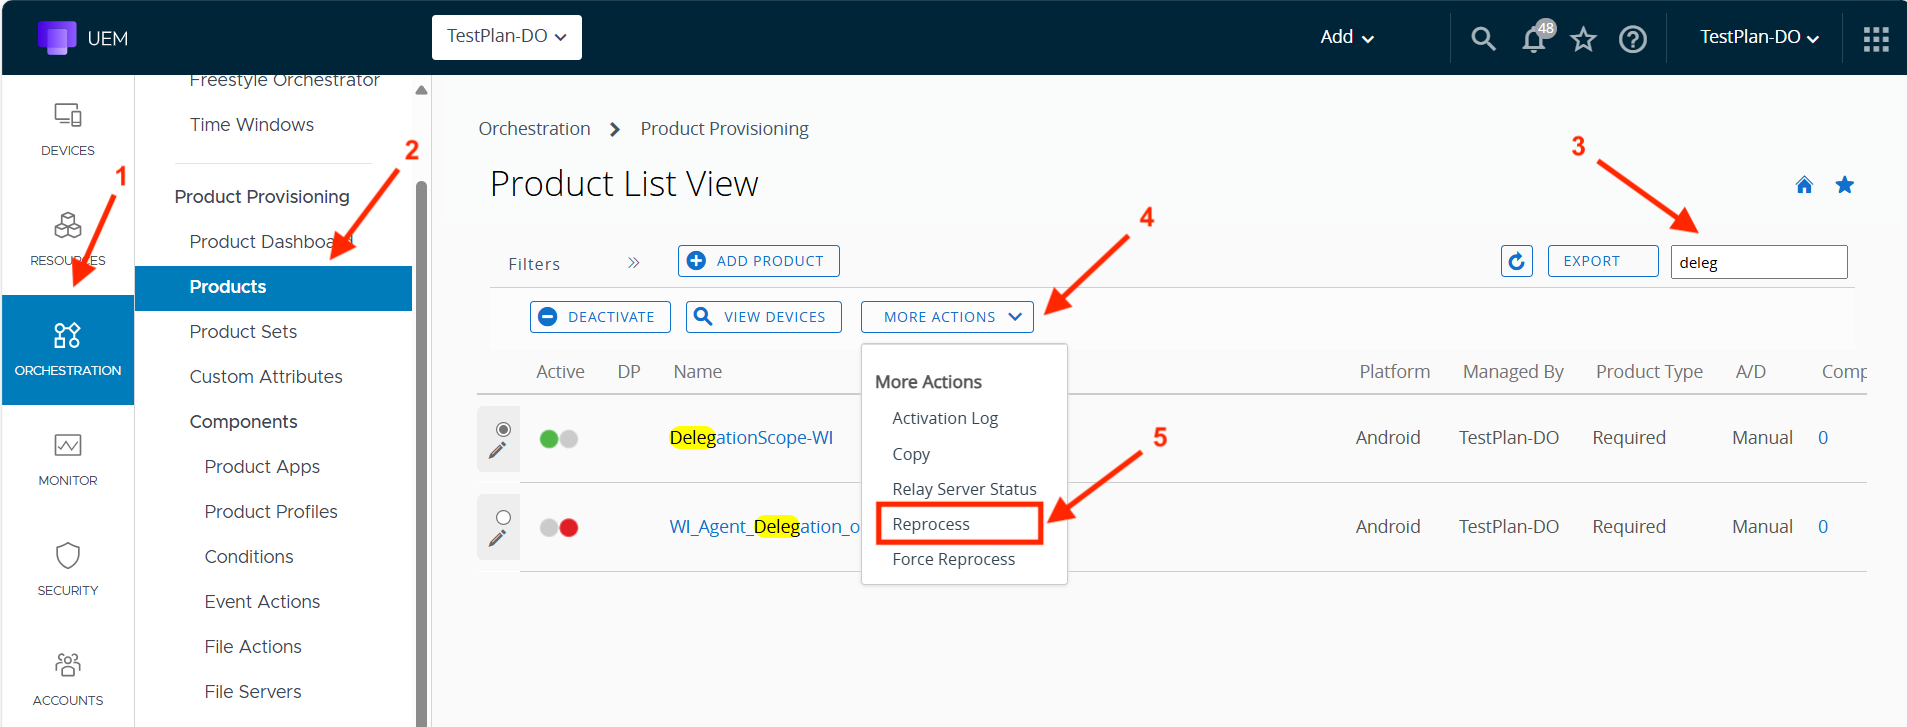
Generate License XML
Zebra's StageNow tool allows the creation of staging profiles that can generate a barcode for scanning with StageNow or generate an XML file for deployment through your Enterprise Mobility Management (EMM) system to distribute Wireless Insight licenses. When procuring the license, a confirmation email is sent containing the Cloud Licensing Service (CLS) URL, which is required for license activation.
To create a StageNow profile:
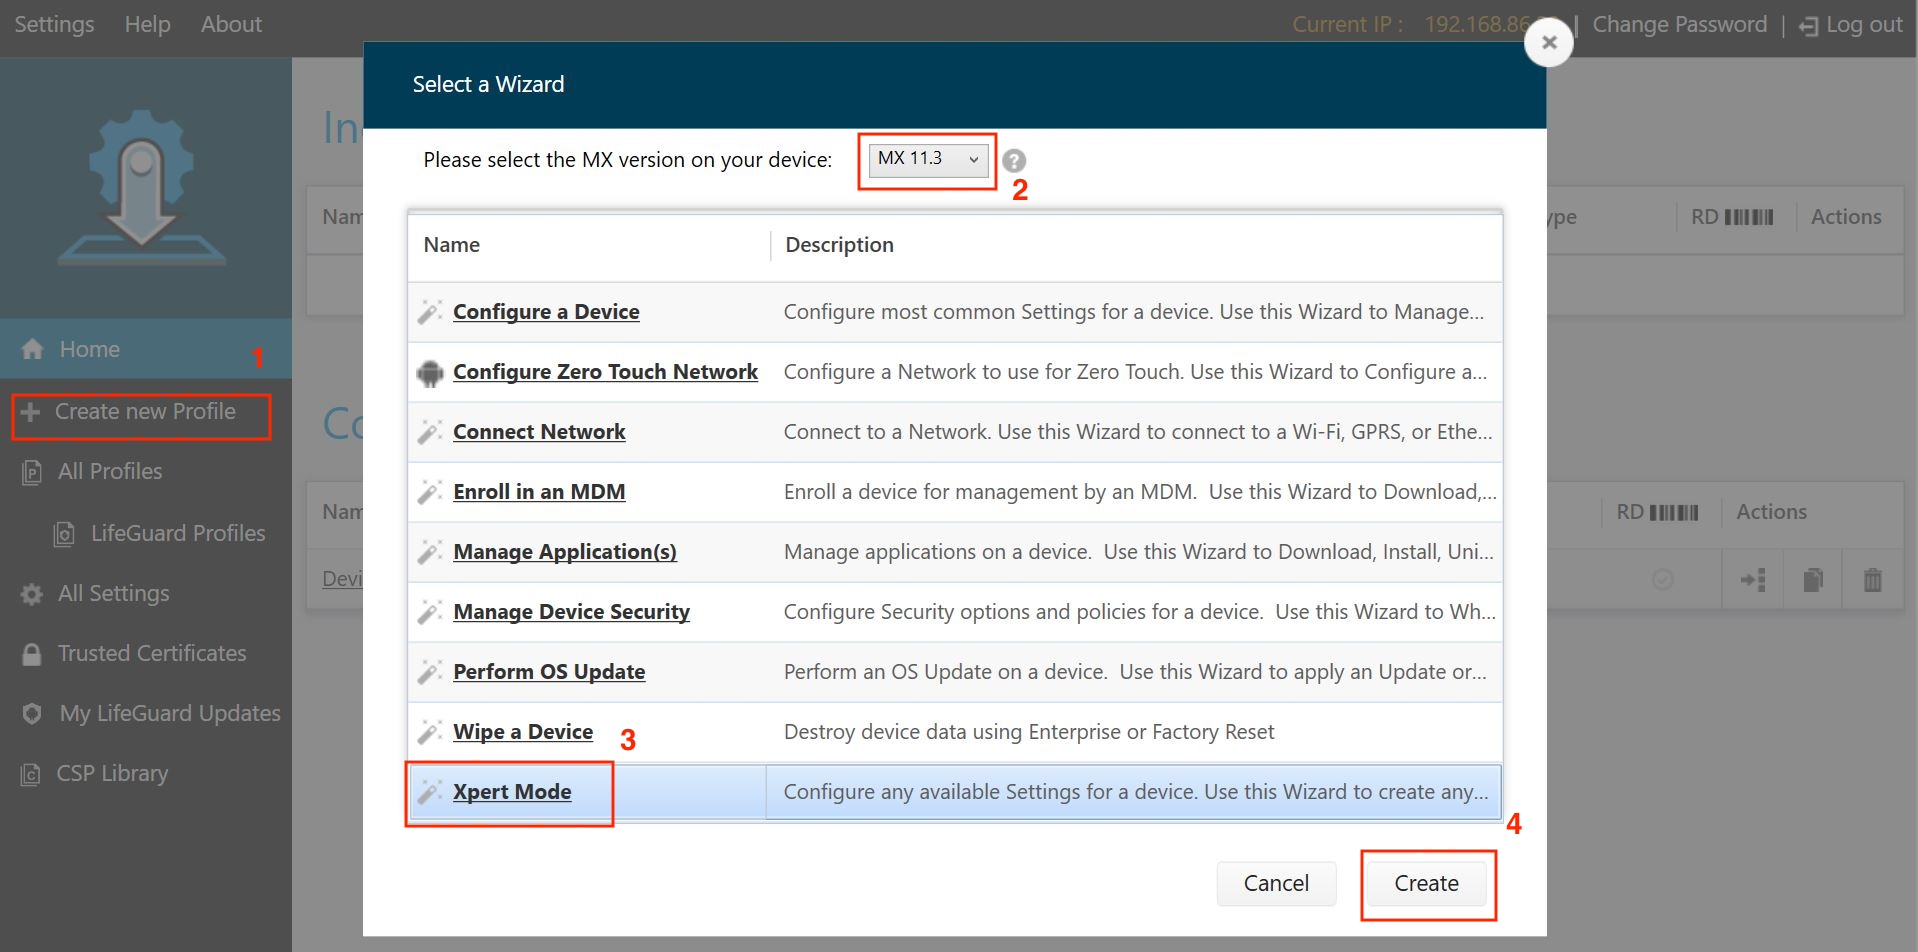
Open StageNow.
Click Create new Profile from the left-hand menu.
Select MX version 10.2 or higher to match the MX version on the device. Select Xpert Mode and click Create.
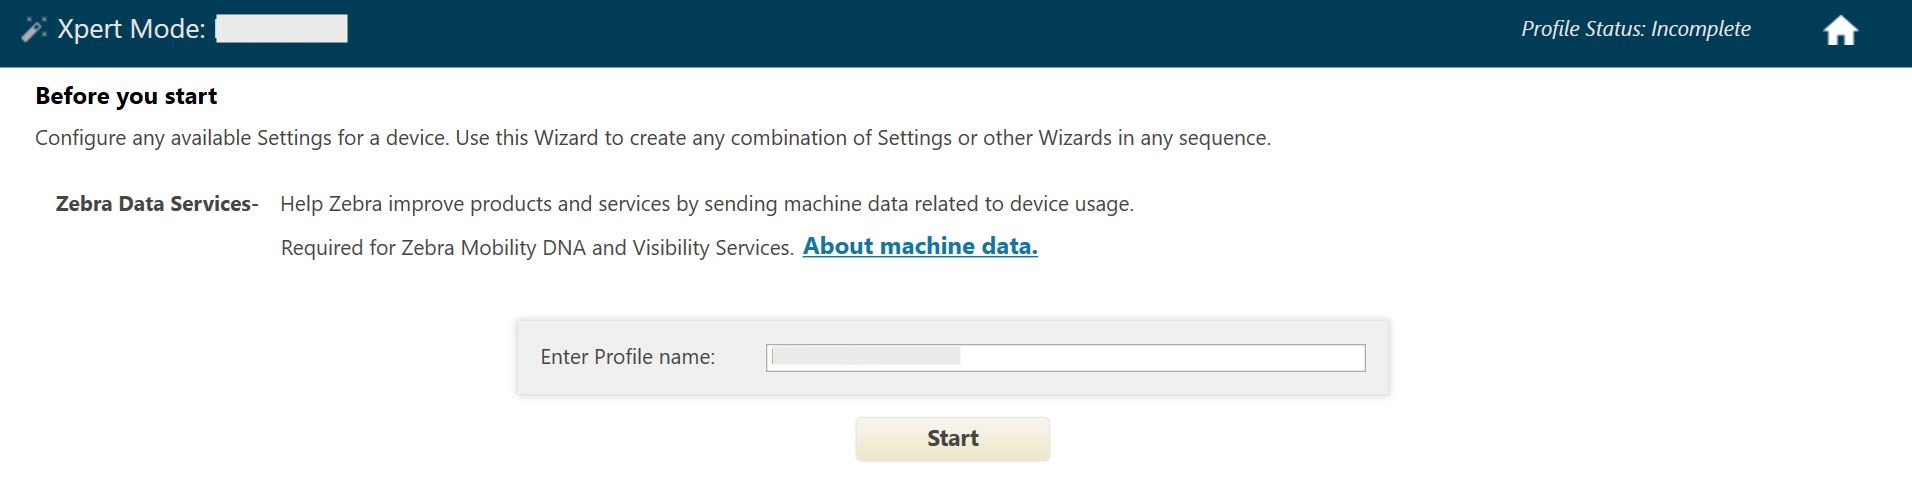
Enter a profile name and click Start.
Scroll down and click LicenseMgr. It will appear on the right side. Click Add.

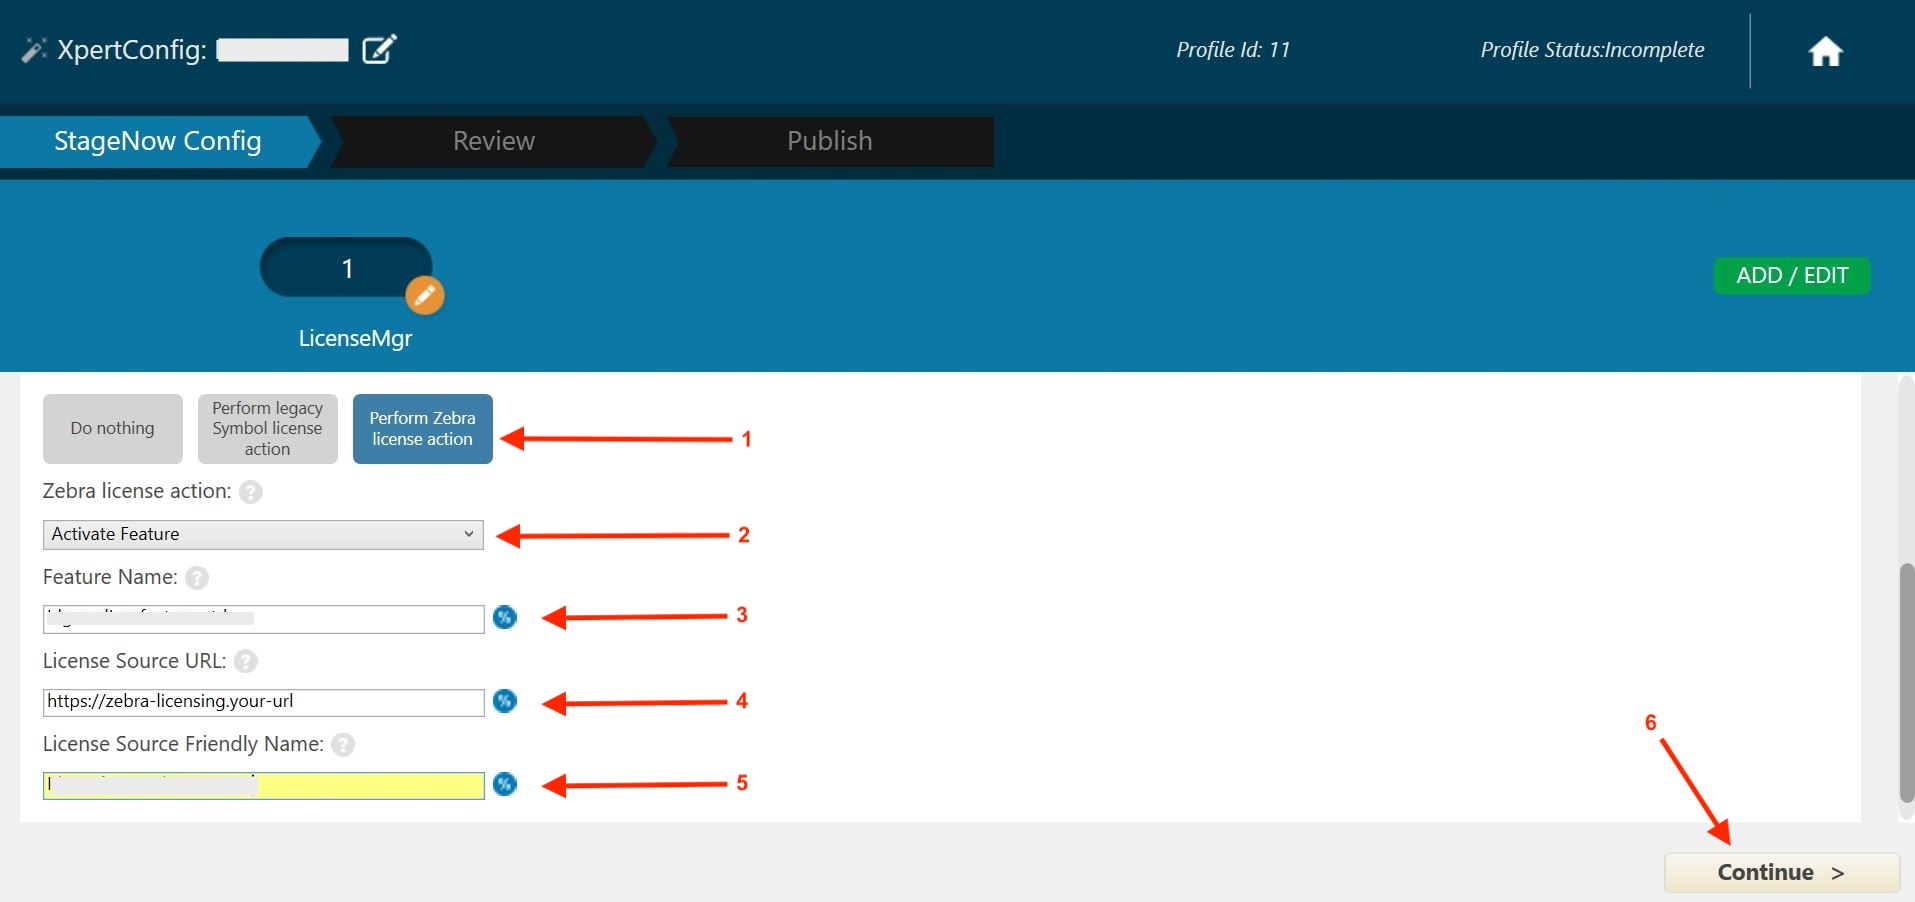
Under LicenseMgr, fill in the following and click Continue:
- License action type: Perform Zebra license action
- Zebra license action: Activate Feature
- Feature Name: wfw-feature-api
- License Source URL: [Paste the CLS URL supplied by Zebra's confirmation email]
- License Source Friendly Name: [Enter a name identifier]
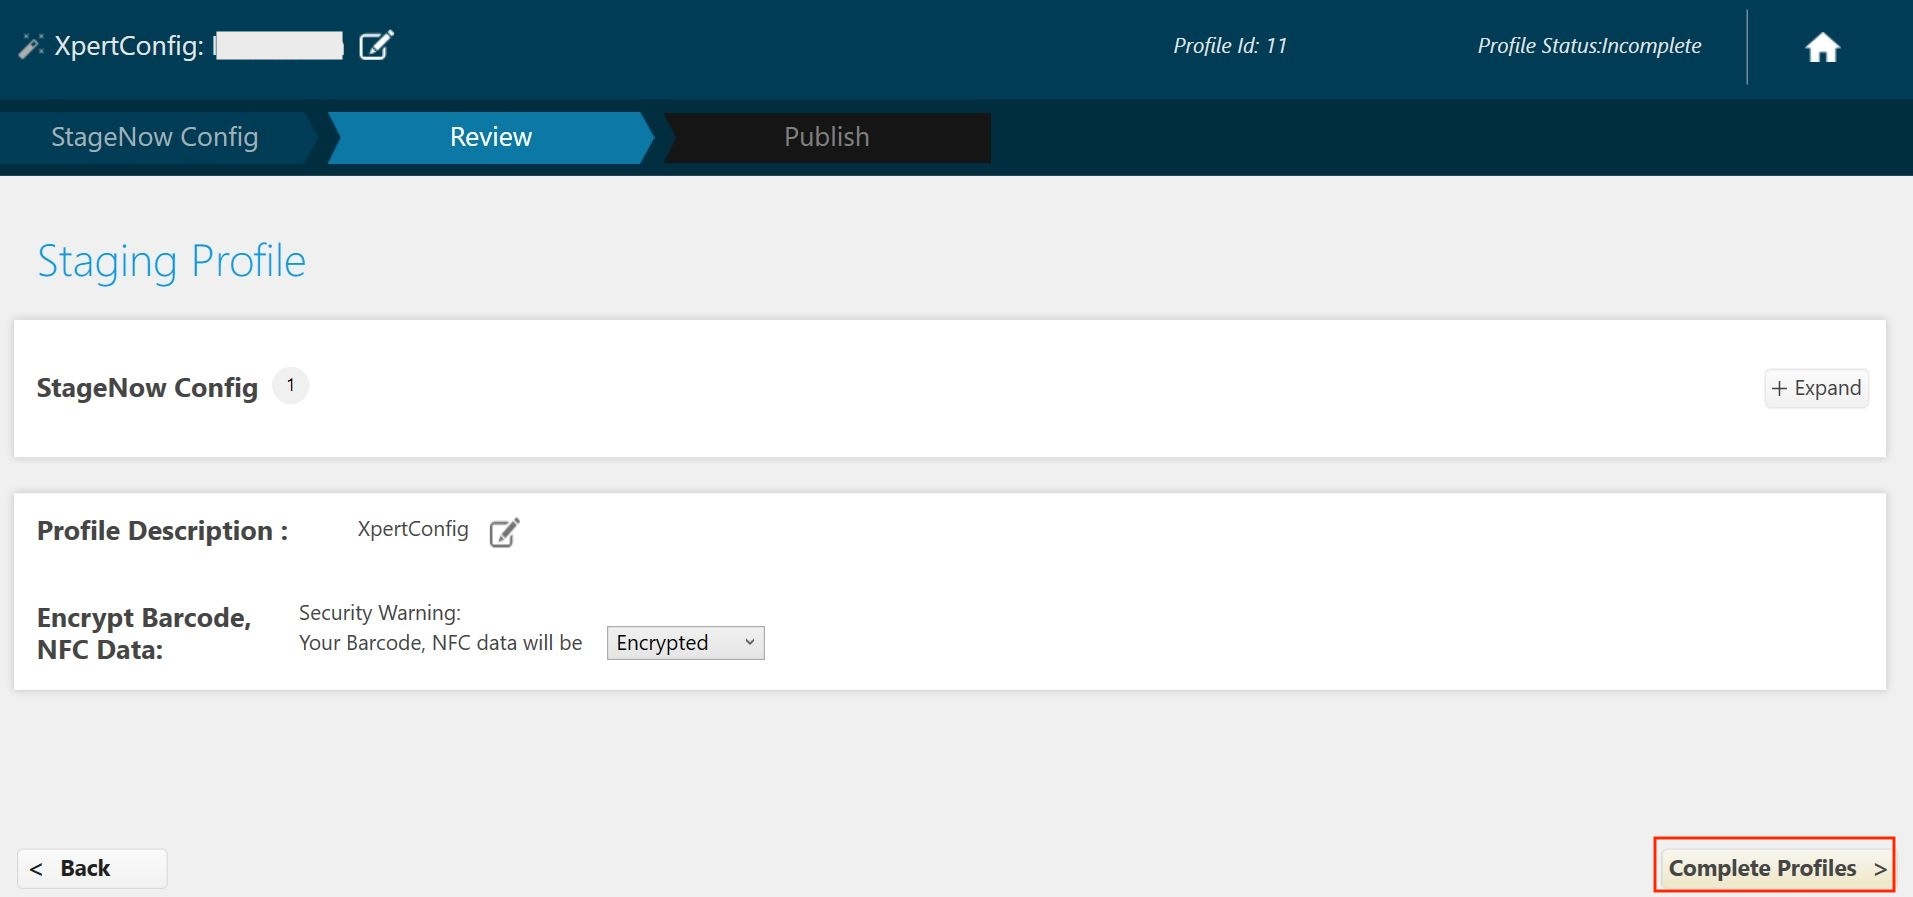
Click Complete Profile to finish creating the StageNow profile.
Deployment options:
- StageNow: Generate a barcode from the StageNow profile. Open StageNow client on the device and scan the generated barcode(s).
- EMM: Export the XML from the StageNow profile. Do not modify the XML file to prevent unexpected behavior. Push the XML profile to the device via EMM (consult the EMM guide) or Zebra DNA Cloud.
Intents
Stop Voice Analysis
Use the following intent to stop voice analysis:
"am broadcast -a 'com.zebra.wirelessinsights.agent.ACTION_EXTERNAL_COMMANDS' --es 'message' '{ \"message_type\": \"command\", \"message\": { \"action\": \"stop\", \"feature\": \"voice\"}}'"
Start Voice Analysis
Use the following intent to start voice analysis, replacing both instances of 5060 values with your desired port number:
"am broadcast -a 'com.zebra.wirelessinsights.agent.ACTION_EXTERNAL_COMMANDS' --es 'message' '{ \"message_type\": \"command\", \"message\": { \"action\": \"start\", \"feature\": \"voice\", \"filter\": [\"warning\", \"error\"], \"configuration\": [ { \"key\": \"activityMode\", \"value\": \"PASSIVE_MODE\" }, { \"key\": \"sessionName\", \"value\": \"wi\" }, { \"key\": \"reportLevel\", \"value\": \"INFO\" }, { \"key\": \"voicePktFilterRule\", \"value\": \"TCP:5060,UDP:5060\" }, { \"key\": \"dynamicCodec\", \"value\": true }, { \"key\": \"port\", \"value\": 4556 } ] } }'"
Assign Group Name
Assigning a group name to devices helps organize them when displayed in the Wireless Insights dashboard within ZDNA Cloud. Use the intent below to assign a group name to the device, replacing Zebra_group with your desired group name. This intent should be sent after the Wireless Insights Agent is installed and configured.
"am broadcast -a 'com.zebra.wirelessinsights.agent.ACTION_EXTERNAL_COMMANDS' --es 'message''{\"message_type\":\"command\",\"message\":{\"action\":\"set\",\"feature\":\"server_config\",\"configuration\":[{\"key\":\"groupName\",\"value\":\"Zebra_group\"}]}}'"