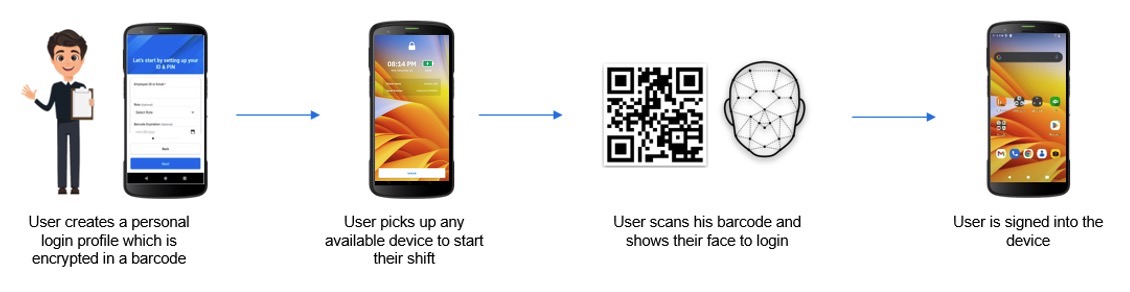
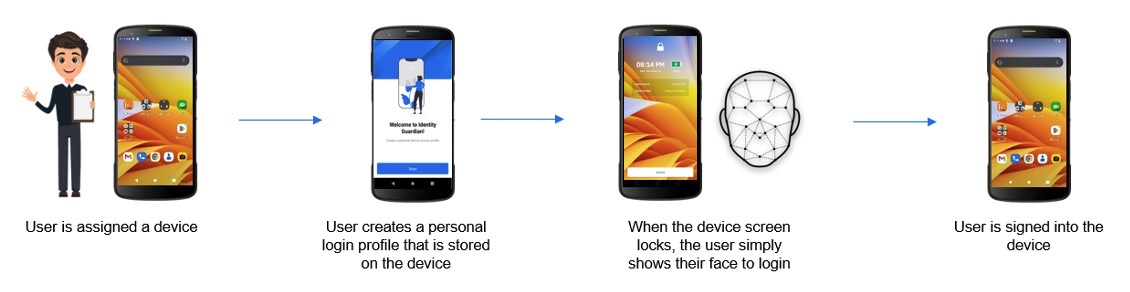
Overview
Identity Guardian provides secure, frictionless device access while safeguarding user data. To accommodate diverse operational workflows, the application offers two primary device deployment architectures, each with distinct authentication workflows.
- Shared Device: Designed for environments where multiple users share a device pool. Users can unlock a device by scanning a provisioned barcode or tapping an NFC card containing encrypted credentials, followed by an optional verification methods (facial biometrics, passcode, or SSO).
- Personally Assigned Device: Designed for dedicated, single-user devices. After initial enrollment, access is streamlined using facial biometrics, SSO or a local passcode. Personal data is securely embedded within the Android framework, ensuring complete privacy and preventing organizational access.
To use Identity Guardian, users must enroll in the system before signing in to authenticate their devices. Integration with identity providers (IdPs) enables single sign-on (SSO), streamlining application access with a single login.
Identity Guardian can be installed and configured using one of the following methods:
- Zebra DNA Cloud: Navigate to My Apps > Zebra Collection to install and manage the application.
- Enterprise Mobility Management (EMM) system: Administrators can configure Identity Guardian using Managed Configurations. This enables the setup of usage policies, device controls, and customized device restrictions for secure and tailored access.
The Zebra DNA Cloud dashboard provides administrators with actionable insights, such as sign-in/sign-out events and usage durations, fostering accountability and efficient management. These insights help organization ensure operational efficiency and accountability in managing devices.
Setup Notes
- Safe Mode Restrictions: Identity Guardian is non-operational in Safe Mode. To disable Safe Mode, administrators can apply the corresponding XML via EMM or scan a barcode using the StageNow client on the device. The XML and StageNow barcode are available depending on your Android version:
- When using the 42Gears EMM system, apps installed via Zebra DNA Cloud in app update mode must be set as high priority.
Requirements
Identity Guardian Requirements
- Enterprise Mobility Management (EMM) system: To configure Identity Guardian, an EMM system supporting Managed Configurations (also known as Managed App Configurations), such as Zebra DNA Cloud or a third-party EMM, is required.
- VMWare Workspace ONE UEM (if applicable): If VMWare Workspace ONE UEM is used, a Custom Setting containing specific XML must be added to ensure Identity Guardian operates properly upon Workspace ONE Launcher logout. For instructions, see VMWare Workspace ONE UEM setup guide.
- Device enrolled as Dedicated Device (Device Owner)
NOTE: Corporate-Owned, Personally-Enabled (COPE) enrolled devices are currently not supported. - Supported Devices: Zebra devices running Android 11 or higher. See Zebra Support Portal for supported devices.
- Biometric Authentication: Requires a front-facing camera.
- Licenses:
- Identity Guardian license: Required for advanced features including facial biometric authentication, Single Sign-On (SSO), and device API support. See Licensing.
- Mobility DNA Enterprise license: Required for basic functionality on Zebra Professional-series devices
Notes:
- After installation on the device, Identity Guardian must be launched for configurations to be applied.
- Single sign-on (SSO) Support: Compatibility with Microsoft Entra ID (formerly Azure Active Directory), PingID and OKTA platforms using OAUTH and OAUTH+OIDC authentication protocols.
- Barcode Authentication: If barcodes are required to be printed or shared, see Print & Share Barcode.
zCreator Requirements
zCreator is a companion application that enables users to:
- Print or share Identity Guardian user barcodes containing encrypted verification data.
- Store user enrollment data on NFC cards, which can then be used for user authentication.
Supported Printers:
- Zebra Models: ZD620, ZD621
- Canon Model: Canon PIXMA E560 Series (300 dpi)
NFC Card Specifications:
- Compatible Card Types: Mifare, DESFire EV3, Salto
- Operating Frequency: NFC cards must operate at 13.56 MHz, the standard frequency for NFC technology.
- Supported Format: Only NDEF format is supported. Note that the application overwrites any existing data present on the card.
- Minimum Capacity: A minimum card capacity of 4 KB is required to successfully store user enrollment data.
Download
Download and install Identity Guardian and zCreator from the following sources:
| Source | Identity Guardian | zCreator |
|---|---|---|
| Google Play Store | Available for download. Refer to Play Store Updates to control automatic updates. |
Available for download |
| Zebra Support Portal | Download Identity Guardian | Download zCreator |
Note: The installation order of zCreator and Identity Guardian does not affect functionality.
Shared Device
In environments where a single device is shared among multiple users, Identity Guardian ensures secure and personalized access tailored to each user's organizational role. To access a shared device, users must first complete a one-time enrollment with Identity Guardian, which can involve capturing the user's facial vectors for facial recognition. Shared devices can support an unlimited number of registered users, offering both flexibility and scalability to organizations.
Administrators can configure enrollment settings through Managed Configurations, including:
- Specifying the required number of facial images for facial biometrics enrollment (if enabled by the administrator).
- Setting barcode or NFC card for user data storage during enrollment. With NFC cards, users can authenticate without requiring additional factors, such as facial scans or passcodes and unlock the device with the simple tap of their NFC card. For more information, see NFC Card. Both rely on the zCreator app.
- Setting up the terms and conditions of use.
Enrollment Methods
Identity Guardian offers two distinct enrollment methods for shared devices:
- Standard Enrollment - This method separates the enrollment and authentication processes across two different devices. It is ideal for scenarios where enrollment is centrally managed, while authentication is distributed.
- Users enroll on a dedicated device configured with an Enrollment profile deployed by their administrator.
- After completing enrollment, authentication is performed on a separate shared device configured with the Authentication profile, also deployed by the administrator. Authentication methods such as Single Sign-On (SSO) or user barcodes can be used.
- Self-Enrollment - This method combines both enrollment and authentication on the same shared device. The device is configured with a unified Authentication profile that incorporates enrollment settings defined by the administrator. Users can complete enrollment and authenticate directly on the same shared device. This streamlined approach is best suited for environments where users independently manage their enrollment and authentication on shared devices.
Secure Encryption During Enrollment:
During the enrollment process, sensitive user data, such as biometric facial images and passcodes, is encrypted using an enrollment key. This key is an encrypted public key derived from the organization’s certificate and configured via Identity Guardian Managed Configuration. For guidance on generating an enrollment key, see Enrollment Configuration. It is essential to ensure that the device used for enrollment is provisioned with the correct Enrollment Configuration.
For both enrollment methods, there are two main types of secure enrollment mechanisms:
- Barcode Enrollment: User data is securely encrypted into a unique barcode, which can be shared and printed using the zCreator app. For temporary user profiles, organizations can configure barcodes with expiration dates and times. To further enhance security, organizations may implement facial biometrics as an authentication method. Key differences between enrollment methods:
- Standard Enrollment - Users can either immediately print the barcode or save it. When the user saves the barcode, it is saved in the
/enterprise/usr/Profilesfolder. After saving, the barcode must be printed or shared within 24 hours, as it will be automatically deleted afterward to prevent retention of personal information on the device or in the cloud. - Self-Enrollment - The user must manually save or print the barcode.
- Standard Enrollment - Users can either immediately print the barcode or save it. When the user saves the barcode, it is saved in the
- NFC Enrollment: Utilizes NFC cards for both user enrollment and authentication. During enrollment, facial biometric vectors and passcodes securely written to the NFC card using the zCreator app. To unlock a device, the user can simplify tap the NFC card, followed by a facial scan or passcode entry.
- Standard Enrollment - Users can either immediately write to the NFC card or save the NFC data. When the user saves the NFC data, it is accessible through zCreator within 24 hours. Users should use zCreator to write to their NFC card within this time frame, after which it will be automatically deleted to prevent retention of personal information on the device or in the cloud.
- Self-Enrollment - The user must manually save or print the barcode.
Authentication Process
Barcode or NFC user authentication on shared devices requires an Authentication Key, an encrypted private key derived from the organization’s certificate, which is configured through Identity Guardian's Managed Configuration. To support seamless cryptographic key rotation, an optional Alternate Authentication Key can also be configured. This provides a migration period where both the primary and alternate keys are active, ensuring zero downtime for end-users. For details on key generation, see Shared Device Authentication. The target device must be provisioned with the proper Authentication configuration.
When a user scans their enrollment barcode or NFC card, the system decrypts the stored data using either the Authentication Key or Alternate Authentication Key.
Security Warning: The data cannot be decrypted or reverse-engineered on any device without the corresponding authentication key. It is essential that organizations maintain the security and confidentiality of the authentication key to ensure protection of user data.
IMPORTANT:Administrators MUST provision their own enrollment and authentication keys on the respective devices used for enrollment and authentication. Failure to do so will result in Identity Guardian using default keys, which may allow any device with those keys to decrypt the barcode, compromising security.
Standard Enrollment
Standard Enrollment involves two separate steps, each performed on different devices:
- User Enrollment: Performed on a dedicated enrollment device, allowing users to complete the enrollment process.
- User Authentication: Once enrolled, users can authenticate on their assigned shared device.
To enable Standard Enrollment on shared devices, administrators must follow these steps:
- Create and deploy separate Enrollment and Authentication profiles: These profiles enable user enrollment and authentication; for guidance, see EMM Setup.
- (Optional) Install and configure zCreator app if user barcodes or NFC cards will be used: For barcodes, this is optional since Standard Enrollment allows barcodes to be saved after enrollment without requiring the app. Download zCreator from Zebra support portal.
- Instruct users to complete their enrollment directly on the designated enrollment device: Ensure users complete the process on the device configured with the Enrollment profile.
- Instruct users to authenticate on their assigned shared device: Users should authenticate using their designated shared device, which is set up with the Authentication profile.
Configuration
I. User Enrollment
Follow these steps to set up the dedicated enrollment device, enabling users to register into the system from a single device:
- Create an Enrollment profile: Configure the Enrollment Profile using Managed Configurations, ensuring the following key settings are applied. Adjust any other unlisted settings as needed to meet your specific enrollment requirements:
- Usage Mode:
- Application Mode: ENROLLMENT
- Enrollment Configurations:
- Enrollment Key: [Enter the enrollment key to encrypt user data.]
- Number of facial images to be enrolled: [This applies only if facial authentication is required (Allow facial opt-out is set to false). For barcode printing, enter 1, as it is the only valid value for this scenario. For other use cases, enter the appropriate value based on your requirements.]
- Allow opening barcode during enrollment: [Enable this option to allow barcode printing during the enrollment process. This displays the Print button at the last step of enrollment.]
- Enrollment Storage Method: [Select NFC or Barcode]
- Usage Mode:
- Install and configure zCreator for barcode use: Set up a zCreator profile and configure the managed configuration settings applicable for barcodes:
- Settings Access: [Set to 1 to allow user access to zCreator settings, otherwise set to 2 to restrict access.]
- General Settings:
- QR Code Size: [Specify the size of the QR Code to be printed.]
- Orientation: [Specify the orientation for the printed barcode.]
- Share-to Settings:
- Sharing: [Set to 1 to allow the user to share the barcode from within the app, otherwise set to 0 to disable.]
- Printer Settings: Configure printer settings for network (WiFi or Ethernet) or Bluetooth printing, if required:
- Network Settings: [Set to 1 to allow the user to change the network printer configuration, otherwise set to 0.]
- IP Address: [Enter the IP address of the network printer in IPv4 format (e.g.,
192.168.1.100).] - Bluetooth Settings: [Set to 1 to allow the user to change the Bluetooth printer configuration, otherwise set to 0.]
- Bluetooth MAC Address: [Enter the Bluetooth printer MAC address in the format
XX:XX:XX:XX:XX:XX, whereXis a hexadecimal digit (0-9, A-F).]
- Deploy the Enrollment and zCreator profiles. Push the configured profiles to the designated enrollment device.
- Launch Identity Guardian and Complete Enrollment. Open Identity Guardian on the enrollment device. Users can complete the enrollment process by following the prompts. Available options, such as printing a barcode during enrollment, depend on the profile configurations.
II. User Authentication
- Create an Authentication profile: Use Managed Configurations to configure the Authentication Profile with the following key settings. Adjust other settings as required:
- Usage Mode:
- Application Mode: AUTHENTICATION
- Lock Screen Configuration:
- Apps Allowed On Lock Screen: [Enable this option to allow specific applications to be displayed on the lock screen. For each app, provide the necessary details (e.g., Package Name, Activity Name).]
- Usage Mode:
- Deploy the Authentication profile. Launch Identity Guardian as part of the deployment.
- Authenticate user. Users can authenticate and sign in to their shared device.
Self-Enrollment
Self-Enrollment enables user enrollment and authentication directly on shared device using a unified Authentication profile. This profile, deployed by administrators, includes enrollment configurations and requires SSO for user authentication.
Administrators must complete the following to enable Self-Enrollment on shared devices:
- Install and configure the zCreator app. This app is required, allowing for barcode printing and sharing or NFC card use. Download zCreator from Zebra support portal.
- Create and deploy an Authentication profile. This enables user enrollment and authentication; refer to EMM Setup.
- Guide users to complete enrollment directly on the device.
Configuration
Step-by-step Configuration (refer to EMM Setup):
- Install zCreator on the devices.
- Create an Authentication profile: Configure the Authentication Profile using Managed Configurations, ensuring the following key settings are applied. Adjust any other unlisted settings as needed to meet your specific enrollment requirements:
- Usage Mode:
- Application Mode: AUTHENTICATION
- Enrollment Configuration:
- Number of facial images to be enrolled: [This applies only if facial authentication is required (Allow facial opt-out is set to false). For barcode printing, enter 1, as it is the only valid value for this scenario. For other use cases, enter the appropriate value based on your requirements.]
- Enrollment Storage Method: [Select NFC or Barcode]
- Shared Device Authentication:
- Comparison Source: [Select the appropriate option, e.g. Barcode, Cloud, NFC, Device Storage; see Comparison Source.]
- Authentication Factor: [SSO must be configured as an Authentication Factor.]
- Authentication Key: [enter the Authentication Key to decrypt the user's personal information.]
- Lock Screen Configuration:
- Apps Allowed On Lock Screen: [Enable this option to allow specific applications to be displayed on the lock screen. The zCreator app must be added to the allowlist; see step 3 below. For each app, add the corresponding application details (e.g., Package Name, Activity Name)]
- Allow Self Enrollment:
- Secure Self Enrollment: true
- User Verification: SSO
- Usage Mode:
- Add zCreator to the Allowlist: For barcode printing and sharing or NFC card use, ensure zCreator is included in the Apps Allowed On Lock Screen under Lock Screen Configuration. Add the following application details as needed:
| Purpose | Package Name | Activity Name |
|---|---|---|
| Display the barcode print preview | com.zebra.mdna.zcreator | com.zebra.mdna.zcreator.PreviewActivity |
| android | com.android.internal.app.ChooserActivity | |
| com.android.intentresolver | com.android.intentresolver.ChooserActivity | |
| Print the barcode | com.android.bips | com.android.bips.ImagePrintActivity |
| com.android.bips | ImagePrintActivity | |
| com.android.printspooler | com.android.printspooler.ui.PrintActivity | |
| com.android.printspooler | com.android.printspooler.ui.SelectPrinterActivity | |
| NFC Tap & Pair | com.zebra.mdna.zcreator | com.zebra.mdna.zcreator.NFCPrinterConnectionActivity |
| NFC Tag Writing | com.zebra.mdna.zcreator | com.zebra.mdna.zcreator.NfcEnrollmentActivity |
| Bluetooth Printing | com.android.settings | com.android.settings.bluetooth.BluetoothPairingDialog |
| com.android.settings | com.android.settings.bluetooth.DevicePickerActivity | |
| com.android.bluetooth | com.android.bluetooth.opp.BluetoothOppBtEnableActivity | |
| Share to Canon | jp.co.canon.bsd.ad.pixmaprint | jp.co.canon.bsd.ad.pixmaprint.view.activity.PrintPreviewActivity |
| jp.co.canon.bsd.ad.pixmaprint | jp.co.canon.bsd.ad.pixmaprint.view.activity.AbpActivity | |
| jp.co.canon.bsd.ad.pixmaprint | jp.co.canon.bsd.ad.pixmaprint.view.activity.SearchPrinterActivity | |
| jp.co.canon.bsd.ad.pixmaprint | jp.co.canon.bsd.ad.pixmaprint.EulaActivity | |
| com.google.android.permissioncontroller | com.android.permissioncontroller.permission.ui.GrantPermissionsActivity | |
| jp.co.canon.bsd.ad.pixmaprint | jp.co.canon.bsd.ad.pixmaprint.view.ijprintsetting.IJPrintSettingActivity | |
| jp.co.canon.bsd.ad.pixmaprint | jp.co.canon.bsd.ad.pixmaprint.view.printing.IJPrintingActivity | |
| Share to Gmail | com.google.android.gm | com.google.android.gm.welcome.WelcomeTourActivity |
| com.google.android.gm | com.google.android.gm.setup.AccountSetupFinalGmail | |
| com.google.android.gms | com.google.android.gms.auth.uiflows.minutemaid.MinuteMaidActivity | |
| com.google.android.gm | com.google.android.gm.welcome.SetupAddressesActivity | |
| com.google.android.gm | com.google.android.gm.ComposeActivityGmailExternal | |
| com.google.android.gm | com.google.android.gm.ConversationListActivityGmail | |
| com.google.android.gm | com.google.android.gm.compose.ComposeActivityGmailExternal | |
| com.google.android.gms | com.google.android.gms.setupservices.GoogleServicesActivity | |
| com.google.android.gms | com.google.android.gms.auth.uiflows.addaccount.PreAddAccountActivity | |
| com.google.android.documentsui | com.android.documentsui.picker.PickActivity |
To share barcodes through apps, add the respective third-party package names and activity names.
- Create a zCreator profile: If barcode generation is required, set up a zCreator profile and configure the managed configuration settings:
- Settings Access: [Set to 1 to allow user access to zCreator settings, otherwise set to 2 to restrict access.]
- General Settings:
- QR Code Size: [Specify the size of the QR Code to be printed.]
- Orientation: [Specify the orientation for the printed barcode.]
- Share-to Settings:
- Sharing: [Set to 1 to allow the user to share the barcode from within the app, otherwise set to 0.]
- Printer Settings: Configure printer settings for network (WiFi or Ethernet) or Bluetooth printing:
- Network Settings: [Set to 1 to allow the user to change the network printer configuration, otherwise set to 0.]
- IP Address: [Enter the IP address of the network printer in IPv4 format (e.g.,
192.168.1.100).] - Bluetooth Settings: [Set to 1 to allow the user to change the Bluetooth printer configuration, otherwise set to 0.]
- Bluetooth MAC Address: [Enter the Bluetooth printer MAC address in the format
XX:XX:XX:XX:XX:XX, whereXis a hexadecimal digit (0-9, A-F).]
- Deploy the Authentication and zCreator profiles. Launch Identity Guardian as part of the deployment.
- Guide users through enrollment. After launching Identity Guardian, users follow prompts to complete enrollment. Available options depend on the Authentication profile settings configured by the administrator.
After enrollment is complete, users can authenticate and sign in to the device.
Print & Share Barcode (zCreator)
The zCreator app, a companion to Identity Guardian, simplifies the creation, printing, and sharing of secure user barcodes. These unique barcodes, generated using facial recognition or passcode during enrollment on Shared Devices, enable seamless user authentication. Supporting both Standard and Self-Enrollment workflows, zCreator offers features such as barcode preview, resizing, and direct printing for efficient and readable barcode generation. Barcodes can also be easily shared via Gmail or Bluetooth for added flexibility.
Key features:
- Streamlined Printing Options: Print barcodes directly to supported Zebra and Canon printers via WiFi, Bluetooth, and Ethernet, with:
- Fixed barcode sizes (3 cm, 4 cm, 5 cm, 6 cm) for consistent printing.
- Centralized admin Managed Configurations for streamlined deployment.
- Direct printing to supported Zebra and Canon printers for faster workflows.
- NFC Tap & Pair for instant connection with NFC-enabled Zebra printers.
- Barcode Sharing:
- Securely share barcodes using Gmail, Bluetooth, Canon Print, or by saving them as a PDF through the Print option.
For guidance on installation and configuration, refer to the Self-Enrollment and Standard Enrollment sections. Instructions for manual configuration post-installation are provided below.
Important Notes for Printing Operation:
- For compatible printers, see Requirements.
- The printer and device must be on the same network.
- Adjust the QR Code Size (specific to Zebra printers) and printer paper size (applicable to all compatible printers) as needed to prevent the barcode from being cropped.
- Calibrate the printer for proper printing.
Install & Configure Printer Apps:
- Canon Printers: For printing with Canon printers, download and install the Canon Print application from the Play Store. Proper calibration and adjustment of the Canon printer settings are essential to ensure the barcode is printed correctly.
- Zebra Printers: For printing with Zebra printers, download and install the Zebra Printer Utility application from the Play Store. Recommended Settings for QR Code printing:
- Printing speed: Should not exceed 4.
- Darkness: Set between 10 and 15.
- Supported paper sizes:
- 2-inch (5 cm) width paper: Allows QR Codes of 3 or 4 cm with accompanying text.
- 3-inch (7.62 cm) width paper: Allows QR Codes of 3, 4, 5, and 6 cm with accompanying text.
Configure zCreator
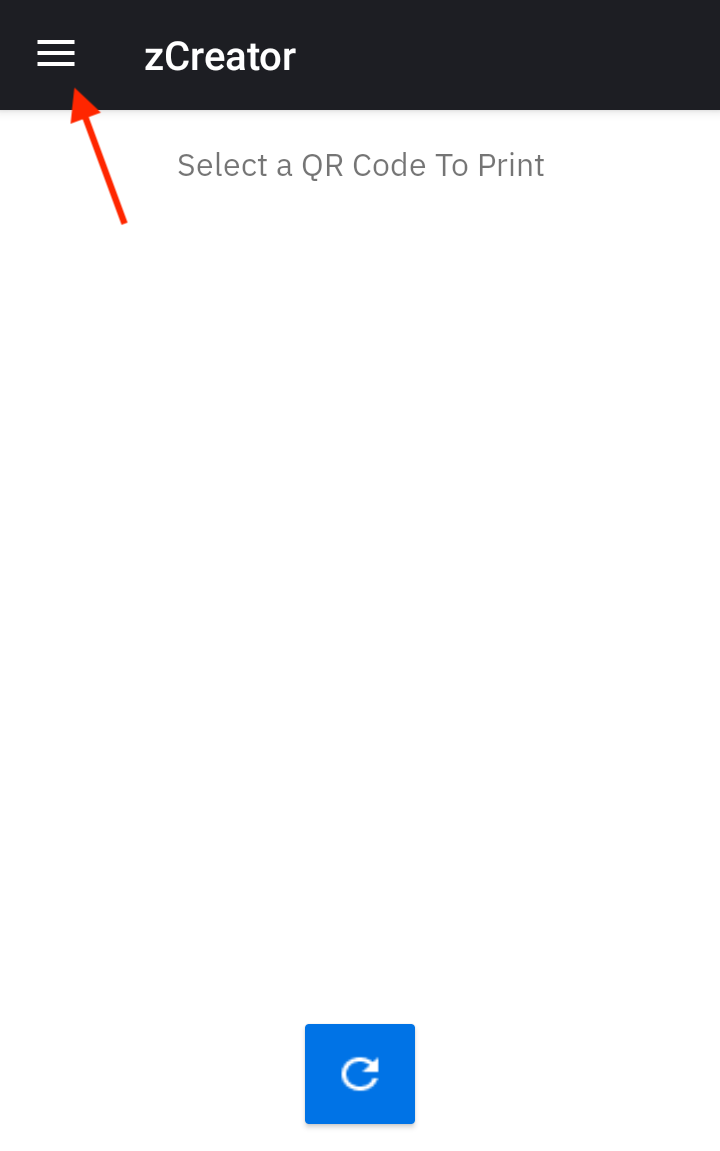
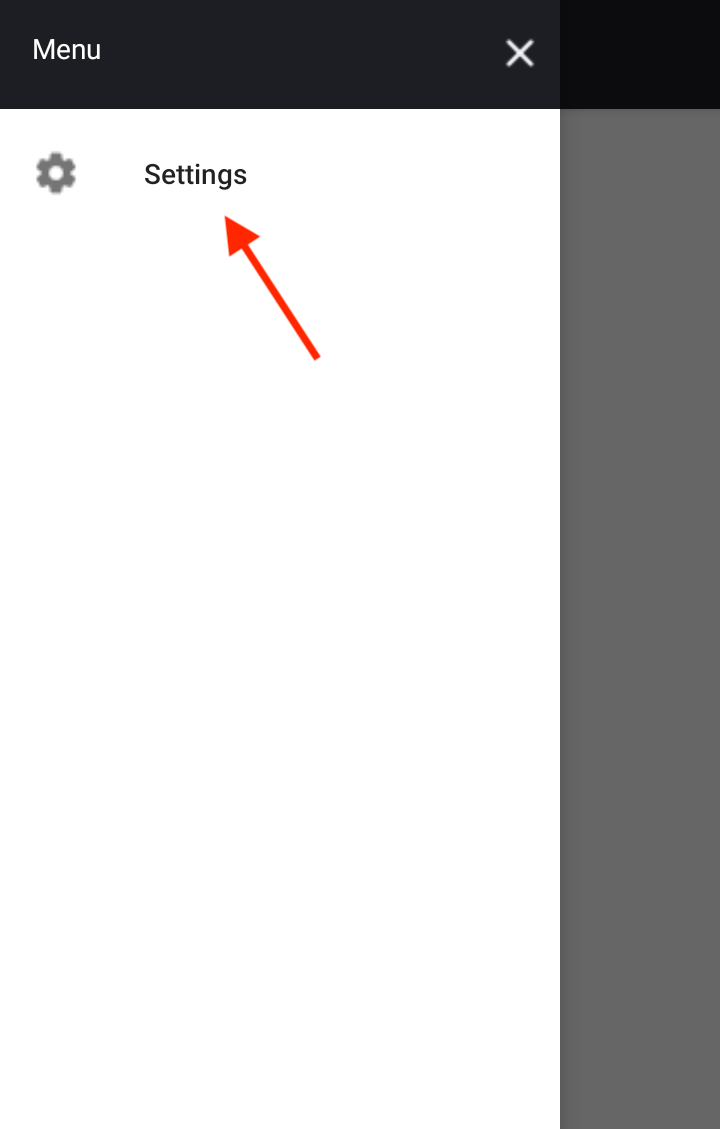
To configure zCreator, the Settings menu is accessible by tapping on the menu icon at the top left and selecting Settings.
 |
 |
 |
||
| Access to zCreator Settings | ||||
Available options:
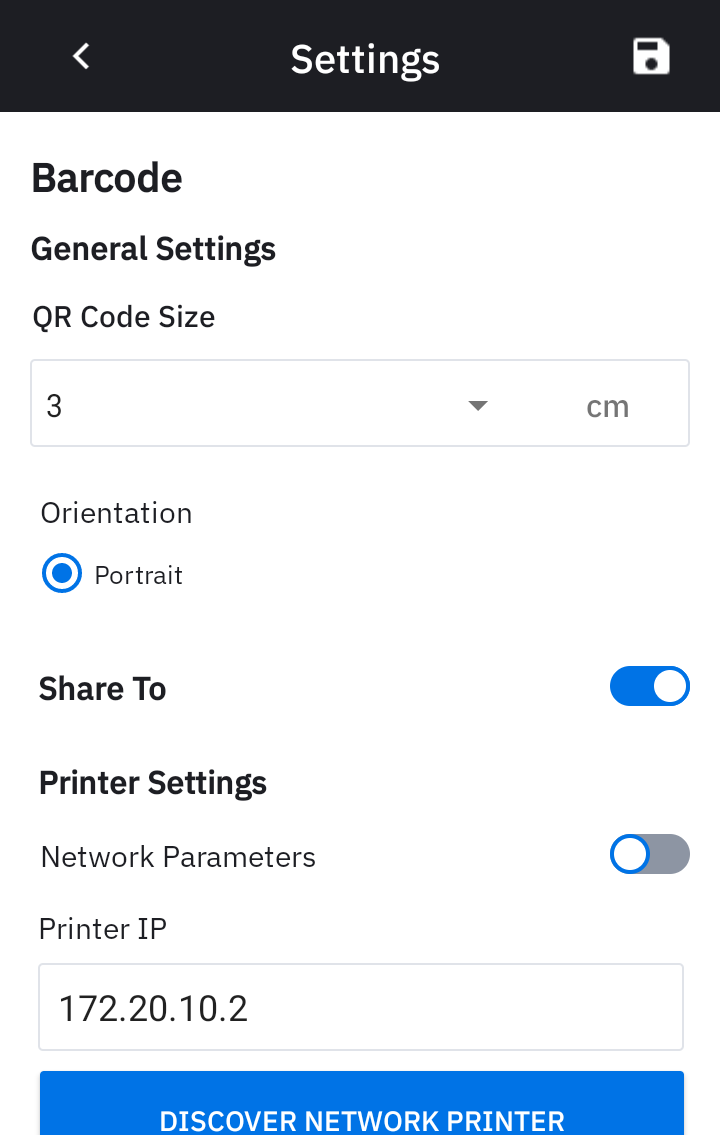
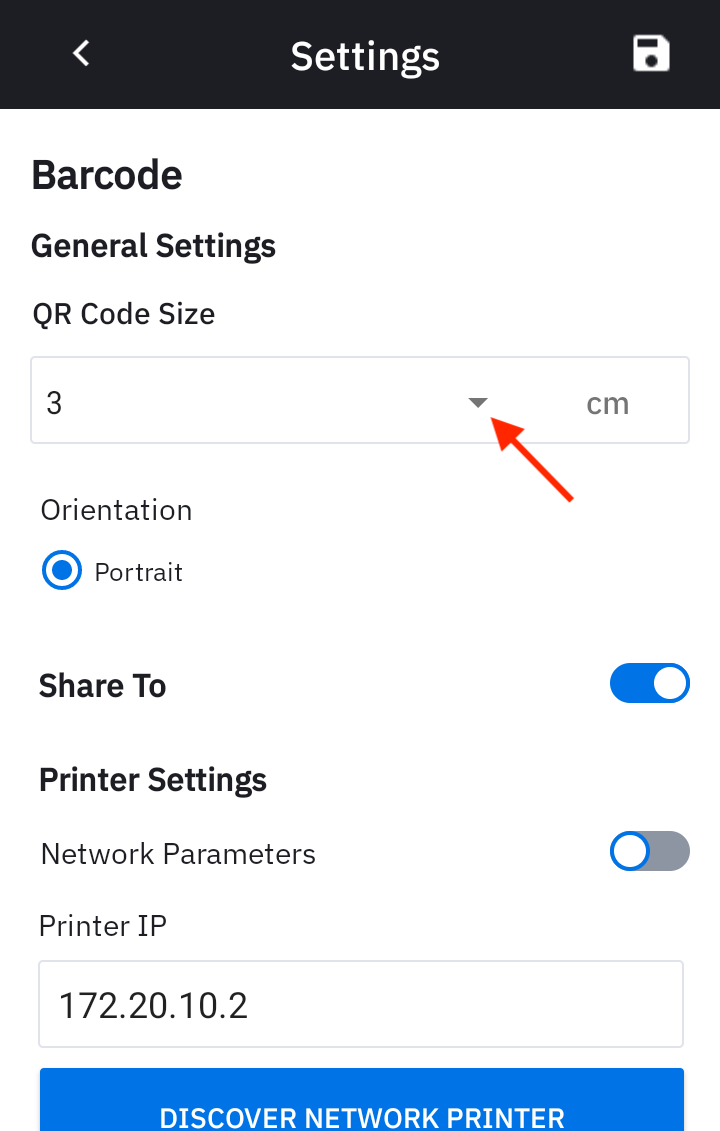
Adjust the QR Code Size: This setting only applies when printing to Zebra printers. It does not affect the size of the QR Code displayed in the Preview screen.
Specify the size of the QR Code to print.
Set network printer settings: Toggle on Network Parameters and enter the IP address of the network printer in IPv4 format (e.g.,
192.168.1.100). If this is not known, tap Discover Network Printer to perform a search for the network printer and allow the user to select the desired printer.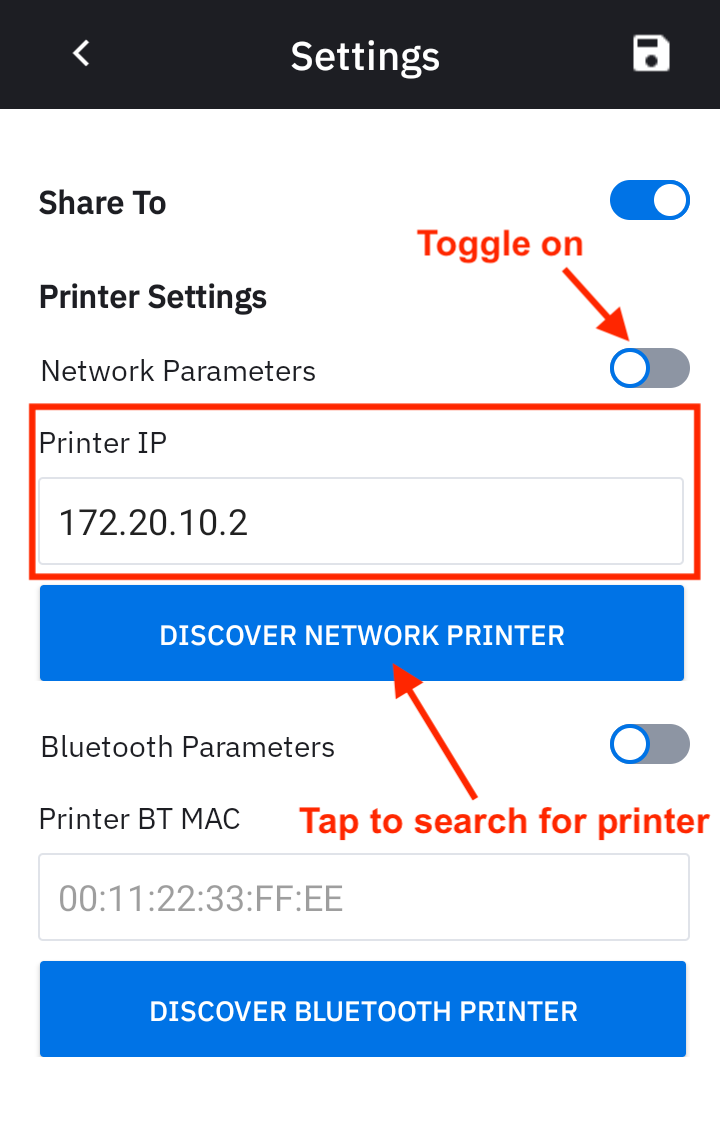
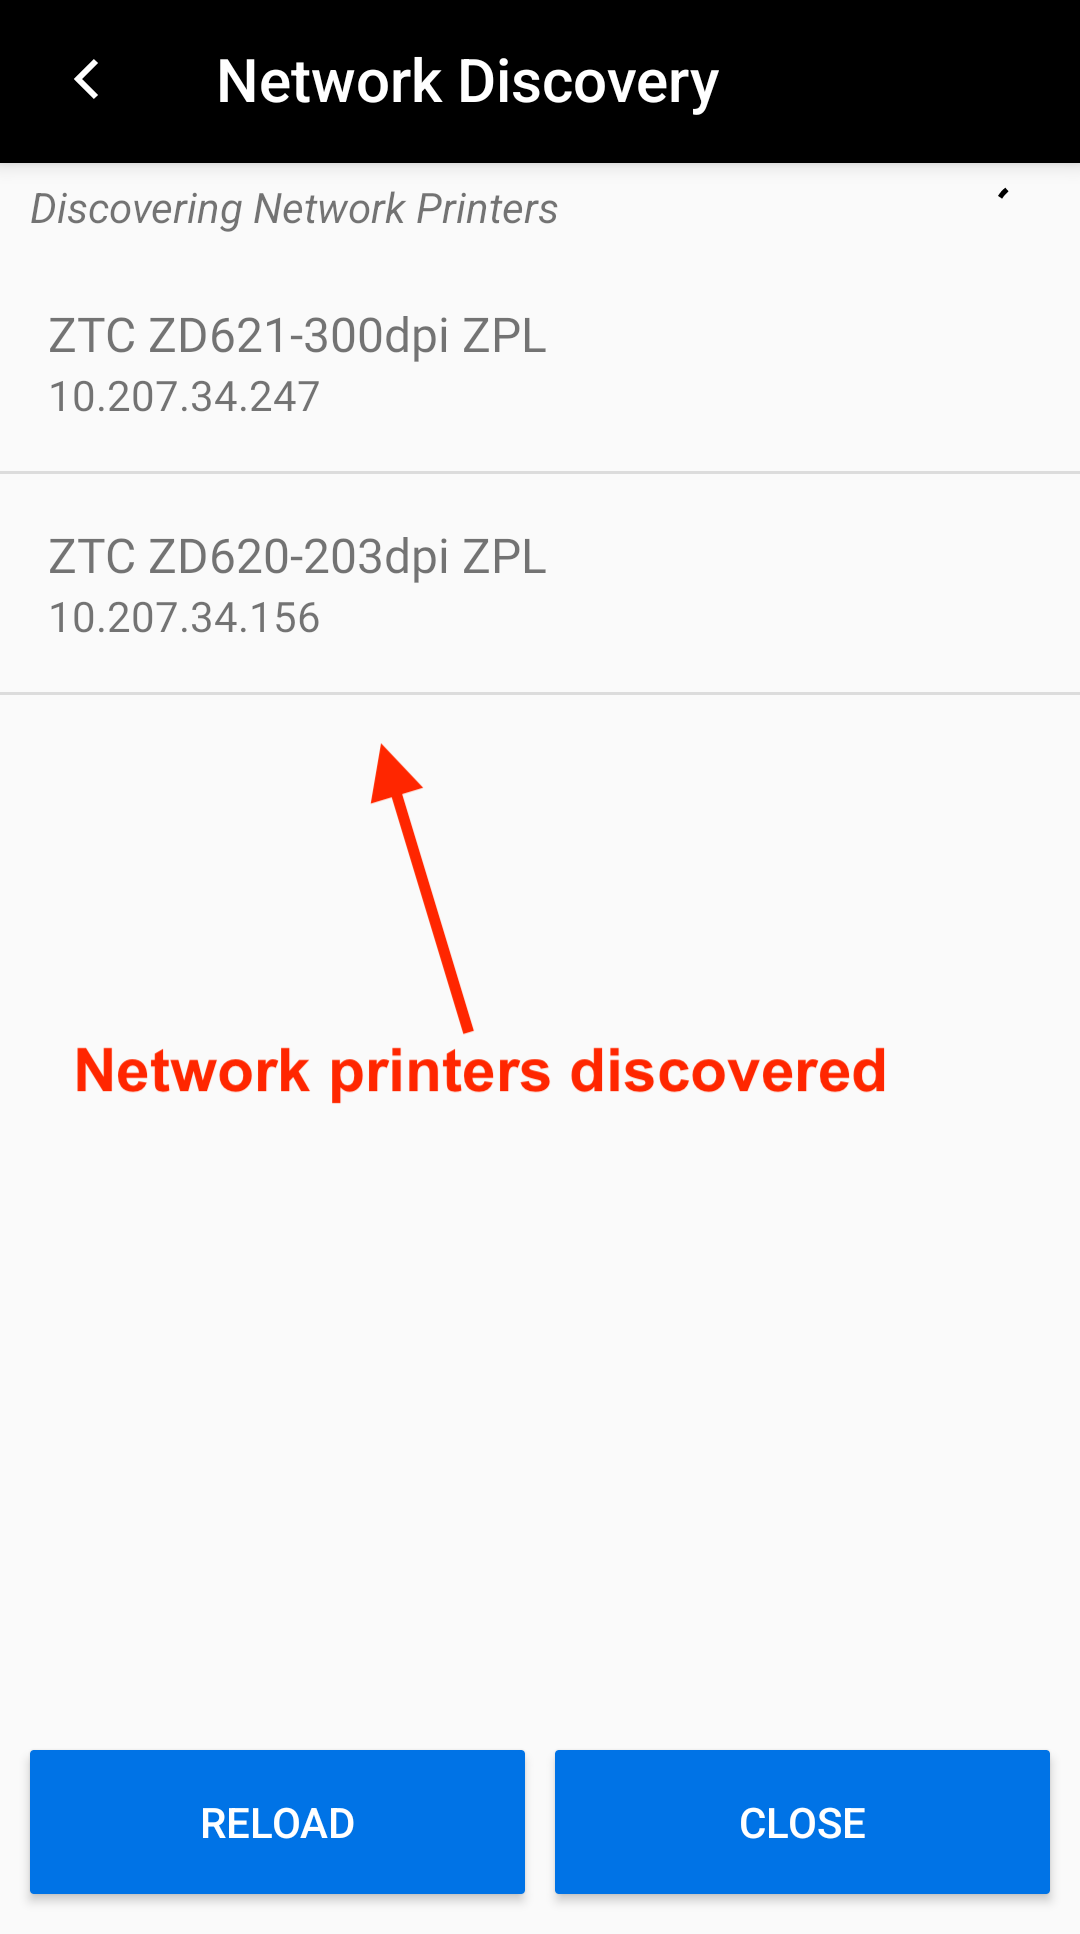
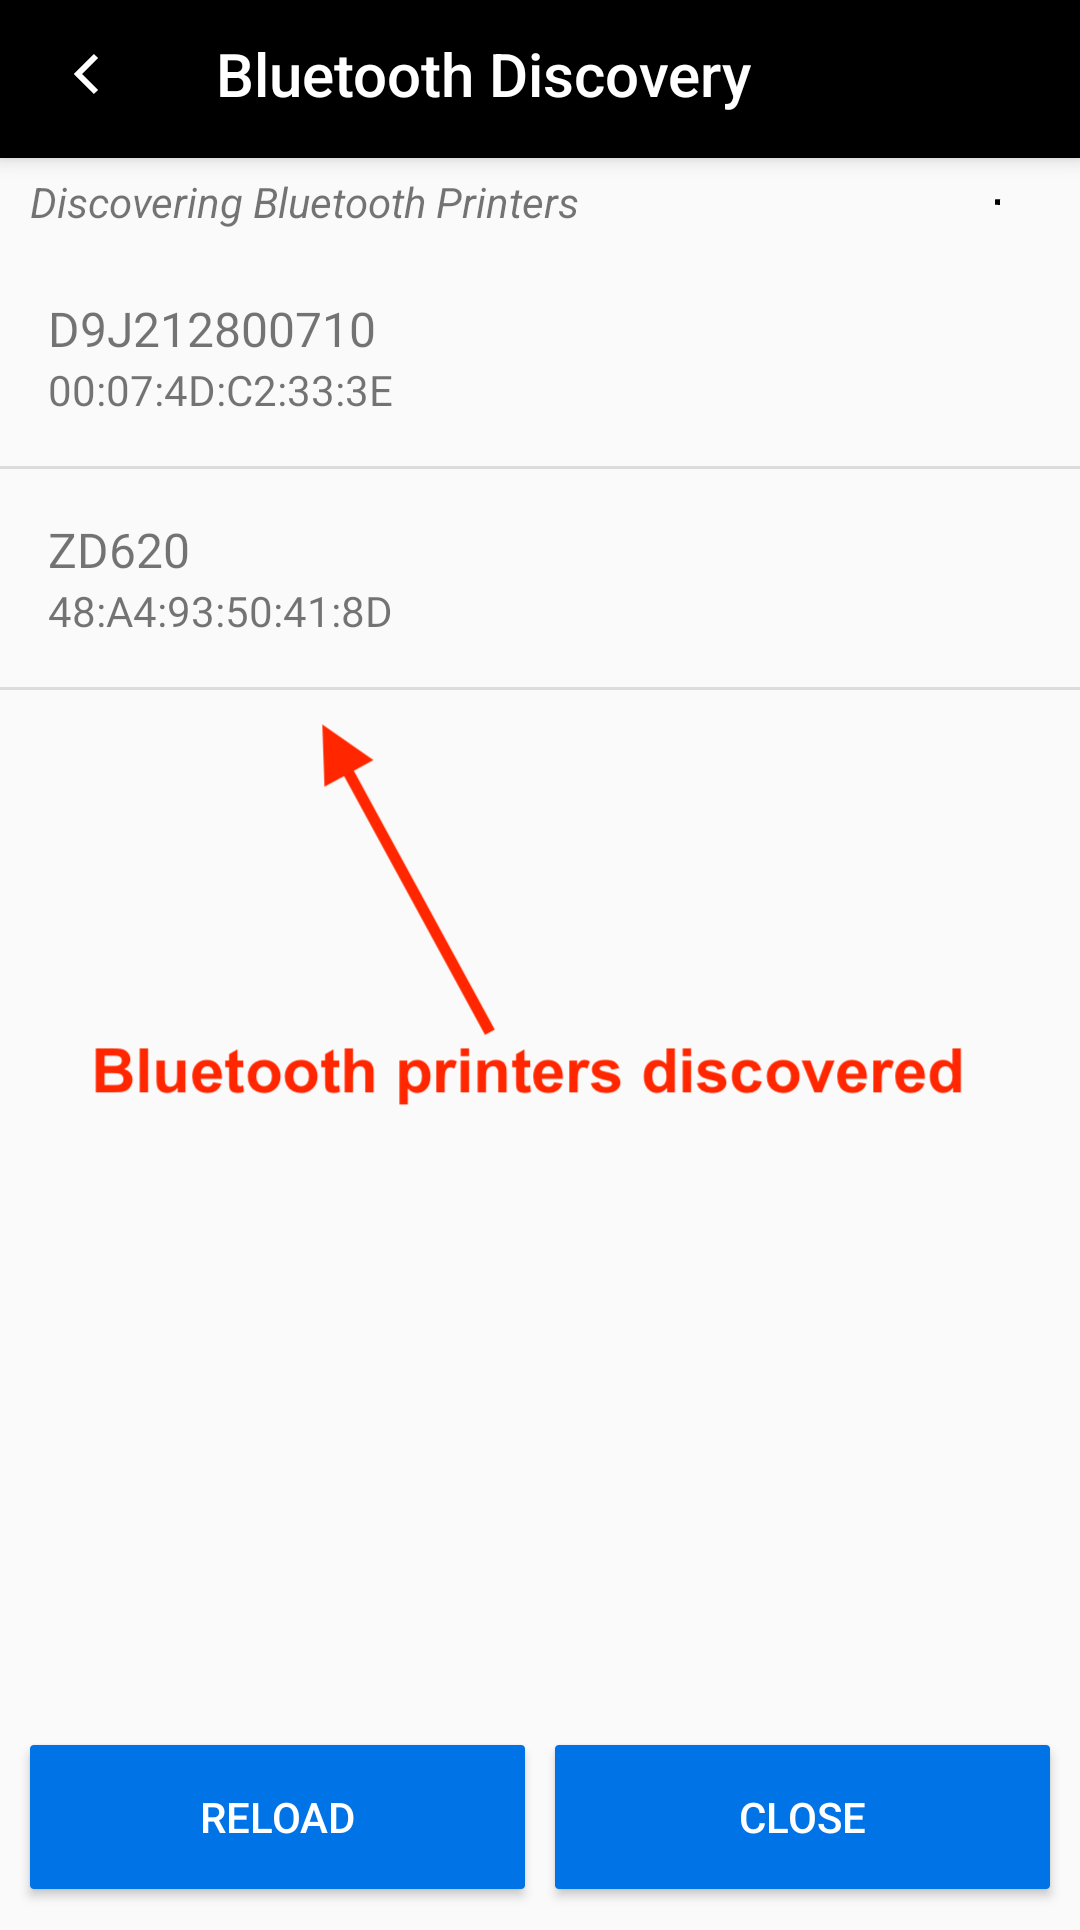
Network Printer Settings Search for Network Printer Set Bluetooth printer settings:
Toggle on Bluetooth Parameters and enter the Bluetooth printer MAC address in the format
XX:XX:XX:XX:XX:XX, whereXis a hexadecimal digit (0-9, A-F). If this is not known, tap Discover Bluetooth Printer to perform a search for the Bluetooth printer and allow the user to select the desired printer.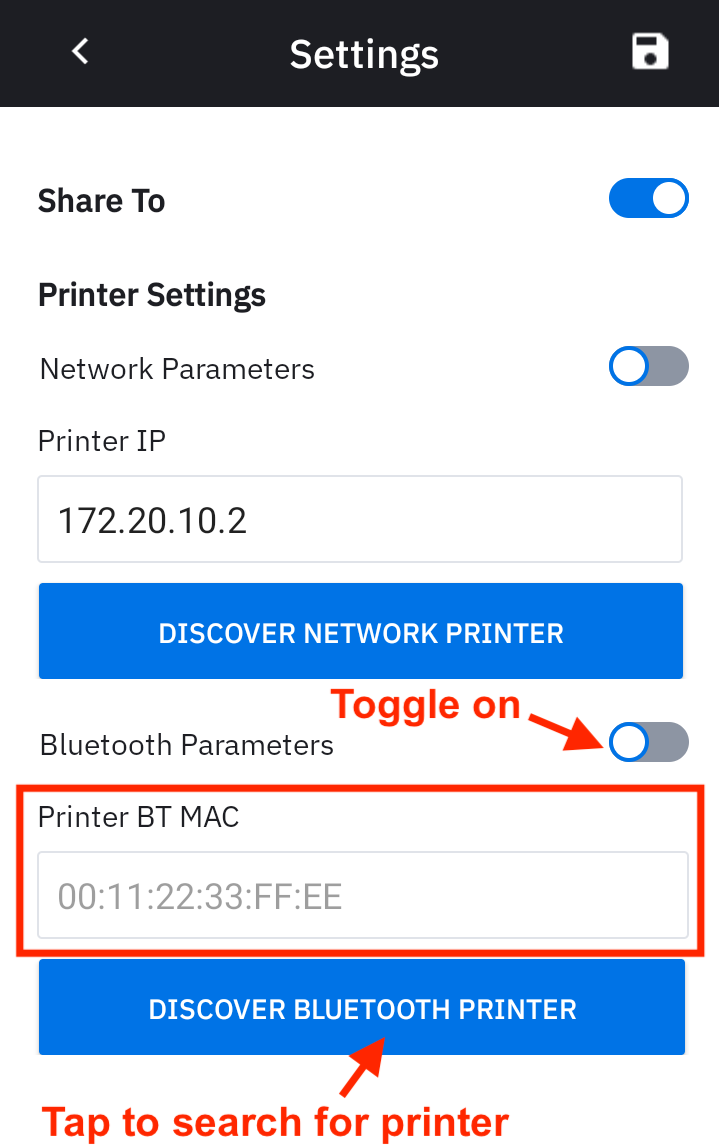
Bluetooth Printer Settings Search for Bluetooth Printer Share-To:
Toggle on Share-to and select the desired method to share. The barcode file name is
shared_image.png.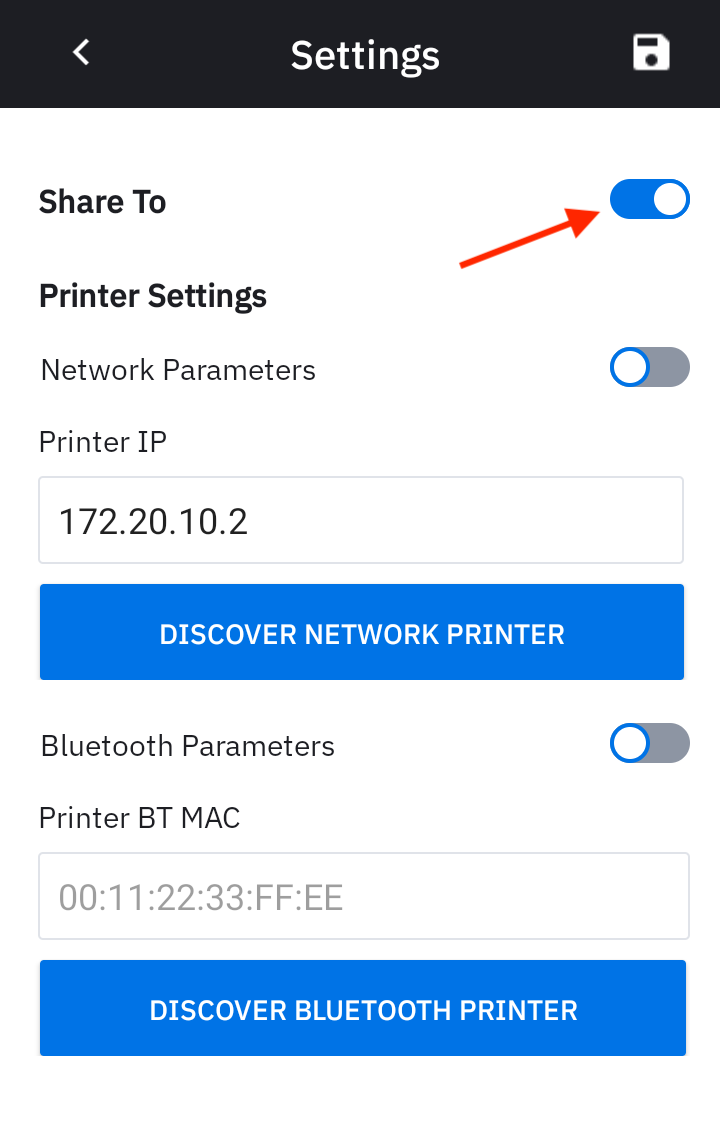
Usage Note: When a user modifies the zCreator settings and saves the changes, these modifications should not persist after the app is terminated. The settings are designed to revert to the configurations set by the admin. However, in some cases, the user changes may persist unexpectedly after the app is closed. To resolve this issue, the admin should redeploy the settings.
Personally Assigned Device
In environments where devices are assigned to specific users, these individuals retain control over their encrypted personal data and can delete it as needed. User data is safeguarded within the Android framework, stored in Identity Guardian's isolated storage, which is part of Android's access-controlled application platform. This ensures that even the organization itself cannot access the data. For enhanced security, administrators can customize multi-factor authentication settings, including a passcode, facial biometrics, and/or SSO. Unlike Shared Devices, Personally Assigned Devices do not utilize barcodes.
Profile Setup
For personally assigned devices, administrators should create a profile which encompasses both enrollment and authentication configurations by following these steps (see EMM Setup):
- Create a profile:
- Use Managed Configurations to configure a profile.
- Under Usage Mode, set Application Mode = PERSONALLY ASSIGNED.
- Configure all necessary Managed Configuration settings, such as Enrollment, Authentication, and SSO Authentication.
- Deploy the profile. Launch Identity Guardian as part of the deployment.
- Guide users through enrollment. Users would follow the prompts in Identity Guardian to complete the enrollment process. The available options depend on the profile settings configured by the administrator.
- Authenticate the user. After enrollment is complete, users can authenticate and sign in to the device.
SSO
Identity Guardian integrates with identity providers (IdPs) to simplify authentication. Users log in only once, leveraging Single sign-on (SSO) to streamline the process. This single login grants access to multiple applications, eliminating the need to manage separate credentials for each app.
For SSO authentication, Microsoft Authenticator and Custom Chrome Tabs are supported to act as brokers.
See SSO Requirements.
Microsoft Entra ID
This section provides guidance to integrate Identity Guardian with Microsoft Entra ID (formerly Azure Active Directory):
I. Register & Configure Identity Guardian
II. Add a 3rd-party Device Compliance Partner
III. Configure Microsoft Authenticator App
IV. Configure Zebra Identity Guardian App
V. Configure Role Mapping
I. Register & Configure Identity Guardian
To establish a trust relationship between Identity Guardian and the Microsoft identity platform, register Zebra Identity Guardian as an Android application in Microsoft Entra ID (IdP). For more information, refer to Microsoft's documentation for guidance on registering an application with the Microsoft identity platform.
Follow these steps:
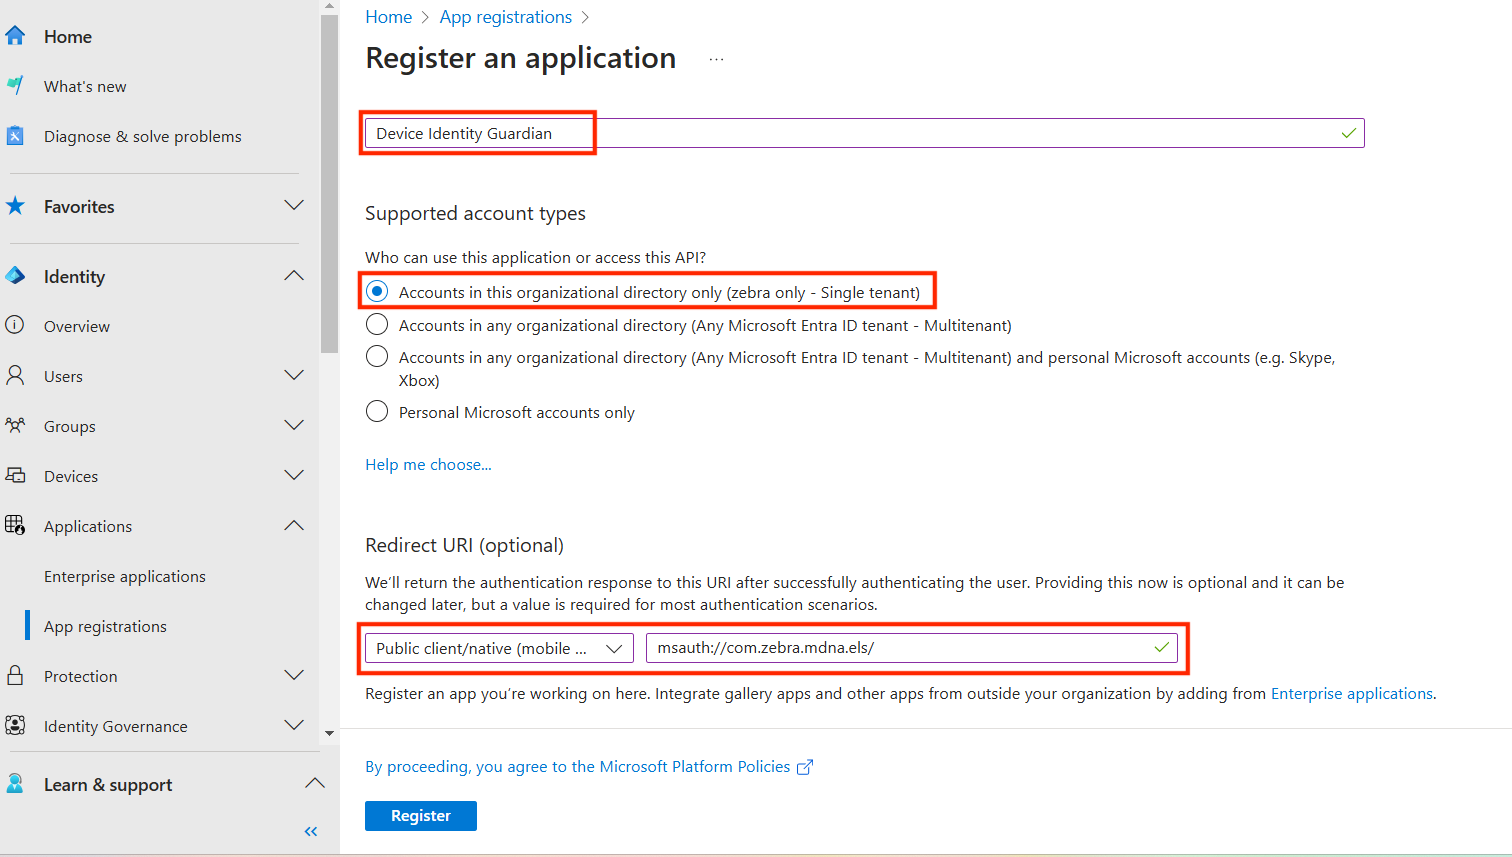
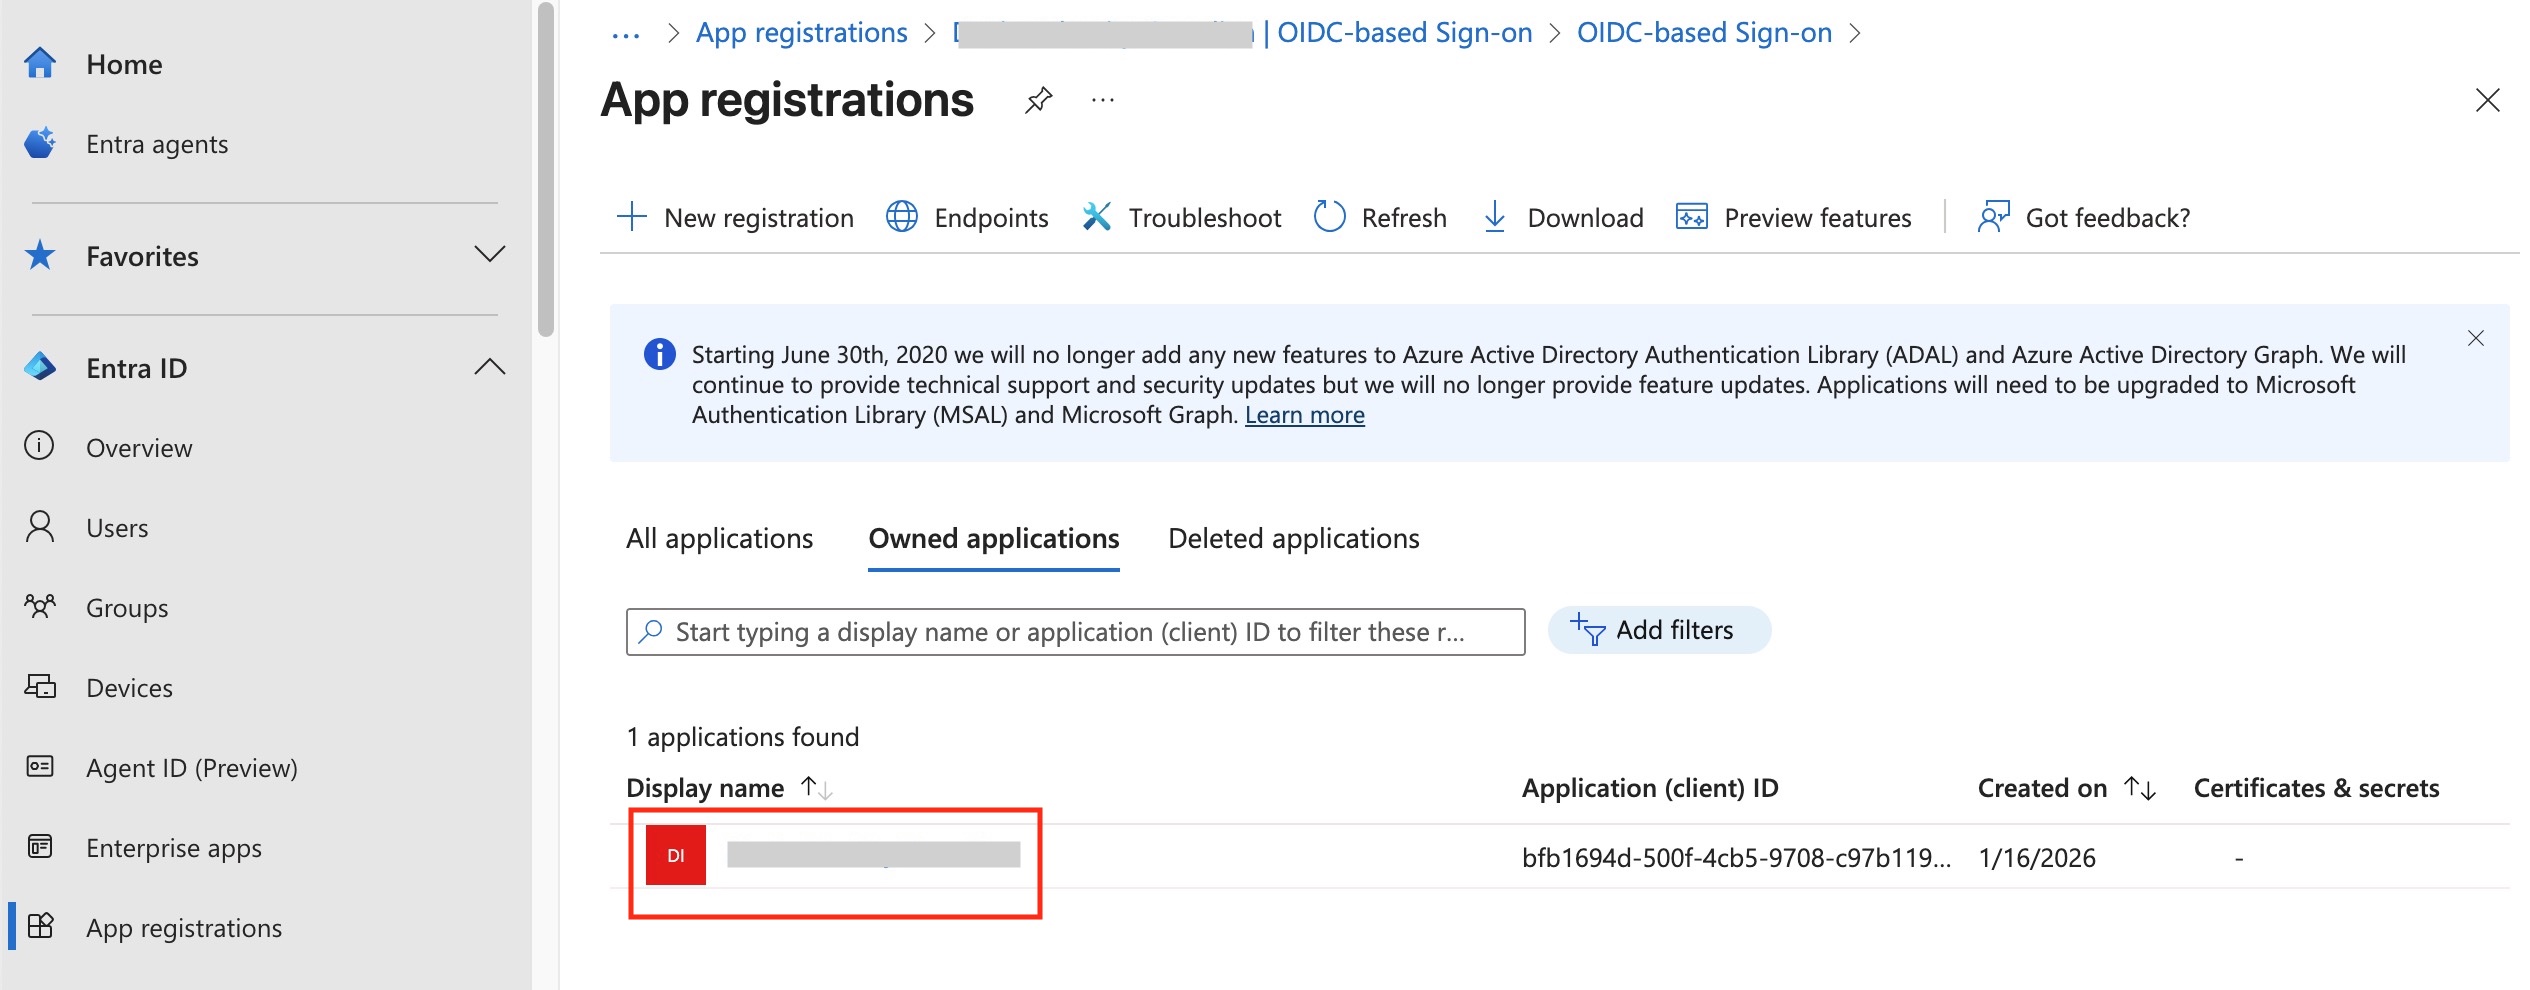
- In the Microsoft Entra admin center, navigate to Applications > App registrations. Click New registration.

- In the Register an application screen, enter/select the following, then click Register.:
- Name: [Enter a name, e.g., Zebra Identity Guardian]
- Supported account type: Accounts in this organizational directory only (Single tenant)
- Redirect URI: Public client/native (mobile & desktop) msauth://com.zebra.mdna.els/
- Navigate to Applications > App registrations > Authentication. Click Add a platform then click Android.
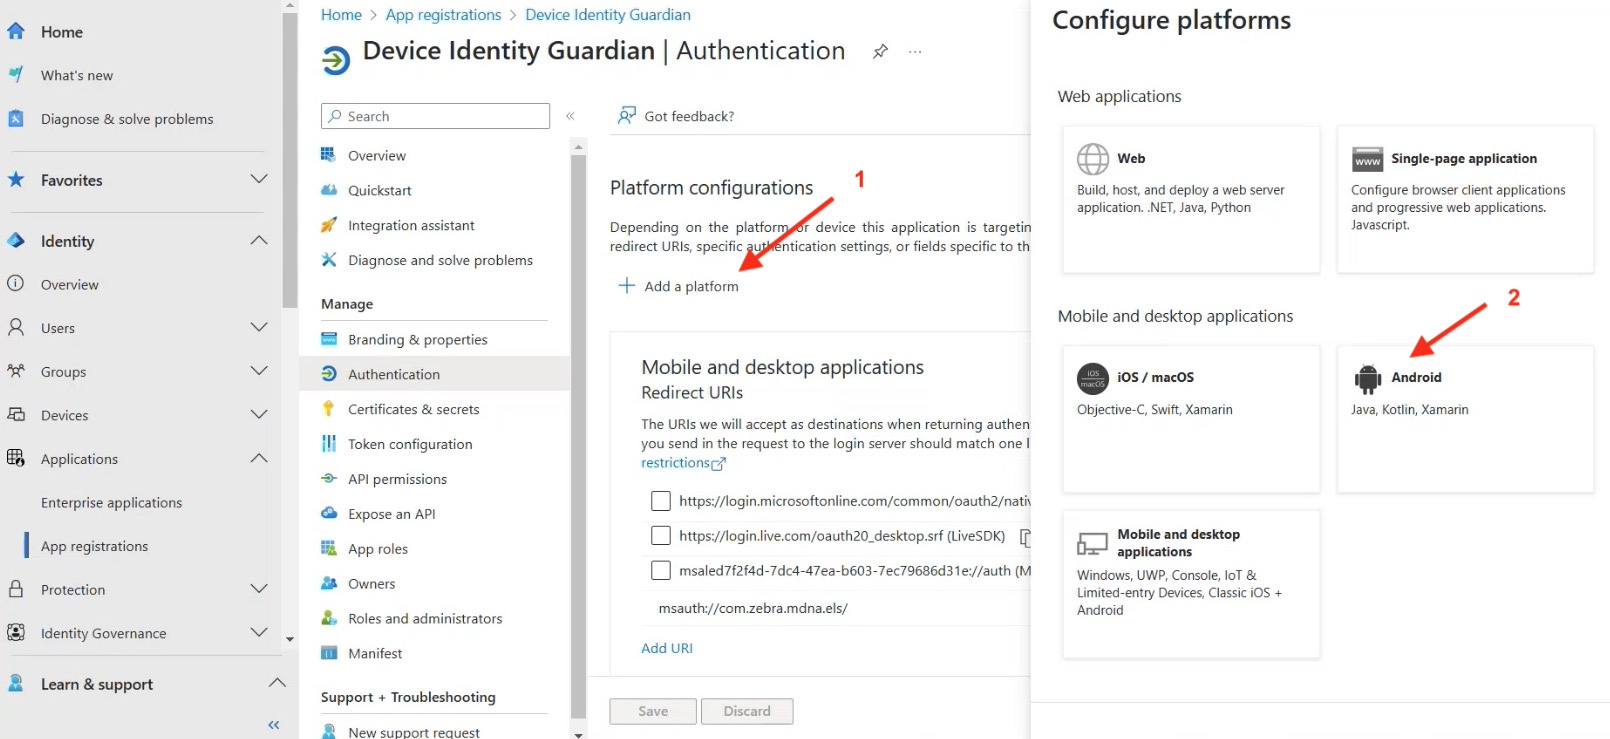
- Enter the following, then click Configure.
- Package name: com.zebra.mdna.els
- Signature hash: KqmK9tYXpw+eW2lke7US3iG9EAQ=
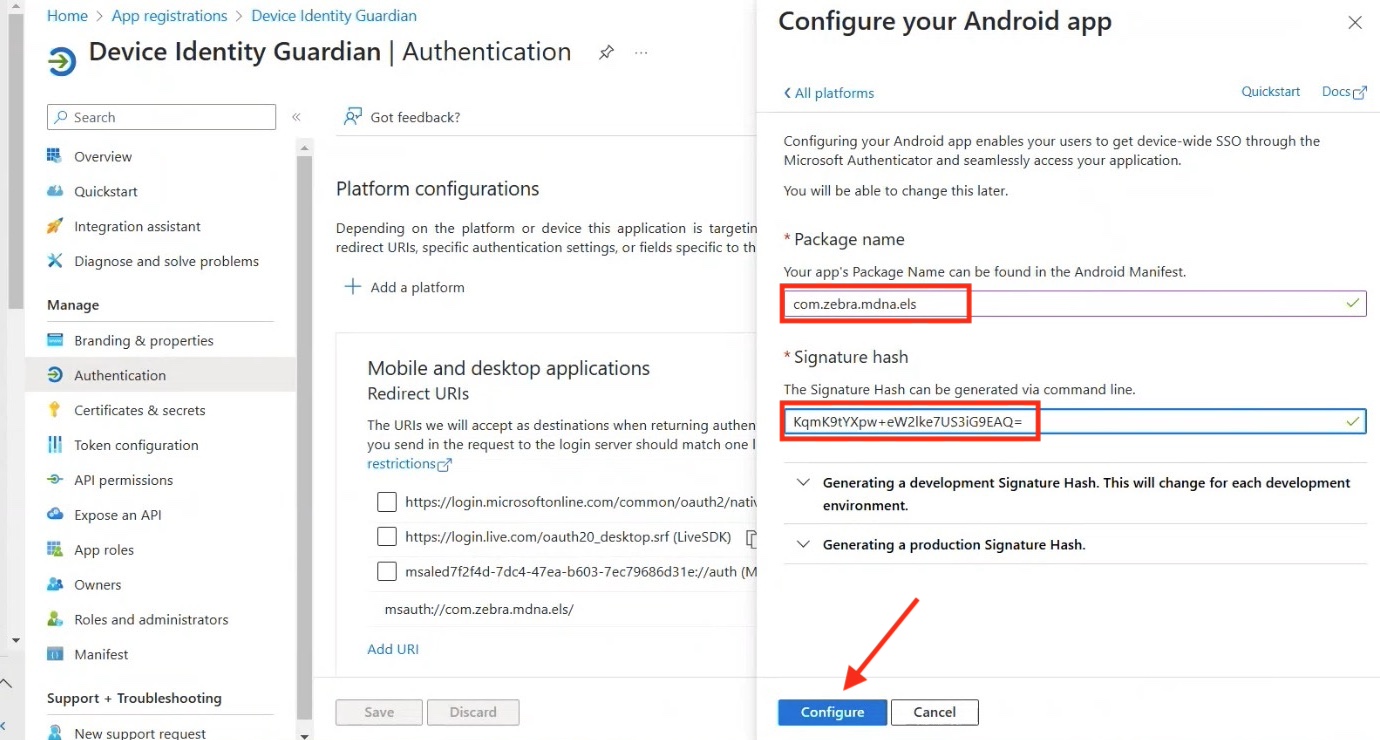
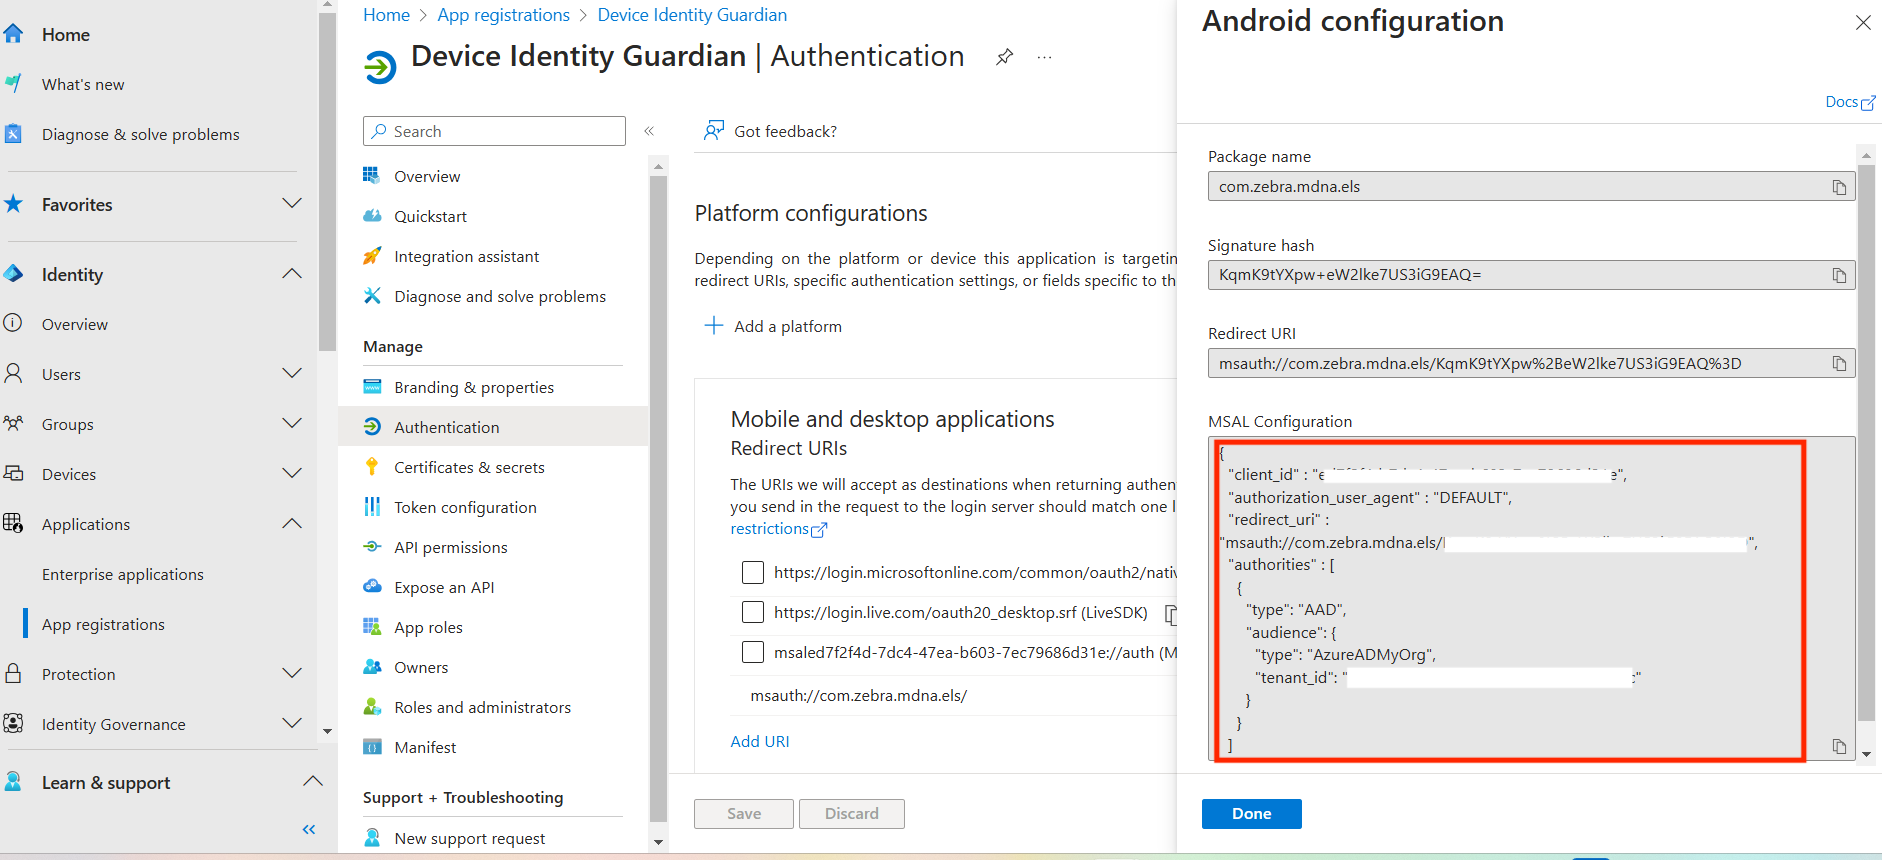
- The Android configuration screen displays. Copy and save the MSAL Configuration; it is required in a later step. Click Done.
II. Add a 3rd-party Device Compliance Partner
When using Microsoft Authenticator for single sign-on (SSO) in shared device mode, a third-party device compliance partner solution can be integrated with Microsoft Intune. This allows for the collection of device compliance data alongside Intune's own compliance results. The combined data can then be used to develop access policies, offering enhanced protection for the organization and its data. Examples of third-party device compliance partners include solutions such as SOTI MobiControl, VMware Workspace ONE UEM (formerly AirWatch). For guidance on adding a third-party device compliance partner in Intune, consult your EMM or Microsoft's documentation .
III. Configure Microsoft Authenticator App
For optimal use of shared device mode with SSO through Microsoft Authenticator, ensure the Microsoft Authenticator app is installed on the devices. This facilitates automatic SSO single sign-in and single sign-out across Microsoft apps on the device.
To install and configure Microsoft Authenticator app:
Download and install the Microsoft Authenticator app from Google Play via an EMM, such as SOTI MobiControl, VMware Workspace ONE UEM, or Microsoft Intune.
In the Microsoft Entra ID admin center, navigate to Applications > App registrations > Overview and record the tenant ID.
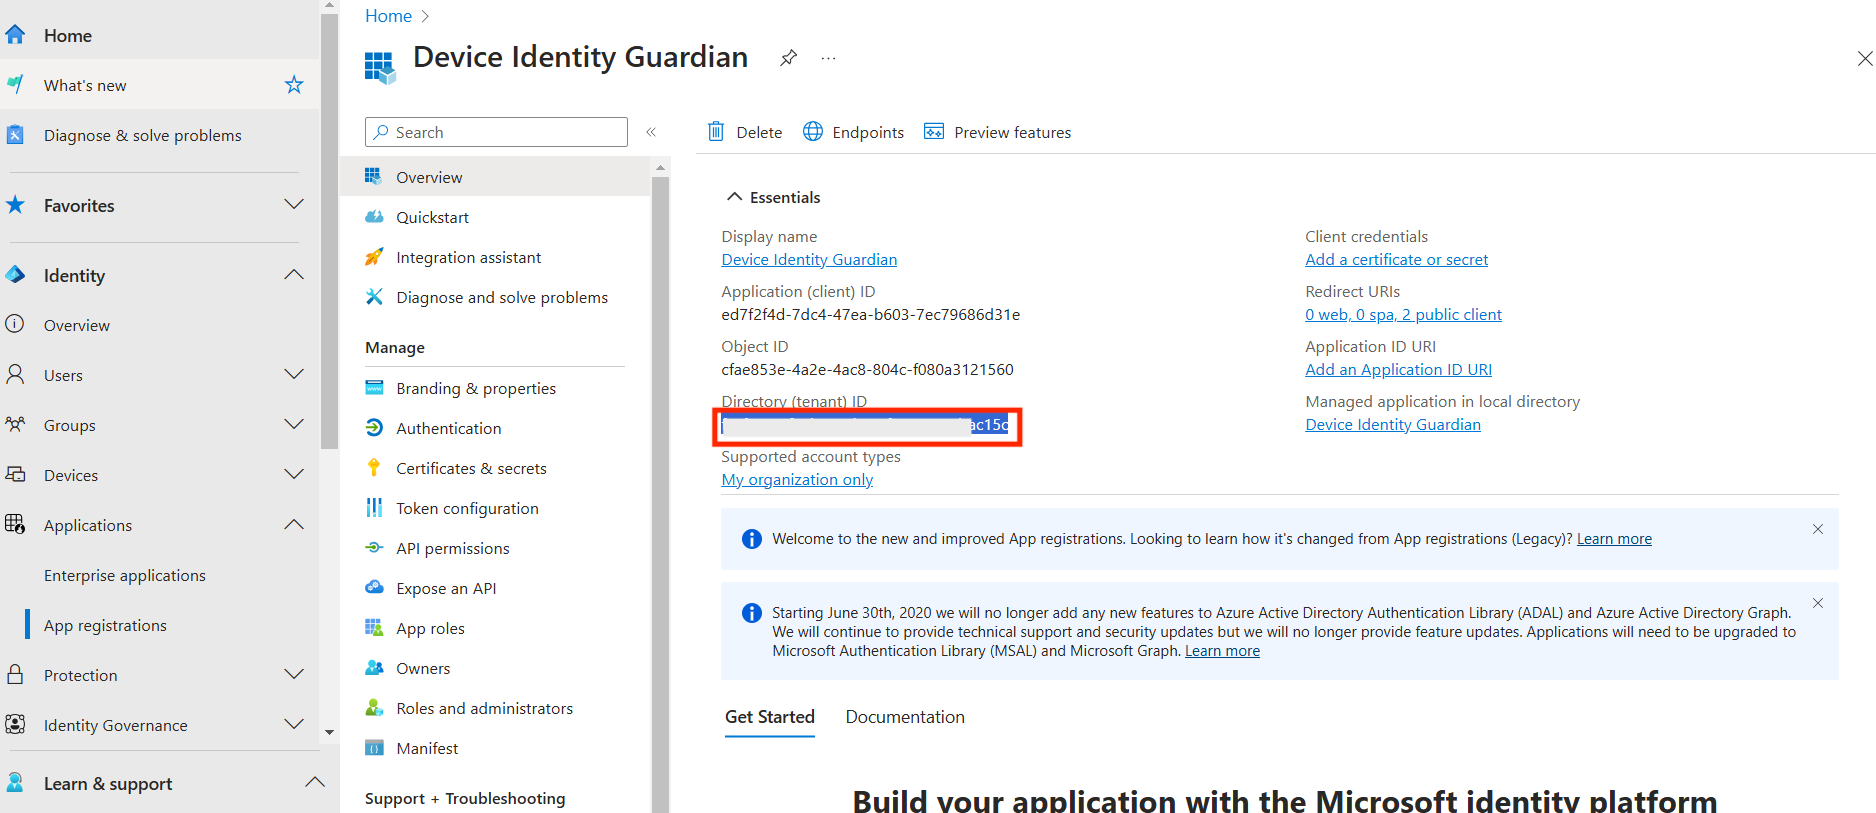 Retrieve the tenant ID
In the EMM, open Managed App Config for the Microsoft Authenticator app and enter the following:
- Shared Device Mode: [Toggle to enable]
- Shared Device Mode Tenant Identifier: [Enter the tenant ID recorded from the previous step]
- Shared Device Mode Registration token:
%SHARED_DEVICE_REG_TOKEN%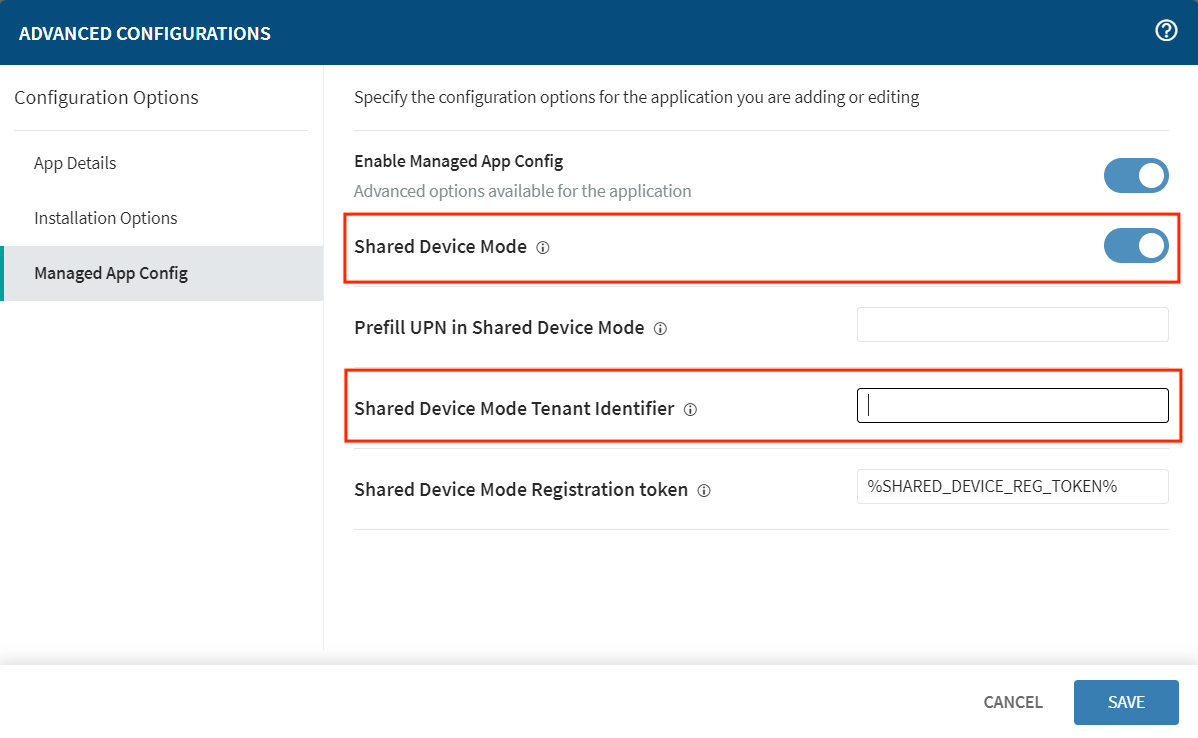 _Sample of Managed App Config from SOTI MobiControl. Other EMMs may vary.*
Click Save.
IV. Configure Zebra Identity Guardian App
To enable user access to the device through SSO, install and set up Identity Guardian on the devices:
- Deploy and install the Zebra Identity Guardian app on the devices.
- Launch the app using an EMM. This step must be performed at least once.
- Enter the Managed Configuration settings for the app via your EMM:
- Select Application Mode: Authentication
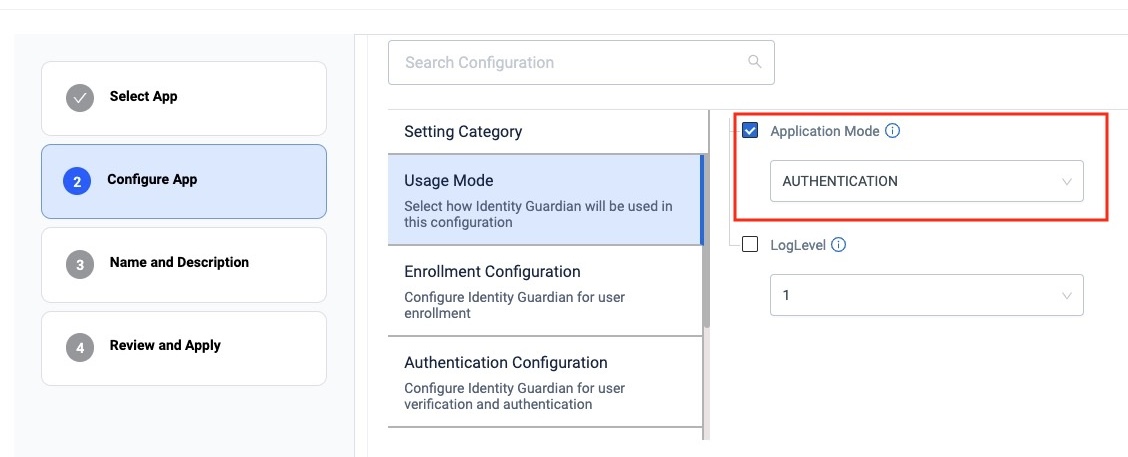 zDNA Cloud Managed Config
 - Configure the Verification Setup to validate the user access:
- Primary Authentication Factor: SSO
- Secondary Authentication Factor: [Select FACE, PASSCODE, SSO or NONE]
- Fallback Authentication Factor: [Select FACE, PASSCODE, NONE, SSO or ADMIN BYPASS PASSCODE]
- Primary Authentication Timeout: [Enter value in ms, e.g. "300000"]
- Fallback Authentication Timeout: [Enter value in ms, e.g. "300000"]
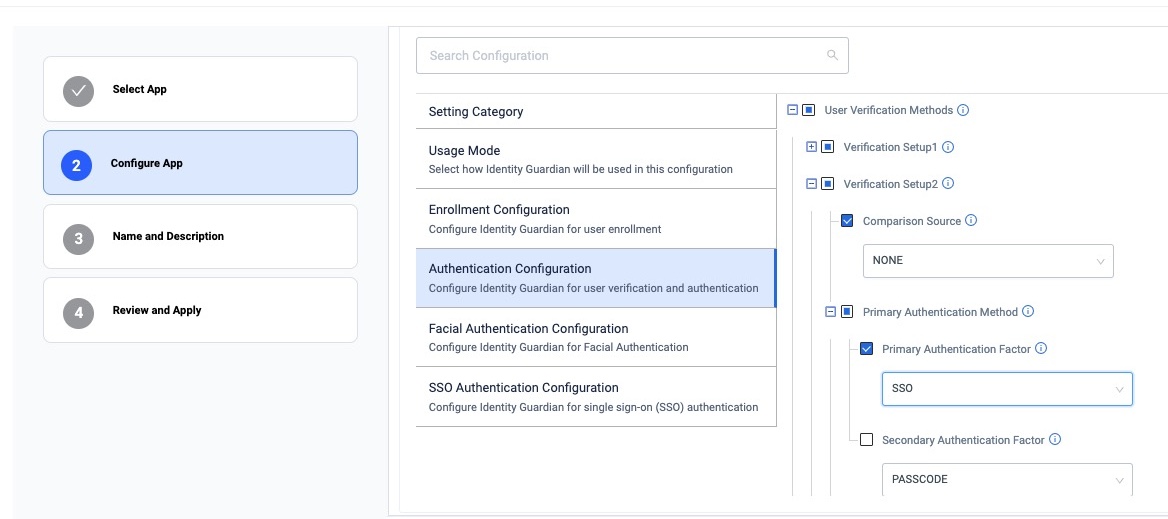 zDNA Cloud Managed Config sample screen
- Configure the Lock-screen Event options:
- On Unlock:
- Verification Setup: [Enter the desired authentication scheme, e.g. "Verification Setup1"]
- On Reboot:
- Verification Setup: [Enter the desired authentication scheme, e.g. "Verification Setup1"]
- On AC power connected:
- Verification Setup: [Enter the desired authentication scheme, e.g. "Verification Setup1"]
- On AC power disconnected:
- Verification Setup: [Enter the desired authentication scheme, e.g. "Verification Setup1"]
- On device manual check in:
- Verification Setup: [Enter the desired authentication scheme, e.g. "Verification Setup1"]
- On user change: - Verification Setup: [Enter the desired authentication scheme, e.g. "Verification Setup1"]
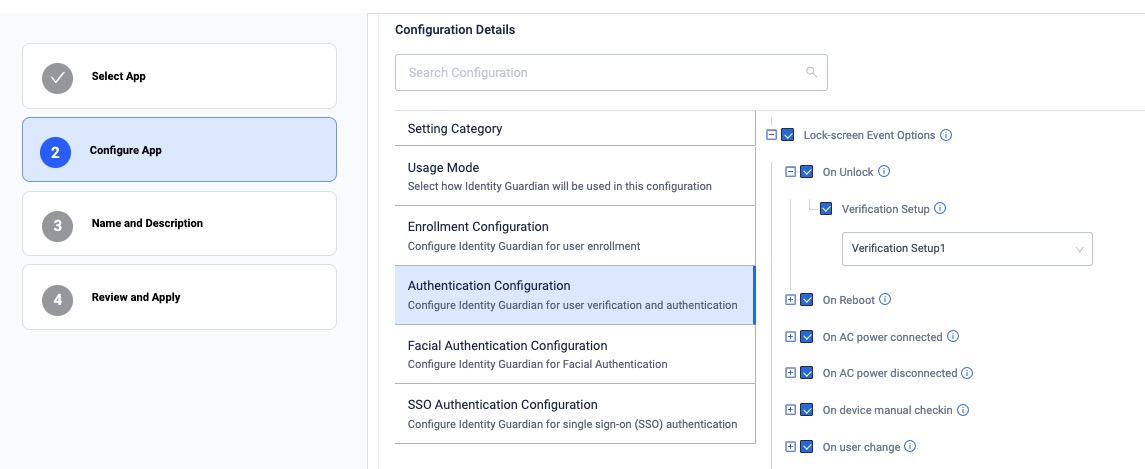 zDNA Cloud Managed Config sample screen
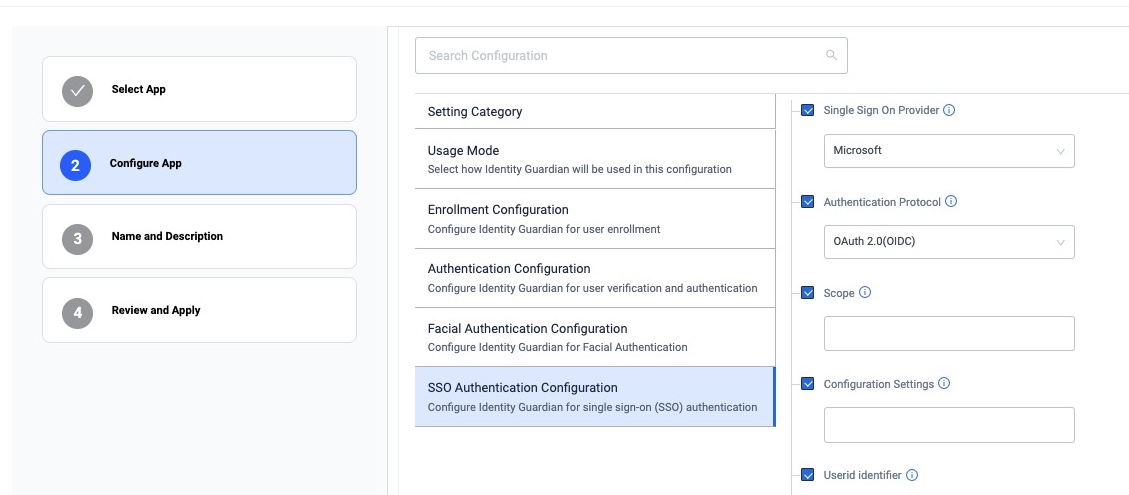
- Configure the SSO Authentication configuration for the app to communicate with Microsoft SSO to authenticate the user:
• Single Sign On Provider: Microsoft
• Authentication Protocol: OAuth 2.0 (OIDC)
• Scope: [Enter the string based on the SSO server settings]
• Configuration Settings: [Copy the MSAL Configuration from step I.5 and insert it into this field. Then:
• Add the key-value pairs forbroker_redirect_uri_registeredandshared_device_mode_supportedas shown in the sample below. This enables the Microsoft Authenticator app to register the device in shared device mode.
• Remove theaudienceelement along with all its child elements and their values.
• Enter theauthority_urlretrieved from Applications > App registrations > Overview. Click on Endpoints to view it.] Retrieve
 authority_urlendpoint
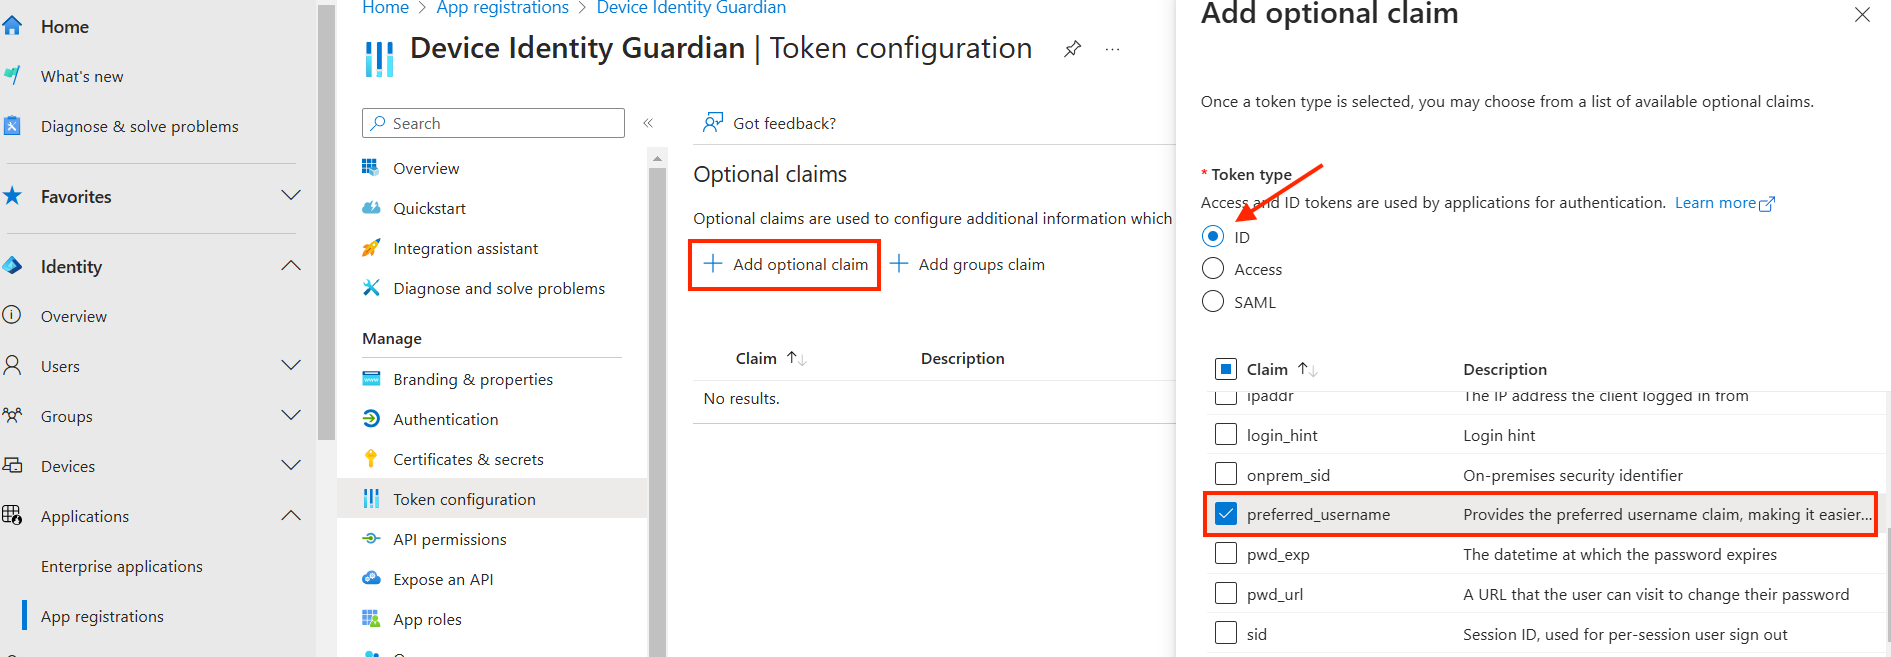
Ensure your Configuration Settings entered resembles this sample{ "client_id" : "[Your client ID populated]", "authorization_user_agent" : "DEFAULT", "redirect_uri" : "msauth://com.zebra.mdna.els/ AbcB123Xab%c123a3xyz123ABCXYZ%12", "account_mode" : "SINGLE", "broker_redirect_uri_registered": true, "shared_device_mode_supported": true, "authorities" : [ { "type": "AAD", "authority_url": "[ENTER YOUR AUTHORITY URL]" } ] } - Userid identifier: [Enter the claim specifying the value to be displayed as the user name in Identity Guardian, e.g. preferred_username. Retrieve this from the Microsoft Entra ID admin center by navigating to Applications > App Registrations > Token configuration. Click Add optional claim and select ID for the token type.]
 Claim used to display the user name
 zDNA Cloud Managed Config
- Select Application Mode: Authentication
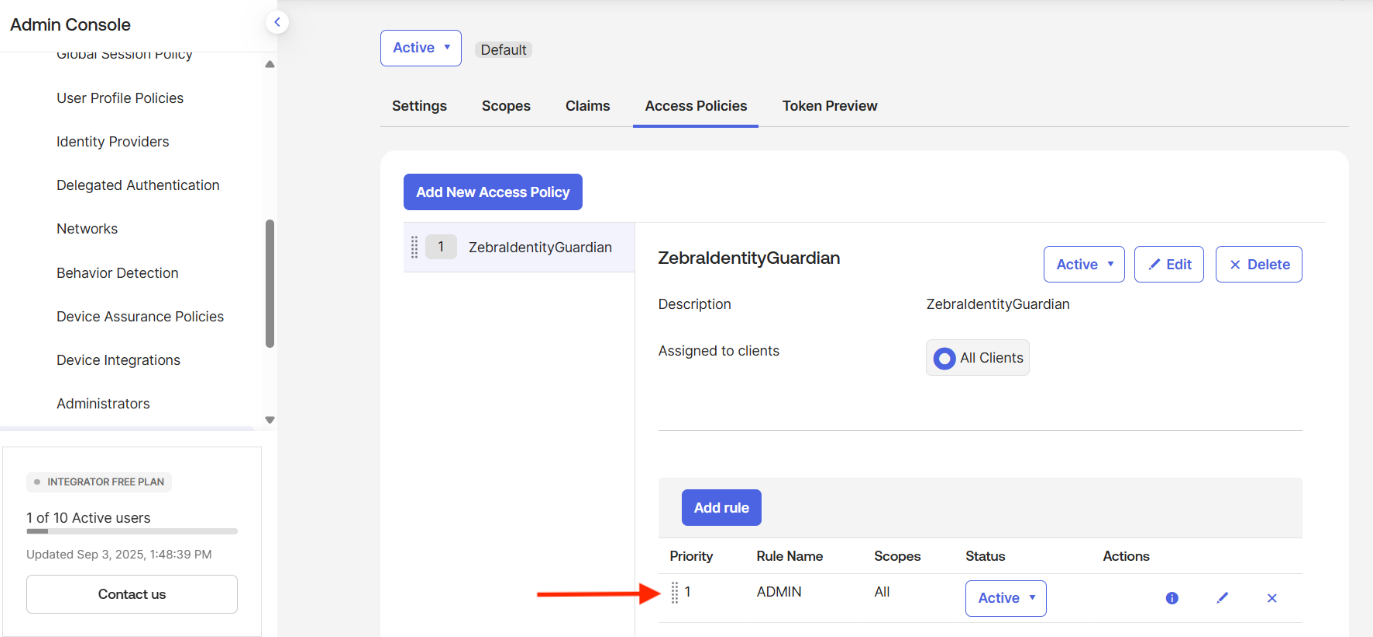
V. Configure Role Mapping
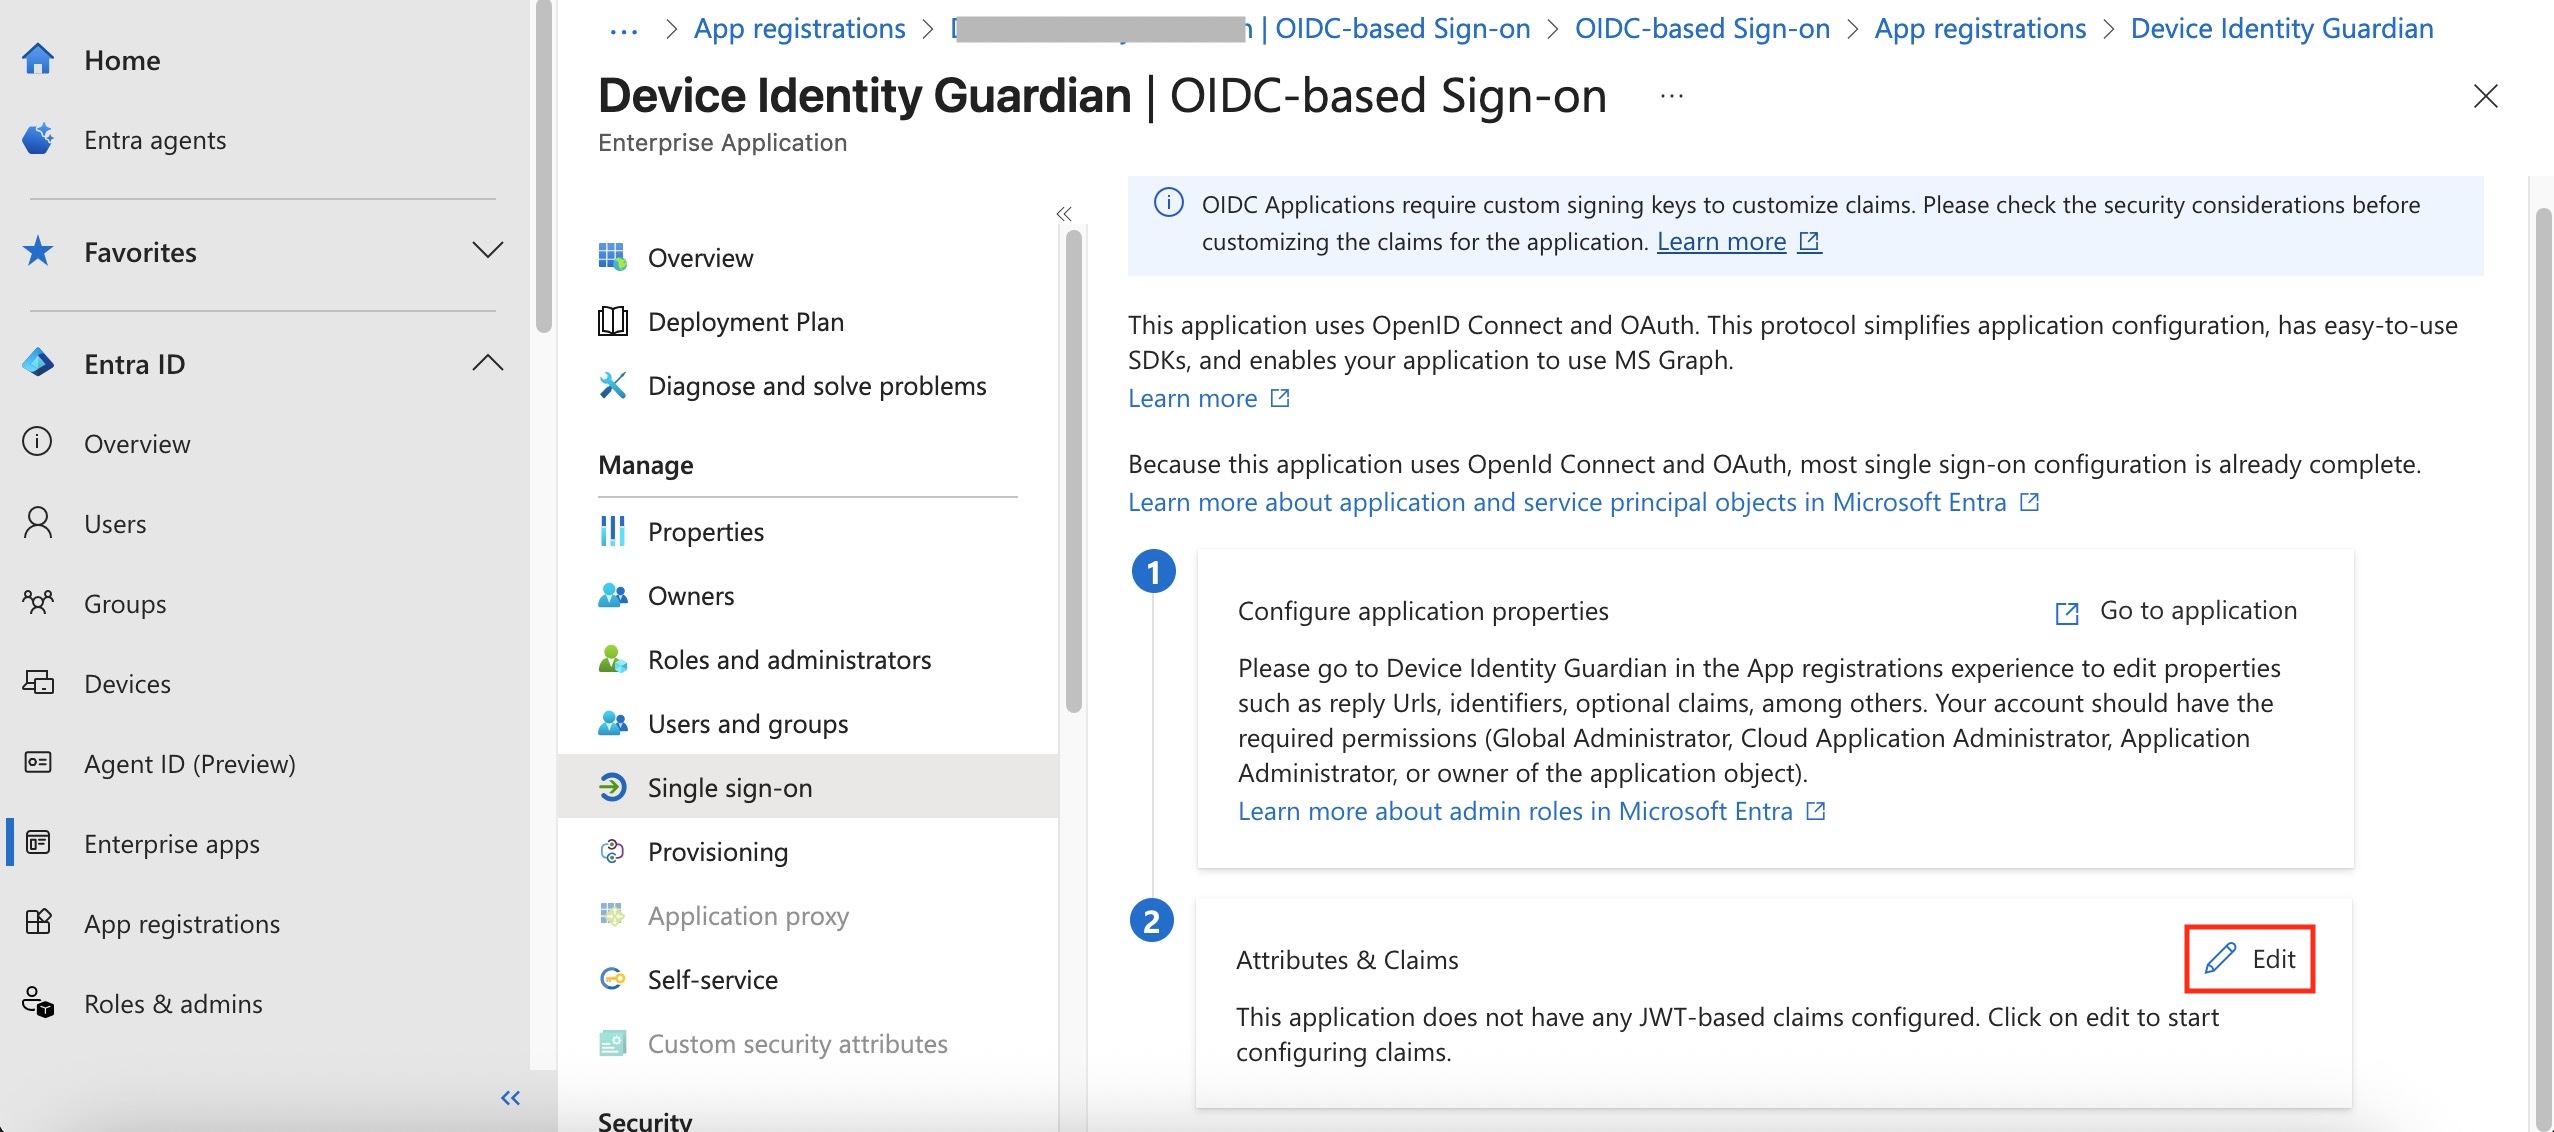
Configure built-in or custom attributes as claims in Microsoft Entra ID, which are then sent to your application in the SSO response for mapping to application-specific roles.
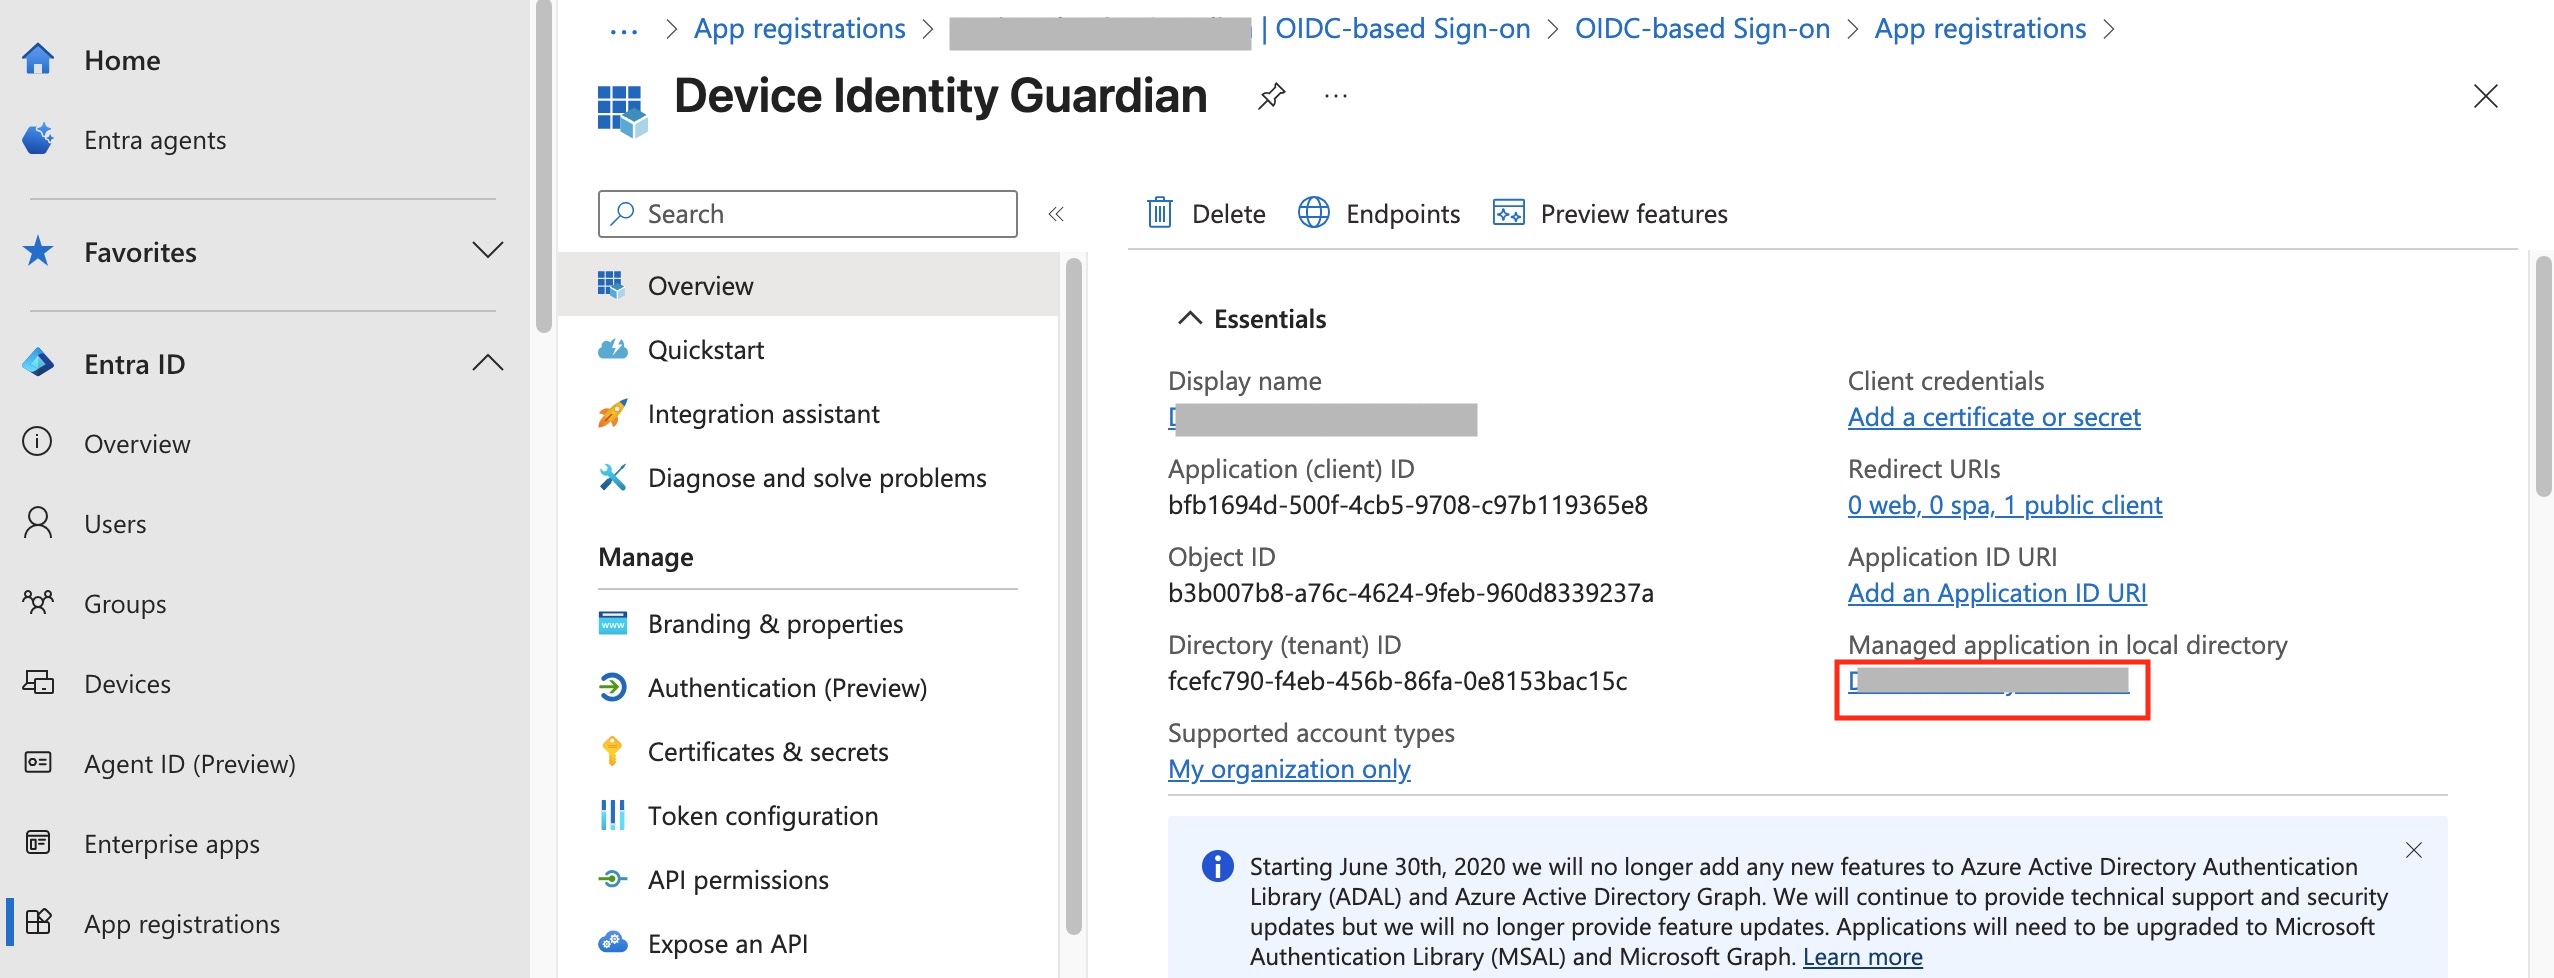
- In the Microsoft Entra admin center, navigate to Entra ID > App registrations. Click on your application in the list.
- In the Essentials section, click the name of your app under Managed application in local directory.
- Under Manage, click Single sign-on. Under Attributes & Claims, click Edit.
- Add a built-in attribute to the token as a claim. Click Add new claim.
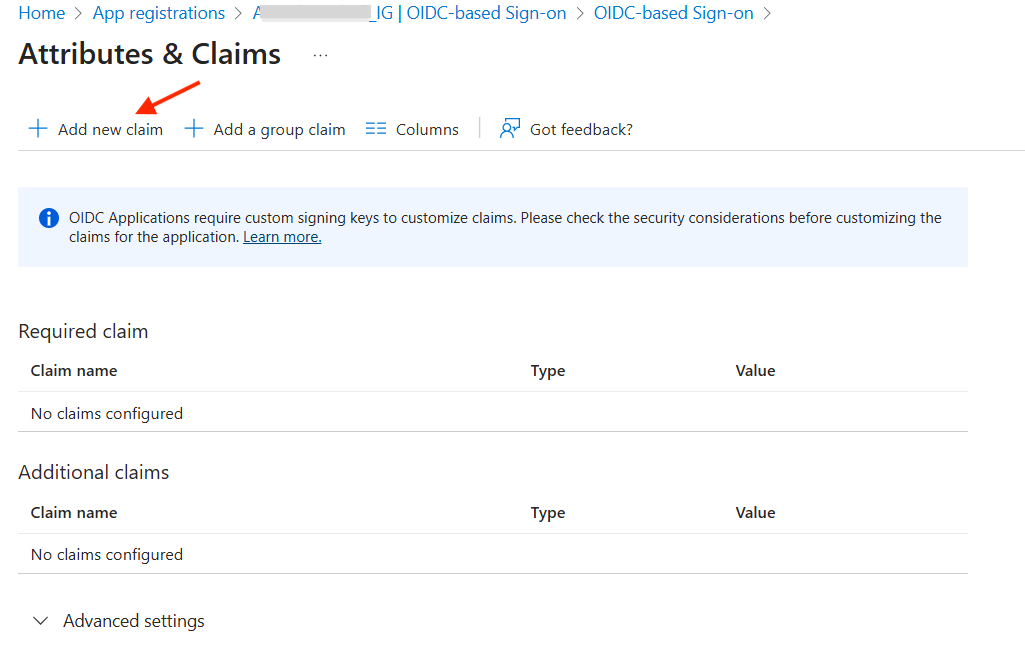
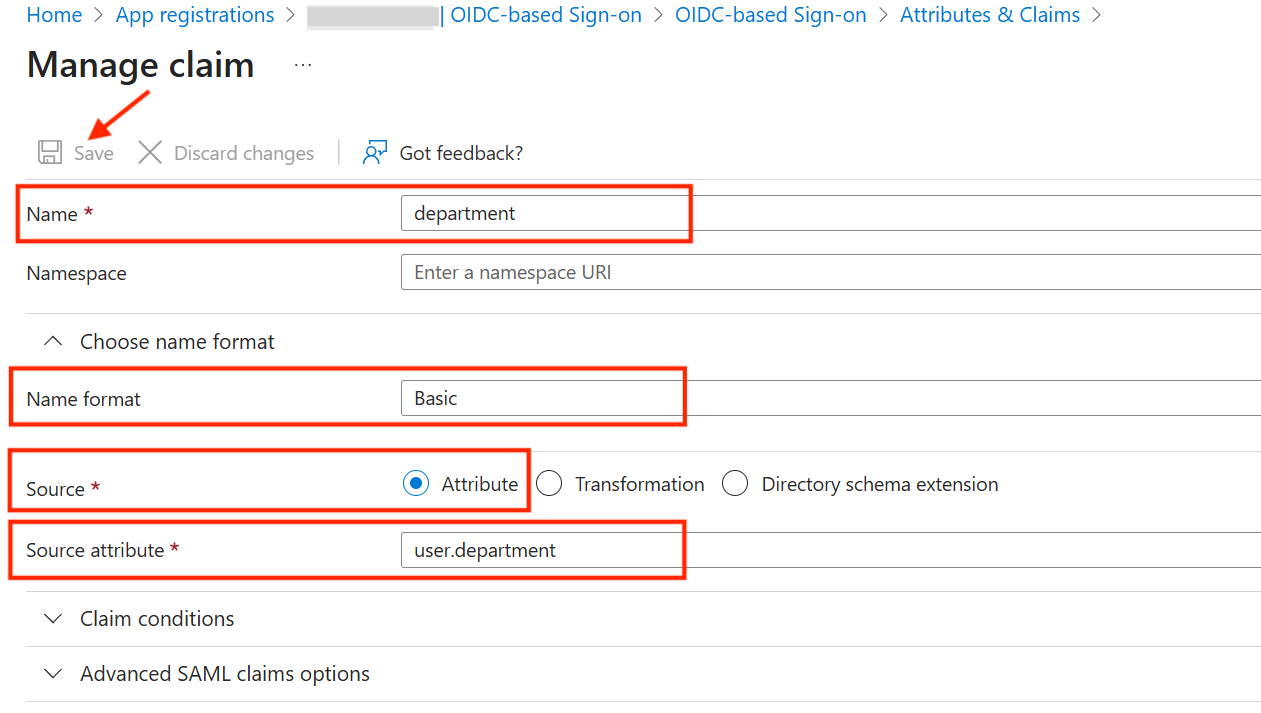
- Enter or select the following, then click Save:
- Name: [Enter a name for the claim. Record this case-sensitive value, as it serves as the SSO Key in Identity Guardian's SSO Mapping configuration for a later step.]
- Name format: Basic
- Source: Attribute
- Source attribute: [Select the appropriate built-in attribute.]
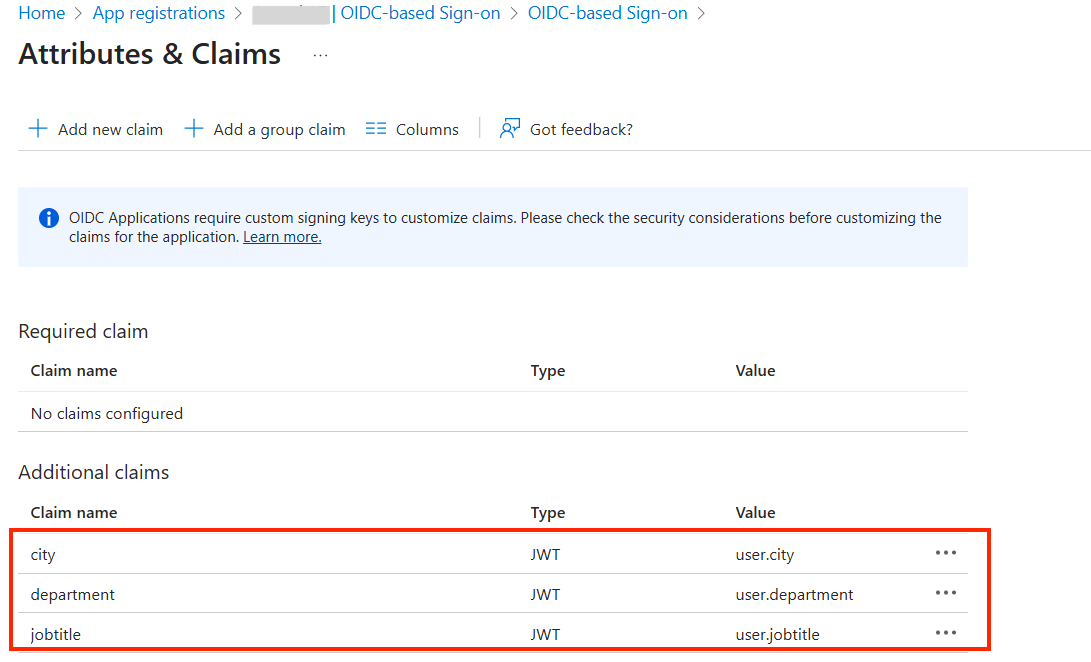
- Repeat the previous step for all built-in attributes to be added.
- Update the application manifest to accept these claims. Navigate to Entra ID > App registrations. Select your app under Owned applications.
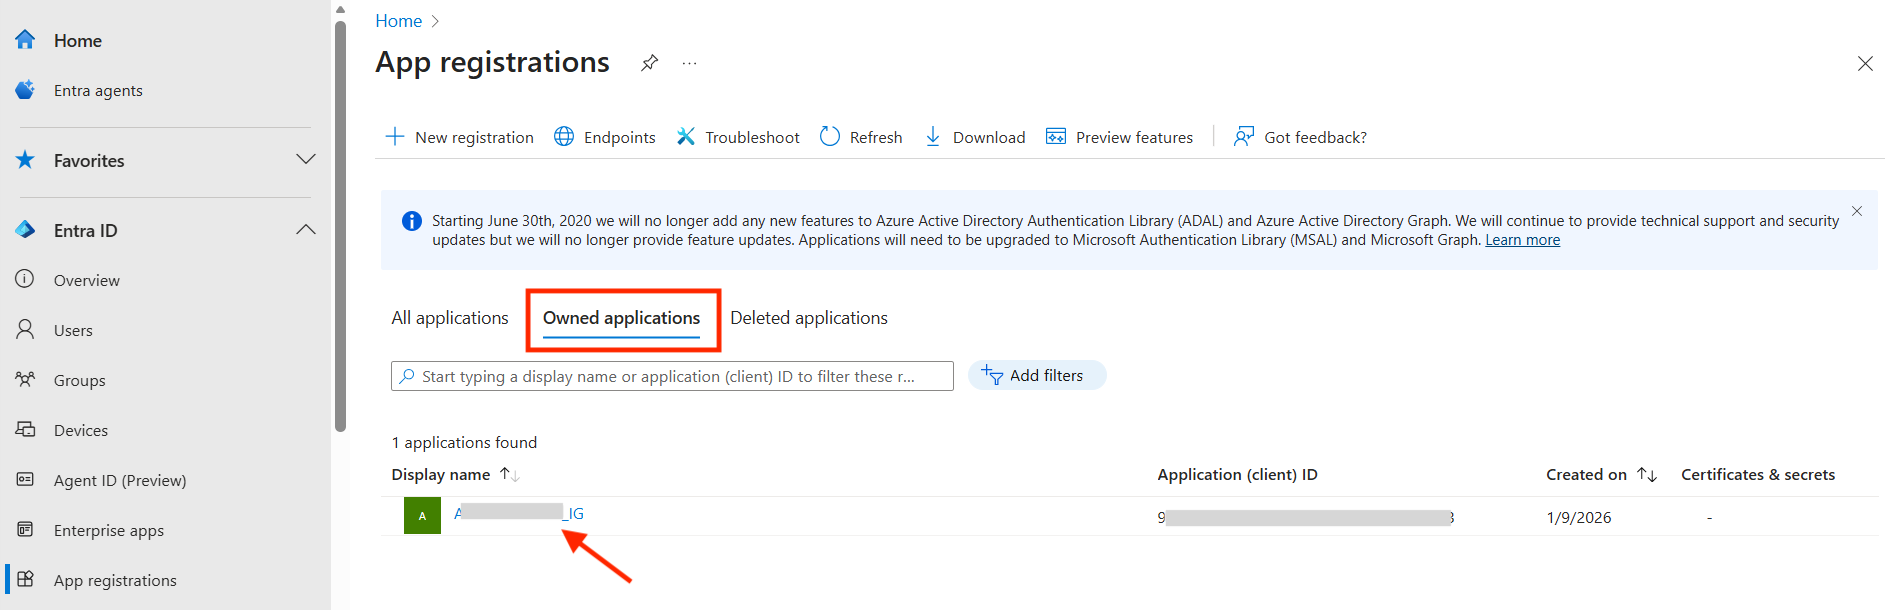
- In the left menu, select Manifest under Manage to open the app manifest.
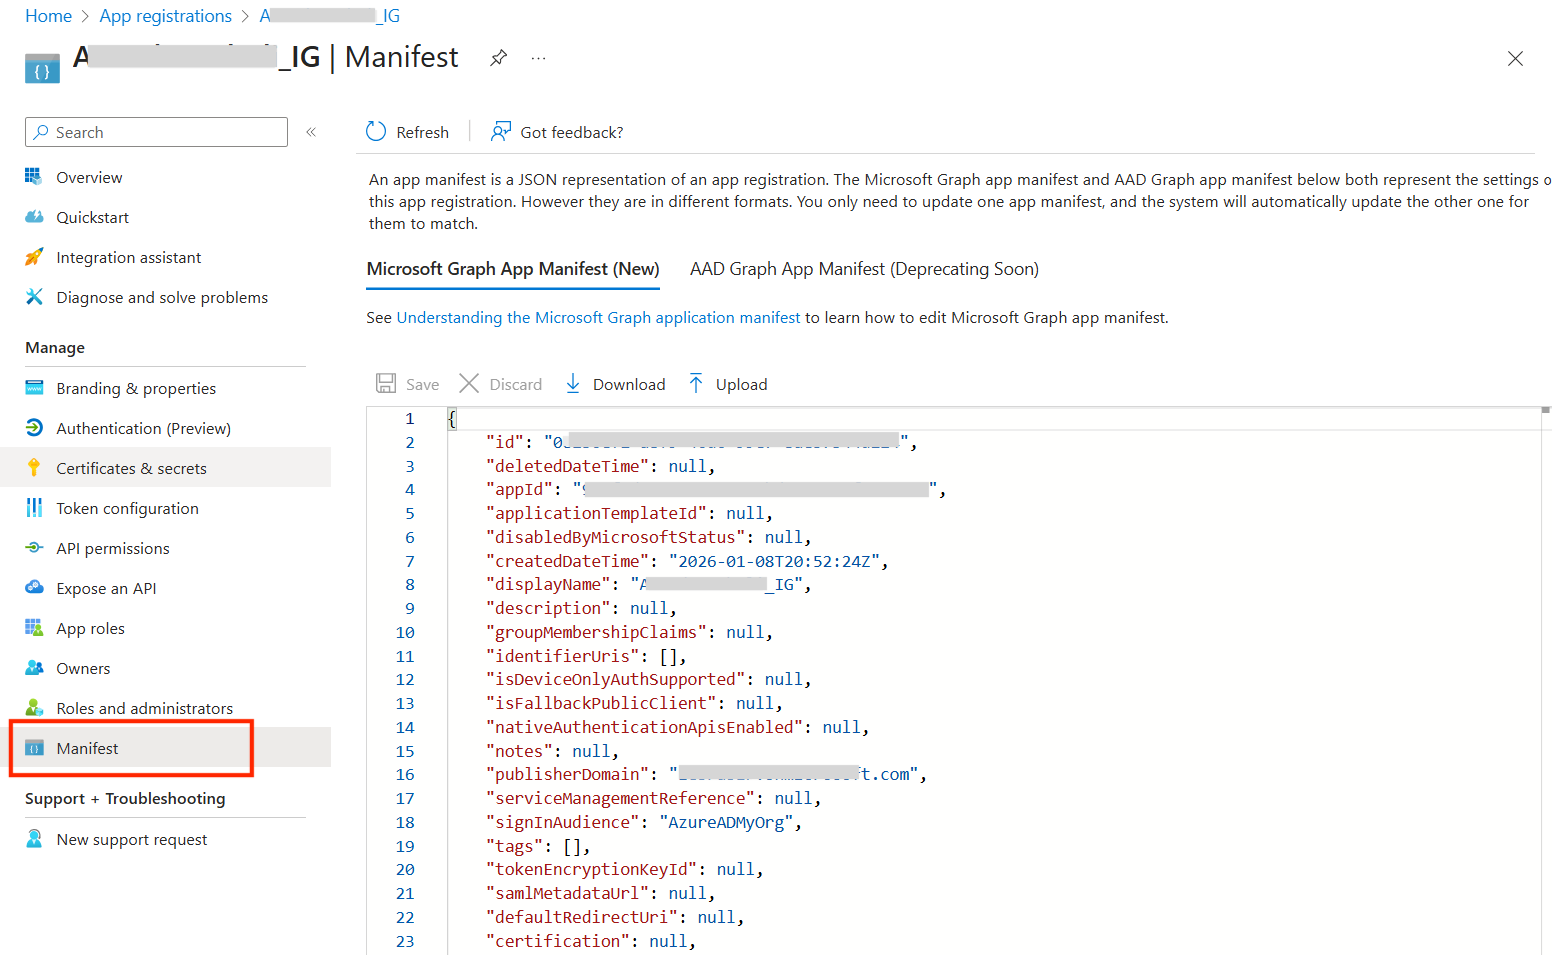
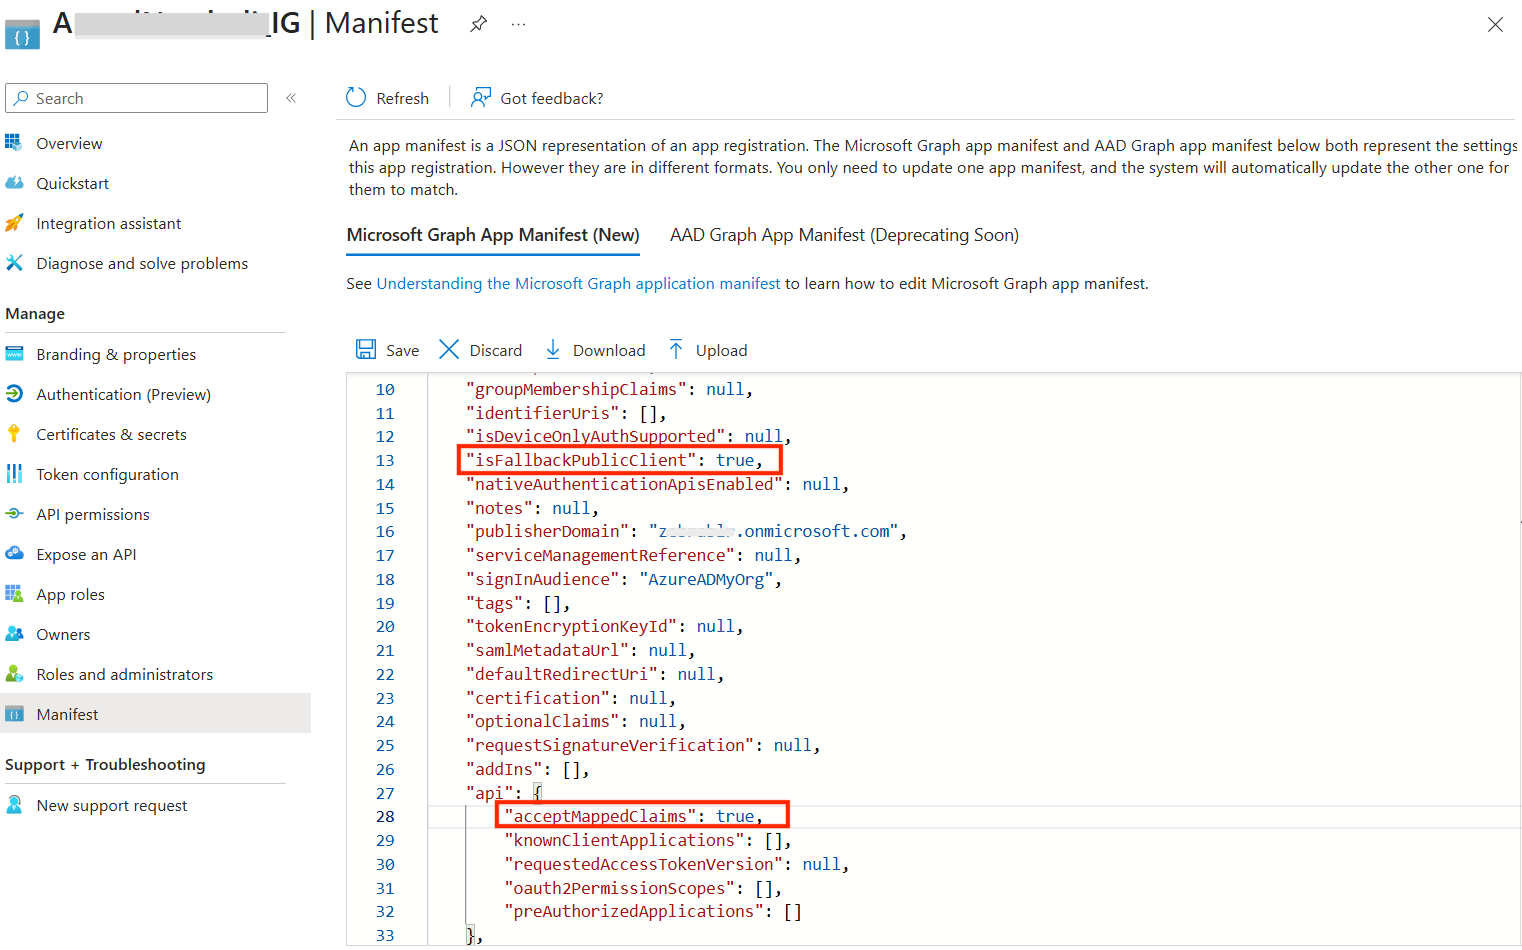
- Locate the following keys and set them to the specified values, then click Save:
- acceptMappedClaims: true
- isFallbackPublicClient: true
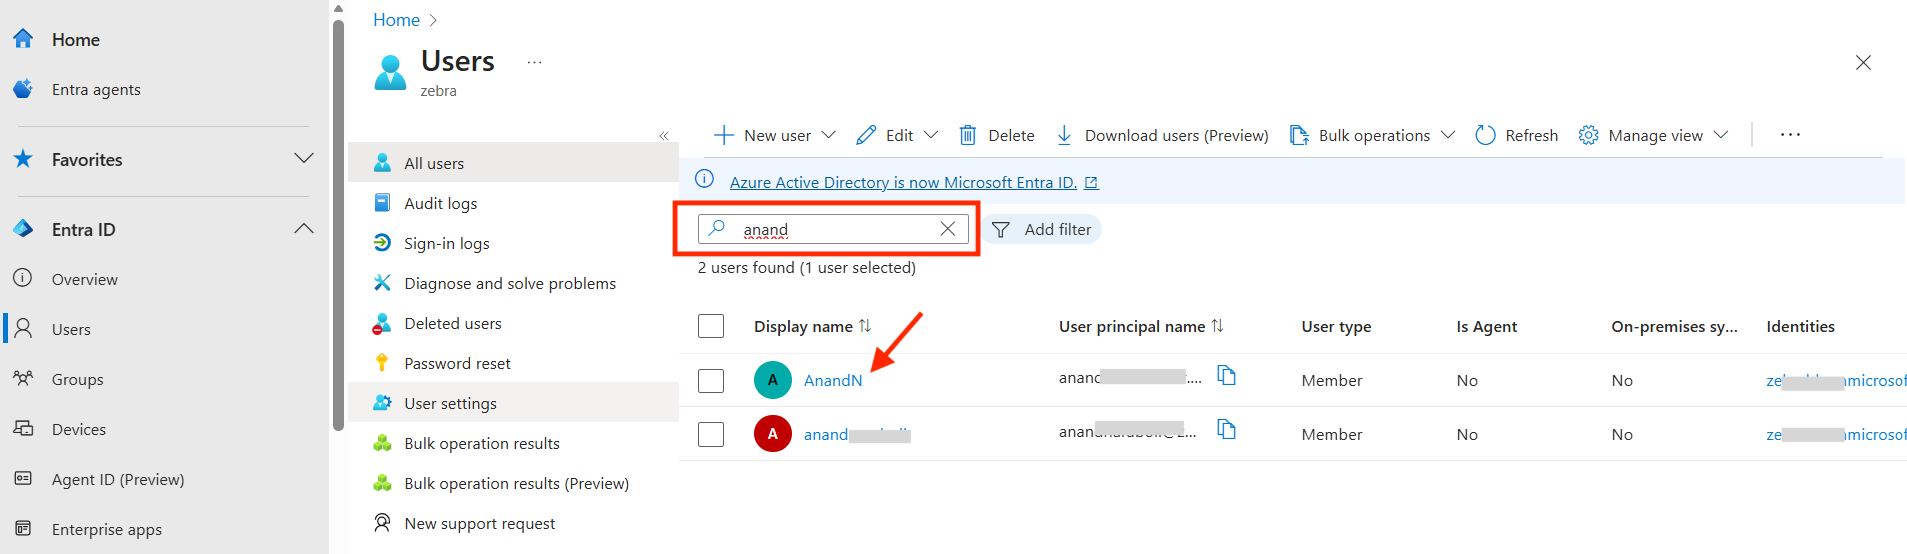
- Configure role(s) for each user. Navigate to Entra ID > Users.
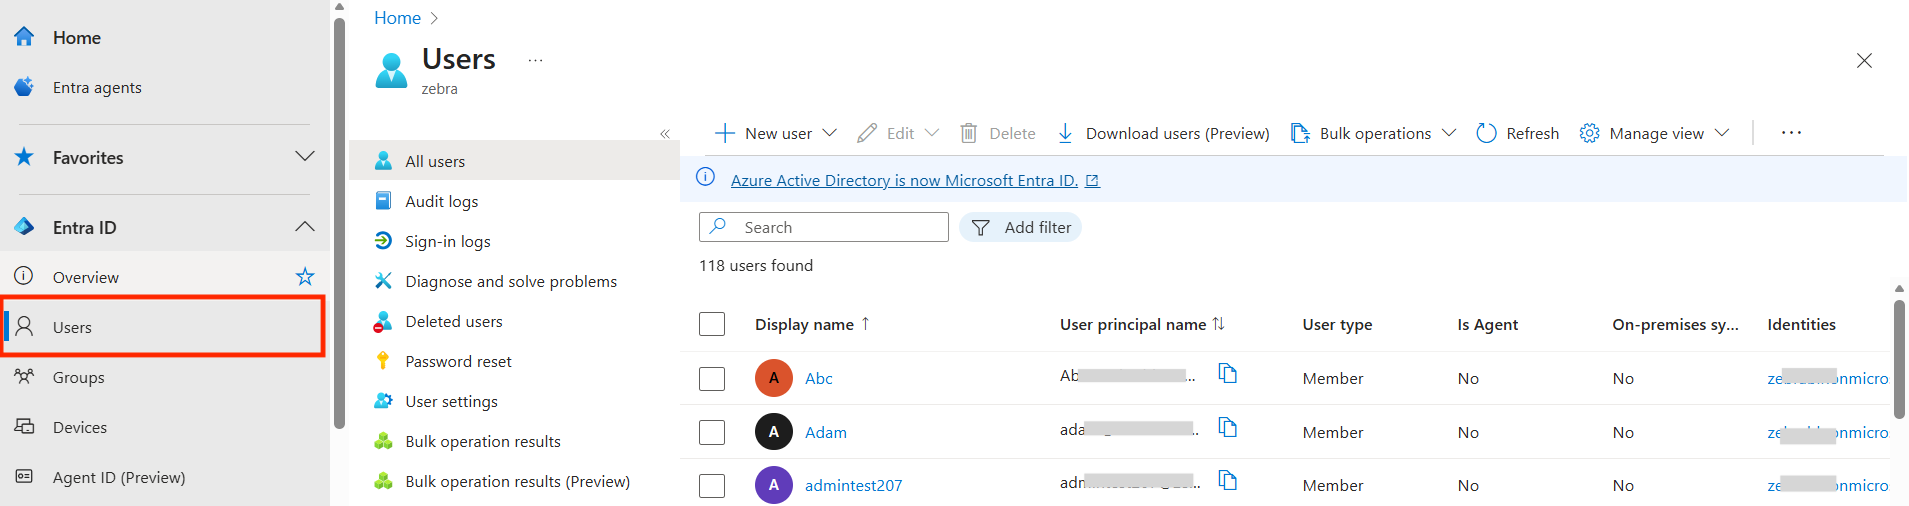
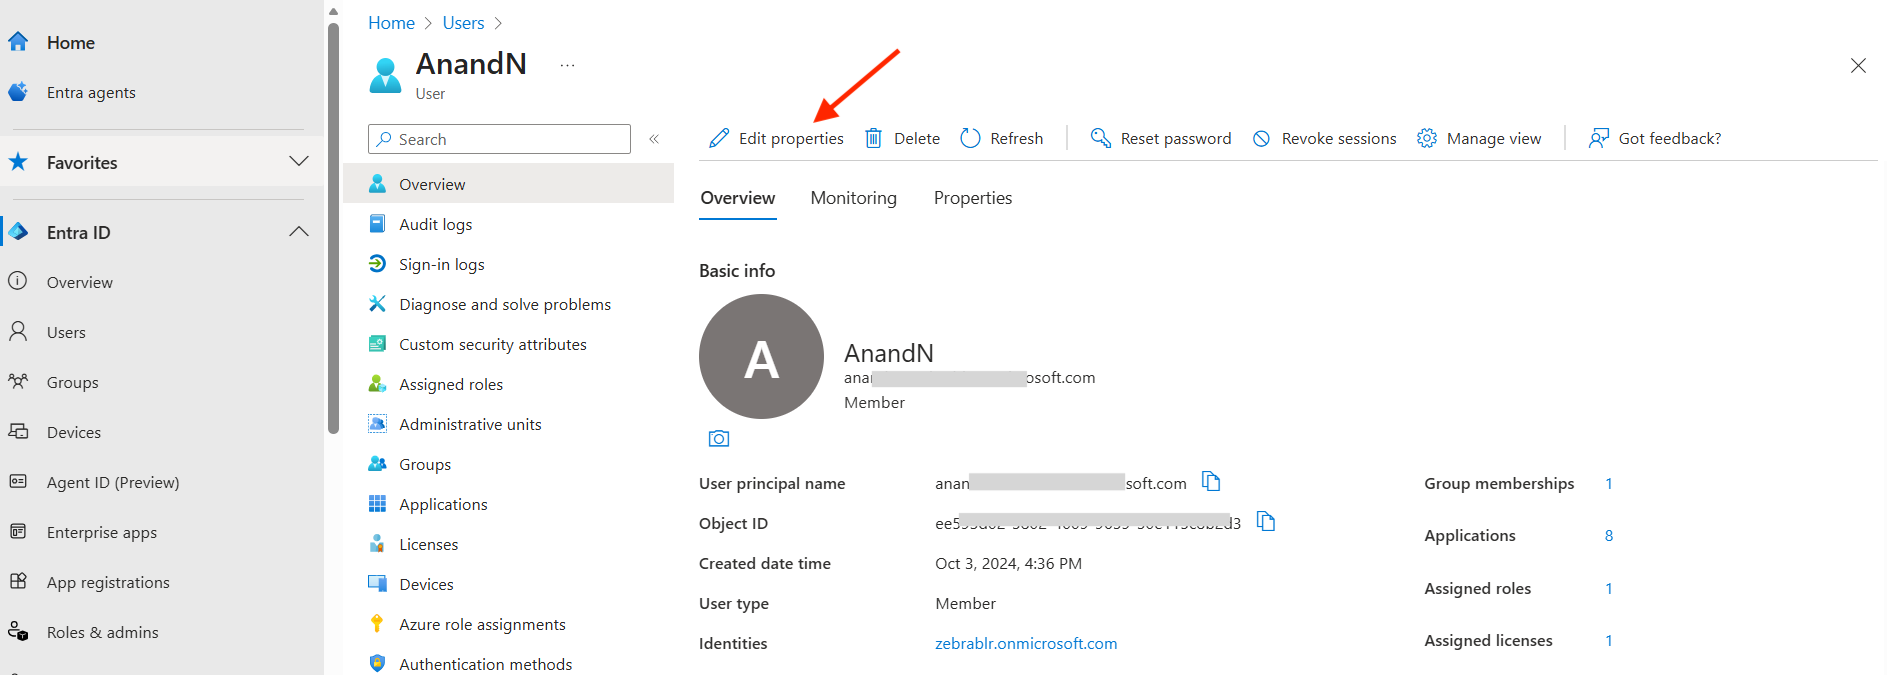
- Search for the user to assign the role, then click on the user name from the results.
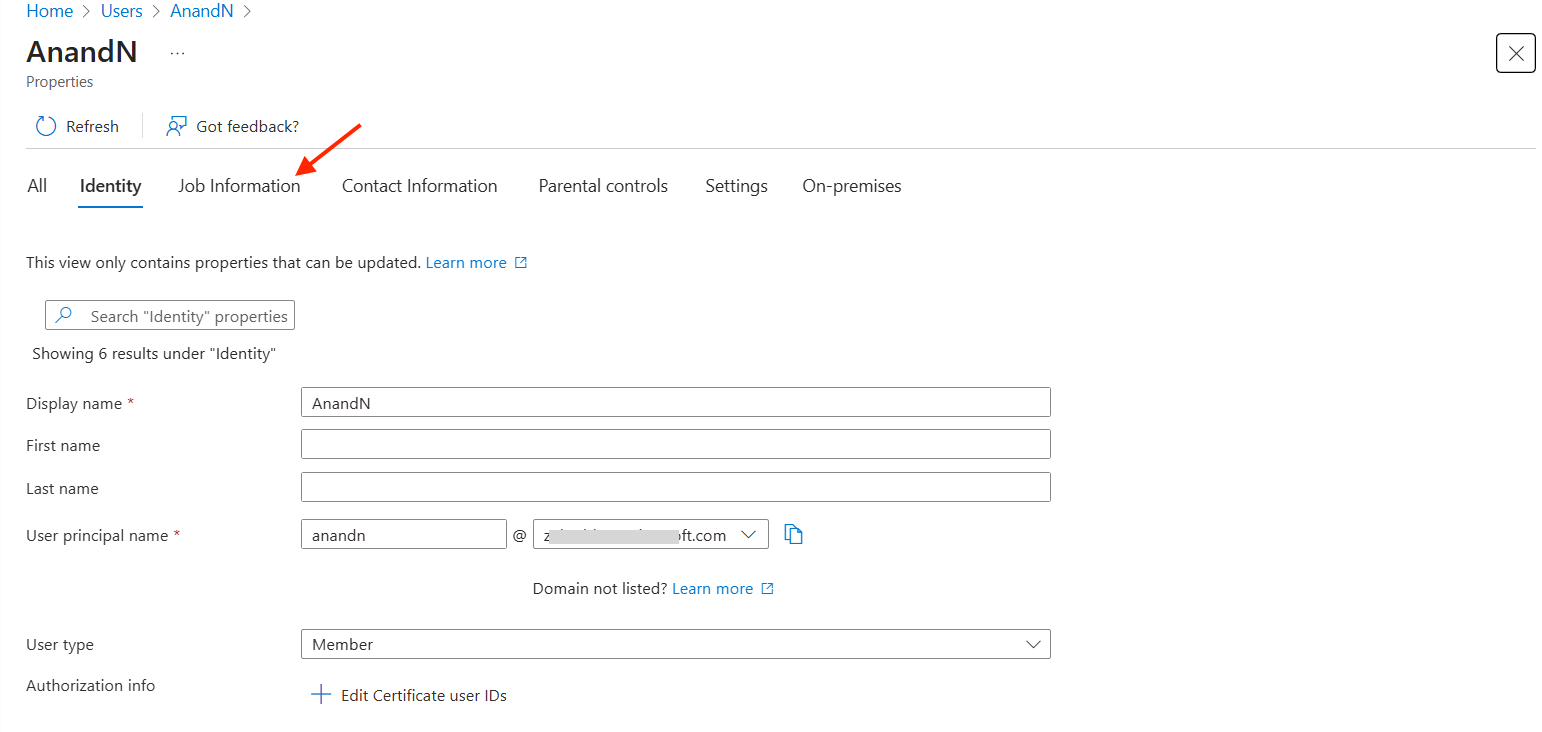
- Click Edit Properties.
- Click Job Information.
- For the Department field, enter the desired value. Record this case-sensitive value, as it serves as the SSO Value in Identity Guardian's SSO Mapping configuration for a later step.
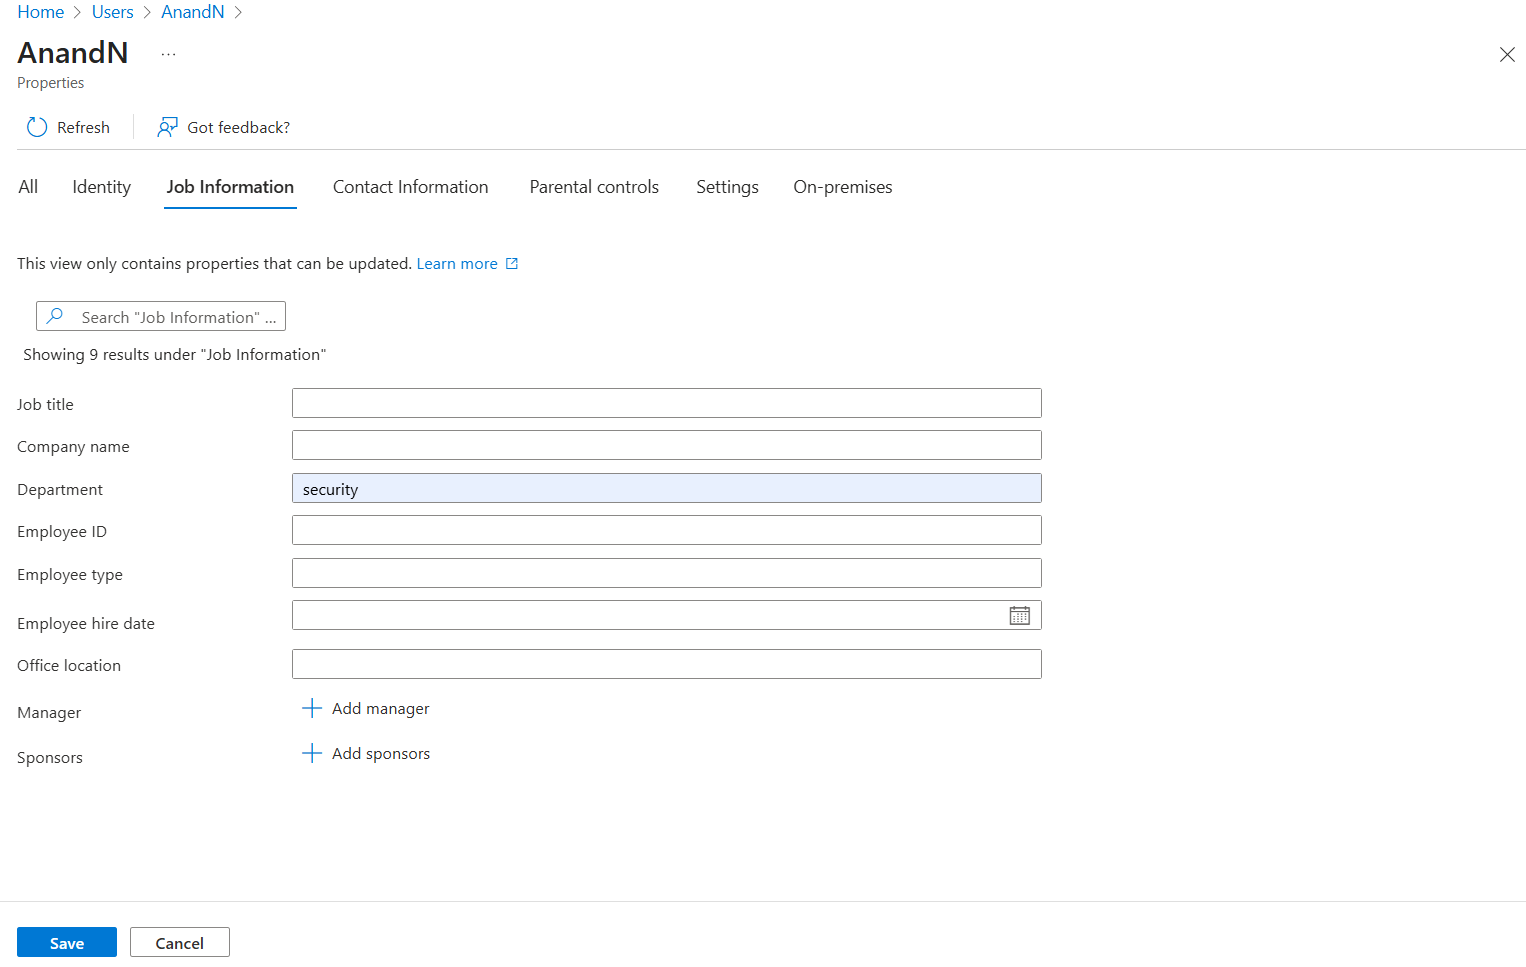 Make any other required edits for the user, including multiple roles if needed, then click Save.
 - Enter the Managed Configuration settings for SSO Mapping via your EMM:
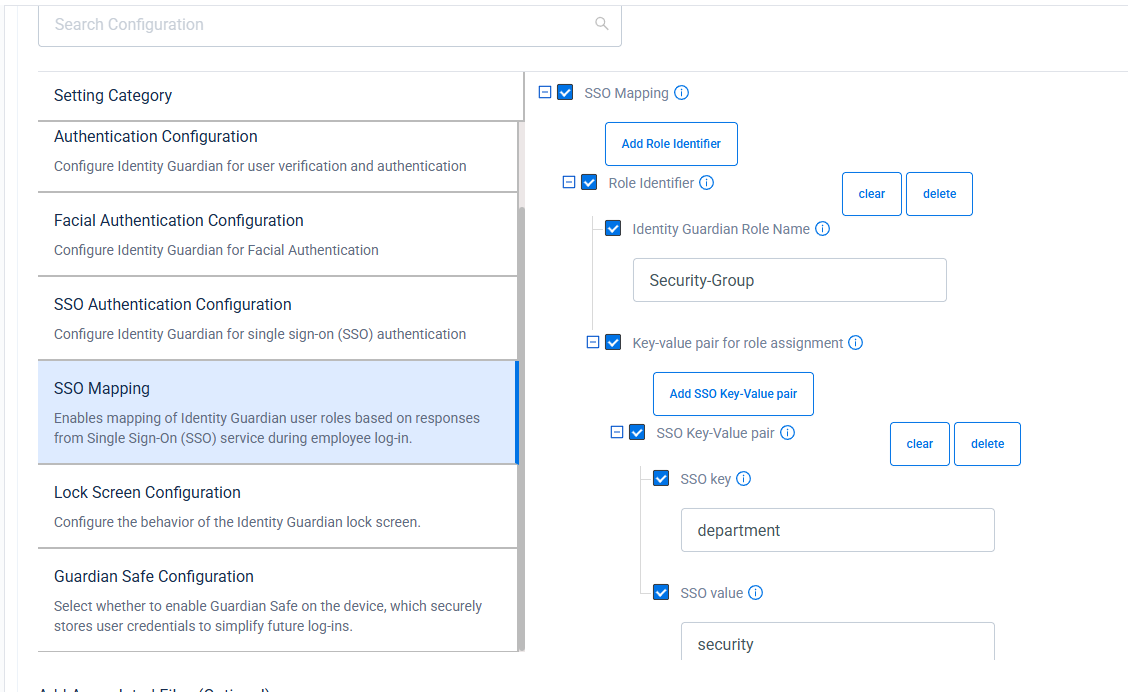
- SSO Mapping - Tick to enable the recognition and mapping of the Single Sign-On (SSO) response to application-specific roles. Click Add Role Identifier as needed to add additional roles.
- Role Identifier - Establishes links between roles in SSO responses and their corresponding roles within the Identity Guardian app.
- Identity Guardian Role Name - Enter the Identity Guardian user role to be assigned based on SSO response during user sign-in
- Key-value Pair for Role Assignment - Add one or more SSO key-value pairs to identify and map users to a predefined Identity Guardian user role. Click Add SSO Key-Value Pair as needed.
- SSO Key-Value Pair - Enable this option to assign a user based on a specific key-value pair received in the SSO response. - SSO Key - Enter the attribute key from the SSO response (from step 5). - SSO Value - Enter the corresponding attribute value(s) (from step 14). To assign multiple values, separate them with a comma.
- SSO Mapping - Tick to enable the recognition and mapping of the Single Sign-On (SSO) response to application-specific roles. Click Add Role Identifier as needed to add additional roles.
- See Managed Configurations to configure any other non-SSO settings.
- Deploy the Managed Configurations to the devices through your EMM.
When a device receives the new configurations, Zebra Identity Guardian activates the lock screen. The user must then authenticate via Single Sign-On (SSO) to access the device. For more details, see User Guide.
PingID
This section provides guidance to integrate Identity Guardian with PingID.
To enable user access to the device through SSO, install and set up Identity Guardian on the devices:
- Deploy and install Zebra Identity Guardian app on the devices.
- Launch the app using an EMM. This step must be performed at least once.
- Enter the Managed Configuration settings for the app via your EMM:
- Select the application mode:
- Application Mode: Authentication
zDNA Cloud Managed App Config
- Application Mode: Authentication
- Configure the Verification Setup to validate the user access:
- Primary Authentication Factor: SSO
- Secondary Authentication Factor: [Select FACE, PASSCODE, or NO_COMPARISON]
- Fallback Authentication Factor: [Select FACE, PASSCODE, NONE, SSO or ADMIN BYPASS PASSCODE]
- Primary Authentication Timeout: [Enter value in ms, e.g. "300000"]
- Fallback Authentication Timeout: [Enter value in ms, e.g. "300000"]
zDNA Cloud Managed Config
- Configure the Lock-screen Event options:
- On Unlock:
- Verification Setup: [Enter the desired authentication scheme, e.g. "Verification Setup1"]
- On Reboot:
- Verification Setup: [Enter the desired authentication scheme, e.g. "Verification Setup1"]
- On AC power connected:
- Verification Setup: [Enter the desired authentication scheme, e.g. "Verification Setup1"]
- On AC power disconnected:
- Verification Setup: [Enter the desired authentication scheme, e.g. "Verification Setup1"]
- On device manual check in:
- Verification Setup: [Enter the desired authentication scheme, e.g. "Verification Setup1"]
- On user change:
- Verification Setup: [Enter the desired authentication scheme, e.g. "Verification Setup1"]
zDNA Cloud Managed Config
- Configure the SSO Authentication Configuration:
- Single Sign On Provider: PingId
- Authentication Protocol: OAuth 2.0 (OIDC)
- Scope: openid email profile
- Userid Identifier: [Specify the user key for identifying the signed-in user]
- Configuration Settings: [Enter the specified string, but replace the following values with those from your own SSO response: logoutURL, revokeURL, tokenURL, authorizationURL, clientId, userInfoUrl]
{ "redirectURI" : "com.zebra.mdna.els:/loginComplete", "logoutURL" : "[enter your logout URL]", "revokeURL" : "[enter your revoke URL]", "tokenURL" : "[enter your token URL]", "authorizationURL" : "[enter your authorization URL]", "clientAuthType" : 0, "clientId" : "[enter your clientID]", "certificatePhrase" : "", "userInfoUrl" : "[enter your userInfo URL]", "certificate" : "" }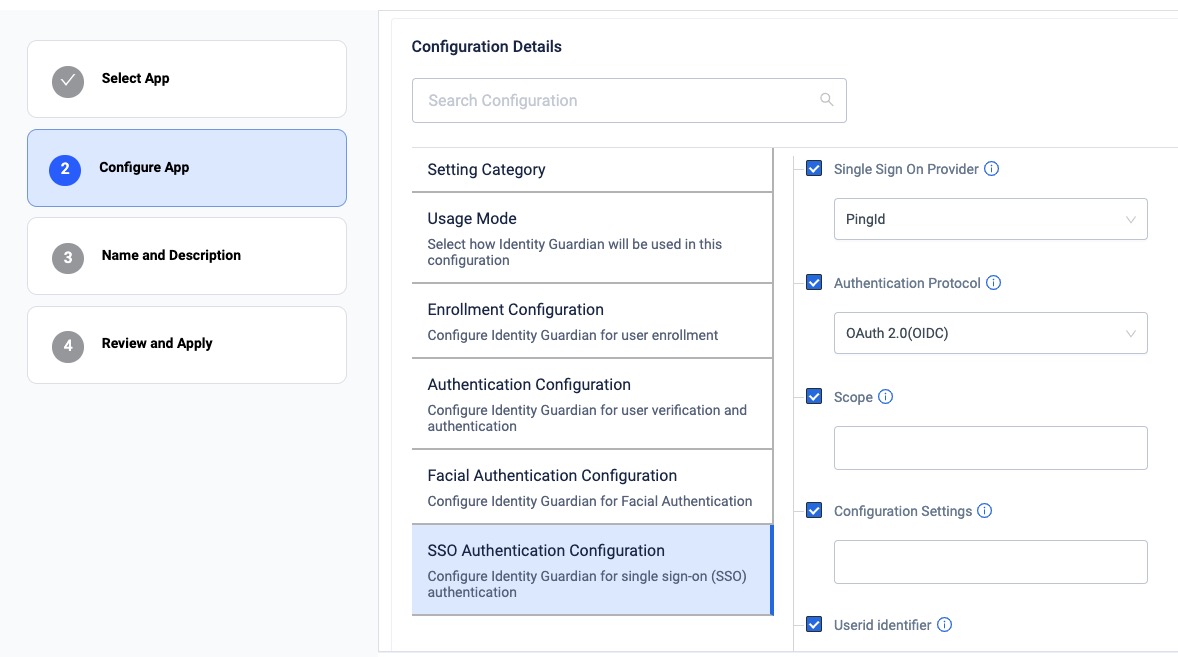 zDNA Cloud Managed App Config
- Select the application mode:
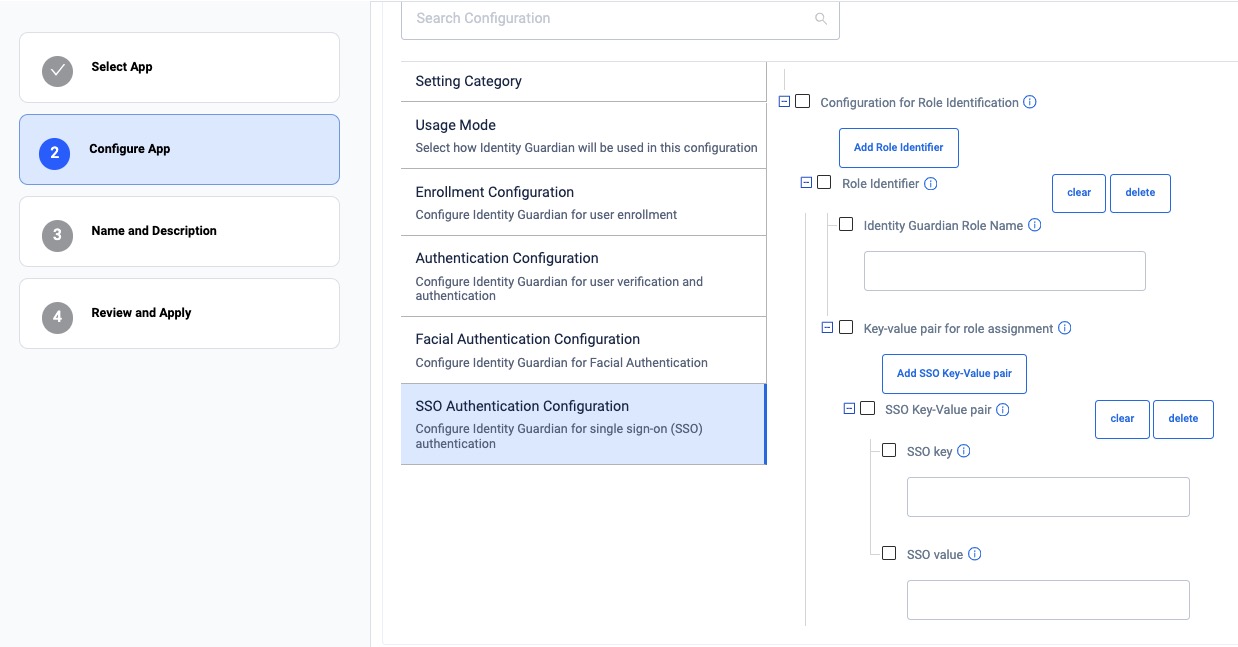
- If mapping the SSO response to application-specific roles, enter the following (see Managed Configurations for more information):
- Configuration Role Identification - Enables the recognition and mapping of the Single Sign-On (SSO) response to application-specific roles. Click Add Role Identifier as needed.
- Role Identifier - Establishes links between roles in SSO responses and their corresponding roles within the Identity Guardian app.
- Identity Guardian Role Name - Enter the Identity Guardian user role to be assigned based on SSO response during user sign-in
- Key-value Pair for Role Assignment - Add one or more SSO key-value pairs to identify and map users to a predefined Identity Guardian user role. Click Add SSO Key-Value Pair as needed.
- SSO Key-Value Pair - Choose whether the SSO response, which contains the user key and values, should be mapped to a corresponding user role in Identity Guardian
- SSO Key - Enter the SSO key to map it to an Identity Guardian role.
- SSO Value - Enter the SSO value(s) to map to the Identity Guardian role. Use commas to separate multiple entries.
 zDNA Cloud Managed Config
- Configuration Role Identification - Enables the recognition and mapping of the Single Sign-On (SSO) response to application-specific roles. Click Add Role Identifier as needed.
- See Managed Configurations to configure any other non-SSO settings.
- Deploy the Managed Configurations to the devices through your EMM.
When a device gets updated with the new configurations, Zebra Identity Guardian activates the lock screen. The user is then required to authenticate themselves using Single Sign-On (SSO) to gain access to the device. See User Guide for more information.
Okta
This section provides guidance to integrate Identity Guardian with Okta using OAuth 2.0 (OIDC) protocol.
I. Register Zebra Identity Guardian
II. Configure Zebra Identity Guardian App
I. Register Zebra Identity Guardian
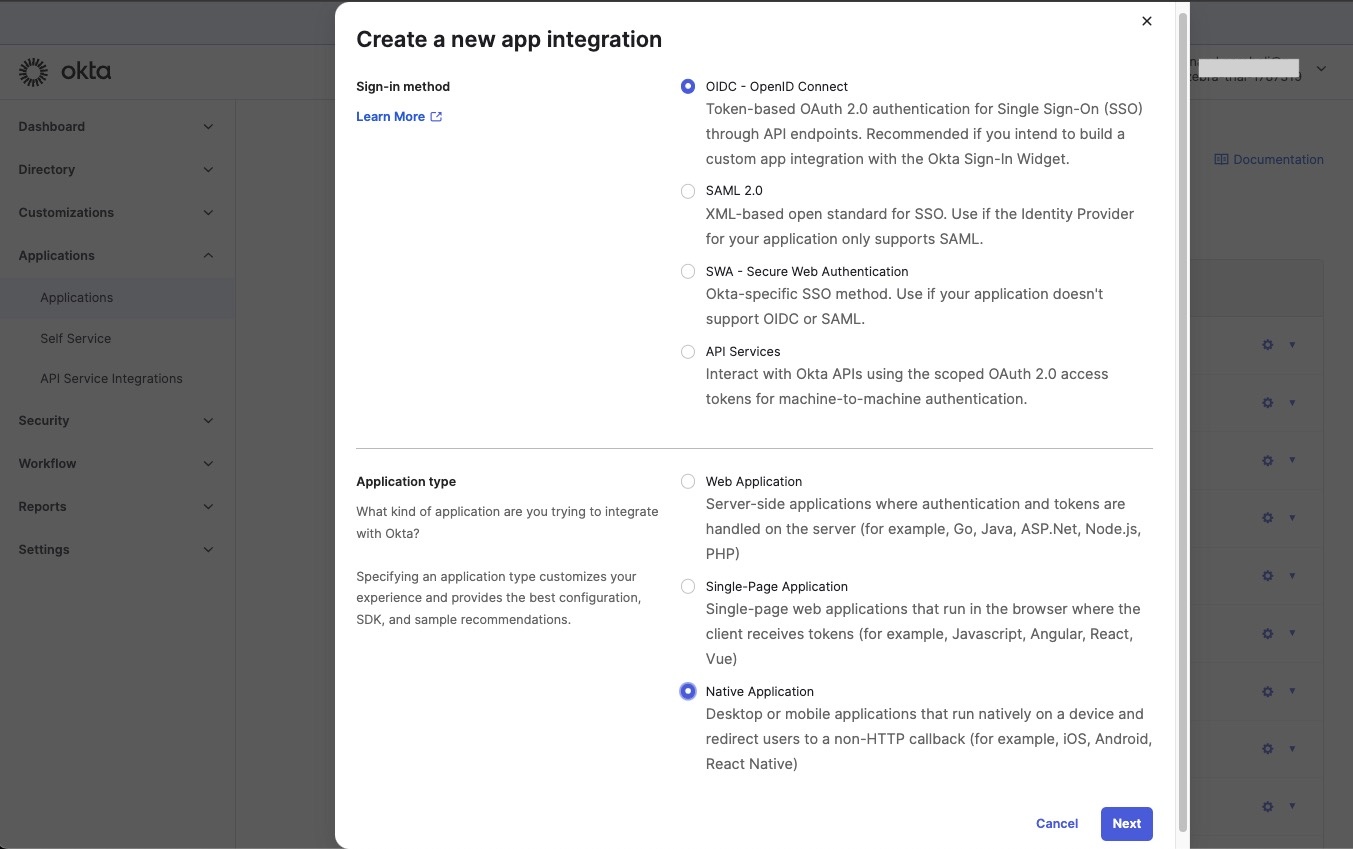
In the Okta web portal, create a new application. From the left menu, select Applications > Applications. Click on Create App Integration.

Select OIDC, then select Native Application. Click Next.
Enter the App integration name. If needed, select Refresh Token, which contains credentials that can be used to obtain a new access token without requiring the user to re-authenticate. This is particularly useful for maintaining a user’s session without requiring them to log in again after their access token expires. For Sign-in redirect URIs and Sign-out redirect URIs, enter the following:
com.zebra.mdna.els:/loginComplete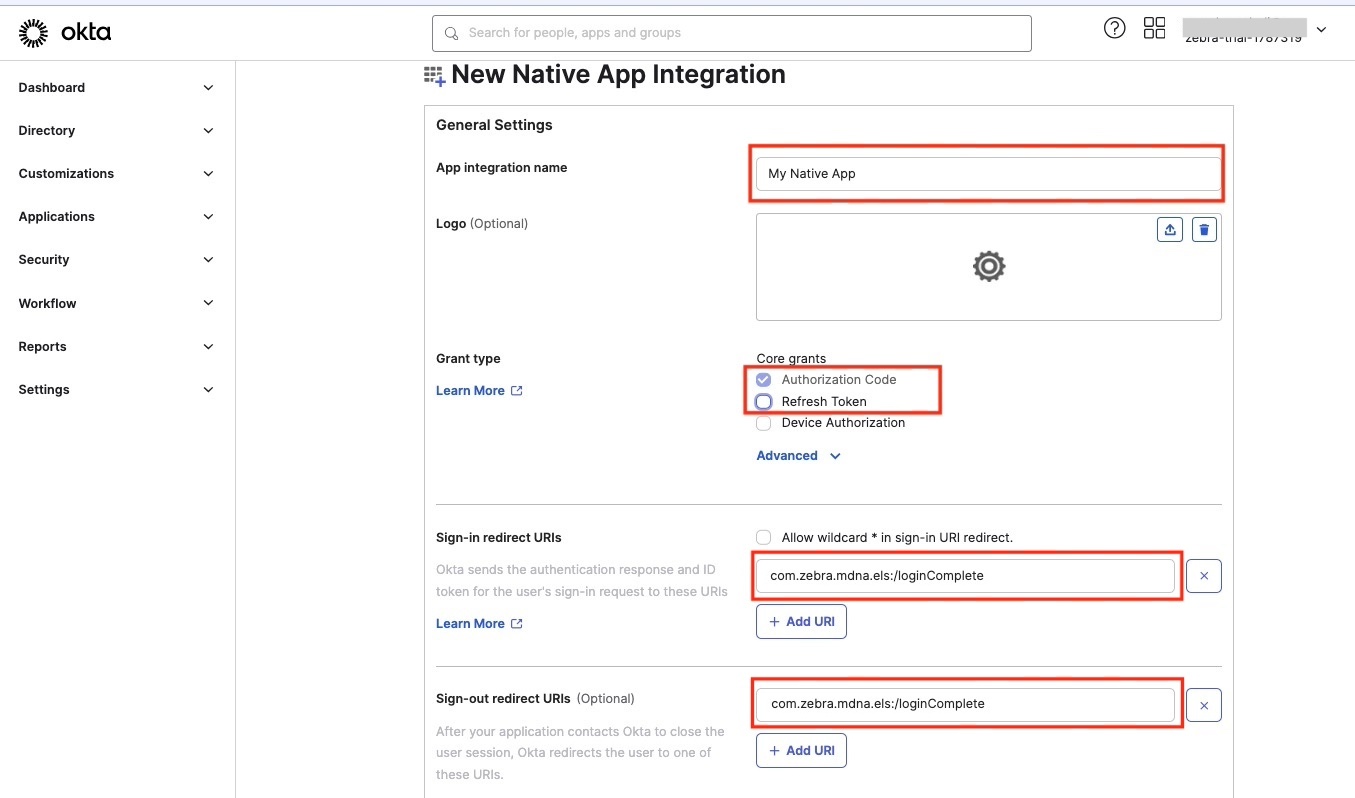
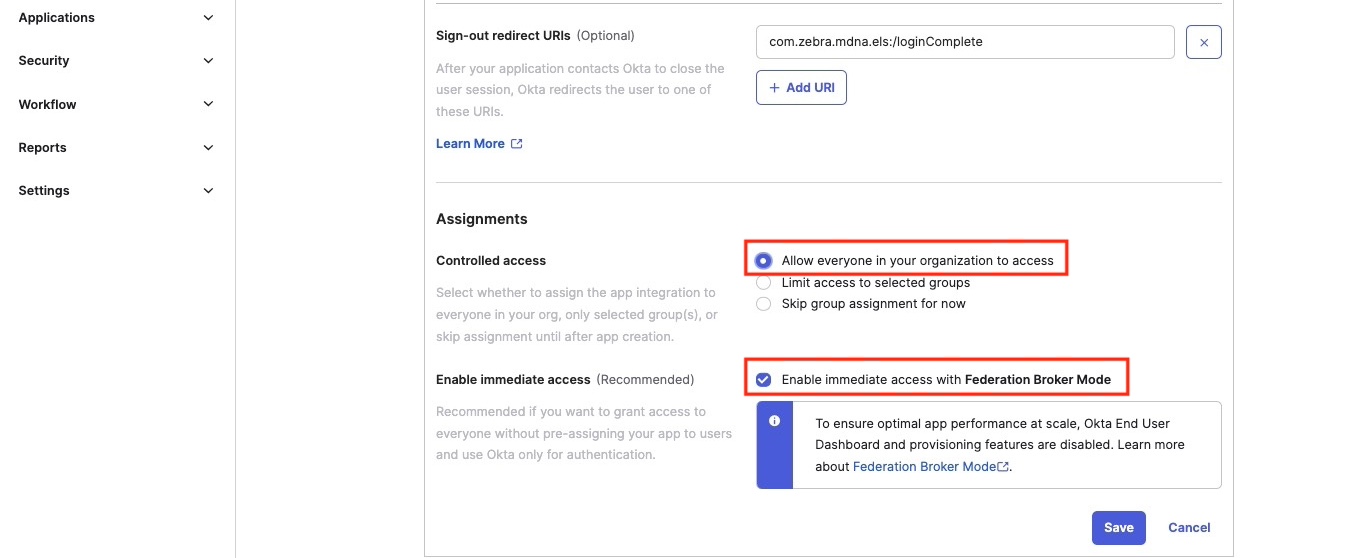
For Controlled access, select Allow everyone in your organization to access. Then select Enable immediate access with Federation Broker Mode. Click Save.
From Security > API, click on Default.
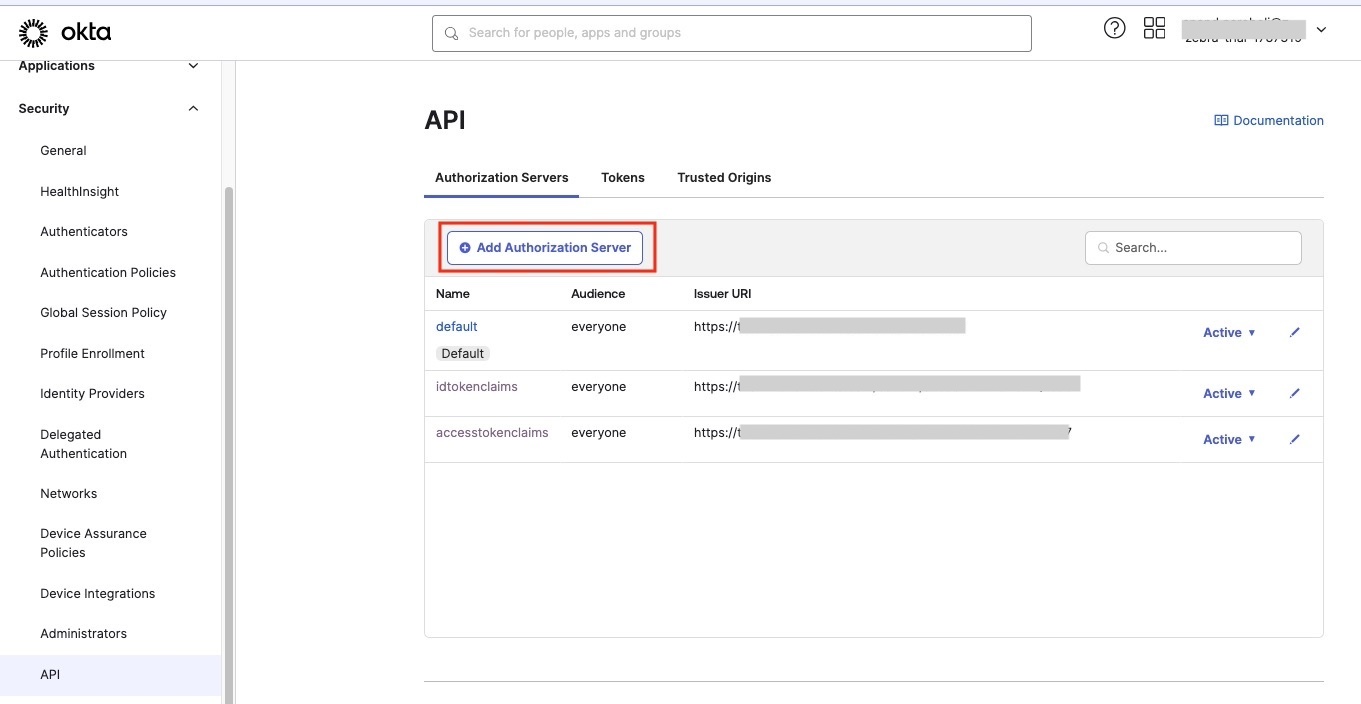
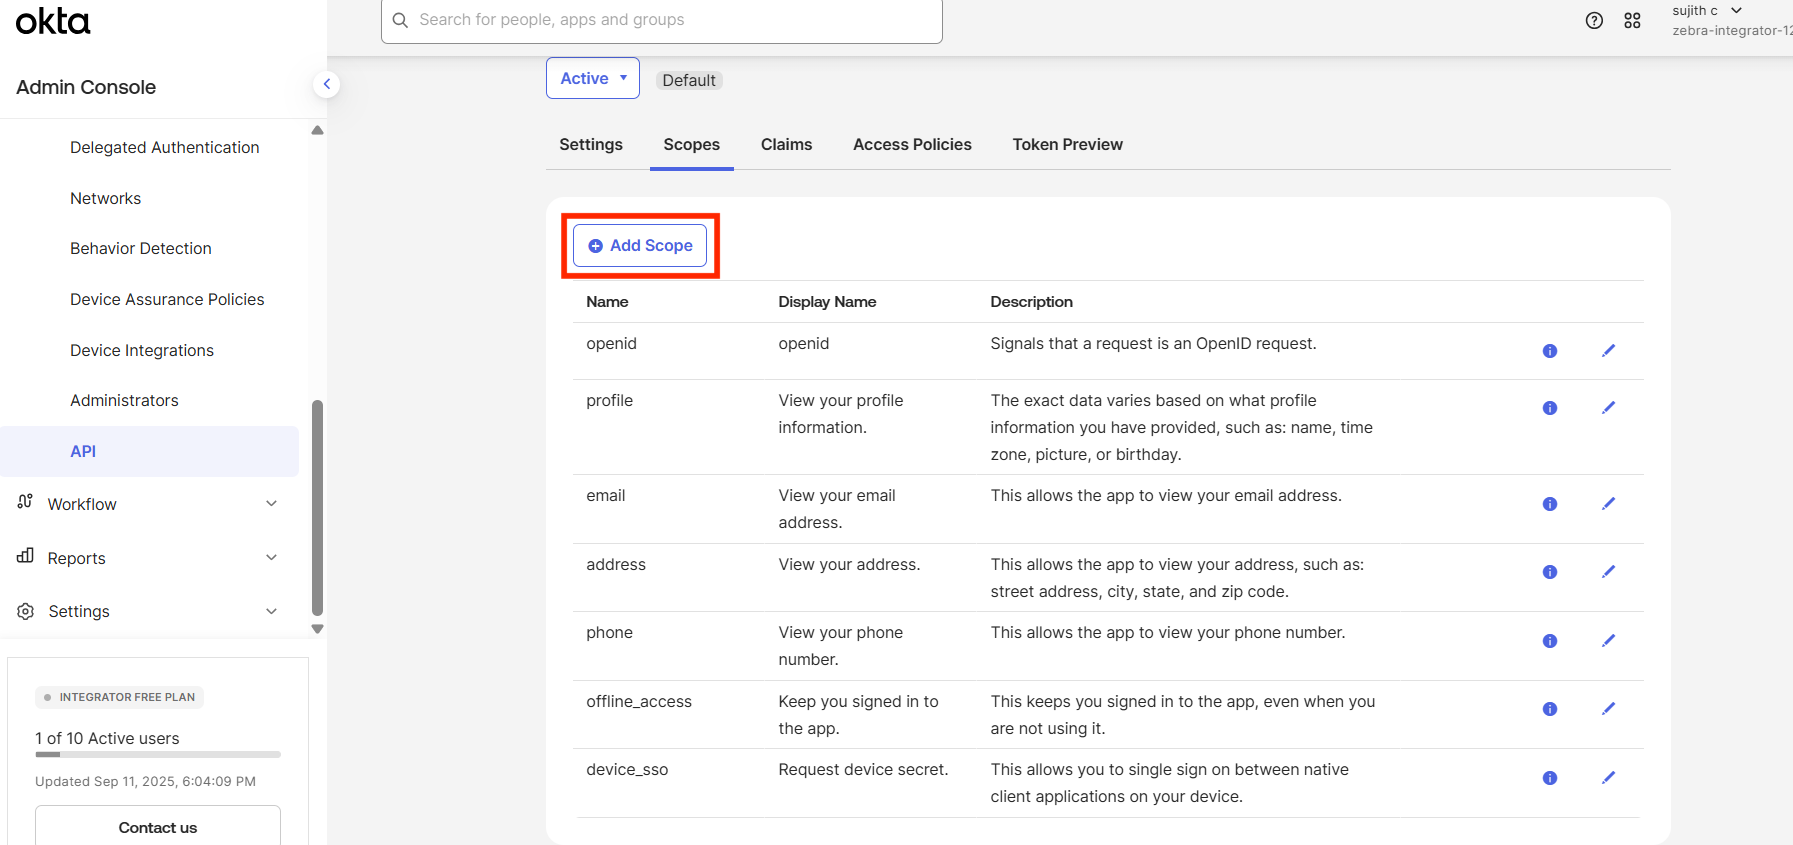
These scopes are enabled by default: openid, email, profile, offline_access. Click Add Scope.
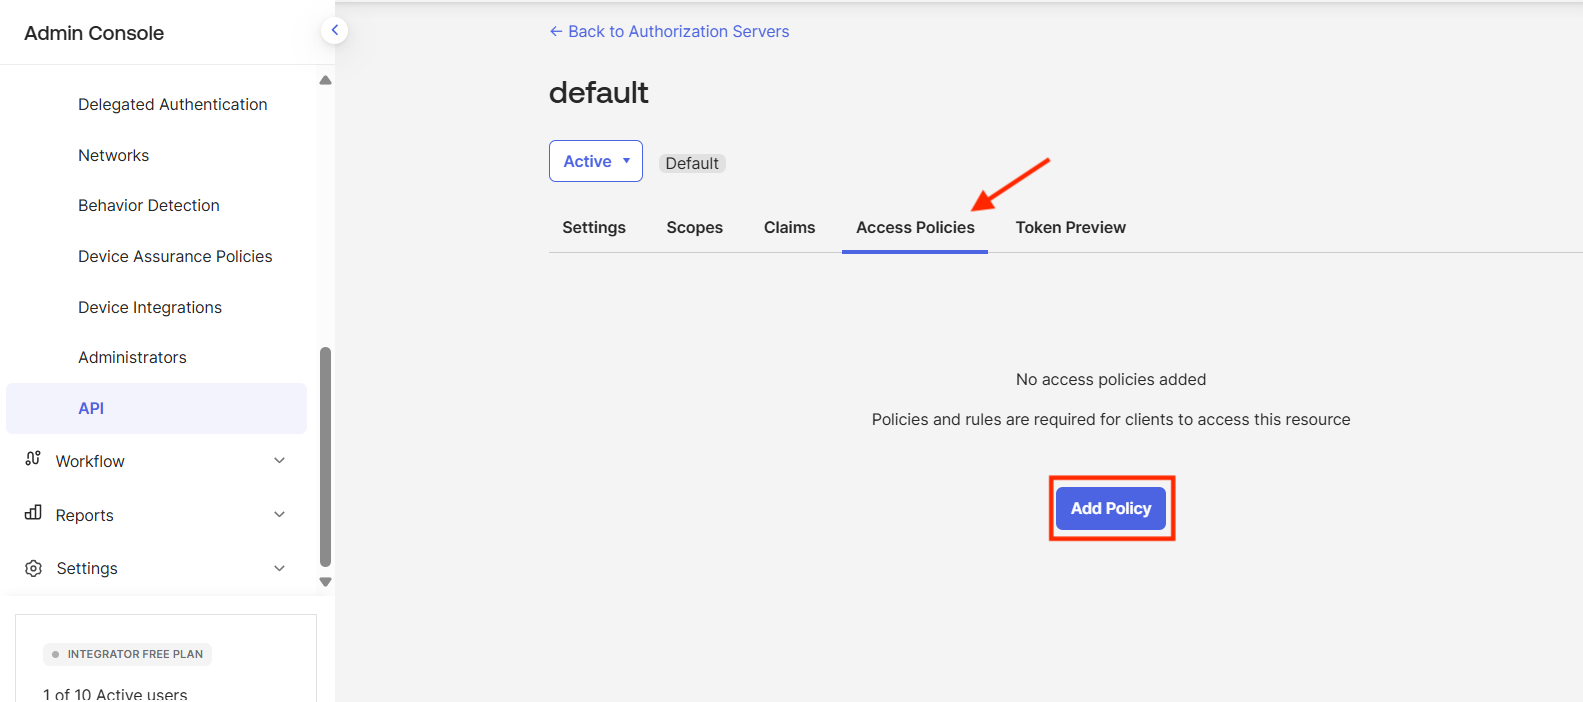
Click on the Access Policies tab, then click on Add Policy.
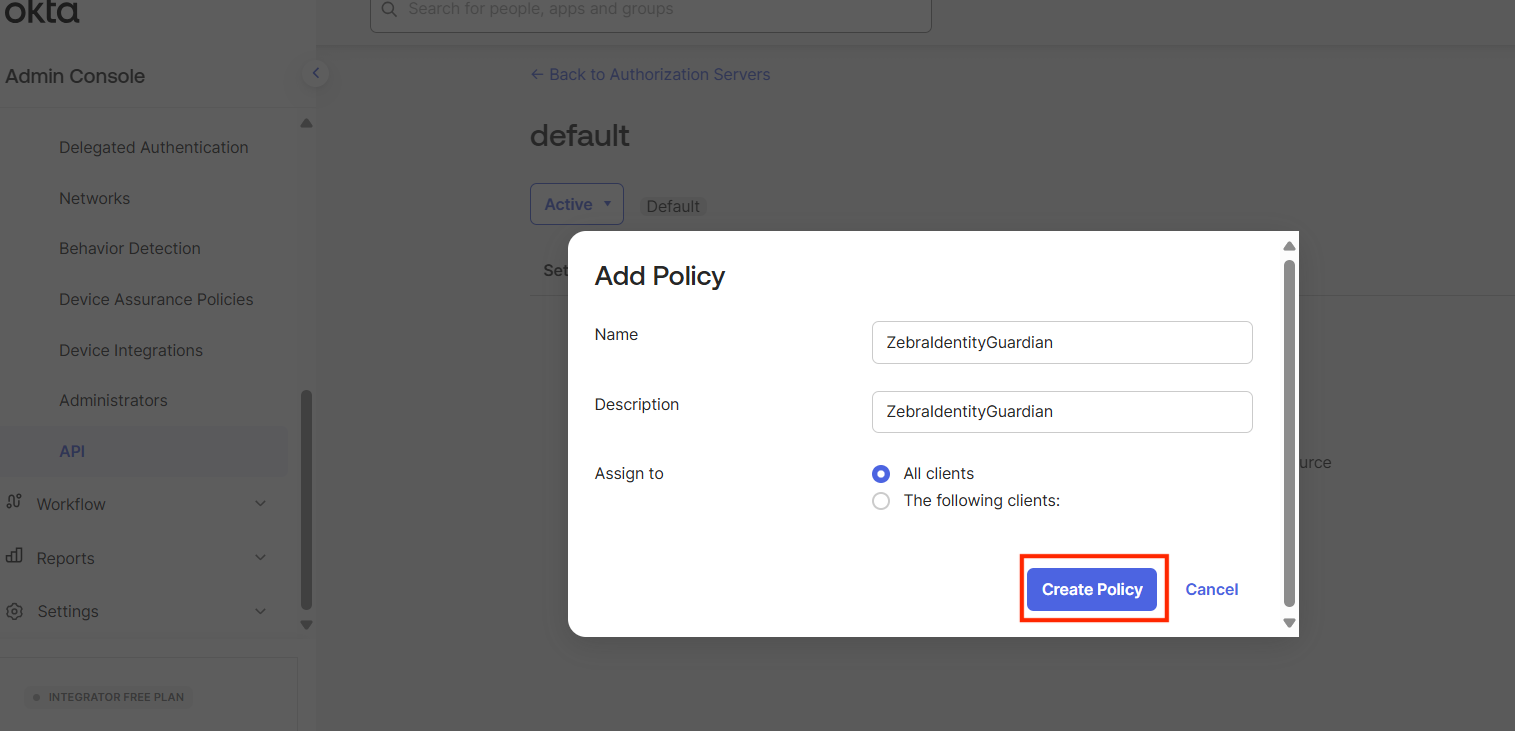
Enter a name and description. Click Create Policy.
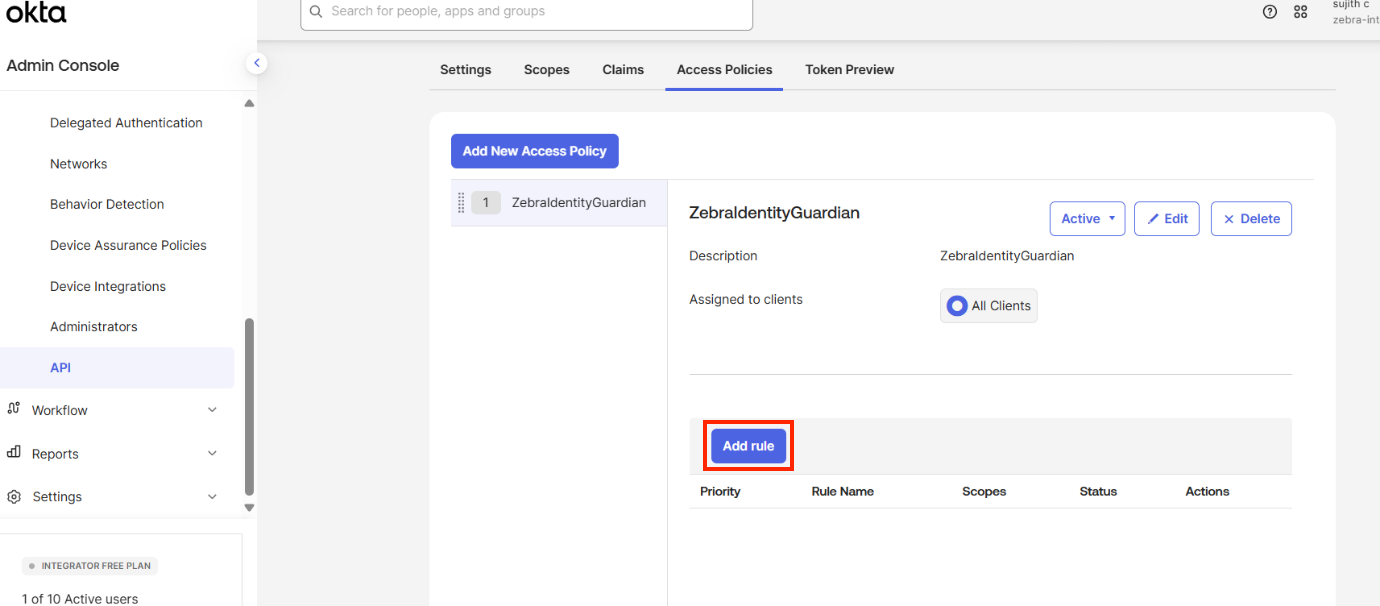
The policy is added. Click Add Rule.
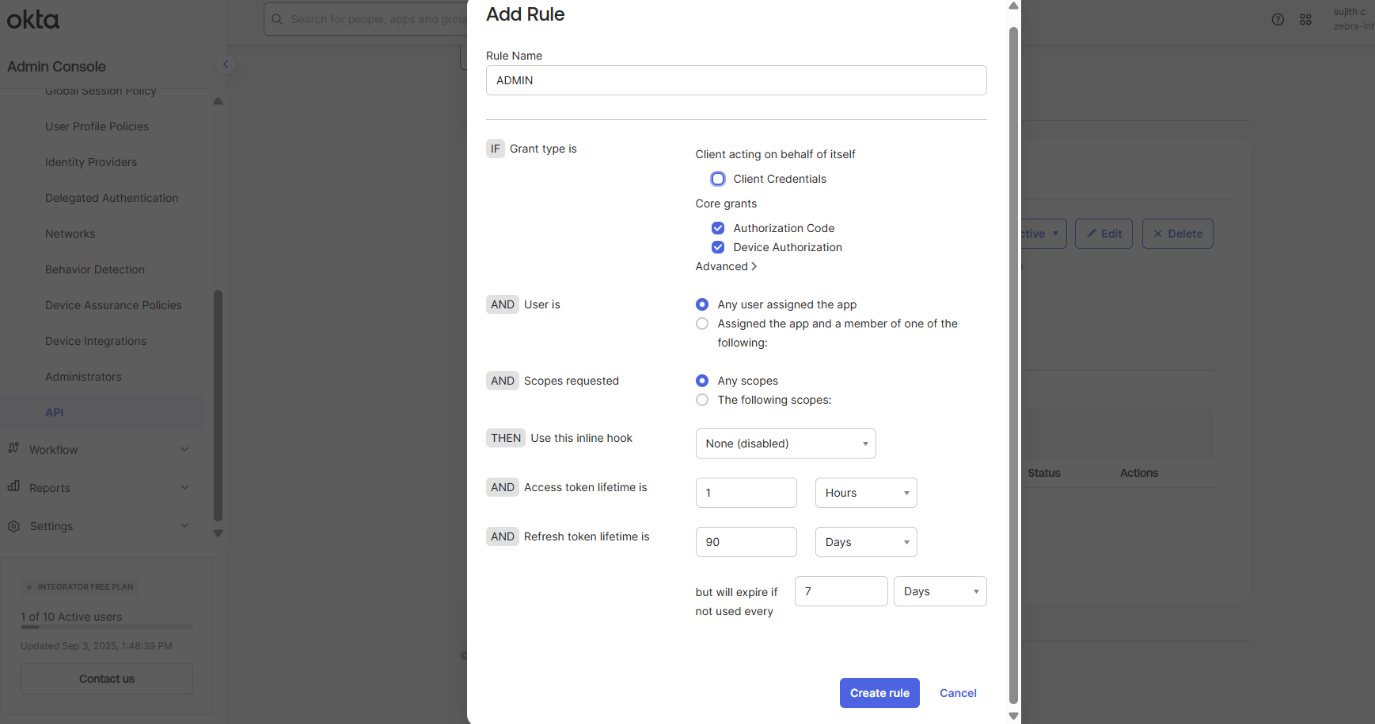
Enter a name for the rule and fill out the remaining fields as needed. Click Create rule.
The rule is added.
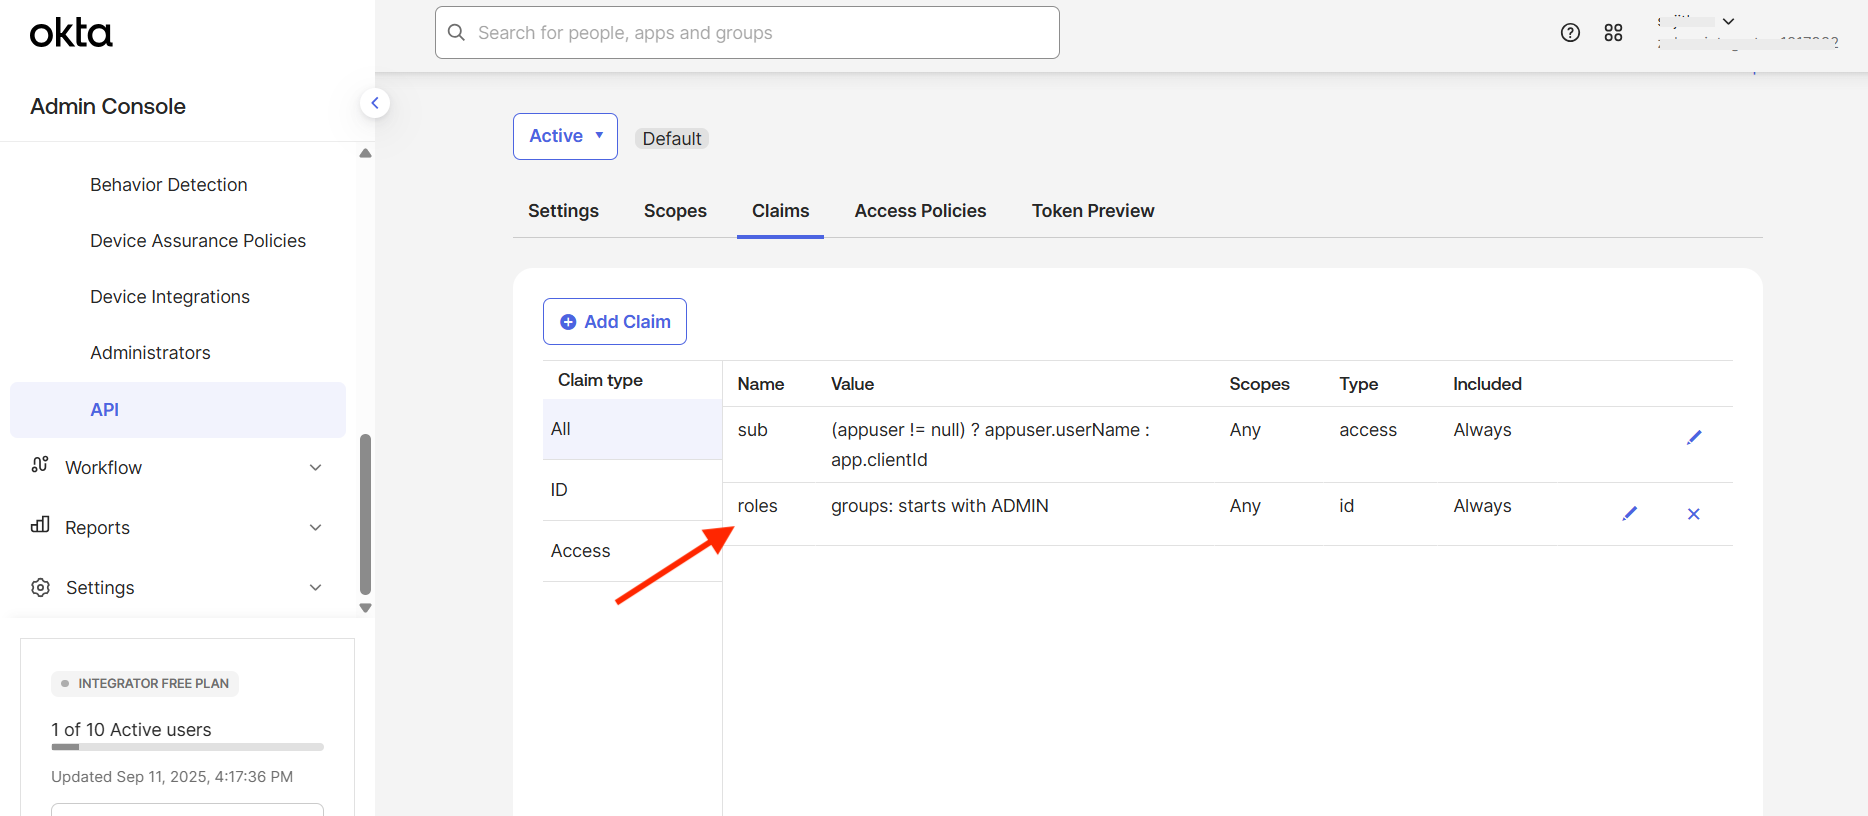
Click the Claims tab to create a user role. This role will be used for role mapping in Identity Guardian. Click Add Claim.
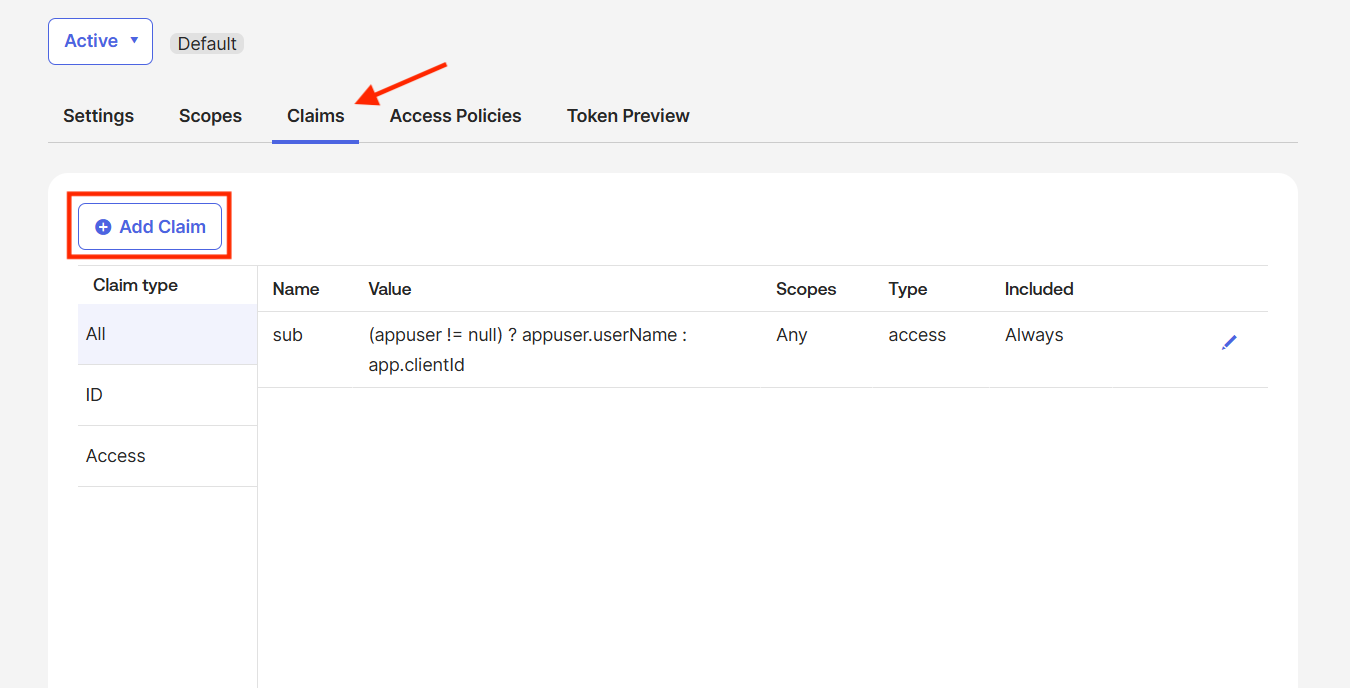
Enter a name. For Include in token type select ID Token, Value type select Groups, select a filter and enter "ADMIN" in the text field, and for Include In select Any scope.Click Create.
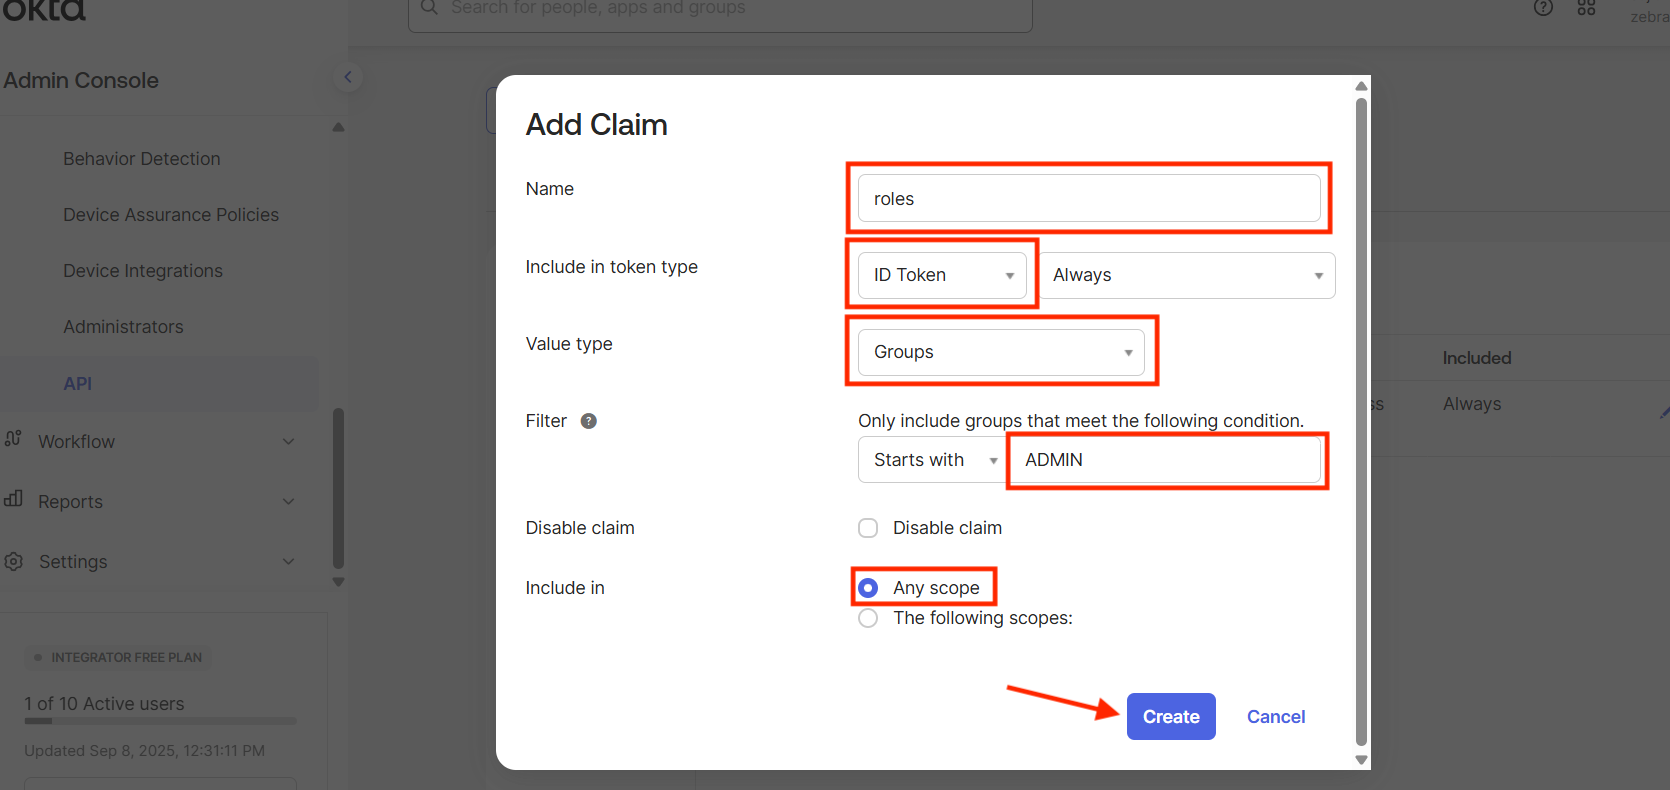
The claim is added.
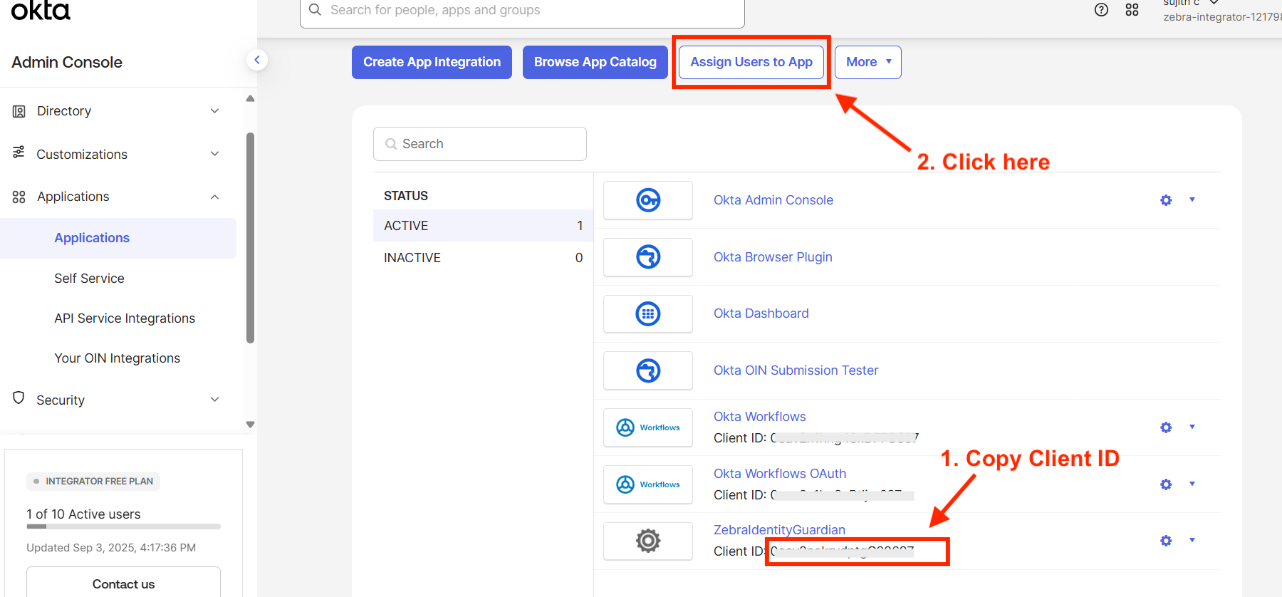
Go to Applications > Applications. Copy the Client ID of the application created in step 3, e.g. ZebraIdentityGuardian. This will be needed for a later step. Then, click on the Assign Users to App button to add users to access the created application.
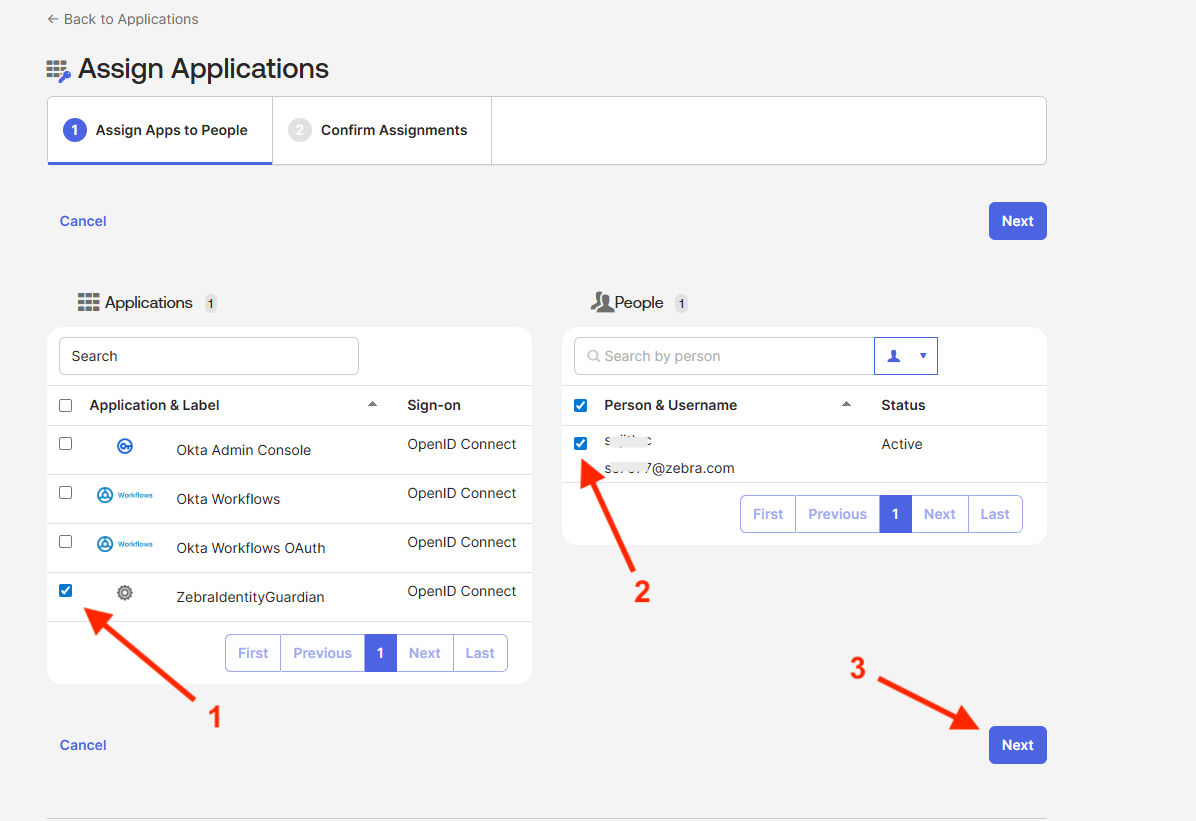
In the Applications section, select the application created. In the People section, select the user. Click Next to assign the application to the user.
Go to Security > API. Click on default.

The Settings screen appears. Click on the Metadata URI link.
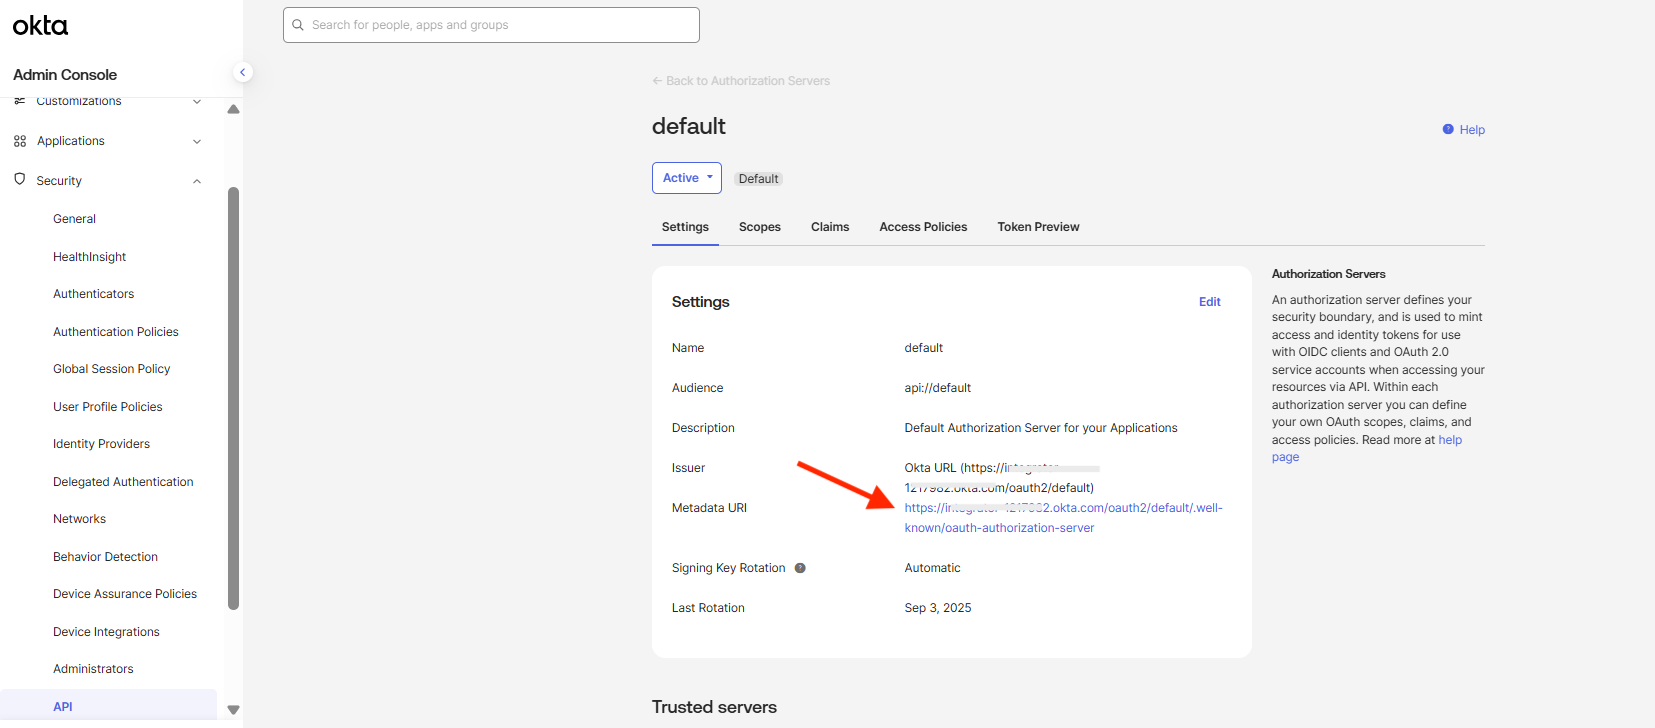
The browser opens displaying the Metadata URI, which includes the Identity Guardian end point APIs needed for Okta operations. Use the JSON format below to build the SSO configuration needed for Identity Guardian. Replace the placeholders, indicated by angled brackets
<>, With the appropriate values obtained from the Metadata URI. This JSON data will be used in the next section to complete the SSO configuration.{ "authorizationScope": "openid, email, profile, offline_access", "redirectURI": "com.zebra.mdna.els:/loginComplete", "logoutURL": "<Enter the value specified for 'end_session_endpoint'>", "tokenURL": "<Enter the value specified for 'token_endpoint'>", "authorizationURL": "<Enter the value specified for 'authorization_endpoint'>", "clientAuthType": 0, "clientId": "<Enter the Client ID retrieved from step 15 above>", "certificatePhrase": "", "userInfoUrl": "<Enter the value specified for 'issuer'>/v1/userinfo", "revokeURL": "<Enter the value specified for 'revocation_endpoint'>", "certificate": "", "clientSecret": "", "enablePKCE": true }
II. Configure Zebra Identity Guardian App
To enable user access to the device through SSO, install and set up Identity Guardian on the devices:
Deploy and install Zebra Identity Guardian app on the devices.
Launch the app using an EMM. This step must be performed at least once.
Enter the Managed Configuration settings for the app via your EMM:
- Select the application mode:
- Application Mode: Authentication
zDNA Cloud Managed Config
- Application Mode: Authentication
- Configure the Verification Setup to validate the user access:
- Primary Authentication Factor: SSO
- Secondary Authentication Factor: [Select FACE, PASSCODE, SSO or NONE]
- Fallback Authentication Factor: [Select FACE, PASSCODE, NONE, SSO or ADMIN BYPASS PASSCODE]
- Primary Authentication Timeout: [Enter value in ms, e.g. "300000"]
- Fallback Authentication Timeout: [Enter value in ms, e.g. "300000"]
zDNA Cloud Managed Config
- Select the application mode:
- Configure the Lock-screen Event options:
- On Unlock:
- Verification Setup: [Enter the desired authentication scheme, e.g. "Verification Setup1"]
- On Reboot:
- Verification Setup: [Enter the desired authentication scheme, e.g. "Verification Setup1"]
- On AC power connected:
- Verification Setup: [Enter the desired authentication scheme, e.g. "Verification Setup1"]
- On AC power disconnected:
- Verification Setup: [Enter the desired authentication scheme, e.g. "Verification Setup1"]
- On device manual check in:
- Verification Setup: [Enter the desired authentication scheme, e.g. "Verification Setup1"]
- On user change:
- Verification Setup: [Enter the desired authentication scheme, e.g. "Verification Setup1"]
zDNA Cloud Managed Config
- Configure the SSO Authentication Configuration for the app to communicate with Microsoft SSO to authenticate the user:
- Single Sign On Provider: Okta
- Authentication Protocol: OAuth 2.0 (OIDC)
- Scope: [Enter the string based on the SSO server settings, e.g. "openid email profile offline_access"]
- Configuration Settings: [Enter the JSON data from the last step from the previous section I. Register Zebra Identity Guardian. A sample is shown below]
{ "authorizationScope": "openid email profile offline_access", "redirectURI" : "com.zebra.mdna.els:/loginComplete", "logoutURL" : "your_logout_URL", "tokenURL" : "your_token_URL", "authorizationURL" : "your_authorization_URL", "clientAuthType" : 0, "clientId" : "your_client_ID", "certificatePhrase" : "", "userInfoUrl" : "your_userInfo_URL", "revokeURL" : "your_revoke_URL", "certificate" : "", "clientSecret":"", "enablePKCE": true }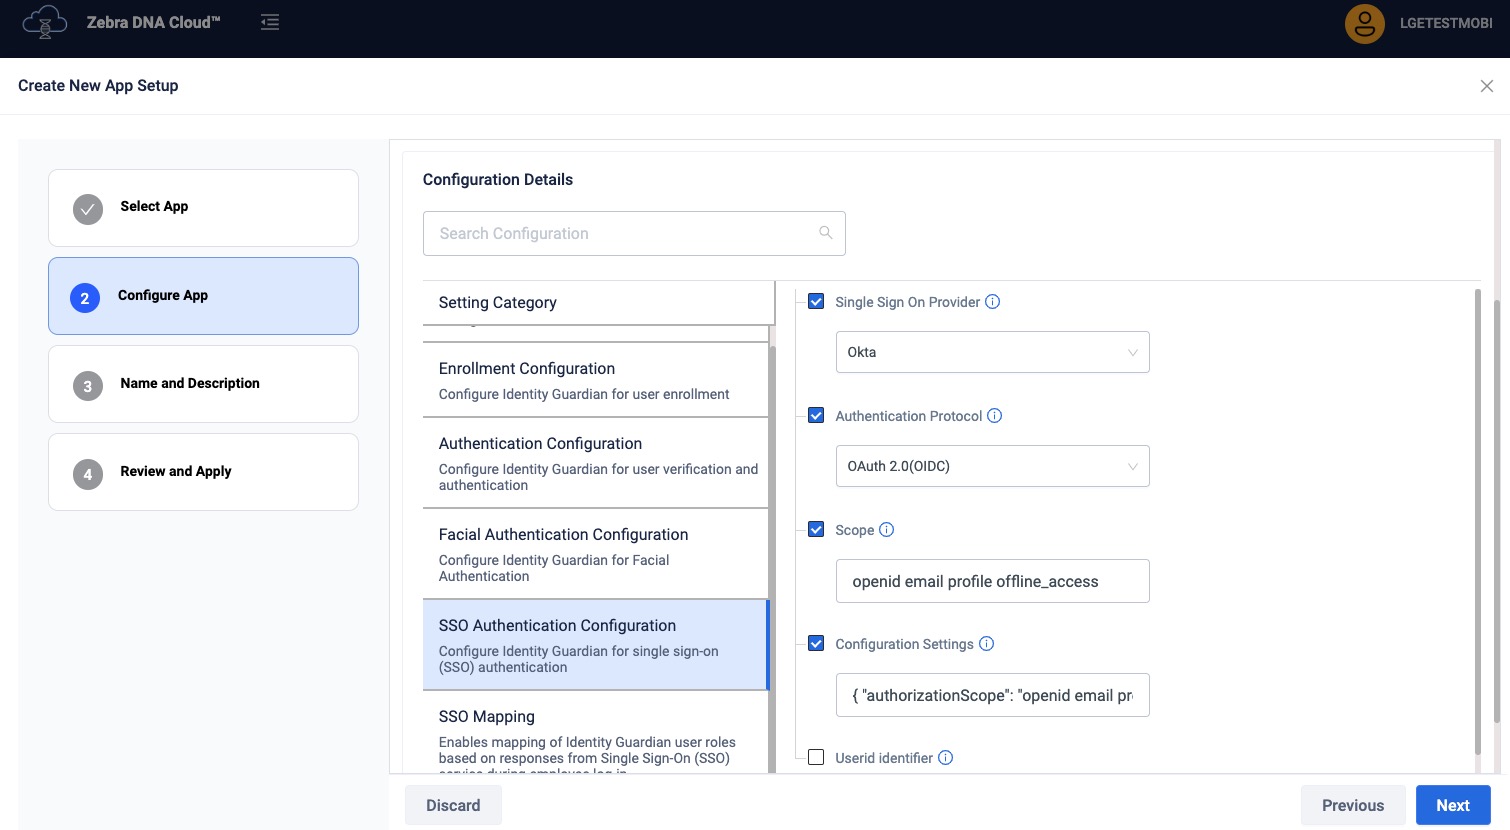 zDNA Cloud Managed Config
 If mapping the SSO response to application-specific roles, enter the following (see Managed Configurations for more information):
- Configuration Role Identification - Enables the recognition and mapping of the Single Sign-On (SSO) response to application-specific roles. Click Add Role Identifier as needed.
- Role Identifier - Establishes links between roles in SSO responses and their corresponding roles within the Identity Guardian app.
- Identity Guardian Role Name - Enter the Identity Guardian user role to be assigned based on SSO response during user sign-in
- Key-value Pair for Role Assignment - Add one or more SSO key-value pairs to identify and map users to a predefined Identity Guardian user role. Click Add SSO Key-Value Pair as needed.
- SSO Key-Value Pair - Choose whether the SSO response, which contains the user key and values, should be mapped to a corresponding user role in Identity Guardian
- SSO Key - Enter the SSO key to map it to an Identity Guardian role.
- SSO Value - Enter the SSO value(s) to map to the Identity Guardian role. Use commas to separate multiple entries.
zDNA Cloud Managed Config
- Configuration Role Identification - Enables the recognition and mapping of the Single Sign-On (SSO) response to application-specific roles. Click Add Role Identifier as needed.
See Managed Configurations to configure any other non-SSO settings.
Deploy the Managed Configurations to the devices through your EMM.
When a device gets updated with the new configurations, Zebra Identity Guardian activates the lock screen. The user is then required to authenticate themselves using Single Sign-On (SSO) to gain access to the device. See User Guide for more information.
Secure Setup for Faster Logins
Identity Guardian can simplify Single Sign-On (SSO) logins by prompting users for SSO authentication only once, post device enrollment. For frequent situations like device lock, it offers efficient options like biometric or pin-based access, eliminating the need for repeated SSO logins. It maintains the original SSO session's integrity, ensuring exclusive user access and simultaneous logout from all apps, creating a secure and streamlined login process.
To implement this authentication strategy, follow the procedure below based on whether the device model is shared or personally assigned.
Shared Devices
Administrator setup - refer to Managed Configurations:
- Set SSO authentication in the following managed configurations:
- Usage Mode
- Application Mode: Authentication
- Shared Device Authentication
- User Verification Methods
- Verification Setup1: [Select or enter all desired options and include SSO as one of the authentication factors.]
- Lock-screen Event Options
- On user change: [Select the verification that includes SSO authentication, e.g. Verification Setup1]
- Usage Mode
- For the rest of the following Lock-screen Event Options, select the verification that does not include SSO authentication, e.g. Verification Setup2 (includes face or passcode):
- On Unlock
- On Reboot
- On AC Power Connected
- On AC Power Disconnection
- In Shared Device Authentication, set the following to false under Force Logout Options:
- On Lock
- On Reboot
- On AC Power Connected
- On AC Power Disconnected
End user authentication:
- Enroll the user. Make sure to enter the SSO user ID in the Employee ID field.
- Once the enrollment process is complete, the user is required to authenticate themselves on the device by scanning their user barcode once.
- If the scanned barcode matches with the enrolled user, the SSO session remains active. For subsequent logins, the user is prompted to authenticate via facial biometrics or user passcode, depending on the setup by the administrator.
- If the scanned barcode does not match with the enrolled user, it prompts for SSO credentials since an “On user change” event occurred. These SSO credentials remain active on the device.
- After the user authenticates, the user is no longer required to re-enter their SSO credentials unless one of the following occurs:
- The user logs out manually from the device
- The user is automatically logged out of the device if any of the Force Logout Options are met from Shared Device Authentication in the managed configurations.
- The SSO session times out.
Personally Assigned Devices
Administrator setup - refer to Managed Configurations:
- Set SSO authentication in the following managed configurations:
- Usage Mode
- Application Mode: Personally Assigned
- Personal Device Authentication
- User Verification Methods
- Verification Setup1: [Select or enter all desired options and include SSO as one of the authentication factors.]
- Lock-screen Event Options
- On user change: [Select the verification that includes SSO authentication, e.g. Verification Setup1]
- Usage Mode
- For the rest of the following Lock-screen Event Options, select the verification that does not include SSO authentication, e.g. Verification Setup2 (includes face or passcode):
- On Unlock
- On Reboot
- On AC Power Connected
- On AC Power Disconnection
- In Personal Device Authentication, set the following to false under Force Logout Options:
- On Lock
- On Reboot
- On AC Power Connected
- On AC Power Disconnected
End user authentication:
- Enroll the user. Make sure to enter the SSO user ID in the Employee ID field.
- Once the enrollment process is complete, the user is required to authenticate themselves on the device by facial biometrics or passcode entry once. If successful, the SSO session remains active.
- After the user authenticates, the user is no longer required to re-enter their SSO credentials unless one of the following occurs:
- The user logs out manually from the device
- The user is automatically logged out of the device if any of the Force Logout Options are met from Personal Device Authentication in the Managed Configurations.
- The SSO session times out.
EMM
Deploy and configure Identity Guardian on devices using an Enterprise Mobility Management (EMM) system, such as Zebra DNA Cloud or a third party system, which supports Managed Configurations.
After installation, Identity Guardian must be launched for the configurations to take effect.
Generic Setup Process Using EMM:
Enroll the devices to the EMM.
Upload the required APKs to the EMM: This can be done via Android Enterprise or the EMM's App Store.
Add the Identity Guardian APK to the EMM. Ensure the Identity Guardian app is configured to auto-launch after installation. The EMM system may offer the option to auto-launch the app. If this option is not available, the following commands may be used to launch Identity Guardian:
For Android, such as from another app, use this command:
adb shell am start -n com.zebra.mdna.els/com.zebra.mdna.els.userEnrollment.activity.EnrollmentActivityFor an EMM, such as VMware Workspace ONE UEM (AirWatch), use this command to launch via intent:
mode=explicit,broadcast=false,action=android.intent.action.MAIN,package=com.zebra.mdna.els,class=com.zebra.mdna.els.userEnrollment.activity.EnrollmentActivity
If barcode printing or sharing is needed on Shared Devices, add the zCreator APK to the EMM.
- If the EMM kiosk configuration is being used, make sure to include the zCreator app package name to the allowlist:
com.zebra.mdna.zcreator
- If the EMM kiosk configuration is being used, make sure to include the zCreator app package name to the allowlist:
Create and configure application policies: Use Managed Configurations to configure the necessary settings for Identity Guardian and zCreator (if applicable). Refer to the following guides:
- For Shared Devices: Choose the appropriate enrollment type:
- Standard Enrollment - Separate Enrollment and Authentication Profiles are required.
- Self-Enrollment - Single profile combines enrollment and authentication configurations
- For Personally Assigned Devices: Single profile combines enrollment and authentication configurations; see Personally Assigned Device.
- For Shared Devices: Choose the appropriate enrollment type:
Assign and apply the application policies:
- Shared Devices:
- For Standard Enrollment, deploy the Enrollment Profile on the dedicated enrollment device and the Authentication Profile on the shared device.
- For Self-Enrollment, deploy the unified Authentication Profile directly to the shared device.
- Personally Assigned Devices: Deploy the single profile to the device.
- Shared Devices:
Guide Users through Enrollment and Authentication: Users proceed through the enrollment process on the device by following the prompts. After enrollment completion, they can authenticate to sign in to the device based on the Authentication Configuration(Shared Device Authentication or Personal Device Authentication) set by their administrator.
- Shared Devices:
- Standard Enrollment: Users enroll on a dedicated enrollment device and authenticate on a separate shared device; see standard enrollment and authentication.
- Self-Enrollment: Users complete both enrollment and authentication on the same shared device; see self-enrollment and authentication.
- Personally Assigned Devices: Users complete both enrollment and authentication on their personally assigned device; see personal device user enrollment and authentication.
EMM Allowlisting: Shared Devices & Kiosks
For Shared Device environments operating in a locked-down state (such as EMM kiosk or Check-In/Check-Out with Device Guardian), specific application activities require explicit allowlisting to ensure Identity Guardian launches prior to the home screen.
When configuring an EMM profile for Shared Devices, include the required package and activity names based on specific use cases:
| Purpose | Package Name | Activity |
|---|---|---|
| Identity Guardian Authentication | com.zebra.mdna.els |
com.zebra.mdna.els.authentication.AuthenticationActivity |
| Guardian Safe: Save Credentials | com.zebra.mdna.els.passwordvault.SaveCredentialActivity |
|
| Guardian Safe: Edit Credentials Dialog | com.zebra.mdna.els.passwordvault.AlterDialogActivity |
|
| Guardian Safe Settings | com.zebra.mdna.els.passwordvault.GuardianSafeSettingsActivity |
|
| Guardian Safe: List Credentials | com.zebra.mdna.els.passwordvault.ListCredentialActivity |
|
| zDNA Client Launch (if required by deployment workflow) | com.zebra.zebradna |
com.zebra.zebradna.MainActivity |
| Microsoft SSO with Chrome: Browser Launcher | com.android.chrome |
org.chromium.chrome.browser.document.ChromeLauncherActivity |
| Microsoft SSO with Chrome: First Run | org.chromium.chrome.browser.firstrun.FirstRunActivity |
|
| Microsoft SSO with Chrome: Custom Tab | org.chromium.chrome.browser.customtabs.CustomTabActivity |
|
| Microsoft SSO Broker Authorization | com.zebra.mdna.els |
com.microsoft.identity.common.internal.providers.oauth2.AuthorizationActivity |
| Microsoft SSO Broker Browser Tab | com.microsoft.identity.client.BrowserTabActivity |
Configuration Note: Add only the activities required for the specific deployment scenario. For example:
- Exclude Chrome and Microsoft SSO activities unless the Shared Device sign-in flow specifically uses Microsoft SSO via Chrome Custom Tabs.
- Similarly, allowlist the zDNA activity only if the deployment requires zDNA to launch directly from the kiosk or Check-in/Check-out screen.
Video Demonstrations for EMM Configuration
The following subsections provide video demonstrations tailored for specific EMMs. Within the videos, profiles are created based on user access:
- Shared devices - Create two separate profiles based on the Application Mode selected under the Usage Mode section:
- Enrollment - This creates unique user barcodes for authentication and is required when implementing facial biometrics.
- Authentication - This configures the authentication methods employed for users to sign into the device.
- Personally assigned devices - Create a profile by selecting Personally Assigned from Application Mode under the Usage Mode section. This creates a profile encompassing both enrollment and authentication configurations for personally assigned devices.
Zebra DNA Cloud
This section provides video demonstrations to guide through the process of setting up Identity Guardian using the Zebra DNA Console.
Create and Deploy Enrollment Profile
This first video guides through the process of creating and deploying an enrollment profile, specifically for a shared device. Learn how to define configurations for a user's first-time enrollment, including registering facial features, obtaining user role data, setting up a pin code, and more.
Note: For personally assigned devices, select Personally Assigned from Application Mode under the Usage Mode section. This creates a profile encompassing both enrollment and authentication configurations.
Create and Deploy Authentication Profile
This second video walks through the process of creating and deploying an authentication profile, specifically for a shared device. It guides through the process of establishing configurations for user authentication each time a user signs into the device. These configurations include scanning a barcode, setting up SSO, defining the passcode, among others. The enrollment profile, created from the previous video, can be used as a template to modify and create this authentication profile.
User Authentication
This video demonstrates various scenarios of user device authentication. In this example, one group of authentication settings is applied to a shared device with the following configurations:
- Comparison source: Barcode
- Primary authentication: SSO
- Secondary authentication: Passcode
- Fallback authentication: Admin bypass passcode
SOTI MobiControl
This video provides step-by-step instructions for setting up Identity Guardian on shared devices using SOTI MobiControl. It covers:
- Deploying the Identity Guardian APK file
- Automatically launching the app
- Creating and applying an enrollment profile
- Creating and applying an authentication profile
Note: For personally assigned devices, select Personally Assigned from Application Mode under the Usage Mode section. This creates a profile that includes both enrollment and authentication configurations.
VMware Workspace ONE UEM
This video provides step-by-step instructions for setting up Identity Guardian on shared devices using VMware Workspace One UEM. This process involves the following steps (Note: Step 3 is an additional configuration required, not covered in the video):
Deploying the Identity Guardian APK file.
Creating and applying an enrollment profile.
Adding Custom XML Settings (Required): Supplementing the video, a custom XML must be deployed. In the Workspace One UEM console, navigate to Resources > Profile & Baselines > Profiles > Add and select Custom Settings (navigation paths may vary depending on console version). Add the following XML content:
<characteristic type="com.android.agent.miscellaneousSettingsGroup" uuid="2c787987-1c4a-4eaa-8cd4-3acb39b8f97f">
<parm name="cicoBroadcastApps" value="com.zebra.mdna.els" />
</characteristic>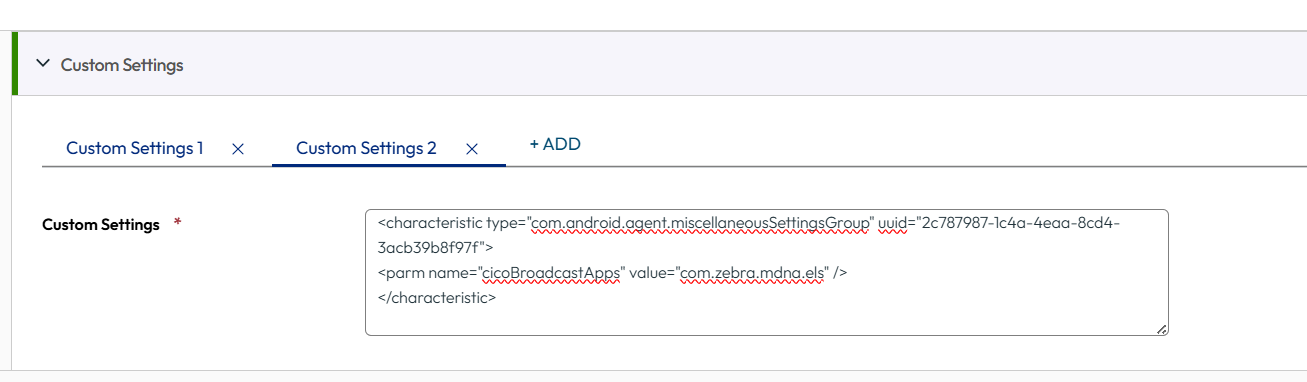
Automatically launching Identity Guardian.
After applying an enrollment profile, this next video continues with:
- Creating and applying an authentication profile
- Automatically launching Identity Guardian to implement the changes
Note: For personally assigned devices, select Personally Assigned from Application Mode under the Usage Mode section. This creates a profile that includes both enrollment and authentication configurations.
Microsoft Intune
This video provides step-by-step instructions for installing and setting up Identity Guardian with Microsoft Intune, demonstrating the following:
- Deploying the Identity Guardian APK file
- Creating and applying an enrollment profile
- For the app configuration policy, first modify the sample Microsoft Intune JSON file according to your desired settings. Refer to Managed Configurations to update the "value" field in the JSON file for each configuration option based on its key. For example, for the key
APPLICATION_MODE, enter the valueENROLLMENTto enroll shared devices. Then, copy and paste the entire JSON content into the designated field as instructed in the video.- For SSO Authentication Configuration, in addition to replacing the appropriate value for the key
ssoProvider, enter the appropriate values for the following keys:ssoScope,client_id,redirect_uri,authority_url, andssoUseridIdentifier.
- For SSO Authentication Configuration, in addition to replacing the appropriate value for the key
- For the app configuration policy, first modify the sample Microsoft Intune JSON file according to your desired settings. Refer to Managed Configurations to update the "value" field in the JSON file for each configuration option based on its key. For example, for the key
- Launching Identity Guardian - Copy the XML content to launch Identity Guardian via OEMConfig
Although this applies to shared devices, similar instructions can be followed personally assigned devices by setting Personally Assigned for Application Mode under the Usage Mode section. This creates a profile that includes both enrollment and authentication configurations.
After applying an enrollment profile, this next video continues with:
- Creating and applying an authentication profile for shared devices
- For the app configuration policy, first modify the sample Microsoft Intune JSON file according to your desired settings. Refer to Managed Configurations to update the "value" field in the JSON file for each configuration option based on its key. For example, for the key
APPLICATION_MODE, enter the valueAUTHENTICATIONto authenticate shared devices. Then, copy and paste the entire JSON content into the designated field as instructed in the video.- For SSO Authentication Configuration, in addition to replacing the appropriate value for the key
ssoProvider, enter the appropriate values for the following keys:ssoScope,client_id,redirect_uri,authority_url, andssoUseridIdentifier.
- For SSO Authentication Configuration, in addition to replacing the appropriate value for the key
- For the app configuration policy, first modify the sample Microsoft Intune JSON file according to your desired settings. Refer to Managed Configurations to update the "value" field in the JSON file for each configuration option based on its key. For example, for the key
- Launching Identity Guardian to implement the changes - Copy the XML content for launching Identity Guardian via OEMConfig
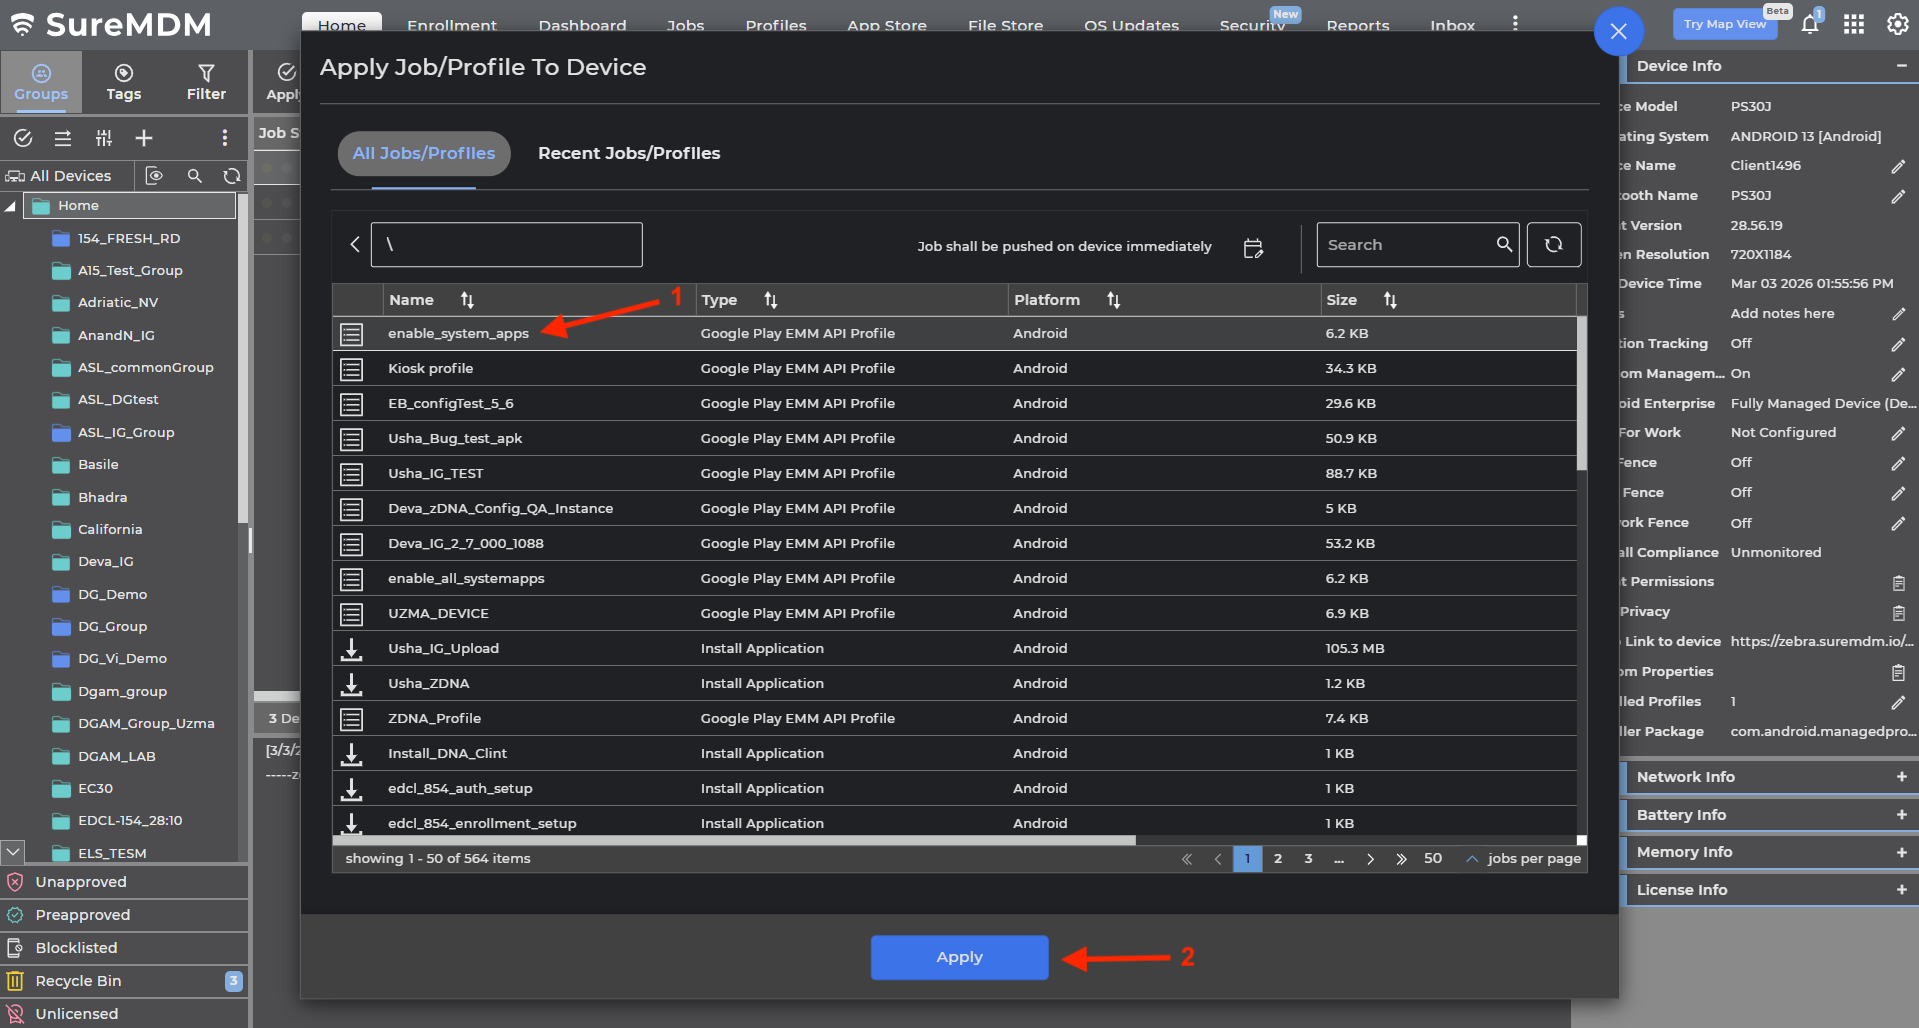
42Gears SureMDM
This video walks through the process of setting up Identity Guardian on personally assigned devices using SureMDM. It covers:
- Deploying the Identity Guardian APK file.
- Automatically launching the app.
- Creating a policy to configure the desired settings for enrollment and authentication.
Configuration for Shared Devices:
For shared devices, create two separate configuration profiles based on the selected Application Mode (under the Usage Mode section):
- Enrollment - Creates unique user barcodes for authentication and is required when implementing facial biometrics.
- Authentication - Configures the authentication methods employed for users to sign into the device.
Required Dependency:
The Enable All System Apps option must be deployed to devices. See instructions below.
Accessing Full Identity Guardian Settings
IMPORTANT: When accessing Identity Guardian Managed Configuration settings through the Profiles feature in the 42Gears dashboard, the available options may be incomplete or missing. To resolve this and access the full set of Identity Guardian Managed Configuration settings, use the Jobs feature instead.
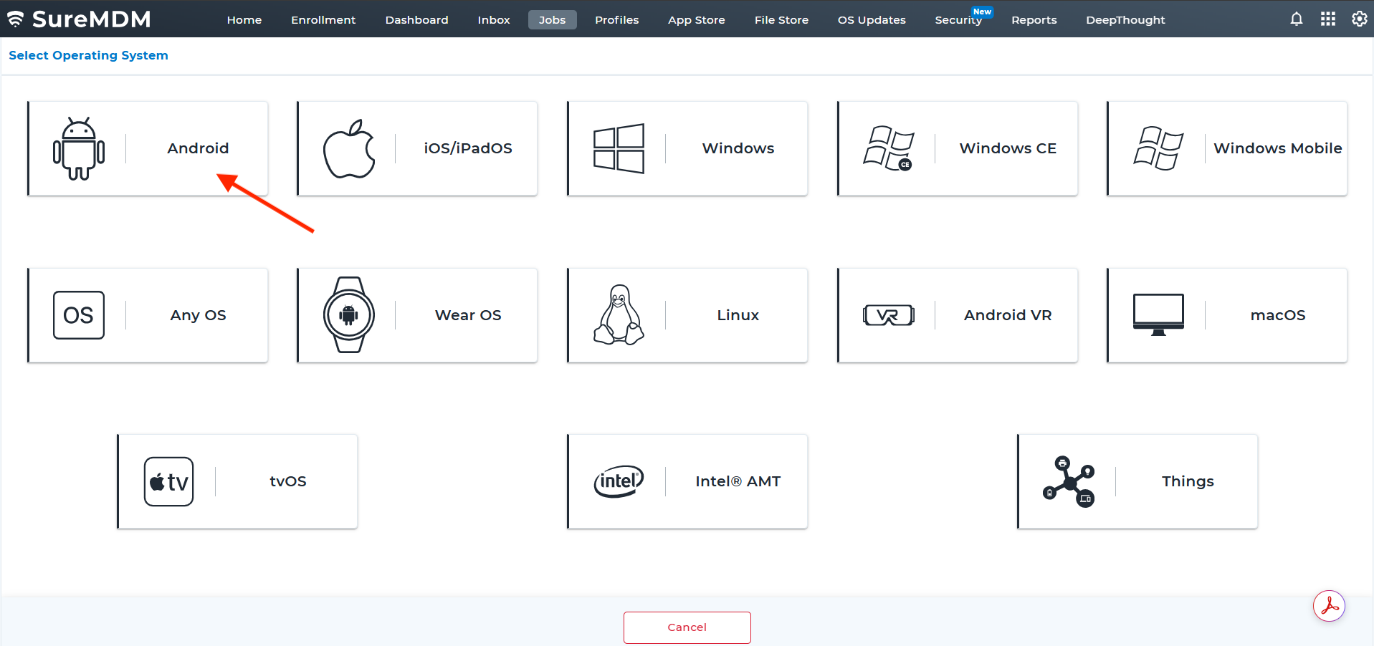
Follow these steps to proceed (Note: Ensure the Identity Guardian APK is uploaded to the SureMDM app store before proceeding.):
- From the 42Gears SureMDM dashboard, click Jobs.

- Choose Android.
- Choose Install Application.
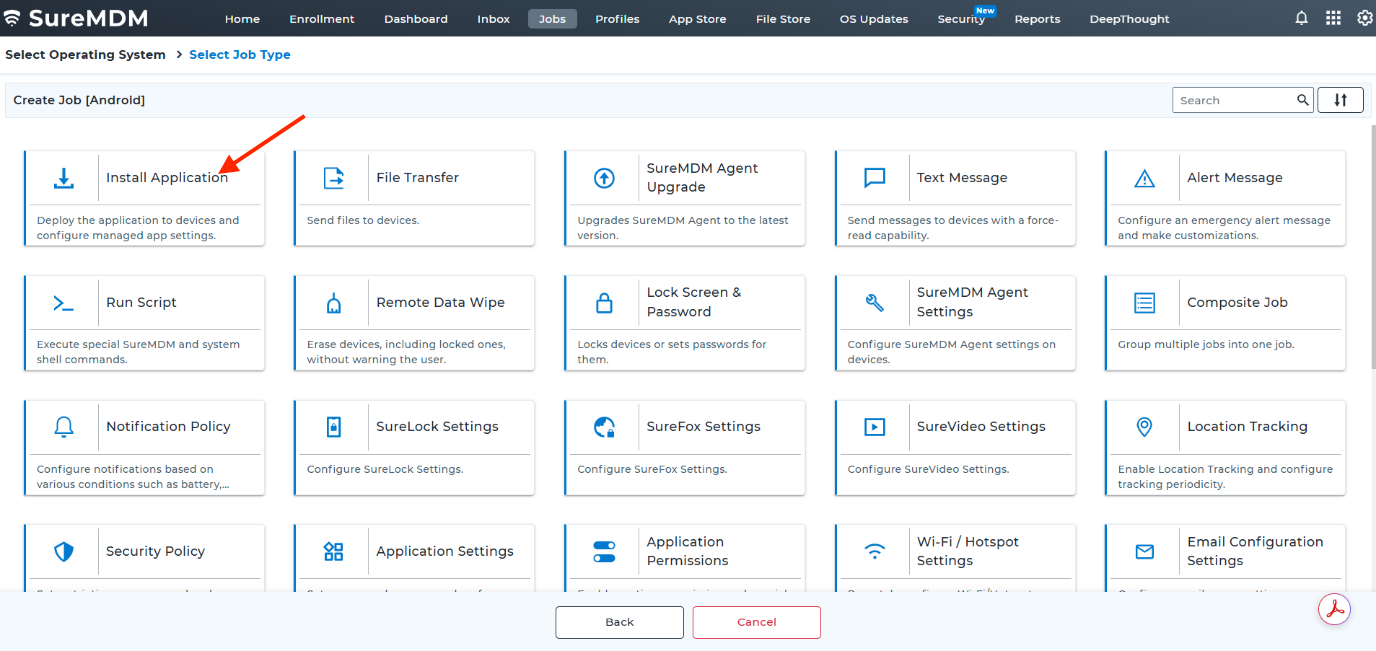
- Click Add App.
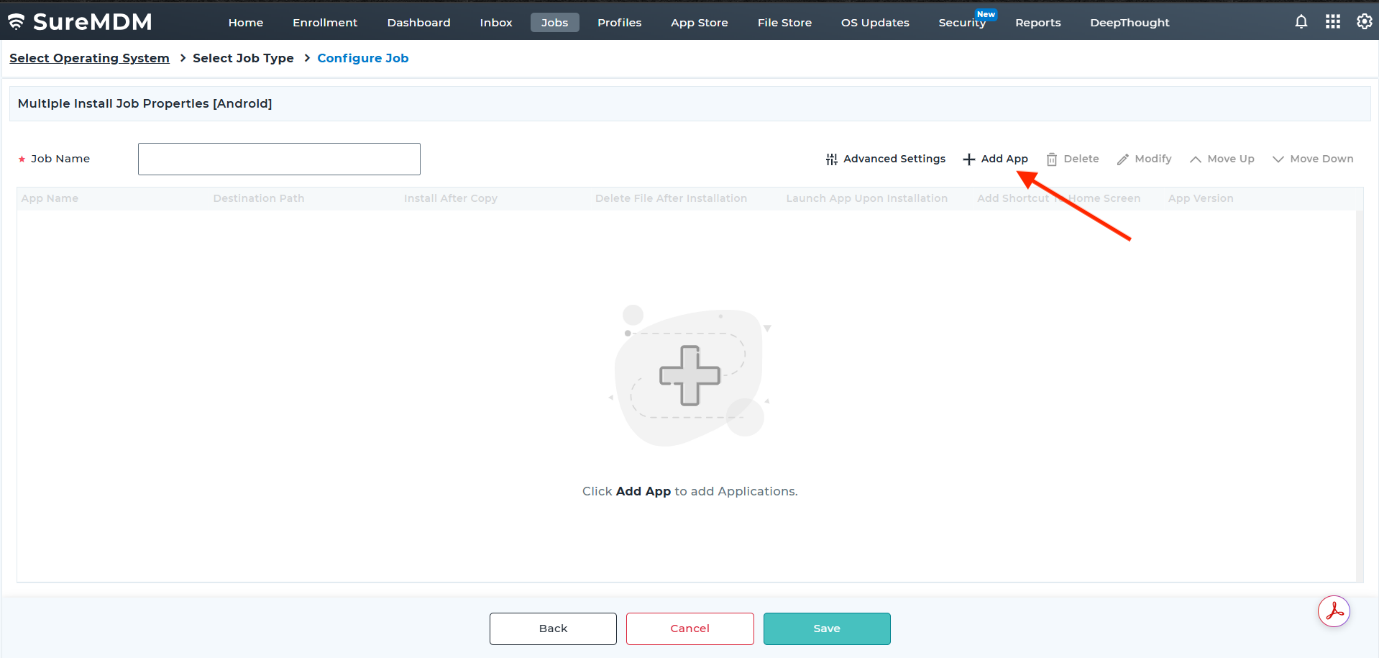
- Enable Use Apps from App Store and provide the following:
- Apps: [Select the Identity Guardian app uploaded to the SureMDM app store.]
- App Version: [Select the appropriate app version.]
- Device Path: [Specify the folder path for the install file (default:
/sdcard/).] - Install After Copy: [Enable this option.]
- Launch App Upon Installation: [Enable this option.]
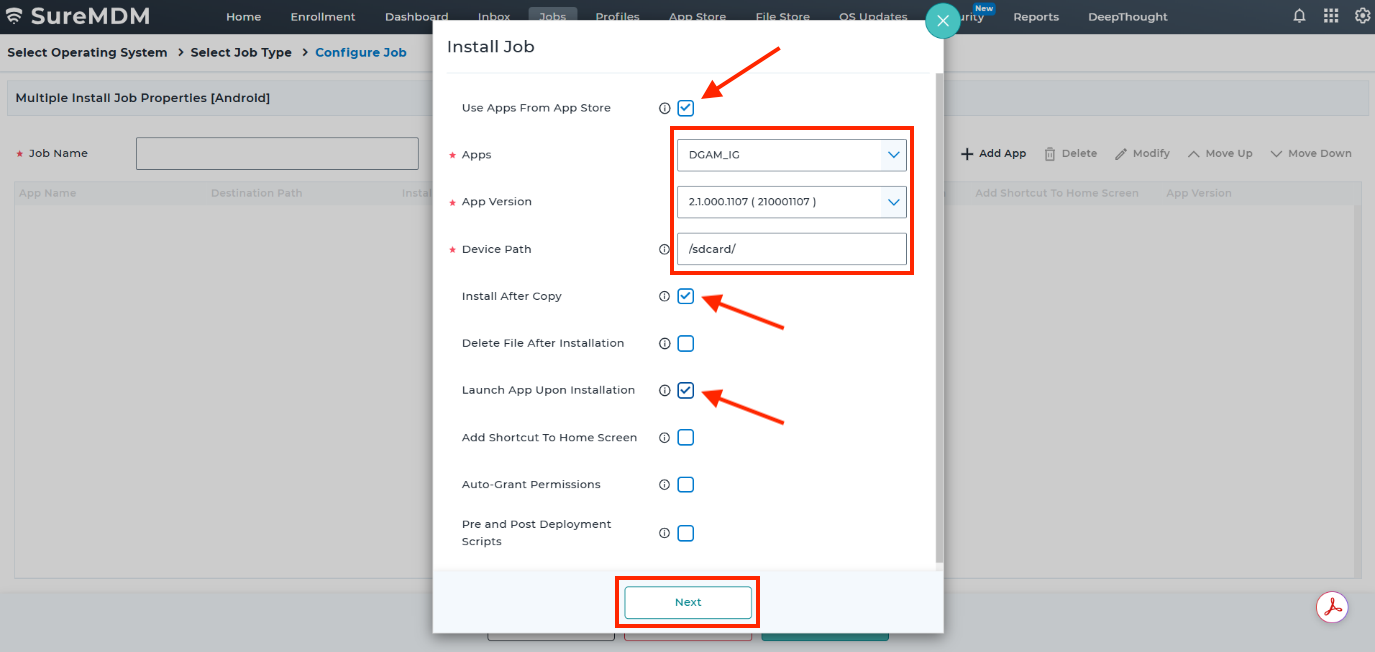
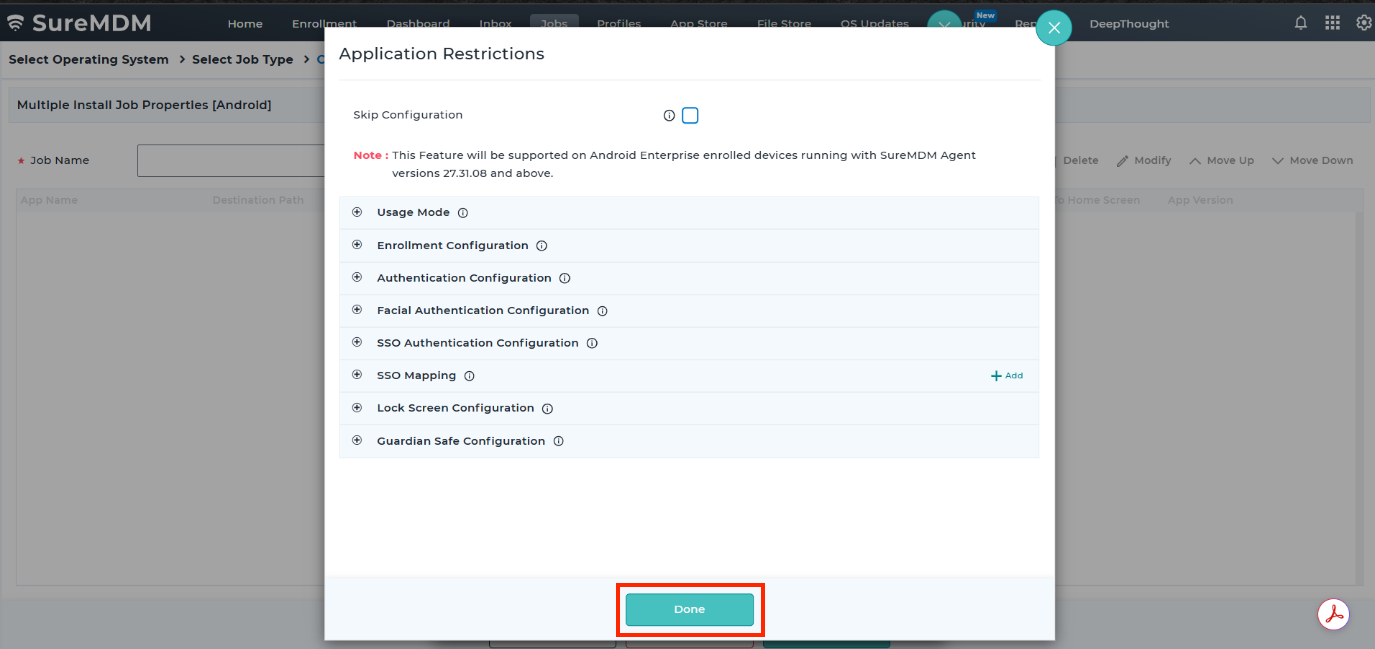
- Adjust any additional settings as needed, then click Done.
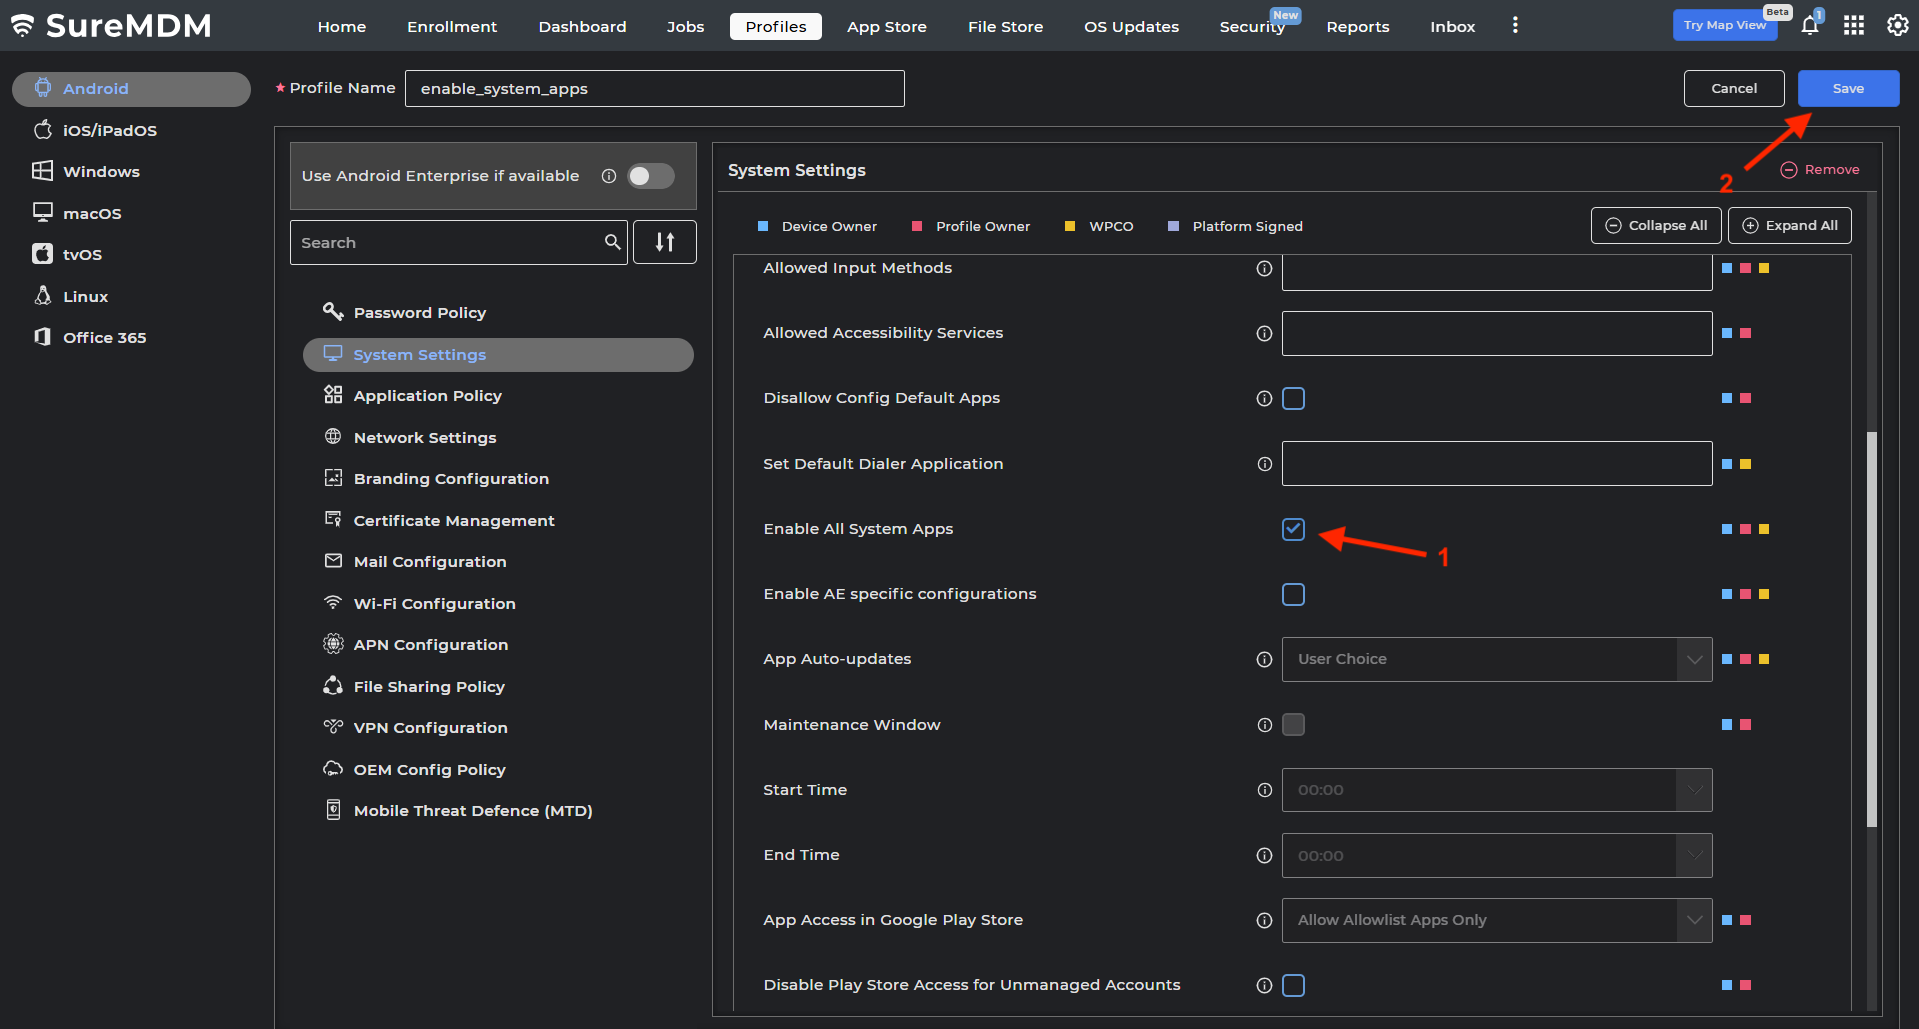
Enable All System Apps
The Enable All System Apps option must be deployed to devices to allow dependent apps to run, such as Chrome, zLicenseManager, and DataWedge. To deploy this setting:
- From the 42Gears SureMDM dashboard, click Profiles.
- Click New Profile and select Primary Profile.
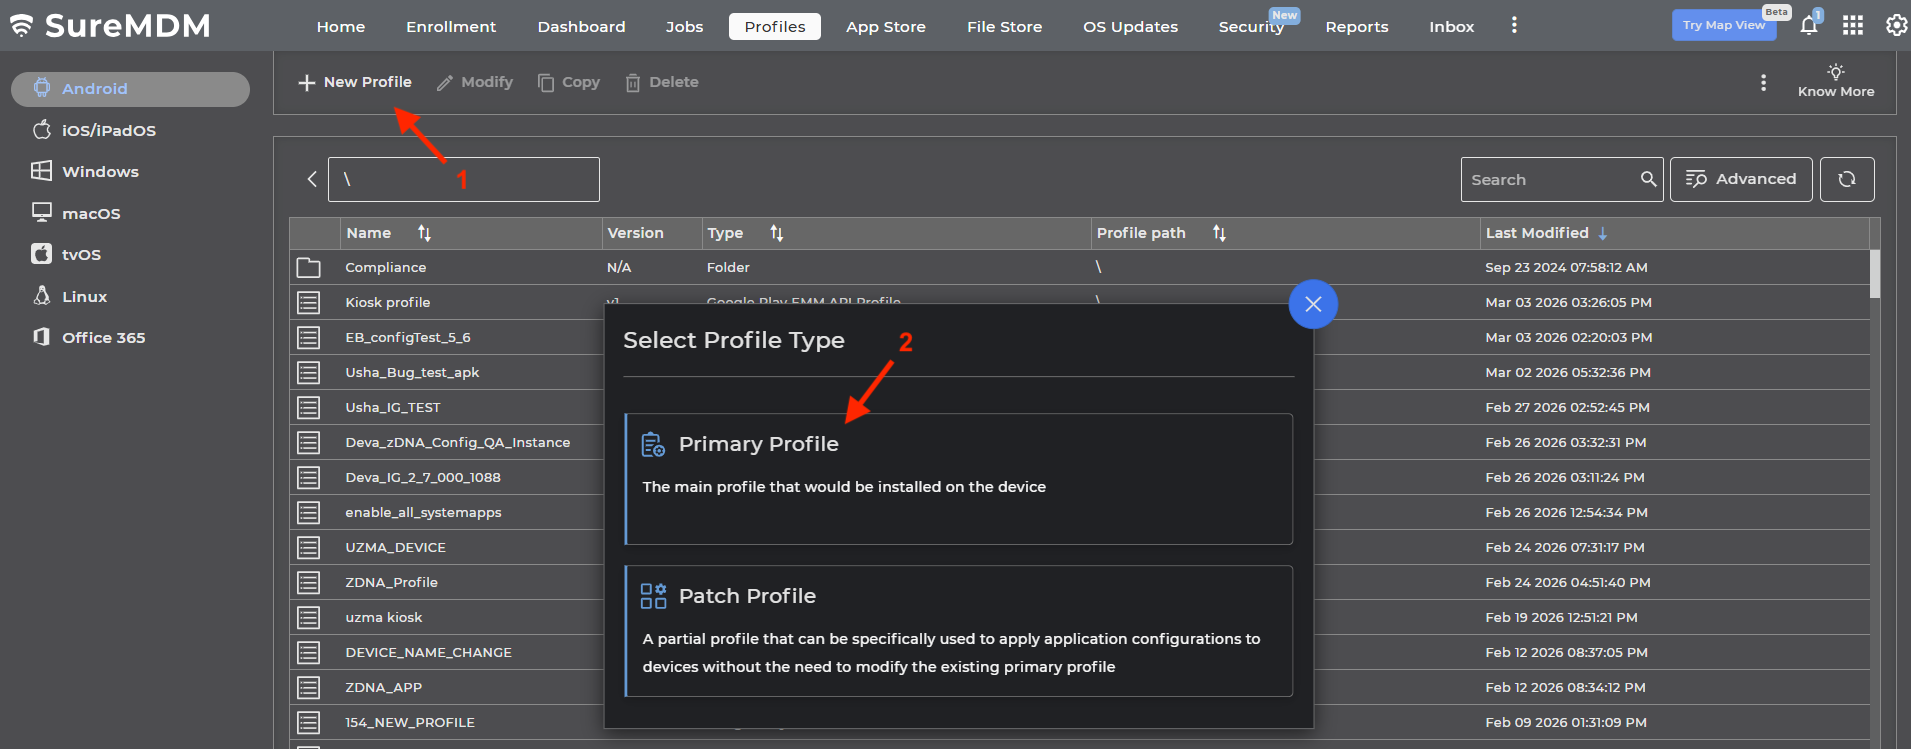
- Enter a profile name. Click System Settings and click Configure.
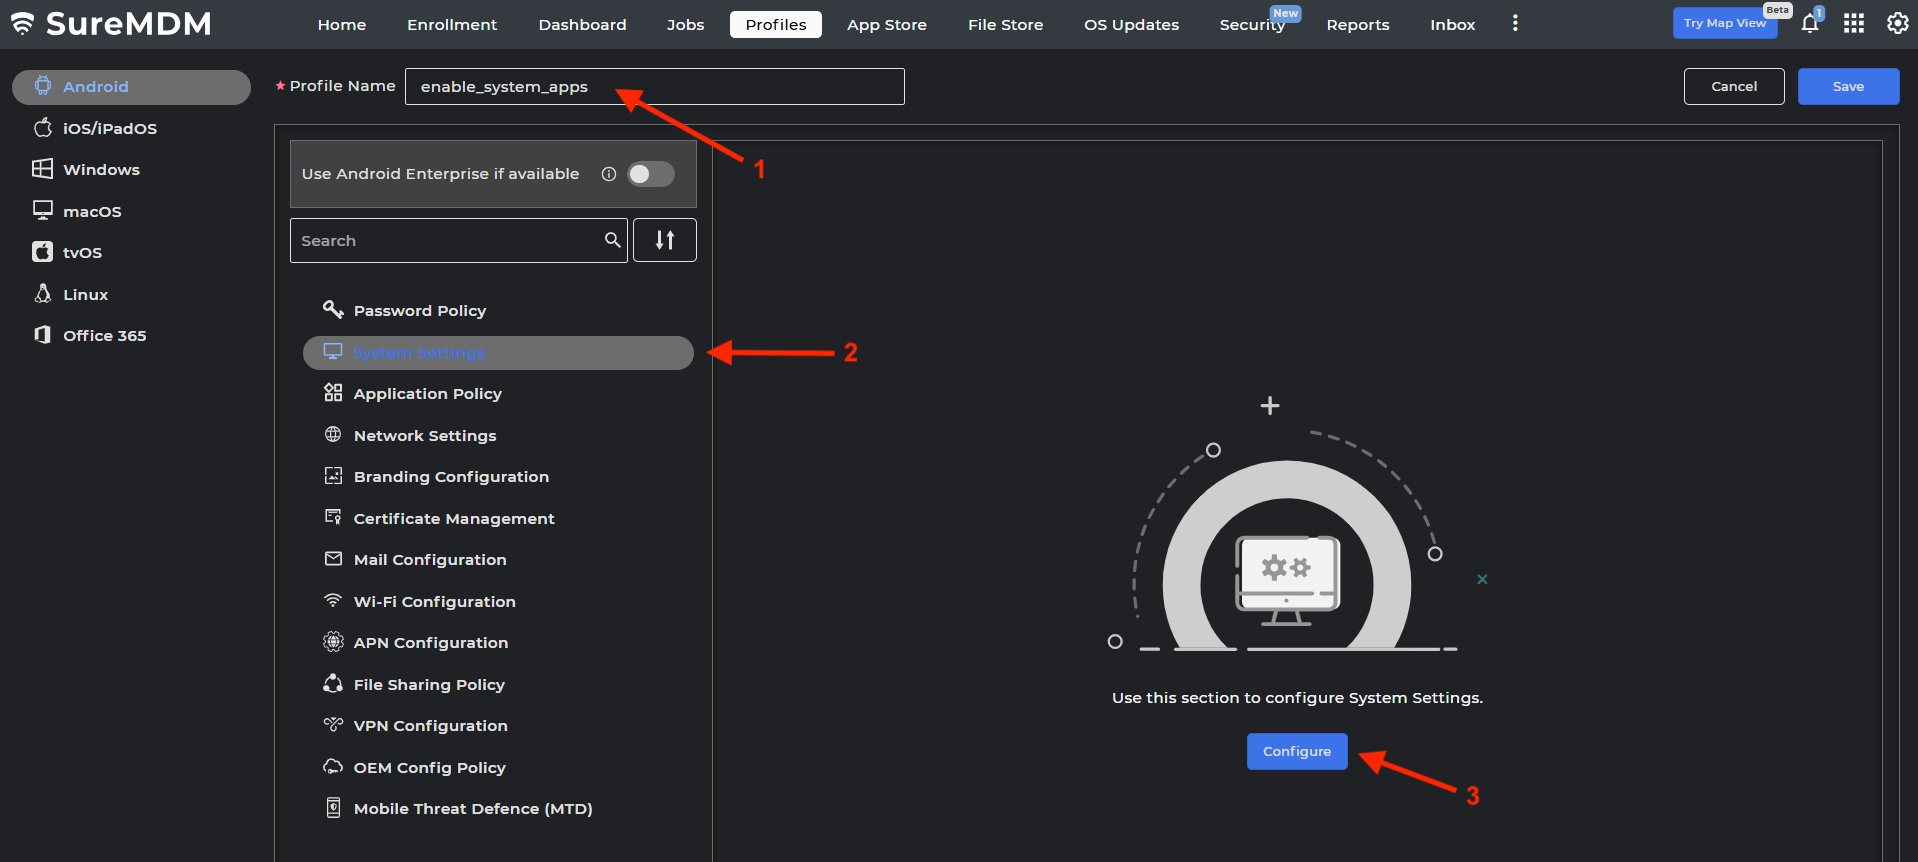
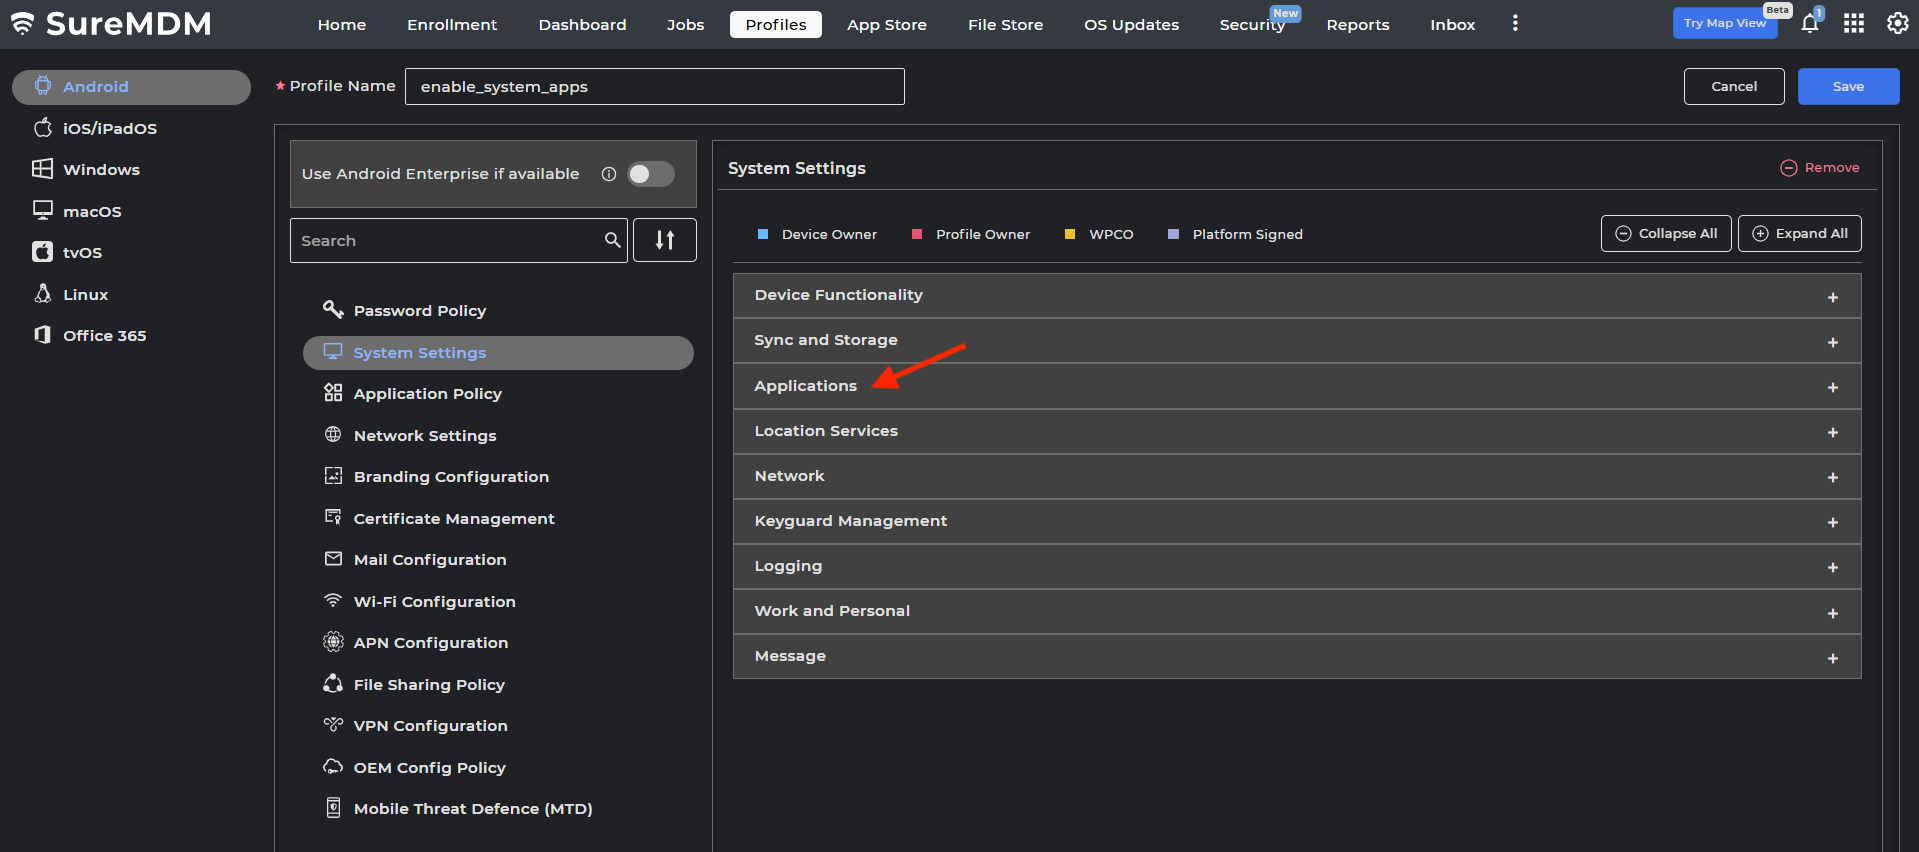
- Click Applications.
- Scroll down and check the option for Enable All System Apps. Click Save.
- From the top menu, click Home. Select the device(s) and click Apply.
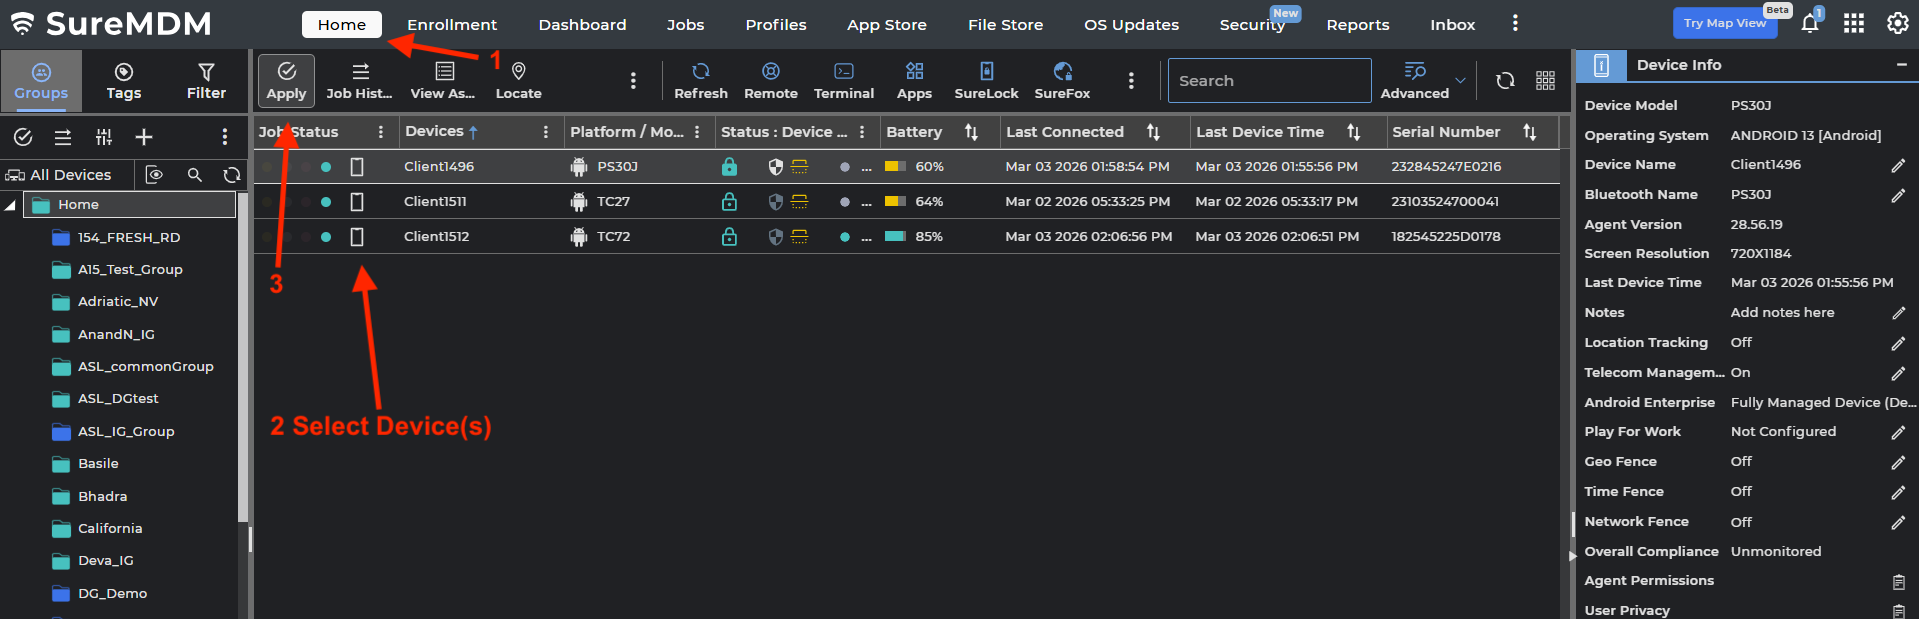
- Select the profile created from step 3, then click Apply.
DataWedge Profile
To enable scanning of the user enrollment barcode, a DataWedge profile is required. Identity Guardian automatically creates a default profile named "IdentityGuardian" for this purpose. This section provides instructions for creating a custom profile if the default configuration does not meet your needs.
NOTE: When mass deploying custom DataWedge profiles, ensure that the Identity Guardian profile is included along with your custom profiles in the exported DataWedge database file.
Follow these steps to create and export either a custom DataWedge profile or the default profile for Identity Guardian:
- Open DataWedge.
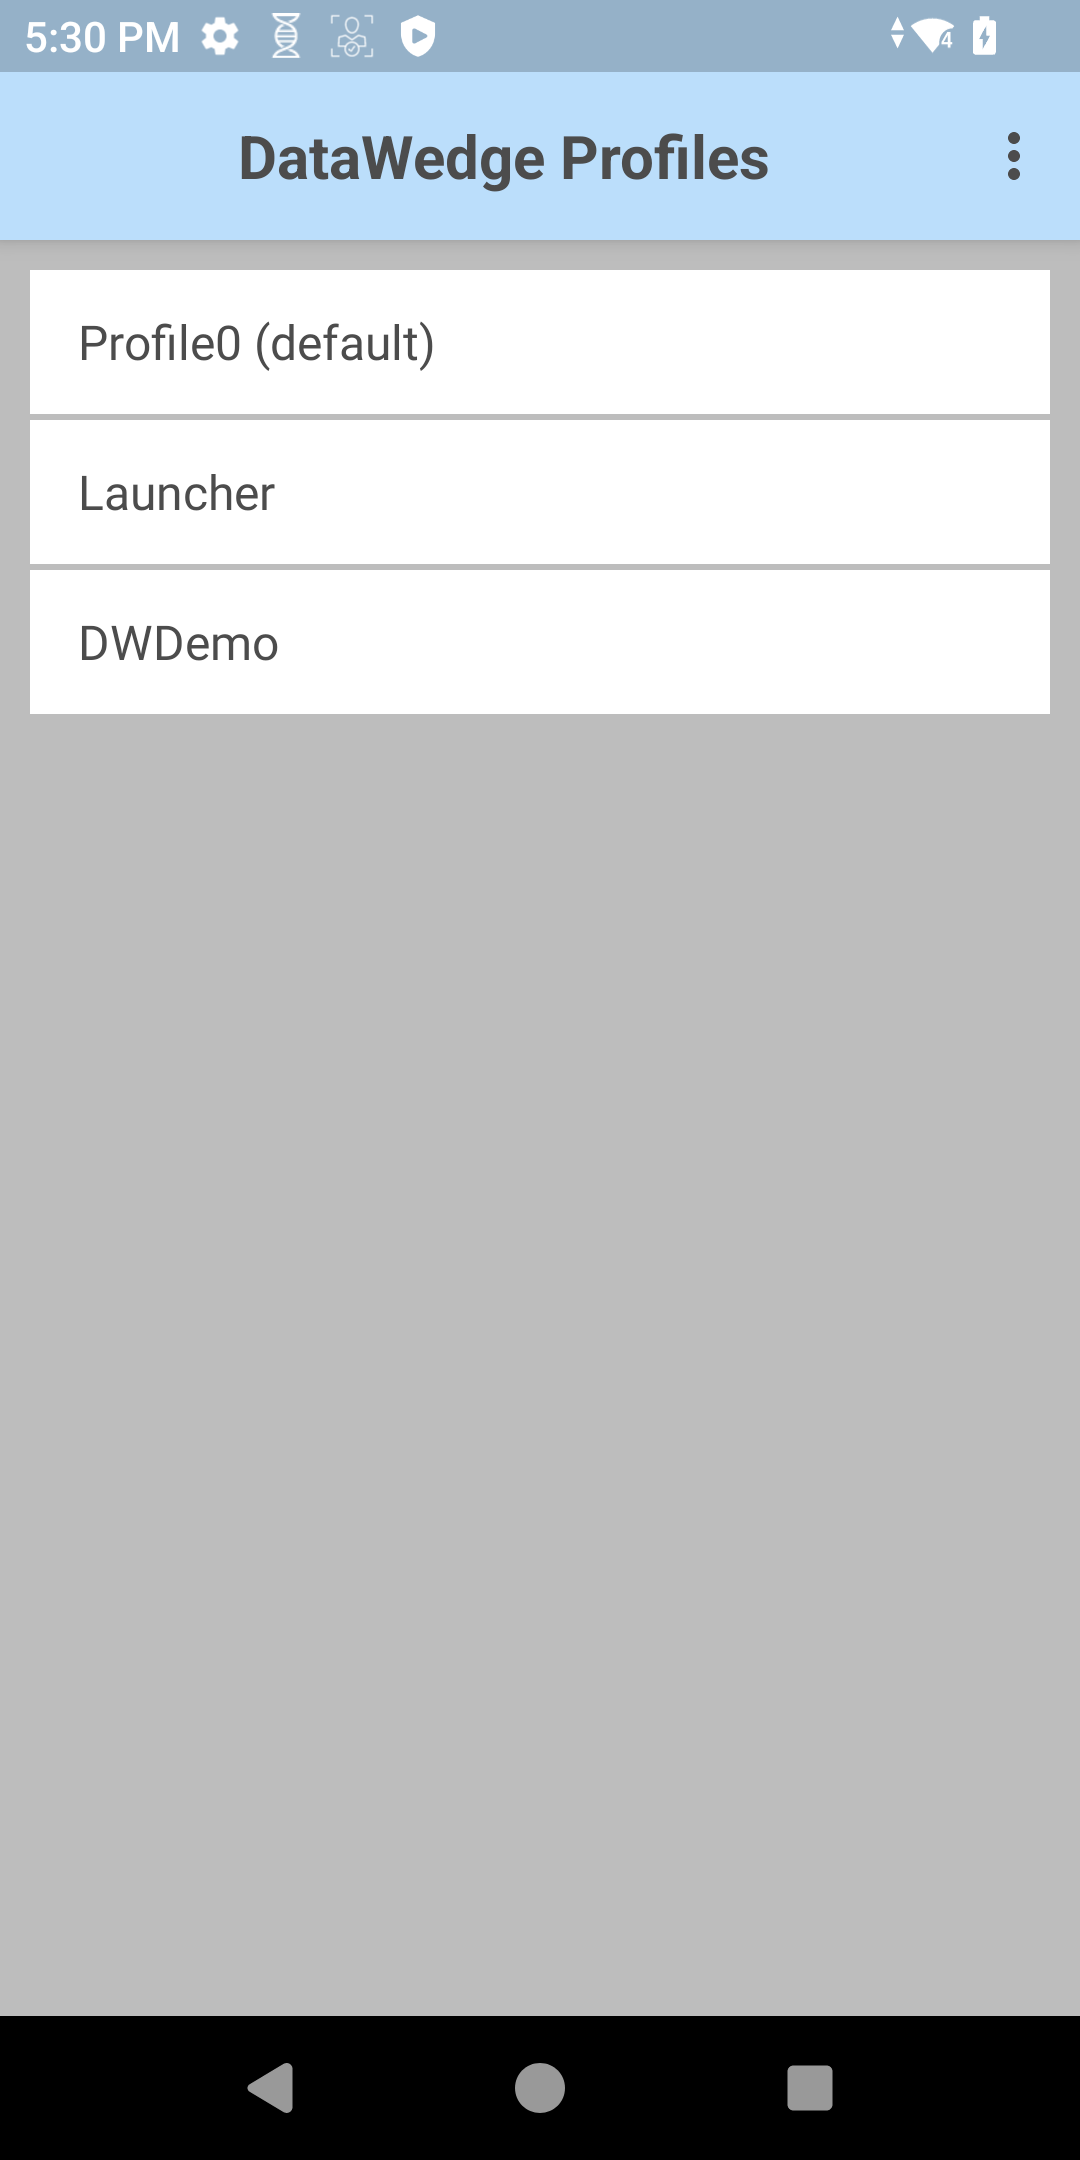
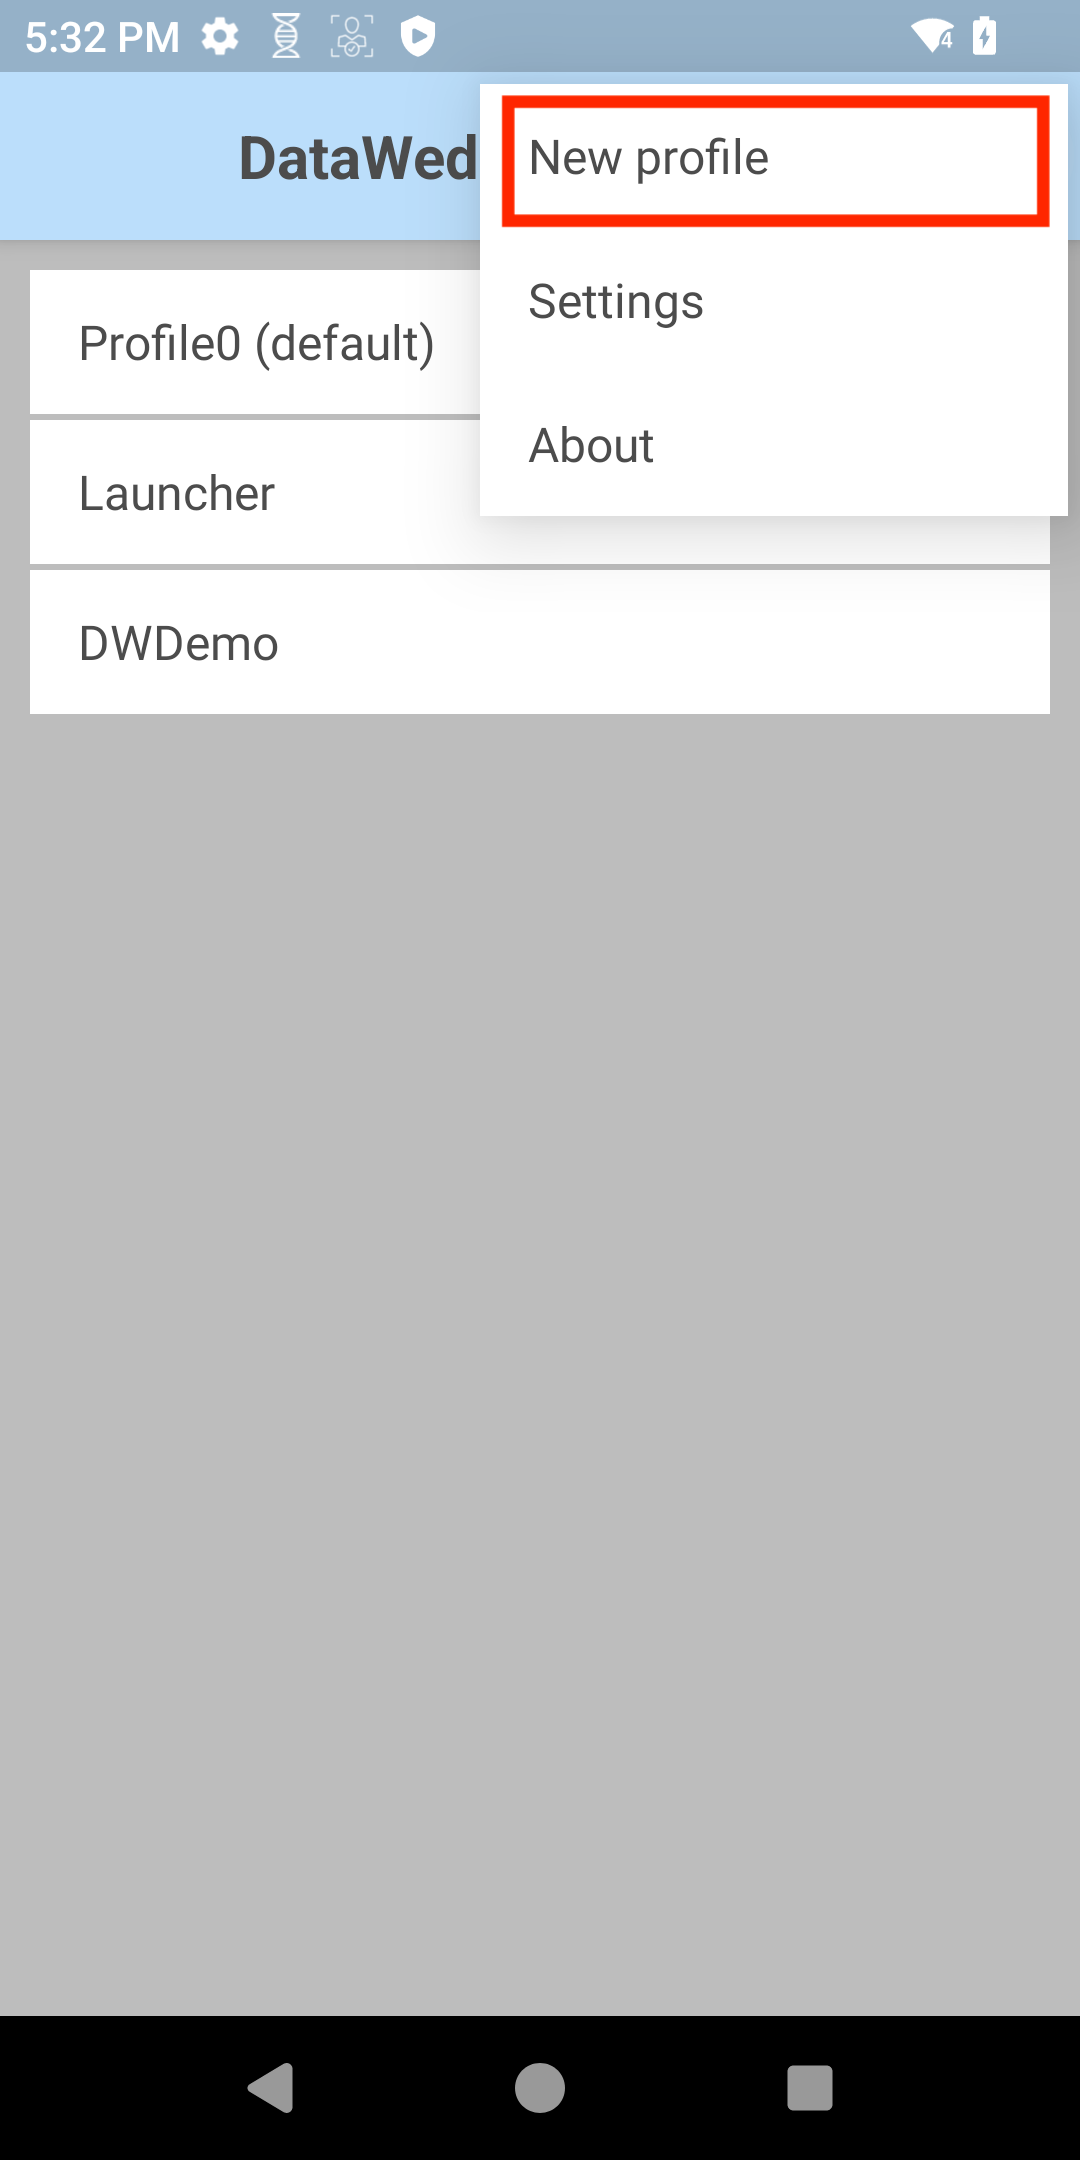
- From the top right options menu, select New Profile.
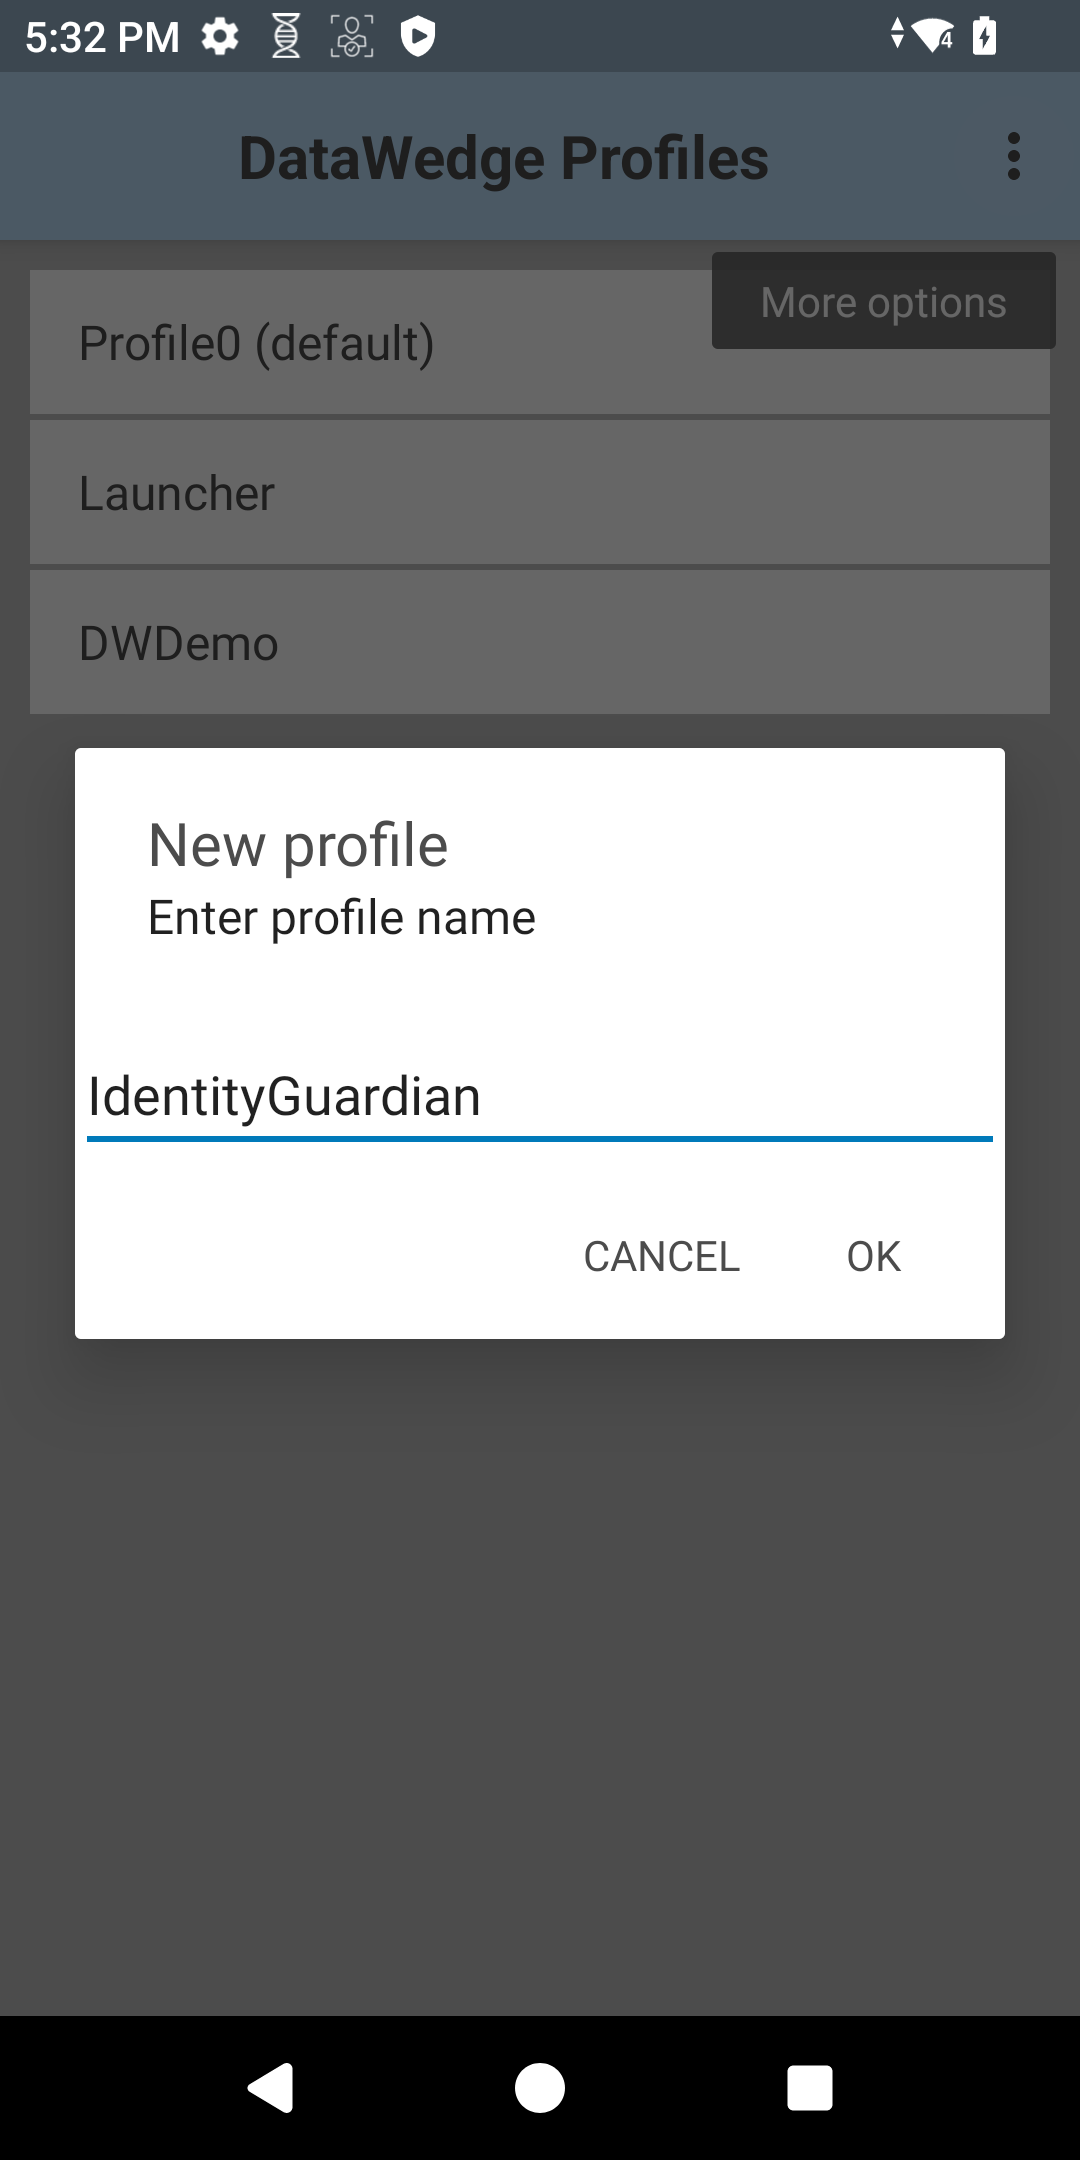
- Enter a profile name, such as "IdentityGuardian."
- Locate the new profile in the list and tap its name.
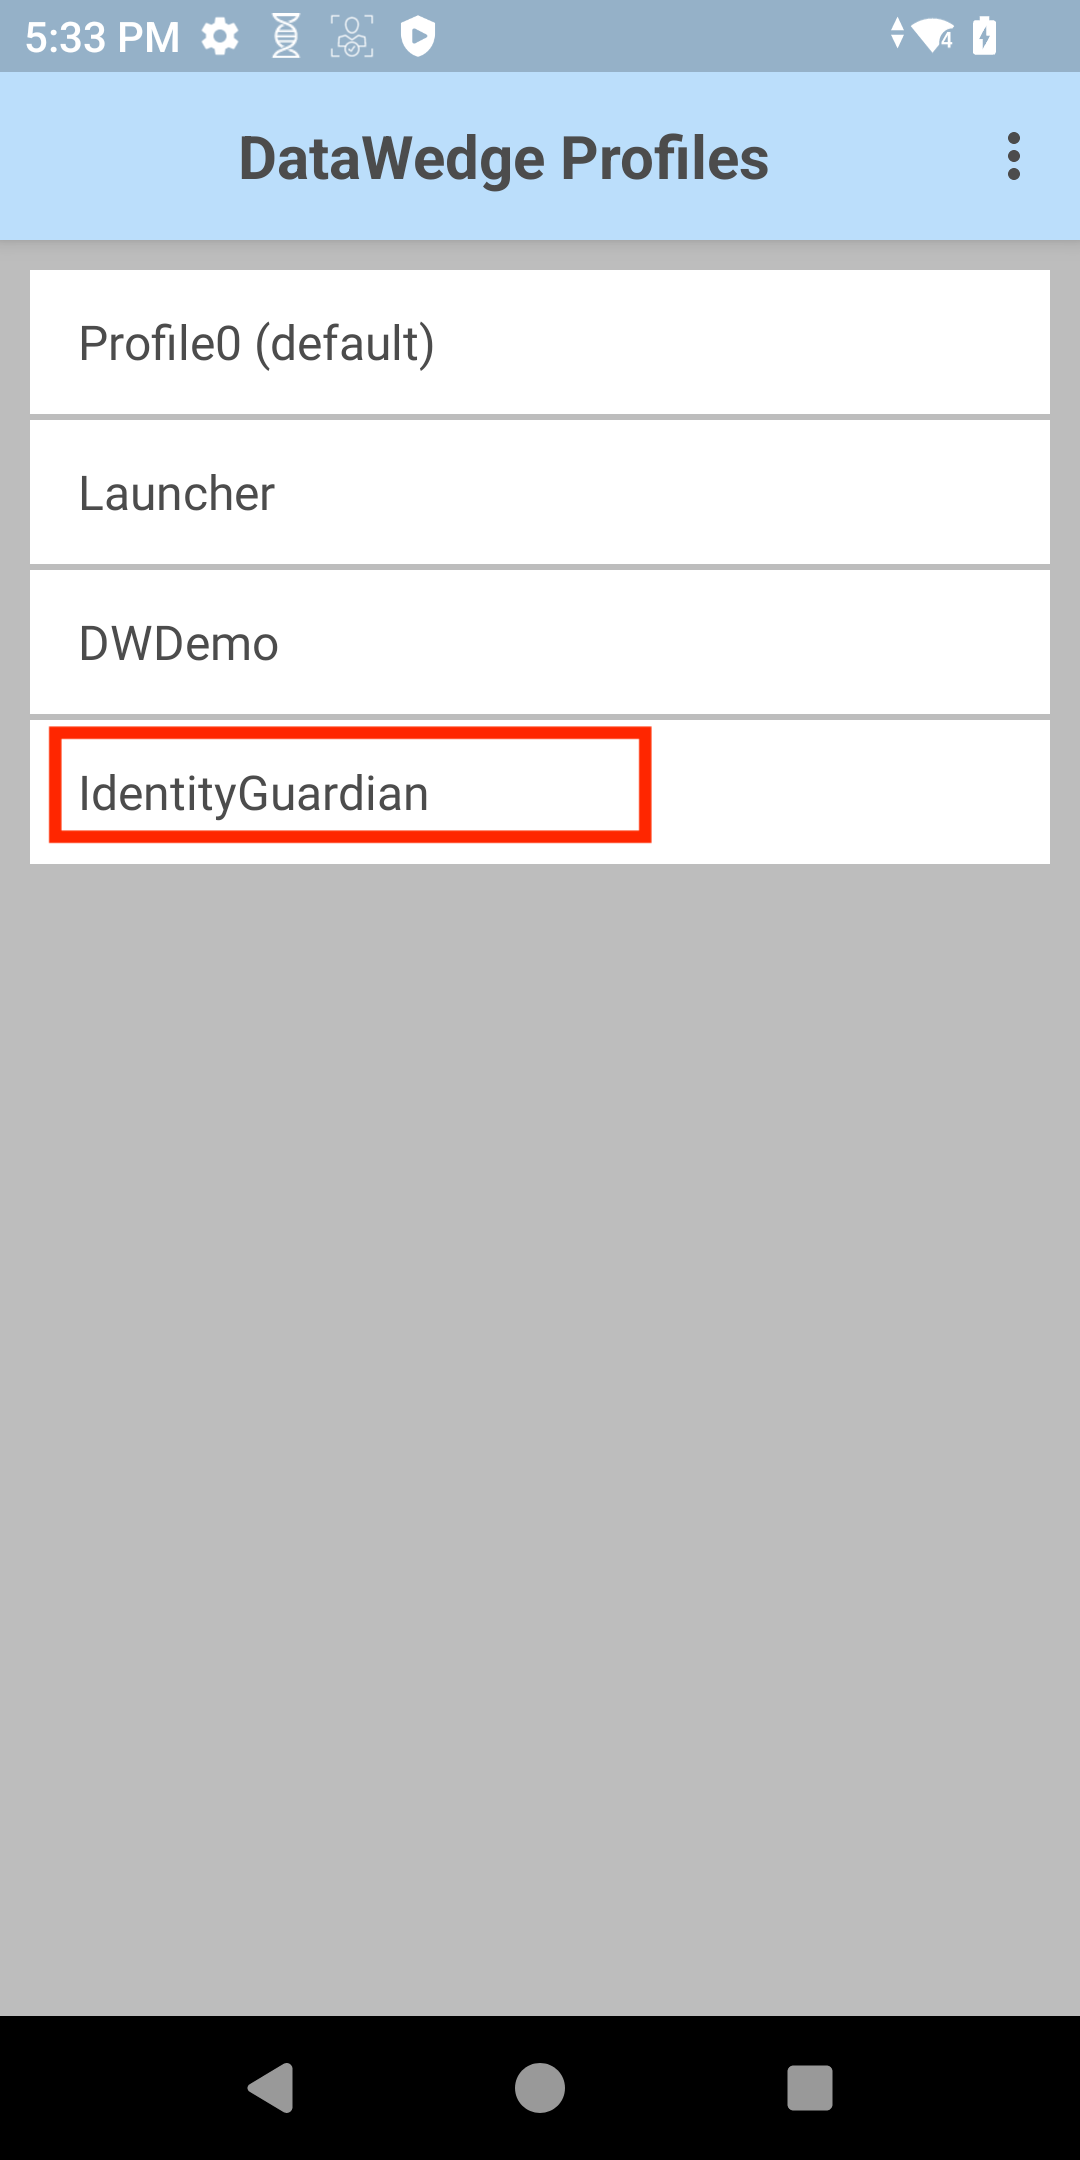
- The profile is enabled by default. Tap Associated apps.

- From the top right options menu, select New app/activity.
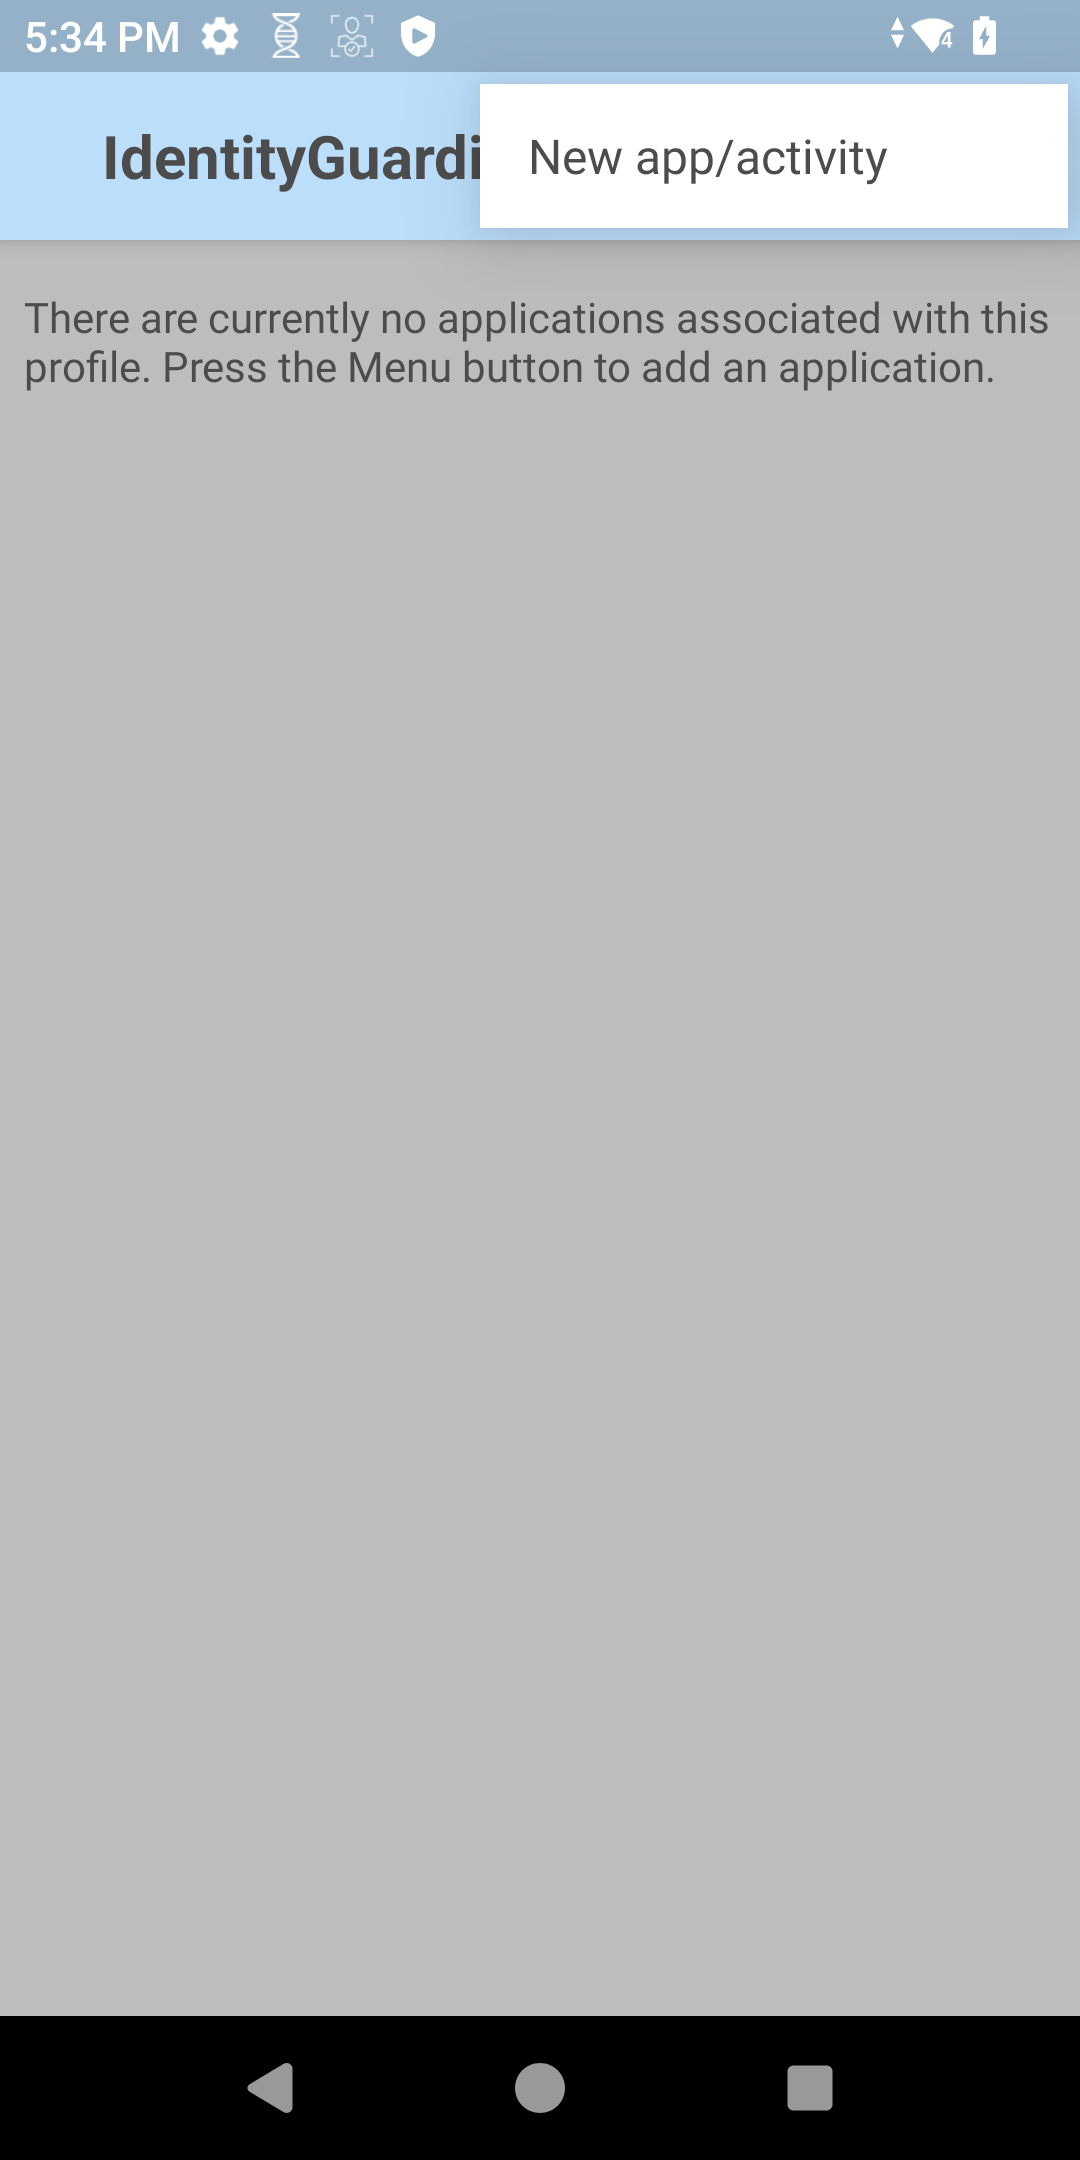
- Scroll through the app list and select com.zebra.mdna.els.
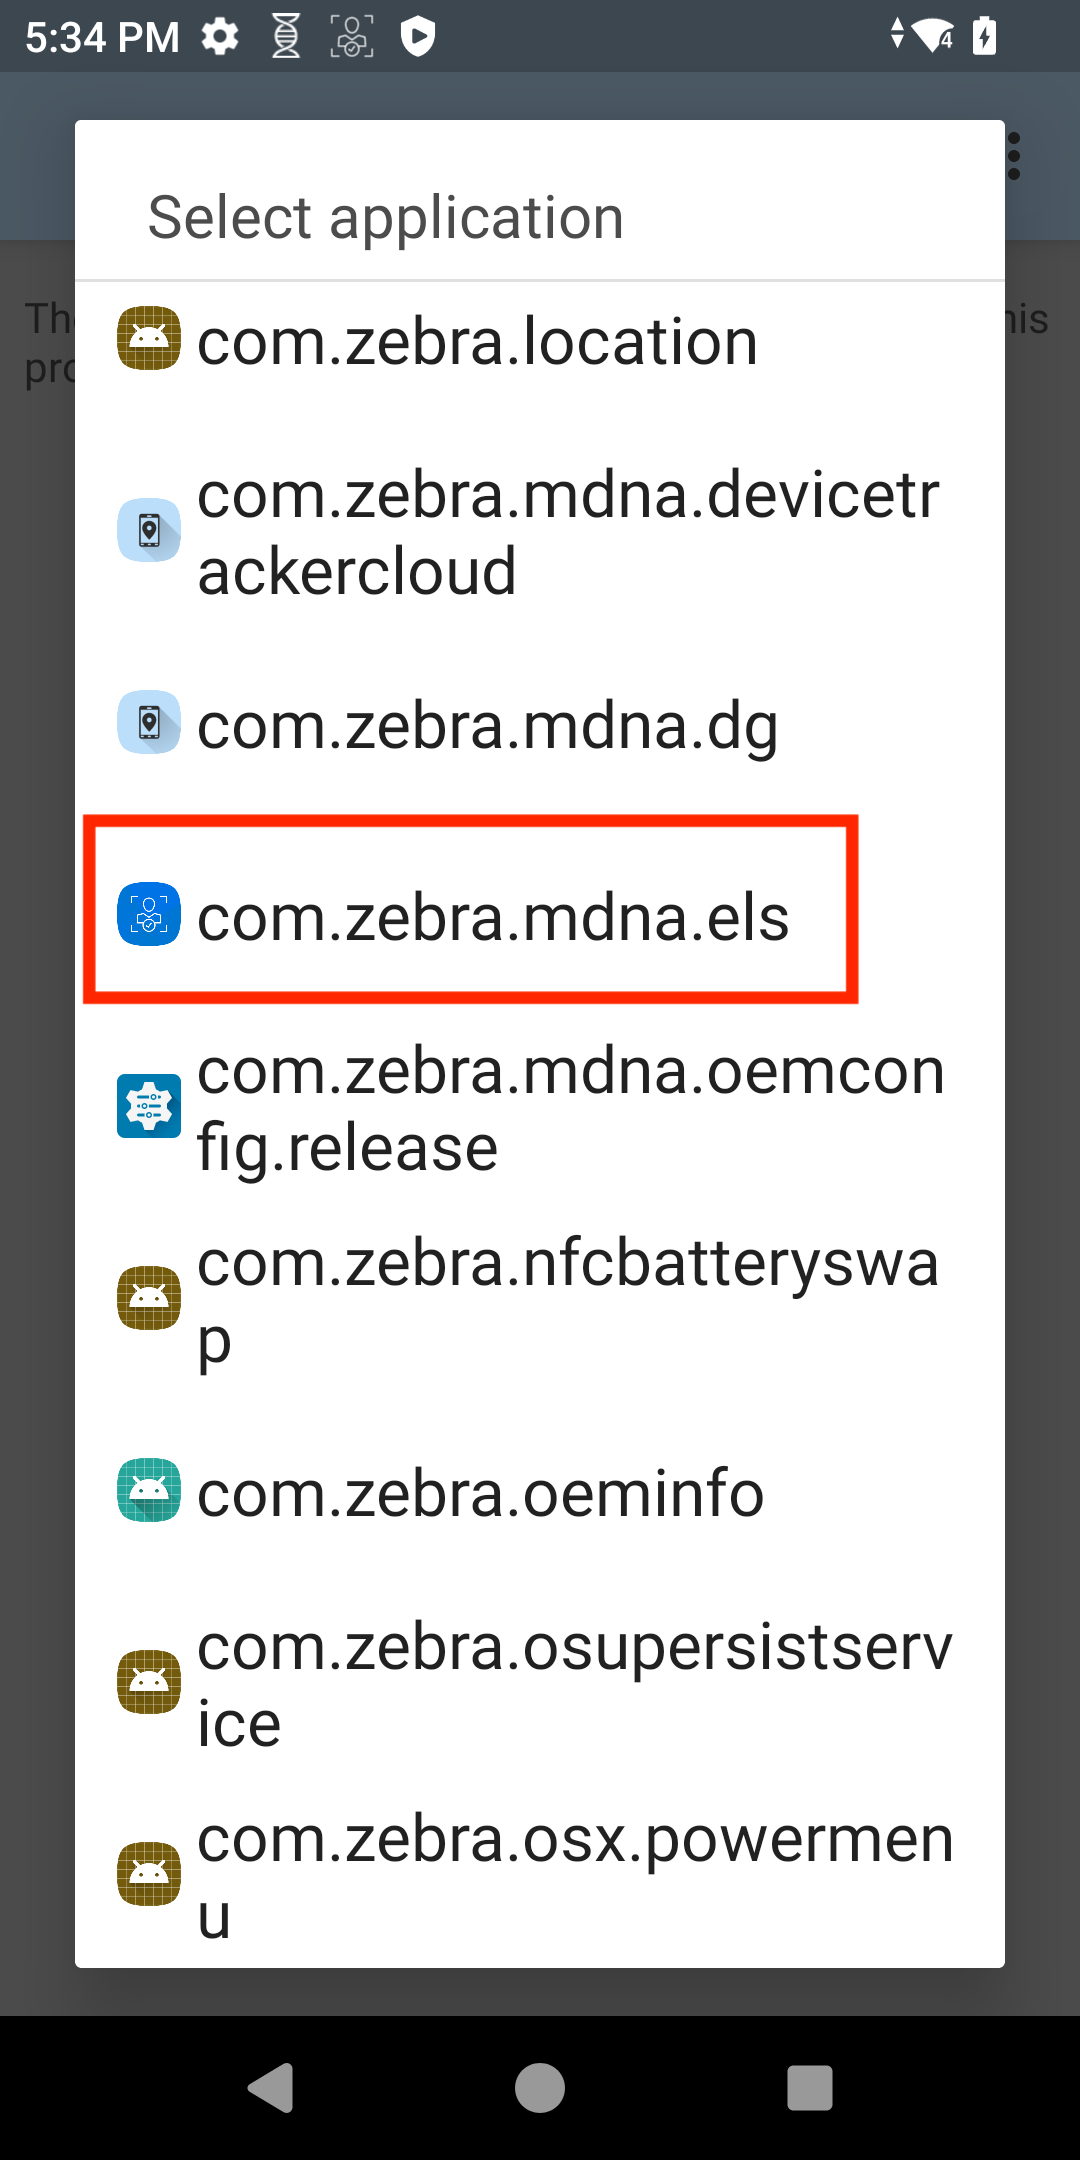
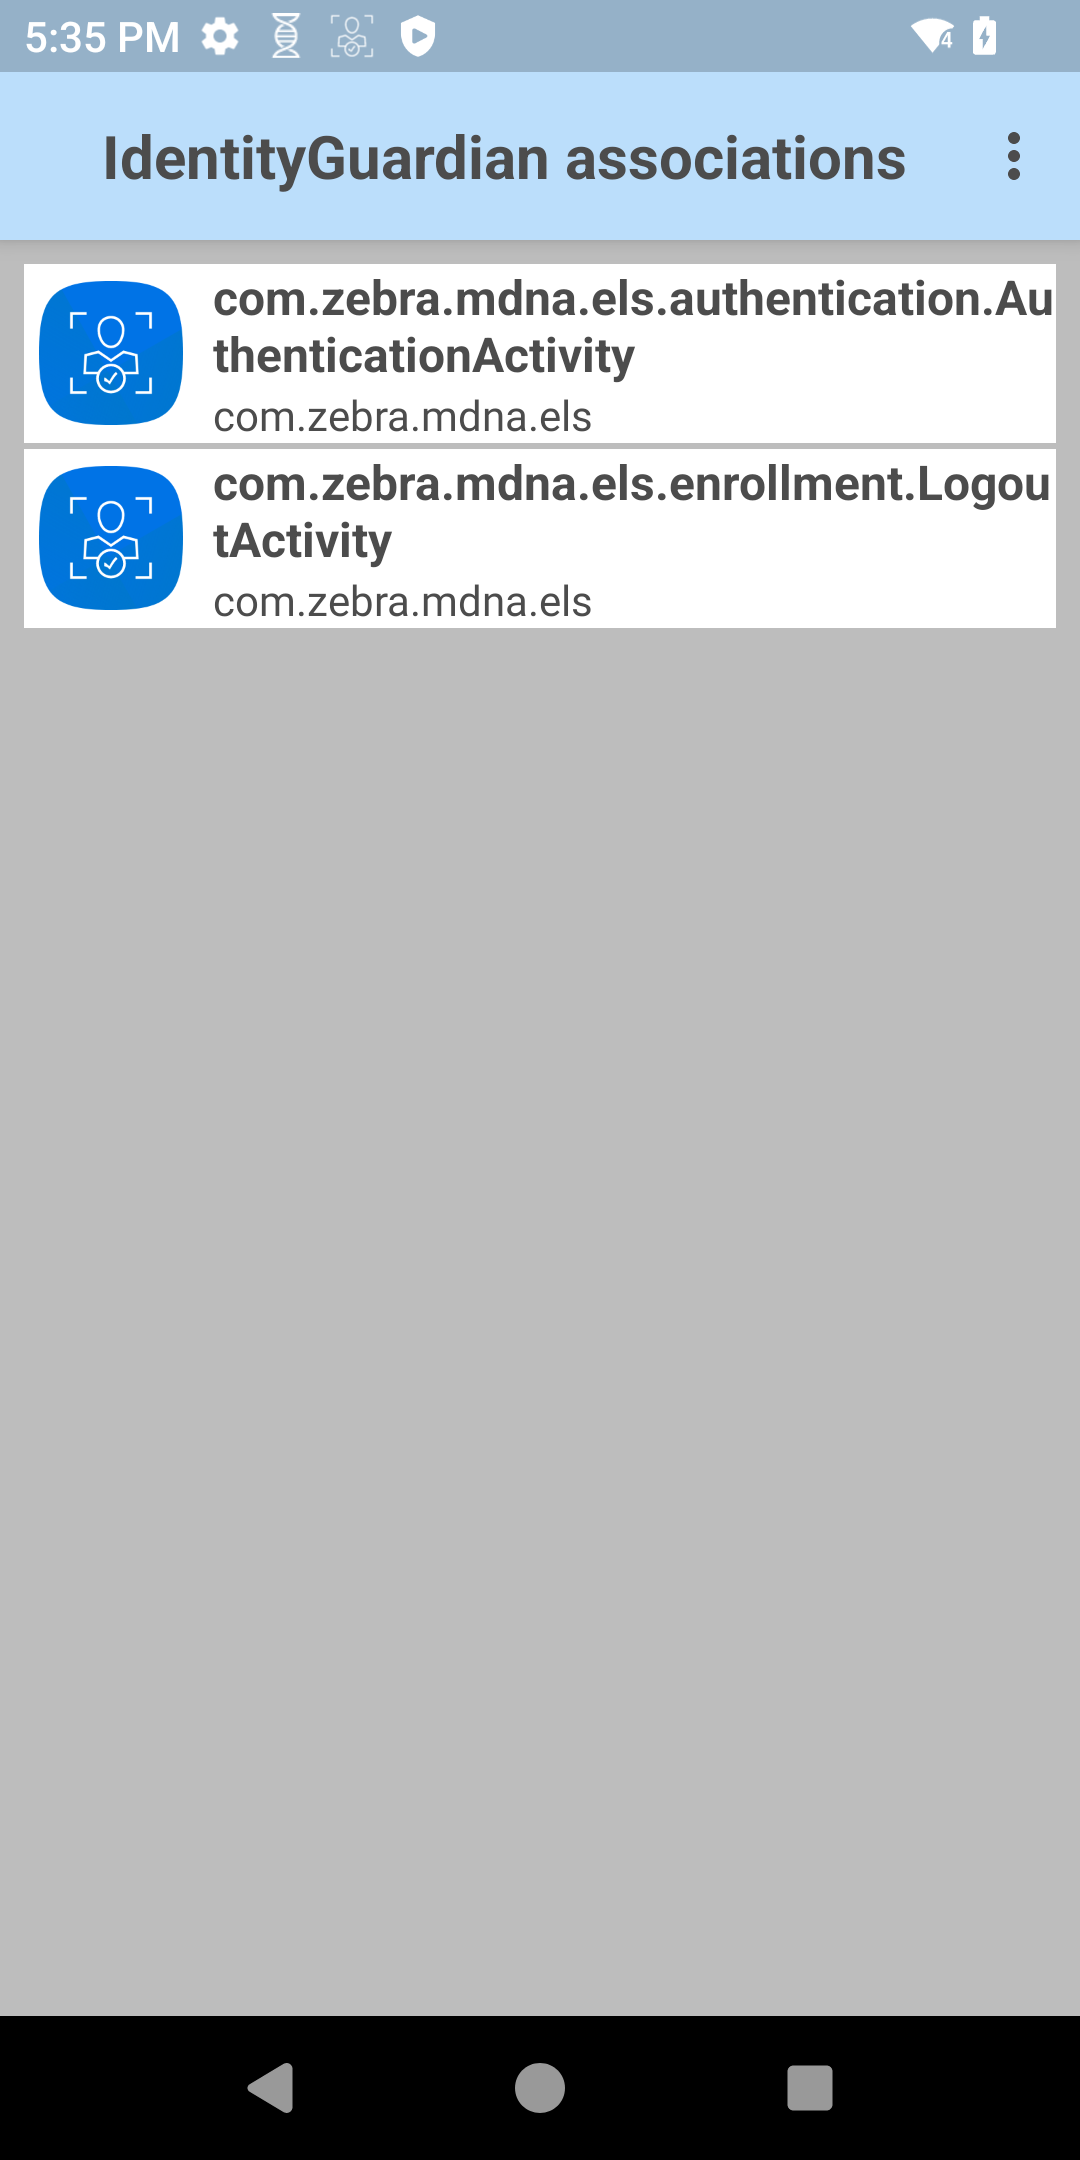
- Activities associated with the app is visible. From this list, select:
- com.zebra.mdna.els.authentication.AuthenticationActivity
- com.zebra.mdna.els.enrollment.LogoutActivity
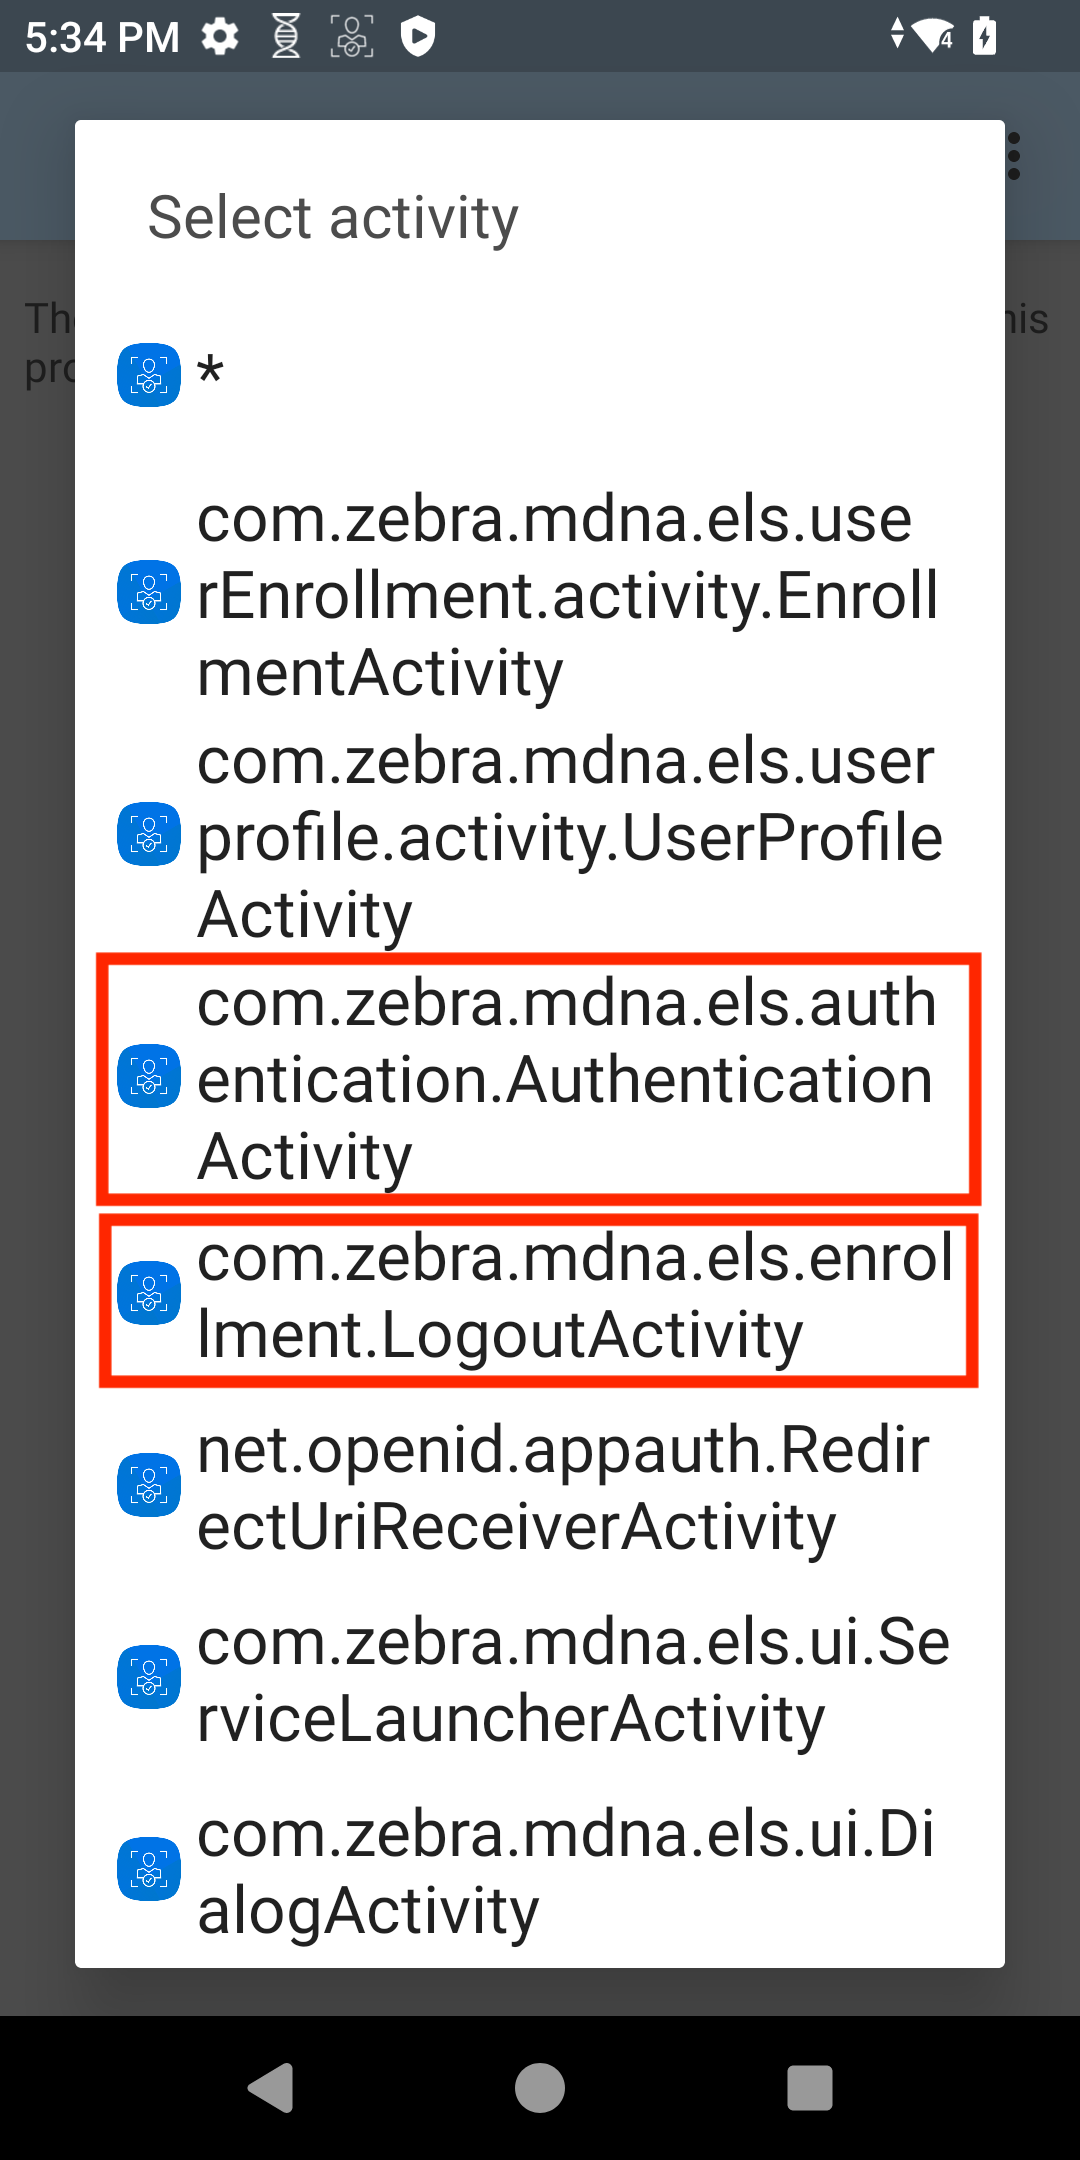
- The selected activities are displayed.
- Tap back to return to the IdentityGuardian profile screen. Ensure Barcode Input is enabled, then tap Scanner selection.
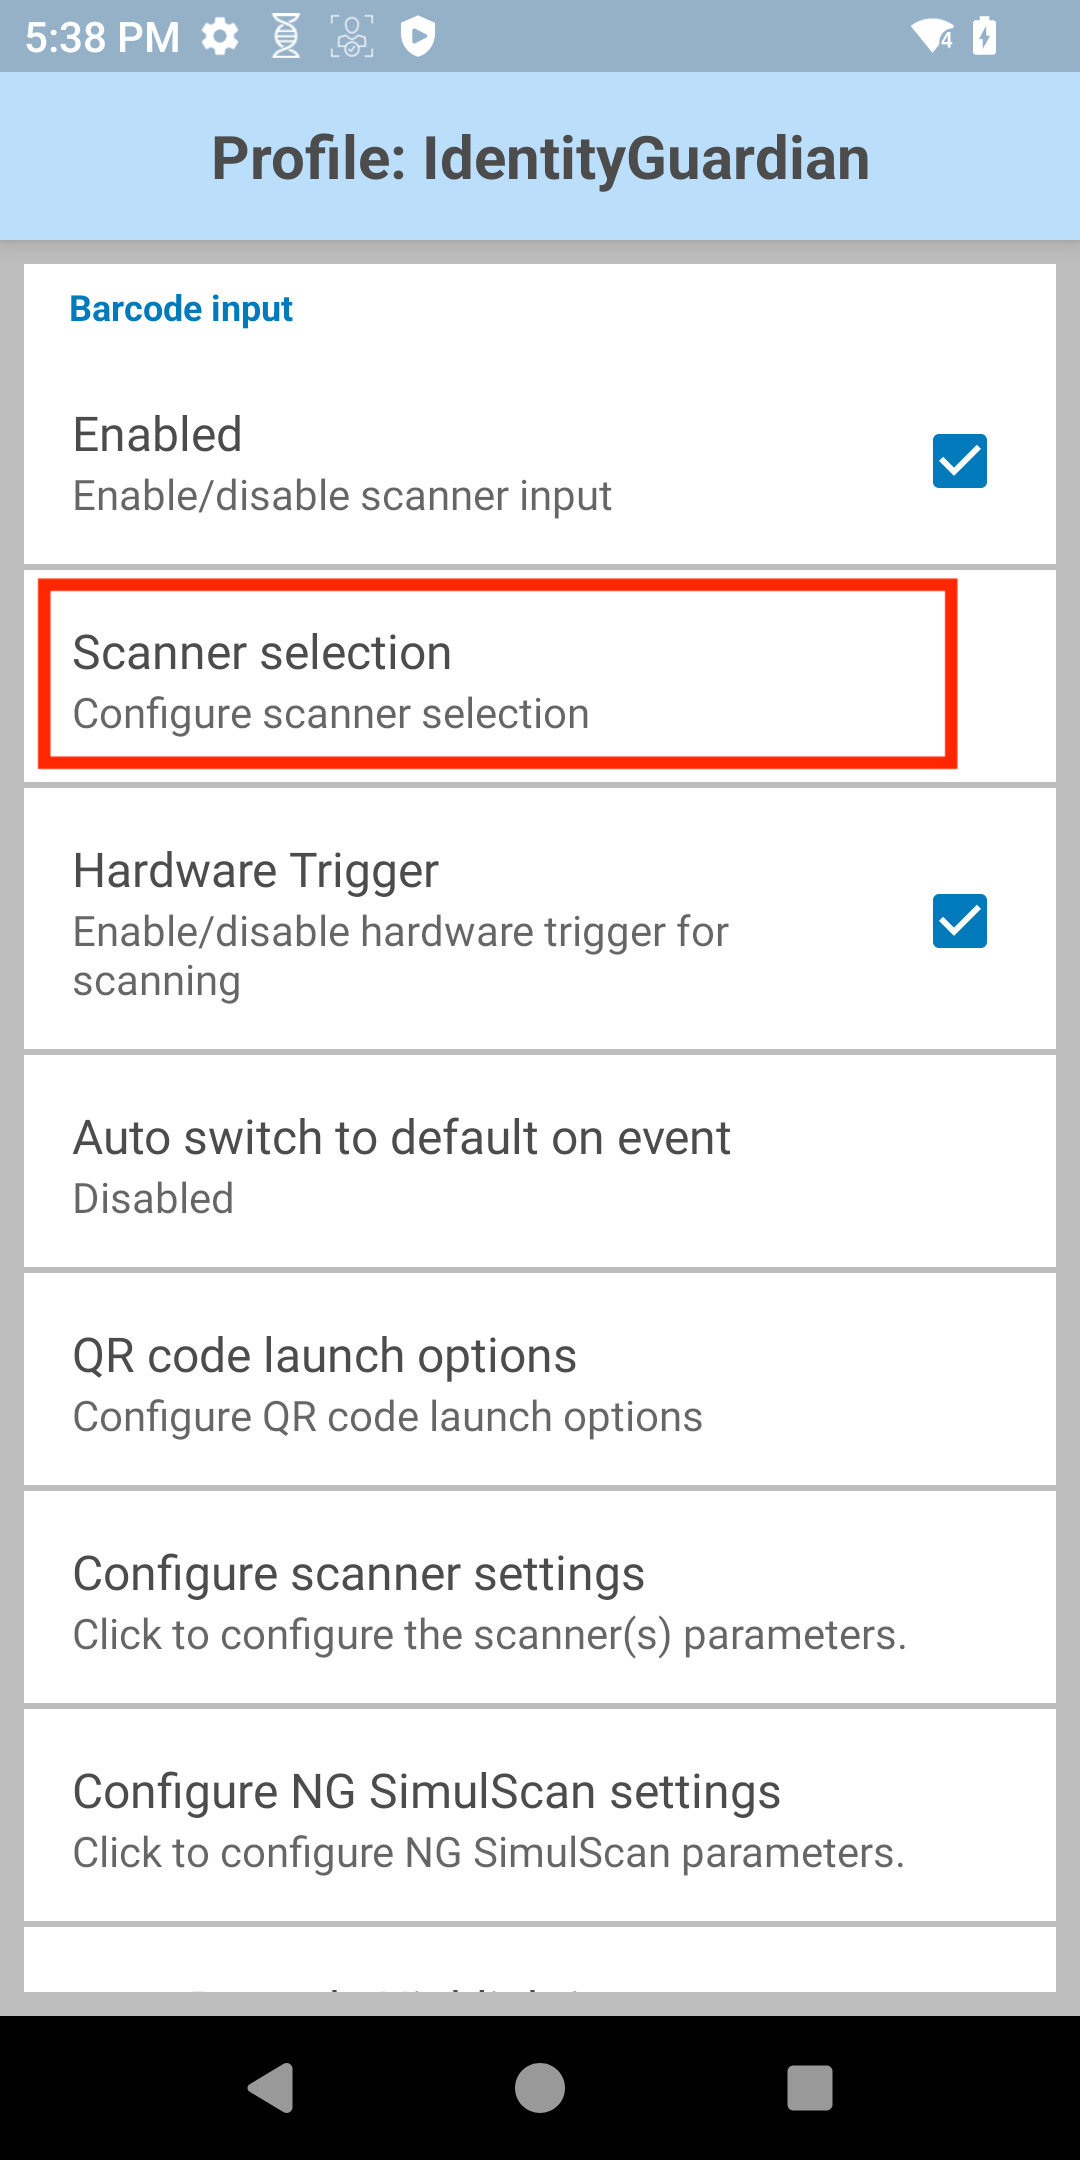
- Ensure that the Auto option is selected.

- Tap back to return to the IdentityGuardian profile screen. Tap on Configure scanner settings.
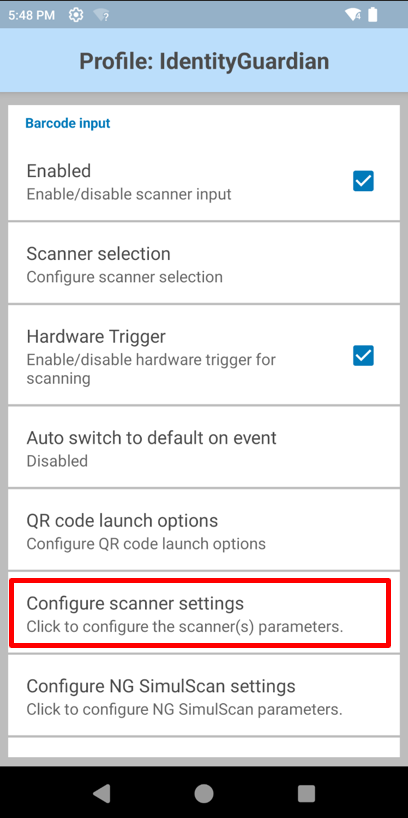
- Tap on Reader params.
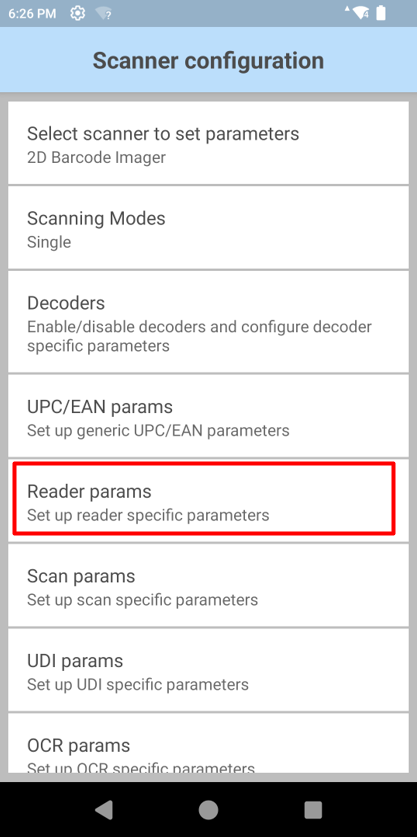
- Tap on Beam timer.
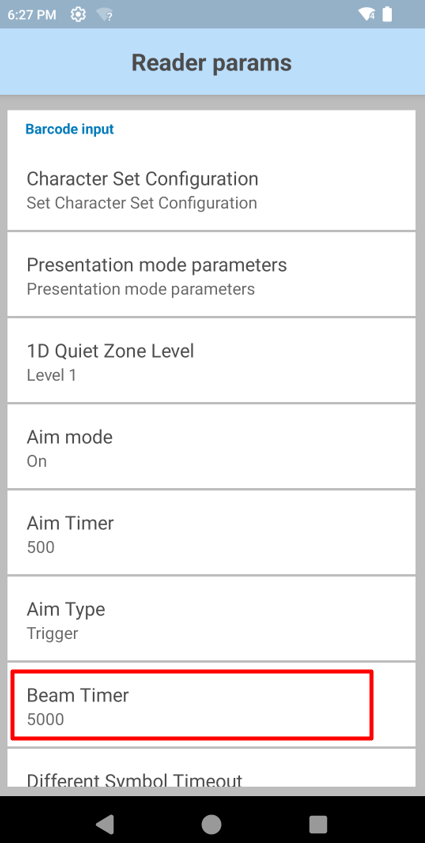
- Set the Beam Timer to 15000 ms and click OK.
- Note: Zebra recommends this 15-second timeout to allow sufficient time for scanning. This value, already set in the default profile, is particularly helpful in environments with vehicle-mounted devices where more time maay be needed to align the scanner.

- Note: Zebra recommends this 15-second timeout to allow sufficient time for scanning. This value, already set in the default profile, is particularly helpful in environments with vehicle-mounted devices where more time maay be needed to align the scanner.
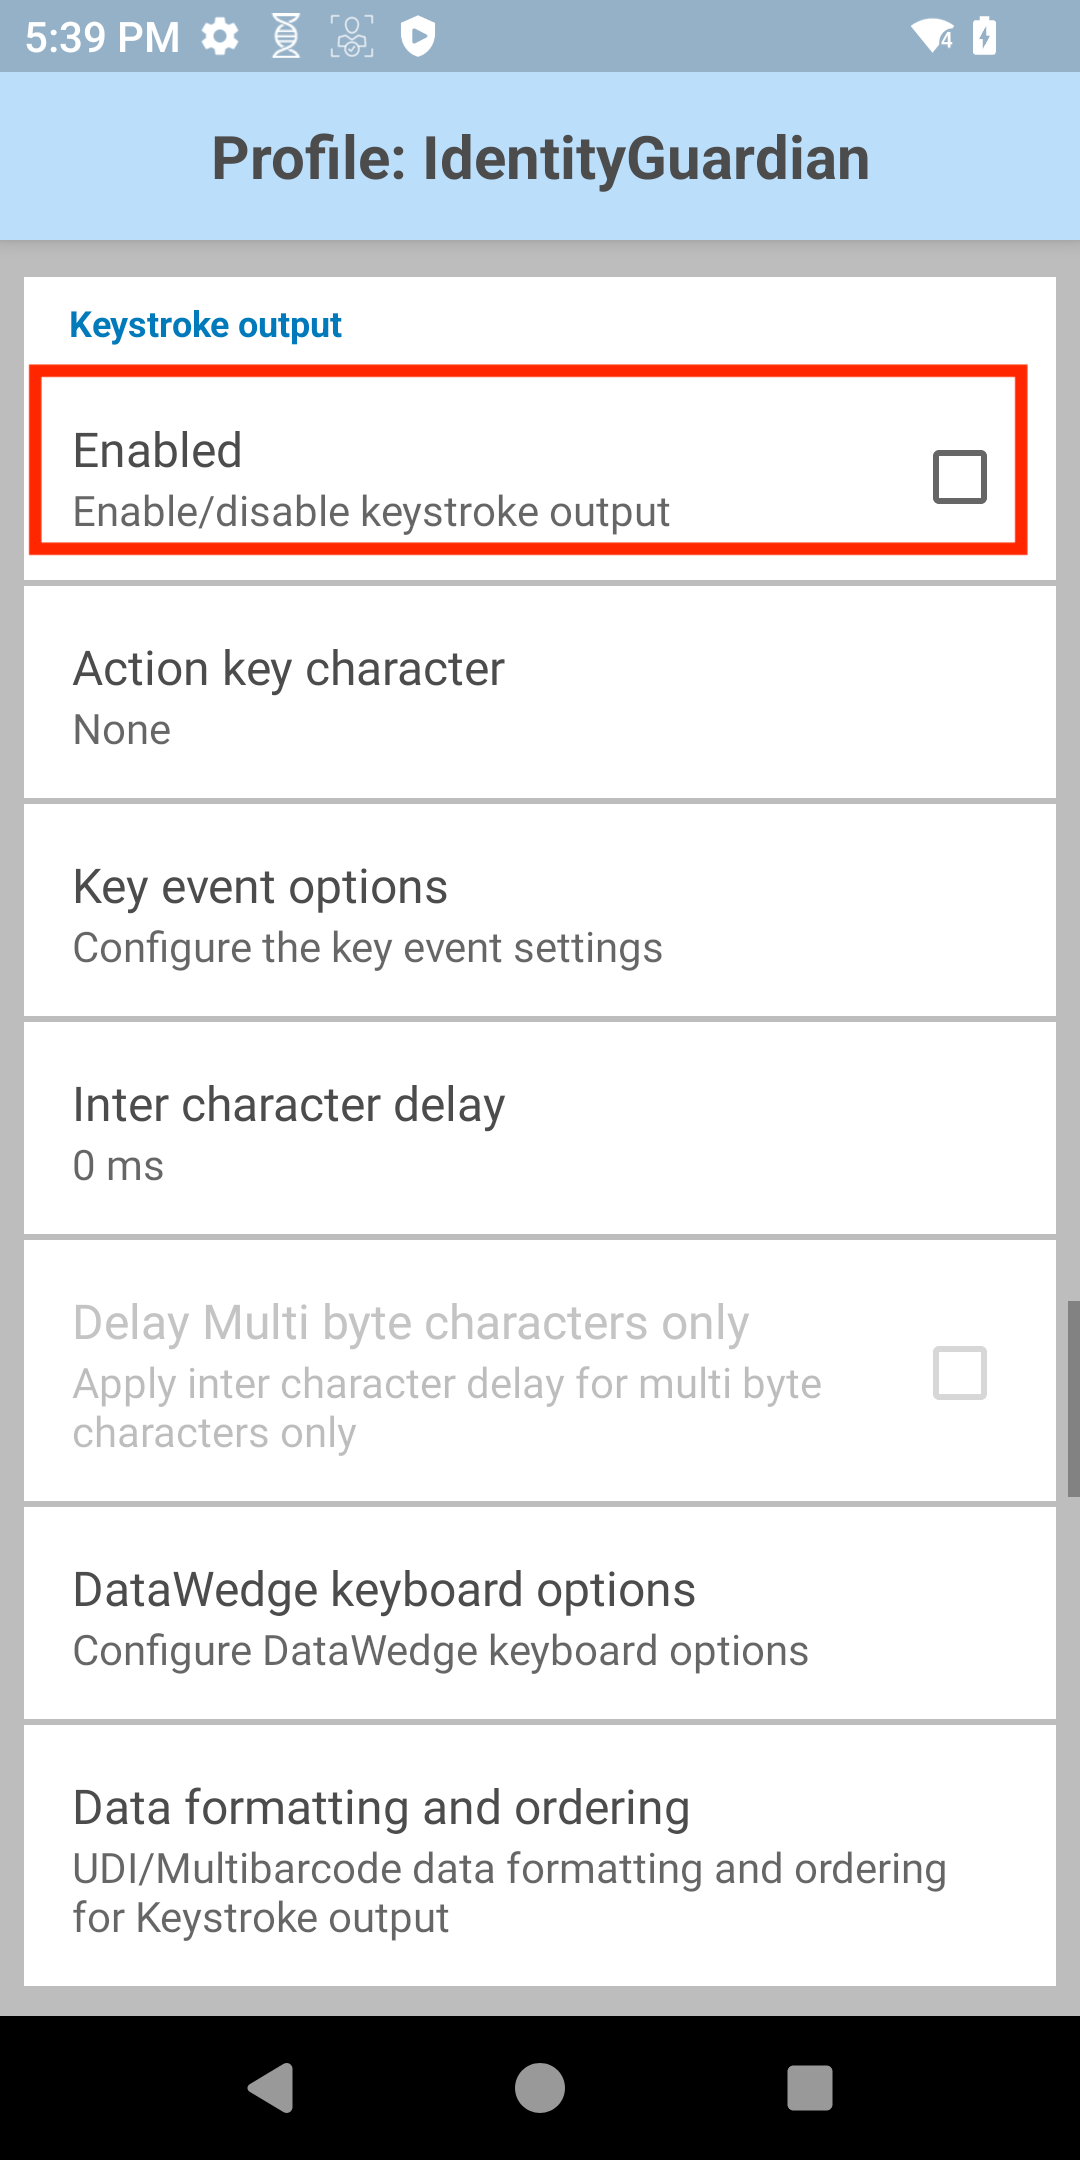
- Tap the back button to return to the IdentityGuardian profile screen. Scroll to Keystroke output and ensure it is disabled.
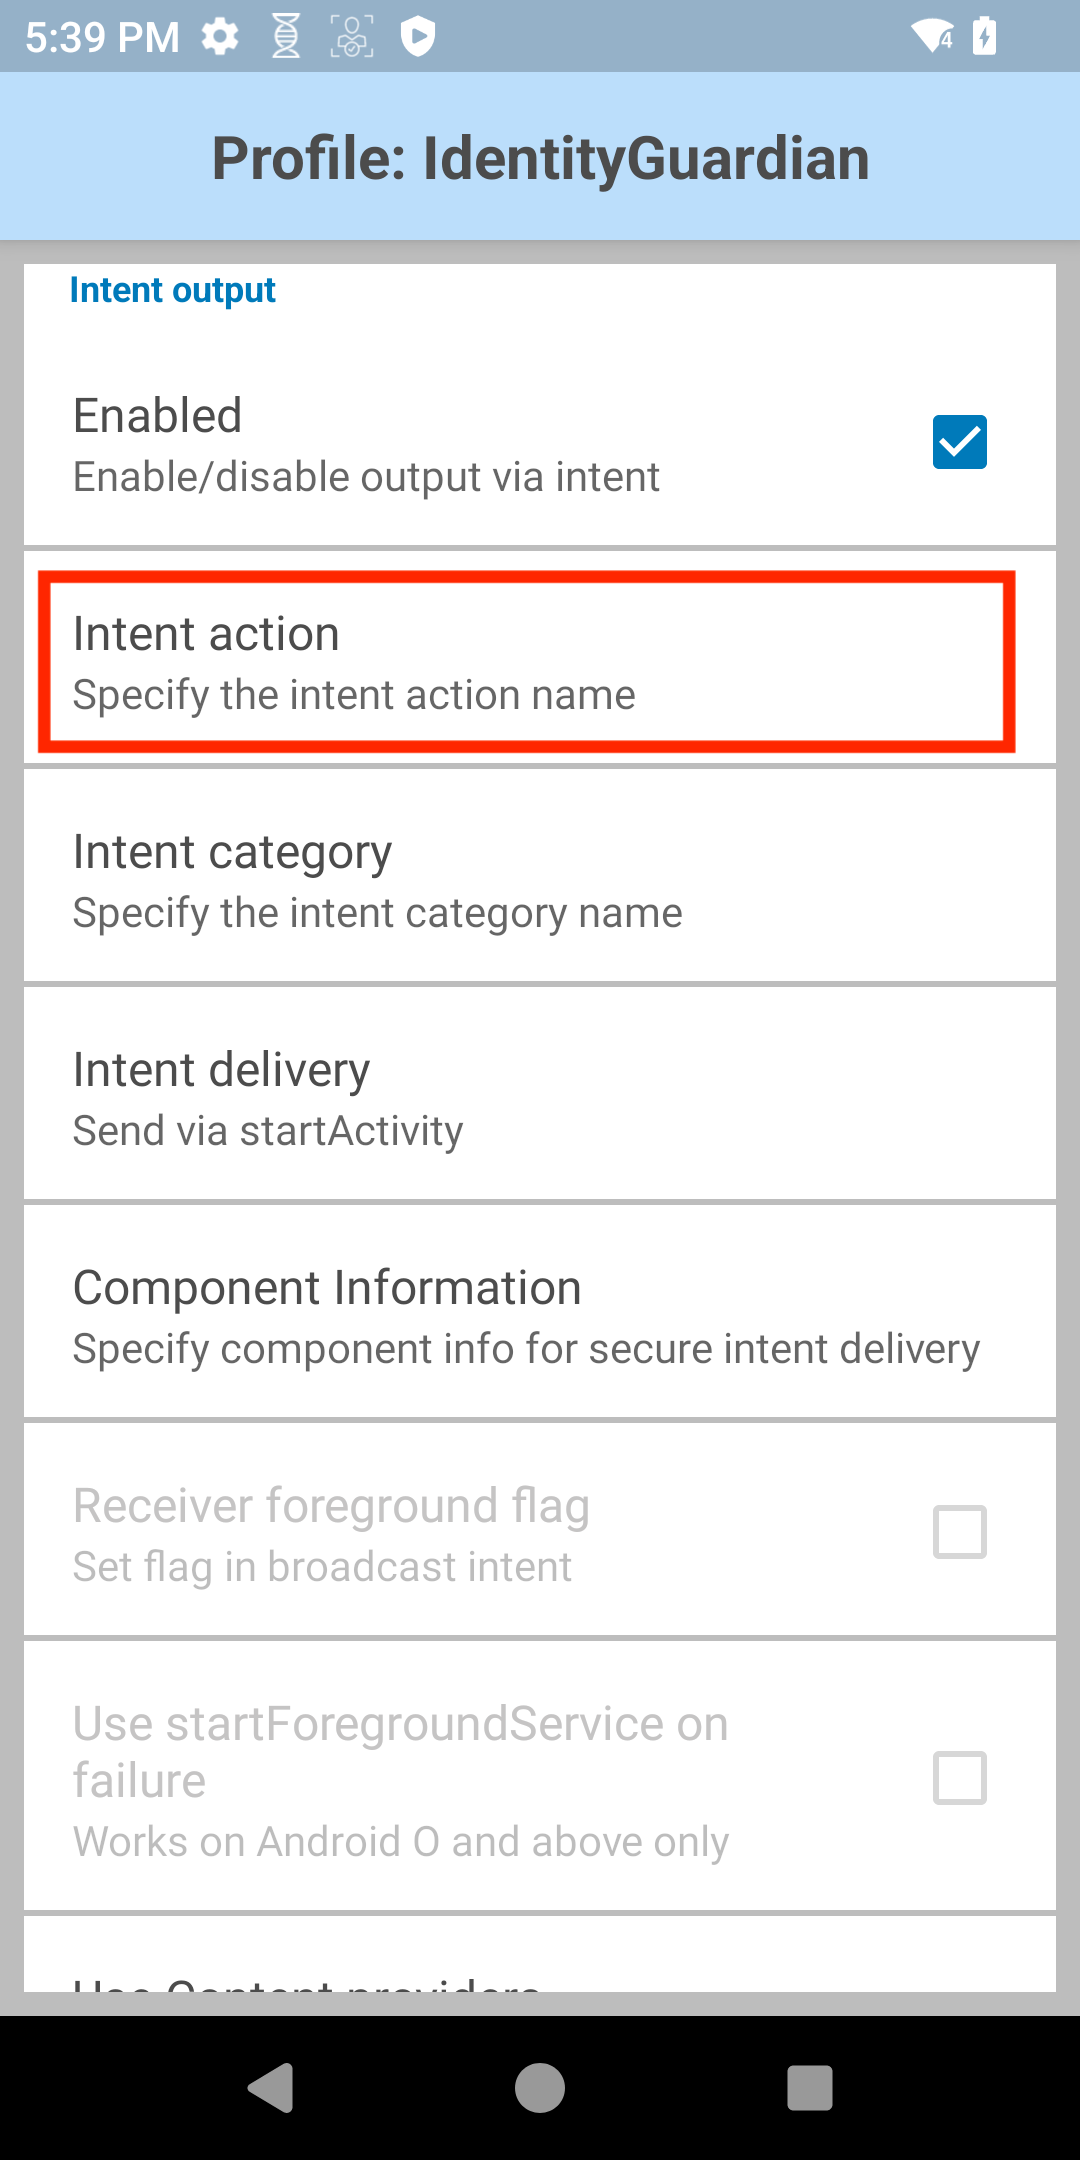
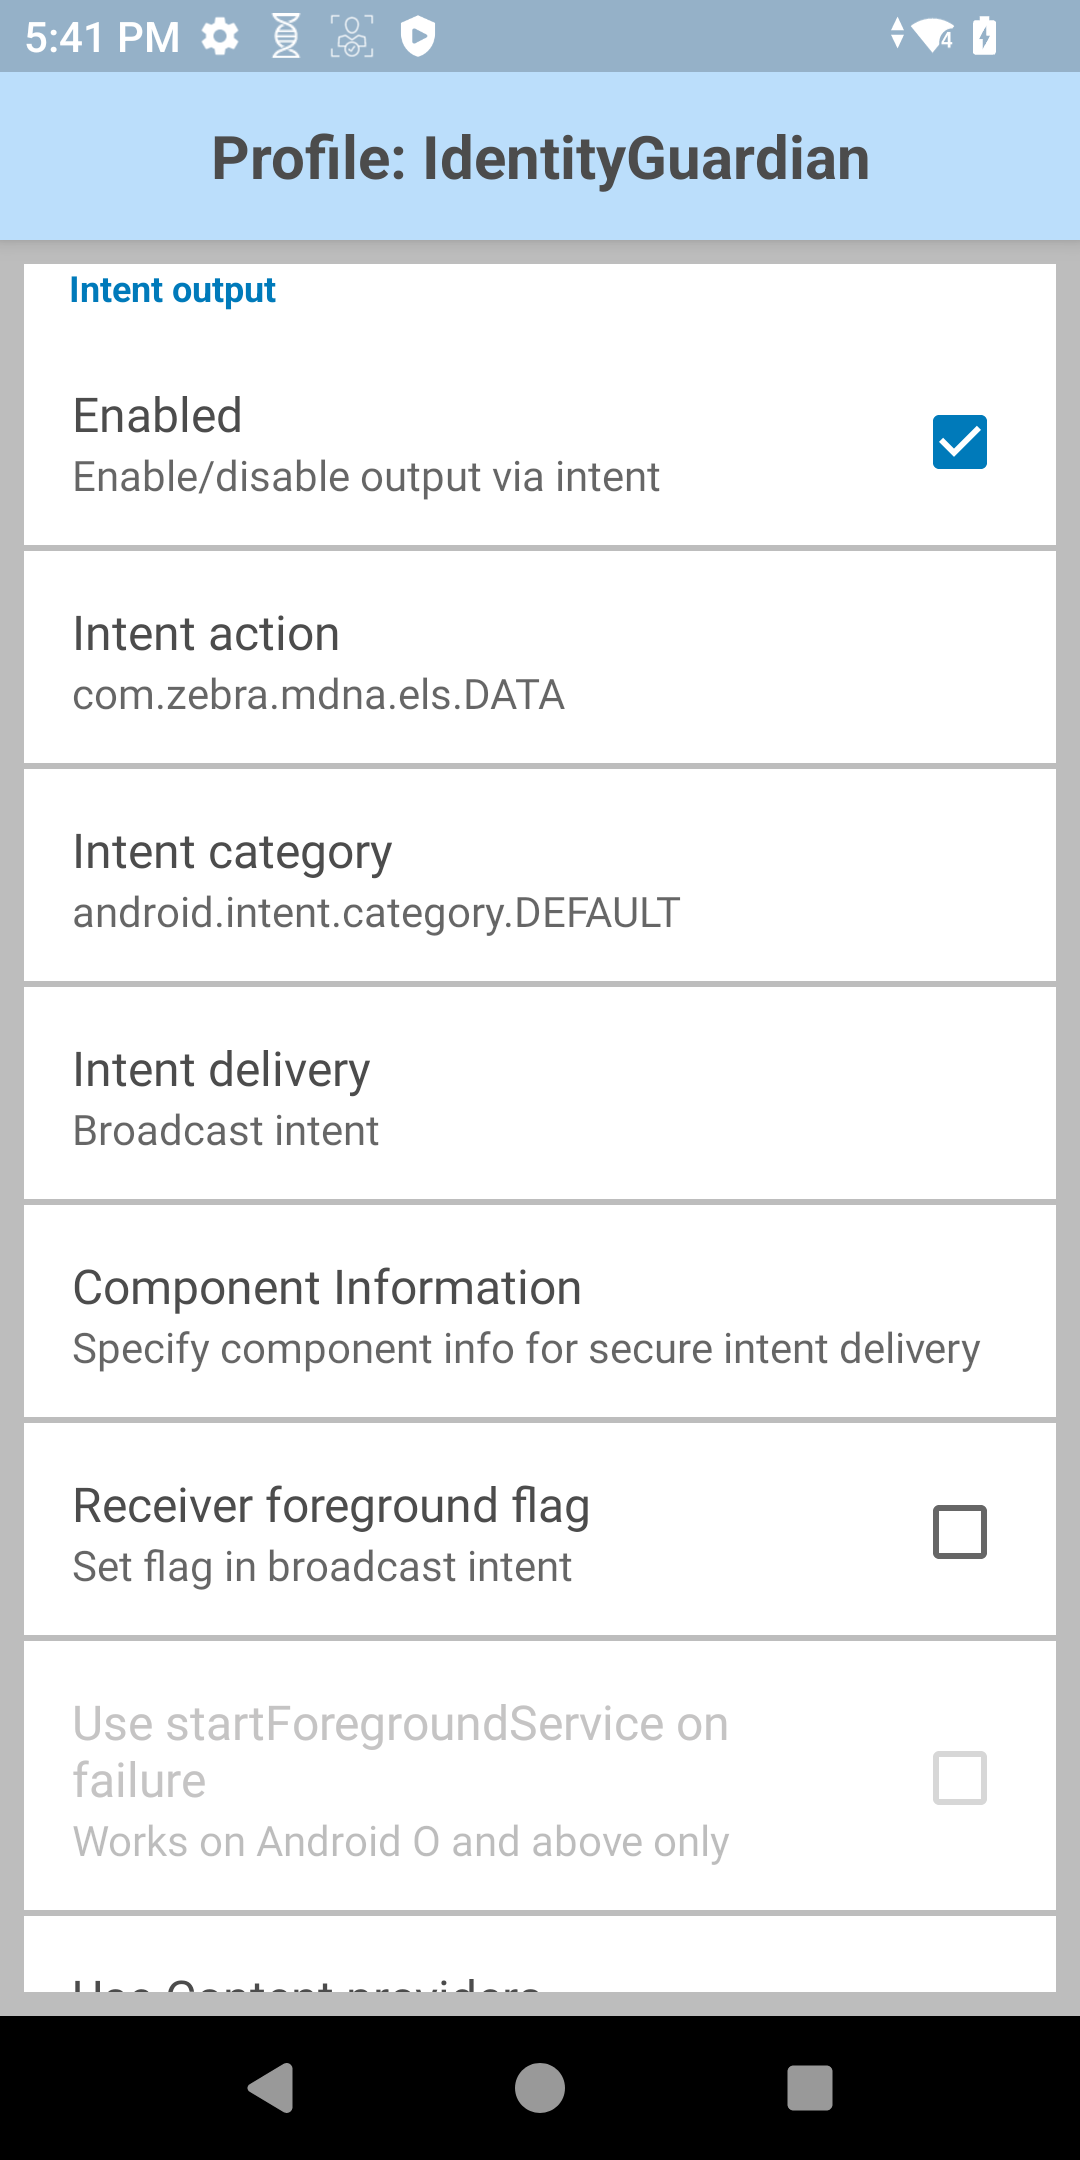
- Scroll to Intent Output and ensure it is enabled. Tap Intent action.
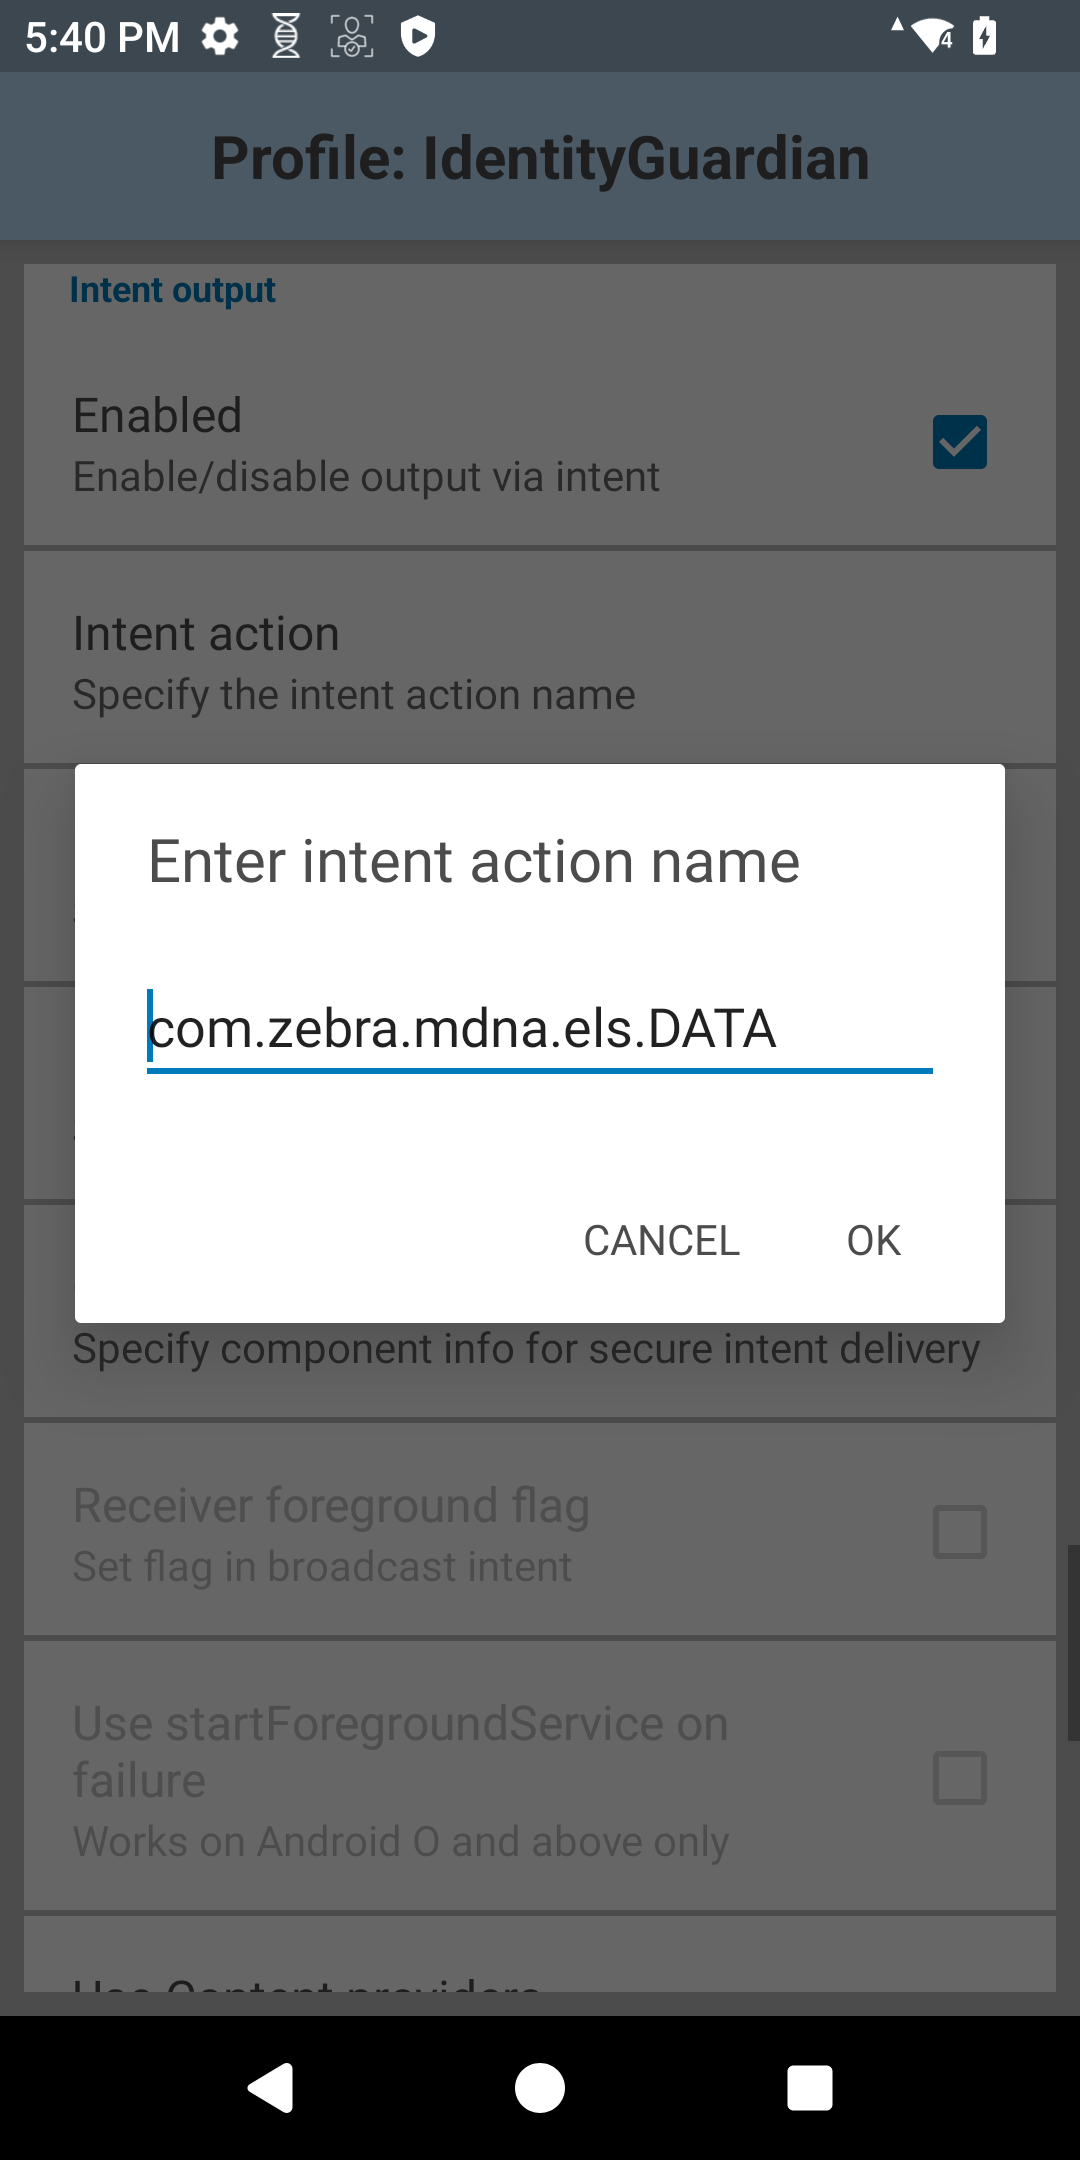
- Enter the intent action name "com.zebra.mdna.els.DATA" and tap OK.
- Tap Intent category. Enter "android.intent.category.DEFAULT" and tap OK.
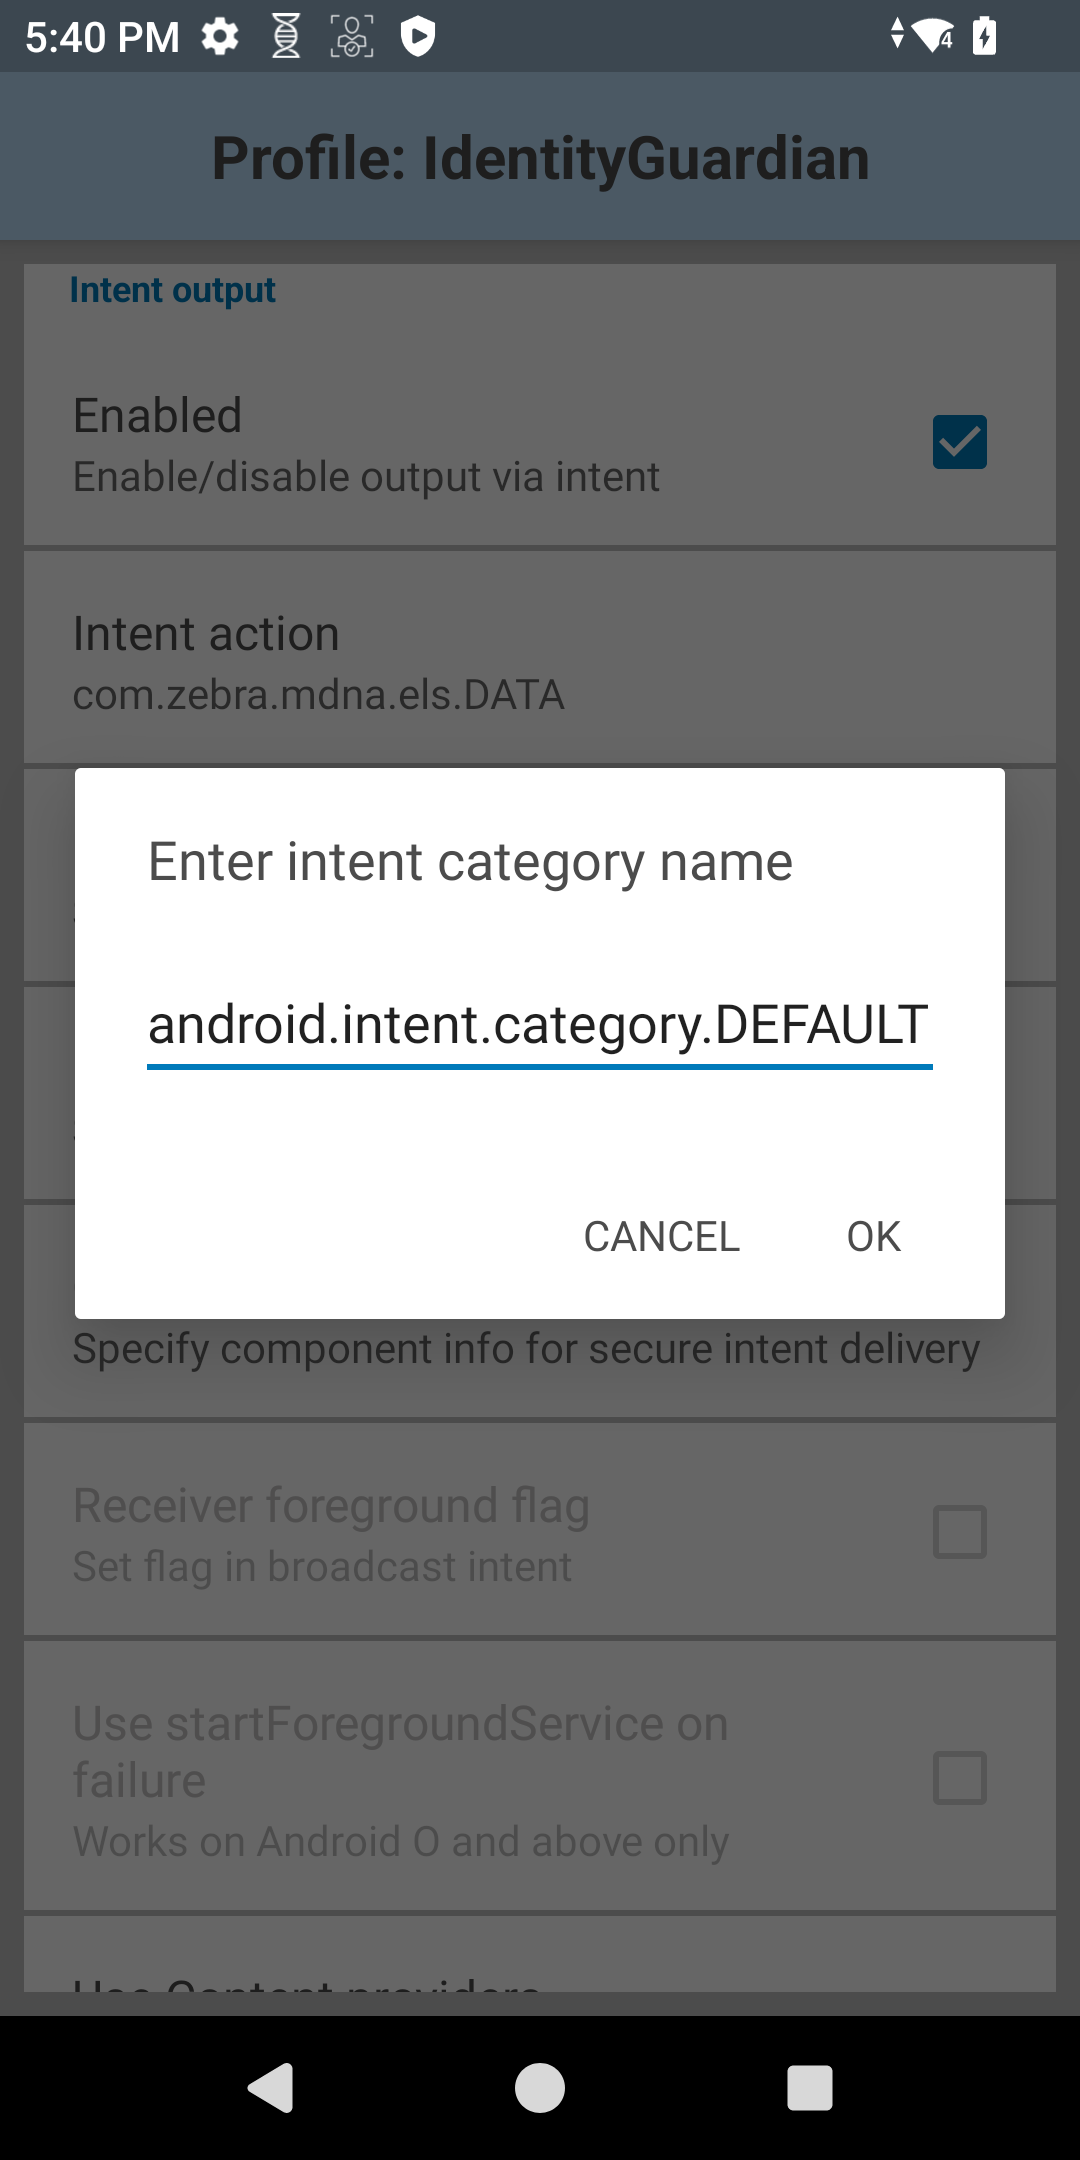
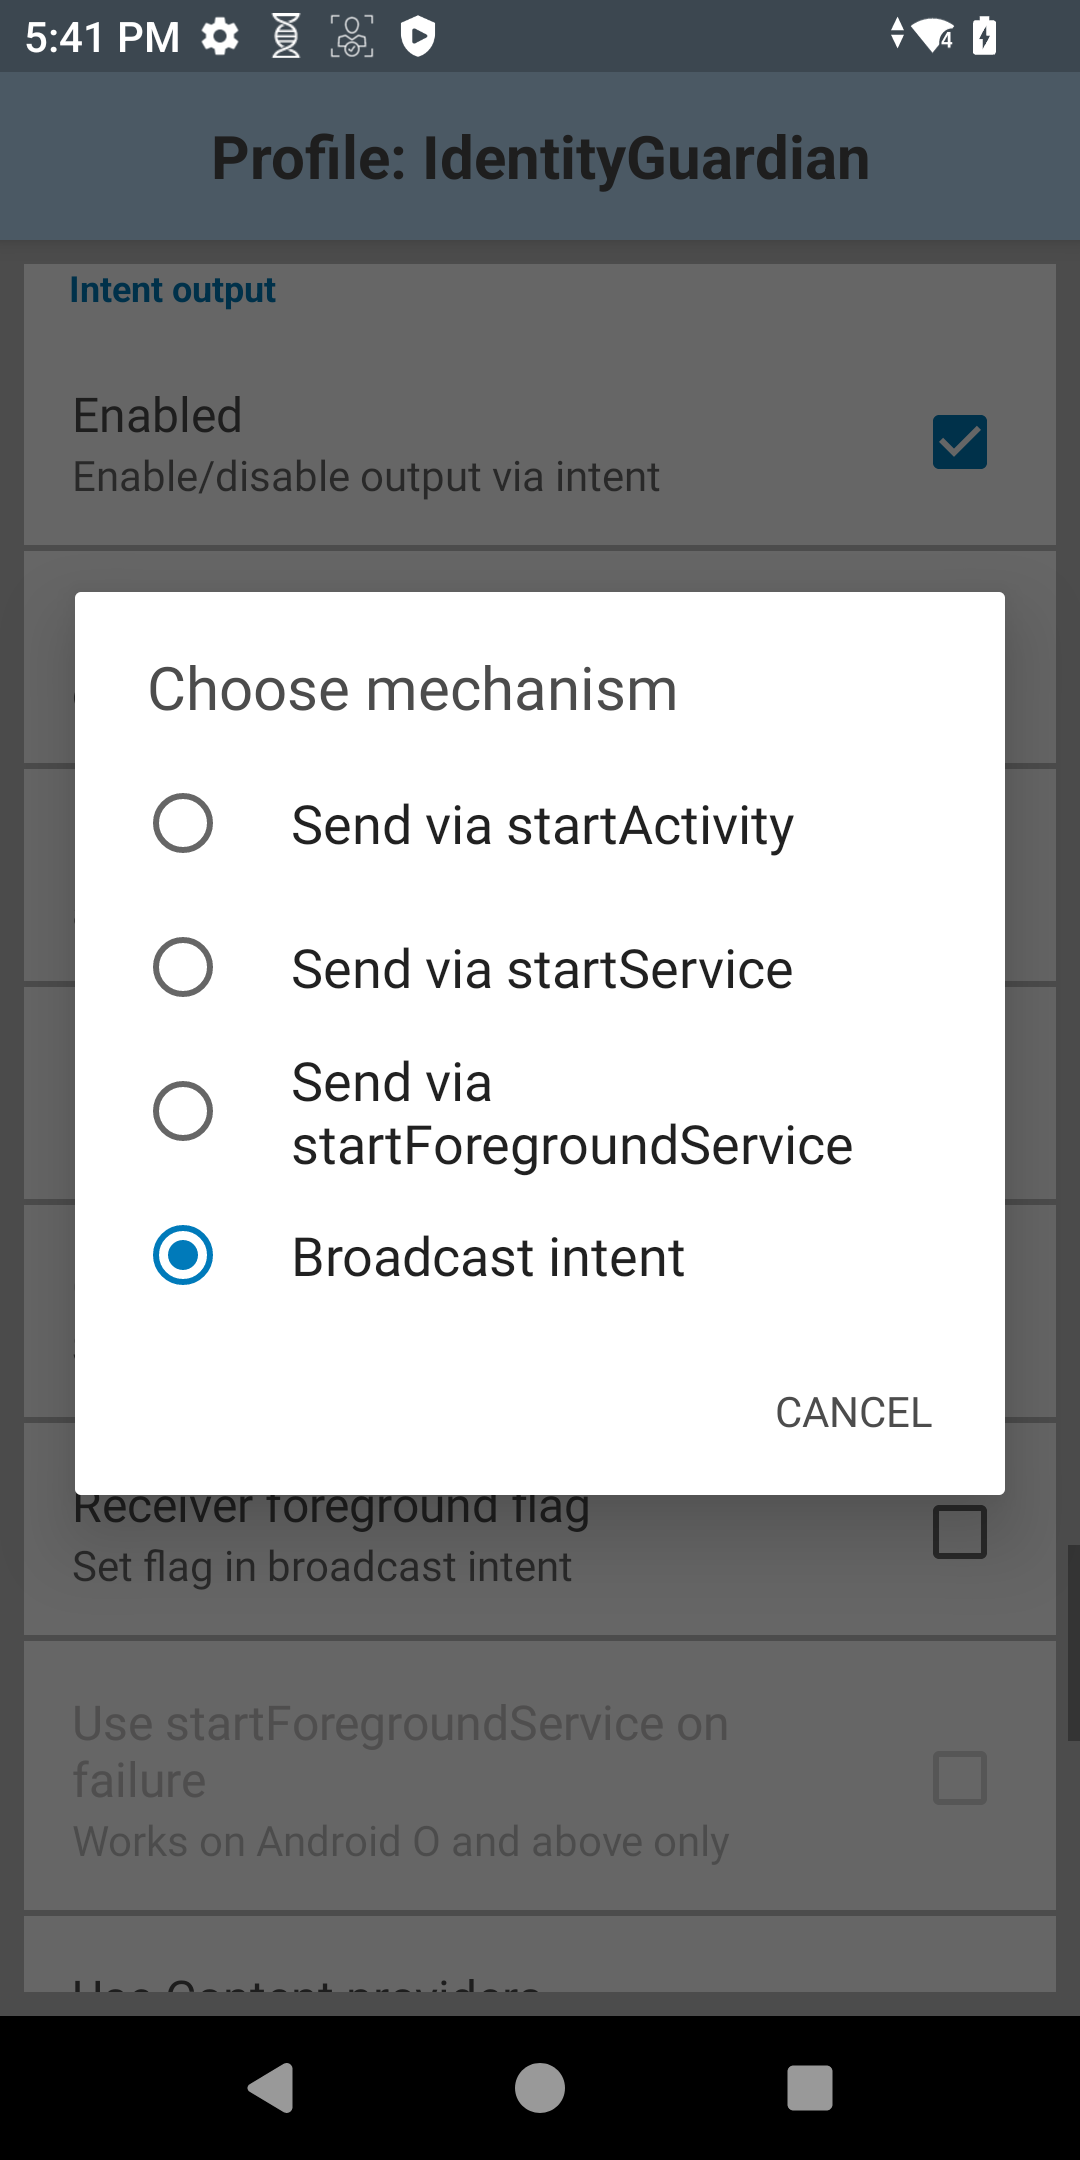
- Tap Intent delivery. Select Broadcast intent.
- Verify all settings.
- Export the profile and deploy it to the devices. For instructions, see DataWedge Profile Deployment.
Play Store Updates
To prevent automatic updates from interrupting provisioning and to maintain better version control, select Zebra value-add applications (including Identity Guardian) have Google Play updates disabled by default in the operating system. This change replaces the previous default-enabled state and takes effect starting with the April 2026 LifeGuard releases for Android 14 and Android 15. For supported platforms and devices, see the Zebra Support Portal. While updates are disabled by default, administrators retain full control over application management.
Notes:
- This change also restricts standard update methods, including manual installation, manual updates via the Google Play Store, and Android Debug Bridge (ADB).
- This change is not applicable for Android 11 and Android 13, as Play Store updates are enabled by default on these versions.
Administrator Controls: Modify the default setting at any time using MX App Manager with the AllowApplicationUpgrade or DisallowApplicationUpgrade option with one of the following methods:
Configuration via MX App Manager: Use this method to submit the XML through the EMM platform to enable/disable automatic updates for Google Play:
- Enable Automatic Updates: Use the
AllowApplicationUpgradeoption. Download the Enable_AutoUpgrade_IG.xml. - Disable Automatic Updates: Use the
DisallowApplicationUpgradeoption. Download the Disable_AutoUpgrade_IG.xml.
- Enable Automatic Updates: Use the
Configuration via Zebra OEMConfig: If using Zebra OEMConfig with the EMM system, follow these steps:
In the EMM system, create a new setting profile using Zebra OEMConfig.
Find the System Configuration section.
Look for the Pass-Through Command field and copy/paste this code to enable automatic updates:
  <wap-provisioningdoc>
  <characteristic version="10.3" type="AppMgr">
  <parm name="Action" value="AllowApplicationUpgrade"/>
  <parm name="Package" value="com.zebra.mdna.els"/>
  </characteristic>
  </wap-provisioningdoc>
To disable automatic updates, use:
<wap-provisioningdoc>
<characteristic version="10.3" type="AppMgr">
<parm name="Action" value="DisallowApplicationUpgrade"/>
<parm name="Package" value="com.zebra.mdna.els"/>
</characteristic>
</wap-provisioningdoc>
Behavior Persistence Note: This setting persists after a device reboot or an OTA upgrade.
Alternative Update Methods: Even with Google Play updates disabled, applications can still be updated directly through the following methods:
- Zebra DNA Cloud: Centrally manage, schedule, and push Identity Guardian updates directly to the device fleet.
- EMM Deployment: Most EMMs supporting Android Enterprise management (Device Owner or Profile Owner mode) allow administrators to directly push application updates to devices, bypassing the Google Play Store.
- Zebra MX Deployment: "AllowApplicationUpgrade" (Action 16) within the Zebra MX App Manager permits application upgrades to be applied via an EMM or StageNow. Specify
com.zebra.mdna.elsfor the Package Name to ensure Identity Guardian upgrades are allowed.
Uninstallation
Follow the standard procedure to uninstall the application.
Standard Enrollment Cleanup
For Standard Enrollments, all contents must be manually deleted from the /enterprise/usr/profiles directory after the application is uninstalled. This completely removes all user data.