Overview
The TWAIN driver's GUI provides an alternate method to access the supported TWAIN capabilities.
TWAIN Sample Application
A TWAIN sample application is provided with the default TWAIN driver installation and can be used to demonstrate the TWAIN driver GUI interface.
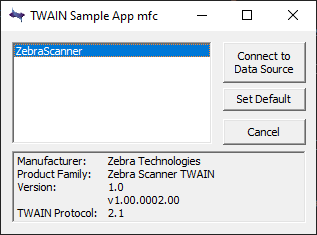 Figure 1: TWAIN Sample Application
TWAIN Configuration Screen
From the TWAIN Sample Application screen, select ZebraScanner and click Connect to Data Source to display the TWAIN Configuration screen (Figure 2).
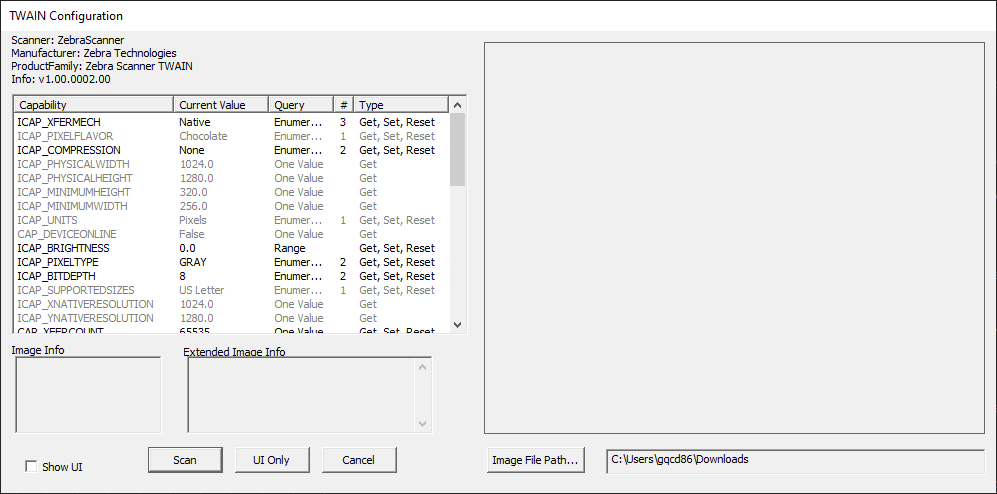 Figure 2: TWAIN Configuration Screen
The TWAIN Configuration screen lists the supported capabilities with their current values. A user can change a value by double clicking the capability. Capabilities that are grayed out cannot be changed and are read-only.
NOTE The ICAP_BRIGHTNESS and ICAP_JPEGQUALITY capabilities can only be set graphically through the advanced settings (see Advanced Settings).
TWAIN Configuration Screen:
- Image File Path: Allows the user to browse to a folder in which the scanned image file can be saved.
- Show UI: If checked, the basic GUI screen described below displays when the Scan button is clicked.
- Scan: Click this button to initiate an image capture.
- UI Only: Click this button to display the Basic GUI screen without initiating an image capture.
- Cancel: Click this button to close the TWAIN Configuration screen.
Basic UI Screen
From the TWAIN Configuration screen (Figure 2), click UI Only to display the basic GUI Scan Settings screen
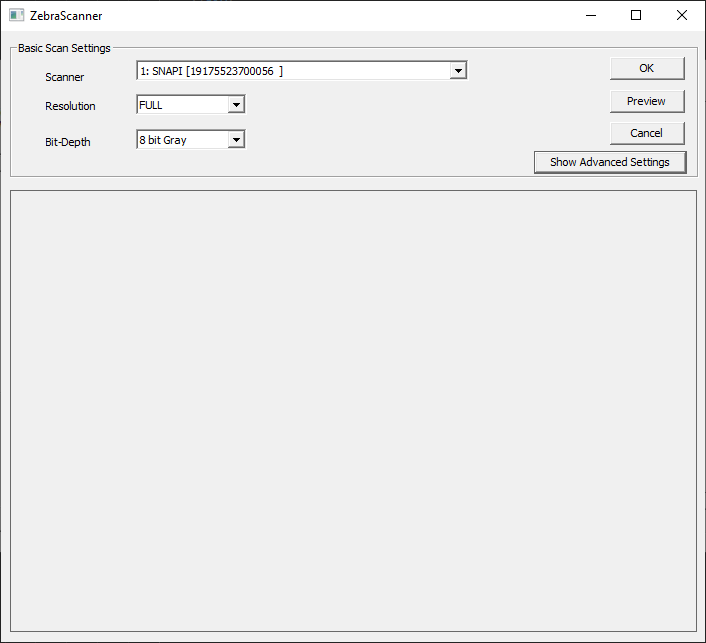 Figure 3: Zebra TWAIN Driver GUI - Basic Screen
GUI Scan Settings screen:
- Scanner drop-down list: Shows available sources.
- Resolution drop-down list: Shows supported resolution values, and determines the pixel size of the captured image.
- Bit-Depth drop-down list: Shows supported bit depth values.
- Preview: Click this button to capture an image, and display it in the GUI.
-
OK/Scan: Click this button to capture an image, and transfer it to the calling application.
NOTE On this screen, the OK button is renamed Scan if the Show UI box is checked in Figure 2.
- Cancel: Click this button to close the GUI screen.
- Show Advanced Settings: Click this button to open the Advanced Settings sections of the GUI.
Advanced Settings
When you click Show Advanced Settings from the GUI Scan Settings screen, the Advanced Settings section extends. This displays the basic GUI Scan Settings screen plus advanced setting options.
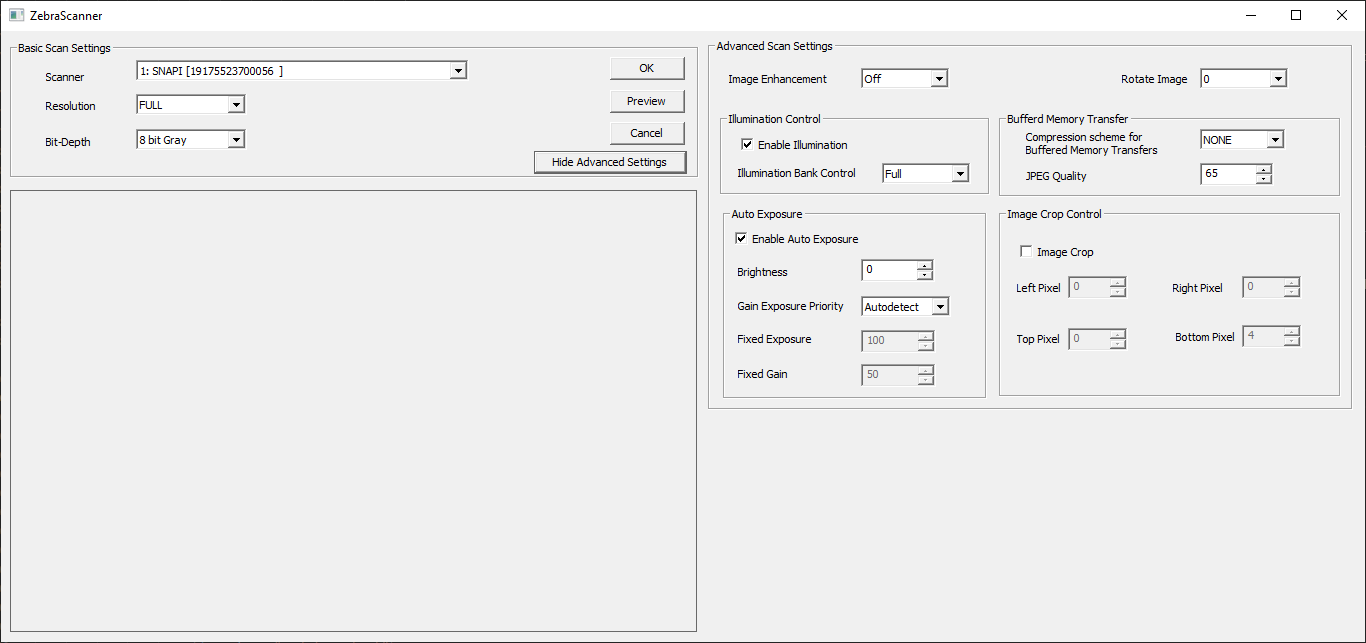 Figure 4: Zebra TWAIN Driver GUI - Advanced Settings Screen
Advanced Settings screen:
- Image Count: Corresponds to the CAP_XFERCOUNT capability in the range of 1 to 25 for the number of image transfers the application transfers throughout the current session.
- Image Enhancement: Sets the imaging scanner's ability to automatically enhance an image through a combination of edge sharpening and contrast enhancement. Off disables automatic enhancement; Low, Medium, and High perform those levels of image enhancement.
- Rotate Image: Sets the degree of rotation of the captured image - 0, 90, 180, 270.
- Enable Illumination: Enables the illumination banks on the scan engine. Check the box to enable Illumination Bank Control.
- Illumination Bank Control: Determines the operation of the illumination banks. Full enables both banks; Auto switches the illumination system from left to right; Left enables the left bank; Right enables the right bank.
- Enable Auto Exposure: Enables the imaging scanner to automatically determine the gain and exposure settings to best capture an image. Checking this box also enables the Gain Exposure Priority setting. If Enable Auto Exposure is unchecked, the Fixed Exposure and Fixed Gain settings will be enabled allowing the user to manually set those values.
- Gain Exposure Priority: Sets the scanner's gain/exposure priority when the Auto Exposure setting is enabled - Autodetect, Low Gain or Low Exposure. Low Gain priority sets the scanner to favor longer exposure time over higher gain to capture an image. Low Exposure priority sets the scanner to favor higher gain over exposure for image capture. Autodetect sets the priority based on the scanner's configuration. For example, if the scanner is mounted in a magnetic switch read enabled stand, it uses Low Gain priority. Refer to the imaging scanner's Product Reference Guide for more information on this setting.
- Fixed Exposure: The manual exposure setting in the range of 5 to 5000.
- Fixed Gain: The manual gain setting in the range of 1 to 100.
- Brightness: Sets the relative brightness of the captured image in the range of -1000 to 1000.
- Image Crop: Enables Image Crop Control. The Left, Right, Top and Bottom Pixel values determine the rectangular sub-region of the full size captured image that will be displayed or transferred.
- Left Pixel: Sets the left pixel column used to crop a captured image. This value ranges from 0 to (Xresolution - 2) depending on the selected resolution (image size).
- Right Pixel: Sets the right pixel column used to crop a captured image. This value ranges from 0 to (Xresolution - 1) depending on the selected resolution (image size).
- Top Pixel: Sets the top pixel row used to crop a captured image. This value ranges from 0 to (Yresolution - 2) depending on the selected resolution (image size).
- Bottom Pixel: Sets the bottom pixel row used to crop a captured image. This value ranges from 0 to (Yresolution - 1) depending on the selected resolution (image size).