Overview
This chapter describes how to install Zebra Scanner SDK and its components on recommended platforms.
NOTE See System Requirements for supported platforms.
The SDK installation package includes support for:
- Installing required components to enable any Zebra scanner to communicate with applications or tools that execute on top of the Zebra Scanner SDK.
- Supporting documents.
- Test utilities.
- Sample applications and source projects.
This section covers installation and configuration instructions.
NOTE Uninstall any previous Zebra, Symbol or 3rd party drivers or SDKs installed on your system which communicate with Zebra Scanner Devices before installing the Zebra Scanner SDK. This includes but is not limited to Zebra and Symbol supplied OPOS, JPOS and SNAPI drivers.
NOTE For a list of a scanner's supported attribute (parameter) numbers and definitions, refer to the Product Reference Guide for that model scanner, available from the Zebra Support website at http://www.zebra.com/support. Attributes include configuration parameters, monitored data, and asset tracking information.
SDK Components
The SDK installation package includes following components.
- Zebra Scanner SDK Core components and drivers (COM API, Imaging drivers)
-
OPOS Drivers
- Scanner OPOS
- Scale OPOS
-
JPOS Drivers
- Scanner JPOS
- Scale JPOS
-
Remote Management Components
- Scanner WMI Provider
- Driver WMI Provider
- Web Link to latest Developer's Guide - Document(s)
-
Test & Sample utilities with Source code packages
- Scanner SDK Sample Application (C++)
- Scanner SDK Sample Application (Microsoft® C# .NET)
- Scanner OPOS Test Utility
- Scale OPOS Test Utility
- JPOS Test Utility for Scanner and Scale
- Scanner WMI Provider Test Utility (Microsoft® C# .NET)
- Driver WMI Provider Test Utility (Microsoft® C# .NET).
The SDK installation package installs its components to the following default location: C:\Program Files\Zebra Technologies\Barcode Scanners\.
System Requirements
Supported Operating Systems
Table 1: Supported Operating Systems
| Zebra Scanner SDK Installation Package | |
|---|---|
| Microsoft® Windows 10 (32bit) | Zebra_Scanner_SDK_(32bit)_v3.xx.xxxx.exe |
| Microsoft® Windows 10 (64bit) | Zebra_Scanner_SDK_(64bit)_v3.xx.xxxx.exe |
Recommended minimum hardware requirement: x86 PC for 32-bit SDK, or x64 PC for 64-bit SDK with 512Mb RAM.
Scanner Models Versus Communication Modes
For an up-to-date table listing scanner models and their supported communication modes refer to the Scanner SDK for Windows website at: http://www.zebra.com/scannersdkforwindows.
Installing the SDK
Download the relevant Scanner SDK setup program for the 32-bit or 64-bit operating system on your PC from http://www.zebra.com/scannersdkforwindows.
There are two options for installing the Zebra Scanner SDK on a system.
- Typical installation - Loads all components in the installation package.
- Custom installation - Provides the ability to change the default selection of components.
If you install components such as OPOS, JPOS or WMI provider (remote management), the installer automatically installs sample programs and test utilities related to those components.
To download the appropriate OPOS, JPOS and WMI Developer’s Guides go to: http://www.zebra.com/scannersdkforwindows.
Step-by-Step Installation Instructions
-
Execute the setup program. The installation process checks for CoreScanner drivers on the target machine. If the driver package is not present or outdated, clicking Install adds updated drivers before installing the scanner SDK package.
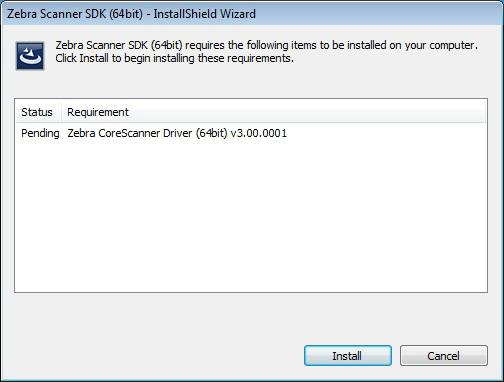 Figure 1: Prerequisite Check And Install
-
Installation continues once the prerequisite drivers are installed on the machine.
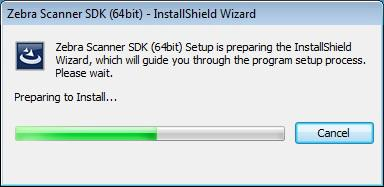 Figure 2: Install Window
-
Click Next on the Welcome screen.
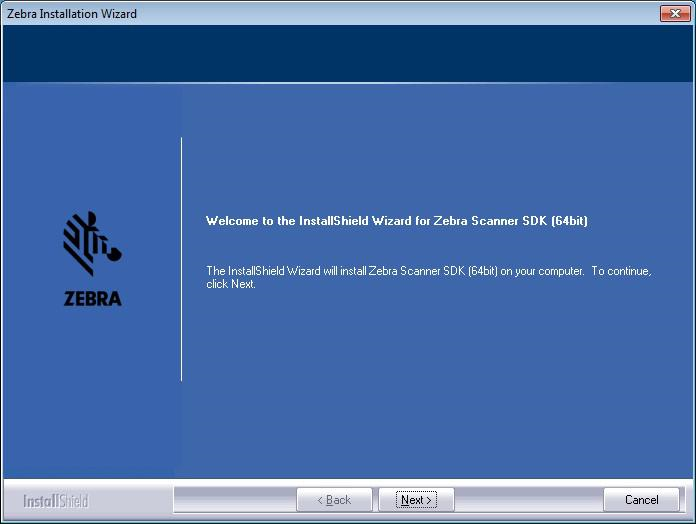 Figure 3: Welcome Screen
-
Review the license agreement and click Yes to accept.
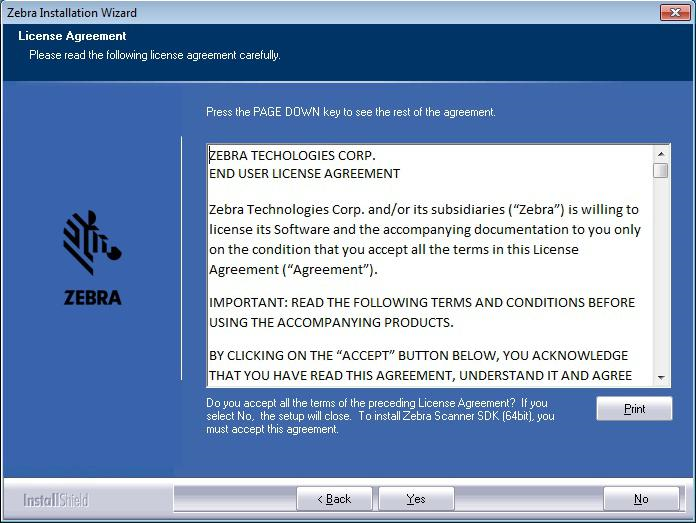 Figure 4: License Agreement
-
Select the Setup Type.
The user is prompted with two installation options:
- Complete - The installation package installs all components.
- Custom - The installation package gives the option to select which components are loaded during the installation process. The user is prompted to select components from the available list.
The user can select the destination folder by clicking Browse and selecting the drive and folder in which to install the Zebra Scanner SDK. However, common components are placed in designated locations for consistency with other SDK users.
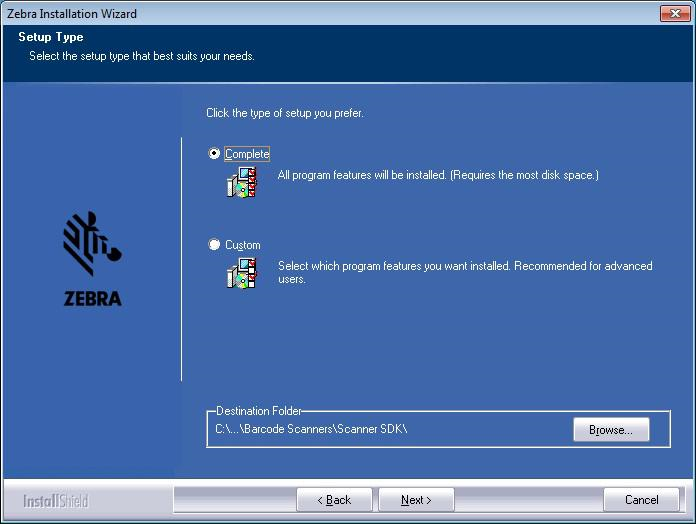 Figure 5: Setup Type
-
Select features. The user is prompted to select features to be installed from the available components list.
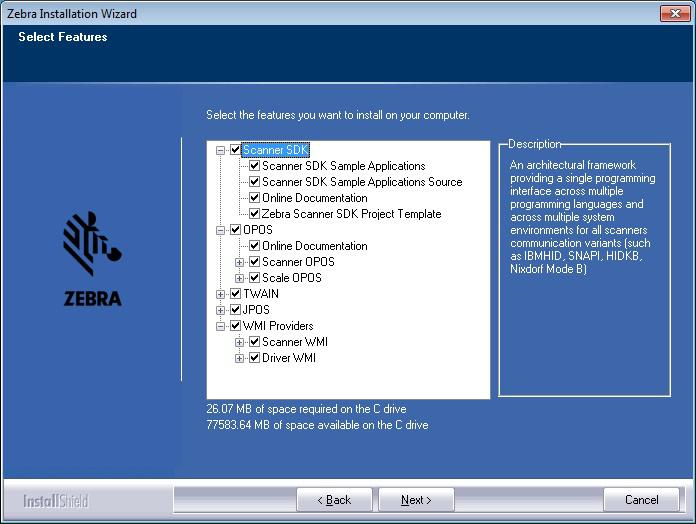 Figure 6: Select Features
NOTE Scanner SDK and USB imaging drivers are common components and are installed automatically.
-
Wait for the installation to complete.
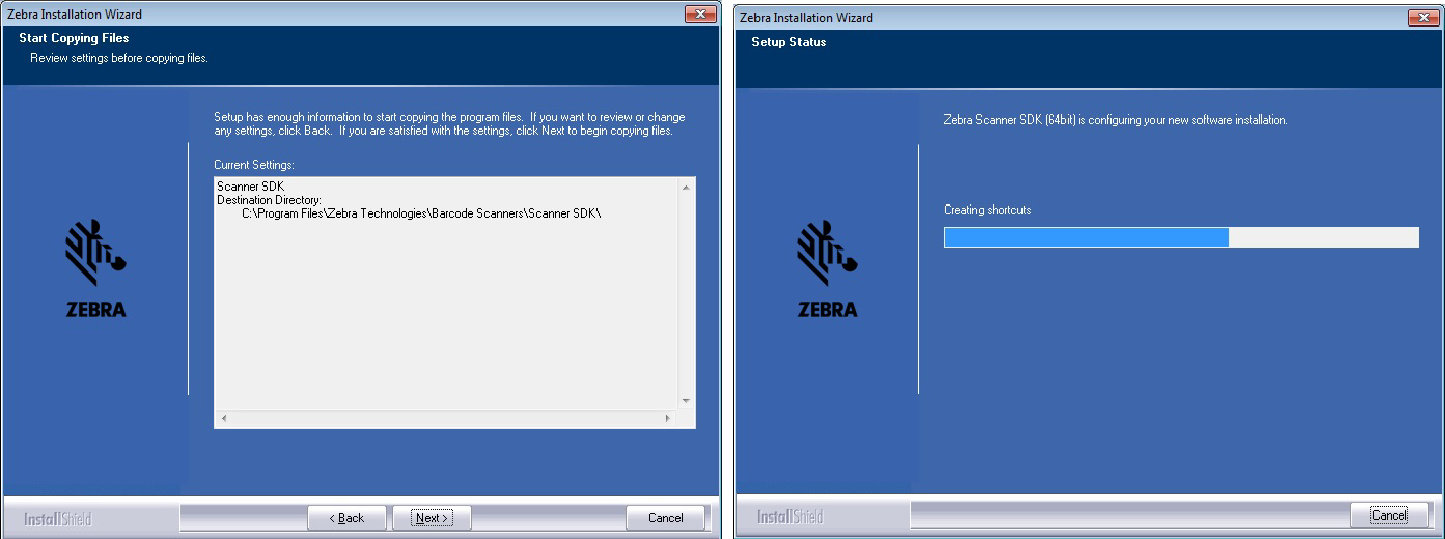 Figure 7: Installation Progress
-
Installation complete.
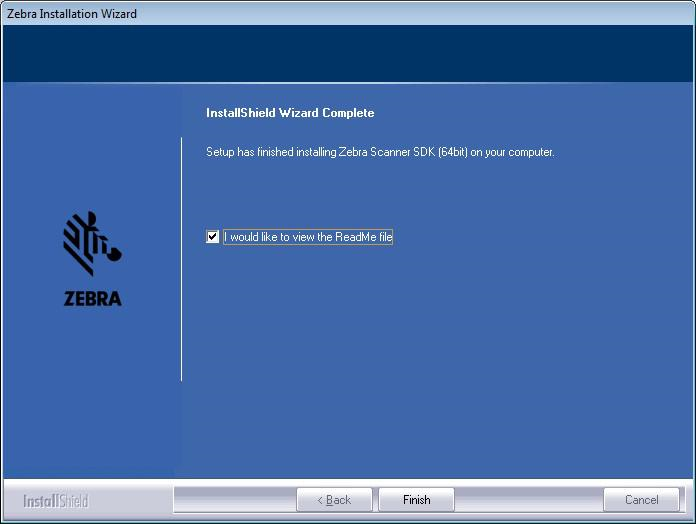 Figure 8: Installation Complete
Installed Components
There are three Windows services installed with the CoreScanner driver in a default installation:
- CoreScanner - coordinates activity between the communication layer (SNAPI, IBMHH, SSI, etc.) and upper level drivers (OPOS, JPOS, SDK API, etc.).
- RSM Driver Provider - provides WMI support.
- Symbol Scanner Management - provides WMI support.
Table 2: Zebra Scanner SDK Components
| Component | Location |
|---|---|
| Common Components | %ProgramFiles%\Zebra Technologies\Barcode Scanners\Common |
| Scanner SDK | %ProgramFiles%\Zebra Technologies\Barcode Scanners\Scanner SDK |
| Scanner OPOS Driver | %ProgramFiles%\Zebra Technologies\Barcode Scanners\Scanner SDK\OPOS |
| Scanner JPOS Driver | %ProgramFiles%\Zebra Technologies\Barcode Scanners\Scanner SDK\JPOS |
| Scanner WMI Provider | %ProgramFiles%\%\ Zebra Technologies\Barcode Scanners\Scanner SDK\WMI Provider Scanner |
| Driver WMI Provider | %ProgramFiles%\Zebra Technologies\Barcode Scanners\Scanner SDK\WMI Provider Driver |
| TWAIN Driver | %WinDir%\twain_32\Zebra – On 32/64bit version %WinDir%\twain_64\Zebra – On 64bit version |
Configuration
Serial Mode Settings
The Zebra Scanner SDK is capable of communicating with scanners connected to serial ports through Nixdorf Mode B, or SSI serial host mode. The SDK does not open any serial port without user consent to prevent other devices from being interfered with by Scanner SDK commands. Users can configure SDK usage of serial ports with entries in the <SERIAL_MODE_SETTINGS> section of the config.xml file located in %Program Files%\Zebra Technologies\Barcode Scanners\Common.
Serial mode setting entries indicate the serial com port number (PORT ID), the baud rate (BAUD) and the serial host mode (NAME) used to communicate with the attached scanner. The value of the name field can be NIXMODB, or SSI and the value of each of the three fields must be enclosed in quotation marks.
By default, the serial port settings in config.xml are commented out. To activate a serial mode setting, enter a line outside of the commented area, modify the settings appropriately, save the config.xml file and restart the CoreScanner service.
Sample <SERIAL_MODE_SETTINGS> Definition in Config.xml
<SERIAL_MODE_SETTINGS>
    <!-- Uncomment lines in this section to configure Serial Scanners -->

    <!-- <PORT ID='5' BAUD='9600' NAME='NIXMODB'/> -->
    <PORT ID='3' BAUD='9600' NAME='SSI'/>
</SERIAL_MODE_SETTINGS>
Simulated HID Keyboard Configuration
The Zebra Scanner SDK is capable of configuring a scanner to send simulated HID keyboard output (also known as HIDKB pump, or HIDKB emulation mode) while in USB SNAPI, USB IBM Hand-held, USB IBM Table-top, SSI, or RS-232 Nixdorf Mode B communication modes. This simulated HID keyboard output functionality can be configured by changing the XML elements in the simulated HID KB setting section of the config.xml file.
As of language locale, English, French and Italian languages are supported by the CoreScanner Driver.
Table 3: Config.xml File Elements
| Tag | Values | Description |
|---|---|---|
| <ENABLE> | 0, 1 | 0 - Disable (default) 1 - Enable |
| <LOCALE> | 0 - 3 |
0 - Generic Unicode Keyboard (default) 1 - French 2 - English 3 - Italian Default mode will setup the HIDKB from region and language. |
| <FUNCTION_KEY_MAPPING> | 0, 1 | When - 0 VK_RETURN transmitted as VK_CONTROL + M VK_TAB transmitted as VK_CONTROL + I VK_BACK transmitted as VK_CONTROL + H When - 1 VK_RETURN transmitted as VK_RETURN VK_TAB transmitted as VK_TAB VK_BACK transmitted as VK_BACK Refer to your scanner's Product Reference Guide for further information on function key mapping. |
| <INTER_KEY_DELAY> | 0, >0 | Character transmission delay interval in milliseconds. The default value of zero transmits keystrokes as they are decoded. If > 0, latency is introduced into key transmission so that any receiving application can adjust to the rate of transmission. |
| <KEY_CODE_SETTING>2 | 0 - 2 |
Define which key code type Simulated HID KB is configured. 0 - Virtual Keys only (default)1 - Scan Code only* 2 - Virtual Keys & Scan Code * This mode only transmits the scan codes. The system keyboard driver translates the scan codes into virtual-key codes. |
2 Features & options are available only in config file version 2.
Sample <SIMULATED_HID_KB_SETTINGS> definition in config.xml:
<SIMULATED_HID_KB_SETTINGS>
    <!-- Default=0, French=1, English=2, Italian=3 -->
    <LOCALE>0</LOCALE>

    <!-- Enabled=1, Disabled=0 -->
    <ENABLE>0</ENABLE>

    <FUNCTION_KEY_MAPPING>1</FUNCTION_KEY_MAPPING>

    <INTER_KEY_DELAY>0</INTER_KEY_DELAY>

    <ADF_PATH></ADF_PATH>

    <!-- Virtual Key only =0, ScanCode only =1, Virtual Key & Scan Code =2-->
    <KEY_CODE_SETTING>0</KEY_CODE_SETTING>
</SIMULATED_HID_KB_SETTINGS>
Notes
- Refer to the specific scanner Product Reference Guide for supported serial port parameter settings.
- Simulated HID Keyboard Output settings can be temporarily changed by an application using the CoreScanner API commands KEYBOARD_EMULATOR_ENABLE and KEYBOARD_EMULATOR_SET_LOCALE. To make permanent changes to these settings that remain persistent over a reboot of the host machine, the Config.xml file must be manually edited. Changes to Config.xml take effect only after the CoreScanner service is restarted.
- When using the language locale with Simulated HID Keyboard Output, the user may need to change the input language of the application receiving keyboard input to match the language specified in config.xml.
- Simulated HID Keyboard functionality becomes unavailable if you use Windows' Switch User functionality to switch the user on your PC. Manually restart the CoreScanner, RSM Driver Provider, and Symbol Scanner Management services, or reboot the host PC to ensure correct operation.
Driver Data Formatting (DDF)
DDF enables the formatting of scanned bar code data with prefix and suffix labels through the CoreScanner driver and available from CoreScanner version 3.07.0037. DDF is available while the scanner is in USB SNAPI, USB IBM Hand-held, USB IBM Table-top, SSI, or RS-232 Nixdorf Mode B communication mode1. Unlike Advanced Data Formatting (ADF), DDF does not permit modifying the scanned bar code data itself with any rule-based method. The prefix/suffix labels are composed of one or more ASCII characters (1-255). There can be one or more prefix/suffix labels, and they are defined in the config.xml file in the section using the <DDFTAGDEF> tag. The DDF description is composed of a <DDFMETA> section, and a <DDFSELECT> section. The <DDFMETA> section defines the prefix/suffix labels used in DDF, and how they are combined in various ways to compose one or more DDF format definitions in the form of <DDFDEF> tags.
Following features are introduced along with DDF.
- Ability to include ALT + <Key> as a prefix. (ALT key sequence can only be included as a prefix and ALT will only be followed with 1 character).
- Define the ALT sequence key's ASCII value as under <ALT1> tag.
- Backward compatibility to older data formatting (i.e., SDF).
Sample <DDF> definition in config.xml:
This Driver Data Formatting functionality can be configured by changing the XML elements in the section of the config.xml file located in %Program Files%\Zebra Technologies\Barcode Scanners\Common.
<DDF>
    <DDFMETA>
        <DDFTAGDEF>SUFFIX1.SUFFIX2.PREFIX1.ALT1</DDFTAGDEF>
        <SUFFIX1>13.13</SUFFIX1>
        <SUFFIX2>13.13</SUFFIX2>
        <PREFIX1>13.13</PREFIX1>
        <ALT1>91</ALT1>
        <!-- Key value for ALT Sequence : ASCII value of Key that need to press with the ALT Key. (Support only for single key in v1)  -->
        <!-- ALT sequence only works as the first prefix. All other formats will be not supported in v1 -->
        <DDFDEF DdfCode='0' DdfFormat='DATA'/>
        <DDFDEF DdfCode='1' DdfFormat='ALT1.DATA.SUFFIX1'/>
        <DDFDEF DdfCode='2' DdfFormat='DATA.SUFFIX2'/>
        <DDFDEF DdfCode='3' DdfFormat='DATA.SUFFIX1.SUFFIX2'/>
        <DDFDEF DdfCode='4' DdfFormat='PREFIX1.DATA'/>
        <DDFDEF DdfCode='5' DdfFormat='PREFIX1.DATA.SUFFIX1'/>
        <DDFDEF DdfCode='6' DdfFormat='PREFIX1.DATA.SUFFIX2'/>
        <DDFDEF DdfCode='7' DdfFormat='PREFIX1.DATA.SUFFIX1.SUFFIX2'/>
    </DDFMETA>
    <DDFSELECT>0</DDFSELECT>
</DDF>
Four DDF prefix/suffix/ALT labels are defined as: SUFFIX1, SUFFIX2, PREFIX1, and ALT1. The values in these tags are delimited by a '.' character in the XML. Each of these labels is defined as shown below with the decimal ASCII character sequence that they represent:
SUFFIX1 = ascii(13), ascii(10) = CR, LFSUFFIX2 = ascii(35), ascii(36) = #, $
ALT1 = ascii(91) = [
PREFIX1 = ascii(37), ascii(38) = %, &
Formats are also delimited by a '.' character in the XML. There can be one or more format definitions that use the above defined labels.
This format definition is identified by the keyword DDFCode and the format is represented by the keyword DDFFormat. Note that "DATA" is an intrinsic that means "Insert the Scanned Bar Code Here". The format definition to be executed is based on DDFCode and is specified in the <DDFSELECT> tag.
<DDFDEF DDFCode='6' DDFFormat='PREFIX1.DATA.SUFFIX2' />The XML clause above would transmit the bar code data as:
%&BarcodeData#$Or
<DDFDEF DDFCode='1' DDFFormat='ALT1.DATA.SUFFIX2' />
The XML clause above would transmit the bar code data as:
ALT+[ BarcodeData #$Silent Unattended Installation of the Scanner SDK
The CoreScanner driver and the Scanner SDK require the Microsoft 2019 C++ Redistributable Package which automatically installs if it is does not already exist on the host PC. For an unattended installation, a complication arises if the 2019 C++ Redistributable is not pre-installed. By default, Microsoft triggers a reboot of the PC after the C++ Redistributable installation. In this case, a reboot is injected into the overall silent install process (which may then also require a login).
To avoid the interruption, the 2019 C++ Redistributable can be downloaded from Microsoft and pre- installed silently while suppressing the reboot using the command line switches /install /quiet /norestart. This delays the required reboot, and allows a custom silent CoreScanner and Scanner SDK install to be performed using a subsequent command.
The Visual C++ Redistributable for Visual Studio 2019 can be downloaded from the Microsoft website. The appropriate file vcredist_x86.exe (32-bit version) or vcredist_x64.exe (64-bit version) must be selected and downloaded.
The command line to perform its install silently without reboot is:
vcredist_x86.exe /install /quiet /norestart
or,
vcredist_x64.exe /install /quiet /norestart
The required reboot must be performed at the end of the overall installation process to ensure correct operation.
The Zebra Scanner SDK, including the underlying CoreScanner driver, is packaged using the Flexera InstallShield installer program. SDK components can be selectively installed using the SDK Custom Installation option. In conjunction with this custom install option, the installer program supports command line switches to record custom responses that can be used to create a silent install response file. These response files, ending in the extension .iss, may then be used to perform a silent installation of the CoreScanner driver and Scanner SDK components on production PCs.
The Silent Install command line options are listed in the following table.
Table 4: Silent Install Command Line Options
| Command Line Switch | Description |
|---|---|
| -s | Silent mode. The -s switch runs the installation in silent mode using the responses contained in a recorded response file. |
| -r | Record mode. The -r switch displays all the setup dialogs and records the chosen responses in the file specified with the -f1 switch described below. |
| -f1 | Specify custom response file name and path. The -f1 switch specifies where the response file is located for the -s switch, or where it should be created when using the -r switch. Specify an absolute path; using a relative path yields unpredictable results. |
| -f2 | Specify alternative log file name and path. When running an installation in silent mode (using the -s switch), the log file is created by default in the same directory and with the same name (except for the extension) as the response file. The -f2 switch enables you to specify an alternative log file location and file name. Specify an absolute path; using a relative path yields unpredictable results. |
When executed from a command prompt, the example below uses the -r and -f1 switches to record your responses to the setup prompts into a custom response file:
“Scanner_SDK_(32bit)_v2.0x.00xx.exe" -r -f1"c:\path\customsetup.iss"The responses chosen using the command above are saved in the specified response file and can then be used as input to silently install the SDK with those chosen responses on production PCs.
The next example shows how the -s switch uses the response file created with the previous command to perform the silent install:
"Scanner_SDK_(32bit)_v2.0x.00xx.exe" -s -f1"c:\path\customsetup.iss"Note that there is no space between the -f1 switch and first quotation mark for the custom response file.
If necessary, the -r switch option can also be used to record a custom response file for a silent removal of the SDK by running the command on a PC that has the SDK already installed.
IMPORTANT The CoreScanner drivers are required for any SDK component so the CoreScanner services are installed, and must be running to provide functionality.