Overview
This guide demonstrates how create an app that uses the Barcode Highlighting feature. It includes the capability to switch from barcode scanning to Barcode Highlighting mode, and demonstrates how to use the Barcode Highlighting feature to highlight different types of barcodes in designated colors.
Description
In this example, we are creating an app to distinguish between boxes of different flavors of ice cream using the Barcode Highlighting feature. Each box contains a single flavor and the barcode from each flavor shares a string of characters. When the barcode is scanned from the box, it is highlighted in a specified color based on the rules defined:
- Boxes of strawberry flavor contain barcodes with text “090986”. These barcodes are highlighted in pink color.
- Boxes of chocolate flavor contain barcodes with text “7777”. These barcodes are highlighted in brown color.
- Other barcodes are highlighted in green color.
DataWedge's SWITCH_DATACAPTURE API is used to switch between barcode scanning and barcode highlighting to implement the following actions:
- Tap on “Regular” button to switch to barcode scanning mode (without highlighting)
- Tap on “Highlight” button to switch to barcode highlighting mode
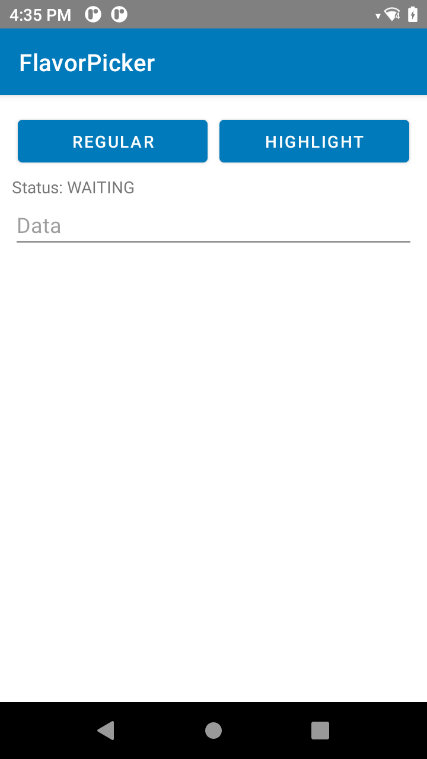
Main screen of app
Download source code files.
Requirements
- DataWedge version 11.2 or higher (find the version)
- Scanning framework 32.0.3.6 or higher (find the version)
- Android 11 or higher
Prerequisites
To test barcode highlighting based on the specified rules, generate the barcodes as follows:
- Create a barcode containing the text “090986” to represent boxes of strawberry flavored ice cream.
- Create a barcode containing the text “7777” to represent boxes of chocolate flavored ice cream.
Highlight Barcodes
In summary, the steps to create this sample app to highlight barcodes are:
- Create the UI
- Create the DataWedge Profile
- Register a broadcast receiver to receive status notifications
- Add 'Switch to Barcode Highlighting' mode
- Add 'Switch to Barcode Scanning' mode
These steps are explained in detail in the following subsections.
1. Create the UI
Create an Android application. Add the following elements to the UI:
- Button to switch to regular barcode scanning mode (Regular button)
- Button to switch to barcode highlighting mode (Highlight button)
- TextView to display scanner status and barcode highlighting status
- EditText to display the scanned data
Main screen of app
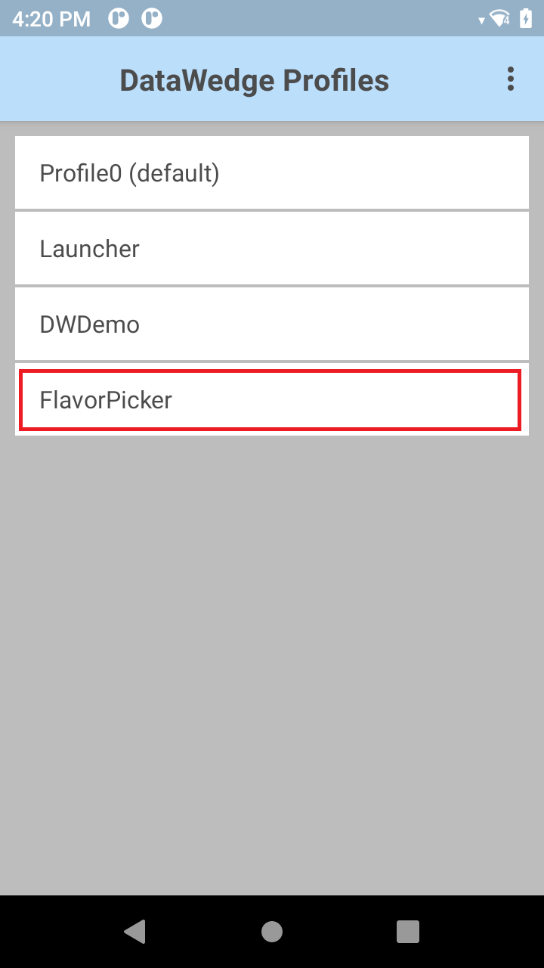
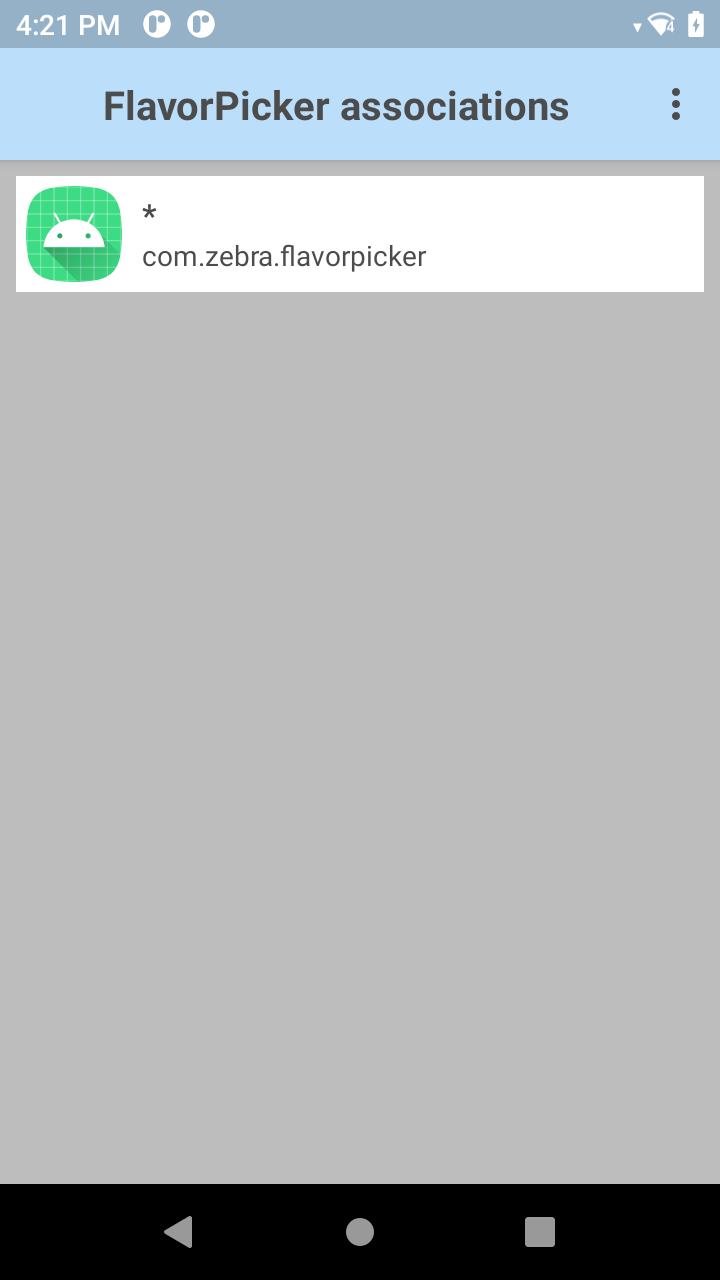
2. Create the DataWedge Profile
Create a profile in DataWedge and associate the profile to the app:
 |
 |
3. Register a broadcast receiver to receive status notifications
Register a broadcast receiver to listen to scanner status and workflow status notifications, which include barcode highlighting notifications:
public class MainActivity extends AppCompatActivity {

    TextView txtStatus = null;
    @Override
    protected void onCreate(Bundle savedInstanceState) {
        super.onCreate(savedInstanceState);
        setContentView(R.layout.activity_main);
        txtStatus = findViewById(R.id.txtStatus);
        registerReceivers();
        registerUnregisterForNotifications(true, "WORKFLOW_STATUS");
        registerUnregisterForNotifications(true, "SCANNER_STATUS");
    }

    @Override
    protected void onDestroy() {
        super.onDestroy();
        registerUnregisterForNotifications(false, "WORKFLOW_STATUS");
        registerUnregisterForNotifications(false, "SCANNER_STATUS");
        unregisterReceivers();
    }

    private void registerReceivers() {
        IntentFilter filter = new IntentFilter();
        filter.addAction("com.symbol.datawedge.api.NOTIFICATION_ACTION");
        filter.addAction("com.symbol.datawedge.api.RESULT_ACTION");
        filter.addCategory(Intent.CATEGORY_DEFAULT);
        registerReceiver(broadcastReceiver, filter);
    }

    private void unregisterReceivers() {

        unregisterReceiver(broadcastReceiver);
    }

    private BroadcastReceiver broadcastReceiver = new BroadcastReceiver() {
        @Override
        public void onReceive(Context context, Intent intent) {
            String action = intent.getAction();
            if (action.equals("com.symbol.datawedge.api.NOTIFICATION_ACTION")) {

                if (intent.hasExtra("com.symbol.datawedge.api.NOTIFICATION")) {
                    Bundle b = intent.getBundleExtra("com.symbol.datawedge.api.NOTIFICATION");
                    String NOTIFICATION_TYPE = b.getString("NOTIFICATION_TYPE");
                    if (NOTIFICATION_TYPE != null) {
                        switch (NOTIFICATION_TYPE) {
                            case "WORKFLOW_STATUS":
                            case "SCANNER_STATUS":

                                String status = b.getString("STATUS");
                                txtStatus.setText("Status: " + status);
                                break;
                        }
                    }
                }
            }
        }
    };

    void registerUnregisterForNotifications(boolean register, String type) {
        Bundle b = new Bundle();
        b.putString("com.symbol.datawedge.api.APPLICATION_NAME", getPackageName());
        b.putString("com.symbol.datawedge.api.NOTIFICATION_TYPE", type);
        Intent i = new Intent();
        i.putExtra("APPLICATION_PACKAGE", getPackageName());
        i.setAction("com.symbol.datawedge.api.ACTION");
        i.setPackage("com.symbol.datawedge");
        if (register)
            i.putExtra("com.symbol.datawedge.api.REGISTER_FOR_NOTIFICATION", b);
        else
            i.putExtra("com.symbol.datawedge.api.UNREGISTER_FOR_NOTIFICATION", b);
        this.sendBroadcast(i);
    }
}
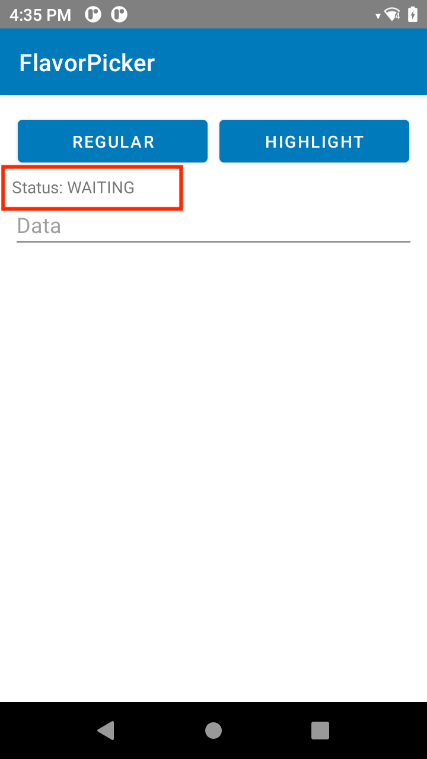
The received status is displayed in the Status TextView as part of the UI:
4. Add 'Switch to Barcode Highlighting' mode
Implement the click event for the Highlight button. In the code, perform the following:
- Use SWITCH_DATACAPTURE API to enable barcode highlighting.
- Create a new rule called "Rule1" to highlight barcodes that contain the text “090986” in pink (#CEF04E6E) color.
- Create a new rule called "Rule2" to highlight barcodes that contain the text “7777” in brown (#CEF04E6E) color.
- Add "Rule1" and "Rule2" to the rule list to be sent in an Intent.
- Assign the rule list to “barcode_overlay” parameter.
- Broadcast the Intent.
    public void onClickHighlight(View view) {

        //Specify the DataWedge action and SWITCH_DATACAPTURE API parameters
        Intent i = new Intent();
        i.setAction("com.symbol.datawedge.api.ACTION");
        i.putExtra("APPLICATION_PACKAGE", getPackageName());
        i.setPackage("com.symbol.datawedge");
        i.putExtra("SEND_RESULT", "LAST_RESULT");
        i.putExtra("com.symbol.datawedge.api.SWITCH_DATACAPTURE", "BARCODE");

        Bundle paramList = new Bundle();
        //Specify the scanner to use (Only internal imager and camera are supported currently)
        paramList.putString("scanner_selection_by_identifier", "INTERNAL_IMAGER");
        //Enable barcode highlighting
        paramList.putString("barcode_highlighting_enabled", "true");

        //Create a barcode highlighting Rule 1 [Start]
        Bundle rule1 = new Bundle();
        rule1.putString("rule_name", "Rule1");
            Bundle rule1Criteria = new Bundle();

        //Set the criteria/condition. Specify the contains parameter.
        Bundle bundleContains1 = new Bundle();
        bundleContains1.putString("criteria_key", "contains");
        bundleContains1.putString("criteria_value", "090986");

        //Container is just one parameter of identifier group.
        // There are other params such as ignore case, min length, max length
        ArrayList identifierParamList = new ArrayList<>();
        identifierParamList.add(bundleContains1);

        //Add the parameters of "identifier" group as a ParcelableArrayList to criteria list
        rule1Criteria.putParcelableArrayList("identifier", identifierParamList);

        //Add the criteria to Rule bundle
        rule1.putBundle("criteria", rule1Criteria);

        //Set up the action bundle by specifying the color to be highlight
        Bundle bundleFillColor = new Bundle();
        bundleFillColor.putString("action_key", "fillcolor");
        bundleFillColor.putString("action_value", "#CEF04E6E");

        ArrayList rule1Actions = new ArrayList<>();
        rule1Actions.add(bundleFillColor);
        rule1.putParcelableArrayList("actions", rule1Actions);
        //Create a barcode highlighting Rule 1 [Finish]

        //Create a barcode highlighting Rule 2 [Start]
        Bundle rule2 = new Bundle();
        rule2.putString("rule_name", "Rule2");
        Bundle rule2Criteria = new Bundle();

        Bundle bundleContains2 = new Bundle();
        bundleContains2.putString("criteria_key", "contains");
        bundleContains2.putString("criteria_value", "7777");

        ArrayList identifierParamList2 = new ArrayList<>();
        identifierParamList2.add(bundleContains2);

        rule2Criteria.putParcelableArrayList("identifier", identifierParamList2);

        rule2.putBundle("criteria", rule2Criteria);
        Bundle rule2BundleStrokeColor = new Bundle();
        rule2BundleStrokeColor.putString("action_key", "fillcolor");
        rule2BundleStrokeColor.putString("action_value", "#CE7F2714");
        ArrayList rule2Actions = new ArrayList<>();
        rule2Actions.add(rule2BundleStrokeColor);
        rule2.putParcelableArrayList("actions", rule2Actions);
        //Create a barcode highlighting Rule 1 [Finish]

        //Add the two created rules to the rule list
        ArrayList ruleList = new ArrayList<>();
        ruleList.add(rule1);
        ruleList.add(rule2);

        //Assign the rule list to barcode_overlay parameter
        Bundle ruleBundlebarcodeOverlay = new Bundle();
        ruleBundlebarcodeOverlay.putString("rule_param_id", "barcode_overlay");
        ruleBundlebarcodeOverlay.putParcelableArrayList("rule_list", ruleList);

        ArrayList ruleParamList = new ArrayList<>();
        ruleParamList.add(ruleBundlebarcodeOverlay);

        paramList.putParcelableArrayList("rules", ruleParamList);

        i.putExtra("PARAM_LIST", paramList);

        sendBroadcast(i);
    }
After tapping on the Highlight button, wait for the SESSION_STARTED state before pressing the trigger to scan. The status transitions as follows:
PLUGIN_READY > WORKFLOW_READY > WORKFLOW_ENABLED > SESSION_STARTED
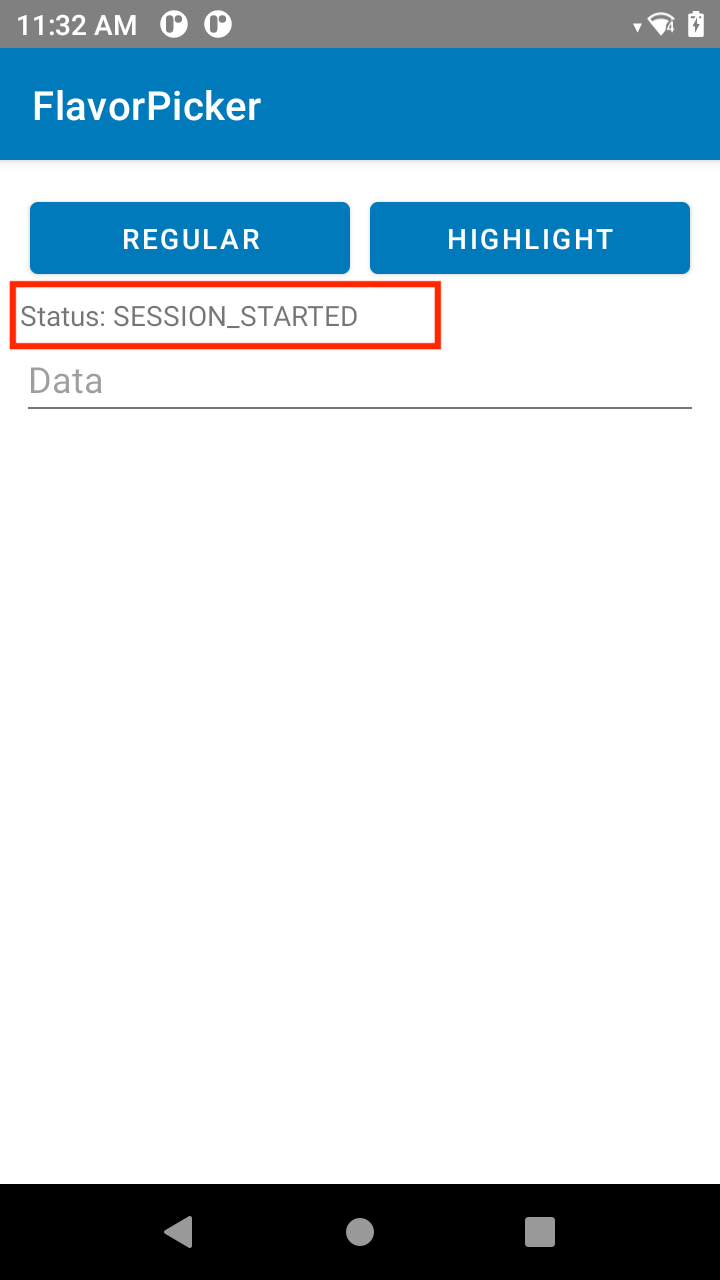
Session started status
After the status changes to SESSION_STARTED, press the trigger to see barcode highlighting in action. The barcodes are highlighted in different colors based on the flavor:
- Barcodes from boxes of strawberry flavored ice cream are highlighted in pink color.
- Barcodes from boxes of chocolate flavored ice cream are highlighted in brown color.
- Other barcodes scanned that do not meet the defined rules are highlighted in green color.
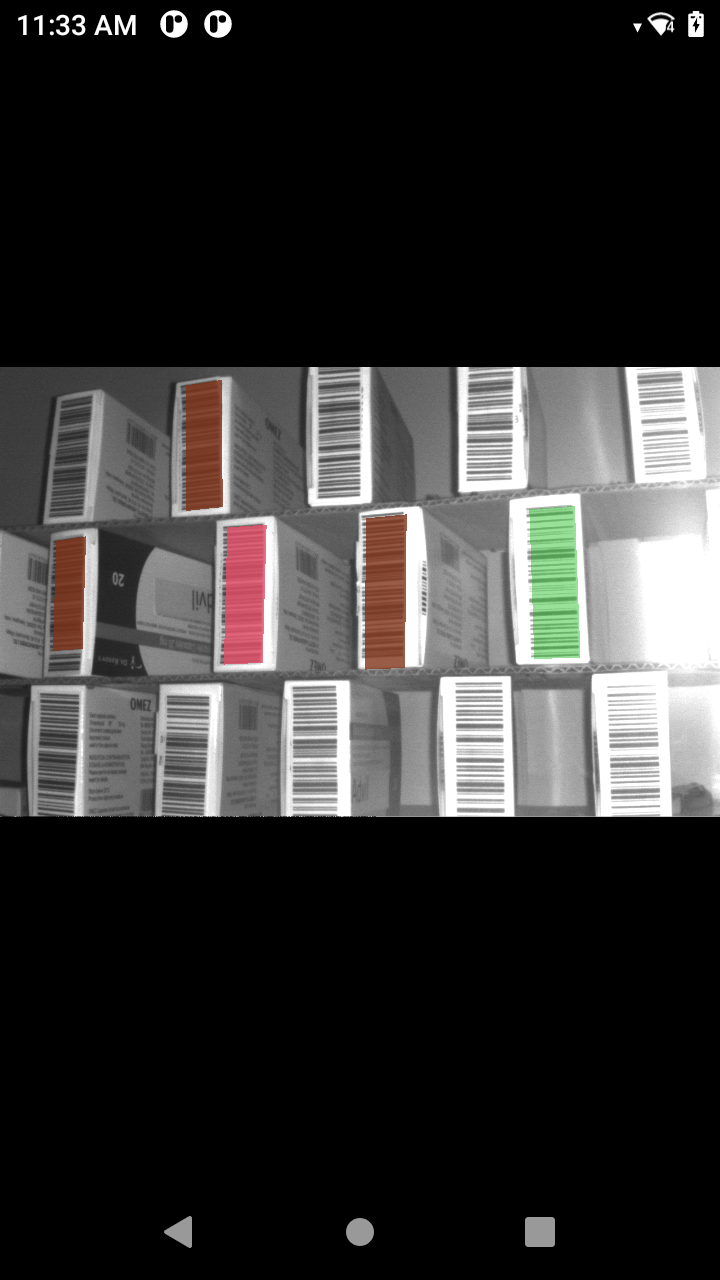
Barcodes highlighted
5. Add 'Switch to Barcode Scanning' mode
Implement the click event for the Regular button to switch to barcode scanning mode (i.e. disable barcode highlighting). In the code, perform the following:
- Use SWITCH_DATACAPTURE API to disable barcode highlighting.
    public void onClickRegular(View view) {

        //Specify the DataWedge action and SWITCH_DATACAPTURE API parameters
        Intent i = new Intent();
        i.setAction("com.symbol.datawedge.api.ACTION");
        i.putExtra("APPLICATION_PACKAGE", getPackageName());
        i.setPackage("com.symbol.datawedge");
        i.putExtra("SEND_RESULT", "LAST_RESULT");
        i.putExtra("com.symbol.datawedge.api.SWITCH_DATACAPTURE", "BARCODE");

        Bundle paramList = new Bundle();
        //Specify the scanner to use (Only internal imager and camera are supported currently)
        paramList.putString("scanner_selection_by_identifier", "INTERNAL_IMAGER");
        //Disable barcode highlighting
        paramList.putString("barcode_highlighting_enabled", "false");

        i.putExtra("PARAM_LIST", paramList);

        sendBroadcast(i);
    }
Intent Output
The intent output from scanning barcodes with the Barcode Highlighting option returns the following:
| Field Name | Description |
|---|---|
| string_data | Decoded data |
| length | Length of the decoded data (number of characters) |
| barcodetype | Barcode ID of the symbology of the decoded data. See the Barcode Type Table below. |
| URI | URI to content provider to extract the image data. See Extract Barcode Highlighting Image Data below. |
Barcode Type Table:
| Barcode ID | Label |
|---|---|
| 1 | LABEL-TYPE-CODE39 |
| 2 | LABEL-TYPE-CODABAR |
| 3 | LABEL-TYPE-CODE128 |
| 4 | LABEL-TYPE-D2OF5 |
| 5 | LABEL-TYPE-IATA2OF5 |
| 6 | LABEL-TYPE-I2OF5 |
| 7 | LABEL-TYPE-CODE93 |
| 8 | LABEL-TYPE-UPCA |
| 9 | LABEL-TYPE-UPCE0 |
| 10 | LABEL-TYPE-EAN8 |
| 11 | LABEL-TYPE-EAN13 |
| 12 | LABEL-TYPE-CODE11 |
| 14 | LABEL-TYPE-MSI |
| 15 | LABEL-TYPE-EAN128 |
| 16 | LABEL-TYPE-UPCE1 |
| 17 | LABEL-TYPE-PDF417 |
| 19 | LABEL-TYPE-CODE39 |
| 21 | LABEL-TYPE-TRIOPTIC39 |
| 22 | LABEL-TYPE-BOOKLAND |
| 23 | LABEL-TYPE-COUPON |
| 25 | LABEL-TYPE-ISBT128 |
| 26 | LABEL-TYPE-MICROPDF |
| 27 | LABEL-TYPE-DATAMATRIX |
| 28 | LABEL-TYPE-QRCODE |
| 30 | LABEL-TYPE-USPOSTNET |
| 31 | LABEL-TYPE-USPLANET |
| 32 | LABEL-TYPE-CODE32 |
| 33 | LABEL-TYPE-ISBT128 |
| 34 | LABEL-TYPE-JAPPOSTAL |
| 35 | LABEL-TYPE-AUSPOSTAL |
| 36 | LABEL-TYPE-DUTCHPOSTAL |
| 37 | LABEL-TYPE-MAXICODE |
| 38 | LABEL-TYPE-CANPOSTAL |
| 39 | LABEL-TYPE-UKPOSTAL |
| 44 | LABEL-TYPE-MICROQR |
| 45 | LABEL-TYPE-AZTEC |
| 48 | LABEL-TYPE-GS1-DATABAR |
| 49 | LLABEL-TYPE-GS1-DATABAR-LIM |
| 50 | LABEL-TYPE-GS1-DATABAR-EXP |
| 52 | LABEL-TYPE-US4STATE |
| 53 | LABEL-TYPE-US4STATE-FICS |
| 55 | LABEL-TYPE-WEBCODE |
| 57 | LABEL-TYPE-MATRIX-2OF5 |
| 72 | LABEL-TYPE-UPCA |
| 73 | LABEL-TYPE-UPCE0 |
| 74 | LABEL-TYPE-EAN8 |
| 75 | LABEL-TYPE-EAN13 |
| 80 | LABEL-TYPE-UPCE1 |
| 81 | LABEL-TYPE-COMPOSITE-AB |
| 82 | LABEL-TYPE-COMPOSITE-AB |
| 83 | LABEL-TYPE-COMPOSITE-AB |
| 84 | LABEL-TYPE-COMPOSITE-AB |
| 85 | LABEL-TYPE-COMPOSITE-AB |
| 86 | LABEL-TYPE-COMPOSITE-AB |
| 87 | LABEL-TYPE-COMPOSITE-AB |
| 88 | LABEL-TYPE-COMPOSITE-AB |
| 89 | LABEL-TYPE-COMPOSITE-C |
| 90 | LABEL-TYPE-TLC39 |
| 97 | LABEL-TYPE-COMPOSITE-AB |
| 98 | LABEL-TYPE-COMPOSITE-AB |
| 99 | LABEL-TYPE-COMPOSITE-AB |
| 100 | LABEL-TYPE-COMPOSITE-AB |
| 101 | LABEL-TYPE-COMPOSITE-AB |
| 102 | LABEL-TYPE-COMPOSITE-AB |
| 103 | LABEL-TYPE-COMPOSITE-AB |
| 104 | LABEL-TYPE-COMPOSITE-AB |
| 105 | LABEL-TYPE-SIGNATURE |
| 114 | LABEL-TYPE-CHINESE-2OF5 |
| 115 | LABEL-TYPE-KOREAN-3OF5 |
| 136 | LABEL-TYPE-UPCA |
| 137 | LABEL-TYPE-UPCE0 |
| 138 | LABEL-TYPE-EAN8 |
| 139 | LABEL-TYPE-EAN13 |
| 144 | LABEL-TYPE-UPCE1 |
| 161 | LABEL-TYPE-OCR |
| 180 | LABEL-TYPE-DATABAR-COUPON |
| 183 | LABEL-TYPE-HANXIN |
| 193 | LABEL-TYPE-GS1-DATAMATRIX |
| 194 | LABEL-TYPE-GS1-QRCODE |
| 195 | LABEL-TYPE-MAILMARK |
| 196 | LABEL-TYPE-DOTCODE |
| 198 | MULTICODE-DATA-FORMAT |
| 200 | LABEL-TYPE-GRIDMATRIX |
| 205 | LABEL-TYPE-FINNISHPOSTAL-4S |
| 255 | LABEL-TYPE-UNDEFINED |
Extract Barcode Highlighting Image Data
Make sure the following permission is added in the application manifest file to access the DataWedge Content Provider:
<uses-permission android:name="com.symbol.datawedge.permission.contentprovider" />
IMPORTANT: DataWedge apps targeting Android 11 or later must include the following <queries> element in the AndroidManifest.xml file due to package visibility restrictions imposed by Android 11 (API 30):
    <queries>
        <package android:name="com.symbol.datawedge" />
    </queries>
Use the value from the “uri” field to get the URI to access the DataWedge Content Provider. Then use a ContentResolver to pass the URI and retrieve a Cursor object. The Cursor object contains two columns:
| Name | Description |
|---|---|
| raw_data | Contains the image data in byte[] format |
| next_data_uri | URI to be used to retrieve the remaining Image data. If there is no remaining image data, this field will be empty. |
Read the raw_data and save it in a ByteArrayOutputStream object. If next_data_uri is not empty, read the raw_data from the URI provided in the next_data_uri column. Continue to read the raw_data field and store the value into the ByteArrayOutputStream object, until the next_data_uri is empty. This can be done using a while loop:
String uri = jsonObject.getString("uri");
Cursor cursor = getContentResolver().query(Uri.parse(uri),null,null,null);
ByteArrayOutputStream baos = new ByteArrayOutputStream();
if(cursor != null)
{
    cursor.moveToFirst();
    baos.write(cursor.getBlob(cursor.getColumnIndex("raw_data")));
    String nextURI = cursor.getString(cursor.getColumnIndex("next_data_uri"));
    while (nextURI != null && !nextURI.isEmpty())
    {
        Cursor cursorNextData = getContentResolver().query(Uri.parse(nextURI),
                null,null,null);
        if(cursorNextData != null)
        {
            cursorNextData.moveToFirst();
            baos.write(cursorNextData.getBlob(cursorNextData.
                    getColumnIndex("raw_data")));
            nextURI = cursorNextData.getString(cursorNextData.
                    getColumnIndex("next_data_uri"));

            cursorNextData.close();
        }

    }
    cursor.close();
}
When all values are stored for the image data, read the values mapped by the field names supported by image output (e.g. “width”, “height”, etc.) shown in the table below to construct the Bitmap object.
Image Output:
| Field Name | Type | Description |
|---|---|---|
| width | int | Width of the image in pixels |
| height | int | Height of the image in pixels |
| size | int | Size of the image buffer in pixels |
| stride | int | Width of a single row of pixels of an image |
| imageformat | string | Supported formats: Y8, YUV Note: YUV format must be interpreted as NV12 format. |
| orientation | int | Rotation of the image buffer, in degrees. Values: 0, 90, 180, 270, |
Use getBitmap() method from the ImageProcessing class (provided below) to get the Bitmap object:
int width = 0;
int height = 0;
int stride = 0;
int orientation = 0;
String imageFormat = "";

width = jsonObject.getInt("width");
height = jsonObject.getInt("height");
stride = jsonObject.getInt("stride");
orientation = jsonObject.getInt("orientation");
imageFormat = jsonObject.getString("imageformat");

Bitmap bitmap = ImageProcessing.getInstance().getBitmap(baos.toByteArray(),imageFormat, orientation,stride,width, height);
Class ImageProcessing:
/*
* Copyright (C) 2018-2021 Zebra Technologies Corp
* All rights reserved.
*/
package com.zebra.idscanningapp;

import android.graphics.Bitmap;
import android.graphics.BitmapFactory;
import android.graphics.ImageFormat;
import android.graphics.Matrix;
import android.graphics.Rect;
import android.graphics.YuvImage;

import java.io.ByteArrayOutputStream;

public class ImageProcessing{

    private final String IMG_FORMAT_YUV = "YUV";
    private final String IMG_FORMAT_Y8 = "Y8";

    private static ImageProcessing instance = null;

    public static ImageProcessing getInstance() {

        if (instance == null) {
            instance = new ImageProcessing();
        }
        return instance;
    }

    private ImageProcessing() {
        //Private Constructor
    }

    public Bitmap getBitmap(byte[] data, String imageFormat, int orientation, int stride, int width, int height)
    {
        if(imageFormat.equalsIgnoreCase(IMG_FORMAT_YUV))
        {
            ByteArrayOutputStream out = new ByteArrayOutputStream();
            int uvStride = ((stride + 1)/2)*2;  // calculate UV channel stride to support odd strides
            YuvImage yuvImage = new YuvImage(data, ImageFormat.NV21, width, height, new int[]{stride, uvStride});
            yuvImage.compressToJpeg(new Rect(0, 0, stride, height), 100, out);
            yuvImage.getYuvData();
            byte[] imageBytes = out.toByteArray();
            if(orientation != 0)
            {
                Matrix matrix = new Matrix();
                matrix.postRotate(orientation);
                Bitmap bitmap = BitmapFactory.decodeByteArray(imageBytes, 0, imageBytes.length);
                return Bitmap.createBitmap(bitmap, 0 , 0, bitmap.getWidth(), bitmap.getHeight(), matrix, true);
            }
            else
            {
                return BitmapFactory.decodeByteArray(imageBytes, 0, imageBytes.length);
            }
        }
        else if(imageFormat.equalsIgnoreCase(IMG_FORMAT_Y8))
        {
            return convertYtoJPG_CPU(data, orientation, stride, height);
        }

        return null;
    }


    private Bitmap convertYtoJPG_CPU(byte[] data, int orientation, int stride, int height)
    {
        int mLength = data.length;
        int [] pixels = new int[mLength];
        for(int i = 0; i < mLength; i++)
        {
            int p = data[i] & 0xFF;
            pixels[i] = 0xff000000 | p << 16 | p << 8 | p;
        }
        if(orientation != 0)
        {
            Matrix matrix = new Matrix();
            matrix.postRotate(orientation);
            Bitmap bitmap = Bitmap.createBitmap(pixels, stride, height, Bitmap.Config.ARGB_8888);
            return Bitmap.createBitmap(bitmap, 0 , 0, bitmap.getWidth(), bitmap.getHeight(), matrix, true);
        }
        else
        {
            return Bitmap.createBitmap(pixels, stride, height, Bitmap.Config.ARGB_8888);
        }
    }
}
Related Guides: