Overview
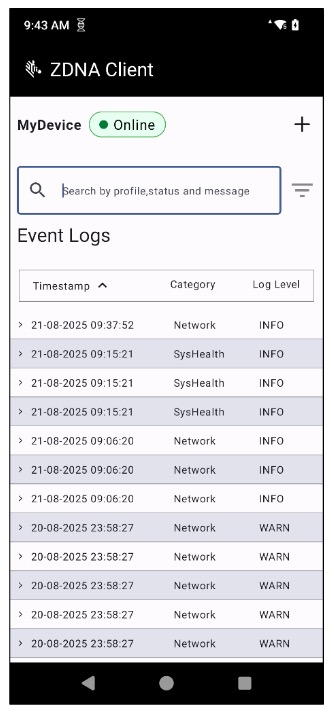
The Zebra DNA Client is installed at device enrollment that displays logs of device operations, system health and connection activities relating to DNA Cloud. This can provide device users and/or support staff with important troubleshooting capabilities by exposing problems or potential problems before they arise. Logs are refreshed automatically, displaying the latest events at the top, and allow searching and filtering activities by category, status and date/time, helping to ensure efficient device oversight and management.
 Click image to enlarge; ESC to exit.
Main Features
- Displays device:
- Connection status (online/offline)
- Memory usage
- Battery health
- Events from the last seven (7) days
- Sorts events by:
- Timestamp (date/time)
- Categorizes Events by:
- Network
- SysHealth
- HouseKeeping
- AppMgmt
- DeviceAction
- DeviceSetting
- LMK
- NA
- Ranks Events by:
- DEBUG
- INFO
- WARN
- ERROR
Using DNA Client
To Begin Viewing Logs:
Tap the "Zebra DNA Client" icon to open the app:
 Click image to enlarge; ESC to exit.
At launch, the app displays device activities from the last seven (7) days; most recent events are on top.
Scroll through the list to find events of possible concern: Click image to enlarge; ESC to exit.
Tap on an individual event to display its details:
 Click image to enlarge; ESC to exit.
Enter a word in the filter box to display only events that contain that word:
 Click image to enlarge; ESC to exit.
Tap "Timestamp" to sort log entries by date and time:
 Click image to enlarge; ESC to exit.
Tap the filter icon for filtering options:
 Click image to enlarge; ESC to exit.
Tap the (+) symbol to display battery health and memory usage:
 Click image to enlarge; ESC to exit.
Updates are deployed in stages to prevent system overload and bandwidth usage spikes. As a result, it can take several hours for updates to reach all devices once they become available.
To enable automatic updates:
In the ZDNA console, select My Services from the User Account drop-down (upper-right corner).
 Click image to enlarge; ESC to exit.
Click the "Automatic updates" toggle (if not already enabled):
 Click image to enlarge; ESC to exit.
If selecting "Groups based," add the desired Groups in the Groups field:
 Click image to enlarge; ESC to exit.
Check this box to update devices NOT assigned to ANY group in addition to updating those in the specified Group(s):
 Click image to enlarge; ESC to exit.
Click "Save" button when finished:
 Click image to enlarge; ESC to exit.