Overview
Installing Enterprise Browser development tools on a desktop or laptop system provides all the software necessary to start making Enterprise Browser apps. Deploying apps requires a connection via Android Debug Bridge (ADB) to one or more supported Zebra devices running Android. See the Requirements sections below for more information.
EB Artifacts
Zebra recommends using the latest JavaScript libraries included with the downloaded version of Enterprise Browser for all apps. After installation, JavaScript libraries are located in:
C:\EnterpriseBrowserForAndroid\JavaScriptFiles\EnterpriseBrowser
on the development host computer.
| File Name | Description | Contents | Source (+link) |
|---|---|---|---|
EnterpriseBrowserForAndroid_x.x.x.x.msi |
Installer for Windows PCs | • EB device runtimes for Android • EB Companion Utilities for Windows • EB Feature Demo, misc. |
|
EnterpriseBrowserForAndroid_vx.x.x.x.dmg |
Installer for macOS | • EB Android APK (general use) • EB Android APK (SAP bundle)* |
|
EnterpriseBrowser_signed_x.x.x.x.apk |
EB for Android app installer | • EB Android APK (general use) | |
EnterpriseBrowser_SAP_signed_x.x.x.x.apk |
EB for Android app installer | • EB Android APK (SAP bundle)* |  |
*The SAP and general-use Enterprise Browser .apk files are identical; the difference is in the included Config.xml file, which is customized for SAP deployments. To modify the SAP config file for general use, simply copy the Config.xml file from the /android_regular folder on the device to the /enterprise/device/enterprisebrowser device folder.
Developer Requirements
Building Enterprise Browser apps and configuration files requires the following:
- A computer running Windows 10
- The Enterprise Browser dev. kit (
.msifile) from the Zebra Support Portal - One or more supported Zebra devices connected to the computer
- USB driver for targeting Zebra devices installed
- Android Developer Tools installed and running
See Connections section for details
Other device updates might be required for compatibility with EB 3.3. See compatibility matrix.
Administrator Requirements
Deploying Enterprise Browser apps and/or configuration files requires the following:
- A Windows computer with Zebra StageNow tools installed
- An Enterprise Mobility Management (EMM) system (optional)
- An Enterprise Browser 3.3
.apkdownloaded from Google Play or the Zebra Support Portal - For manual deployment directly to individual device(s) ONLY:
- One or more supported Zebra devices connected to the computer
- USB driver for targeting Zebra devices installed
- Android Developer Tools installed and running
See Connections section for details
Optional Config Files
Settings are stored in separate files for each of the optional EB features listed below. For each optional feature used in an app, a config file is created by the developer to contain settings for that feature. Each such config file must be present on the device and its location referenced in the app's Config.xml file.
Optional EB Features:
- Keycode mapping
- Shortcuts
- DOM injection
- Native tabbar
- Custom CSS
- ButtonBar
- Page-based Actions
Click each option above for more information.
EB 3.3 NOTES
EB 3.3 imposes major changes to installation, storage and permitted use of variables. Details are below.
Zebra recommends backing up user data before performing any installation or upgrade operation.
Device OS image (BSP) update required. MORE INFO.
Package Name Change
- EB 3.3 and subsequent versions will have the following package name:
- EB 3.3 package name:
com.zebra.mdna.enterprisebrowser - Previous package name:
com.symbol.enterprisebrowser
- EB 3.3 package name:
- Previous EB versions (with the old package name) cannot be upgraded to EB 3.3.
EB versions prior to 3.3 must be uninstalled.
Android does not support upgrading an app to a newer version delivered under a different package name. - All new features and device support will be added to EB 3.3 and later and delivered under the new package name.
Previous versions and package names are deprecated. - Software, systems and files containing the prior EB package name must be updated with the new package name.
These might include, but are not limited to:- Any "allowlist" or" whitelist" such as those created with AccessMgr
- Intents that launch Enterprise Browser
- StageNow Profiles used to install any version prior to EB 3.3
- EMM systems used to install any version prior to EB 3.3
- Any hard-coded instance of the string "
com.symbol.enterprisebrowser"
- Revised installation instructions reflect the new process for single-device deployment.
Why Change the Package Name?
In compliance with Google policy, the package name of the public version of Enterprise Browser was changed to differentiate it from the private version previously released on Google Play.
Storage Restrictions
- EB 3.3. targets Android API level 30, which enforces the following scoped storage restrictions on devices running Android 11:
- External storage is no longer accessible, including SD Card
Config.xmlfiles must be redeployed to:
/enterprise/device/enterprisebrowser- All other config files must also be saved to:
/enterprise/device/enterprisebrowser - All references in existing
Config.xmlfiles to restricted storage locations must be modified to reflect the path above.
- Additional changes are required if a
Config.xmlfile contains references to an SD Card in the config files for optional features: - EB JavaScript apps are no longer permitted to read from or write to any path that begins with
/sdcard. If necessary, apps must be modified to access/enterprise/device/enterprisebrowser - Substitution variables in the
Config.xml(i.e., %PRIMARYDIR%, %SECONDARYDIR%) are no longer supported - The variable %PERSISTCONFDIR% remains supported. This resolves to a directory that persists after an Enterprise Reset of the device (i.e.
/enterprise/device/enterprisebrowser) and can be used in place of any fully qualified path to that location.
Licensing, App/OS Update
- Licenses for Enterprise Browser 2.0 (and later) are valid.
If present on the device, licenses are automatically reapplied when Enterprise Browser 3.3 is installed. - Updates to other Zebra apps might be required for compatibility with EB 3.3. See compatibility matrix.
- All EB 3.3 companion tools (i.e. Config Editor, Shortcut Utility etc.) must be reinstalled. Download the latest installer (
.msi) from the Zebra support portal to install.
Zebra recommends backing up user data before performing any installation or upgrade operation.
I. Prep Host and Target
The steps in this section are required only one time for any given host. For deployment instructions, skip to one of the sections below:
- Administrators -> See Mass Deployment section
- Developers -> See Manual Deployment section
From a Windows host
On Windows host systems, communication from the host to target device(s) is handled by the Android Debug Bridge (ADB) for Android. If the device isn't visible to Windows when connected via USB, refer to the Connections section. NOTE: ADB supports USB connections only.
Once a host-to-device connection is established...
To install the Enterprise Browser runtime onto a device:
- From the Zebra Support Portal, download and install the desired version of the EB
.msifile.
For example:EnterpriseBrowserForAndroid_3.2.5.0.msi - Select Start -> Enterprise Browser for Android -> Enterprise Browser Installer to bring up the EB Installer.
A window appears similar to the image below: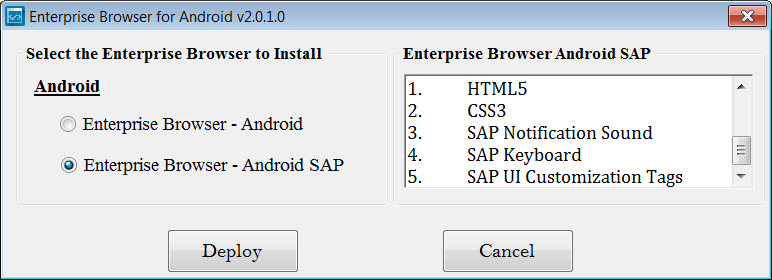 Click image to enlarge; ESC to exit.
- Select the desired package to install ("Android" or "Android SAP").
Information in the right-hand pane varies according to the selection. - Click "Deploy" and follow prompts.
Installation of EB runtime for Android is complete.
For help configuring Enterprise Browser settings, refer to the Config Reference page or On-device Configuration guide.
From a macOS Host
For macOS systems, the preferred deployment method for Enterprise Browser runtimes is with the Android File Transfer utility. If Android File Transfer (AFT) is already installed, skip to Step 5.
- From the Zebra Support Portal, download and install the desired version of the EB
.dmgfile.
For example:EnterpriseBrowserForAndroid_3.2.5.0.dmg - Visit the Android File Transfer page.
- Download and open the Android File Transfer
.dmgfile. - Drag the Android File Transfer app into the Applications folder on the host Mac.
- Plug in the target Zebra Android device and unlock the screen. The device file system should automatically appear on the Mac in a window similar to the image below (it's sometimes necessary to launch or re-launch the app manually).
- Use AFT to copy the Enterprise Browser runtime for Android to internal "phone" storage, which is opened by default.
Storage buttons (red arrow) will be shown only if an additional storage card is present in the device.
Connected devices must be unlocked before file transfers can be performed.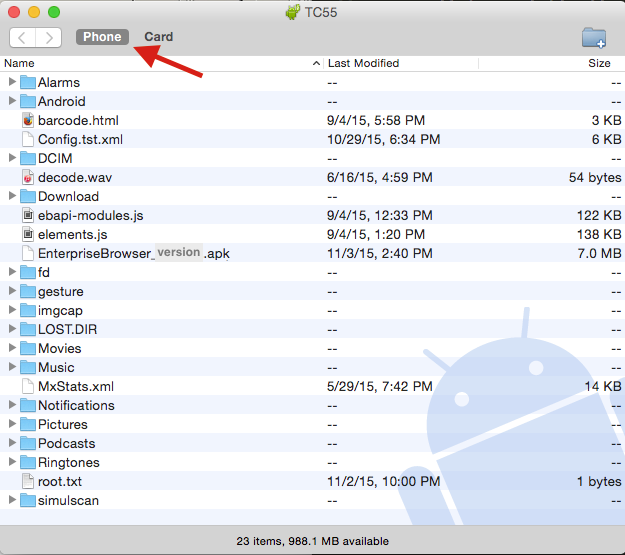
- Using a file browser app on the device, navigate to and double-tap the
.apkto unpackage its files and directories. - Restart the device to complete the installation.
- Apply device license if necessary. Licenses applied to previous EB versions (and not removed) are automatically reapplied when EB is reinstalled.
Installation of EB runtime for Android is now complete.
For help configuring Enterprise Browser settings, refer to the Config Reference page or On-device Configuration guide.
II. Mass Deployment
The Enterprise Browser installer (.apk) , apps (.html) and configuration (.xml) file(s) can be mass-deployed to devices across an enterprise with a compatible EMM system using instructions in this section and in the EMM Procedures section below.
Zebra recommendations:
• Back up user data before any installation or upgrade operation.
• Fully test all apps and deployment processes before distribution.
To mass-deploy an EB 3.3 app:
- Uninstall any prior version of Enterprise Browser, if present.
Previous package name:com.symbol.enterprisebrowser - For Google Play,
configure the EMM to download and install Enterprise Browser and set a Policy to deploy and manage it through the EMM.
EB 3.3 package name:com.zebra.mdna.enterprisebrowser
For the Zebra Support Portal, manually download the Enterprise Browser.apkand deploy and install it using Zebra StageNow or the organization's EMM. - Copy the app's
.html,Config.xmland optional config file(s) (if any) to the following folder on the device:
/enterprise/device/enterprisebrowser
If deploying shortcuts, copy theEBShortcuts.xmlfile to:
/enterprise/device/enterprisebrowser/EnterpriseBrowserShortcutFiles
Directory names are case sensitive. - Relaunch EB to activate settings.
- Apply device license if necessary.
Licenses applied to previous EB versions (and not removed) are automatically reapplied when EB is reinstalled.
IMPORTANT:
- If deploying config files, it's critical that the EMM be configured to execute Step 2 prior to Step 3 above for activation of config files.
- Deployed files and folders must be granted full ("777") permissions to read, write, and execute for all users.
Also see:
- EMM Procedures | Generalized steps needed for deployment using an EMM
- EB Licensing | Per-device licensing, application and deployment
III. Manual Deployment
Enterprise Browser can be manually installed on a device in one of three ways:
Select and install it from Google Play either remotely through a computer browser or through the Google Play app on the device itself.
Download the
.apkfrom the Zebra Support Portal and install on a USB-connected device using adb:adb install [apk path]Download the installer (
.msi) file from the Zebra Support Portal, install it and use the included installer utility to push EB to one or more USB-connected devices.
NOTE: The EB installer package (.apk) can be individually pushed to devices from Windows or macOS machines and manually unpackaged on the device. After running the desired Enterprise Browser installer (.msi or .dmg) on the development host, perform the steps below as appropriate for the manual installation scenario. The Enterprise Browser runtime and app(s) also can be mass-deployed using Zebra StageNow or a compatible EMM system. See the Mass Deployment section.
Zebra recommends fully testing apps using the manual deployment process before mass deployment across an enterprise.
All EB apps comprise a minimum of three files:
theApp.html- The HTML code with user interface, program logic and references to device-peripheral APIs (JavaScript).Config.xml- Configuration and feature settings for the app.ebapi-modules.js- JavaScript file with APIs for using device peripherals.
An additional settings file is required for each of the optional features employed by the app, if any.
Zebra recommends using the latest JavaScript libraries included with the downloaded version of Enterprise Browser. After installation, JavaScript libraries are located in:
C:\EnterpriseBrowserForAndroid\JavaScriptFiles\EnterpriseBrowser
on the development host computer.
To manually push an EB app to a device:
Skip to Step 4 if the EB runtime has already been installed on the target device and the need is ONLY to deploy a new or updated app and its settings file(s).
1. Uninstall any prior version of Enterprise Browser, if present.
2. Download and install Enterprise Browser from one of the sites below:
3. If installed from Google Play, skip to Step 4.
Select a. or b. below to install an .apk from the portal:
a. Use ADB to install the app:
adb install [apk path]
b. ~OR~ using a file browser on the device, locate double-tap the .apk.
This creates the /enterprise/device/enterprisebrowser/ folder on the device and stores the Enterprise Browser executable there.
4. Push the app's .html and Config.xml files and optional config files (if any, see Overview) to:
/enterprise/device/enterprisebrowser/
Directory names are case sensitive.
5. Relaunch EB to activate settings.
6. Apply device license if necessary.
Licenses applied to previous EB versions (and not removed) are automatically reapplied when EB is reinstalled.
The EB app is ready to use.
EMM Procedures
The steps listed below are intended to provide generalized guidance for organizations using an Enterprise Mobility Management (EMM) system for deployment. Procedures, feature names and other attributes of specific EMMs will vary.
IMPORTANT:
• Target device(s) must be enrolled in the EMM system before attempting any software deployment.
• Deployed files and folders must be granted full ("777") permissions to read, write, and execute for all users.
Generalized EMM Process
- Navigate to app policies or resources section
- Create a new Policy or add an app
- Select platform as Android or Android Enterprise
- If deploying from Google Play, create an app Policy for "Managed Google Play"
- When prompted, search for "Enterprise Browser"
- Select Enterprise Browser as the app to deploy
- Select additional app options as desired for Policy
- Save and assign the Policy
Connections
Android devices
Requirements for using the Enterprise Browser Installer on a Windows system to target an Android device:
- USB drivers for the specific hardware device being targeted
- The Android ADT bundle to make devices visible and to push files (includes ADB)
- A path to
adb.exein the host system's environment variable
STEP 1: Get USB drivers
Visit the Zebra Support Portal, download and install the latest driver from the list.
For non-Zebra hardware, visit Google’s OEM USB Driver page for instructions and links to OEM drivers for the brand of device.
STEP 2: Get Android ADT
Visit the Android Developer Tools page, download and install the Android SDK to match the system (macOS, Linux or Windows 32/64).
STEP 3: Update system path
Add the full path to adb.exe to the system path. The EB installer and its utilities use ADB to push files to Android devices. Since its location could vary with any given system, the path to adb.exe must be available system-wide so that EB can simply execute "abd.exe" rather than repeating the explicit path with every push function.
To add the platform-tools path to the system's environment variable:
- Right-click "Computer" and select -> Properties
- Select "Advanced System Settings" in the System Properties window
- In the "Advanced" tab, Click the "Environment Variables" button to bring up a window similar to the one below:
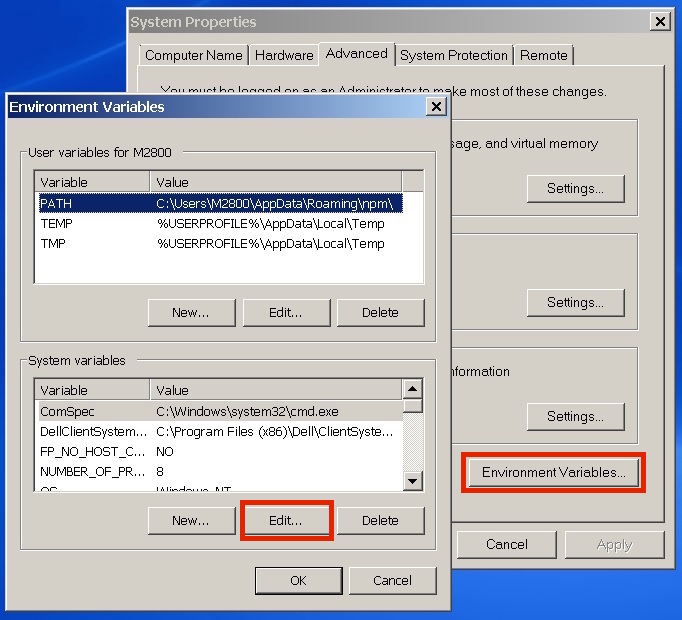
In the LOWER window, scroll down to "Path"
Select Path and click "Edit..." to bring up the path for editing
Add a semicolon (;) to the end of the line followed by the path to "abd.exe"
If unsure of the path, the following DOS command will reveal it:
c:\> dir /s adb.exe
This command should result in something like this:
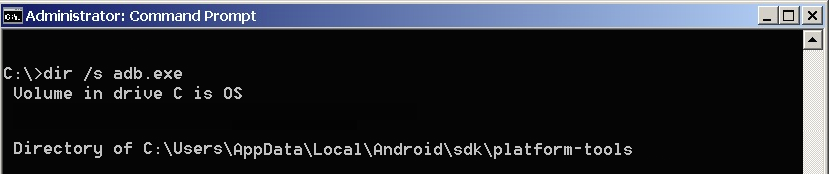
If there's more than one path to adb.exe, enter the one that ends with
\platform-toolsThe correct string for this example would be
;C:\Users\AppData\Local\Android\sdk\platform-tools(notice the semicolon separator at the beginning of the line)Close the dialog and restart the system
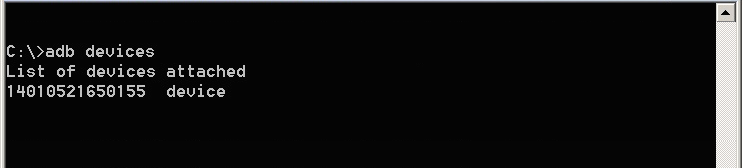
To confirm that the path is correct, connect the device and run the following command:
$ adb devices
If everything is setup correctly, a display like the following will be seen:
The system is now ready to deploy Enterprise Browser apps to an Android device.
Launch Enterprise Browser
After installation and first launch, an Enterprise Browser app icon will appear in the all-apps section or "App Drawer" of Android devices. Versions prior to Enterprise Browser 1.5 launch with default runtime settings as defined in the Config.xml file on the device. Enterprise Browser 1.5 and later can be launched with a pre-configured Config.xml file and optionally a pre-configured keycodemapping.xml file. See the Config.xml Reference for information about configuring the Config.xml file.
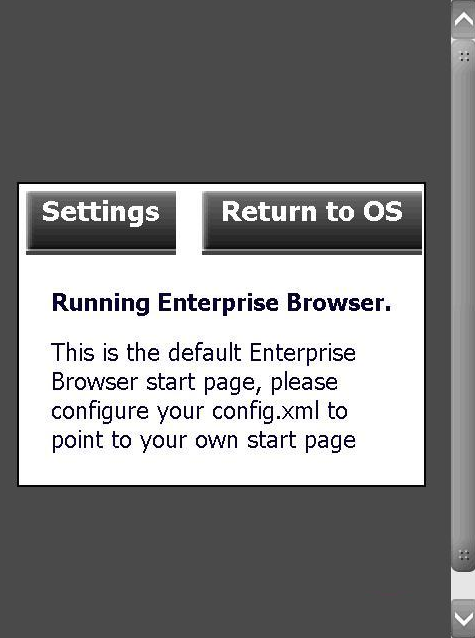
With default settings, the startup screen appears similar to the image below:
 Click image to enlarge; ESC to close.
Press the "Return to OS" button to skip settings configuration and bring up the operating system. To display the Settings button again, simply relaunch the Enterprise Browser app.
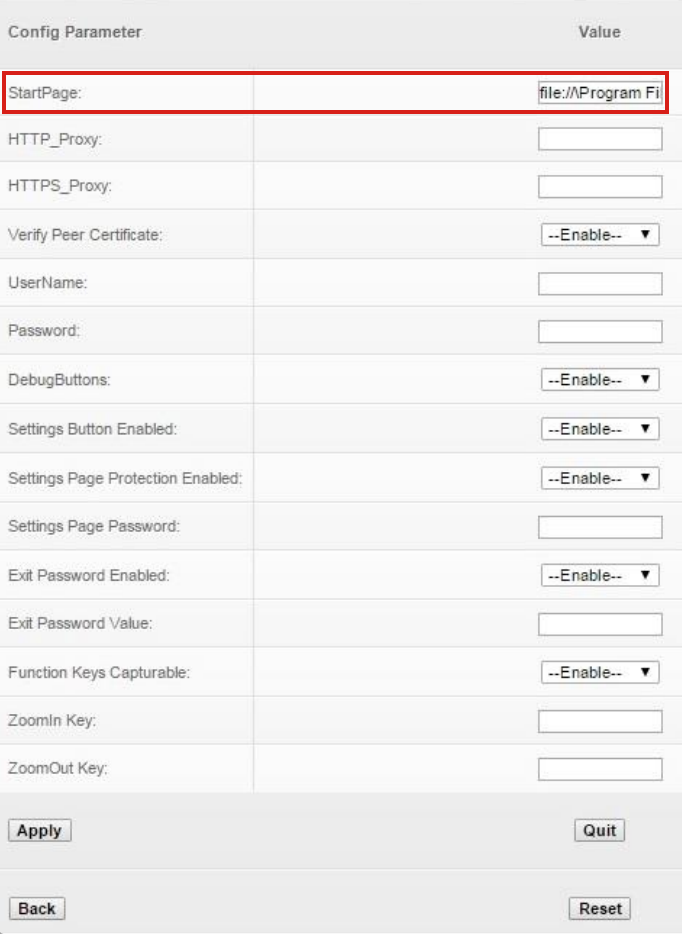
Press the "Settings" button to edit the on-device Config.xml file. A screen appears like the image below:
 Click image to enlarge; ESC to close.
Setting the start page
To activate an EB app's start page, enter the URL in the Value field of the StartPage parameter, as highlighted above, but do not apply the changes yet. Applying changes immediately will cause the new start page to be displayed next time EB is launched and will remove access to the Settings panel.
WARNING: Free-form text fields such as "username" and "password" can accept alpha-numeric characters only. Entering non-text characters (< > \ / " ') in these fields (except in a URL field) will corrupt the Config.xml file.
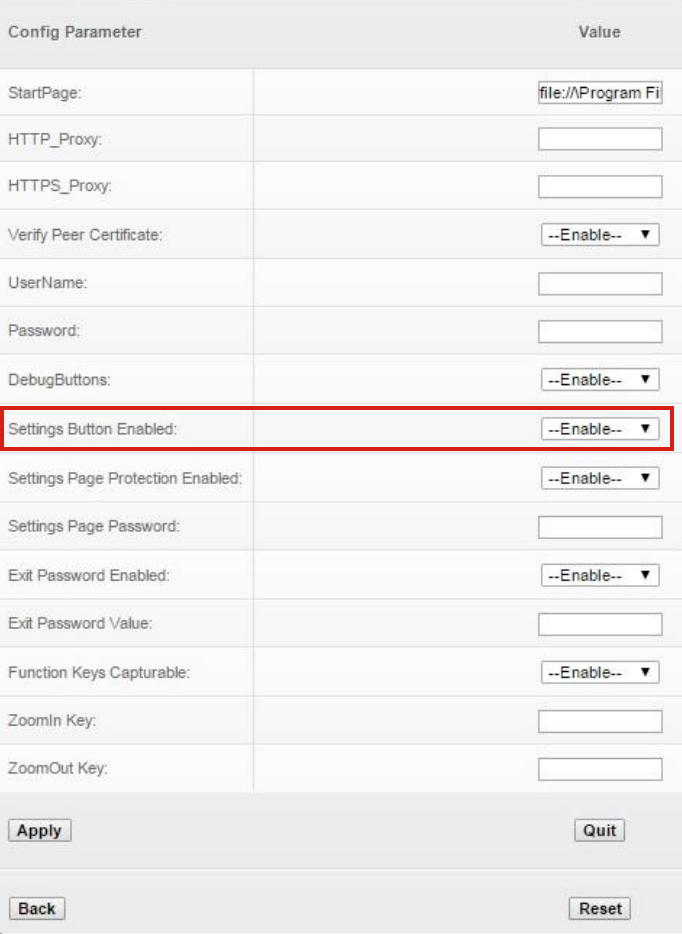
If on-device access to runtime settings is desired after setting up the start page (for example, to experiment with various settings before deployment), set the SettingsButtonEnabled parameter to "Enable" (as below). This will cause a Settings button to appear in the UI at all times. Passwords also can be set here, if desired.
 Click image to enlarge; ESC to close.
Press "Apply" to update the Config.xml file with the new settings. A screen like the one below will be displayed. Restart the app to activate the changes.
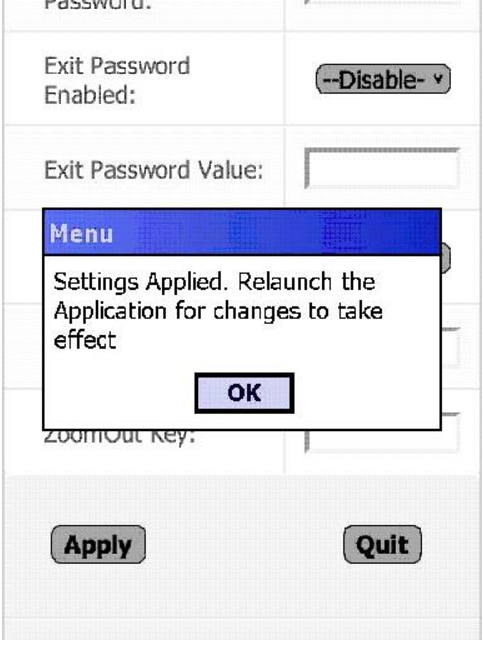 Click image to enlarge; ESC to close.
The Settings button, if enabled, appears in the UI like the one in the red box below.
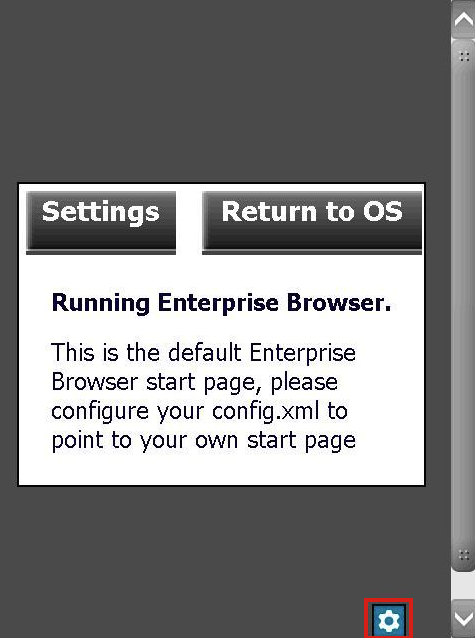 Click image to enlarge; ESC to close.
WARNING: Free-form text fields such as "username" and "password" can accept alpha-numeric characters only. Entering non-text characters (< > \ / " ') in these fields (except in a URL field) will corrupt the Config.xml file.
The on-device settings panel provides access to just a small subset of Enterprise Browser runtime settings. For access to all settings, please refer to the On-device Configuration guide.