TWAIN Driver for Windows

Overview

The Zebra TWAIN Driver for Windows enables an imaging scanner to capture and transfer images to a TWAIN-compliant application. This driver conforms to portions of the TWAIN specification version 2.1 and provides an interface for querying and setting TWAIN capabilities.

The Zebra TWAIN driver provides two interfaces:

  • A programmatic (non Graphical User Interface [GUI]) interface that supports capabilities described in the TWAIN version 2.1 specification in addition to custom TWAIN capabilities specific to Zebra imaging scanners.
  • A GUI that is accessible through TWAIN-compliant applications.
Figure 1: GUI for the Zebra TWAIN Driver
For more details, visit www.twain.org


Version History

Please refer Barcode Scanner SDK for Windows release notes for more details.


Installation and Configuration

Overview

This chapter describes installation instructions and settings to configure the Zebra Scanner TWAIN driver on a host computer.

For custom installation instructions, refer to the Zebra Scanner SDK installation guide.

NOTE TWAIN components are installed by default with the standard Scanner SDK installation. If a custom Scanner SDK installation is performed, the TWAIN option must be selected to install the TWAIN driver components.

After a successful installation of the Zebra scanner TWAIN components, the Zebra TWAIN data source (TWAIN.ds) is located in one of the following folders:

  • 32-bit version: %SystemRoot%\twain_32\Zebra
  • 64-bit version: %SystemRoot%\twain_64\Zebra

The required Zebra core scanner drivers are located in the folder: %Program Files%\Zebra Technologies\Barcode Scanners\Common.


Configuration

Scanner Configuration Barcode

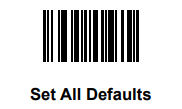
Scan the Set All Defaults bar code below to return all parameters to the scanner's default values. Refer to the scanner's Product Reference Guide for default values.

Set All Defaults

USB SNAPI Communication

IMPORTANT: Zebra image-capable scanner must be configured in USB SNAPI communication mode to be accessible through the Zebra Scanner TWAIN driver. Scan the USB SNAPI bar code below to configure the scanner for usage with the Zebra TWAIN driver.

USB SNAPI with Imaging

Enabling Logging in the Zebra TWAIN Driver

The Zebra TWAIN driver provides two logging mechanisms to assist with troubleshooting.

  • Application event logging viewable through the Windows Event Viewer under Windows Logs → Application.
  • File logging.

To enable logging, follow these steps:

  1. Using the regedit utility, go to the registry key: HKEY_LOCAL_MACHINE\SOFTWARE\Zebra\Zebra Scanners\TWAIN

    Figure 2: HKEY_LOCAL_MACHINE Registry Key
  2. To enable Windows application event logging, change the value of EventViewer from "0" to "1".
  3. To enable file logging, change the value of Enable from "0" to "1" and provide a valid file path as the value of LogFile. Ensure that the application has write permission to the location provided.
  4. Restart the application.

Programmatic TWAIN Interface

Overview

The TWAIN driver's programmatic (non-GUI) interface supports 34 capabilities from the TWAIN specification version 2.1 in addition to 10 other custom capabilities that are available with Zebra imaging scanners.

For additional information on standard TWAIN capabilities, please visit www.twain.org.

See Table 2 below for the custom capabilities specific to Zebra imaging scanners


Zebra Scanner TWAIN Driver Supported Capabilities

The Zebra TWAIN driver supports the standard TWAIN capabilities (shown in Table 1) through the programmatic (non-GUI) interface.

Table 1: Supported Standard TWAIN Capabilities

Standard TWAIN Capability Type Supported Values (default in bold text)
CAP_SUPPORTEDCAPS TWTY_UINT16 lists the supported capabilities
ICAP_XFERMECH TWTY_UINT16 TWSX_NATIVE, TWSX_FILE, TWSX_MEMORY
ICAP_PIXELFLAVOR TWTY_UINT16 TWPF_CHOCOLATE
ICAP_COMPRESSION TWTY_UINT16 TWCP_NONE, TWCP_JPEG
ICAP_PHYSICALWIDTH TWTY_FIX32 1024.00
ICAP_PHYSICALHEIGHT TWTY_FIX32 1280.00
ICAP_MINIMUMHEIGHT TWTY_FIX32 320.00
ICAP_MINIMUMWIDTH TWTY_FIX32 256.00
ICAP_UNITS TWTY_UINT16 TWUN_PIXELS
CAP_DEVICEONLINE TWTY_BOOL TRUE, FALSE
ICAP_BRIGHTNESS TWTY_FIX32 Range: -1000.00 to 1000.00, step 1.00, default = 0.00
ICAP_PIXELTYPE TWTY_UINT16 TWPT_BW, TWPT_GRAY
ICAP_BITDEPTH TWTY_UINT16 4, 8
ICAP_SUPPORTEDSIZES TWTY_UINT16 TWSS_USLETTER
ICAP_XNATIVERESOLUTION TWTY_FIX32 512.00
ICAP_YNATIVERESOLUTION TWTY_FIX32 640.00
ICAP_XRESOLUTION TWTY_FIX32 1024.00, 512.00, 256.00
ICAP_YRESOLUTION TWTY_FIX32 1280.00, 640.00, 320.00
CAP_XFERCOUNT TWTY_INT16 -1
ICAP_IMAGEFILEFORMAT TWTY_UINT16 TWFF_TIFF, TWFF_BMP, TWFF_JFIF
ICAP_ROTATION TWTY_FIX32 0.00, 90.00, 180.00, 270.00
CAP_UICONTROLLABLE TWTY_BOOL TRUE, FALSE
CAP_ENABLEDSUIONLY TWTY_BOOL TRUE, FALSE
ICAP_LAMPSTATE TWTY_BOOL TRUE, FALSE
ICAP_EXTIMAGEINFO TWTY_BOOL TRUE, FALSE
CAP_REACQUIREALLOWED TWTY_BOOL TRUE, FALSE
CAP_POWERSUPPLY TWTY_UINT16 TWPS_EXTERNAL
ICAP_BITORDER TWTY_UINT16 TWBO_LSBFIRST, TWBO_MSBFIRST
ICAP_PLANARCHUNKY TWTY_UINT16 TWPC_CHUNKY, TWPC_PLANAR
CAP_SERIALNUMBER TWTY_STR32 Serial number of imaging scanner
CAP_CUSTOMDSDATA TWTY_BOOL TRUE, FALSE
ICAP_IMAGEFILTER TWTY_UINT16 TWIF_NONE, TWIF_LOWPASS, TWIF_BANDPASS, TWIF_HIGHPASS
ICAP_ORIENTATION TWTY_UINT16 TWOR_ROT0
ICAP_JPEGQUALITY TWTY_UINT16 Range: 0 to 100, step 1, default = 65

Table 2 below shows the custom TWAIN capabilities specific to Zebra imaging scanners which are available through the Zebra TWAIN driver's programmatic (non-GUI) interface. See Advanced Settings for descriptions of advanced capabilities. For additional information on features, consult the specific Zebra imaging scanner's Product Reference Guide available at: www.zebra.com/support

Table 2: Custom TWAIN Capabilities Specific to Zebra Imaging Scanners

Zebra Imaging Scanner Capability Cap ID Item Type Supported Msg(s) GetContainerType CurrentContainer Type Supported Values (default in bold text)
IMOTCAP_AUTOEXPOSURE 0x8001 TWTY_BOOL TWQC_GET,
TWQC_GETDEFAULT,
TWQC_GETCURRENT,
TWQC_RESET,
TWQC_SET
TWON_ONEVALUE TWON_ONEVALUE TRUE: Enable
FALSE: Disable
IMOTCAP_GAINEXPOSUREPRIORITY 0x8002 TWTY_UINT16 TWQC_GET,
TWQC_GETDEFAULT,
TWQC_GETCURRENT,
TWQC_RESET,
TWQC_SET
TWON_ENUMERATION TWON_ONEVALUE GAIN_EXPOSURE_PRIORITY_LOW_GAIN: 0
GAIN_EXPOSURE_PRIORITY_LOW_EXPOSURE: 1
GAIN_EXPOSURE_PRIORITY_AUTO: 2
IMOTCAP_FIXEDEXPOSURE 0x8003 TWTY_UINT16 TWQC_GET,
TWQC_GETDEFAULT,
TWQC_GETCURRENT,
TWQC_RESET,
TWQC_SET
TWON_RANGE TWON_ONEVALUE Range: 5 to 5000, Default = 100
IMOTCAP_FIXEDGAIN 0x8004 TWTY_UINT16 TWQC_GET,
TWQC_GETDEFAULT,
TWQC_GETCURRENT,
TWQC_RESET,
TWQC_SET
TWON_RANGE TWON_ONEVALUE Range: 1 to 100, Default = 50
IMOTCAP_ILLUMINATIONBANKCONTROL 0x8005 TWTY_UINT16 TWQC_GET,
TWQC_GETDEFAULT,
TWQC_GETCURRENT,
TWQC_RESET,
TWQC_SET
TWON_ENUMERATION TWON_ONEVALUE ILLUMINATION_BANK_CONTROL_FULL: 0
ILLUMINATION_BANK_CONTROL_AUTO: 1
ILLUMINATION_BANK_CONTROL_LEFT: 2
ILLUMINATION_BANK_CONTROL_RIGHT: 3
IMOTCAP_CROP 0x8006 TWTY_BOOL TWQC_GET,
TWQC_GETDEFAULT,
TWQC_GETCURRENT,
TWQC_RESET,
TWQC_SET
TWON_ONEVALUE TWON_ONEVALUE FALSE: Disable
IMOTCAP_LEFTPIXEL 0x8007 TWTY_UINT16 TWQC_GET,
TWQC_GETDEFAULT,
TWQC_GETCURRENT,
TWQC_RESET,
TWQC_SET
TWON_RANGE TWON_ONEVALUE 0 - 1279
IMOTCAP_RIGHTPIXEL 0x8008 TWTY_UINT16 TWQC_GET,
TWQC_GETDEFAULT,
TWQC_GETCURRENT,
TWQC_RESET,
TWQC_SET
TWON_RANGE TWON_ONEVALUE 0 - 1279
IMOTCAP_TOPPIXEL 0x8009 TWTY_UINT16 TWQC_GET,
TWQC_GETDEFAULT,
TWQC_GETCURRENT,
TWQC_RESET,
TWQC_SET
TWON_RANGE TWON_ONEVALUE 0 - 1023
IMOTCAP_BOTTOMPIXEL 0x8010 TWTY_UINT16 TWQC_GET,
TWQC_GETDEFAULT,
TWQC_GETCURRENT,
TWQC_RESET,
TWQC_SET
TWON_RANGE TWON_ONEVALUE 0 - 1023

TWAIN Driver Sample Application

Overview

The TWAIN driver's GUI provides an alternate method to access the supported TWAIN capabilities.


TWAIN Sample Application

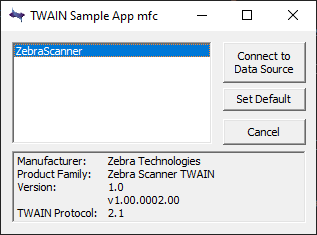
A TWAIN sample application is provided with the default TWAIN driver installation and can be used to demonstrate the TWAIN driver GUI interface.

Figure 3: TWAIN Sample Application

TWAIN Configuration Screen

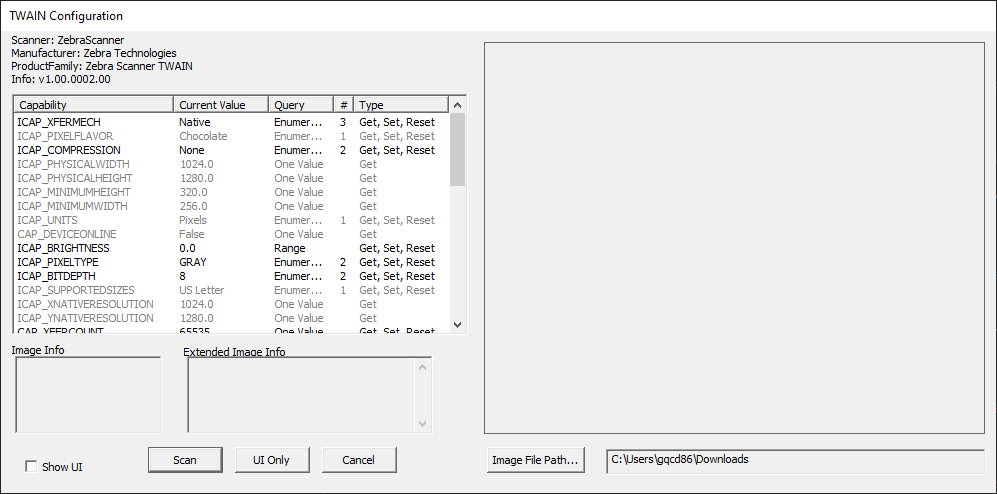
From the TWAIN Sample Application screen, select ZebraScanner and click Connect to Data Source to display the TWAIN Configuration screen (Figure 4).

Figure 4: TWAIN Configuration Screen

The TWAIN Configuration screen lists the supported capabilities with their current values. A user can change a value by double clicking the capability. Capabilities that are grayed out cannot be changed and are read-only.

NOTE The ICAP_BRIGHTNESS and ICAP_JPEGQUALITY capabilities can only be set graphically through the advanced settings (see Advanced Settings).

TWAIN Configuration Screen:

  • Image File Path: Allows the user to browse to a folder in which the scanned image file can be saved.
  • Show UI: If checked, the basic GUI screen described below displays when the Scan button is clicked.
  • Scan: Click this button to initiate an image capture.
  • UI Only: Click this button to display the Basic GUI screen without initiating an image capture.
  • Cancel: Click this button to close the TWAIN Configuration screen.

Basic UI Screen

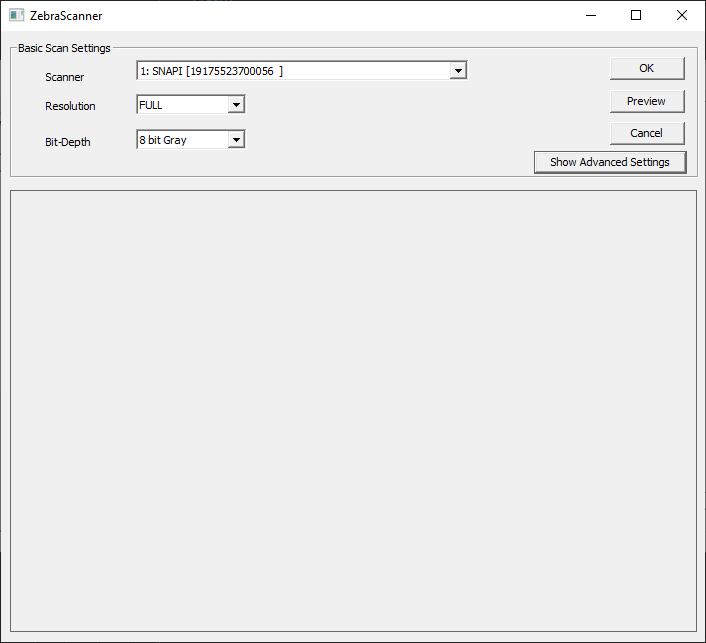
From the TWAIN Configuration screen (Figure 4), click UI Only to display the basic GUI Scan Settings screen

Figure 5: Zebra TWAIN Driver GUI - Basic Screen
GUI Scan Settings screen:

  • Scanner drop-down list: Shows available sources.
  • Resolution drop-down list: Shows supported resolution values, and determines the pixel size of the captured image.
  • Bit-Depth drop-down list: Shows supported bit depth values.
  • Preview: Click this button to capture an image, and display it in the GUI.
  • OK/Scan: Click this button to capture an image, and transfer it to the calling application.

    NOTE On this screen, the OK button is renamed Scan if the Show UI box is checked in Figure 4.

  • Cancel: Click this button to close the GUI screen.
  • Show Advanced Settings: Click this button to open the Advanced Settings sections of the GUI.

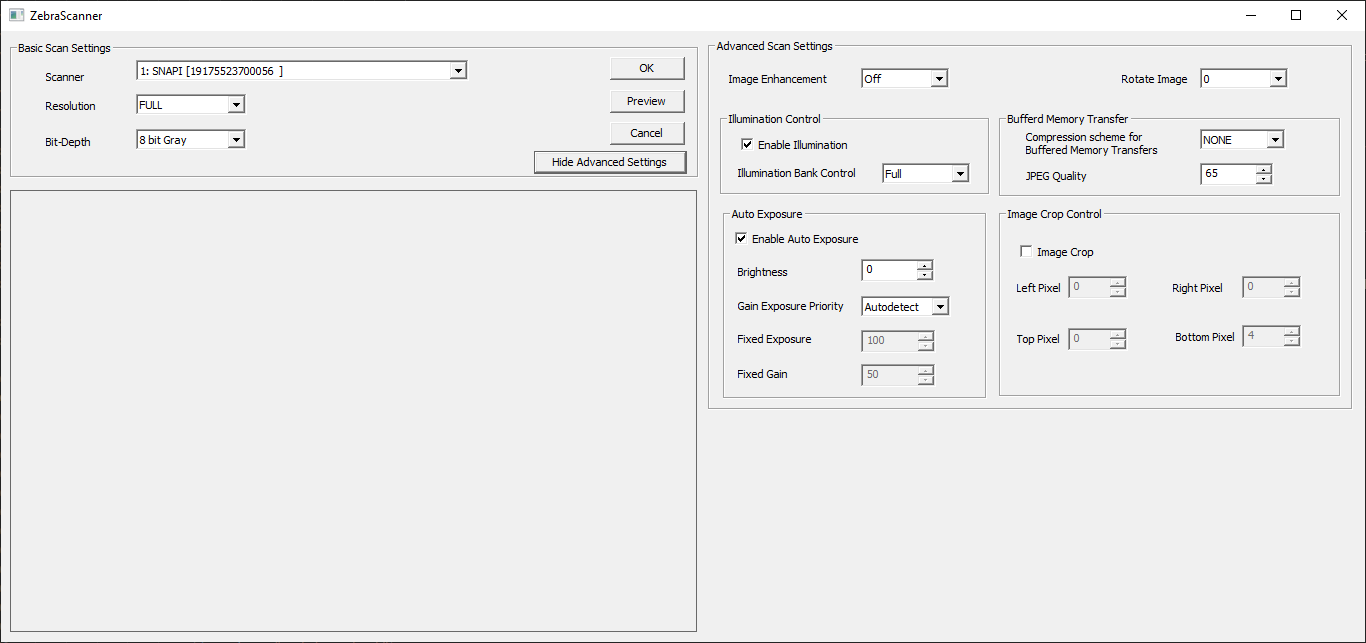
Advanced Settings

When you click Show Advanced Settings from the GUI Scan Settings screen, the Advanced Settings section extends. This displays the basic GUI Scan Settings screen plus advanced setting options.

Figure 6: Zebra TWAIN Driver GUI - Advanced Settings Screen

Advanced Settings screen:

  • Image Count: Corresponds to the CAP_XFERCOUNT capability in the range of 1 to 25 for the number of image transfers the application transfers throughout the current session.
  • Image Enhancement: Sets the imaging scanner's ability to automatically enhance an image through a combination of edge sharpening and contrast enhancement. Off disables automatic enhancement; Low, Medium, and High perform those levels of image enhancement.
  • Rotate Image: Sets the degree of rotation of the captured image - 0, 90, 180, 270.
  • Enable Illumination: Enables the illumination banks on the scan engine. Check the box to enable Illumination Bank Control.
  • Illumination Bank Control: Determines the operation of the illumination banks. Full enables both banks; Auto switches the illumination system from left to right; Left enables the left bank; Right enables the right bank.
  • Enable Auto Exposure: Enables the imaging scanner to automatically determine the gain and exposure settings to best capture an image. Checking this box also enables the Gain Exposure Priority setting. If Enable Auto Exposure is unchecked, the Fixed Exposure and Fixed Gain settings will be enabled allowing the user to manually set those values.
  • Gain Exposure Priority: Sets the scanner's gain/exposure priority when the Auto Exposure setting is enabled - Autodetect, Low Gain or Low Exposure. Low Gain priority sets the scanner to favor longer exposure time over higher gain to capture an image. Low Exposure priority sets the scanner to favor higher gain over exposure for image capture. Autodetect sets the priority based on the scanner's configuration. For example, if the scanner is mounted in a magnetic switch read enabled stand, it uses Low Gain priority. Refer to the imaging scanner's Product Reference Guide for more information on this setting.
  • Fixed Exposure: The manual exposure setting in the range of 5 to 5000.
  • Fixed Gain: The manual gain setting in the range of 1 to 100.
  • Brightness: Sets the relative brightness of the captured image in the range of -1000 to 1000.
  • Image Crop: Enables Image Crop Control. The Left, Right, Top and Bottom Pixel values determine the rectangular sub-region of the full size captured image that will be displayed or transferred.
  • Left Pixel: Sets the left pixel column used to crop a captured image. This value ranges from 0 to (Xresolution - 2) depending on the selected resolution (image size).
  • Right Pixel: Sets the right pixel column used to crop a captured image. This value ranges from 0 to (Xresolution - 1) depending on the selected resolution (image size).
  • Top Pixel: Sets the top pixel row used to crop a captured image. This value ranges from 0 to (Yresolution - 2) depending on the selected resolution (image size).
  • Bottom Pixel: Sets the bottom pixel row used to crop a captured image. This value ranges from 0 to (Yresolution - 1) depending on the selected resolution (image size).

Download TWAIN Driver for Windows

IMPORTANT: Zebra recommends using the latest release whenever possible.


TWAIN components are installed by default with the standard Scanner SDK installation. If a custom Scanner SDK installation is performed, the TWAIN option must be selected to install the TWAIN driver components.

To Download Barcode Scanner SDK for Windows:

  1. Visit the Zebra Barcode Scanner SDK for Windows download page and select the desired download(s).
  2. Proceed to the Barcode Scanner SDK for Windows release notes for the version details.
  3. Proceed to the Barcode Scanner SDK for Windows setup page for installation instructions.