Overview
The Scan-To-Connect (STC) Utility is a Zebra Android app that lets you pair a Zebra cordless scanner to your phone or tablet by simply scanning an on-screen barcode, and then delivers scanned data straight into your apps as keyboard input. No manual Bluetooth pairing menus, no cables.
This guide walks you through the whole journey: installing the app, granting the required permissions, enabling the STC keyboard, pairing a scanner, and using the app day to day. It also covers every setting, a fast checklist for managed and production rollouts, troubleshooting, and the list of supported scanners.
What the Utility Does
The STC Utility lets you connect and pair a Zebra cordless scanner to an Android device:
- Scan to pair – the app shows a pairing barcode; scanning it with the scanner completes the Bluetooth (BLE) connection.
- Data as keystrokes – once connected, barcode data is typed into whichever text field currently has focus, using the bundled Zebra Scan-To-Connect keyboard (input method).
- Configurable delivery – choose the communication protocol, tune keystroke timing, and optionally auto-launch a target app after each connection.
Before You Begin
Make sure you have the following ready:
- An Android device with Bluetooth (BLE) support.
- A supported Zebra cordless scanner – refer to Supported Devices.
- The STC Utility app, installed from the Google Play Store.
- Bluetooth enabled on the Android device.
You will be asked to grant a few permissions during setup (folder access, nearby devices/Bluetooth) and to enable the STC on-screen keyboard. These permission settings are explained in detail under Setup & Configuration.
How It Works
A high-level understanding of the app's functionality makes the setup process straightforward and easy to follow.
- The pairing barcode: the app generates a Code 128 barcode on screen that encodes the pairing instructions for your scanner. By reading the generated pairing barcode, the scanner automatically executes the necessary steps and connects with the app.
- The connection: your scanner and device pair over Bluetooth. Depending on the mode you choose, this is either standard Bluetooth or the more efficient Bluetooth Low Energy (BLE).
- The keyboard: the app installs a Zebra Scan-To-Connect keyboard for its recommended modes. You must enable this keyboard to allow it to type scanned data into your applications. Otherwise, the data will not be displayed.
Supported Devices
For the compatible devices list, please visit the following page.
Cordless Scan-To-Connect for Android – Support and Downloads
Version History
Version 2.2.17 – 03/2026
- Removed the need to switch to Zebra keyboard while operating under HID protocol.
- Bug fix – Fixed the issue of Zebra keyboard overlapping with navigation buttons on some Android devices.
Version 2.2.16 – 12/2025
- Added Android 16 Support.
- Populated external application list for auto launch after connection establishment.
- Updated Storage Access Framework for Modern Android Compatibility.
- Bug Fix – Fixed an issue of STC barcode disappearance on permission denial.
Version 2.2.15 – 03/2025
- Added Android 15 support. Note Android 12 and older versions no longer supported by Zebra's SDK.
Version 2.2.13 – 04/2024
- Added Android 14 support. Note Android 11 and older versions no longer supported by Zebra's SDK.
- Bug Fixes – Addressed Code 128 Barcode data getting scrambled in Enhanced HID over BLE mode.
Version 2.2.12 – 10/2023
- Bug Fixes – Now “Enter key” in STC keyboard sends the “search key”, was incorrectly sending a “Space character” (in Chrome browser).
- Bug Fixes – Eliminated keyboard selection enforcement issue while in HID Keyboard mode. Now it is not mandatory to switch to Zebra keyboard, while in HID keyboard mode.
Version 2.2.10 – 04/2023
- Added support for Android 13 and Android SDK API level 33.
- Add BLE STC (Scan-To-Connect) paring for non-English languages.
Version 2.2.7 – 01/2021
- Added AndroidX library structure support.
- Added Android 11 support.
- Changed how the STC barcode is generated. It no longer uses the Bluetooth MAC address to generate the STC barcode. Instead, the STC barcode is generated with a unique Zebra pairing ID.
- Added BTLE support to STC supported com protocols.
Version 2.2.2 – 04/2018
- Added pass through of keystrokes when ADF rules configured in scanner.
- Optimized text of enter Bluetooth MAC address screen.
- Optimized pair barcode presentation when shown on tablet in landscape mode.
Version 2.1.6 – 01/2018
- Bug fixes.
Version 2.1.0 – 10/2017
- Support “Enhanced Human Interface Device over Bluetooth” using Zebra Scan-To-Connect virtual keyboard in English (US) devices.
- Added Android 8 support.
Version 2.0.4 – 01/2017
- DS8178 and DS2278 support.
- Added Android 7.x support.
Version 2.0.3 – 10/2016
- STC Suite barcode support.
- Launch an application after connection.
- Create production version of application.
Version 1.0.0 – 10/2015
- Initial STC release.
Communication Protocols
During the setup process, select a mode to determine how scanner data is delivered to the host device.
Table 1: Communication Protocols
| Protocol | What it is | Best for |
|---|---|---|
| HID Keyboard | Standard Bluetooth. The scanner behaves like a plug-in keyboard. Simple and universally compatible, but with no delivery guarantees or advanced character support. | Basic setups where simplicity matters most. |
| Enhanced HID Keyboard | Zebra's optimized mode over Bluetooth Classic. Adds Data Delivery Protection (lost or corrupted scans are re-sent) and supports international/Unicode characters. | Reliable, high-volume scanning. |
| Enhanced HID Keyboard over BLE | The same enhanced reliability and character support, but over Bluetooth Low Energy – far gentler on battery for both scanner and device. Unlike the other two protocols, you are not prompted to enter the device's Bluetooth MAC address. | Most users. This is the recommended default. |
Using STC Utility
- Launch the STC Utility App
After installing the STC Utility app from the Play Store, tap the app icon to launch it. The STC splash screen appears while the app loads.
- Grant Access to the STC_Suite Folder
On initial setup, the app opens the file picker at an STC_Suite folder. Tap the Use this folder button at the bottom of the screen to grant access to this location.
A system confirmation dialog then appears. Tap Allow to grant access to the STC_Suite folder.
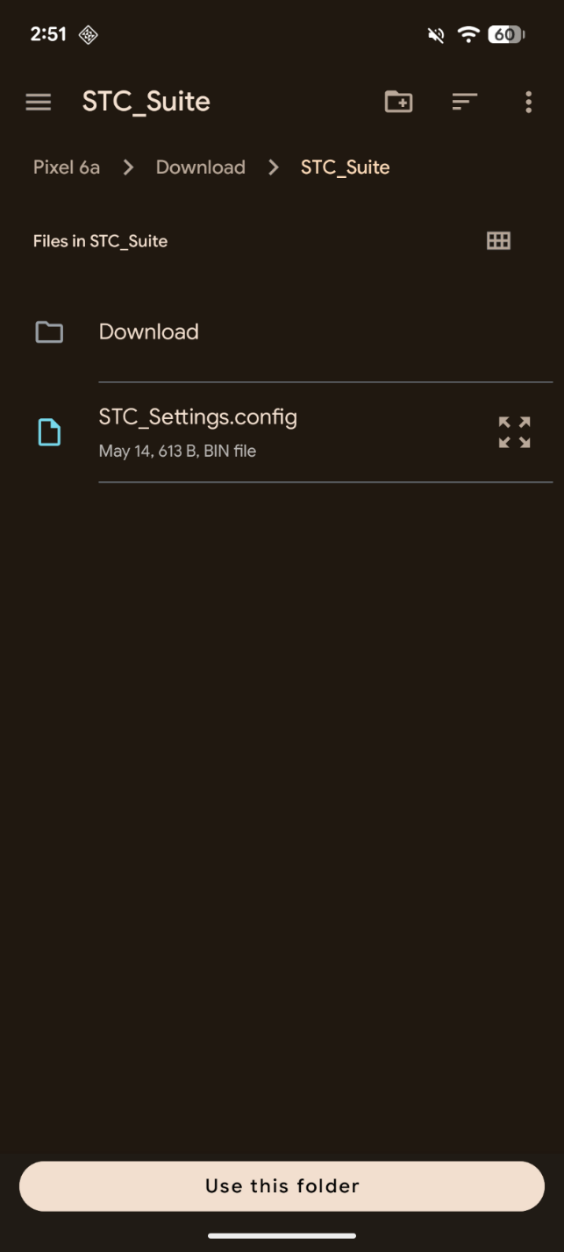 Figure 1: Selecting the STC_Suite Settings Folder
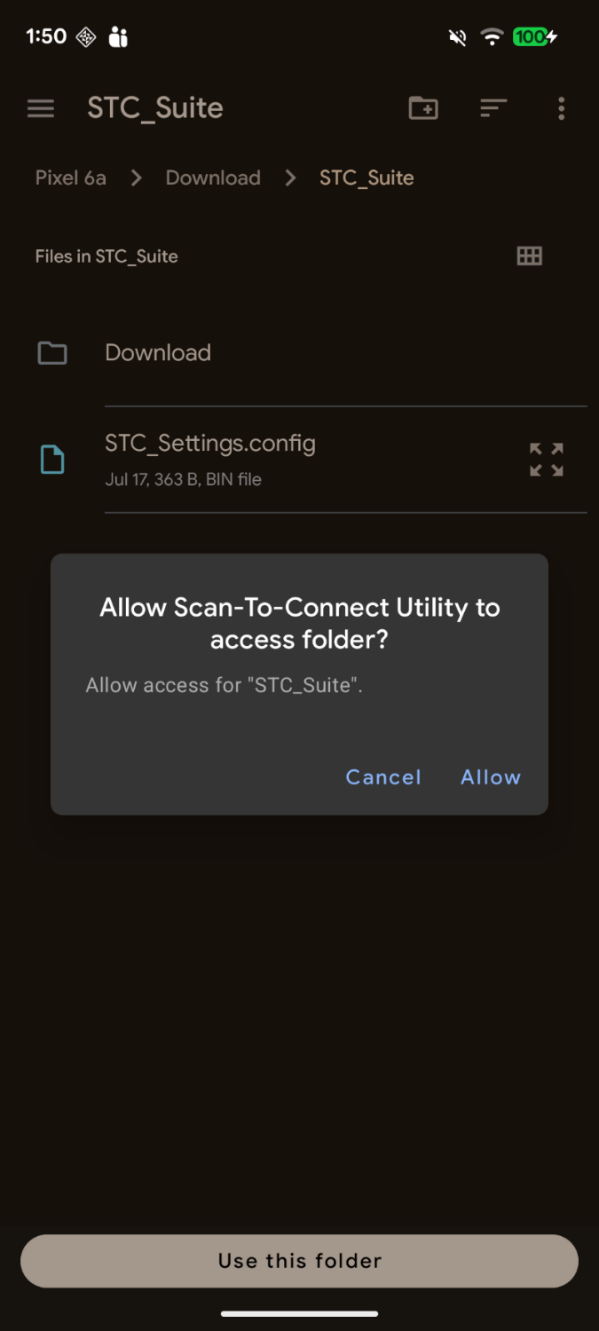 Figure 2: Granting Permission to the Folder
Why does the app want a folder? The STC Utility keeps its configuration in a small file called STC_Settings.config. Granting folder access lets the app read a pre-supplied configuration (handy when IT has set the app up for you) and save your own settings for next time. If no configuration file is present, the app simply creates and manages its own settings automatically. - Allow Nearby Devices (Bluetooth) Permission
The app requests permission to find, connect to, and determine the relative position of nearby devices – required for BLE scanning. Tap Allow to continue. This is essential: without it the app cannot discover or pair your scanner.
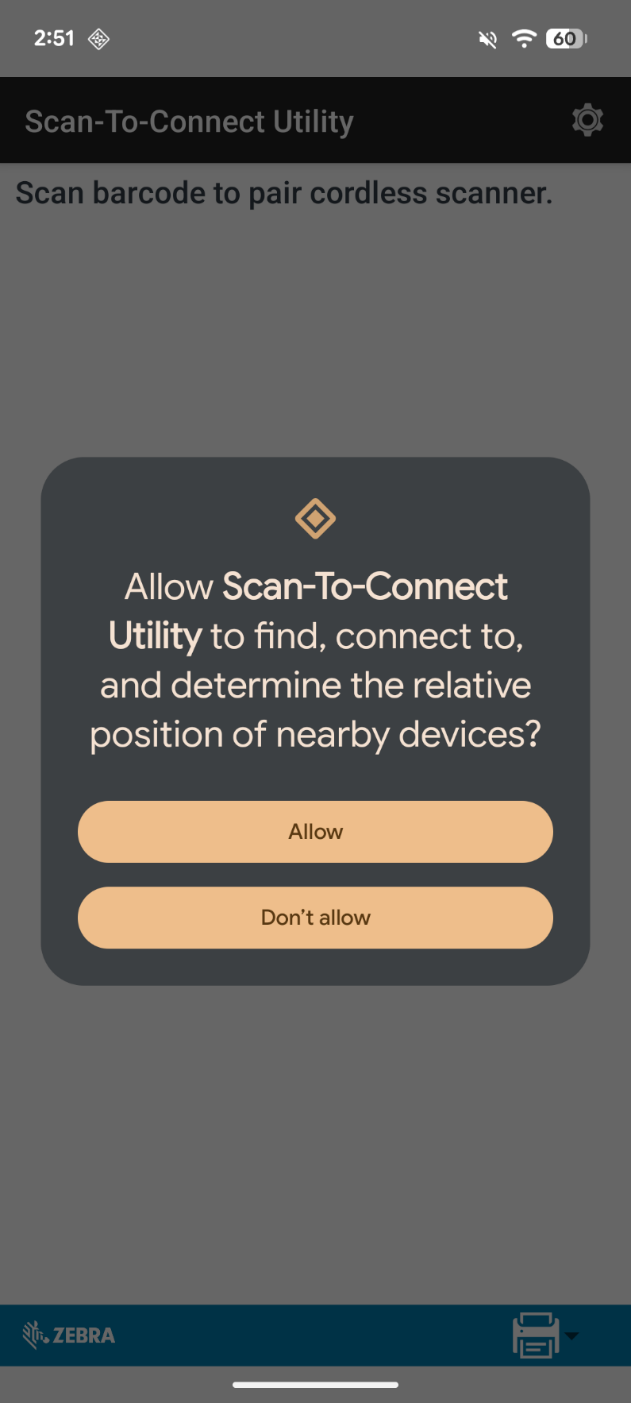 Figure 3: Allowing Nearby Devices (Bluetooth) Permission
NOTE: On older versions of Android, you may also be asked for Location and Storage permissions. These are used for Bluetooth scanning and for saving the settings file; allow them to continue. - Select the Communication Protocol
The Select Communication Protocol dialog lets you choose how the scanner talks to your device – see Communication Protocols. The recommended protocol, Enhanced HID Keyboard Over BLE, is selected by default. Tap Continue to move forward.
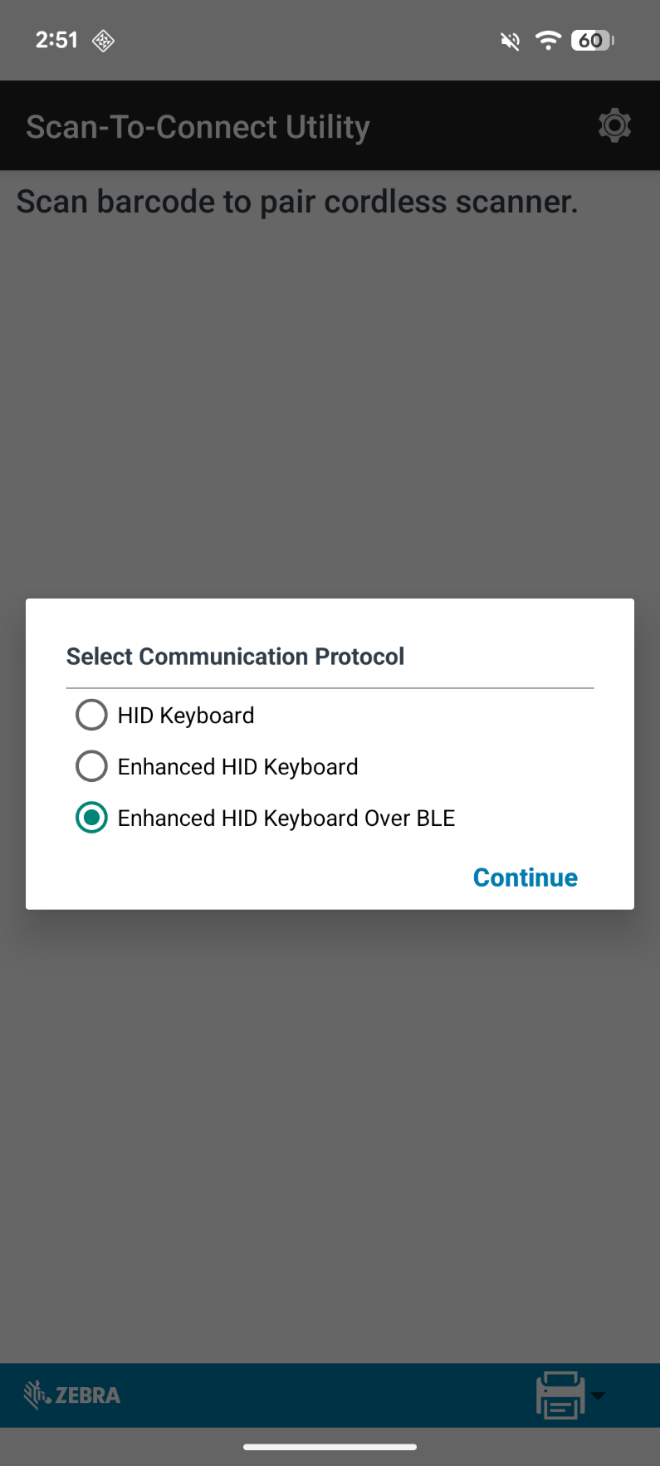 Figure 4: Selecting the Communication Protocol
TIP: You can change the protocol at any time later from the Settings (gear) menu on the main screen. - Setup Wizard (1 of 2): Go to Language & Input
The Setup Wizard prompts you to enable the Zebra Scan-To-Connect keyboard in Android's Language & Input settings. Tap GO TO LANGUAGE & INPUT.
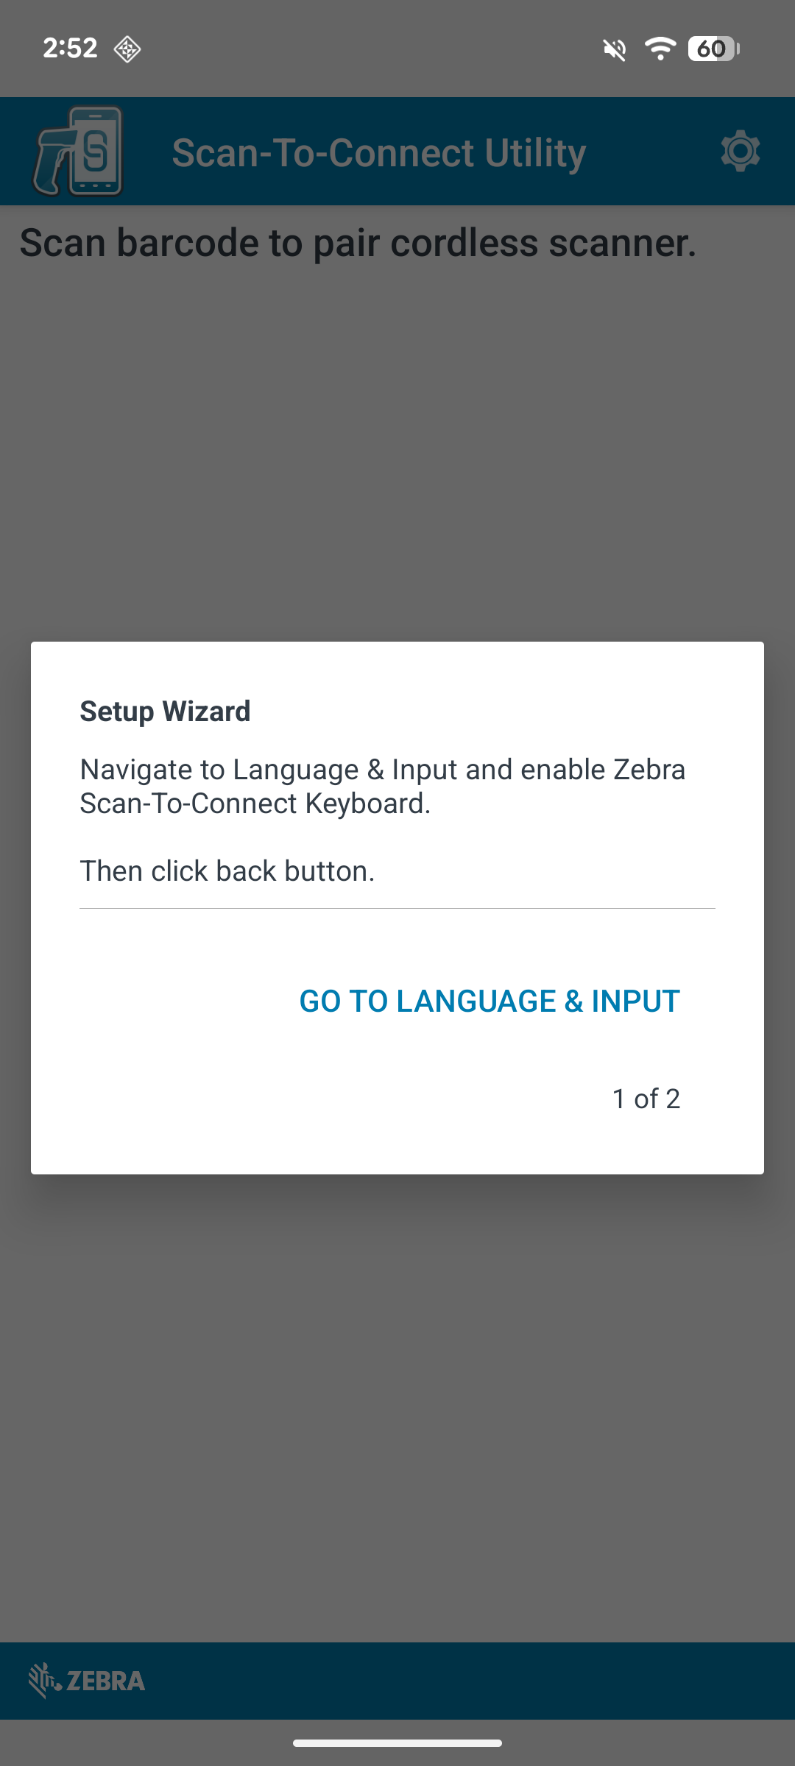 Figure 5: Setup Wizard (1 of 2) – Language & Input
- Enable the Zebra Scan-To-Connect Keyboard
On the On-screen keyboard settings page, find Zebra Scan-To-Connect and toggle it ON to enable the input method.
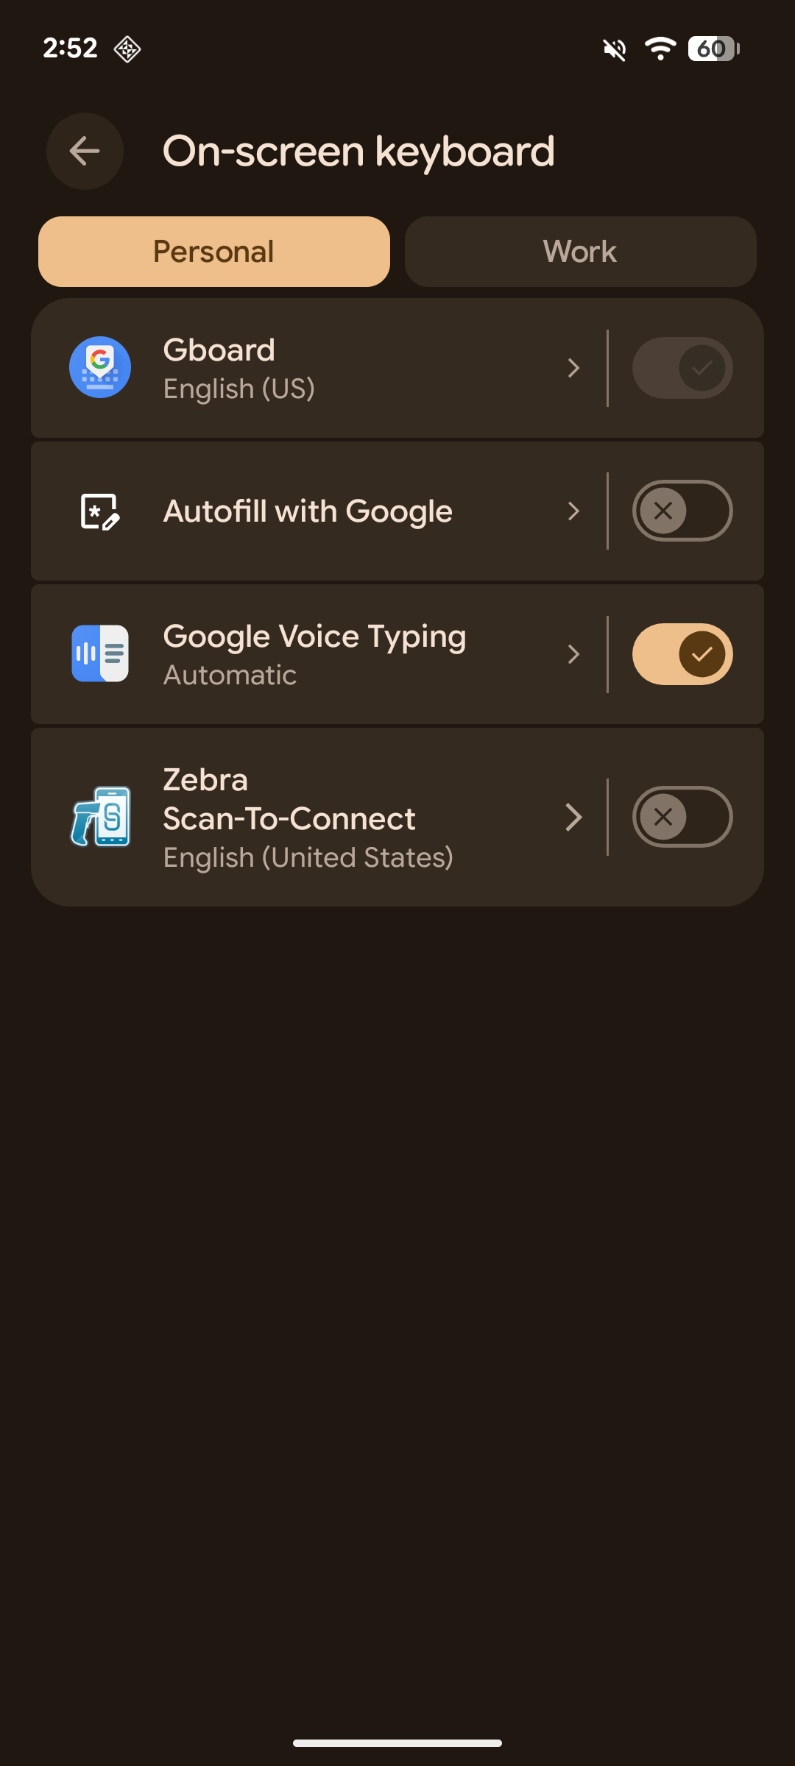 Figure 6: Enabling the Zebra Scan-To-Connect Keyboard
- Confirm the Prompts
Android shows an Attention warning that the input method can collect the text you type. Tap OK to confirm and enable the keyboard.
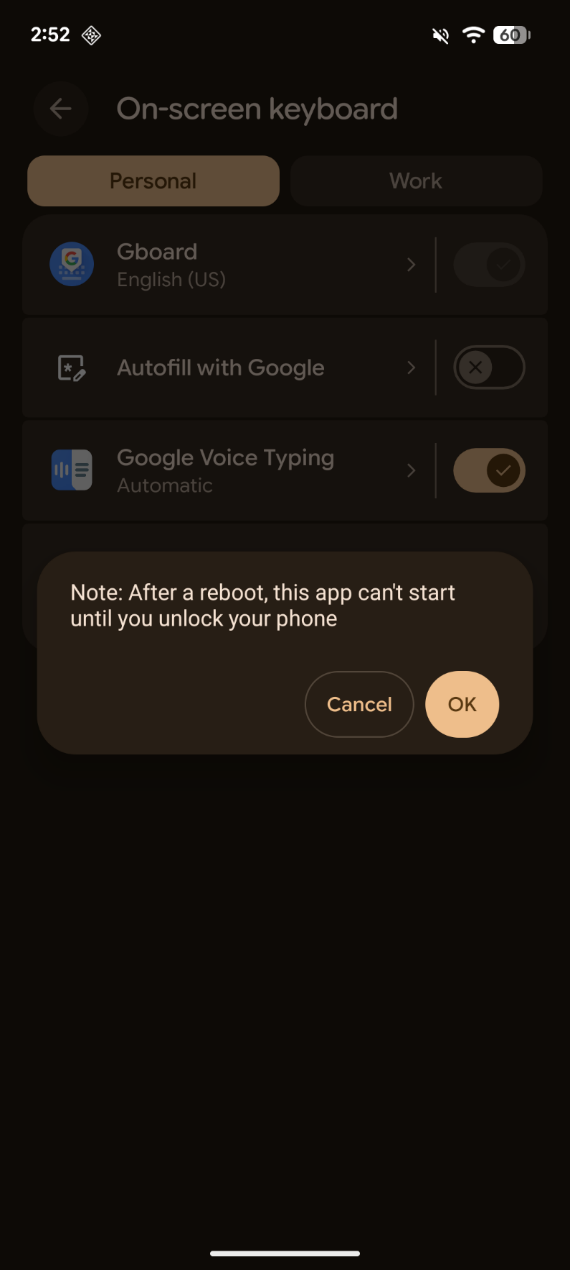 Figure 7: Confirming the Input Method Attention Prompt
A follow-up note may appear: "After a reboot, this app can't start until you unlock your phone." Tap OK to acknowledge and continue.
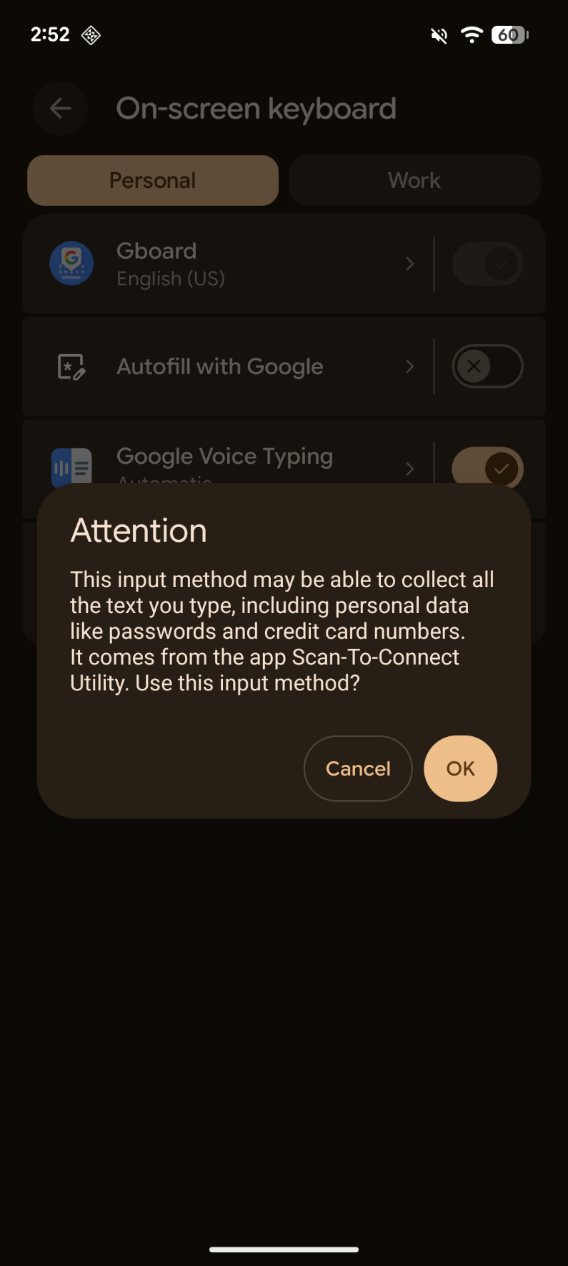 Figure 8: Acknowledging the Reboot Notice
- Setup Wizard (2 of 2): Change Keyboard
Back in the STC Utility app, the Setup Wizard now prompts you to set Zebra Scan-To-Connect as the default keyboard. Tap GO TO CHANGE KEYBOARD.
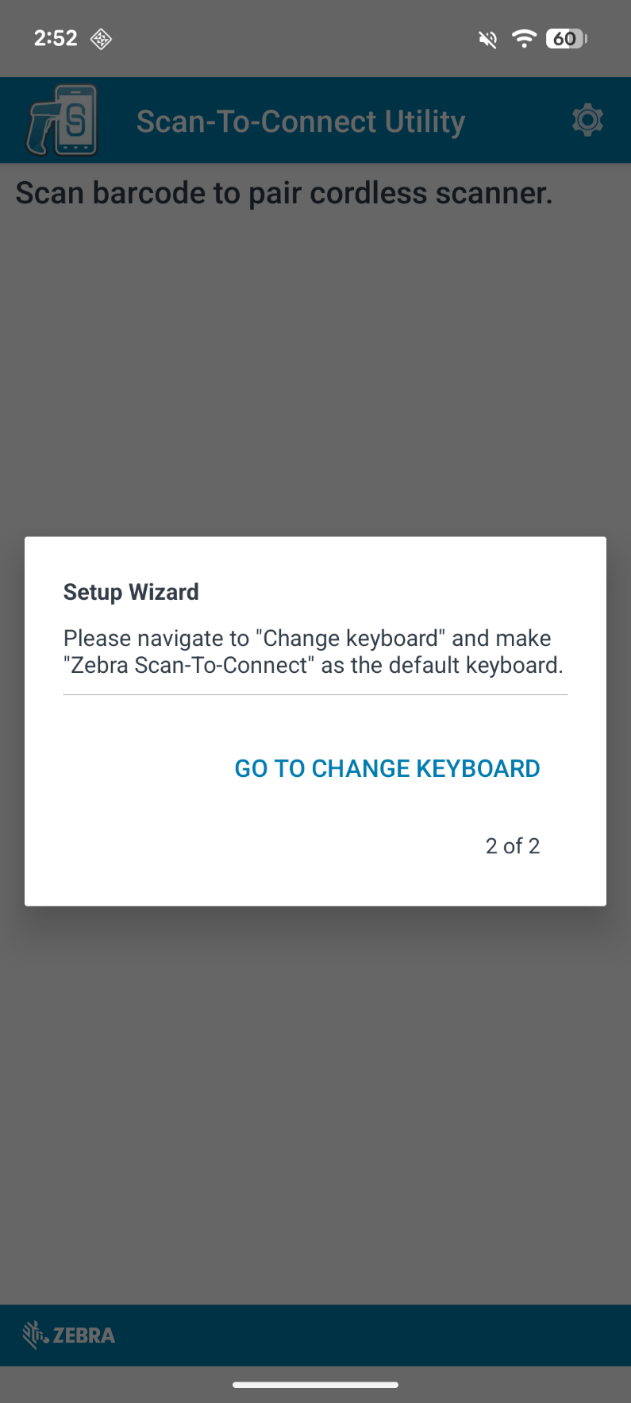 Figure 9: Setup Wizard (2 of 2) – Change Keyboard
- Select Zebra Scan-To-Connect as the Active Keyboard
In the keyboard selection popup, choose Zebra Scan-To-Connect – English (United States) instead of Gboard. This makes the Zebra Scan-To-Connect keyboard the active input method.
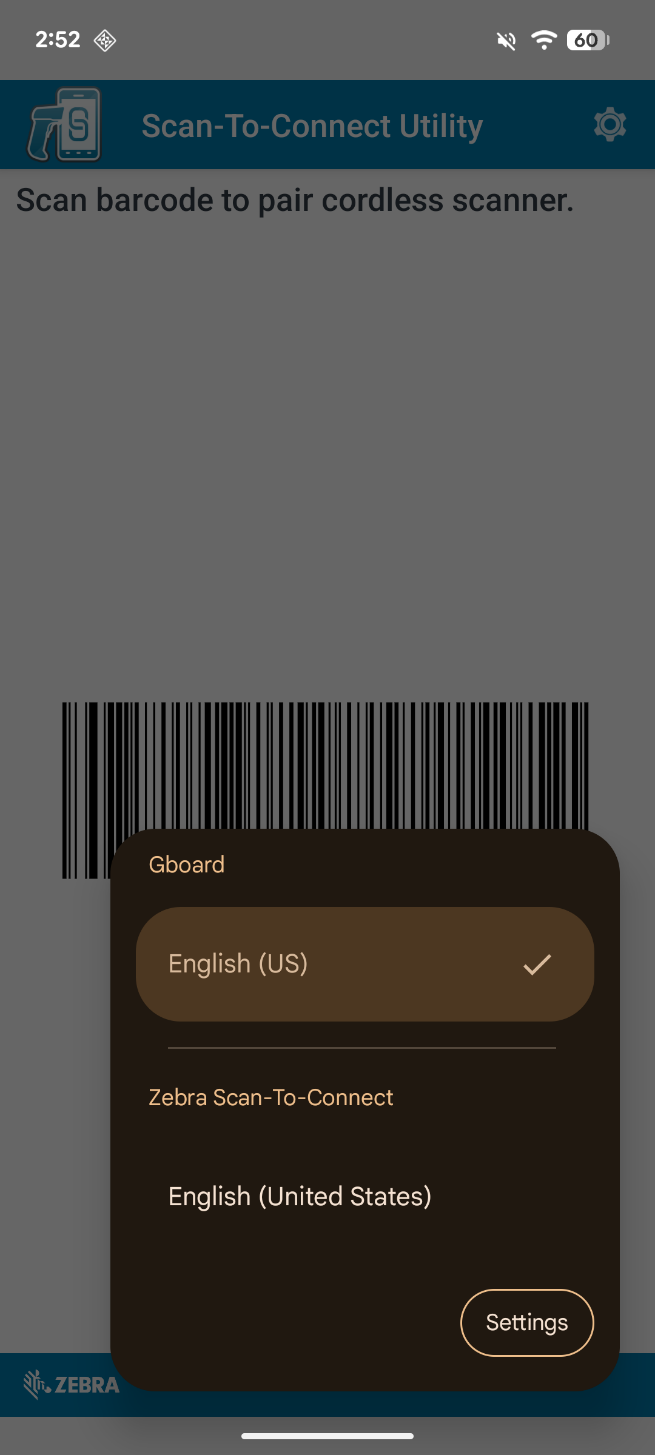 Figure 10: Selecting Zebra Scan-To-Connect as the Active Keyboard
IMPORTANT: Make sure the language is English (United States). The Enhanced modes require this locale; if a different language is selected, the app will prompt you to switch and scanned data may not appear correctly. - Scan the Pairing Barcode
The app returns to the main screen and displays a pairing barcode under Scan barcode to pair cordless scanner. Using your Zebra cordless scanner, scan the barcode on the screen to complete the Bluetooth (BLE) pairing. Once scanned, the scanner connects to the device and setup is complete.
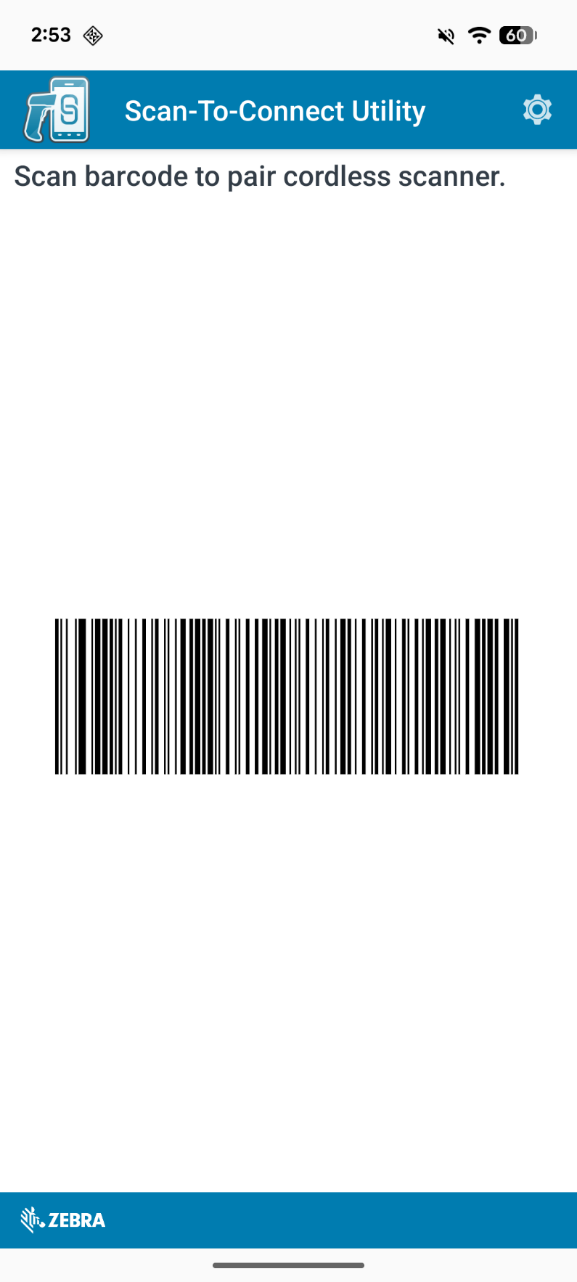 Figure 11: Scanning the Pairing Barcode
TIP: Hold the scanner 15–20 cm (6–8 in) from the screen and keep it steady. If the barcode looks too small or too large for your scanner, you can change its size later from Settings.
Settings
Open Settings from the main screen to configure app behavior.
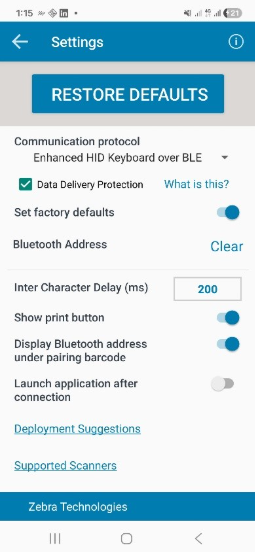 Figure 12: Settings View
Table 2: Settings Reference
| Setting | What it does | Options / values |
|---|---|---|
| Restore defaults | Resets all app behavior to baseline values. | Action |
| Communication protocol | Switches among HID and enhanced modes. Change only if you understand your deployment requirement. | HID / Enhanced HID / Enhanced HID over BLE |
| Data delivery protection | Adds reliability safeguards for enhanced protocol modes. Tap "What is this?" in-app for details. | Enhanced modes only |
| Set factory defaults | Controls whether the scanner's factory defaults are applied during pairing. | On / Off |
| Bluetooth address | Shows the saved manual address (if any); tap "Clear" to remove it. | Format AA:BB:CC:DD:EE:FF |
| Inter-character delay (ms) | Delay between injected keystrokes. Increase if characters drop or arrive out of order. | 0–3000 ms (default 200) |
| Show print button | Shows or hides the print controls on the main screen. | On / Off |
| Display Bluetooth address under pairing barcode | Shows or hides the address text beneath the barcode. | On / Off |
| Launch application after connection | Auto-launches a selected app after a successful connection. Use "Select application" to choose the target. | On / Off + app picker |
| Deployment suggestions | Opens deployment instructions for admin rollout. | Action |
| Supported scanners | Opens the in-app supported scanner list. | Action |
Managed Deployments
Use this checklist for managed and production environments where a consistent configuration is pushed to many devices.
- Configure the app in Settings as required.
- Fully close the app – do not leave it running in the background.
- Ensure the settings file is written to:
Internal Storage > Download > STC_Suite > Download > STC_Settings.config
- Take a copy of the configuration file.
- Paste or deploy the copied configuration file to the Internal Storage > Download > STC_Suite directory of the destination Android device.
The destination device's STC Utility application will now be configured the same as the source device's.
Standard Pairing Flow
- Open the installed STC app on your Android device.
- Ensure Bluetooth is turned ON.
- Confirm the pairing barcode is visible on the main screen.
- Scan the barcode using the scanner.
If a Bluetooth Address Is Needed
For some protocol and device combinations, the app may ask for your phone or tablet's Bluetooth address:
- Tap GO TO ABOUT PHONE to locate the address.
- Enter it in the app in the format AA:BB:CC:DD:EE:FF.
- Tap Continue.
Receiving Barcode Data
After your scanner is paired using the steps above, every barcode you scan is delivered to your Android device as keyboard input through the bundled Zebra Scan-To-Connect input method. The decoded barcode text is typed into whichever text field currently has focus – exactly as if you had typed it yourself. You do not need to keep the STC Utility app in the foreground; scanning works system-wide, in any app that accepts text.
How Barcode Data Reaches Your Apps
- Open the app you want to scan into (for example a browser, notes app, spreadsheet, or line-of-business app) and tap a text field so the cursor is active.
- Make sure Zebra Scan-To-Connect is the active keyboard for the focused field. It is set as the default during setup (Steps 7–10); if another keyboard takes over, re-select it from Android's keyboard switcher.
- Scan a barcode. The decoded data is injected into the focused field as keystrokes.
- If your scanner is configured to add a terminator (such as Enter or Tab), it is applied after the data – for example submitting a form or jumping to the next field automatically.
Good to Know
- Works everywhere: any on-screen text field, in any app, can receive scanned data.
- Nothing is stored: the STC Utility passes scans straight through to the focused field – it does not keep a copy of your data.
- Delivery speed: if characters are dropped or arrive out of order, increase the Inter-character delay in Settings. Data delivery protection (available in the enhanced protocol modes) further guards against lost or duplicated characters.
Pairing Barcode Not Working
- Confirm that the scanner model is supported.
- Confirm that the correct protocol is selected.
- If requested, provide a valid Bluetooth address.
- Reopen the app and rescan the barcode.
Scanner Connects but Data Is Not Typed
- For enhanced modes, confirm the Zebra Scan-To-Connect keyboard is enabled and set as default (see Steps 7–10).
- Increase the Inter-character delay (for example 300 or 500 ms) and retest.
Wrong App Opens After Pairing
- Go to Settings.
- Disable Launch application after connection, or select the correct app.
Download STC Utility for Android
IMPORTANT
Zebra recommends using the latest release whenever possible.
To download the STC Utility for Android:
- Visit the Zebra Cordless Scan-To-Connect for Android download page and select the desired download(s).
- Proceed to the STC Utility for Android release notes for the version details.
To install the STC Utility for Android from Google Play, please visit the following.