Overview
The OPOS driver does not support any I/O functions directly to the scanner. However, the OPOS sample application exposes management access to an RSM-ready scanner through the Zebra Scanner SDK. Through the DirectIO feature, a POS application communicates directly with the underlying CoreScanner Service.
Information in this chapter is applicable to both scanner and scale devices.
DirectIO Methods
Syntax
LONG DirectIO(
    _In_ LONG   nCommand,
    _Inout_ LONG   *lpData,
    _Inout_ BSTR   *pbstrIOXML
);
DirectIO Method Parameters:
nCommand[in]: Commands to be executed by OPOS Service. Following are the possible values for this parameter.
enum DIO_Opcodes
{
    //Common for Scanner and Scale
    DIO_GET_SCANNERS = 1,
    DIO_RSM_ATTR_GETALL = 5000,
    DIO_RSM_ATTR_GET = 5001,
    DIO_RSM_ATTR_GETNEXT = 5002,
    DIO_RSM_ATTR_SET = 5004,
    DIO_RSM_ATTR_STORE = 5005,
    DIO_RTA_GET_SUPPORTED = 5500,
    DIO_RTA_REGISTER = 5501,
    DIO_RTA_UNREGISTER = 5502,
    DIO_RTA_GET_EVENT_STATUS = 5503,
    DIO_RTA_SET_EVENT_STATUS = 5504,
    DIO_RTA_SUSPEND = 5505,
    DIO_RTA_GETSTATE = 5506,

    // Scanner Specific
    DIO_SCANNER_UPDATE_FW_DAT = 5016,
    DIO_SCANNER_UPDATE_FW_PLUGIN = 5017,
    DIO_SCANNER_LOAD_CONFIG = 5020,

    //NCR Scanner
    NCR_DIO_SCANNER_TONE = 501,
    NCR_DIO_SCANNER_RESET = 502,
    NCR_DIO_SCANNER_STATUS = 503,
    NCR_DIO_SCANNER_DIRECT = 507,
    NCR_DIO_SCANNER_NOT_ON_FILE = 508,

  //NCR Scale
   NCR_DIO_SCALE_STATUS = 601,
   NCR_DIO_SCALE_LIVE_WEIGHT = 604,
   NCR_DIO_SCALE_DIRECT = 605
};
lpData: Indicates the CoreScanner Status. Refer to the Scanner SDK User's guide for CoreScanner status code description
pbstrIOXML: This value holds input and output arguments for the commands in XML format.
DirectIO Commands
DIO_GET_SCANNERS
This will retrieve all the scanners connected to the system and identified by CoreScanner service. No input XML is required for this command.
OutXml: This contains the raw XML string of all the connected scanners in the format:
<scanners>
    <scanner type="mode">
        <scannerID>id1</scannerID>
        <serialnumber>serial_number</serialnumber>
        <GUID>S_N:XXXXXXXXXXXXXXXXXXXXXX</GUID>
        <VID>vendor_id</VID>
        <PID>product_id</PID>
        <modelnumber>model_number</modelnumber>
        <DoM>date_of_manufacture</DoM>
        <firmware>firmware_version</firmware>
    </scanner>
</scanners>
DIO_RSM_ATTR_GETALL
This will retrieve a list of supported RSM attributes of a connected device. The Product Reference Guide specified for the connected scanner contains the definitions of all these attributes.
InXml
<inArgs>
    <scannerID>scanner_id</scannerID>
    <!-- ScannerID of one of the scanners which could be retrieved by executing DIO_GET_SCANNERS DirectIO command -->
</inArgs>
InOutXml: This contains the raw XML string of all the supported RSM attributes:
<outArgs>
    <scannerID>scanner_id</scannerID>
    <arg-xml>
        <modelnumber>DS8108-XXXXXXXXXXXX</modelnumber>
        <serialnumber>serial_number</serialnumber>
        <GUID>S_N:XXXXXXXXXXXXXXXXXXXXXXXXXX</GUID>
        <response>
            <opcode>5000</opcode>
            <attrib_list>
                <attribute name="">0</attribute>
                <attribute name="">1</attribute>
                <attribute name="">2</attribute>
                <attribute name="">3</attribute>
                <attribute name="">4</attribute>
                <attribute name="">5</attribute>
                ...
                ...
                <attribute name="">25102</attribute>
                <attribute name="">25103</attribute>
                <attribute name="">25104</attribute>
                <attribute name="">25105</attribute>
            </attrib_list>
        </response>
    </arg-xml>
</outArgs>
The value of each attribute in the returned XML list can be accessed using the DIO_RSM_ATTR_GET command.
NOTE: Calling this is not necessary if the attributes you wish to SET, or GET are known ahead of time.
DIO_RSM_ATTR_GET
This command can be used to retrieve scanner attribute information including value, data type, and permission. For more information, refer to the Zebra Scanner SDK for Windows Developer's Guide.
InXml
<inArgs>
    <scannerID>scanner_id</scannerID>
    <cmdArgs>
        <arg-xml>
            <attrib_list>attribute1[,attribute2,…,attributeN]</attrib_list>
            <!-- a list of scanner attribute numbers separated by commas -->
        </arg-xml>
    </cmdArgs>
</inArgs>
OutXml
<outArgs>
    <scannerID>scanner_id</scannerID>
    <arg-xml>
        <modelnumber>DS8108-XXXXXXXXXXX</modelnumber>
        <serialnumber>serial_number</serialnumber>
        <GUID>XXXXXXXXXXXXXXXXXXXXX</GUID>
        <response>
            <opcode>5001</opcode>
            <attrib_list>
                <attribute>
                <id>attribute1</id>
                <name></name>
                <datatype>F</datatype>
                <permission>RWP</permission>
                <value>True</value>
                </attribute>
            </attrib_list>
        </response>
    </arg-xml>
</outArgs>
DIO_RSM_ATTR_GETNEXT
This will retrieve the value of the next available attribute of the given attribute number. Refer to the Scanner SDK documentation for input XML for this command.
InXml
<inArgs>
    <scannerID>scanner_id</scannerID>
    <cmdArgs>
        <arg-xml>
            <attrib_list>3</attrib_list>
        </arg-xml>
    </cmdArgs>
</inArgs>
OutXml
<outArgs>
    <scannerID>scanner_id</scannerID>
    <arg-xml>
        <modelnumber>DS9208-XXXXXXXXXX</modelnumber>
        <serialnumber>XXXXXXXXXXXX</serialnumber>
        <GUID>S_N:XXXXXXXXXXXX</GUID>
        <response>
            <opcode>5002</opcode>
            <attrib_list>
                <attribute>
                    <id>4</id>
                    <name></name>
                    <datatype>F</datatype>
                    <permission>RWP</permission>
                    <value>True</value>
                </attribute>
            </attrib_list>
        </response>
    </arg-xml>
</outArgs>
DIO_RSM_ATTR_SET / DIO_RSM_ATTR_STORE
Sets (volatile, cleared after device reboot) or stores (non-volatile, retained after device reboot) attributes respectively, specified in the XML string given in the obj argument. No OutXml for these two commands.
InXml
<inArgs>
    <scannerID>scanner_id</scannerID>
    <cmdArgs>
        <arg-xml>
            <attrib_list>
                <attribute>
                    <id>rsm_attribute_number</id>
                    <datatype>valid_datatype</datatype>
                    <value>value_maching_datatype</value>
                </attribute>
            </attrib_list>
        </arg-xml>
    </cmdArgs>
</inArgs>
The following are the valid values:
- rsm_attribute_number: One of the scanners accepted, writeable attributes numbers.
- valid_datatype: A valid datatype character: F, B, W, D, A, S
- value_matching_datatype: A value that is consistent with the datatype and the datatype range. For example, 'F' is a 'Boolean' value that may be either 'false' or 'true'. A 'B' datatype is 'Byte' which ranges from 0-255.
For example, to disable UPC Code 128, the actual XML string passed into the obj argument would look this:
<inArgs>
    <scannerID>1</scannerID>
    <cmdArgs>
        <arg-xml>
            <attrib_list>
                <attribute>
                    <id>7</id>
                    <datatype>F</datatype>
                    <value>False</value>
                </attribute>
            </attrib_list>
        </arg-xml>
    </cmdArgs>
</inArgs>
DIO_SCANNER_LOAD_CONFIG
This command can be used to update the scanner configuration by specifying the relevant scannerID and the absolute file path, including the filename, created using 123Scan (.scncfg).
InXML:
<inArgs>
    <scannerID>1</scannerID>
    <cmdArgs>
        <arg-string>C:\DS8108 Config.scncfg</arg-string>
    </cmdArgs>
</inArgs>
OutXml: None. Instead of OutXml, DirectIO events with the following event types will be received.
- CONFIG_LOAD_START = 17
- CONFIG_LOAD_PROGRESS = 18
- CONFIG_LOAD_END = 19
Possible error scenarios are outlined below.
| Failure | Error Code |
|---|---|
| File does not exist | ERROR_INLVAID_CONFIG_FILE (601) |
| Incorrect extension | ERROR_INLVAID_CONFIG_FILE (601) |
| Self-hash failure | ERROR_INLVAID_CONFIG_FILE (601) |
| Incompatible device | ERROR_INCOMPATIBLE_CONFIG_FILE (602) |
| XML syntax validation failure | ERROR_CONFIG_FILE_SYNTAX_VALIDATION_FAILED (603) |
DIO_SCANNER_UPDATE_FW_DAT / DIO_SCANNER_UPDATE_FW_PLUGIN
This command can be used to update the scanner firmware by specifying the relevant scannerID and the absolute path of the firmware file (PLUGIN or DAT), including the filename.
InXML:
<inArgs>
    <scannerID>1</scannerID>
    <cmdArgs>
        <arg-string>C:\DS3678-STANDARD.SCNPLG</arg-string>
    <arg-int>2</arg-int>
    </cmdArgs>
</inArgs>
OutXml: None. Instead of OutXml, DirectIO events with the following event types will be received.
- SCANNER_UF_SESS_START = 11
- SCANNER_UF_DL_START = 12
- SCANNER_UF_DL_PROGRESS= 13
- SCANNER_UF_DL_END= 14
- SCANNER_UF_SESS_END= 15
- SCANNER_UF_STATUS= 16
Possible error scenarios are outlined below.
| Failure | Error Code |
|---|---|
| ERROR_FW_INVALID_DATFILE | Invalid firmware file (500) |
| ERROR_FW_UPDATE_FAILED_IN_SCN | FW Update failed in scanner (501) |
| ERROR_FW_READ_FAILED_DATFILE | Failed to read DAT file (502) |
| ERROR_FW_UPDATE_INPROGRESS | Firmware Update is in progress (cannot proceed another FW Update or another command) (503) |
| ERROR_FW_UPDATE_ALREADY_ABORTED | Firmware update is already aborted (504) |
| ERROR_FW_UPDATE_ABORTE | FW Update aborted (505) |
| ERROR_FW_SCN_DETTACHED | Scanner is disconnected while updating firmware (506) |
| ERROR_FW_UPDATE_NOT_SUPPORTED | Device doesn't support firmware update (507) |
| STATUS_FW_SWCOMP_RESIDENT | The software component is already resident in the scanner (600) |
NCR_DIO_SCANNER_NOT_ON_FILE
This command is used to execute the NCR “Not on File” tone pattern configured through Registry key value.
This registry key can only be configured for the device, not for the logical device. "Computer\HKEY_LOCAL_MACHINE\SOFTWARE\Zebra\Zebra Scanners\OPOS\Scanner" - NcrScanNOFPattern
NCR_DIO_SCANNER_RESET
This command is used to reset the device.
NCR_DIO_SCANNER_STATUS
This command is used to get the IBM USB status bytes of the scanner. Status bytes are given as a string.
NCR_DIO_SCANNER_DIRECT
This command is used to execute direct IO commands GetAll, Get, GetNext, Set and Store attributes directly without the corresponding direct IO command for these operations. Direct IO OpCode for these operations is passed as an attribute in the InXml.
InXml
<inArgs>
    <scannerID>scanner_id</scannerID>
    <opcode>5001</opcode>
    <cmdArgs>
        <arg-xml>
            <attrib_list>1</attrib_list>
        </arg-xml>
    </cmdArgs>
</inArgs>
OutXml
<?xml version="1.0" encoding="UTF-8"?>
<outArgs>
    <scannerID>scanner_id</scannerID>
    <arg-xml>
        <modelnumber>DS9208-XXXXXXXXXXX</modelnumber>
        <serialnumber>XXXXXXXXXXXXX</serialnumber>
        <GUID>S_N:XXXXXXXXXXXXXX</GUID>
        <response>
            <opcode>5001</opcode>
            <attrib_list>
                <attribute>
                    <id>1</id>
                    <name></name>
                    <datatype>F</datatype>
                    <permission>RWP</permission>
                    <value>True</value>
                </attribute>
            </attrib_list>
        </response>
    </arg-xml>
</outArgs>
NCR_DIO_SCALE_LIVE_WEIGHT
This command is used to get the live weight value of the scale. No need of providing an InOutXml argument.
NCR_DIO_SCALE_STATUS
This command is used to get the IBM USB status bytes of the scale. Status bytes are given as a string. No need of providing an InOutXml argument.
NCR_DIO_SCALE_DIRECT
This command is used to execute direct IO commands GetAll, Get, GetNext, Set and Store attribute directly without the corresponding direct IO command for these operations. Direct IO OpCode for these operations is passed as an attribute in the InXml.
InXml
<inArgs>
    <scannerID>scanner_id</scannerID>
    <opcode>5001</opcode>
    <cmdArgs>
        <arg-xml>
            <attrib_list>34</attrib_list>
        </arg-xml>
    </cmdArgs>
</inArgs>
OutXml
<outArgs>
    <scannerID>scanner_id</scannerID>
        <arg-xml>
        <modelnumber>DS9208-XXXXXXXXXXX</modelnumber>
        <serialnumber>XXXXXXXXXXXXXXX  </serialnumber>
        <GUID>S_N:XXXXXXXXXXXXXXXXXXXX</GUID>
        <response>
        <opcode>5001</opcode>
            <attrib_list>
                <attribute>
                    <id>34</id>
                    <name></name>
                    <datatype>B</datatype>
                    <permission>RWP</permission>
                    <value>1</value>
                </attribute>
            </attrib_list>
        </response>
    </arg-xml>
</outArgs>
Real Time Alerts (RTA)
Real Time Alerts (RTA) are preselected events that are monitored by a scanner device. When a selected statistic has reached a specified value or when a selected event occurs, it is then reported by the scanner device to the host as an alert.
For more information, see Real Time Alerts (RTA) Developer Guide
The OPOS driver uses Direct IO commands to configure the Real Time Alerts feature in the scanner or cradle device, and it uses Direct IO events to receive notifications when an RTA event is sent by the scanner.
For more information on InXmls and OutXmls, refer to RTA opcodes in Using the Methods (Examples).
Return Value
If the function succeeds, the return value will be OPOS_SUCCESS. Else other relevant OPOS result codes defined in UPOS Specification will return.
Using OPOS Sample Application to send DirectIO Commands
DirectIO operations can be done using the panel highlighted in red, as shown in the screenshot given below.
The required DirectIO command can be selected from the drop-down list named as the Command.
The OutXML corresponding to the selected DirectIO command can be retrieved by clicking on the Execute button.
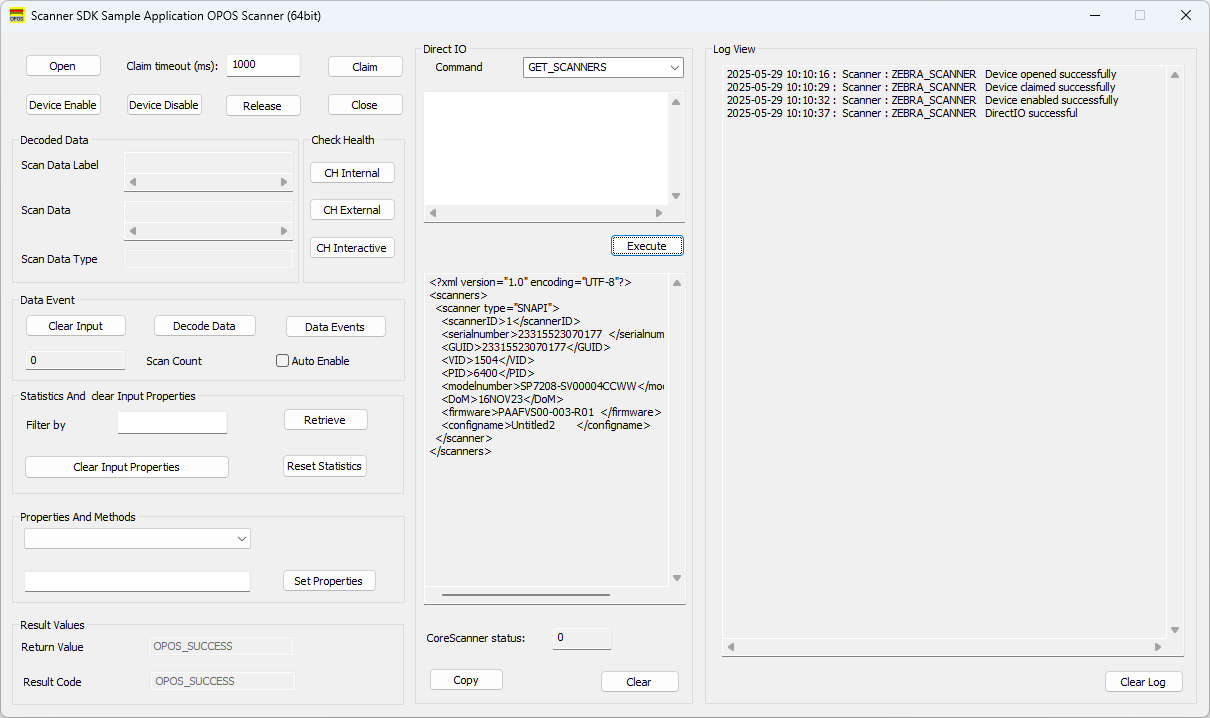 Figure 1: OPOS Sample Application - DirectIO Command Execution
To send Direct I/O commands using the OPOS sample application:
- Connect a Zebra scanner and switch to a management-enabled host mode such as IBM OPOS, IBM Hand-held, IBM Table-top, or SNAPI.
- Open the OPOS sample application for Scanner.
- Click Open and select ZEBRA_SCANNER as the service object name.
- Click Claim.
To retrieve a list of all the scanners connected to the PC:
- Select DIO_GET_SCANNERS as DirectIO opcode from the Direct I/O section.
- Click Execute. The Direct I/O OutXml text box populates with XML with all the attached scanners.
To retrieve all attributes available in the scanner:
- Select DIO_RSM_ATTR_GETALL as DirectIO opcode from Direct I/O section.
- In the Direct I/O InXml text box, change the value of the ScannerID XML element to the scannerID from which you want to retrieve attributes. Use the GET_SCANNER command to find available ScannerIDs.
- Click Execute. The Direct I/O OutXml text box populates with XML with attribute numbers of all supported attributes.
To retrieve more information for an attribute:
- Select DIO_RSM_ATTR_GET as DirectIO opcode from the Direct I/O section.
- In the Direct I/O InXml text box, change the value of the ScannerID XML element to the required scanner ID, and enter a comma-separated list of attribute numbers as the value of attrib_list.
- Click Execute. The Direct I/O OutXml text box populates with XML containing a list of attributes with values and other attribute-related details.
To temporarily set or permanently store the value of an attribute:
- Select DIO_RSM_ATTR_SET or DIO_RSM_ATTR_STORE as DirectIO opcode from the Direct I/O section.
- In the Direct I/O InXml text box, change the value of the ScannerID XML element to the required scanner ID and change the values of data_type and the value XML elements accordingly as obtained by executing the command DIO_RSM_ATTR_GET.
- Click Execute. For these Direct I/O op-codes, an OutXml does not populate.
Upon executing each opcode, the CoreScanner Status field populates with the status of the underlying CoreScanner driver. Any value other than 0 indicates an error.