About Color Camera SDK for Windows

Overview

This document provides installation and programming information that allow MP7 color camera enabled application development for Windows.


Supported Devices

For the compatible devices list, please visit following page.

https://www.zebra.com/us/en/support-downloads/software/developer-tools/bioptic-color-camera-sdk-for-windows.html

Supported Windows Operating System

Color Camera SDK for Windows supports the following Windows versions.

  • Windows 10 64bit

Version History

Version 1.00.0026 - 10/2026

  1. Bug Fix - Fixed an issue with delayed opening of the Camera SDK C++ sample application.
  2. Bug Fix - Fixed an issue saving a configuration file that generated a file name with extra spaces.

Version 1.00.0025 - 06/2026

  1. Bug Fix - Addressed a packaging issue to ensure the correct header files are now included in the installation.

Version 1.00.0024 - 04/2026

  1. Bug Fix - Minor sample app fix - Fixed an issue where the C# sample application did not close when the Cancel button was pressed in the error dialog.
  2. Bug Fix - Minor sample appfix - Fixed an issue where the C# sample application would freeze after a firmware update.
  3. Bug Fix - Minor sample app fix - Fixed an issue where a firmware update would fail with an "Install Camera Firmware in Progress" error when two instances were opened with two Camera devices.
  4. Bug Fix - Minor sample app fix - Fixed an issue in the C++ sample application where clicking the Reboot button multiple times during a reboot caused additional reboots and an application freeze.
  5. Bug Fix - Minor sample app fix - Fixed an issue where the text box displayed an incorrect status for Red Illumination Detection in the C# and C++ applications.

Version 1.00.0023 - 01/2026

  1. Bug Fix - Minor sample app fix - Resolved an issue where the device awake indicator remained active after reopening the application in the Camera SDK C# sample application.
  2. Bug Fix - Addressed mismatched application versions across Camera SDK applications in both C# and C++.
  3. Bug Fix - Minor sample app fix - Resolved an issue where changing the image format to JPEG did not persist after writing to flash and reverted to BMP in both C# and C++ applications.
  4. Bug Fix - Minor sample app fix - Ensured the weight data clears from the weight data box upon clicking the "Clear" button in both C# and C++ applications.
  5. Bug Fix - Resolved an issue where the SDK processed image data for decode data incorrectly, leading to exceptions in the Camera SDK.

Version 1.00.0021 - 07/2025

  1. Exposed 'IsRedIlluminationPresent' API to detect the presence of red spots in the captured image frames.
  2. Exposed 'GetFrame' API for the user to request adjacent frames of a given frame.
  3. Bug Fix - Fixed an issue causing corrupted image output.
  4. Bug Fix - Minor sample app fix - Fixed an issue with the produce event displaying incorrect weight unit information in the C++ sample application.
  5. Bug Fix - Minor sample app fix - Fixed an intermittent issue on saving multiple images with the same name in C# sample application.
  6. Bug Fix - Resolved the issue of decode events not getting triggered for SP72 device.

Version 1.00.0020 - 03/2025

  1. Added a new event to monitor and update the status of image events continuously streamed from camera (if registered) to the end-user application.

Version 1.00.0019 - 12/2024

  1. Bug Fix - Fixed issue on camera SDK logging, where only 1 log file was created during camera operations although multiple log file creation was configured in the log configurations.
  2. Bug Fix - Fixed incorrect display of weight data in the Camera SDK Sample Application for C#.

    NOTE: On Windows 10 OS version 10.0.17763.1 - Due to the USB composite device driver (Usbccgp.sys) in Windows 10.0.17763.1, capturing snapshots from the Camera SDK could produce 0-byte images. This issue can be resolved by upgrading to a newer Windows OS version.

Version 1.00.0017 - 07/2024

  1. Added support for SP72XX and MP72XX.
  2. Added support to discover and configure multiple color camera models (i.e. PIDs for various MP72XX models).
  3. Added produce weight data support for C# and C++ sample applications.
  4. Improved device enumeration speed in the SDK when discovering devices with multiple PIDs.
  5. Bug Fix - Fixed decode data offset configuration to prevent missing barcodes when rapidly scanned.

Version 1.00.0016 - 04/2024

  1. Code base updated (migrated) to Visual Studio 2019 from Visual Studio 2017.
  2. Bug Fix - Fixed an issue in the Camera SDK Sample application to prevent image resolution-related changes when background detection is in progress. An error message is shown if image resolution is modified while background detection is taking place.

Version 1.00.0015 - 01/2024

  1. Added logging capabilities to the SDK, using spdlogs for camera SDK modules.
  2. Bug Fix - Now the SDK prevents a firmware update with an invalid DAT file path.
  3. Bug Fix - Addressed an intermittent crash in UVC adapter when retrieving snapshot image frames.

Version 1.00.0013 - 06/2020

  1. Initial release.

Getting Started with the Bioptic Color Camera

Overview

This provides step-by-step instructions to import the Color Camera SDK module and build Windows 10/Window 7 SP1 applications to work with the MP7 Color Camera.

The Color Camera SDK supports building C++ applications with C++11 standard or above. To build C++ applications for Windows 10/Window 7(SP1) use Visual Studio 2017 or later.

The SDK includes a COM wrapper DLL (camera_sdk.dll) that enables development of C# MP7 Color Camera applications. C++/C# sample applications show how to access the camera SDK in C++/.Net.


Creating Color Camera SDK Windows Applications

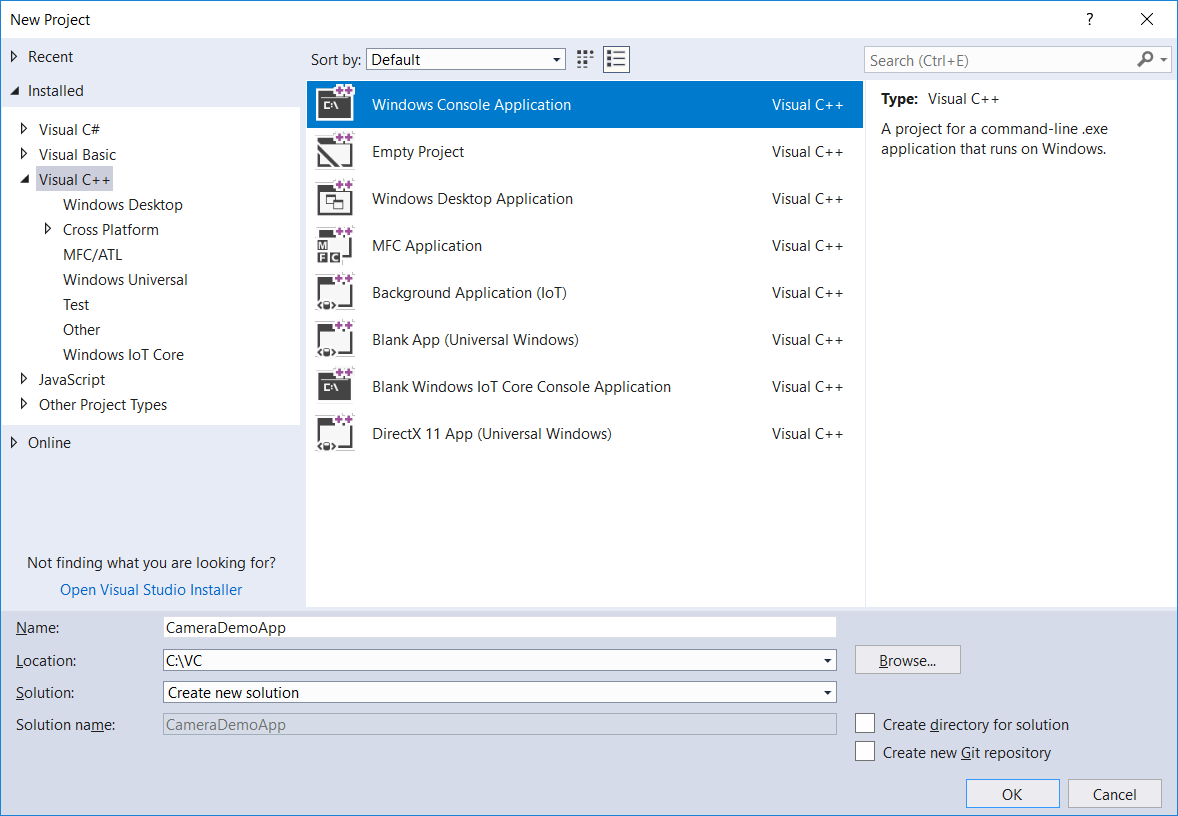
To create a VC++ Windows Project in Visual Studio 2017:

  1. Start Visual Studio 2017->Select File → New → Project → Visual C++, create a new Windows Console Application project and follow the on-screen steps in Visual Studio.

    Figure 1: Create New Project
  2. Add the Camera SDK include directories to the project. Select Project → Properties → Configuration Properties → C++, in "Additional Include Directories" specify the path of the Camera SDK include directory (C:\Program Files (x86)\Zebra Technologies\Barcode Scanners\Bioptic Camera\SDK\include) sub folders:

    • camera_sdk\inc
    • device_manager\inc
    • camera_sdk\firmware_update
    • image_converter
    Figure 2: Camera SDK include Folders Specification
  3. Add the Camera SDK library directory to the project. Select Project → Properties → Configuration Properties → Linker, in "Additional Library Directories" specify the path of the Camera SDK lib folder (C:\Program Files (x86)\Zebra Technologies\Barcode Scanners\Bioptic Camera\SDK\Release\lib\x86) where the device_manager.lib, image_converter.lib and zebracam.lib lib files are located. (Note: for debug projects use the SDK debug libs path).

    Figure 3: Camera SDK Libs
  4. Add the Camera SDK library files to the project. Select Project → Properties → Configuration Properties → Linker → Input, in "Additional Dependencies" specify the Camera SDK libs:

    • device_manager.lib
    • devicewatcher.lib
    • image_converter.lib
    • zebracam.lib
    • uvc_adapter.lib
    • devmgr_adapter.lib
    Figure 4: Camera SDK Lib Files Specifications
  5. The Camera SDK requires the following include files:

    
    #include "device_manager.h"
    #include "device_manager_types.h"
    #include "zebra_camera.h"
    #include "zebra_camera_manager.h"
    #include "camera_types.h"
    #include "image_converter.h";  
    
    
  6. Import the following namespaces into the application to access the Camera SDK.

    
    using namespace zebra;
    using namespace camera_sdk;
    using namespace image;
    
    
  7. Build the camera application.

    Figure 5: Example Camera SDK Sample Application

Building and Running Project

Before building/running make sure the following Camera SDK dll files are in the target application folder:

  • device_manager.dll
  • zebracam.dll
  • image_converter.dll
  • devmgr_adapter.dll
  • uvc_adapter.dll

When the application is built and run attach the MP7 Camera (attach/detach events are notified).

Figure 6: Example Camera SDK Sample Application

NOTE : Make sure the specified DLLs are present in the target application folder.


Color Camera SDK Developer Guide

Overview

This section provides detailed information about how to use various functionalities of the Color Camera SDK to develop applications.

The Color Camera SDK allows Windows applications to be developed that communicate with the MP700 color camera.

The SDK provides an API that can be used by external applications to manage and control the camera specific functionality of a connected MP7 Color Camera over USB. The SDK allows camera configuration (setting/getting specific UVC camera properties), capturing snapshot images and streaming of camera video. Specific decode-image and related metadata (decode data) can also be retrieved using the SDK. The Camera SDK COM wrapper object allows calling the Camera SDK API from COM client applications. This COM wrapper supports multi-client communication with multiple cameras.


Basics

The Color Camera SDK provides the ability to manage camera connections (via the device manager class), perform various operations with connected cameras, configure connected cameras and retrieve information related to connected cameras via the ZebraCamera class.

Camera functionality is defined under the camera_sdk namespace. The application uses the ZebraCamera class to interact with a camera.

The DeviceManager class is used to register for device notification events to discover cameras (detect camera attach/detach events). The ZebraCameraManager class is used to manage connected cameras, create a connection to a specific camera, update firmware, reboot a specific camera.

If method calls fail, the corresponding method throws an exception. It is recommended to call all API methods in try-catch blocks for handling exceptions.


Camera Management

Camera DiscoveryCamera discovery is the first step to communicate with a zebra camera. Create a DeviceManager instance as follows:


#include "device_manager.h"
#include "device_manager_types.h"

using namespace zebra;

DeviceManager device_manager;           // Creating device manager

AttachedListener attached_listener;     // Create attached listener
DettachedListener detached_listener;    // Create detached listener

device_manager.AddDeviceAttachedListener(attached_listener);
device_manager.AddDeviceDetachedListener(detached_listener);

This registers callback functions that are notified when a Zebra MP7 camera is attached/detached. The callback event handler implementation is given below:


vector<DeviceInfo>device_list;
class AttachedListener :public DeviceAttachedListener
{
    public:
        void Attached(DeviceInfo dev_info) override
        { 
            device_list.push_back(dev_info);
            std::cout << "Device attached" << std::endl;
        }
};

class DettachedListener : public DeviceDetachedListener
{
    public:
        void Detached(DeviceInfo dev_info) override
        { 
            std::cout << "Device detached" << std::endl;
        }
}; 


To unregister from device notification:


// Remove device listeners
device_manager.RemoveDeviceAttachedListener(attached_listener);
device_manager.RemoveDeviceDetachedListener(detached_listener);

Camera Object Creation

To create a camera object, use a ZebraCameraManager instance and call the CreateZebraCamera method with the DeviceInfo object of the corresponding camera to connect (camera DeviceInfo objects are returned by calling EnumerateDevices). The DeviceInfo object received with the device attach event can also be used to create a camera object.


#include "device_manager.h"
#include "device_manager_types.h"
#include "zebra_camera.h"
#include "zebra_camera_manager.h"
#include "camera_types.h"

using namespace zebra;
using namespace camera_sdk;

ZebraCameraManager camera_manager;
DeviceManager device_manager;

vector <DeviceInfo> device_list = device_manager.EnumerateDevices();

auto camera = camera_manager.CreateZebraCamera(device_list[0]);

// Call camera specific functionality
std::cout << "Brightness:" << camera->Brightness.Value() << std::endl;


Camera Object Functionality

Camera Information

The following information is provided via camera object methods.

  • Model Number
  • Serial Number
  • Date of Manufacture
  • Date of First Program
  • First Service Date
  • Firmware Version
  • Hardware Version
  • Supported Frame Types
  • Current Frame Type

Camera Properties

The following properties are configurable using the camera object.

  • Brightness
  • Contrast
  • Saturation
  • Sharpness
  • Gamma
  • White Balance Component
  • Backlight Compensation
  • Gain
  • Absolute Exposure Time
  • Video Mode Setting
  • Illumination Mode Setting
  • Power User Mode Setting

Retrieving Camera Information


// Get Camera Information
std::cout << "Serial Number : " << camera->GetSerialNumber() << std::endl;
std::cout << "Model Number : " << camera->GetModelNumber() << std::endl;
std::cout << "Firmware Version : " << camera->GetFirmwareVersion() << std::endl;
std::cout << "Date of First Service : " << camera->GetFirstServiceDate() << std::endl;
std::cout << "Date of Manufacture : " << camera->GetDateOfManufacture() << std::endl;
std::cout << "Date of First Program : " << camera->GetDateOfFirstProgram() << std::endl;
std::cout << "Hardware Version : " << camera->GetHardwareVersion() << std::endl;

Retrieving Camera Properties


// Call camera specific functionality
std::cout << "Brightness:" << camera->Brightness.Value() << std::endl;
std::cout << "Contrast:" << camera->Contrast.Value() << std::endl;
std::cout << "Saturation:" << camera->Saturation.Value() << std::endl;
std::cout << "Sharpness:" << camera->Sharpness.Value() << std::endl;
std::cout << "Gamma:" << camera->Gamma.Value() << std::endl;

Setting Camera Properties


// Get camera specific property (brightness)
int16_t minVal = camera->Brightness.Minimum();
int16_t maxVal = camera->Brightness.Maximum();
int16_t defVal = camera->Brightness.Default();

int16_t  newVal = minVal + 1;       // New value

camera->Brightness.Value(newVal);   // Set new value

Camera Object SDK Methods/Properties

Table 1: Methods and Properties

Method/Property Description
GetSerialNumber Get camera serial number
GetModelNumber Get camera model number
GetDateOfManufacture Get date of manufacture
GetDateOfFirstProgram Get date of first program
GetFirstServiceDate Get date of first service
GetFirmwareVersion Get camera firmware version
GetHardwareVersion Get camera hardware version
GetSupportedFrameTypes Get supported frame types
GetCurrentFrameType Get current frame type (frame format : YUY2/UYVY, width, height, frame rate)
Brightness Set/Get camera Brightness property
Contrast Set/Get camera Contrast property
Saturation Set/Get camera Saturation property
Sharpness Set/Get Sharpness property
Gamma Set/Get Gamma property
WhiteBalanceComponent Set/Get White Balance Component property
BacklightCompensation Set/Get Backlight Compensation property
Gain Set/Get Gain property
AbsoluteExposureTime Set/Get Absolute Exposure Time property (seconds)
VideoModeSetting

Set/Get Video Mode property

  • OFF: Color camera will not generate video frames
  • WAKEUP: Color camera generates video frames when MP7 is woken up (default)
  • CONTINUOUS: Color camera always generates video frames
IlluminationModeSetting

Set/Get Illumination Mode property

  • STANDARD: Standard Illumination mode (default)
  • ALWAYS : Illumination always on
  • ON,ALWAYS_OFF: Illumination always off
PowerUserModeSetting

Set/Get Power User Mode property

  • DISABLE / ENABLE : When Power User Mode is enabled Gain/White Balance Component/ White Balance Component (Auto) /Gamma are disabled.
CaptureSnapshot Capture Snapshot Image
SetDefaults Set camera parameters to default values
AddContinuousImageEventListener Add listener for continuous image events
RemoveContinuousImageEventListener Remove listener for continuous image events
AddSnapshotImageEventListener Add listener for snapshot-image events
RemoveSnapshotImageEventListener Remove listener for snapshot-image events
AddProduceImageEventListener Add listener for produce-image events
RemoveProduceImageEventListener Remove listener for produce-image events
AddDecodeImageEventListener Add listener for decode-image events (generated when barcode scanned)
RemoveDecodeImageEventListener Remove listener for decode-image events
AddDecodeSessionStatusChangeEventListener Add listener for decode-session-status-change events
RemoveDecodeSessionStatusChangeEventListener Remove listener for decode-session-status-change events

Managing Events

Applications can register for one or more events, to be notified when it occurs. There are several types of events:

Table 2: Events

Event Description
ContinuousImageEvent Event notifying continuous image events.
SnapshotImageEvent Event notifying snapshot image events, triggered when CaptureSnapshot method called or when camera snapshot button pressed on MP7.
ProduceImageEvent Event notifying produce-image events. Image event triggered when weight placed on MP7.
DecodeImageEvent Event notifying decode-image events. Image event triggered when barcode scanned with MP7. (decode data is available as metadata provided in callback event arguments).
DecodeSessionStatusChangeEvent Event notifying decode-session-status-change events. Decode-Session-Status-Change event triggered when barcode detection started/stopped in field of view of MP7.

Image Events

Image events returns the following image data structure:


ImageEventData.ImageFormat  - Image formats: RGB,YUY2,UYVY
ImageEventData.image        - raw image buffer

Image events also return an additional image meta data structure that contain image number and additional information such as decode data (for decode image events).

Continuous Image Event Notification

Continuous image events are fired whenever image frames are available from the MP7 color camera. To trigger events call AddContinuousImageEventListener with event handler object, and set VideoModeSetting to CONTINUOUS. The following example shows how to receive continuous image events.

Create an image event handler class to receive event notifications:


// Continuous image event handler class
class ContinuousImageEventObserver : public ContinuousImageEventListener {
    public:
        void ImageReceived(ImageEventData ev, ImageEventMetaData meta_data) {
            printf("width=%d, height=%d\r\n", ev.image.width, ev.image.height);
        }
    };

Register for continuous image events to receive notifications:


// Set Video Mode to continuous
camera->VideoModeSetting.Value(VideoMode::CONTINUOUS);
ContinuousImageEventObserver continuous_image_event_observer;

// Register for continuous image event notification
camera->AddContinuousImageEventListener(continuous_image_event_observer);
std::cout << "Capturing video...." << std::endl;

//Wait for video stream capture
getchar();

Derive from ContinuousImageEventListener and implement the ImageReceived callback in the image event handler. The image event triggered returns the image data (and attributes: width/height).

Image Conversion and Saving

Use the Image Converter Encode API to convert the returned image buffer stream to a JPEG/BMP. The Encode method can be used to convert returned image data to a bitmap or jpeg buffer (that can be written to a file) as shown below:


// Continuous image event handler class
class ContinuousImageEventObserver : public ContinuousImageEventListener {
    public:
        void ImageReceived(ImageEventData ev, ImageEventMetaData meta_data) {
            printf("width=%d, height=%d\r\n", ev.image.width, ev.image.height);
            std::vector<uint8_t> bmp_image_buffer = Encode(FileConverter::YUY2_TO_BMP, ev.image);
            std::ofstream bmp_image_file_stream("outputImage.bmp", std::ios_base::binary);
            bmp_image_file_stream.write((const char*)&bmp_image_buffer[0], bmp_image_buffer.size());
            bmp_image_file_stream.close();
            std::vector<uint8_t> jpeg_image_buffer = Encode(FileConverter::YUY2_TO_JPEG, ev.image);
            std::ofstream jpeg_image_file_stream("outputImage.jpeg", std::ios_base::binary);
            jpeg_image_file_stream.write((const char*)&jpeg_image_buffer[0], jpeg_image_buffer.size());
            jpeg_image_file_stream.close();
        }
    };

Snapshot Image Event Notification

Snapshot image event gets fired when the user presses the camera snapshot button on the MP7000. The following example shows how to receive/save snapshot image events.

Create an image event handler class to receive snapshot event notifications:


// Snapshot image event handler class
class SnapshotImageEventObserver : public SnapshotImageEventListener {
    public:
        void ImageReceived(ImageEventData ev, ImageEventMetaData md) {
            printf("Snapshot Event Triggered: width=%d, height=%d\r\n",ev.image.width,ev.image.height);
            std::vector<uint8_t> bmp_image_buffer = Encode(FileConverter::YUY2_TO_BMP, ev.image);
            std::ofstream bmp_image_file_stream("outputImage.bmp", std::ios_base::binary);
            bmp_image_file_stream.write((const char*)&bmp_image_buffer[0], bmp_image_buffer.size());
            bmp_image_file_stream.close();
            std::vector<uint8_t> jpeg_image_buffer = Encode(FileConverter::YUY2_TO_JPEG, ev.image);
            std::ofstream jpeg_image_file_stream("outputImage.jpeg", std::ios_base::binary);
            jpeg_image_file_stream.write((const char*)&jpeg_image_buffer[0], jpeg_image_buffer.size());
            jpeg_image_file_stream.close();
        }
};

Register for snapshot image events to receive notifications:


//Register for snapshot image event notification
SnapshotImageEventObserver snapshot_image_event_observer;
camera->AddSnapshotImageEventListener(snapshot_image_event_observer);
std::cout << "Capturing Snapshot (press MP7 snapshot button) ..." << std::endl;

//Wait for snapshot image event
getchar();

Derive from SnapshotImageEventListener and implement the ImageReceived callback in the image event handler. The image event triggered returns the image data (and attributes: width/height).

Decode Image Event Notification

Decode image event is fired when the MP7000 performs a barcode decode. The decode image event contains a color image of the item scanned. The image event meta data contains the corresponding barcode decode data (Note: decode data returned is limited to a maximum of 25 characters). The following example shows how to receive/save decode image events.

Create an image event handler class to receive decode event notifications:


// Decode image event handler class
class DecodeImageEventObserver : public DecodeImageEventListener {
    public:
        void ImageReceived(ImageEventData ev, ImageEventMetaData md) {
            printf("Decode Event Triggered: width=%d, height=%d\r\n",ev.image.width,ev.image.height);
            printf("Image Number :%d\r\n", md.image_number);
            printf("Decode Data :%s\r\n", md.decode_data.c_str());

            std::vector<uint8_t> bmp_image_buffer = Encode(FileConverter::YUY2_TO_BMP, ev.image);
            std::ofstream bmp_image_file_stream("outputImage.bmp", std::ios_base::binary);
            bmp_image_file_stream.write((const char*)&bmp_image_buffer[0], bmp_image_buffer.size());
            bmp_image_file_stream.close();

            std::vector<uint8_t> jpeg_image_buffer = Encode(FileConverter::YUY2_TO_JPEG, ev.image);
            std::ofstream jpeg_image_file_stream("outputImage.jpeg", std::ios_base::binary);
            jpeg_image_file_stream.write((const char*)&jpeg_image_buffer[0], jpeg_image_buffer.size());
            jpeg_image_file_stream.close();

            // Retrieve decode data
            string decode_data = md.decode_data;
        }
};

Register for decode image events to receive notifications:


//Register for decode image event notification
DecodeImageEventObserver decode_image_event_observer;
camera->AddDecodeImageEventListener(decode_image_event_observer);
std::cout << "Scan barcode to trigger decode image event ..." << std::endl;

//Wait for decode image event
getchar();

Derive from DecodeImageEventListener and implement the ImageReceived callback in the image event handler. The image event triggered returns the image data (and attributes: width/height). The decoded barcode data that corresponds to the decode image event can be retrieved using returned metadata.

Produce Image Event Notification

Produce event gets fired when the MP7000 scale detects a non-zero stable weight on the platter. The following example shows how to receive/save produce-image events.

Create an image event handler class to receive produce-image event notifications:


// Produce image event handler class
class ProduceImageEventObserver : public ProduceImageEventListener {
    public:
        void ImageReceived(ImageEventData ev, ImageEventMetaData md) {
            printf("Produce Event Triggered: width=%d, height=%d\r\n", ev.image.width, ev.image.height);
            std::vector<uint8_t> bmp_image_buffer = Encode(FileConverter::YUY2_TO_BMP, ev.image);
            std::ofstream bmp_image_file_stream("outputImage.bmp", std::ios_base::binary);
            bmp_image_file_stream.write((const char*)&bmp_image_buffer[0], bmp_image_buffer.size());
            bmp_image_file_stream.close();
            std::vector<uint8_t> jpeg_image_buffer = Encode(FileConverter::YUY2_TO_JPEG, ev.image);
            std::ofstream jpeg_image_file_stream("outputImage.jpeg", std::ios_base::binary);
            jpeg_image_file_stream.write((const char*)&jpeg_image_buffer[0], jpeg_image_buffer.size());
            jpeg_image_file_stream.close();
        }
};

Register for produce-image events to receive notifications:


//Register for produce image event notification
ProduceImageEventObserver produce_image_event_observer;
camera->AddProduceImageEventListener(produce_image_event_observer);
std::cout << "Place weight on MP7 to trigger produce image event ..." << std::endl;

//Wait for produce-image event
getchar();

Derive from ProduceImageEventListener and implement the ImageReceived callback in the image event handler. The image event triggered returns the image data (and attributes: width/height).

Decode Session Event Notification

When barcode detection is started in the field of view of the Bioptic/MP7 the Decode Session Start event is triggered, and when barcode detection ends in the field of view the Decode Session End event is triggered by the Camera SDK. The following example shows how to programmatically detect Decode Session Start/End events.


DecodeSessionStatusChangeEventHandler* decode_session_status_change_event_handler_ = nullptr;
decode_session_status_change_event_handler_ = new DecodeSessionStatusChangeEventHandler(this);

// Register for decode session status change events
camera_->AddDecodeSessionStatusChangeEventListener(*decode_session_status_change_event_handler_);

// Wait for trigger of decode session events …

// Unregister for decode session status change events
camera_->RemoveDecodeSessionStatusChangeEventListener(*decode_session_status_change_event_handler_);


// Class to handle decode session status change events
class DecodeSessionStatusChangeEventHandler :public DecodeSessionStatusChangeEventListener
{
    public:
        void DecodeSessionStatusChanged(DecodeSessionStatus status)
        {
            if (status == DecodeSessionStatus::DECODE_SESSION_START)
            {
                std::cout << "Decode Session Start event triggered" << std::endl;
            }
            else if (status == DecodeSessionStatus::DECODE_SESSION_END)
            {
                std::cout << "Decode Session End event triggered" << std::endl;
            }
        }
};

Set Defaults

Reset camera parameters to defaults by calling the SetDefaults method as follows:


// Set Defaults 
camera->SetDefaults();

Capture Snapshot

To trigger snapshot image event programmatically, call the CaptreSnapshot method as follows:


// Capture Snapshot Image 
camera->CaptureSnapshot();

Device Management

The DeviceManager class methods can be used to discover connected cameras and receive notification of MP7 camera attach/detach events (see previous “Camera Discovery” section of document). Connected cameras can be retrieve as follows:


DeviceManager device_manager;       // Creating device manager

// Enumerate device list 
auto device_list= device_manager.EnumerateDevices();
getchar();

Reboot Camera

The following example shows how to programmatically reboot the MP7 Camera. The Reboot method is a blocking call, the calling thread blocks until the camera gets rebooted. This method has a parameter that defines the timeout for the blocking call.


ZebraCameraManager camera_manager;  // Create camera manager object

// Reboot the specified camera 
camera_manager.Reboot(camera, 10000);

Load Configuration

The following example shows how to programmatically load a settings configuration string to the camera. Following is the sample setting XML:


<cameraconfig>
    <metadata>
        <modelnumber>XXXXXXXXXXXXXXXXXX</modelnumber>
        <serialnumber>XXXXXXXXXXXXXXXX</serialnumber>
        <firmware>CAAERS00-001-N21</firmware>
        <hardwareversion>1</hardwareversion>
    </metadata>
    <attrib_list>
        <attribute>
            <id>8194</id>
            <name>Brightness</name>
            <value>8</value>
        </attribute>
        <attribute>
            <id>8195</id>
            <name>Constrast</name>
            <value>10</value>
        </attribute>
        <attribute>
            <id>8199</id>
            <name>Saturation</name>
            <value>8</value>
        </attribute>
        <attribute>
            <id>8200</id>
            <name>Sharpness</name>
            <value>4</value>
        </attribute>
        <attribute>
            <id>8201</id>
            <name>Gamma</name>
            <value>25</value>
        </attribute>
        <attribute>
            <id>8204</id>
            <name>White alance</name>
            <value>
                <red>3469</red>
                <blue>11735</blue>
            </value>
        </attribute>
        <attribute>
            <id>8193</id>
            <name>Backlight</name>
            <value>10</value>
        </attribute>
        <attribute>
            <id>8196</id>
            <name>Gain</name>
            <value>3</value>
        </attribute>
        <attribute>
            <id>2052</id>
            <name>Absolute Exposure Time</name>
            <value>-10</value>
        </attribute>
        <attribute>
            <id>32769</id>
            <name>Video Mode</name>
            <value>2</value>
        </attribute>
        <attribute>
            <id>32770</id>
            <name>Illumination Mode</name>
            <value>0</value>
        </attribute>
    </attrib_list>
</cameraconfig>

To persist configuration, set the persist parameter to true.


ZebraCameraManager camera_manager;  // Create camera manager object
string config_xml;
// Load configuration settings xml file as string 
config_xml = …
// Load configuration file to camera 
zebra_camera_manager.LoadConfiguration(camera, config_xml, true);

Retrieve Configuration

The following example shows how to programmatically retrieve a xml settings configuration string from the camera.


ZebraCameraManager camera_manager;  // Create camera manager object
string config_xml;

// Retrieve configuration file from camera 
config_xml= zebra_camera_manager.RetrieveConfiguration(camera);

Firmware Update

The following example shows how to update firmware of the MP7 Camera, and receive firmware download status events. To register for firmware download notification events call AddFirmwareDownloadEventListener with corresponding event handler object.


bool session_stop = false;
// Firmware event handler class
class FirmwareEventHandler :public FirmwareDownloadEventListener
{
    void EventReceived(FirmwareDownloadEventsArgs event_args) override
    {
        if (event_args.GetOperationCode() == FirmwareDownloadEventsArgs::OperationCode::kSessionStart)
        {
            std::cout << "[FirmwareDownloadEvent][SessionStart]" << std::endl;
        }
        if (event_args.GetOperationCode() == FirmwareDownloadEventsArgs::OperationCode::kDownloadStart)
        {
            std::cout << "[FirmwareDownloadEvent][DownloadStart]" << std::endl;
        }
        if (event_args.GetOperationCode() == FirmwareDownloadEventsArgs::OperationCode::kProgress)
        {
            std::cout << "[FirmwareDownloadEvent][Progress]" << to_string(event_args.GetCurrentRecord()) << "/" << to_string(event_args.GetTotalRecords()) << std::endl;
        }
        if (event_args.GetOperationCode() == FirmwareDownloadEventsArgs::OperationCode::kDownloadEnd)
        {
            std::cout << "[FirmwareDownloadEvent][DownloadEnd]" << std::endl;
        }
        if (event_args.GetOperationCode() == FirmwareDownloadEventsArgs::OperationCode::kSessionStop)
        {
            std::cout << "[FirmwareDownloadEvent][SessionStop]" << std::endl;
            session_stop = true;
        }
    }
};

To start firmware download call DownloadFirmware with the corresponding firmware file. (firmware update progress is reported).


ZebraCameraManager camera_manager;  // Create camera manager object
//Firmware update event handler
FirmwareEventHandler firmware_event_handler;
//Register for firmware download events
camera_manager.AddFirmwareDownloadEventListener(firmware_event_handler);
std::string firmware_file("CAAERS00-001-N15D0.DAT");
//Start firmware download
camera_manager.DownloadFirmware(camera, firmware_file);
// Wait for session end
std::chrono::system_clock::time_point startTime = std::chrono::system_clock::now();
while (session_stop == false)
{
    this_thread::sleep_for(std::chrono::milliseconds(10));
    auto newTime = std::chrono::system_clock::now();
}
camera_manager.RemoveFirmwareDownloadEventListener(firmware_event_handler);
// Flash firmware 
camera_manager.InstallFirmware(camera);

Once the firmware download is complete call InstallFirmware to start flashing the firmware to the camera. Wait for the camera firmware to flash. To unregister for firmware download events call RemoveFirmwareDownloadEventListener. To cancel firmware download, call the CancelFirmwareDownload method.


ZebraCameraManager camera_manager;  // Create camera manager object

// Cancel firmware download  
config_xml= zebra_camera_manager.CancelFirmwareDownload(camera);


SDK Logging Configuration

The default setting disables log file generation for Bioptic Color Camera v1.00.0013 and earlier versions. To activate logging, follow the steps outlined below:

  1. Install Bioptic Color Camera for Windows on the PC.
  2. Copy spdlog_configuration.xml file from "C:\Program Files (x86) \Zebra Technologies\Barcode Scanners\Bioptic Camera\Sample Applications\src\SampleApp_CPP" and place in "C:\Program Files (x86) \Zebra Technologies\Barcode Scanners\Bioptic Camera\SDK\Release\bin\x86" with sample application executables.
  3. Create a new folder with the name "Logs" in the same location (inside "C:\Program Files (x86) \Zebra Technologies\Barcode Scanners\Bioptic Camera\SDK\Release\bin\x86") and grant access rights.
  4. Execute Camera SDK Sample Applications.

Below attributes are configurable through the spdlog_configuration.xml file.

  1. log_file_name : By default, log files generated will be saved with the name CameraSDKLog.log.
  2. log_file_path : Indicates where the log files will be saved. For Bioptic Color Camera v1.00.0013 and earlier versions, Log folder needs to be created, and read/write permission should be granted manually.
  3. max_file_size : Maximum file size in Kilo Bytes (considering 1KB = 1024B). Minimum size is 5KB and if any value less is defined, it will be defaulted to the minimum value.
  4. max_file_count : Maximum file count. The minimum is 1 and anything less or invalid value will be defaulted to 1.
  5. log_pattern : By default, the pattern of a log line will be “[%H:%M:%S:%e] [T%t] [P%P] [%l] [%s] [%#] [%!] %v". A single log entry pattern can be customized with the following options.

    1. %H - Hours in 24 format 00-23
    2. %M - Minutes 00-59
    3. %S - Seconds 00-59
    4. %e - Millisecond part of the current second 000-999
    5. %t - Tread ID
    6. %P - Process ID
    7. %l - The log level of the message
    8. %s - Base name of the source file
    9. %# - Source line
    10. %! - Source Function
    11. %v - The actual text to log
  6. log_level : Log level to be recorded. 2 = INFO, 3 = WARNING, 4 = ERROR, 5 = CRITICAL 6 = LOG_OFF, 0,1 = TRACE, DEBUG
Bounding Box Detection

Overview

The Bounding Box Detection Library detects the bounding box of a moving object in the field of view of a MP7 Bioptic scanner using OpenCV.


Bounding Box Detection Configuration

The bounding box background filter type defines how the bounding box is detected, the following table lists the possible configurations for background filter types.

Table 3: Bounding Box Detection Configuration

Background Filter Type Description
Static

This option assumes a static background, the background frame should be saved with initial call of the SetBackgroundFrame method, before any calls to detect bounding box. If the background or lighting conditions change, call SetBackgroundFrame to reset the background frame (where no objects are in the field of view of the MP7).

Dynamic Use this option for dynamic changing background, any objects that are not moving becomes part of the background after some time.
Dynamic Gaussian Use This option for dynamic changing background, any objects that are not moving becomes part of the background after some time. Additional gaussian blurring is applied before background detection.
Mixed Uses a combination of methods 1 (Static) and 2 (Dynamic) to detect background.

Bounding Box Detection Sample

C++ Bounding Box API

The C++ Bounding box detection API is defined in the camera_imaging library:

  • C++ header : camera_bounding_box_factory.h
  • Library : camera_imaging.lib

Include the above header and lib into the target bounding box detection application. Include/Lib directories should be specified in the target C++ project.

Dependencies :The Camera SDK bin DLLs (and OpenCV DLLs) should be in the target application folder.

The following code shows how to detect bounding box:


CameraBoundingBoxDetectorInterface* frame_proc;

//Create an instance of bounding box detector (with the specified type of background filter)
frame_proc = CameraImageProcessingFactory::CreateBoundingBoxDetector(BackgroundFilterType::kStatic);


//Call from continuous/decode/produce/snapshot event handler to get bounding box location
void Render(LPBYTE frame_buffer, LONG buffer_size, int image_width, int image_height, int image_type)
{
    vector bounding_rect; //Point array of bounding box location coordinates

    if (save_background_) //flag to indicate saving of background frame
    {
        //Save background frame
        frame_proc->SetBackgroundFrame(frame_buffer,buffer_size, image_width, image_height, image_type);
        save_background_ = false;
    }
    else
    {
        //Detect bounding box
        bool rect_found = frame_proc->DetectBoundingBox((frame_buffer,buffer_size, image_width,
        image_height, image_type,bounding_rect);

    if (rect_found)
    {
        // Bounding box detected
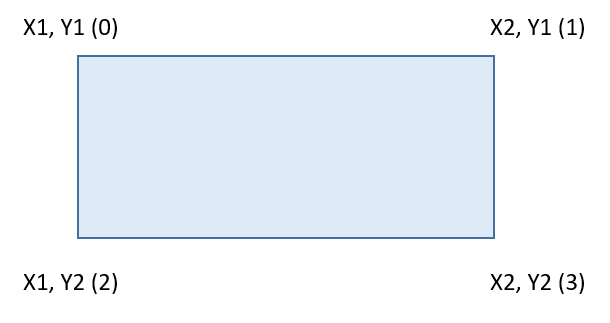
        int x1 = bounding_rect[0].x; //Bounding box top left x  
        int y1 = bounding_rect[0].y; //Bounding box top left y  
        int x2 = bounding_rect[3].x; //Bounding box bottom right x  
        int y2 = bounding_rect[3].y; //Bounding box bottom right y
    }
}

The SetBackgroundFrame method is used to specify the background image. Initially call this method with an image frame of the background (with no object in the field of view of the MP7). Next call the DetectBoundingBox to detect the bounding box, if a bounding box is found the function returns true. The bounding_rect point array parameter gives the output detected location of the bounding box. The coordinates are as follows:

Figure 7: Bounding Box Coordinates

C# COM API Bounding Box Detection Sample

The C# Bounding box detection API is defined in the native library: image_proc.dll

Dependencies: In addition to the above DLL the Camera SDK bin DLLs (and OpenCV DLLs) should be in the target application folder.

In the C# project include the following native method declarations, to call bounding box detection DLL functions.


using System;
using System.Runtime.InteropServices;

namespace CameraSDKSampleApp
{
    /// <summary>
    /// This class contains native declarations used int the CameraSDK C# sample application.
    /// </summary>
    class NativeMethods
    {
        ///  Bounding box detection image processing library native methods
        /// <summary>
        /// Initialize Bounding Box Detector
        /// </summary>
        /// <param name="background_filter_type">background_filter_type</param>
        [DllImport("image_proc.dll", CallingConvention = CallingConvention.Cdecl)]
        internal static extern void InitBoundingBoxDetector(int background_filter_type);

        /// <summary>
        /// Set Background Frame
        /// </summary>
        /// <param name="background_frame_buffer">Background frame image buffer</param>
        /// <param name="length">length of background frame buffer</param>
        /// <param name="image_width">image width</param>
        /// <param name="image_height">image height</param>
        /// <param name=image_type">image type (reserved BMP:0/JPEG:1)</param>
        [DllImport("image_proc.dll", CallingConvention = CallingConvention.Cdecl)]
        internal static extern void SetBackgroundFrame(IntPtr background_frame_buffer, int length, 
        int image_width, int image_height, int image_type);

        /// <summary>
        /// Detect Bounding Box
        /// </summary>
        /// <param name="input_frame_buffer">input image frame to detect bounding box </param>
        /// <param name="length">length of image frame buffer</param>
        /// <param name="image_width">input image width</param>
        /// <param name="image_height">input image height</param>
        /// <param name=image_type">input image type (reserved BMP:0/JPEG:1)</param>
        /// <param name="x1">detected bounding box location top left x</param>
        /// <param name="y1">detected bounding box location top left y</param>
        /// <param name="x2">detected bounding box location bottom right x</param>
        /// <param name="y2">detected bounding box location bottom right y</param>
        /// <returns>Returns true if bounding box detected</returns>
        [DllImport("image_proc.dll", CallingConvention = CallingConvention.Cdecl)]
        internal static extern bool DetectBoundingBox(IntPtr input_frame_buffer, int length,
        int image_width, int image_height, int image_type, 
        ref int x1, ref int y1, ref int x2, ref int y2);
    }
}

In the C# camera image event handler the following code snippet detects the bounding box: (See C# Camera SDK Sample Application source for complete project)


private void Camera_OnImageEvent(ref byte[] gImage, object imageBuffer, int length, int width, int height, int imageType, string eventType, string decodeData = "")
{
    lock (imageEventLock)
    {
        if (gImage == null || gImage.Length < length)
        {
            gImage = new byte[length];
        }
        ((Array)imageBuffer).CopyTo(gImage, 0);
        msImage.Flush();
        msImage.Seek(0, SeekOrigin.Begin);
        msImage.Write(gImage, 0, length);
        msImage.SetLength(length);
    }
    curForm.BeginInvoke((MethodInvoker)delegate
    {
        lock (imageEventLock)
        {
            if (imageType != ImageTypeRaw)
            {
                if (saveBackground) //If background frame (first frame)
                {
                    byte[] inData = new byte[length];
                    msImage.Seek(0, SeekOrigin.Begin);
                    msImage.Read(inData, 0, length);
                    msImage.Seek(0, SeekOrigin.Begin);
                    msImage.SetLength(length);
                    int size = Marshal.SizeOf(inData[0]) * inData.Length;
                    IntPtr inPtr = Marshal.AllocHGlobal(size);
                    Marshal.Copy(inData, 0, inPtr, inData.Length);
                    // Set Background Frame
                    NativeMethods.SetBackgroundFrame(inPtr, length, width, height, imageType);
                    saveBackground = false;
                    picImage.Image = Image.FromStream(msImage);
                }
                else
                {
                    byte[] inData = new byte[length];
                    msImage.Seek(0, SeekOrigin.Begin);
                    msImage.Read(inData, 0, length);
                    msImage.Seek(0, SeekOrigin.Begin);
                    msImage.SetLength(length);
                    int size = Marshal.SizeOf(inData[0]) * inData.Length;
                    IntPtr inPtr = Marshal.AllocHGlobal(size);
                    Marshal.Copy(inData, 0, inPtr, inData.Length);
                    int x1 = 0;
                    int y1 = 0;
                    int x2 = 0;
                    int y2 = 0;
                    Image img = Image.FromStream(msImage);
                    // Detect Bounding Box
                    if (NativeMethods.DetectBoundingBox(inPtr, length, width, height, imageType, ref x1, ref y1, ref x2, ref y2))
                    {  
                        // Draw Bounding Box
                        Graphics g = Graphics.FromImage(img);
                        g.DrawRectangle(new Pen(Brushes.LightGreen, 5), x1, y1, x2 - x1, y2 - y1);
                    }
                    picImage.Image = img;
                    Marshal.FreeHGlobal(inPtr);
                }
            }
            else
            {
                picImage.Image = Image.FromStream(msImage);
            }
        }
    });
}


Camera SDK COM API

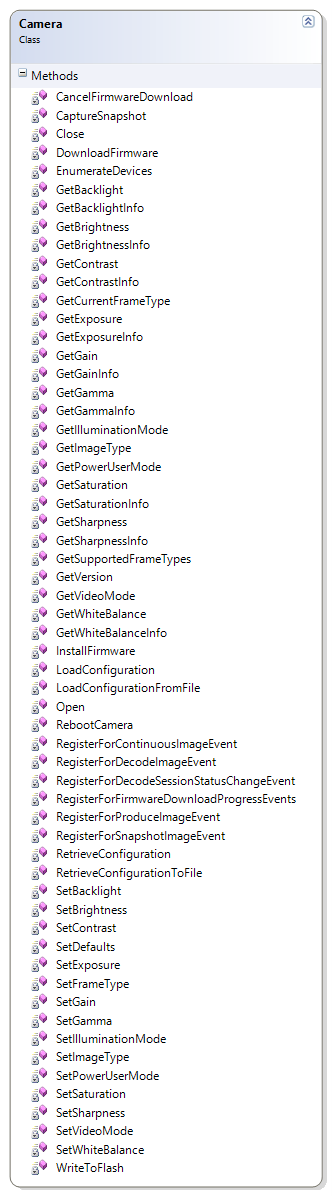
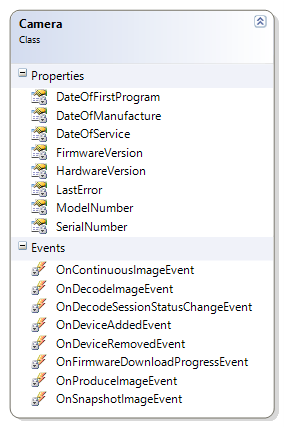
The Color Camera SDK provides a COM service(“bcc_com.exe”) with the following corresponding methods /properties/events, that allows calling the Color Camera SDK API from C# or other COM clients. The COM service allows multiple clients to communicate/manage multiple connected Bioptic cameras simultaneously. It is an out-of-process COM service that gets started on demand.

Figure 8: COM API Methods
Figure 9: COM API Properties and Events
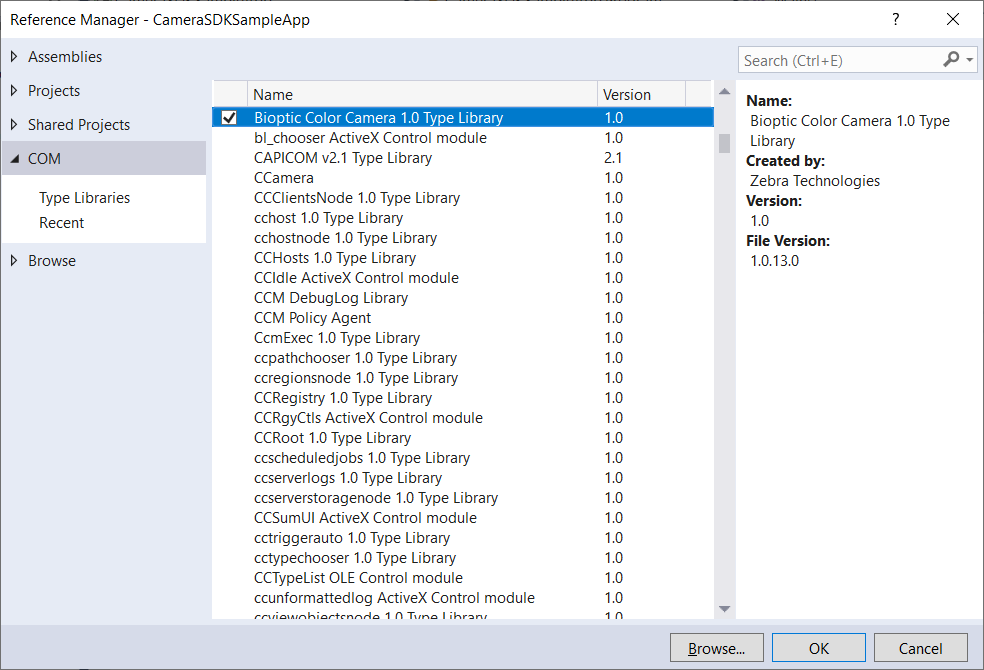
To use this COM object in C#, add a reference to the Camera SDK COM component as follows:

Figure 10: Reference Manager

Add the following namespace to the project:


using BiopticColorCamera;

Create an instance of the Camera SDK COM object as follows and call the required methods/properties.


Camera camera = new Camera();

Following is a simple C# Camera Demo Application (using the Bioptic Color Camera COM service):


/*
File: Program : Program.cs
Description: Color Camera SDK Demo Console Application
*/

using System;
using System.Threading;
using BiopticColorCamera;   // Color Camera SDK namespace

namespace CameraDemoApp
{
    /// <summary>
    ///  Color Camera SDK Demo Console Application
    /// </summary>
    class Program
    {
        const int VideoModeContinuous = 2; // Continuous video mode
        const int Register = 1; // Register for event notification
        const int UnRegister = 0; // Unregister for event notification
        static int frameNumber = 0; // Image frame number
        const int True = 1;
        const int False = 0;

        /// <summary>
        /// Camera SDK Image event handler
        /// </summary>
        /// <param name="imageBuffer">Input frame buffer</param>
        /// <param name="length">Length of frame</param>
        /// <param name="width">Width of image</param>
        /// <param name="height">Height of frame</param>
        /// <param name="imageType">Image type (0:Bmp/1:Jpeg)</param>
        private static void Camera_OnContinuousImageEvent(ref object imageBuffer, int length, int width, int height, int imageType)
        {
            Console.WriteLine("Camera frame received:" + frameNumber);
            frameNumber++;
        }

        /// <summary>
        /// Color Camera SDK Demo Program
        /// </summary>
        /// <param name="args"></param>
        static void Main(string[] args)
        {
            Array devices;
            int deviceIndex = 0; // Bioptic connected camera index

            // Create camera instance
            Camera camera = new Camera();

            // Enumerate cameras
            Console.WriteLine("Discovering cameras.");
            camera.EnumerateDevices(out devices);

            // Open camera (with index 0) 
            Console.WriteLine("Opening first camera");
            camera.Open((string) devices.GetValue(deviceIndex));

            // Get asset information
            Console.WriteLine("Camera Info:");
            Console.WriteLine("Model :" + camera.ModelNumber);
            Console.WriteLine("Serial : " + camera.SerialNumber);
            camera.SetVideoMode(VideoModeContinuous);

            // Get/Set property information
            int propertyValue = -1;
            int defaultValue = -1;
            int min = 0;
            int max = 0;
            int step = 1;
            int isAutoEnabled = False;
            int isAutoSupported = False;

            // Get brightness property value
            camera.GetBrightness(out propertyValue, out isAutoEnabled);
            // Get brightness property info (min/max/default/step/is-auto-supported)
            camera.GetBrightnessInfo(out min, out max, out defaultValue, out step, out isAutoSupported);

            // Display brightness info
            Console.WriteLine("Brightness Value   : " + propertyValue.ToString());
            Console.WriteLine("Brightness Minimum : " + min.ToString());
            Console.WriteLine("Brightness Maximum : " + max.ToString());
            Console.WriteLine("Brightness Default : " + defaultValue.ToString());
            Console.WriteLine("Brightness Step    : " + step.ToString());

            // New brightness value = min value + step
            int newValue = min + step;
            // Set new brightness value
            camera.SetBrightness(newValue, isAutoEnabled);

            // Get exposure property value
            camera.GetExposure(out propertyValue, out isAutoEnabled);
            // Get exposure property info (min/max/default/step/is-auto-supported)
            camera.GetExposureInfo(out min, out max, out defaultValue, out step, out isAutoSupported);

            // Display exposure info
            Console.WriteLine("Exposure Value   : " + propertyValue.ToString());
            Console.WriteLine("Exposure Minimum : " + min.ToString());
            Console.WriteLine("Exposure Maximum : " + max.ToString());
            Console.WriteLine("Exposure Default : " + defaultValue.ToString());
            Console.WriteLine("Exposure Step    : " + step.ToString());

            // New exposure value = min value + step
            newValue = min + step;
            // Set new exposure value
            camera.SetExposure(newValue, isAutoEnabled);


            // Register for image events
            Console.WriteLine("Registering for image events");
            camera.OnContinuousImageEvent += Camera_OnContinuousImageEvent;
            camera.RegisterForContinuousImageEvent(Register);

            // Wait for image events to trigger
            Thread.Sleep(5000);

            // Unregister for image events
            Console.WriteLine("Unregistering for image events");
            camera.RegisterForContinuousImageEvent(UnRegister);

            // Close camera connection
            Console.WriteLine("Closing camera");
            camera.Close();
        }
    }
}


Camera SDK Sample Applications

Overview

This chapter describes how to use the Color Camera SDK, and includes code snippets from the sample application.


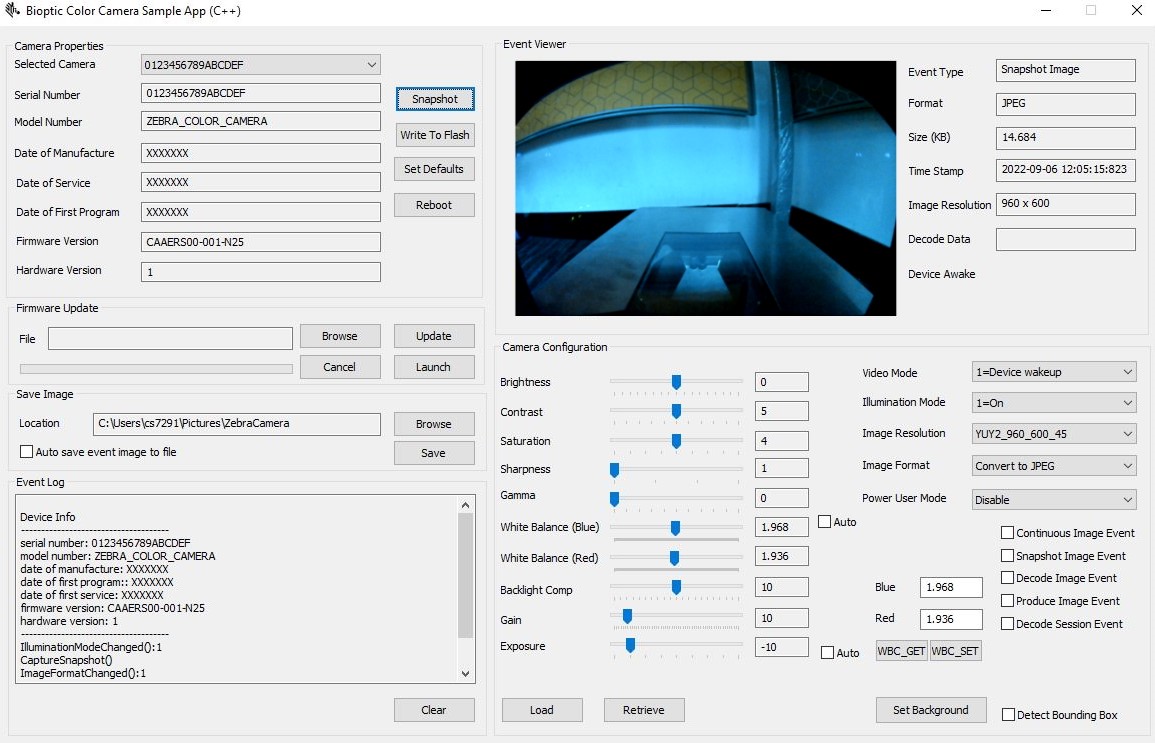
C++ Sample Application

The Desktop Windows Color Camera SDK Sample Application shows how to call the Camera SDK methods, configure the MP7 Camera and receive image data.

Figure 11: C++ Sample Application

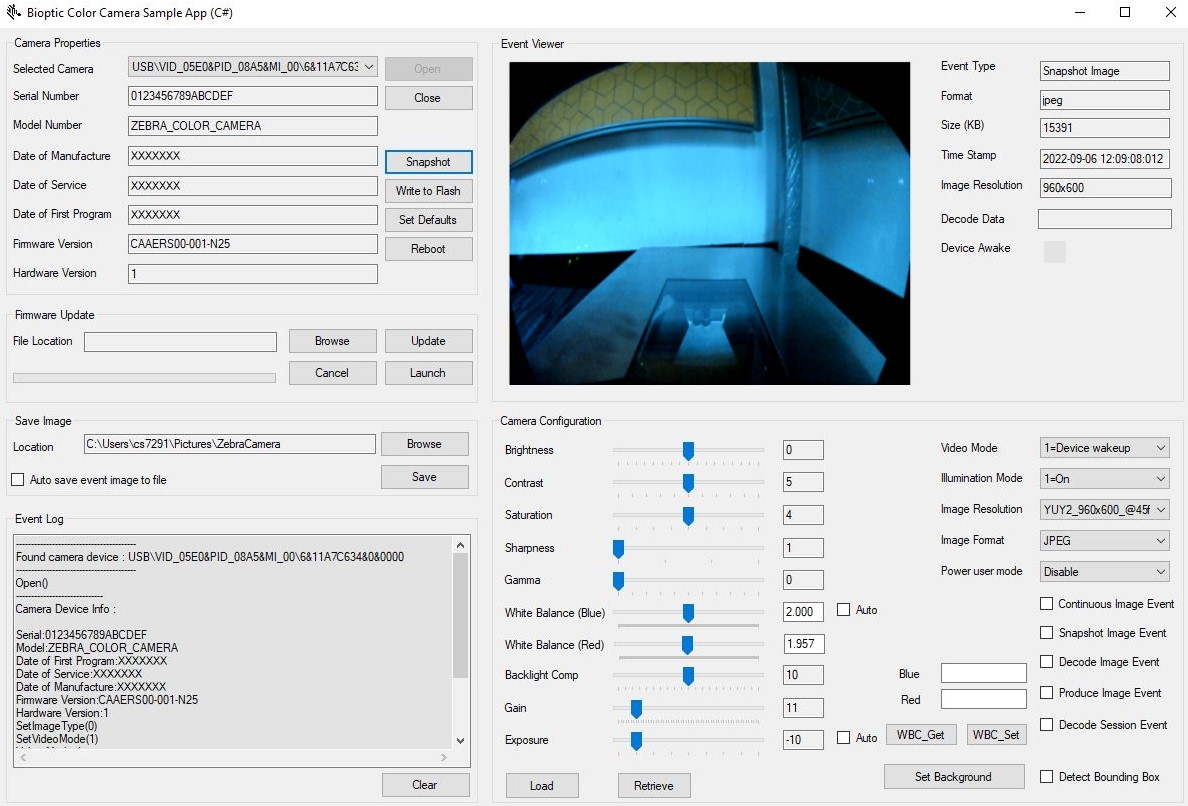
C# Sample Application

The Color Camera SDK C# sample application that uses COM wrapper DLL (camera_sdk.dll) is shown below.

Figure 12: C# Sample Application

White Balance Component

White Balance Component value is a double value with range 0 to 4.000. Camera SDK presents this value in fixed point representation with a 16-bit value, 12 bits allocated to floating points.

The min, max and default value returned from the SDK may not be correct for the white balance component property. Correct Values for those properties are:


Min – 0
Max – 16384 (0x4000)
Resolution - 1

To receive the default value of White Balance Component Values set all settings to defaults by calling SetDefaults() method on the camera and then retrieve the White Balance Component Values.

Below sample code illustrate how to use read and write WhiteBalanceComponent values using camera SDK.

C++ API


#define FLOATING_POINT 12

/**
* Converts fixed point value to a double.
*/
double WBFixedToDouble(uint16_t  val)
{
    return ((double)val / (double)(1 << FLOATING_POINT));
}

/**
* Converts double to a fixed pont value.
*/
uint16_t WBDoubleToFixed(double val)
{
    return (uint16_t)(val * (1 << FLOATING_POINT));
}

/**
* Read white balance component value from the camera.
*/
void GetWhiteBalance(std::shared_ptr camera)
{
    int blue = 0, red = 0;
    blue = camera->WhiteBalanceComponent.Value().Blue(); 
    red = camera->WhiteBalanceComponent.Value().Red(); 
}

/**
* Write white balance component values to the camera.
*/
Void SetWhiteBalance(std::shared_ptr camera)
{
    double blue = 1.5;
    double red = 2.5;
    uint16_t shourt_blue, short_red;
    shourt_blue = WBDoubleToFixed(blue);
    short_red = WBDoubleToFixed(red);

    WhiteBalance Wb((int)shourt_blue, (int)short_red);

    camera->WhiteBalanceComponent.Value(Wb);
}

Camera SDK COM Wrapper (C# API)

In Camera SDK COM wrapper, White Balance Component values are encoded in to single 32bit integer. The high order bits contains the blue component value (16-bit) and low order bits contains the red component value (16-bit), represented in fixed point representation. See C#/C++ Sample Application section (sample app sources) for more details.


/// <summary>
/// Converts 4.12 fixed point format to double
/// </summary>
/// <param name="value"></param>
/// <returns></returns>
double WBToDouble(int value)
{
    var val_ = (double)value / (double)(1 << 12);
    return val_;
}

/// <summary>
/// Converts double to 4.12 fixed point format.
/// </summary>
/// <param name="value"></param>
/// <returns></returns>
int DoubleToWB(double value)
{
    var val_ = (int)(value * (1 << 12));
    return val_;
}

/// <summary>
/// Splits 32 bit combined white balance components value to 16 bit white balance component 
/// blue and 16 bit white balance component red value.
/// </summary>
/// <param name="propertyValue">32bit white balance component property value.</param>
/// <param name="blueValue">16 bit white balance component blue value.</param>
/// <param name="redValue">16 bit white balance component red value.</param>
void GetWhiteBalanceComponentValues(int propertyValue, out int blueValue, out int redValue)
{
    blueValue = propertyValue >> 16 & 0x0000FFFF;
    redValue = propertyValue & 0x0000FFFF;
}

/**
* Read white balance component value from the camera.
*/
private void GetWhiteBalance(Camera camera)
{
    int propertyValue = -1;
    int isAutoEnabled = False;
    int blueValue = 0;
    int redValue = False;

    camera.GetWhiteBalance(out propertyValue, out isAutoEnabled);
    GetWhiteBalanceComponentValues(propertyValue, out blueValue, out redValue);
    Var redValueDouple = WBToDouble(redValue);
    Var blueValueDouple = WBToDouble(blueValue);
}


MP7 Color Camera Power User Mode

Power User Mode Configuration Guide

The MP7 Color Camera supports contextual switching between optimized camera settings for different scenarios. This guide outlines how to modify the settings within each context to suit your needs. For details on default values and when each context takes effect, please see the Power User Mode Contexts section.

Enabling Power User Mode

Enabling power user mode is done by setting a value of 0x1 to Zebra Extension control 9.

Configuring Power User Contexts

Configuring contexts is done by modifying Zebra Extension controls 2 to 5, with control 2 corresponding to Context 1. Each control contains an array of 26 bytes. The structure of the array is shown below:

                                                
uint32_t  min_auto_exposure;
uint32_t  max_auto_exposure;
uint32_t  exposure;
uint16_t  min_auto_gain;
uint16_t  max_auto_gain;
uint16_t  gain;
uint16_t  white_balance_temp;
uint16_t  white_balance_blue_gain;
uint16_t  white_balance_red_gain;
uint8_t   exposure_auto;
uint8_t   white_balance_auto;

Ordering of bytes in the array will depend on the method used to transmit the extension unit command, but by default (such as in the supplied MP7CC_cmdline.exe) White Balance Auto will be the leftmost byte in the array and Minimum Auto Exposure will be rightmost.

For convenience, a batch file called “SetContexts.bat” demonstrates packing the bytes together and sending them to the camera. This file is included with all SDK installations.

Power User Mode Contexts

For MP7 four Power User contexts available:

Context 1: Video mode set to Device Wakeup and white LED stopped

Defaults:

  • Auto exposure off, 1 ms exposure
  • 1.7x gain
  • Manual white balance. 2.865 blue gain, 0.847 red gain

Context 2: Video mode set to Device Wakeup and white LED running

Defaults:

  • Auto exposure on. 1ms minimum, 3ms maximum
  • Auto gain on. 1.7x minimum, 20x maximum
  • Auto white balance

Context 3: Video mode set to Continuous and illumination mode off

Defaults:

  • Auto exposure on. 1ms minimum, 3ms maximum
  • Auto gain on. 1.7x minimum, 20x maximum
  • Auto white balance

Context 4: Video mode set to Continuous and illumination mode on

Defaults:

  • Auto exposure on. 1ms minimum, 3ms maximum
  • Auto gain on. 1.7x minimum, 20x maximum
  • Manual white balance. 2.865 blue gain, 0.847 red gain

Color Camera Management Utility (CCMU) for Windows

Overview

Color Camera Management Utility (CCMU) is a tool that can utilize Color Camera SDK (software development kit) to execute command line interface-based commands for Camera Management.

Utilizing the color camera management utility requires user to copy the CCMU.exe into the following path where the bin files of the Color Camera SDK are installed.

Default location: C:\Program Files (x86)\Zebra Technologies\Barcode Scanners\Bioptic Camera\SDK\Release\bin\x86

The following commands can be executed using the CCMU tool.

  1. Retrieve Configuration - Retrieve configuration from camera and save to file (*.bcccfg)
  2. Load Configuration - Load the given bcccfg configuration file to the supported camera. (*.bcccfg)
  3. Firmware Update - Update the camera firmware with the given firmware file (*.DAT)
  4. Get Asset Information - Query asset information from the first camera connected.
  5. Reboot - Reboot the first color camera connected to the host. (v1.0.13.2 and above)

Utility Commands

  1. Open the command prompt and navigate to the folder which contains the CCMU.exe.

    Example: "cd C:\Program Files (x86)\Zebra Technologies\Barcode Scanners\Bioptic Camera\SDK\Release\bin\x86"

  2. The following are examples of executing the above-mentioned commands.

    1. Retrieve Configuration

      The following command will retrieve the configuration from the color camera and save it as ret01.bcccfg file on the same folder path as CCMU.exe.

      --time, will log the actions in progress with timestamp.

      
      ccmu.exe --time retrieveconfiguration ./ret.bcccfg


      NOTE: This requires a command prompt with administrator privileges to create the retrieved config file in the "C:\Program Files (x86)\Zebra Technologies\Barcode Scanners\Bioptic Camera\SDK\Release\bin\x86" folder path.

    2. Load Configuration

      Load configuration to the Color Camera. The config file's folder path needs to be passed along with .bcccfg extension.

      --time, will log the actions in progress with timestamp.

      
      ccmu.exe --time loadconfiguration ret.bcccfg
      
      
    3. Firmware Update

      Update the color camera, the DAT file needs to be included for the command. DAT file needs to be in the same folder path as RCMU exe to execute the following command. If the firmware file is stored elsewhere, provide the relative path in the command.

      --time, will log the actions in progress with timestamp.

      
      ccmu.exe --time updatefirmware R01.DAT 
      
      
    4. Get Asset Information

      Obtain Asset information from the color camera.

      
      ccmu.exe assetinfo 
      
      
    5. Reboot

      Reboot color camera. After a successful reboot, the serial number of the rebooted camera will be informed on the CLI.

      
      ccmu.exe reboot 
      
      
  3. Use the following command to check the utility help.

    
    ccmu.exe -help-all


Source Codes

Color Camera SDK Sample Applications for Windows

The Color Camera SDK Sample Applications (C# and C++) shows how to call the Camera SDK methods, configure the MP7 Camera and receive image data.

Color Camera SDK for Windows v1.0


API Reference

COM API Documentation

The Color Camera SDK COM API reference is generated from the source code and documents the classes, interfaces, methods, properties, and events that Windows applications use to control the camera.

The API reference opens in a new tab, so you can keep this guide open alongside it.

Download Color Camera SDK for Windows

IMPORTANT: Zebra recommends using the latest release whenever possible.


To Download Color Camera SDK for Windows:

  1. Visit the Zebra Color Camera SDK for Windows download page and select the desired download(s).
  2. Proceed to the Color Camera SDK for Windows release notes for the version details.