About Color Camera SDK for Linux

Overview

This document provides installation and programming information that allow MP7 color camera enabled application development for Linux.


Supported Devices

For the compatible devices list, please visit following page.

https://www.zebra.com/us/en/support-downloads/software/developer-tools/bioptic-color-camera-sdk-for-linux.html

Supported Linux Distributions

Color Camera SDK for Linux supports the following Linux Distributions.

  • Ubuntu 18.04 (64bit)
  • CentOS 7 (64bit)

Version History

Version 1.0.0-39 - 01/2026

  1. Exposed "IsRedIlluminationPresent" API to detect the presence of red spots in the captured image frames.
  2. Exposed "GetFrame" API for the user to request adjacent frames of a given frame.
  3. Enhanced memory management.
  4. Bug fix - Resolved the issue of decode events not getting triggered for SP72 device.

Version 1.0.0-34 - 07/2024

  1. Added Multi PID detection capability.
  2. Added weight data and weight unit for the produce event.
  3. Bug fix - Resolved the issue on multiple images saving which persisted with the save button.

Version 1.0.0-22 - 04/2024

  1. Optimized Camera SDK by exposing only the required symbols to the end user.
  2. Implemented proper usage of SPD log within the Camera SDK.

Version 1.0.0-21 - 10/2020

  1. Bug fix - firmware update failed in camera after detaching while updating firmware.

Version 1.0.0-17 - 06/2020

  1. Initial release.

Installation and Configuration

Overview

This document provides deployment information that allow MP7 color camera enabled application development for Linux.


Setting up the Environment

To install zebra camera SDK, Ubuntu 18.04 64bit or CentOS 7 64bit version is required. Before installing the packages, any existing zebra-camera-sdk package installation needs to be removed with the following code line, for Debian.


sudo dpkg -r zebra-camera-sdk 

dpkg -l | grep zebra-camera-sdk command can be used to check for any previous installations of zebra-camera-sdk

  • Install libgtk library

    
    sudo apt-get install libwxgtk3.0-0v5
    
    
  • Install OpenCV

    Instructions can be found at: https://docs.opencv.org/4.1.0/d7/d9f/tutorial_linux_install.html It is imperative to install OpenCV 4.1.0 version for successful Application operation.

  • Install ZeroMq library.

    
    sudo apt-get install libzmq5
    
    
  • Use sudo ldconfig command to update the library database.

Installing the Packages

  • Navigate to the folder containing camera SDK Debian packages.

    ‘zebra-camera-sdk.x.x.x-xx.deb’ (E.g.: ‘zebra-camera-sdk.1.0.0-13.deb’)

  • Use sudo dpkg -i zebra-camera-sdk.1.0.0-13.deb command to install the Debian packages.
  • Once the installation is completed, perform a sudo ldconfig.
  • Use ps -e | grep camera-service to check the running status of the camera-service.
  • Verify the availability of required port numbers from the system.
  • Camera service and the applications open some sockets and bind with specific port numbers in the system. These ports should available/free and not acquire by any other programs. Following port numbers required by Camera service and the applications.

    1. 5555
    2. 5556
    3. 5557
    4. Starting from 5558, port numbers will be incremented by 1 per application. If we have only one application, then it will open only 5558. When opening another application, it will acquire port 5559, for the next application 5560 and so on.

    We can check the port availability using netstat command.

  • If the camera-service is not listed with the process id, the following command can be used to start the service.

    
    systemctl start camera-service


Note: camera-service start up can be delayed up to 1 minute depending on system performance. Please wait until the start command is returned to the next line.


Running Sample Application

  • Navigate to ‘samples’ directory.

    
    cd /usr/share/zebra-camera/samples
    
    
  • Super user permission will be required to run the sample application.

    
    sudo ./multi_client_zebra_camera_demo


Uninstalling the Package


sudo dpkg -r zebra-camera-sdk


Color Camera SDK Developer Guide

Camera SDK APIs

zebra camera multi-client API is not thread-safe and it is not safe to use from different threads even with locking.

The include files shown in the code snippet given below need to be included in the ‘.cpp’ file which will be used for calling the APIs.


#include "device_manager.h"
#include "zebra_camera_manager_client.h"
#include "zebra_camera_client.h"

To call most of the API s in the SDK, an object of type ‘ZebraCameraClient’ is needed. The way in which this is accomplished is explained with the following code snippets. ‘ZebraCameraClient’ object used beyond this point of the guide is assumed to have undergone the initialization steps described in this section.

Firstly, an object of the class ‘DeviceManager’ is created.


DeviceManager mgr;

With a call to the method ‘EnumerateDevices()’, the list ‘devinfolist’ gets filled with the connected camera devices.


std::vector<DeviceInfo>  devinfolist = mgr.EnumerateDevices();

Then an object of ‘ZebraCameraManagerClient’ is created by calling the ‘CreateZebraCameraManagerClient()’ method.


std::unique_ptr<zebra::camera_sdk::ZebraCameraManagerClient> cammgr = zebra::camera_sdk::CreateZebraCameraManagerClient();

The above created object along with the ‘devinfolist’ list can be used to create an object of type ‘ZebraCameraClient’’.


std::shared_ptr<zebra::camera_sdk::ZebraCameraClient> camera = cammgr->CreateZebraCamera(devinfolist[0]);


Asset Tracking APIs

Once an object of ‘ZebraCameraClient’ is created, user is able to retrieve camera asset information such as the serial number, model number, date of manufacture, date of first program, first service date, firmware version, and hardware version of an MP7 device.


std::shared_ptr<zebra::camera_sdk::ZebraCameraClient> camera
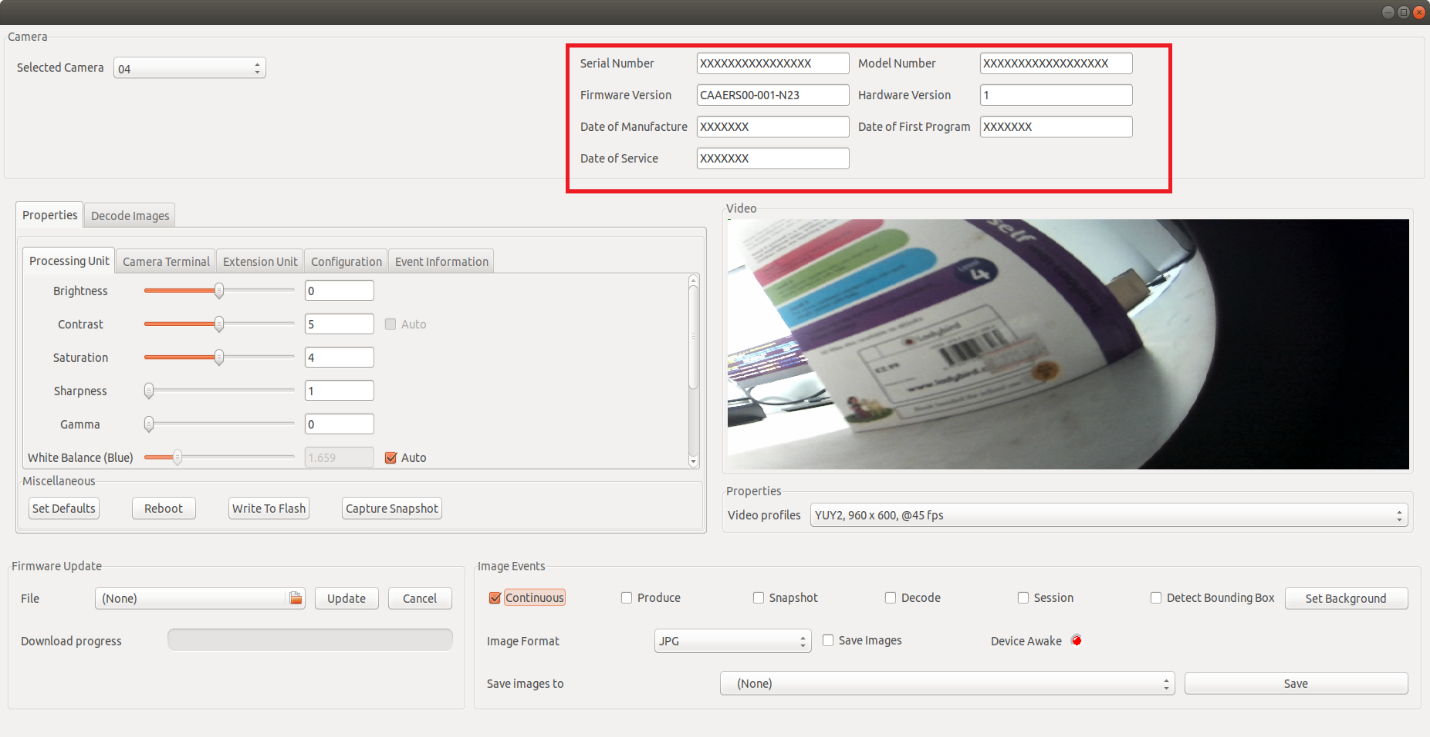
Figure 1: Asset Information

Value retrieval is best explained by the code snippets provided below.


std::string serial_number = camera->GetSerialNumber();      // serial number
std::string model_number = camera->GetModelNumber();        // model number
std::string date_of_manuf = camera->GetDateOfManufacture(); // date of manufacture
std::string date_of_prog = camera->GetDateOfFirstProgram(); // date of first program
std::string date_of_ser = camera->GetFirstServiceDate();    // first server date
std::string firmware_ver = camera->GetFirmwareVersion();    // firmware version
std::string hardware_ver = camera->GetHardwareVersion();    // hardware version


Camera Processing Unit

Properties and the corresponding property values of Camera specification such as Brightness, Contrast, Saturation, Sharpness , Gamma, White Balance and Backlight can be obtained by the user with the code snippets and the explainations provided below.
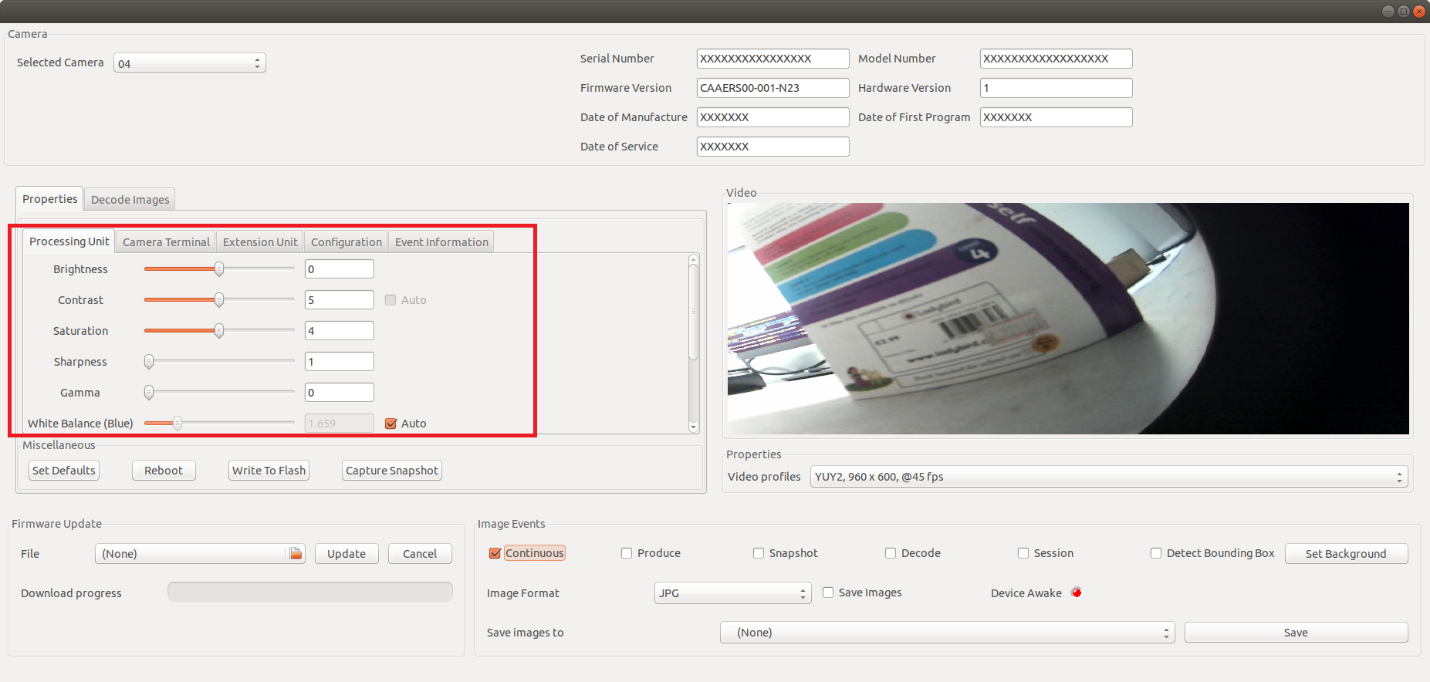
Figure 2: Camera Processing Unit

Brightness

Camera brightness of the MP7 along with various properties of brightness can be obtained with an object of type 'ZebraCameraClient'.


std::shared_ptr<zebra::camera_sdk::ZebraCameraClient> camera

The ways to retrieve said properties are provided below as code snippets.


// Returns the current value set for Brightness.
int16_t brightness = camera->Brightness.Value();

// Returns the minimum value possible for Brightness.
int16_t brightness = camera->Brightness.Minimum();

// Returns the maximum value possible for Brightness.
int16_t brightness = camera->Brightness.Maximum();

// Returns the resolution value of Brightness.
int16_t brightness = camera->Brightness.Resolution();	

// Returns the default value set for Brightness.
int16_t brightness = camera->Brightness.Default();

Contrast

In order to retrieve different properties associated with Contrast, first an object of type ‘ZebraCameraClient’ is created.


std::shared_ptr<zebra::camera_sdk::ZebraCameraClient> camera

Value retrieval for the properties affiliated with Contrast is explained with the code snippets provided below.


//Returns the current value of Contrast.
int16_t contrast = camera->Contrast.Value();	

//Returns the minimum possible value that can be given for Contrast.
int16_t contrast = camera->Contrast.Minimum();

//Returns the maximum possible value that can be given for Contrast.
int16_t contrast = camera->Contrast.Maximum();

//Returns the resolution of Contrast.
int16_t contrast = camera->Contrast.Resolution();

//Returns the default value of Contrast.
int16_t contrast = camera->Contrast.Default();

Saturation

Properties affiliated with Saturation can be obtained with an object of type 'ZebraCameraClient'.


std::shared_ptr<zebra::camera_sdk::ZebraCameraClient> camera

Property value retrieval is described using the code snippets given below.


// Returns the current value of Saturation.
int16_t saturation = camera->Saturation.Value();	

// Returns the minimum possible value that can be given for Saturation.
int16_t saturation = camera->Saturation.Minimum();

// Returns the maximum possible value that can be given for Saturation.
int16_t saturation = camera->Saturation.Maximum();

// Returns the resolution value of Saturation.
int16_t saturation = camera->Saturation.Resolution();
	
// Returns the default value of Saturation.
int16_t saturation = camera->Saturation.Default();

Sharpness

After creating an object of type ‘ZebraCameraClient’, properties of Sharpness can be obtained.


std::shared_ptr<zebra::camera_sdk::ZebraCameraClient> camera


// Returns the current value set for Sharpness.
int16_t sharpness = camera->Sharpness.Value();

// Returns the minimum possible value that can be provided for Sharpness.
int16_t sharpness = camera->Sharpness.Minimum();

// Returns the maximum possible value that can be provided for Sharpness.
int16_t sharpness = camera->Sharpness.Maximum();

// Returns the resolution value of Sharpness.
int16_t sharpness = camera->Sharpness.Resolution();

// Returns the default value of Sharpness
int16_t sharpness = camera->Sharpness.Default();

Gamma

Provided below are code snippets for obtaining properties associated with Gamma with the help of an object of type ‘ZebraCameraClient’.


std::shared_ptr<zebra::camera_sdk::ZebraCameraClient> camera


// Returns the current value set for Gamma.
int16_t gamma = camera->Gamma.Value();

// Returns the minimum possible value that can be given for Gamma.
int16_t gamma = camera->Gamma.Minimum();	

// Returns the maximum possible value that can be given for Gamma.
int16_t gamma = camera->Gamma.Maximum();

// Returns the resolution value of Gamma.
int16_t gamma = camera->Gamma.Resolution();

// Returns the default value of Gamma.
int16_t gamma = camera->Gamma.Default();

White Balance

As the first step, an object of type ‘ZebraCameraClient’ is created.


std::shared_ptr<zebra::camera_sdk::ZebraCameraClient> camera

Then the values are retrieved with the help of the created pointer as shown below.


// Returns the current value of White Balance Component.
zebra::camera_sdk::WhiteBalance wbc = camera->WhiteBalanceComponent.Value();
	
// Returns the minimum possible value that can be given for White Balance Component.
zebra::camera_sdk::WhiteBalance wbc = camera->WhiteBalanceComponent.Minimum();
	
// Returns the maximum possible value that can be given for White Balance Component.
zebra::camera_sdk::WhiteBalance wbc = camera->WhiteBalanceComponent.Maximum();
	
// Returns the resolution value of White Balance Component.
zebra::camera_sdk::WhiteBalance wbc = camera->WhiteBalanceComponent.Resolution();
	
// Returns the default value of White Balance Component.
zebra::camera_sdk::WhiteBalance wbc = camera->WhiteBalanceComponent.Default();

Backlight

Once an object of type ‘ZebraCameraClient’ is created, retrieval of property values of Backlight is shown in below code snippets.


std::shared_ptr<zebra::camera_sdk::ZebraCameraClient> camera


// Returns the value set for Backlight Compensation.
int16_t blc = camera->BacklightCompensation.Value();

// Returns the minimum possible value for Backlight Compensation.
int16_t blc = camera->BacklightCompensation.Minimum();	

// Returns the maximum possible value for Backlight Compensation.
int16_t blc = camera->BacklightCompensation.Maximum();

// Returns the resolution value for Backlight Compensation.
int16_t blc = camera->BacklightCompensation.Resolution();

// Returns the default value set for Backlight Compensation.
int16_t blc = camera->BacklightCompensation.Default();

Gain

With an object of type ‘ZebraCameraClient’, properties affiliated with Gain can be obtained as follows.


std::shared_ptr<zebra::camera_sdk::ZebraCameraClient> camera


// Returns the current value set for Gain.
int16_t gain = camera->Gain.Value();

// Returns the minimum possible value that can be given for Gain.
int16_t gain = camera->Gain.Minimum();

// Returns the maximum possible value that can be used for Gain.
int16_t gain = camera->Gain.Maximum();

// Returns the resolution value of Gain.
int16_t gain = camera->Gain.Resolution();

// Returns the default value set for Gain.
int16_t gain = camera->Gain.Default();


Absolute Exposure Time

As described in the sections above, an object of type ‘ZebraCameraClient’ is created as the first step.


std::shared_ptr<zebra::camera_sdk::ZebraCameraClient> camera

Properties associated with Absolute Exposure Time, such as the current, minimum, maximum and default resolution can be obtained with the above created object as shown by the code snippets given below.


uint32_t aet = camera->AbsoluteExposureTime.Value();
uint32_t aet = camera->AbsoluteExposureTime.Minimum();
uint32_t aet = camera->AbsoluteExposureTime.Maximum();
uint32_t aet = camera->AbsoluteExposureTime.Resolution();
uint32_t aet = camera->AbsoluteExposureTime.Default();

In order to check if Absolute Exposure time is Auto supported, the below code line can be used.


bool auto_supported = camera->AbsoluteExposureTime.IsAutoSupported();

The below code line is used to check if Absolute Exposure Time is auto enabled or not.


bool auto_enabled = camera->AbsoluteExposureTime.IsAutoEnabled();

The way in which the Absolute Exposure Time is set to Auto is explained below.


camera->AbsoluteExposureTime.AutoEnable(true); 

The way in which the Auto property is removed from Absolute Exposure Time is explained below.


camera->AbsoluteExposureTime.AutoEnable(false); 


Absolute Exposure Time

Video Mode

Value set for the Video mode can be retrieved with an object of type ‘ZebraCameraClient’.


std::shared_ptr<zebra::camera_sdk::ZebraCameraClient> camera

The current and default value retrieval for Video Mode is described by the following code lines.


zebra::camera_sdk::VideoMode vm = camera->VideoModeSetting.Value();	
zebra::camera_sdk::VideoMode vm = camera->VideoModeSetting.Default();

Illumination Mode

First, an object of ‘ZebraCameraClient’ has to be created.


std::shared_ptr<zebra::camera_sdk::ZebraCameraClient> camera

Using the created object, value set for the Illumination mode can be obtained as follows.


zebra::camera_sdk::IlluminationMode illum = camera->IlluminationModeSetting.Value();

The default value set for the illumination mode can be retrieved as shown below.


zebra::camera_sdk::IlluminationMode illum = camera->IlluminationModeSetting.Default();


Firmware Update

Described below is the way in which the firmware update can be done using the SDK. An object of ‘ZebraCameraManagerClient’ and an object of ‘ZebraCameraClient’ need to be created. The path of the firmware file has to be given in the form of a string. The way in which these objects are initialized is described in the ‘Camera SDK API’ section.
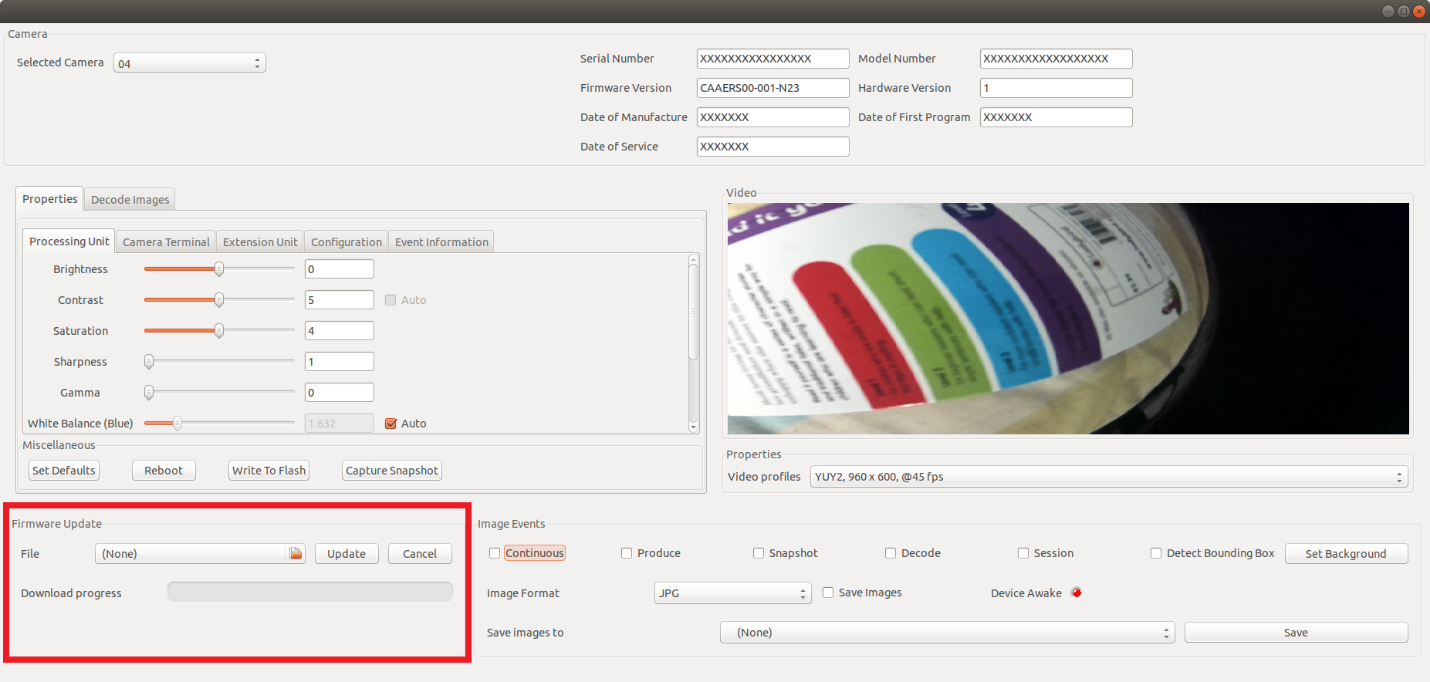
Figure 3: Firmware Update

std::unique_ptr<zebra::camera_sdk::ZebraCameraManagerClient>& mgr
std::shared_ptr<zebra::camera_sdk::ZebraCameraClient> camera
std::string filepath

In order to capture events, an object of the ‘FirmwareDownloadEventObserver’ is created.


class FirmwareDownloadEventObserver: public zebra::camera_sdk::FirmwareDownloadEventListener
{
    public:
        void EventReceived(zebra::camera_sdk::FirmwareDownloadEventsArgs event) override
        {
            printf("%s: opcode=%x, record=%d\n", __func__, (int)event.GetOperationCode(), event.GetCurrentRecord());
        }
};

Functions such as update the UI can be done, once a firmware update event is triggered and notified by the above method. With the below given code line, registering for the firmware download event is accomplished.


FirmwareDownloadEventObserver firmwareObs;
mgr->AddFirmwareDownloadEventListener(firmwareObs);

Once the pointer ‘camera’ and the firmware file location are provided, downloading of the firmware file gets completed and progress events will be received from the above Event Observer method.


mgr->DownloadFirmware(camera, filepath);

Installation of the firmware is achieved as follows.


mgr->InstallFirmware(camera);

Finally, the firmware event listener can be removed using the below given code line.


mgr->RemoveFirmwareDownloadEventListener(firmwareObs);


Image Events
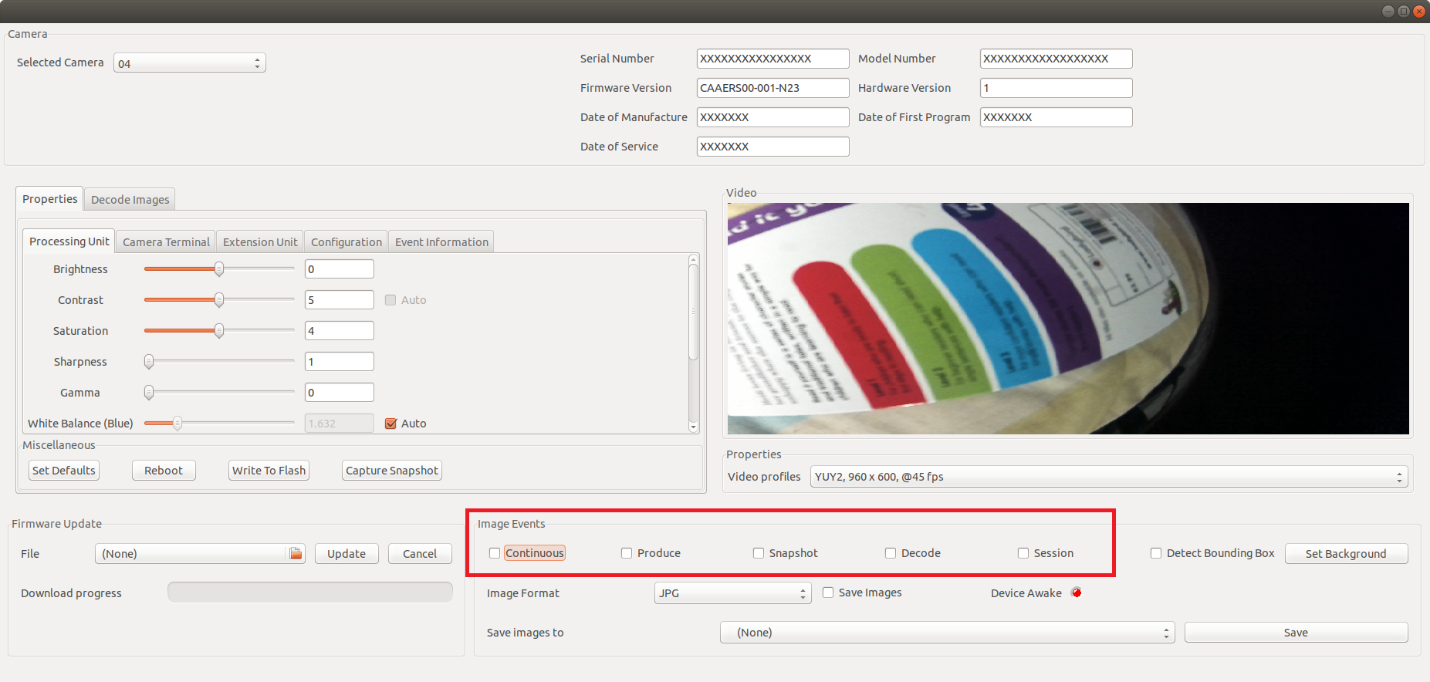
Figure 4: Image Events

Continuous Image Event

A continuous image event is occurred whenever a continuous video stream is displayed in the UI. With the method given in the code snippet below, user can be notified of the event occurrence. Registering and un-registering for the Continuous Image Event can be done by checking and unchecking the checkbox provided in the sample application.


class ContinuousImageEventObserver: public ContinuousImageEventListener {
    public:ata md) 
    {
        printf("ContinuousImageEventObserver: width=%d, height=%d, image_number=%d\n", ev.image.width, ev.image.height, md.image_number);
    }
};

Firstly, an object of ‘ContinuousImageEventObserver’ class is created. Registering and unregistering for the event can be done with the newly created object.


ContinuousImageEventObserver continuousObs;

Registering for Continuous Image Events.


camera->AddContinuousImageEventListener(continuousObs);

Unregistering from Continuous Image Events.


camera->RemoveContinuousImageEventListener(continuousObs);

Produce Image Event

When MP7 reads a stable weight after the registration, this event will be captured by the method given below. User may have logs printed in order to be notified of the event capture.


class ProduceImageEventObserver: public ProduceImageEventListener 
{
    public:
        void ImageReceived(ImageEventData ev, ImageEventMetaData md) 
        {
            (void)md;
            printf("ProduceImageEventObserver: width=%d, height=%d\n", ev.image.width, ev.image.height);
        }
};

Once an object of the type ‘ProduceImageEventObserver’ is created, registering and unregistering for the said event can be performed as shown in the code snippets given below.


ProduceImageEventObserver produceObs;

Registering for Produce Image events.


camera->AddProduceImageEventListener(produceObs);

Unregistering from Produce Image events.


camera->RemoveProduceImageEventListener(produceObs);

Decode Image Event

Registration and Un-registration for the ‘Decode’ image event is same as that for the above described events. When a barcode is read by the MP7 scanner, decode image and the decode data can be captured as an event as shown in the code snippet below.


class DecodeImageEventObserver: public DecodeImageEventListener 
{
    public:
        void ImageReceived(ImageEventData ev, ImageEventMetaData md) 
        {
            printf("DecodeImageEventObserver: width=%d, height=%d, decoded=%s\n", ev.image.width, ev.image.height, md.decode_data.c_str());
            string filename = string("Decode-") + md.decode_data + string(".jpg");
        }
};

With an object of type ‘DecodeImageEventObserver’ decode event registration and un-registration can be done as shown in the code snippets below.


DecodeImageEventObserver decodeObs;

Registering for Decode Image events.


camera->AddDecodeImageEventListener(decodeObs);

Unregistering from Decode Image events.


camera->RemoveDecodeImageEventListener(decodeObs);

Snapshot Image Event

A snapshot can be captured by the button present in the MP7 as well using the Camera SDK sample application. Once a snapshot is captured, ‘Snapshot’ image event will be notified of the occurrence of the event. If the user wishes to, captured snapshot can be saved using the ‘Save’ button present in the UI.

The method that captures the snapshot image event is provided below. Event occurrence can be verified with logs if the user wishes to be notified.


class SnapshotImageEventObserver: public SnapshotImageEventListener 
{
    public:
        void ImageReceived(ImageEventData ev, ImageEventMetaData md) 
        {
            (void)md;
            printf("SnapshotImageEventObserver: width=%d, height=%d\n", ev.image.width, ev.image.height);
        }
};

Registering for Snapshot Image events.


SnapshotImageEventObserver snapshotObs;
camera->AddSnapshotImageEventListener(snapshotObs);

Unregistering from Snapshot Image events.


camera->RemoveSnapshotImageEventListener(snapshotObs);

Decode Session Status Change Image Event

This event gets triggered whenever an object enters and exits the field of view of the scanner.Once the event is captured, the user may check the status of the event using the method given below.


class DecodeSessionStatusChangeEventObserver: public DecodeSessionStatusChangeEventListener
{
    public:	
        void DecodeSessionStatusChanged(DecodeSessionStatus status) override;
};

Registering and unregistering for the said event can be done with an object of type ‘DecodeSessionStatusChangeEventObserver’


DecodeSessionStatusChangeEventObserver decode_session_status_change_listener_;

Registering for Decode Session Status Change event.


camera->AddDecodeSessionStatusChangeEventListener(decode_session_status_change_listener_);

Unregistering from Decode Session Status Change event.


camera->RemoveDecodeSessionStatusChangeEventListener(decode_session_status_change_listener_);


Set Defaults
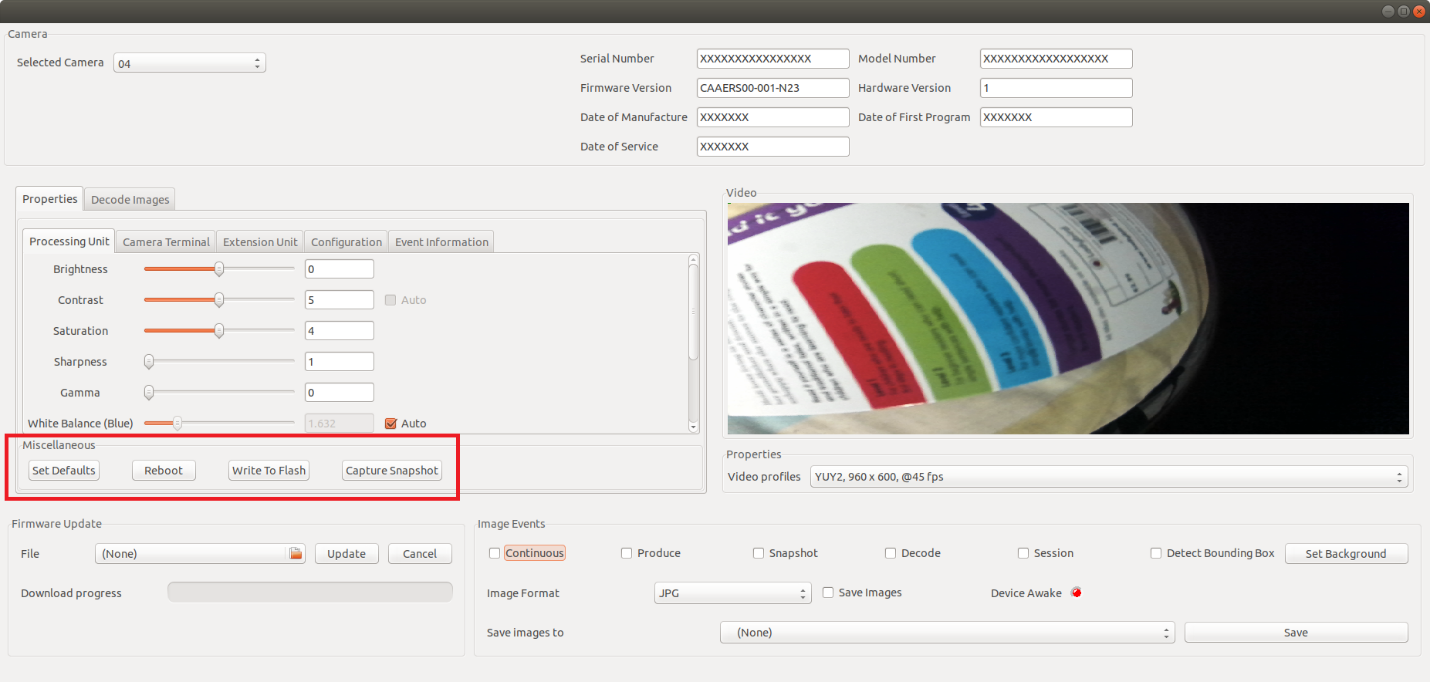
Figure 5: Set Defaults

With the following code snippet, reverting the current camera property values such as Brightness, Contrast etc. to the respective default values can be accomplished.


camera->SetDefaults();


Reboot

A device reboot can be done with the code line provided below. The creation and the initialization of the ‘cammgr’ object is provided in the ‘Camera SDK API’ section.


cammgr ->Reboot(camera);


Load Configuration

Provided below is a sample settings XML that can be loaded in to the MP7 camera.


<cameraconfig>
    <metadata>
        <modelnumber>XXXXXXXXXXXXXXXXXX</modelnumber>
        <serialnumber>XXXXXXXXXXXXXXXX</serialnumber>
        <firmware>CAAERS00-001-N21</firmware>
        <hardwareversion>1</hardwareversion>
    </metadata>
    <attrib_list>
        <attribute>
            <id>8194</id>
            <name>Brightness</name>
            <value>8</value>
        </attribute>
        <attribute>
            <id>8195</id>
            <name>Constrast</name>
            <value>10</value>
        </attribute>
        <attribute>
            <id>8199</id>
            <name>Saturation</name>
            <value>8</value>
        </attribute>
        <attribute>
            <id>8200</id>
            <name>Sharpness</name>
            <value>4</value>
        </attribute>
        <attribute>
            <id>8201</id>
            <name>Gamma</name>
            <value>25</value>
        </attribute>
        <attribute>
            <id>8204</id>
            <name>White alance</name>
            <value>
                <red>3469</red>
                <blue>11735</blue>
            </value>
        </attribute>
        <attribute>
            <id>8193</id>
            <name>Backlight</name>
            <value>10</value>
        </attribute>
        <attribute>
            <id>8196</id>
            <name>Gain</name>
            <value>3</value>
        </attribute>
        <attribute>
            <id>2052</id>
            <name>Absolute Exposure Time</name>
            <value>-10</value>
        </attribute>
        <attribute>
            <id>32769</id>
            <name>Video Mode</name>
            <value>2</value>
        </attribute>
        <attribute>
            <id>32770</id>
            <name>Illumination Mode</name>
            <value>0</value>
        </attribute>
    </attrib_list>
</cameraconfig>

Loading the set configuration with an object of type ‘ZebraCameraManagerClient’ can be achieved with the help of the following code lines.


std::unique_ptr camera_manager_client_;
auto camera = GetCamera();

if (camera)
{
    std::string camera_configuration = std::string(TextCtrlConfiguration->GetValue());
    if (camera_configuration.compare("") != 0 )
    {
        try
        {
            camera_manager_client_->LoadConfiguration(camera, camera_configuration);
        }
        catch (std::exception& e)
        {
            wxString msg;
            msg.Printf(wxT("%s"), e.what());
            wxMessageBox(msg, _("Load configuration into color camera"), wxICON_ERROR);
        }
    }
    else
    {
        wxString msg;
        msg.Printf(wxT("%s"), "load configuration into color camera failed: Empty configuration provided");
        wxMessageBox(msg, _("Load configuration"), wxICON_ERROR);
    }
}


Retrieve Configuration

Configuration retrieval is accomplished with the help of an object of the type ‘ZebraCameraManagerClient’ as shown in the code snippet given below.


std::unique_ptr camera_manager_client_;
auto camera = GetCamera();
if (camera)
{
    std::string camera_config;

    try
    {
        camera_config = camera_manager_client_->RetrieveConfiguration(camera);
        TextCtrlConfiguration->SetValue(camera_config);
    }
    catch (std::exception& e)
    {
        wxString msg;
        msg.Printf(wxT("%s"), e.what());
        wxMessageBox(msg, _("Retrieve configuration"), wxICON_ERROR);
    }
}


Write to Flash

Writing the camera properties to the Camera memory is achieved with the code line given below.


camera->WriteToFlash();


Image Convertor Library

Developers may make use of the ‘image converter’ library in order to convert the ‘YUY2/ UYVY’ images in to ‘rgb’ format. First, ‘image_converter.h’ file should be included.

Then the ‘ColorConverter’ method is used for converting the images in to ‘rgb’ format. The way in which this image conversion takes place upon receival of continuous images is described in the code snippet given below. Similarly, this operation can be done for other image events such as Produce, Decode and Snapshot.


#include "image_converter.h"

void ContinuousImageObserver::ImageReceived(ImageEventData image, ImageEventMetaData md)
{
    (void)md;
    zebra::image::ColorConverter converter;

    switch (image.format)
    {
        case ImageFormat::YUY2:
            converter = zebra::image::ColorConverter::YUY2_TO_RGB;
            break;
        case ImageFormat::UYVY:
            converter = zebra::image::ColorConverter::UYVY_TO_RGB;
            break;
        default:
            return;
    }

    wxLogMessage("%s: wxh: %d x %d", __func__, image.image.width, image.image.height);

    zebra::camera_sdk::Image rgb = zebra::image::ConvertColor(converter, image.image);

    frame_->image_buffer_.CopyToBuffer(rgb.Data(), rgb.Length());
}

Image saving can also be done using the library mentioned above. Based on the user selection, the methods. 'SaveAsJpeg' and 'SaveAsBmp' can be made use of, to save the desired image in the computer.


void ZebraCameraDemoFrame::SaveImage(ImageBuffer& image, std::string str_event_type)
{
    if (!save_image_directory_path_.empty() && CheckBoxSaveImages->GetValue())
    {
        std::time_t t = std::time(nullptr);
        char mbstr[128];
        std::strftime(mbstr, sizeof(mbstr), "%c", std::localtime(&t));
        
        std::string filepath = save_image_directory_path_ + std::string("/") + GetFileName(str_event_type);
        switch (image_file_format_)
        {
        case ImageFileFormat::JPG:
            image.SaveAsJpeg(filepath + std::string(".jpg"));
            break;
        case ImageFileFormat::BMP:
            image.SaveAsBmp(filepath + std::string(".bmp"));
            break;
        default:
            image.SaveAsJpeg(filepath + std::string(".jpg"));
            break;
        }
    }
}

Red illumination detection API

The API is introduced to allow the user to monitor the frames for the presence of a red hue that is occasionally observed on the left and right sides of the image due to the red LED emission of the scanner.


bool isRedIlluminationPresent(int width, int height, uint8_t* data); 

Given below is a sample code snippet that can be used to identify the presence of red illumination in a frame.

The header file 'red_illumination_presence.h' is required to be included in the beginning. When the image information of a received frame is made available, the width, height and the image data need to be passed in to the 'isRedIlluminationPresent' API to analyze the presence of red spots.

The width, height and the pixel data of an image can be retrieved from the 'ImageEventData' once any image event is triggered. Namely Continuous, Decode, Snapshot and Produce.


#include "/usr/include/zebra-camera/imaging_library/red_illumination_presence.h" 

red_illumination_presence frame; 
bool redness_presence= frame.isRedIlluminationPresent(image.width, image.height,const_cast<uint8_t*>(image.data)); 

Returns true in the event of red illumination presence.
Returns false in the event of red illumination absence. 

Based on the presence and the absence of the red hue, the bool value is returned to the user.

Get Frame API

With the 'GetFrame' API, the user is given the capability to call for frames stored in the buffer by passing an integer as a parameter. The option to retrieve the next frame, in the event the user is offered a frame with red illumination present is given with the 'GetFrame' API.


ImageEventData GetFrame(int image_id); 

The information such as the width, height, stride, size and raw pixel data can be retrieved with the returned 'ImageEventData' value of the API.

A code snippet detailing how the registration for the image event 'Produce' in the single client mode is provided below.


zebra::DeviceManager device_manager;
ZebraCameraManager camera_manager; 

auto info = device_manager.EnumerateDevices(); 

if (info.size()) 
{ 
    auto camera = camera_manager.CreateZebraCamera(info[0]);  
    ProduceImageEventObserver continuousObs;
    camera->AddProduceImageEventListener(continuousObs); 
    
    sleep(20);  

    //ImageEventData and ImageMetaData of the received produce images can be found in the ProduceImageEventListener
}    

The registration for the image event 'Produce' in multi-client mode is provided below.


DeviceManager mgr; 

auto devinfolist = mgr.EnumerateDevices(); 
cout << "# cams = " << devinfolist.size() << endl; 

if (0 == devinfolist.size()) 
{ 
    exit(0); 
} 

std::unique_ptr cammgr = zebra::camera_sdk::CreateZebraCameraManagerClient(); 
std::shared_ptr camera = cammgr->CreateZebraCamera(devinfolist[0]); 

ProduceImageEventObserver camobj; 

camera->AddProduceImageEventListener(camobj);  

Obtaining the frame number of a received Produce image is achieved as shown below. With the knowledge of the frame number, the range of values that can be passed to the 'GetFrame' API can be determined.


class ProduceImageEventObserver: public ProduceImageEventListener
{ 
    public: 
        void ImageReceived(ImageEventData ev, ImageEventMetaData md) 
        { 
            printf("ProduceImageEventObserver: width=%d, height=%d, image_number=%d\n", ev.image.width, ev.image.height, md.image_number); 

            int frame_no = md.image_number; 
            
            // Obtain the image number of the received image to get an idea an idea of which frame to call using 'GetFrame' API
        } 

}; 

// Ex:  
// ImageEventData img = camera->GetFrame(frame_no + 1);  
// ImageEventData img = camera->GetFrame(frame_no + 2);  
// ImageEventData img = camera->GetFrame(frame_no + 5);  

The way in which the Produce images are received in the multi-client mode is presented below.


class ProduceImageEventObserver: public zebra::camera_sdk::ProduceImageEventListener
{ 
    public:
        void ImageReceived(zebra::camera_sdk::ImageEventData ev, zebra::camera_sdk::ImageEventMetaData md)
        {
            printf("ProduceImageEventObserver: width=%d, height=%d, image_number=%d, size=%d \n", ev.image.width, ev.image.height, md.image_number, ev.image.size);
            
            last_received_frame = md.image_number;
        }
}; 

Bounding Box Detection

Figure 6: Bounding Box Detection

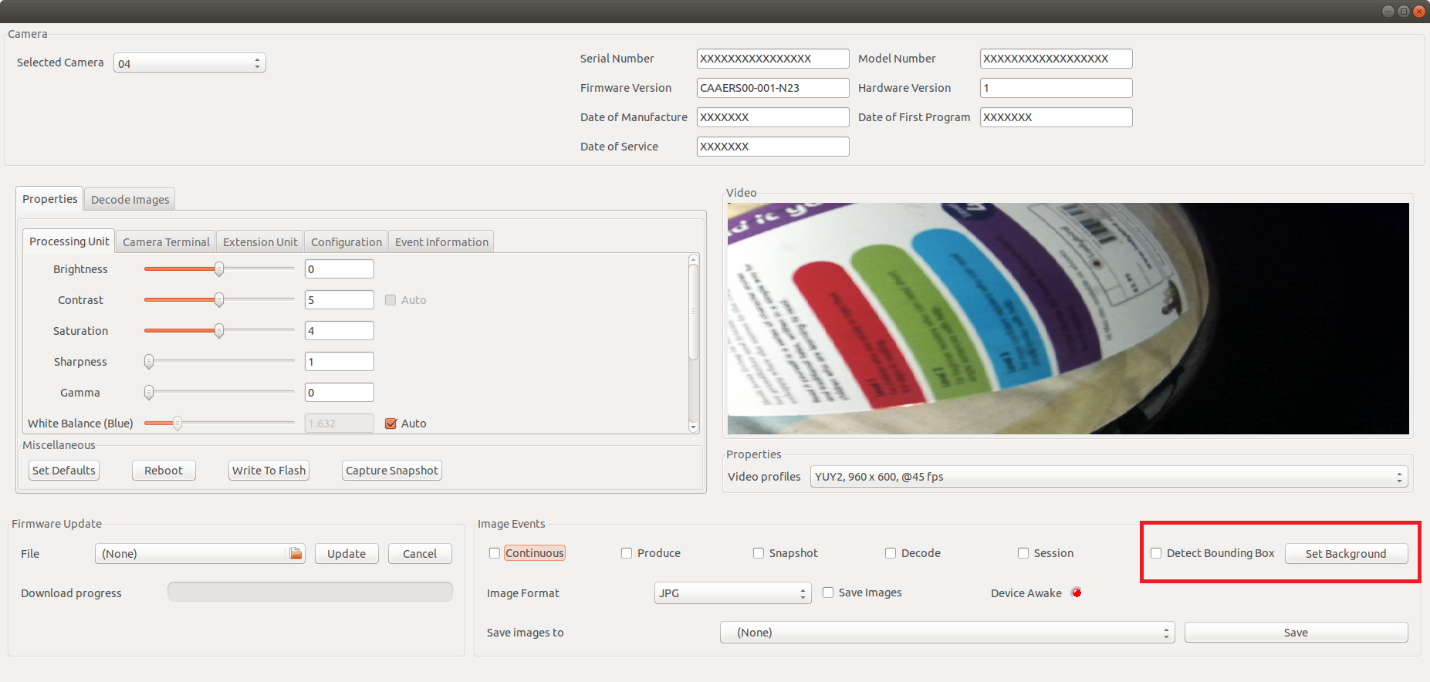
In the GUI, a ‘CheckBox’ is provided for the user to enable/disable the bounding box feature. Once enabled, every time an object is held in front of the camera, a box will be drawn around it in the UI. In the Sample App, the first video frame is considered as the, ‘background’ that is used for comparison with all the other consecutive frames. Bounding box is detected based on the difference observed during the video frame comparison. User may choose to set the background manually by clicking on the ‘Set Background’ button as well. Once the ‘Set Background’ button is pressed, the particular video frame at that point will be considered for comparison purpose.

Below is a brief description of the inner functionality of the Bounding Box implementation.

The file ‘camera_bounding_box_factory.h’ should be included in the .cpp file in which the bounding box functionality is implemented.

First, a pointer of the ‘CameraBoundingBoxDetectorInterface’ is defined.


CameraBoundingBoxDetectorInterface* frameProc;

Next, a vector is defined to hold information relevant to the Bounding Box.


vector<BoundingBoxPoint> bounding_rect;

‘bounding_rect’ is used to contain information of the left bottom coordinates, width and the height of the bounding box. With the following code lines, initialization of the ‘frameProc’ takes place.


frameProc = CameraImageProcessingFactory::CreateBoundingBoxDetector(BackgroundFilterType::kStatic);

As the ‘BackgroundFilterType’, user may use ‘kStatic’ , ‘kDynamic’, ‘kDynamicGaussian’. But for continuous detection of bounding box, filter type ‘kStatic’ should be used.Initially it is required to capture a snapshot from the camera without any objects in the fore front. This image is considered as the Background frame that gets compared with every frame that comes next to check if a movement has occurred. If a movement is detected, the object that caused the movement is identified and a rectangle is drawn surrounding it. The method ‘SetBackgroundFrame’ should be called to set the Background for comparison. Before passing parameters to ‘SetBackgroundFrame’, the image that is displayed in the GUI needs to be converted to either a BMP or a JPG image. The conversion can be achieved by the following code lines.


std::vector<uint8_t> data = Encode(zebra::image::FileConverter::RGB_TO_BMP, image);  

‘&data[0]’ and ‘data.size()’ are the converted image data and the converted image size respectively.’0’ or ‘1’ should be given if the image type is BMP or JPG respectively. Then the converted image data is provided to the ‘SetBackgroundFrame’ method.


frameProc->SetBackgroundFrame(&data[0], data.size(),image_width_, image_height_,0);

Full description of the method is provided below.

  • Sets the background frame (call with first frame / frame to reset background)
  • background_frame_buffer : background frame buffer
  • length : length of background frame buffer
  • image_width: width of background frame
  • image_height: height of background frame
  • image_type: type of background frame (reserved : 0:BMP,1:JPEG)

virtual void SetBackgroundFrame(BYTE* background_frame_buffer, int length, int image_width, int image_height , int image_type) = 0;

After setting the Background, ‘DetectBoundingBox’ method needs to be called. ‘DetectBoundingBox’ method accepts image file type as its first argument. Hence it is required to do an image conversion before passing parameters to the method.


std::vector<uint8_t> data = Encode(zebra::image::FileConverter::RGB_TO_BMP, image); 

An RGB image is displayed when the Sample App is run. In order to call the ‘DetectBoundingBox’ method, the said image needs to be converted to BMP or JPG.


bool rect_found = frameProc->DetectBoundingBox(&data[0], data.size(), image_width_,image_height_,0,bounding_rect);

Full method definition is explained below.

  • Detects the foreground object bounding box in the specified frame
    • input_frame_buffer : input image buffer
    • length : length of input frame buffer
    • image_width: width of input image
    • image_height: height of input image
    • image_type: type of input image (reserved : 0:BMP,1:JPEG)
    • bounding_rect : output bounding box location point array
    • return value : returns true if bounding box found

virtual bool DetectBoundingBox(BYTE* input_frame_buffer, int length, int image_width, int image_height,int image_type, vector &bounding_rect) = 0;

When the above method returns ‘True’, ‘bounding_rect’ vector gets filled with values needed to draw the rectangle on the GUI to represent the bounding box.


float x_pos = (float)bounding_rect[0].x;
float y_pos = (float)bounding_rect[0].y;

float rect_width = (float)bounding_rect[3].x - (float)bounding_rect[0].x ;
float rect_height= (float)bounding_rect[3].y - (float)bounding_rect[0].y;

Information such as x, y coordinate of the left bottom of the rectangle, width and the height of the rectangle is provided by the vector ‘bounding_rect’. This in turn can be used to draw a rectangle using wxWidgets.


Video Profile Property

Video Profile property drop down is populated at the beginning with a call to GetSupportedFrameTypes(). Based on the user choice, video profile of the camera is changed using SetCurrentFrameType(..). The way in which this can be achieved is shown in the code snippet given below.


void SetCurrentFrameTypeTest(std::shared_ptr<zebra::camera_sdk::ZebraCameraClient> camera)
{
    std::vector<zebra::camera_sdk::FrameType> data = camera->GetSupportedFrameTypes();

    for (size_t i = 0; i < data.size(); i++)
    {
        std::cout << (int)data[i].format << "," << data[i].width << ", " << data[i].height << "," << data[i].framerate << std::endl;
    }

    if (data.size() > 1)
    {
        int i = 1;
        camera->SetCurrentFrameType(data[i]);
        std::cout << (int)data[i].format << "," << data[i].width << ", " << data[i].height << "," << data[i].framerate << std::endl;
    }
}

Figure 7: Video Profile Property

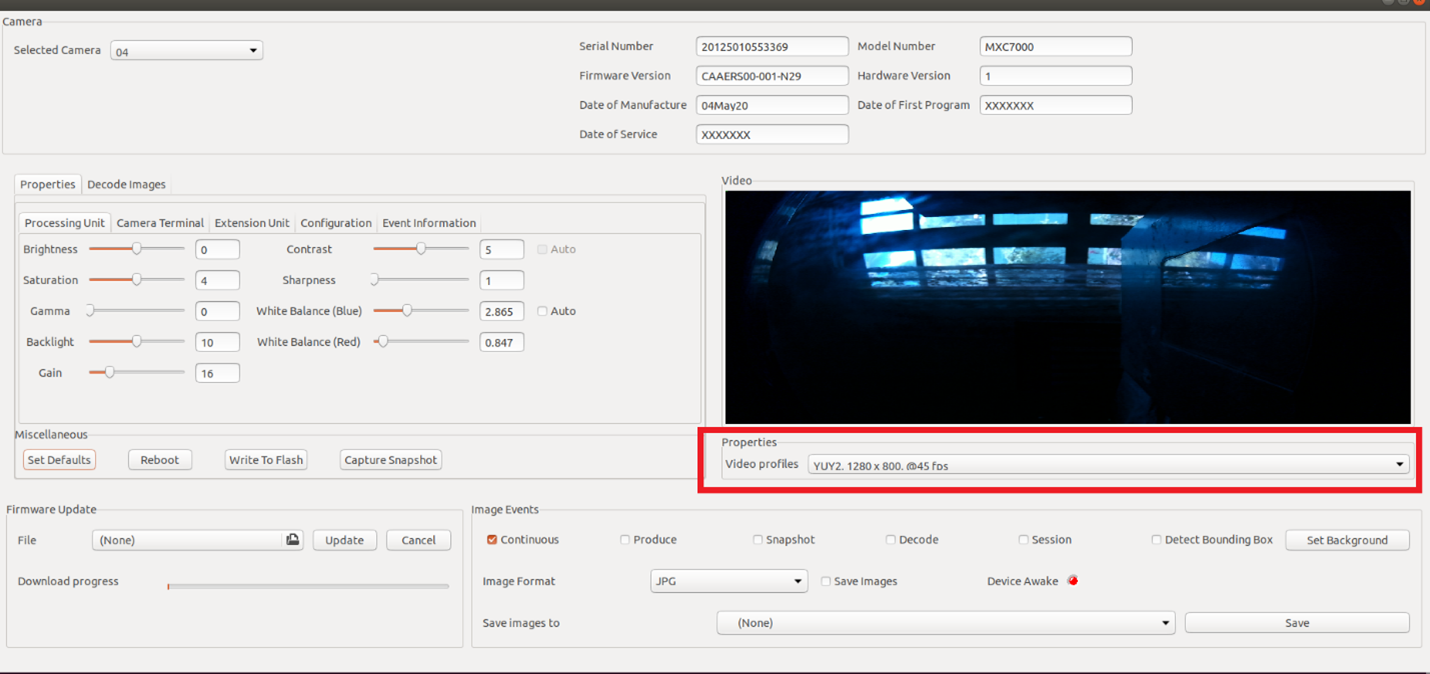
Using the drop-down menu shown above, user is able to select the desired Video Profile. Options available in the drop-down menu are as follows, YUY2 960 x 600 @45 fps, YUY2 1200 x 800 @45 fps, YUY2 480 x 300 @45 fps, YUY2 320 x 200 @45 fps.

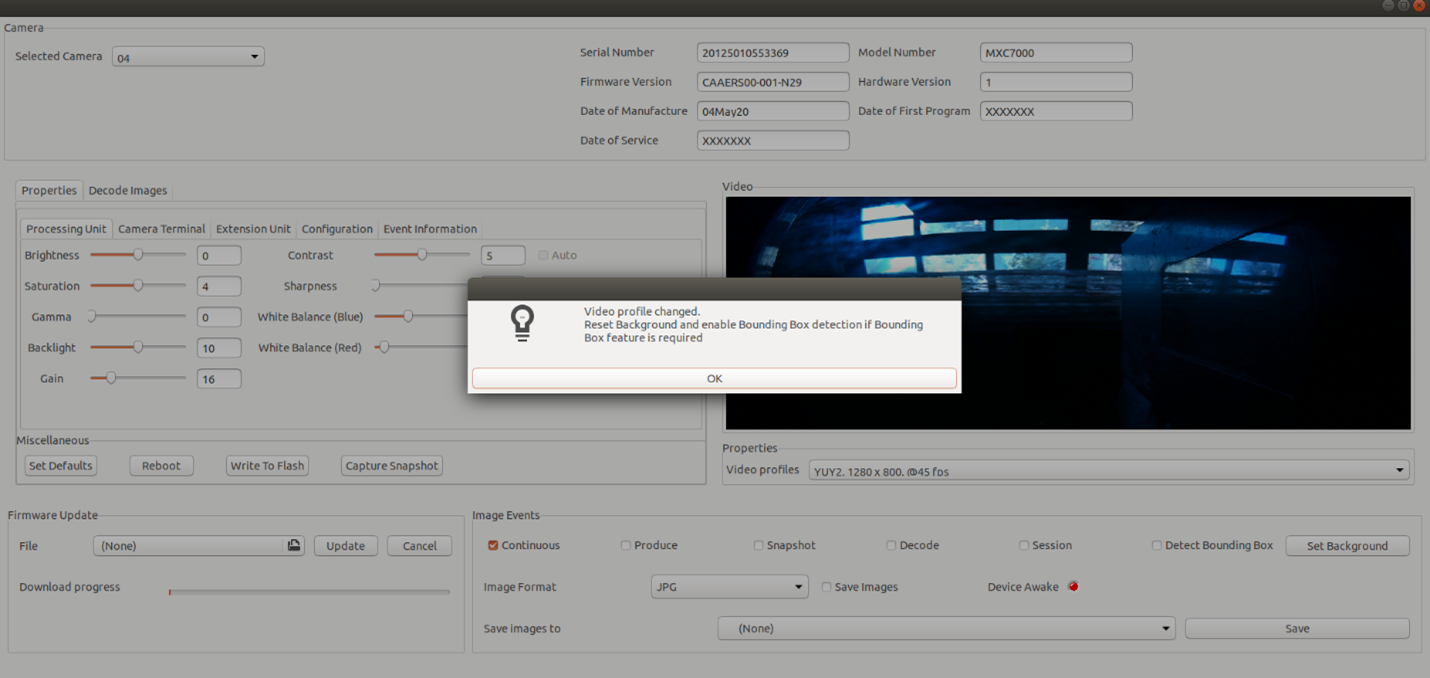
With every selection, a message box is displayed in the Sample App to alert the user to perform a ‘Set Background’ again, which is a mandatory step required in Bounding Box feature. As explained in the previous section, Bounding Box feature operates with a comparison between the set Background frame and the incoming video frame. For the comparison to be successful, both frames should be of the same video profile. Hence with every change of video profile, Background frame has to be reset, if the user desires to make use of the Bounding Box feature.

Figure 8: Video Profile Property Changed
Also, options available in the drop down would vary depending on the USB ports used to connect the camera and the scanner cables. For instance, more options will be present in the drop-down menu when connected to USB 3.0 port than when connected to USB 2.0 port.


Monochrome Library

Pre-requisites

Please refer the Jetson Nano - USB 2.0 OTG Mass Storage Configuration Instructions to configure the hardware setup required to get tower platter images from MP7

Create a C++ application with a preferred IDE. In this example, IDE ‘CodeBlocks’ has been used.

  1. Create a sample GUI.

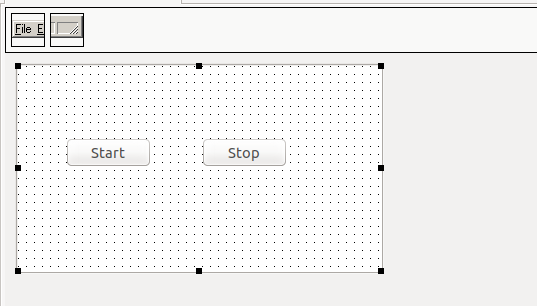
    For this sample application, a simple UI is created with only 2 buttons.
    Start – Registers app with monochrome library. Requests to send events when available.
    Stop – Requests to stop sending events.

    Figure 9: Creating a New Project
  2. Add Monochrome library to the application. For the purpose of documentation,

    1. Create a directory named ‘lib’ and place the ‘libmonochrome-sdk.so’ shared object files (This can be found inside /usr/lib/zebra-camera) in the ‘lib’ directory.
    2. Create a directory named ‘include_tp_header’ and place the header files of the monochrome library in that directory.(headers can be found inside /usr/include/zebra-camera/monochrome_sdk directory.)
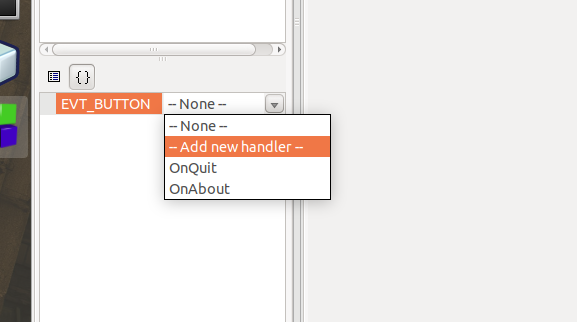
  3. Create ‘button-click’ events for the application.

    Figure 10: Create Events
  4. Create a class to register to events by implementing a pure abstract class “ImageEventSubscriber”. In this example, a class called ‘ImageEventSubscriberSample’ is created.

    1. The header file is given below.

      
      #ifndef IMAGE_EVENT_SUBSCRIPTION_IMPL_H
      #define IMAGE_EVENT_SUBSCRIPTION_IMPL_H
      
      #include "image_event.h"
      #include "image_event_subscriber.h"
      
      /**
      * Sample implementation of the ImageEventSubscriber class.
      * ImageEventSubscriber is a pure abstract class. User can implement(inherit)
      * the class to own class and override the RecieveImageEvents method to get the image events.
      */
      class ImageEventSubscriberSample : public ImageEventSubscriber 
      {
          public:
              /**
              * Sample implementation of the pure virtual method RecieveImageEvents
              * given in the ImageEventSubscriber class.
              * @param image_creation_event ImageCreationEvent object contains the tower platter image data.
              */
              void RecieveImageEvents(ImageCreationEvent *image_creation_event);
      };
      
      #endif /* IMAGE_EVENT_SUBSCRIPTION_IMPL_H */
      
      
    2. Source (cpp) file is provided below.

      Note: As the document is a guide on implementing the monochrome library, the example here only shows, how to retrieve image data. User can use preferred method to show the data in GUI or save images as files. The tower platter image data is contained inside ‘ImageCreationEvent’ class. Data can be retrieved using GetTowerImage() api and GetPlatterImage() APIs. The pure virtual method ‘void RecieveImageEvents (ImageCreationEvent *image_creation_event)’ has to be overridden to receive events.

      
      #include <iostream>
      #include <string>
      #include "image_event_subscriber.h"
      #include "image_event.h"
      #include "image_event_subscription_impl.h"
      
      void ImageEventSubscriberSample::RecieveImageEvents(ImageCreationEvent *image_creation_event)
      {
          uint8_t *tower_image_ptr = image_creation_event_.GetTowerImage();
          uint8_t *platter_image_ptr = image_creation_event_.GetPlatterImage(); 
      }
      
      
  5. In the main program header, two member variables are created to hold the instance of two classes. Namely, ‘ImageEventSubscriberSample’ class that was created earlier and the pure virtual ‘DirectoryObserver’ class. ‘DirectoryObserver’ can be initialized with the implementation of ‘ImageCreationObserver’ object.

    Note: The auto generated code snippets of the CodeBlocks IDE haven been left out of this Guide for better understanding and only applicable sections of the ‘header’ file have been included.

    
    #include "image_event_subscription_impl.h"
    #include "directory_observer.h"
    #include "image_event.h"
    
    class Tower_Platter_SampleFrame: public wxFrame
    {
        public:
            Tower_Platter_SampleFrame(wxWindow* parent,wxWindowID id = -1);
            virtual ~Tower_Platter_SampleFrame();
    
        private:
            // ... some more auto generated codes
    
            //(*Declarations(Tower_Platter_SampleFrame)
            wxStatusBar* StatusBar1;
            wxButton* btn_stop_;
            wxButton* btn_start_;
            //*)
    
            ImageEventSubscriber* subscriber_;
            DirectoryObserver *dir_observer_;
    
            DECLARE_EVENT_TABLE()
    };
    
    
  6. Implementation of the ‘onclick’ event of the ‘start’ button takes place in the source of the main program

    
    void Tower_Platter_SampleFrame::Onbtn_start_Click(wxCommandEvent& event)
    {
        try
        {
            subscriber_ = new ImageEventSubscriberSample();
    
            // creates DirectoryObserver object and registers the above
            // created ImageEventSubscriber object.
            dir_observer_ = new ImageCreationObserver();
            dir_observer_->StartObserving(subscriber_);
        }
        catch (std::exception& exception)
        {
            std::cout << "Exception : " << exception.what()  << std::endl;
        }
    }                                                                    
    
    
  7. OnClick’ event of the ‘Stop button’

    
    void Tower_Platter_SampleFrame::Onbtn_stop_Click(wxCommandEvent& event)
    {
        try
        {
            // stops scanning for new tower platter images
            dir_observer_->StopObserving();
        }
        catch (std::exception& exception)
        {
            std::cout << "Exception : " << exception.what()  << std::endl;
        }
    }                                                                    
    
    
  8. In order to receive image events, TriggerTowerPlatterImageEvent() API should be called, once the DecodeImageEvent is received from the camera SDK.

    
    class DecodeImageEventObserver: public DecodeImageEventListener 
    {
        public:
            void ImageReceived(ImageEventData ev, ImageEventMetaData md) {
                dir_observer_->TriggerTowerPlatterImageEvent();
            }
    };


    Notifies the trigger Tower/Platter Image Events.

    
    TriggerTowerPlatterImageEvent();


    Every time a Decode Image event is triggered, the two corresponding Tower/Platter images will be saved in the Mass Storage by the MP7. When a call is made to ‘TriggerTowerPlatterImageEvent()’, those two images can be retrieved from the Mass Storage through ‘ReceiveImageEvents()’.

  9. 'CMakeList’ file creation.

    Monochrome library can be linked to the project using ‘cmake’. If the user wishes, the same can be achieved with terminal commands as well.

    
    cmake_minimum_required (VERSION 3.8)
    project (gui_sample)
    
    find_package(wxWidgets COMPONENTS core base REQUIRED)
    # wxWidgets include
    include( "${wxWidgets_USE_FILE}" )
    
    set(CMAKE_CXX_STANDARD 11)
    set(CMAKE_CXX_STANDARD_REQUIRED on)
    
    #include library headers 
    include_directories(${CMAKE_CURRENT_SOURCE_DIR}/include_tp_header)
    include_directories(${CMAKE_CURRENT_SOURCE_DIR}/include)
    
    # Link with the shared library:
    link_directories(${CMAKE_CURRENT_SOURCE_DIR}/lib/)
    set ( PROJECT_LINK_LIBS libmonochrome-sdk.so )
    
    # Create an executable
    file(GLOB SOURCE "*.cpp")
    add_executable(gui_sample ${SOURCE})
    
    # Set output target to build directory
    set_target_properties(gui_sample PROPERTIES RUNTIME_OUTPUT_DIRECTORY ${CMAKE_CURRENT_SOURCE_DIR}/build)
    
    target_link_libraries(gui_sample ${PROJECT_LINK_LIBS} )
    target_link_libraries(gui_sample ${wxWidgets_LIBRARIES})
    
    
  10. Build and Run.

    A terminal should be opened in the same folder that contains the CMakeList.txt. Then the following commands should be executed as shown in the code snippets below.

    
    cmake .
    make


    The ‘build’ directory should be opened, and the following code line should be used for execution of the program.

    
    run “./gui_sample” 
    
    
  11. Configuration settings of tower/platter imaging library.

    Tower/platter imaging library configuration file is available at: "/usr/share/zebra-camera/configs/zebra-camera-sdk/camera-sdk-conf.xml"

    • mp_mass_storage_path – Partition path of the SD card that MP7 writes tower/platter images (without trailing “/”). e.g.<mp_mass_storage_path>/media/zebra/mp7flash/Zebra_DecodeImages</mp_mass_storage_path>
    • mass_storage_dev_path – Device path of the mass-storage (without trailing “/”). e.g. <mass_storage_dev_path>/dev/mmcblk0p15</mass_storage_dev_path>
    • mp_mass_storage_mount_point – Specify the mount location of the mass storage device. It will be appeared as storage device after mounting to this location. e.g.<mp_mass_storage_mount_point>/media/zebra/mp7flash</mp_mass_storage_mount_point>
    • mount_command_wait_time - Specify the time delay for mount command to return.The default value is sufficient and can be increased according to the environment. e.g.<mount_command_wait_time>100000</mount_command_wait_time>
    • umount_command_wait_time - Specify the time delay for mount command to return. The default value is sufficient can be increased according to the environment. e.g. <umount_command_wait_time>100000</umount_command_wait_time>

Jetson Nano - USB 2.0 OTG Mass Storage Configuration Instructions

  • Create ‘FAT32’ partition on the Jetson Nano SD Card using ‘gparted’.
  • Insert SD card into the ‘Jetson Nano’ and power-up the board.
  • Record the partition location (i.e: /dev/mmcblk0p13) that was created on the SD card. This will be used in a step further down the document.
  • Disable ‘NVIDIA’ demo service to stop NVIDIA USB OTG demos scripts from running at startup.

    sudo systemctl disable nv-l4t-usb-device-mode
  • Create a new folder by the name,’/opt/zebra’
  • Copy ‘zebra-usb-msd’ folder to ‘/opt/zebra/’
  • Update the Zebra MSD script (zebra-usb-msd.sh) to include the location of the FAT32 partition that was created on the SD card:

    e.g. fs_img="/dev/mmcblk0p13"
  • Update permissions of the script files:

    chmod a+x zebra-usb-msd.sh chmod a+x zebra-usb-msd-stop.sh
  • Enable Zebra MSD service:

    sudo systemctl enable /opt/zebra/zebra-usb-msd/zebra-usbmsd.service
  • Start Zebra MSD service:

    sudo systemctl start zebra-usb-msd
  • Reboot the Jetson Nano
  • After the Jetson Nano is rebooted, USB cable from the OTG port should be attached to an Ubuntu machine.
  • ‘Disks’ tool on the Ubuntu machine can be used to format the connected partition (FAT).
  • Once the above instructions are followed, the Jetson Nano USB MSD will then ready to be interfaced with the MP7.

MP7 Mass Storage Configuration Instructions for Saving Monochrome Images

Table 1: Mass Storage Configurations

Attribute Name Attribute ID Description Default Value Other Values
ATT_ STORE_DECODE_IMAGES 1824 Gives the command to save Decoded images 0
  • 0 - No saving
  • 1 - Saves the image with the slowest decode time
  • 2 - Saves all Decoded Images in the USB drive
ATT_IMAGE_SUBSAMPLE 302 More time is consumed during image saving when the image resolution is high. Decode Image resolution can be reduced by varying the Attribute value. 0
  • 0 – Full resolution
  • 1 – Reduces the image resolution by 1/2
  • 2 – Reduces the image resolution by 1/4
ATT_STORE_DECODE_IMAGES_COUNT 2046 Determines the number of images that can be saved in the storage device 4 Any value between 4 -100. Recommended value for tower/platter images is 10.

Changes Introduced with Multiclient Approach

Zebra_camera_client.h

Listed below are some of the API calls that underwent changes with the introduction of the Multiclient approach. User may locate the following API s in ‘zebra_camera_client.h’ file.

Expert Level APIs


// Returns property value as a buffer.
virtual std::vector GetProperty(Get function, uint8_t unit_or_terminal_id, uint8_t property_id) = 0;

// Set property value as a buffer.
virtual void SetProperty(Set function, uint8_t unit_or_terminal_id, uint8_t property_id, std::vector value) = 0;

// Returns property attributes
virtual AttributeInfo GetPropertyInfo(uint8_t unit_or_terminal_id, uint8_t property_id) = 0;

// Returns true if the specified property is unit or terminal supported.
virtual bool IsPropertySupported(uint8_t unit_or_terminal_id, uint8_t property_id) = 0;

// Returns true if the property supports auto control
virtual bool IsAutoSupported(uint8_t unit_or_terminal_id, uint8_t property_id) = 0;

// Returns true if auto functionality of an auto supported property is enabled.
virtual bool IsAutoEnabled(uint8_t unit_or_terminal_id, uint8_t property_id) = 0;

// Enable/disable auto functionality of an auto supported property.
virtual void AutoEnable(bool enable, uint8_t unit_or_terminal_id, uint8_t property_id) = 0;

Asset Tracking APIs


// Returns serial number as a string.
virtual std::string GetSerialNumber() = 0;

// Returns Camera model number as a string.
virtual std::string GetModelNumber() = 0;

// Returns Date of manufacture as a string.
virtual std::string GetDateOfManufacture() = 0;

// Returns Date of first program as a string.
virtual std::string GetDateOfFirstProgram() = 0;

// Returns First service date as a string.
virtual std::string GetFirstServiceDate() = 0;

// Returns Firmware version as a string.
virtual std::string GetFirmwareVersion() = 0;

// Returns Hardware version as a string.
virtual std::string GetHardwareVersion() = 0;

Video APIs


// Returns supported frame types.
virtual std::vector GetSupportedFrameTypes() = 0;

// Returns current setting for the frame type.
virtual FrameType GetCurrentFrameType() = 0;

// Set Current setting for the frame type.
virtual void SetCurrentFrameType(FrameType frame_type) = 0;

// Adding a listener for continuous image events.
virtual void AddContinuousImageEventListener(ContinuousImageEventListener& listener) = 0;

// Removing the specified continuous image event listener
virtual void RemoveContinuousImageEventListener(ContinuousImageEventListener& listener) = 0;

// Adding a listener for snapshot image events
virtual void AddSnapshotImageEventListener(SnapshotImageEventListener& listener) = 0;

// Removing the snapshot image listener
virtual void RemoveSnapshotImageEventListener(SnapshotImageEventListener& listener) = 0;

// Adding a listener for produce image events.
virtual void AddProduceImageEventListener(ProduceImageEventListener& listener) = 0;

Removing the produce image event listener.// 
virtual void RemoveProduceImageEventListener(ProduceImageEventListener& listener) = 0;

// Adding a listener for decode image events.
virtual void AddDecodeImageEventListener(DecodeImageEventListener& listener) = 0;

// Removing the decode image event listener.
virtual void RemoveDecodeImageEventListener(DecodeImageEventListener& listener) = 0;

// Adding a listener for decode session status change event.
virtual void AddDecodeSessionStatusChangeEventListener(DecodeSessionStatusChangeEventListener& listener) = 0;

// Removing the decode session status change listener.
virtual void RemoveDecodeSessionStatusChangeEventListener(DecodeSessionStatusChangeEventListener& listener) = 0;

Miscellaneous


// Set values of the parameters to their default values.
virtual void SetDefaults() = 0;

// Write current property values to flash memory.
virtual void WriteToFlash() = 0;

// Capture a single frame of image (Snapshot).	
virtual Image CaptureSnapshot() = 0;

zebra_camera_manager_client.h

The following two files need to be included in the ‘zebra_camera_manager_client.h’.


#include "zebra_camera_manager_types.h"
#include "zebra_camera_client.h"

An abstract class that represents an observer of the "Firmware Update" event has been newly introduced.


class FirmwareDownloadEventListener 
{
    public:
        virtual ~FirmwareDownloadEventListener() {}
        virtual void EventReceived(FirmwareDownloadEventsArgs) = 0;
};

The following API calls were modified to incorporate the Multiclient approach. The files can be found inside ‘zebra_camera_manager_client.h’.

                            
// Create a ZebraCameraClient from the provided CameraInfo.	
virtual std::shared_ptr<ZebraCameraClient> CreateZebraCamera(zebra::DeviceInfo camera_info) = 0;

// Reboot the specified ZebraCamera.	
virtual std::shared_ptr<ZebraCameraClient> Reboot(std::shared_ptr<ZebraCameraClient> camera, uint16_t timeout = 20) = 0;
	
// Download firmware to Zebra camera.	
virtual void DownloadFirmware(std::shared_ptr<ZebraCameraClient> camera, std::string filepath) = 0;
	
// Install downloaded firmware.
virtual std::shared_ptr<ZebraCameraClient> InstallFirmware(std::shared_ptr<ZebraCameraClient> camera, uint16_t timeout = 20) = 0;

// Cancel a firmware update.	
virtual void CancelFirmwareDownload(std::shared_ptr<ZebraCameraClient> camera) = 0;
	
// Add firmware download event listener.	 
virtual void AddFirmwareDownloadEventListener(FirmwareDownloadEventListener& firmware_download_event_listener) = 0;

// Remove the specified firmware download event listener.
virtual void RemoveFirmwareDownloadEventListener(FirmwareDownloadEventListener& firmware_download_event_listener) = 0;

// Retrieve the current configuration of the provided camera and return as an XML.
virtual std::string RetrieveConfiguration(std::shared_ptr<ZebraCameraClient> camera) = 0;

// Retrieve the current configuration of the provided camera and save to a *.camcfg file.
virtual void RetrieveConfigurationToFile(std::shared_ptr<ZebraCameraClient> camera, std::string configuration_file_path) = 0;
	
// Load provided configuration as an XML string to the provided camera.
virtual void LoadConfiguration(std::shared_ptr<ZebraCameraClient> camera, std::string configuration, bool persist=true) = 0;
            
// Load provided configuration as an XML file (*camcfg) to the provided camera.
virtual void LoadConfigurationFromFile(std::shared_ptr<ZebraCameraClient> camera, std::string configuration_file_path, bool persist=true) = 0;

// The following method has been newly introduced to the ‘zebra_camera_manager_client.h’.
extern std::unique_ptr<ZebraCameraManagerClient> CreateZebraCameraManagerClient();

camera_types.h

The changes introduced to ‘camera_type.h’ are as follows. Generic type for camera property is given. ‘ZebraCameraClient’ is now given access to the protected constructor.


template <typename T, CameraPropertyId ID>
class Property {
    friend class ZebraCameraClient; 

protected:
    ZebraCameraClient *camera_client_ = nullptr;

Generic type is given for camera property that supports UVC Auto setting. ‘ZebraCameraClient’ is given access to the protected constructor.


template <typename T, CameraPropertyId ID>
class PropertyAuto: public Property<T, ID> {
    friend class ZebraCameraClient;

Generic type is given for enum type properties where resolution is not applicable. ‘ZebraCameraClient’ is provided with access to the protected constructor.


template <typename T, CameraPropertyId ID>
class PropertyEx: public Property<T, ID> {
    friend class ZebraCameraClient;


Multiclient Sample Test App

Given below is a code snippet of the test app written for the purpose of testing and verification of the API calls. The way in which the’ ZebraCameraManagerClient’ object is created is shown by the lines


std::unique_ptr<zebra::camera_sdk::ZebraCameraManagerClient> cammgr = zebra::camera_sdk::CreateZebraCameraManagerClient();


int main() 
{
    cout << "begin" << endl;

    int i;
    DeviceManager mgr;
    auto devinfolist = mgr.EnumerateDevices();

    cout << "enum" << endl;

    for (auto info: devinfolist)
    {
        printf("%s: vid/pid %0x:%0x bus/addr %0x:%0x %s\n",
                __func__,
                info.vid, info.pid,
                info.bus_number, info.device_address,
                info.serial_number.c_str());
    }

    cout << "# cams = " << devinfolist.size() << endl;

    if (0 == devinfolist.size())
    {
        exit(0);
    }

    std::unique_ptr cammgr = zebra::camera_sdk::CreateZebraCameraManagerClient();

    cout << "Created camera manager client" << endl;
    cin >> i;

    std::shared_ptr camera = cammgr->CreateZebraCamera(devinfolist[0]);

    cout << "Created camera client" << endl;
    cin >> i;

    return 0;
}


API Reference

API Documentation

The Color Camera SDK for Linux API reference is generated from the source code and documents the classes, structures, methods, properties, and events that Linux applications use to control the camera.

The API reference opens in a new tab, so you can keep this guide open alongside it.

Download Color Camera SDK for Linux

IMPORTANT: Zebra recommends using the latest release whenever possible.


To Download Color Camera SDK for Linux:

  1. Visit the Zebra Color Camera SDK for Linux download page and select the desired download(s).
  2. Proceed to the Color Camera SDK for Linux release notes for the version details.