Overview
This section explains how to configure audio and vibrate options of the device, as well as Profile settings, which control how data is manipulated before and after being sent to the PC.
Audio and Vibrate Options
CartScan provides control over audio and tactile feedback to indicate each successful scan. This allows audio feedback, for example, to be disabled on the mobile device so as not to disturb patients. The CartScan Home screen displays ON/OFF switches to set audio and vibration feedback when scanning.
To configure the audio and vibrate options:
From the CartScan Home screen, tap Audio and Vibrate switches to set as desired:
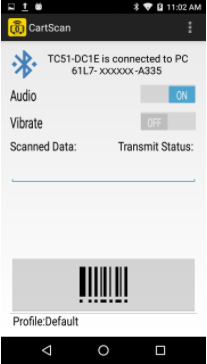 Configure Audio and Vibrate Options
Feedback Settings:
Audio - controls beep sound played with each successful scan (default = ON)
Vibrate - controls tactile feedback activated with each successful scan (default = OFF)
Note: These settings apply only to barcodes scanned with CartScan; sounds and feedback settings of other apps and the system are not effected by these controls.
Configure Profiles
CartScan behavior is controlled by Profiles, which define how acquired data is processed and delivered to a line-of-business (LOB) application. Profiles also can be used to control cursor movement. For example, the addition of a TAB keystroke at the end of an acquired data string moves the cursor to the next field after the data is deposited into the current field. See the ADF Keystrokes section of this page for more information.
IMPORTANT: Do not modify CartScan Profile settings from within DataWedge on the mobile device. Doing so results in unpredictable CartScan behavior.
To view/edit a Profile:
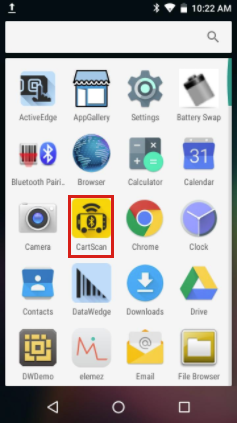
- On the mobile device, locate and tap the CartScan icon:
- Tap Menu > Profiles.
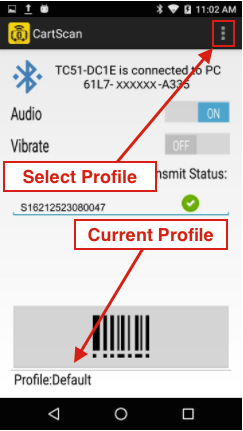
- The Profiles list appears.
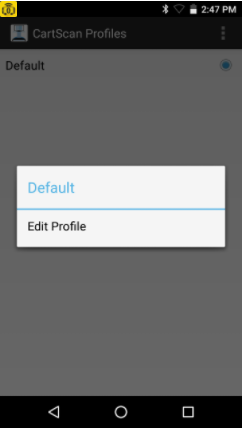
Tap and hold "Default":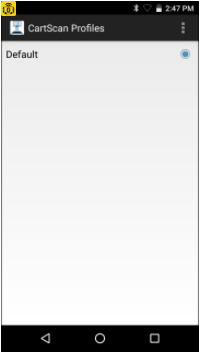
- For Profiles other than "Default," select "Rename" or "Delete" options as needed:

- For editing, tap "Edit Profile" to view and/or edit the Profile settings:
- Configure Profile settings and Data Formating as required:
Profile Settings:
Ignore Session Timeout - maintain the connection indefinitely (or until the user exits the CartScan app or the mobile device moves out of range). Disabling the session timeout is strongly discouraged.
Session Timeout - sets the length of time (from 1 - 60 minutes) to maintain the Bluetooth connection between the mobile device and the PC during periods of inactivity. Default = 2 minutes. Active only when Ignore Session Timeout is disabled.
Enable/disable BT Output - provides a measure of security by restricting delivery via Bluetooth of acquired data to the application running on a PC. If this setting is disabled, the scanned data is not delivered to the connected PC.
Profile Notes:
- The Default Profile cannot be renamed or deleted
- If
AllowProfileEditingoption is set to false:- Profile settings can be viewed but not changed
- Rename and Delete options are not available
- If a Profile is renamed using a name that already exists, an error occurs
Data Formatting
Data formatting provides an easy way to append or prepend acquired data with custom values or keystrokes before passing it to the LOB application on the PC. This can be useful for adding application-specific characters to acquired data or for sending an ENTER and/or TAB character after submitting the data to advance the cursor to the next field.
IMPORTANT: Do not modify CartScan Profile settings from within DataWedge on the mobile device. Doing so results in unpredictable CartScan behavior.
Enable/disable data formatting - controls access to Basic or Advanced Data Formatting functions. If Data Formatting is not enabled, scanned data is passed to the LOB application without modification or extra keystrokes.
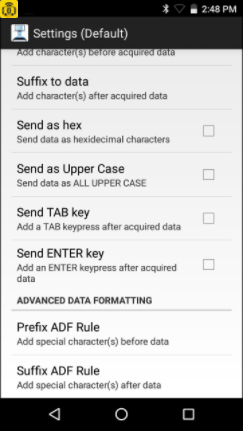
Basic Data Formatting
Appends or prepends acquired data with a simple set of values and special keystrokes.
Prefix to data - adds (prepends) the specified character(s) to the beginning of the acquired data before sending.
Suffix to data - adds (appends) the specified character(s) to the end of the acquired data before sending.
Send as hex - sends the data in hexadecimal format. For example, if the acquired barcode data is 012345, this option sends the hex equivalent of 303132333435.
Send as Upper Case - sends the data in all caps. For example, if the acquired barcode data is abcde, this option sends the string of ABCDE. Any selected prefix and/or suffix data also is converted to upper case, as appropriate.
Send TAB key - appends a TAB character to the processed data.
Send ENTER key - appends an ENTER character to the processed data.
Advanced Data Formatting
Append or prepends acquired data with special characters and keystrokes such as functional keys, mouse clicks, spaces and num-lock characters.
Prefix ADF Rule - Can be configured as displayed in the following table. Keys can be selected from the scrolling list without manually entering the details.
Suffix ADF Rule - Can be configured as displayed in the following table. Keys can be selected from the scrolling list without manually entering the details.
NOTE: ADF keystrokes are visible only in the LOB application on the PC and not in the CartScan app.
Supported ADF Keystrokes
Only the Advanced Data Formatting options listed in this table are supported.
|
ALT 2 |
LEFT ARROW Key |
Browser Back Key |
|
ALT [A-Z] |
UP ARROW Key |
Browser Refresh Key |
|
ALT [ |
RIGHT ARROW Key |
Browser Stop Key |
|
ALT ] |
DOWN ARROW Key |
Browser Search Key |
|
Control-break processing |
PRINT SCREEN Key |
Browser Favorites Key |
|
BACKSPACE Key |
INS Key |
Browser Start and Home Key |
|
TAB Key |
DEL Key |
Volume Mute Key |
|
ENTER Key |
HELP Key |
Volume Down Key |
|
SHIFT Key |
Number Keys [0-9] |
Volume Up Key |
|
CTRL Key |
Alphabet Keys [A-Z] |
Next Track Key |
|
ALT Key |
Left Windows Key (Natural Keyboard) |
Previous Track Key |
|
CAPS LOCK Key |
Right Windows Key (Natural Keyboard) |
Stop Media Key |
|
ESC Key |
Applications Key (Natural Keyboard) |
Play/Pause Media Key |
|
SPACEBAR |
Computer Sleep Key |
Start Mail Key |
|
PAGE UP Key |
Numeric Keypad [0-9] |
Select Media Key |
|
END Key |
Add Key |
; Key |
|
HOME Key |
NUM LOCK Key |
, Key |
|
Subtract Key |
SCROLL LOCK Key |
- Key |
|
Decimal Key |
Left SHIFT Key |
. Key |
|
Divide Key |
Right SHIFT Key |
/ Key |
|
Functional Keys [F1-F24] |
Left CONTROL Key |
` Key |
|
Single-quote Key |
Right CONTROL Key |
[ Key |
|
Separator Key |
\ Key |
] Key |
Only the Advanced Data Formatting options listed in the table above are supported.
Unsupported ADF Keystrokes
|
CTRL 2 |
SELECT Key |
Left MENU Key |
|
CTRL [A-Z] |
PRINT Key |
Right MENU Key |
|
CTRL [ |
EXECUTE Key |
Browser Forward Key |
|
CTRL ] |
Multiply Key |
Start Application 1 Key |
|
CTRL 6 |
CLEAR Key |
Start Application 2 Key |
|
CTRL - |
PAUSE Key |
+ Key |
|
Middle mouse button (three button mouse) |
Left mouse button |
Right mouse button |
|
X1 mouse button |
X2 mouse button |
|
Mass Deployment
Once CartScan is set up and configured as desired on a device, settings can be saved to a file and distributed to other devices either manually or using a Mobile Device Management (MDM) system. Profiles created with CartScan will work on all Zebra devices that support CartScan.
Export Profiles
Settings for all the Profiles on a device are saved in a single file called CartScanConfig.xml. This file can be exported, distributed and imported onto other devices, where its settings are activated automatically.
To export Profile settings:
- On the mobile device, locate and tap the CartScan icon:
- Tap Menu > Profiles.
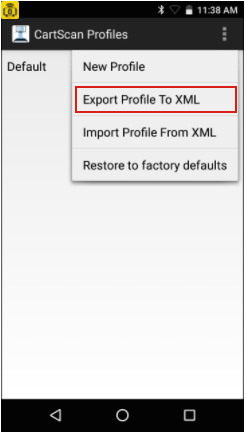
- From the Profiles screen, Tap Menu again and Tap the "Export Profile to XML" option:
- Place checkmark(s) next to the Profile(s) to export.
All selected Profiles will appear on the destination device just as they do on the source. Tap "Export" when all desired Profiles are selected.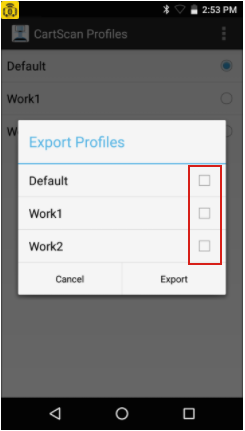
- Make note of the file path in the confirmation screen that appears:
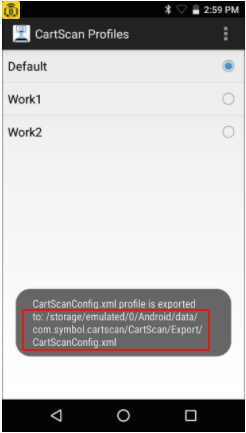
Export Notes
- The config file is saved in the path:
/sdcard/Android/data/com.symbol.cartscan/CartScan/Export/CartScanConfig.xml - The config file can be viewed using the File Browser on the mobile device.
- Exported Profiles are always stored with the following settings by default:
AllowProfileEditing= trueRestoreToDefault= false (see below)
- Information about the Profile active on the mobile device is not contained in the exported file. An imported Profile must be set as the active Profile either manually or with an intent (See Import Notes, below).
Import Profiles
CartScan configuration (.xml) files exported from one mobile device can be imported onto other mobile devices automatically or manually after being pushed to the device using a Mobile Device Management (MDM) system or other means.
To manually import a config file already on the device:
- On the mobile device, locate and tap the CartScan icon:
- Tap Menu > Profiles.
- From the Profiles screen, Tap Menu again and Tap the "Import Profile From XML" option:
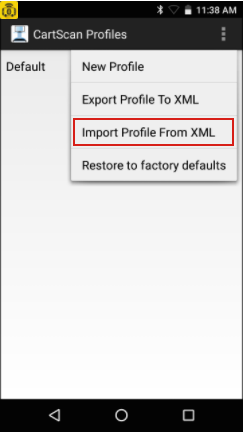
- Navigate to the location of the file being imported and select it. For example:
/storage/emulated/0/Android/data/com.symbol.cartscan/CartScan/Export/CartScanConfig.xml
Confirm whether to replace the existing Profile (if so, Tap "Yes"):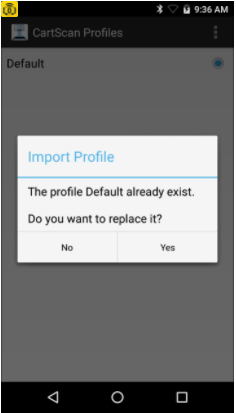
- Tap the HOME key to quit CartScan.
New settings are applied the next time CartScan is launched.
Import Notes
- When importing an exported Profile, the following default settings are imported:
AllowProfileEditing= trueRestoreToDefault= false
AllowProfileEditingcontrols the ability of a device user to make modifications to Profile settings of an imported file (default = false).- When
AllowProfileEditingis set to FALSE, some menu items are disabled. **This can be undone only by deploying a new configuration file withAllowProfileEditingset to TRUE. RestoreToDefault(when true) replaces all existing Profiles on the mobile device with those of the imported file and resets the default Profile to its default values without user confirmation (default = false).- Remote configuration and importing a Profile XML file locally do not change the active Profile unless the
RestoreToDefaultparameter is set to TRUE. - If RestoreToDefault is set to TRUE, the selected Profile replaces ALL existing Profiles and is set as the default Profile.
- An imported Profile is not automatically selected as the active Profile.
- If RestoreToDefault is set to FALSE, new Profiles are added to the existing Profiles.
- If a Profile of the same name exists on the mobile device as one being imported:
- A manual import prompts to "Replace "or "Cancel" incoming profile
- An intent-based import replaces the existing Profile
See the Intents section for more information about sending and receiving intents.
Restore Factory Default Settings
To restore CartScan to the factory default settings:
- On the mobile device, locate and tap the CartScan icon:
- Tap Menu > Profiles.
- From the Profiles screen, Tap Menu again and Tap the "Reset to factory defaults" option:
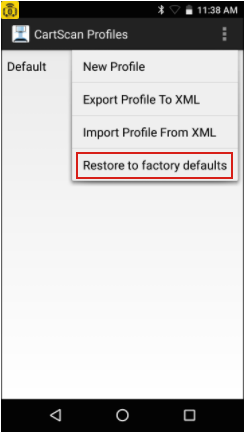
- Tap "Restore" to confirm resetting the device to factory defaults.
- Tap the HOME key to quit CartScan.
New settings are applied the next time CartScan is launched.
Remote Deployment
A Mobile Device Management (MDM) administrator can configure CartScan settings on a device using intents. For example, the following commands push an XML file to the mobile device and start ConfigIntentService (using Activity Manager) with the intent extra value pair of SET_CONFIG_FILE and CartScanConfig.xml config file itself:
Example
adb push CartScanConfig.xml /sdcard/
adb shell am startservice -a com.symbol.cartscan.ConfigIntentService -e SET_CONFIG_FILE “/sdcard/CartScanConfig.xml”
To deploy a CartScanConfig.xml file:
- Push the config file to
/sdcardon the mobile device. - Send intent to
com.symbol.cartscan.ConfigIntentServicewith the XML file path. - Tap the HOME key to quit CartScan.
New settings are applied the next time CartScan is launched.
Sample Config File
A sample of the CartScanConfig.xml is shown below. This file can be displayed on the mobile device and viewed or edited on a PC using an ordinary text editor. Note: The CartScan 2.1 parameters indicated below cannot be controlled remotely through the config file.
<wap-provisioningdoc>
<characteristic type="CartScan" version="1.0">
    <parm name="AllowProfileEditing" value="true"/>
    <parm name="RestoreToDefault" value="false"/>
    <parm name=" BTTimeOut " value="1000"/>
    <parm name="EnableLogging" value="true"/> //remote config not supported
        <characteristic type="CartScanProfile">
            <parm name="ProfileName" value="Default"/>
            <parm name="AudioMode" value="2"/> //remote config not supported
            <parm name="HapticMode" value="1"/> //remote config not supported
            <parm name="IgnoreSessionTimeout" value="false"/>
            <parm name="TimeOut" value="2"/>
            <parm name="BTEnable" value="true"/>
            <parm name="DataFormattingEnable" value="true"/>
            <parm name="BdfPrefix" value=""/>
            <parm name="BdfSuffix" value=""/>
            <parm name="BdfSendHex" value="false"/>
            <parm name="BdfSendUpper" value="false"/>
            <parm name="BdfSendTab" value="false"/>
            <parm name="BdfSendEnter" value="false"/>
            <parm name="AdfPrefix" value=""/>
            <parm name="AdfSuffix" value=""/>
        </characteristic>
</characteristic>
Configure Intents
A new CartScan configuration can be pushed to a device by sending an intent with the following values:
Sending an Intent
- Intent Type -
StartService - Package Name -
com.symbol.cartscan - Class Name -
com.symbol.cartscan.ConfigIntentService
Extras
- SET_CONFIG_FILE: Configuration XML string
Example
This code sends an intent to CartScan with the path to the config file on the device.
Intent AdminStartServiceIntent = new Intent();
AdminStartServiceIntent.setComponent(new ComponentName("com.symbol.cartscan", "com.symbol.cartscan.ConfigIntentService"));
AdminStartServiceIntent.putExtra("SET_CONFIG_FILE", "<PATH TO CARTSCAN XML CONFIGURATION>");
startService(AdminStartServiceIntent);
Receiving an Intent
When config file processing is completed (or if an error occurs during processing), a Broadcast intent is sent, and can be received by any app registered using the com.symbol.cartscan.RESPONSE receiver with the following values:
- Intent Type -
Broadcast - Action Name -
com.symbol.cartscan.RESPONSE
Extras
- STATUS: Pass or Fail
- ERROR_MESSAGE: Error Message
- CONFIG_XML: Configuration XML string
Example
Register to receive CartScan broadcast intents.
<intent-filter>
<action android:name="com.symbol.cartscan.RESPONSE"/>
</intent-filter
Example
Code for writing the broadcast message to the device log.
    public void onReceive(Context context, Intent intentReceived) {
    if ( 0 == intentReceived.getAction().compareToIgnoreCase("com.symbol.cartscan.RESPONSE")
    ) {

    Log.d(TAG, "com.symbol.cartscan.RESPONSE: Status:" + intentReceived.getStringExtra("STATUS"));
    Log.d(TAG, "com.symbol.cartscan.RESPONSE: Error msg:" + intentReceived.getStringExtra("ERROR_MESSAGE"));
    ...