Overview
A Demo App is preloaded onto all devices that support SimulScan and is intended to quickly demonstrate how SimulScan works and what it can do. The Demo App also provides a means of testing custom Templates that implement Multi-barcode, signature capture, OCR, OMR and other advanced SimulScan features.
Note: The Demo App cannot save acquired data and is not suitable for production environments.
Main Features
- Identify forms and data capture
- Scan multiple barcodes and symbologies from a structured or unstructured form
- Use single- and multi-line OCR to acquire alphanumeric characters
- Capture checkboxes using Optical Mark Recognition (OMR)
- Capture Machine Readable Zone (MRZ) data from passports and other travel documents
- Create demos from custom forms
- Download Templates from the Template Builder server
- Configure audio feedback, timeout interval, auto-capture sensitivity and other Advanced Settings
How to Use the Demo App
 Click image to enlarge
To use the SimulScan Demo app for Mixed Data-types:
- Download the Transport & Logistics (T&L) Demo Form (shown above) and print it.
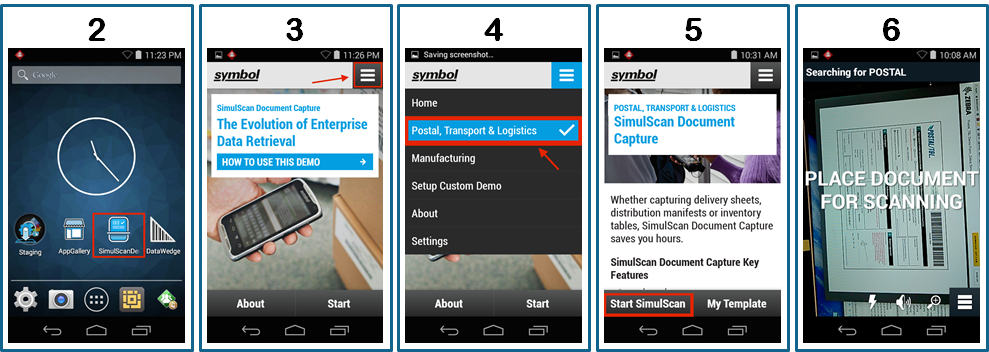
- Locate and tap the SimulScan Demo App icon on the scanning device (see numbered images, below).
- Tap the "hamburger" menu.
- Select the "Postal, Transport & Logistics" Template.
- Tap "Start SimulScan" and begin scanning. The data acquisition device (camera or imager) is selected automatically by SimulScan based on type of data to be acquired and/or settings defined in the Template (this demo uses the camera). The screen should look like image 6, below.
- Orient the scanning device so the target Document fills most of the screen. Orientation can be horizontal or vertical (shown).
 Click images to enlarge
- Hold the scanner still when the green frame appears. Upon acquisition, parsed data is displayed as in Image 8. See the Advanced Settings section for access to auto-capture and sensitivity settings.
- Verify that acquired data is correct, scrolling as necessary. If SimulScan has less than absolute confidence in the correctness of a decoded value, that value will be presented along with an image of the corresponding area from the scanned Document to aid in validation or correction.
- Tap red-highlighted fields to confirm or correct the captured data. The keyboard appears; correct as needed.
- Press OK to return to the Parsed Data screen.
- Repeat Steps 9 and 10 until all errors are corrected. SimulScan tracks edited Fields with color coding.
 Click images to enlarge
Test a Custom Template
The SimulScan Demo app exposes all SimulScan features (except the ability to save data), and can be used to test Templates built by an organization. Custom Templates stored on the Template Builder web site can be pulled from within the Demo app. Locally stored Templates must be pushed to the device manually.
Before You Begin
Before testing a custom Template, complete the following steps:
- Create a printed version of the target Document(s) for which the Template(s) were created.
- If using the Demo App to pull from the server, Template(s) to be tested must be in:
/<accountID>/templates/release/
- If pushing from a local PC to the device, push Template(s) to:
/<internal storage>/simulscan/templates/
For more, see Deploy Templates.
To open a custom Template:
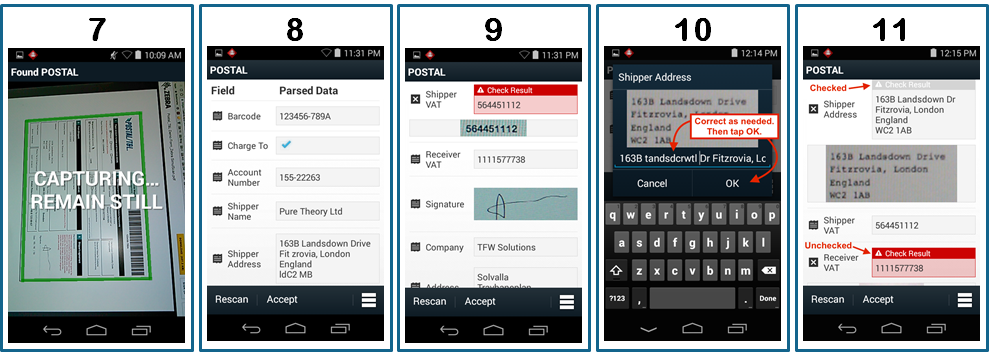
1. Open SimulScan and press Start. A screen appears similar to Image 1, below. Notice that the most recently used Template (if any) remains selected (shown is the "Postal, Transport & Logistics" Template from the exercise above). To switch Templates, press the "My Template" button. A screen appears similar to Image 2.
2. Tap the appropriate drop-down to open the Template to be tested, as in Image 2.
- To continue, go to Step 4 of the How to Use the Demo App section, above.
 Click image to enlarge
My Template Options
Browse external storage - lists Templates in the /<internal storage>/simulscan/templates/ folder on the device.
Default templates - lists Templates included with SimulScan, which are stored in the /enterprise/device/settings/datawedge/templates folder on the device. Custom Templates pushed to this location will be displayed with included ones.
Select from server - lists Templates in the /<accountID>/templates/release/
folder on the Template Builder web site (log-in required) and copies the selected Template to the /<internal storage>/simulscan/templates/ folder on the device.
Advanced Settings
Advanced Settings allow the device user to make adjustments before scanning to help optimize data acquisition. For example, capturing a specific portion of a borderless Document, disabling Auto Capture will prevent capture until the desired portion of the Document is lined up. As another example, increasing Capture Sensitivity can reduce blurriness of the acquired images for Documents that are heavily populated with barcores or other data objects. **Note: The Advanced Settings panel is accessible only when SimulScan is actively scanning.
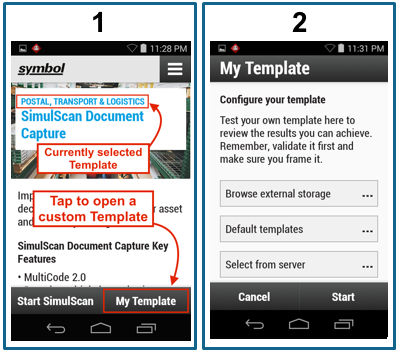
To access Advanced Settings:
1. Tap "Start SimulScan" to enter scanning mode.
2. Tap on the "hamburger menu" to invoke the Advanced Settings panel.
3. Tap on a feature to change its setting as defined below:
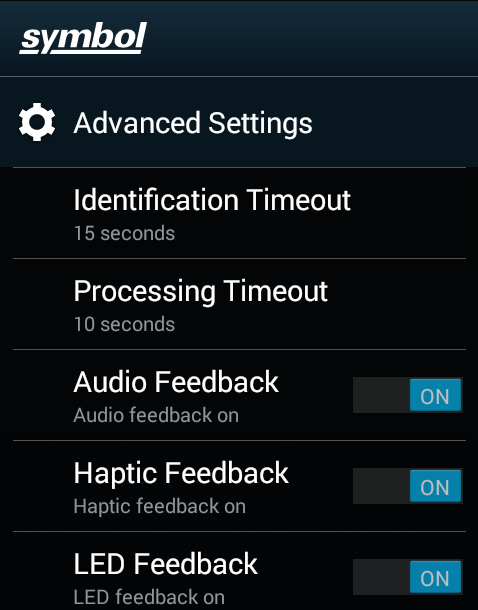
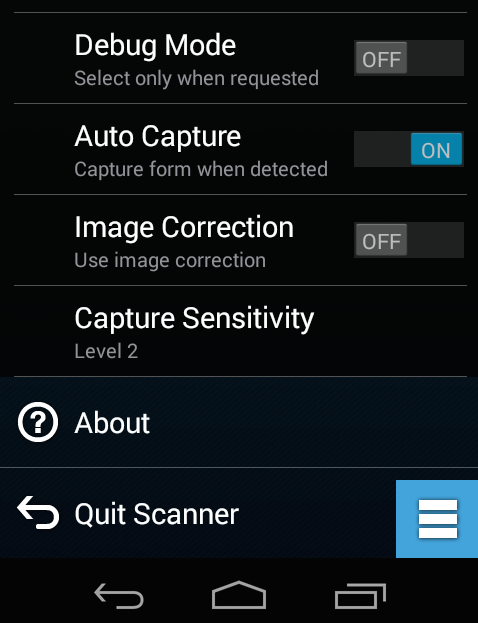 SimulScan's Advanced Settings panel.
Advanced Settings:
Identification Timeout - sets the number of seconds (from 5-30) SimulScan will attempt to identify a Document described by the selected Template.
Processing Timeout - sets the number of seconds (from 5-30) SimulScan will attempt to process an identified Document.
Audio Feedback - plays a beep sound to indicate processing success.
Haptic Feedback - vibrates to indicate processing success.
LED Feedback - flashes the LED light to indicate processing success.
Debug Mode - if enabled, allows a session to write form-capture data to device storage.
Auto Capture - controls whether a document is automatically captured once identified or waits for the a user action.
Image Correction - enables image correction for parsing targets that are slightly curved or crumpled.
Capture Sensitivity - for Auto Capture, sets a stillness threshold for the scanning device from 1-10 (most still).
Related guides: